


前言
自学路上困难多啊,最近的以UITabBarController为根视图的APP很多,而且基本都有自定义的button在UITabBarController上,下面我为新手们介绍下如何创建和自定义UITabBarController中的button。
- Step 1
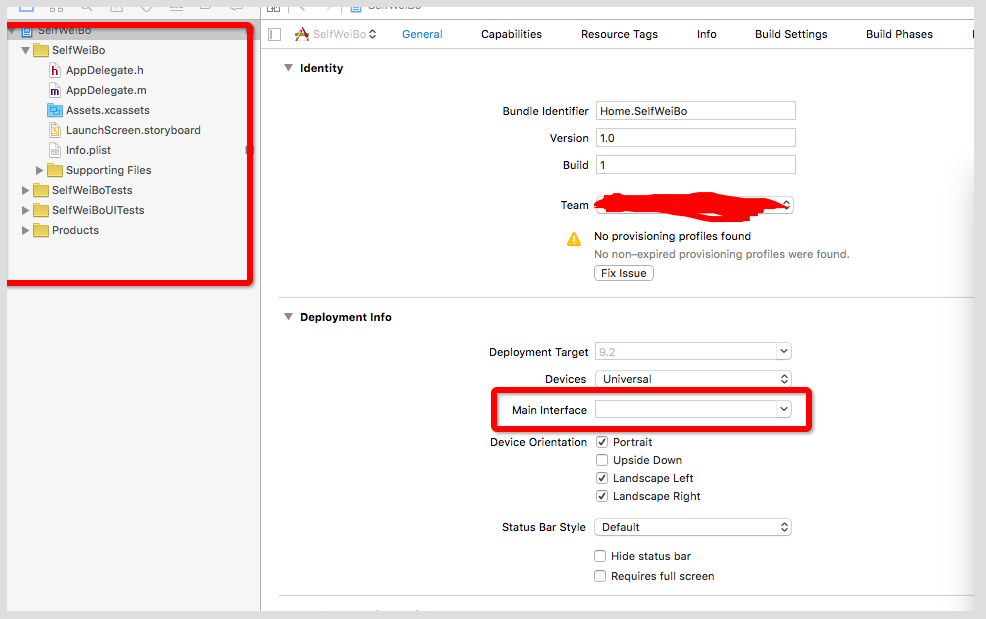
我们创建一个SingleView的项目。我们不需要从storyboard启动项目,所以删除storyboard和ViewController,然后设置Main Interface为空。
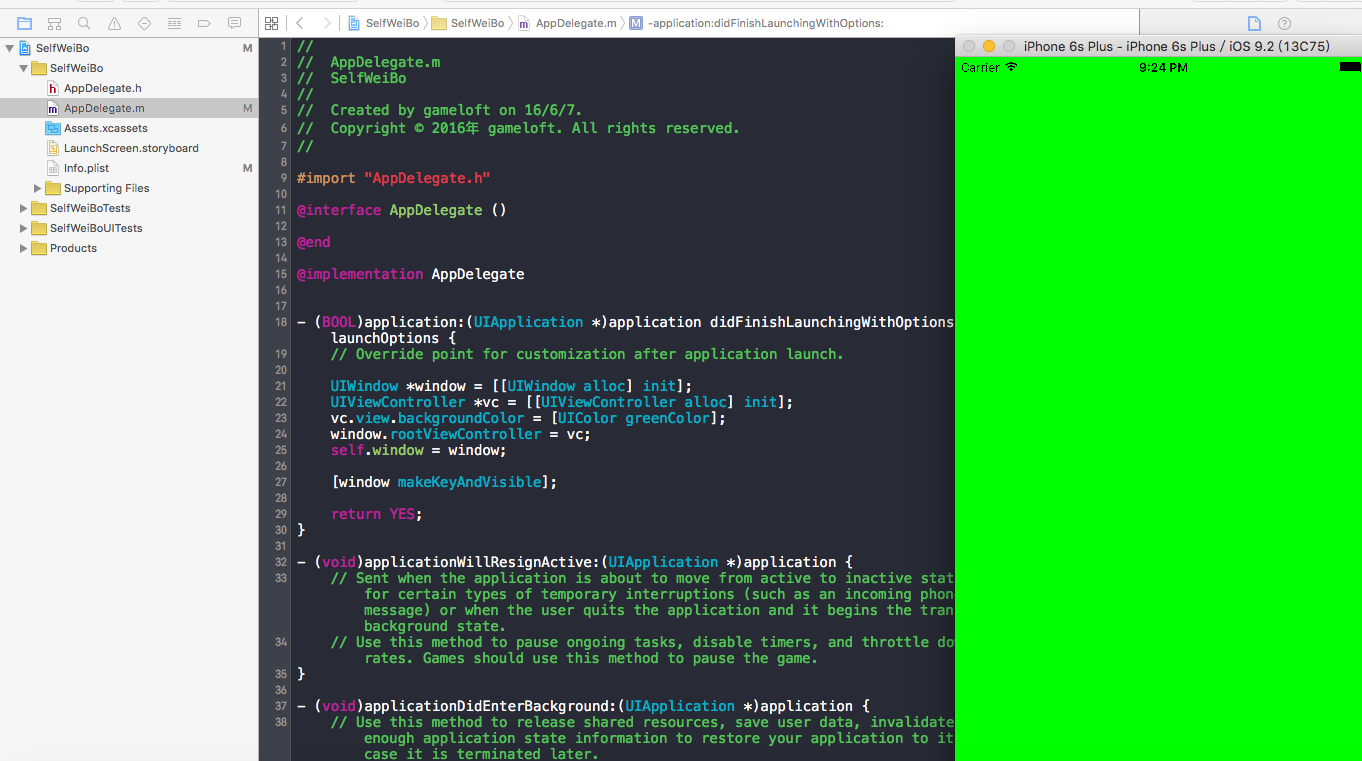
这时如果启动APP,那么屏幕是全黑的,因为东西可以显示。APP启动后,从main函数进入,然后经过一系列初始化后会进入到AppDelegate中的didFinishLaunchingWithOptions函数中。在这个函数中我们可以创建我们的Window,让APP有内容显示。
 - (BOOL)application:(UIApplication *)application didFinishLaunchingWithOptions:(NSDictionary *)launchOptions {
    // Override point for customization after application launch.
    //创建一个window
    UIWindow *window = [[UIWindow alloc] init];

    //创建一个需要在window上显示的viewController
    UIViewController *vc = [[UIViewController alloc] init];

    //设置设个viewController的view背景颜色
    vc.view.backgroundColor = [UIColor greenColor];

    //设置window的rootViewController为创建的UIViewController
    window.rootViewController = vc;

    //把创建的window赋值给AppDelegate的window属性,否则这个window会在函数完成时被释放。
    self.window = window;

    //这句必须调用才能显示window
    [window makeKeyAndVisible];

    return YES;
}
此时在运行程序,模拟器上会有一个绿色的view显示出来了。
我们已经完成了view的显示,下面我们来看看如何建立UITabBarController为根视图的window,并自定义它。
- Step2
为了自定义UITabBarController,我们需要创建一个类继承于UITabBarController,暂且命名为JHRootTabBarController,并且不添加任何代码。然后将didFinishLaunchingWithOptions函数中的UIViewController替换为自己的JHRootTabBarController。运行程序后你会惊奇的发现屏幕底
部多了一个工具栏,虽然它没有按钮,但那也是个工具栏啊!

- Step3
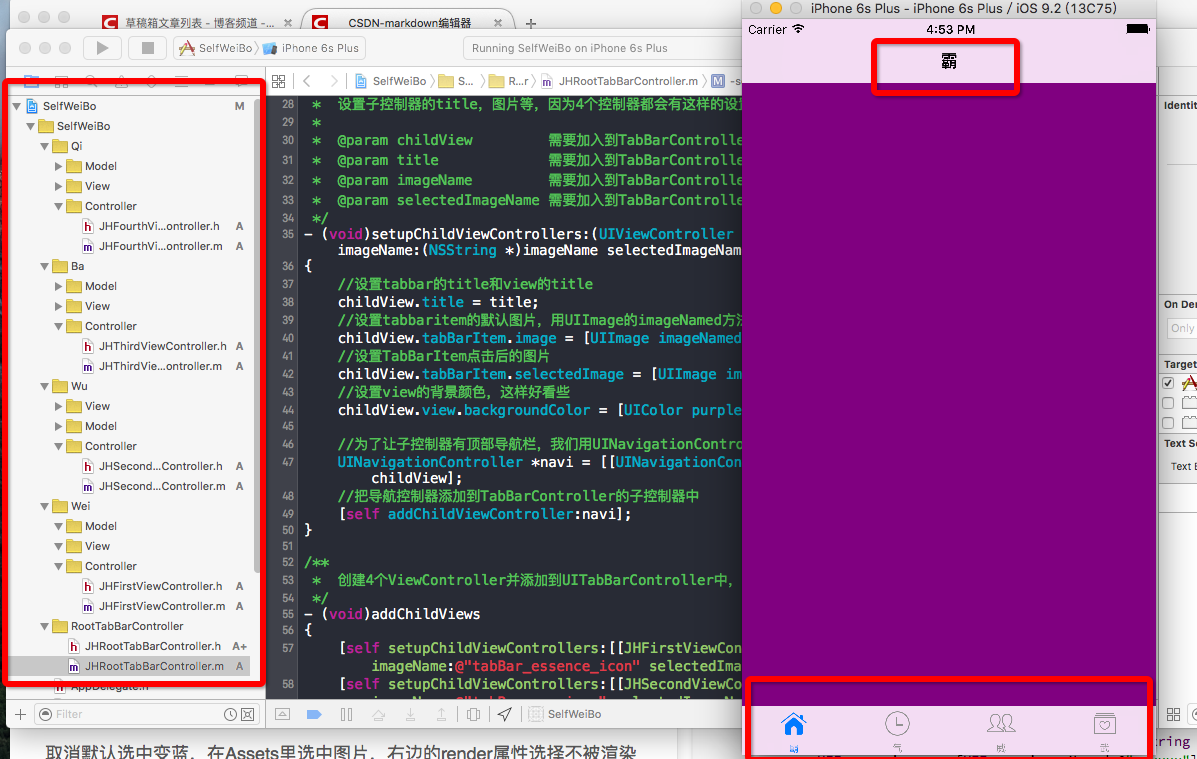
我们创建4个ViewController,并添加到UITabBarController中,这样我们就有了4个TabBarButton,对应4个ViewController。这个4个类命名为JHFirstViewController,JHSecondViewController,JHThirdViewController和JHFourthViewController。在JHRootTabBarController中创建这4个ViewController的对象,因为我们需要导航栏,所以再用UINavigationController来包装下那4个ViewController,然后把导航控制器添加进UITabBarController的子控制器中。下面的代码写在UITabBarController的m文件中
#import "JHRootTabBarController.h"
#import "JHFirstViewController.h"
#import "JHSecondViewController.h"
#import "JHThirdViewController.h"
#import "JHFourthViewController.h"

@interface JHRootTabBarController ()

@end

@implementation JHRootTabBarController
- (void)viewDidLoad {
    [super viewDidLoad];
    // Do any additional setup after loading the view.
    [self addChildViews];
}

/**
 *  设置子控制器的title,图片等,因为4个控制器都会有这样的设置,所以写个函数来调用下,免得写那么多
 *
 *  @param childView         需要加入到TabBarController中的控制器
 *  @param title             需要加入到TabBarController中的控制器的title
 *  @param imageName         需要加入到TabBarController中的控制器的TabBarItem图片
 *  @param selectedImageName 需要加入到TabBarController中的控制器的TabBarItem选中时的图片
 */
- (void)setupChildViewControllers:(UIViewController *)childView WithTitle:(NSString *)title imageName:(NSString *)imageName selectedImageName:(NSString *)selectedImageName
{
    //设置tabbar的title和view的title
    childView.title = title;
    //设置tabbaritem的默认图片,用UIImage的imageNamed方法传入图片名创建图片
    childView.tabBarItem.image = [UIImage imageNamed:imageName];
    //设置TabBarItem点击后的图片
    childView.tabBarItem.selectedImage = [UIImage imageNamed:selectedImageName];
    //设置view的背景颜色,这样好看些
    childView.view.backgroundColor = [UIColor purpleColor];

    //为了让子控制器有顶部导航栏,我们用UINavigationController来包装我们的childView
    UINavigationController *navi = [[UINavigationController alloc] initWithRootViewController:childView];
    //把导航控制器添加到TabBarController的子控制器中
    [self addChildViewController:navi];
}

/**
 *  创建4个ViewController并添加到UITabBarController中,这里用到的图片后面会提供
 */
 * (void)addChildViews
{
    [self setupChildViewControllers:[[JHFirstViewController alloc] init] WithTitle:@"霸" imageName:@"tabBar_essence_icon" selectedImageName:@"tabBar_essence_click_icon"];
    [self setupChildViewControllers:[[JHSecondViewController alloc] init] WithTitle:@"气" imageName:@"tabBar_new_icon" selectedImageName:@"tabBar_new_click_icon"];
    [self setupChildViewControllers:[[JHThirdViewController alloc] init] WithTitle:@"威" imageName:@"tabBar_friendTrends_icon" selectedImageName:@"tabBar_friendTrends_click_icon"];
    [self setupChildViewControllers:[[JHFourthViewController alloc] init] WithTitle:@"武" imageName:@"tabBar_me_icon" selectedImageName:@"tabBar_me_click_icon"];
}
@end
写完后我们的TabBarItem的title及图片和导航栏的titile就都被设置好了。顺带提一句,注意我的目录结构,是根据MVC模式来的,每个TabBarItem对应的页面都有三个文件夹,分别放控制器,视图和数据模型,不理解的我后
面会说。现在我们来看看运行效果
- Step4
在一般底部有TabBar的APP中,中间有些会有一个自定义的按钮,比如微博中的。这个怎么做呢?下面我们就来看看。
因为这里需要自定义TabBar,根据前面做UITabBarController的思路,是不是应该也有个TabBar对应的类,然后我们继承它,再做一些改变呢?答案必须是肯定的啊!我们先创建一个类JHTabBar,它继承于UITabBar。我们需要重写initWithFrame函数和layoutSubviews来创建中间button和布局这5个按钮。
#import "JHTabBar.h"

@interface JHTabBar()

//** plus button */
@property (nonatomic, weak) UIButton *plusButton;

@end

@implementation JHTabBar

/**
 *  重写初始化函数,添加中间的button
 *
 *  @param frame frame
 *
 *  @return return instance of JHTabBar
 */
- (instancetype)initWithFrame:(CGRect)frame
{
    self = [super initWithFrame:frame];
    if (self) {
        UIButton *plusBtn = [UIButton buttonWithType:UIButtonTypeCustom];
        [plusBtn setImage:[UIImage imageNamed:@"tabBar_publish_icon"] forState:UIControlStateNormal];
        [plusBtn setImage:[UIImage imageNamed:@"tabBar_publish_click_icon"] forState:UIControlStateSelected];
        self.plusButton = plusBtn;
        [self addSubview:plusBtn];
    }

    return self;
}

/**
 *  布局子视图,这个函数会被调用来布局视图
 */
- (void)layoutSubviews
{
    //这句必须调用,不然父类的控件就不会显示
    [super layoutSubviews];
    //设置plusButton的frame(宽高为加载的图片的宽高)和center(就是底部工具栏的中心)
    self.plusButton.frame = CGRectMake(0, 0, self.plusButton.currentImage.size.width, self.plusButton.currentImage.size.height);
    //这里不能赋值为TabBar的center,因为TabBar的center(self.center)是相对于屏幕的
    self.plusButton.center = CGPointMake(self.frame.size.width * 0.5, self.frame.size.height * 0.5);

    //布局5个button
    //5个button要布满整个底部工具栏,那么button宽度就是底部工具栏宽度的1/5,而x是以1/5工具栏宽度为增量递增
    NSInteger index = 0;
    CGFloat x = 0;
    CGFloat y = 0;
    CGFloat width = self.frame.size.width * 0.2;
    CGFloat height = self.frame.size.height;

    //遍历TabBar的子视图,取出UITabBarButton,设置frame以达到跳过中间的自定义button来布局的目的
    Class class = NSClassFromString(@"UITabBarButton");

    for (UIView *view in self.subviews) {
        if ([view isKindOfClass:class]) {
            //当index为2时,正好是plusButton的位置,我们跳过这个位置,预留出plusButton的位置
            x = width * (index == 2 ? ++index : index);
            view.frame = CGRectMake(x, y, width, height);
            ++index;
        }
    }

}
之后,我们只需要在RootTabBarController的viewDidLoad函数中用自定义的TabBar替换系统默认的TabBar。但是这里注意,我们只能用KVC来设置,因为系统并没有提供方法来设置TabBar。
//为了加入自定义的button到底部工具栏中,我们需要使用自己的TabBar来替换系统默认的。
    //这里使用KVC是因为系统没有提供设置tabBar的方法,只能用这个方法来设置。
    JHTabBar *tabBar = [[JHTabBar alloc] init];
    [self setValue:tabBar forKey:@"tabBar"];
完成上面的代码后,就是下面这个效果
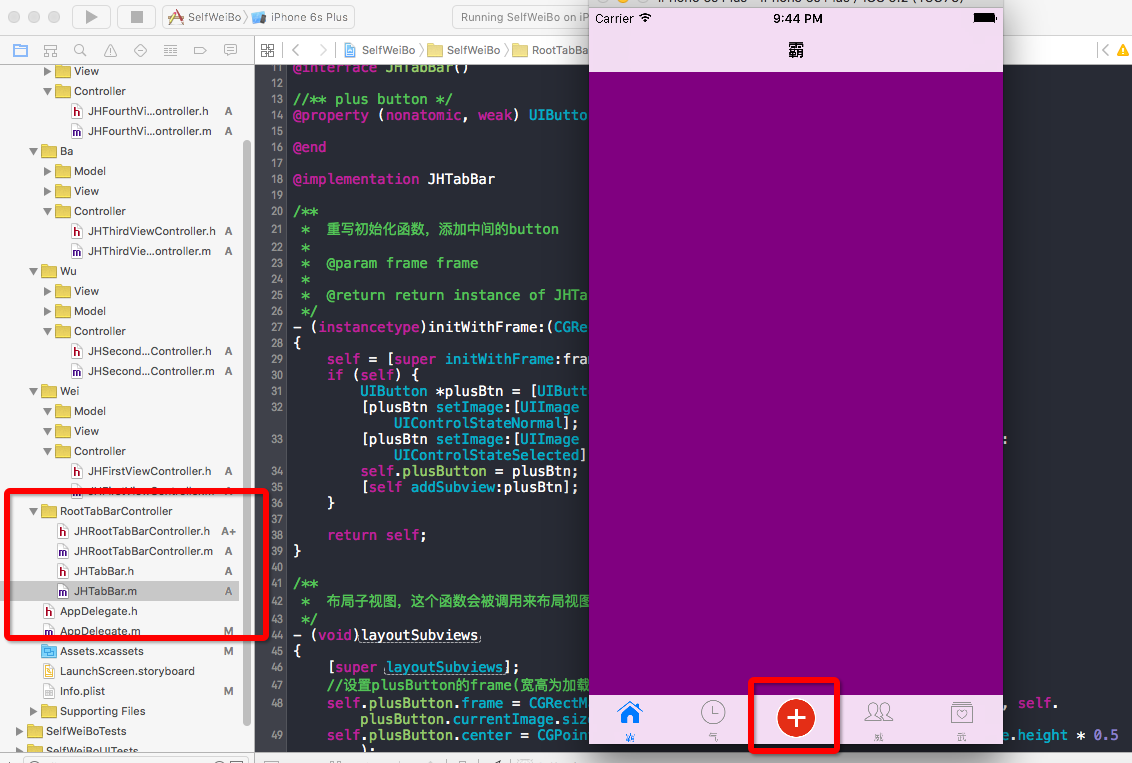
亲们可以自己试一试,有兴趣的一定要手敲下代码。
项目地址点击这里,如果觉得有帮助,希望能给个星星


 4428
4428

 被折叠的 条评论
为什么被折叠?
被折叠的 条评论
为什么被折叠?
 到【灌水乐园】发言


