


public class PathView extends View {
private Paint mPaint;
private int viewWidth;
private int viewHeight;
private int row = 7;
public PathView(Context context) {
super(context);
WindowManager manager = (WindowManager) context
.getSystemService(Context.WINDOW_SERVICE);
Display display = manager.getDefaultDisplay();
DisplayMetrics outMetrics = new DisplayMetrics();
display.getMetrics(outMetrics);
viewWidth = outMetrics.widthPixels;
viewHeight = outMetrics.heightPixels;
init();
}
private void init() {
mPaint = new Paint(Paint.ANTI_ALIAS_FLAG);
mPaint.setStrokeJoin(Join.ROUND);
mPaint.setColor(Color.RED);
mPaint.setStyle(Style.STROKE);
mPaint.setStrokeWidth(5);
}
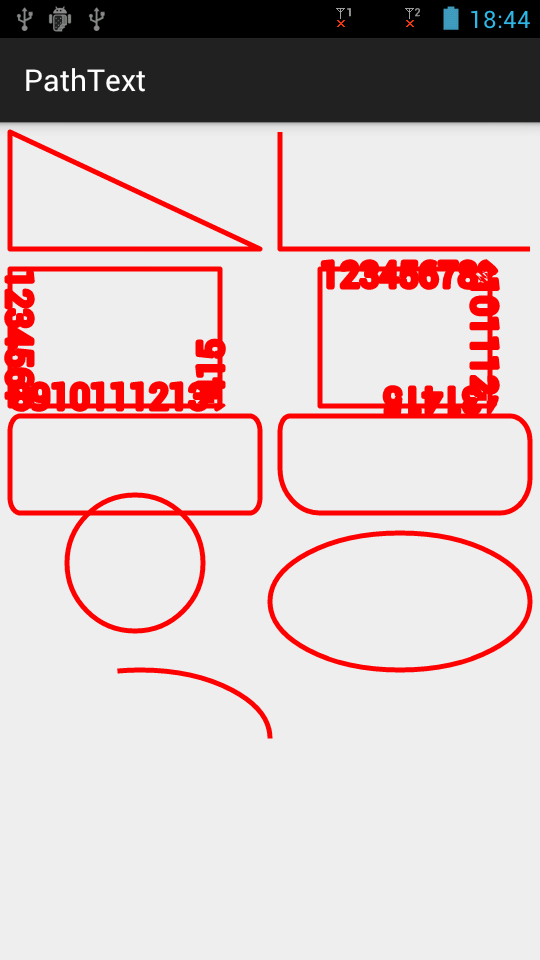
private void drawTriangle(Canvas canvas) {
Path path1 = new Path();
path1.moveTo(10, 10);
path1.lineTo(10, viewHeight / row - 10);
path1.lineTo(viewWidth / 2 - 10, viewHeight / row - 10);
path1.close();// 闭环
canvas.drawPath(path1, mPaint);
Path path2 = new Path();
path2.moveTo(viewWidth / 2 + 10, 10);
path2.lineTo(viewWidth / 2 + 10, viewHeight / row - 10);
path2.lineTo(viewWidth - 10, viewHeight / row - 10);
canvas.drawPath(path2, mPaint);
}
private void drawRect(Canvas canvas) {
Path CCWRectpath = new Path();
RectF rect1 = new RectF(10, viewHeight / row + 10, viewWidth / 2 - 50,
viewHeight / row * 2 + 10);
CCWRectpath.addRect(rect1, Direction.CCW);
// 第二个顺向生成
Path CWRectpath = new Path();
RectF rect2 = new RectF(viewWidth / 2 + 50, viewHeight / row + 10,
viewWidth - 50, viewHeight / row * 2 + 10);
CWRectpath.addRect(rect2, Direction.CW);
// 先画出这两个路径
canvas.drawPath(CCWRectpath, mPaint);
canvas.drawPath(CWRectpath, mPaint);
mPaint.setTextSize(35);
// drawTextOnPath() was not supported with hardware acceleration until
// Android 4.1.
// To work around this problem, simply set a software layer type on your
// View when running on Android < 4.1.
// Just call View.setLayerType(View.LAYER_TYPE_SOFTWARE, null).
// This will force software rendering and fix your problem.
setLayerType(View.LAYER_TYPE_SOFTWARE, null);
canvas.drawTextOnPath("123456789101112131415", CCWRectpath, 0, 3,
mPaint);
canvas.drawTextOnPath("123456789101112131415", CWRectpath, 0, 18,
mPaint);
}
private void drawRoundRect(Canvas canvas) {
Path path = new Path();
RectF rect1 = new RectF(10, viewHeight / row * 2 + 20,
viewWidth / 2 - 10, viewHeight / row * 3 - 20);
path.addRoundRect(rect1, 10, 15, Direction.CCW);
RectF rect2 = new RectF(viewWidth / 2 + 10, viewHeight / row * 2 + 20,
viewWidth - 10, viewHeight / row * 3 - 20);
float radii[] = { 10, 15, 20, 25, 30, 35, 40, 45 };
path.addRoundRect(rect2, radii, Direction.CCW);
canvas.drawPath(path, mPaint);
}
private void drawCircle(Canvas canvas) {
Path path = new Path();
path.addCircle(viewWidth / 2 / 2, viewHeight / row * 3 + 30, viewHeight
/ row / 2, Direction.CCW);
RectF rect = new RectF(viewWidth / 2, viewHeight / row * 3,
viewWidth - 10, viewHeight / row * 4);
path.addOval(rect, Direction.CCW);
canvas.drawPath(path, mPaint);
}
private void drawArc(Canvas canvas) {
Path path = new Path();
RectF rect = new RectF(10, viewHeight / row * 4, viewWidth / 2,
viewHeight / row * 5);
path.addArc(rect, 0, -100);
canvas.drawPath(path, mPaint);
}
@Override
protected void onDraw(Canvas canvas) {
super.onDraw(canvas);
drawTriangle(canvas);
drawRect(canvas);
drawRoundRect(canvas);
drawCircle(canvas);
drawArc(canvas);
}
}
当我们需要在屏幕上形成画线时,Path类的应用是必不可少的,而Path类的lineTo和quadTo方法实现的绘制线路形式也是不一样的,下面就以代码的实现来直观的探究这两个方法的功能实现区别;
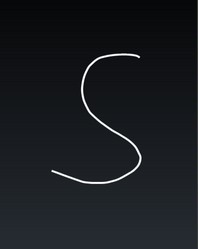
Path—>quadTo(float x1, float y1, float x2, float y2):
该方法的实现是当我们不仅仅是画一条线甚至是画弧线时会形成平滑的曲线,该曲线又称为”贝塞尔曲线”(Bezier curve),其中,x1,y1为控制点的坐标值,x2,y2为终点的坐标值;
贝塞尔曲线的形成,就比如我们把一条橡皮筋拉直,橡皮筋的头尾部对应起点和终点,然后从拉直的橡皮筋中选择任意一点(除头尾对应的点外)扯动橡皮筋形成的弯曲形状,而那个扯动橡皮筋的点就是控制点;
下就面以一个Demo来结合理解quadTo函数的应用,代码如下:
1).自定义View:
public class DrawingWithBezier extends View
{
    private float mX;
    private float mY;

    private final Paint mGesturePaint = new Paint();
    private final Path mPath = new Path();

    public DrawingWithBezier(Context context)
    {
        super(context);
        mGesturePaint.setAntiAlias(true);
        mGesturePaint.setStyle(Style.STROKE);
        mGesturePaint.setStrokeWidth(5);
        mGesturePaint.setColor(Color.WHITE);
    }

    @Override
    public boolean onTouchEvent(MotionEvent event)
    {
        switch (event.getAction())
        {
            case MotionEvent.ACTION_DOWN:
                touchDown(event);
                 break;
            case MotionEvent.ACTION_MOVE:
                touchMove(event);
        }
        invalidate();
        return true;
    }

    @Override
    protected void onDraw(Canvas canvas)
    {
        super.onDraw(canvas);
        canvas.drawPath(mPath, mGesturePaint);
    }

    //手指点下屏幕时调用
    private void touchDown(MotionEvent event)
    {
         //mPath.rewind();
        //重置绘制路线,即隐藏之前绘制的轨迹
        mPath.reset();
        float x = event.getX();
        float y = event.getY();

        mX = x;
        mY = y;
        //mPath绘制的绘制起点
        mPath.moveTo(x, y);
    }

    //手指在屏幕上滑动时调用
    private void touchMove(MotionEvent event)
    {
        final float x = event.getX();
        final float y = event.getY();

        final float previousX = mX;
        final float previousY = mY;

        final float dx = Math.abs(x - previousX);
        final float dy = Math.abs(y - previousY);

        //两点之间的距离大于等于3时,生成贝塞尔绘制曲线
        if (dx >= 3 || dy >= 3)
        {
            //设置贝塞尔曲线的操作点为起点和终点的一半
            float cX = (x + previousX) / 2;
            float cY = (y + previousY) / 2;

            //二次贝塞尔,实现平滑曲线;previousX, previousY为操作点,cX, cY为终点
            mPath.quadTo(previousX, previousY, cX, cY);

            //第二次执行时,第一次结束调用的坐标值将作为第二次调用的初始坐标值
            mX = x;
            mY = y;
        }
    }
}
2).MainActivity:
public class MainActivity extends Activity
{
    @Override
    public void onCreate(Bundle savedInstanceState)
    {
        super.onCreate(savedInstanceState);
        //setContentView(new MySurfaceView(this));
        setContentView(new DrawingWithBezier(this));
        //setContentView(new DrawingWithoutBezier(this));
    }
}
该Demo实现用户在手机屏幕上滑动手指时,可根据手指滑动的位置绘制出相应的线条,类似输入法手势的绘制,所以代码中的画笔Paint命名为mGesturePaint;
比如,我们在屏幕上绘制S这个图案,则形成的图案如下:
Path—>lineTo(float x, float y) :
该方法实现的仅仅是两点连成一线的绘制线路,这样,当我们用这个方法绘制曲线时,缺陷就出来了;下面的例子,同样还是和上面的Demo差不多,只不过Path调用的是lineTo方法,如下:
1). 自定义View:
public class DrawingWithoutBezier extends View
{
    private float mX;
    private float mY;

    private final Paint mGesturePaint = new Paint();
    private final Path mPath = new Path();

    public DrawingWithoutBezier(Context context)
    {
        super(context);
        mGesturePaint.setAntiAlias(true);
        mGesturePaint.setStyle(Style.STROKE);
        mGesturePaint.setStrokeWidth(5);
        mGesturePaint.setColor(Color.WHITE);
    }

    @Override
    public boolean onTouchEvent(MotionEvent event)
    {
        switch (event.getAction())
        {
            case MotionEvent.ACTION_DOWN:
                touchDown(event);
                 break;
            case MotionEvent.ACTION_MOVE:
                touchMove(event);
        }
        invalidate();
        return true;
    }

    @Override
    protected void onDraw(Canvas canvas)
    {
        super.onDraw(canvas);
        canvas.drawPath(mPath, mGesturePaint);
    }

    private void touchDown(MotionEvent event)
    {

        //mPath.rewind();
        mPath.reset();
        float x = event.getX();
        float y = event.getY();

        mX = x;
        mY = y;
        mPath.moveTo(x, y);
    }

    //手指在屏幕上滑动时调用
    private void touchMove(MotionEvent event)
    {
        final float x = event.getX();
        final float y = event.getY();

        final float previousX = mX;
        final float previousY = mY;

        final float dx = Math.abs(x - previousX);
        final float dy = Math.abs(y - previousY);

        //两点之间的距离大于等于3时,连接连接两点形成直线
        if (dx >= 3 || dy >= 3)
        {
            //两点连成直线
            mPath.lineTo(x, y);

            //第二次执行时,第一次结束调用的坐标值将作为第二次调用的初始坐标值
            mX = x;
            mY = y;
        }
    }

}
2).MainActivity:
public class MainActivity extends Activity
{
    @Override
    public void onCreate(Bundle savedInstanceState)
    {
        super.onCreate(savedInstanceState);
        //setContentView(new MySurfaceView(this));
        //setContentView(new DrawingWithBezier(this));
        setContentView(new DrawingWithoutBezier(this));
    }
}
同样地,用该例子绘制S形图案,形成的图案如下:
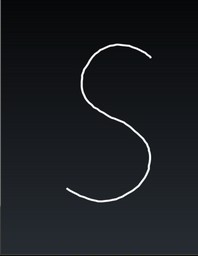
结论 :对比前面quadTo方法绘制的S,lineTo绘制的S在弯曲部分很明显的不能形成平滑的弯曲,会出现明显的两点形成一线的突痕。可能图片看的不是清楚,自行运行这个Demo,然后在屏幕上绘制弯曲曲线或者圆,对比查看他们的形状区别就一目了然;
SurfaceView绘制贝塞尔曲线:
上面的绘制图案方式都是基于View来绘制,当然,我们也可以结合SurfaceView和Rect来实现绘制贝塞尔曲线,这样绘制的效果相对会比较好,而且效率也相对较高,毕竟相对SurfaceView而言,在动态绘制点线方面较之View更加出色;
如下代码:
1).自定义SurfaceView:
public class MySurfaceView extends SurfaceView
{
    private Context mContex;
    private float mX;
    private float mY;

    private SurfaceHolder sfh;
    private Canvas canvas;
    private float mCurveEndX;
    private float mCurveEndY;

    private final Paint mGesturePaint = new Paint();
    private final Path mPath = new Path();
    private final Rect mInvalidRect = new Rect();

    private boolean isDrawing;

    public MySurfaceView(Context context)
    {
        super(context);
        mContex = context;
        sfh = this.getHolder();
        mGesturePaint.setAntiAlias(true);
        mGesturePaint.setStyle(Style.STROKE);
        mGesturePaint.setStrokeWidth(5);
        mGesturePaint.setColor(Color.WHITE);
    }

    public void drawCanvas() {
        try {
            canvas = sfh.lockCanvas();
            if (canvas != null) {
                canvas.drawColor(Color.BLACK);
                canvas.drawPath(mPath, mGesturePaint);
            }
        } catch (Exception e) {
        } finally {
            if (canvas != null)
                sfh.unlockCanvasAndPost(canvas);
        }
    }

    @Override
    public boolean onTouchEvent(MotionEvent event)
    {
        switch (event.getAction())
        {
            case MotionEvent.ACTION_DOWN:
                touchDown(event);
                invalidate();
                return true;

            case MotionEvent.ACTION_MOVE:
                if (isDrawing)
                {
                    Rect rect = touchMove(event);
                    if (rect != null) {
                        invalidate(rect);
                    }
                    return true;
                }
                break;
            case MotionEvent.ACTION_UP:
                if (isDrawing)
                {
                    touchUp(event);
                    invalidate();
                    return true;
                }
                break;
        }
        return super.onTouchEvent(event);
    }

    private void touchDown(MotionEvent event)
    {
        isDrawing = true;
        mPath.reset();
        float x = event.getX();
        float y = event.getY();

        mX = x;
        mY = y;

        mPath.moveTo(x, y);

        mInvalidRect.set((int) x, (int) y, (int) x , (int) y);
        mCurveEndX = x;
        mCurveEndY = y;
    }

    private Rect touchMove(MotionEvent event)
    {
        Rect areaToRefresh = null;

        final float x = event.getX();
        final float y = event.getY();

        final float previousX = mX;
        final float previousY = mY;

        final float dx = Math.abs(x - previousX);
        final float dy = Math.abs(y - previousY);

        if (dx >= 3 || dy >= 3)
        {
            areaToRefresh = mInvalidRect;
            areaToRefresh.set((int) mCurveEndX , (int) mCurveEndY ,
                    (int) mCurveEndX, (int) mCurveEndY);

          //设置贝塞尔曲线的操作点为起点和终点的一半
            float cX = mCurveEndX = (x + previousX) / 2;
            float cY = mCurveEndY = (y + previousY) / 2;

            //实现绘制贝塞尔平滑曲线;previousX, previousY为操作点,cX, cY为终点
            mPath.quadTo(previousX, previousY, cX, cY);
            //mPath.lineTo(x, y);

            // union with the control point of the new curve
            /*areaToRefresh矩形扩大了border(宽和高扩大了两倍border),
             * border值由设置手势画笔粗细值决定
             */
            areaToRefresh.union((int) previousX, (int) previousY,
                    (int) previousX, (int) previousY);
           /* areaToRefresh.union((int) x, (int) y,
                    (int) x, (int) y);*/


            // union with the end point of the new curve
            areaToRefresh.union((int) cX, (int) cY ,
                    (int) cX, (int) cY);

            //第二次执行时,第一次结束调用的坐标值将作为第二次调用的初始坐标值
            mX = x;
            mY = y;
            drawCanvas();
        }
        return areaToRefresh;
    }

    private void touchUp(MotionEvent event)
    {
        isDrawing = false;
    }
}
2). MainActivity:
public class MainActivity extends Activity
{
    @Override
    public void onCreate(Bundle savedInstanceState)
    {
        super.onCreate(savedInstanceState);
        setContentView(new MySurfaceView(this));
        //setContentView(new DrawingWithBezier(this));
        //setContentView(new DrawingWithoutBezier(this));
    }
}
相关代码下载链接:>http://download.csdn.net/detail/stevenhu_223/5702603
moveTo、lineTo、quadTo、cubicTo、arcTo
1、moveTo
moveTo 不会进行绘制,只用于移动移动画笔。
结合以下方法进行使用。
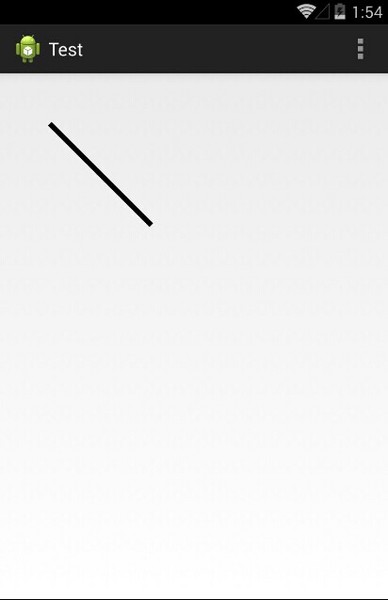
2、lineTo
lineTo 用于进行直线绘制。
mPath.lineTo(300, 300);
canvas.drawPath(mPath, mPaint);
默认从坐标(0,0)开始绘制。如图:
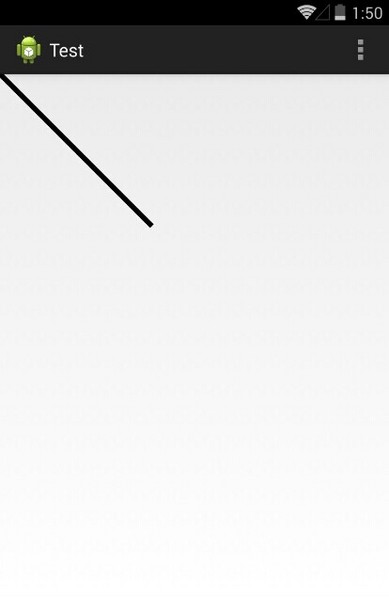
刚才我们不说了moveTo是用来移动画笔的吗?
mPath.moveTo(100, 100);
mPath.lineTo(300, 300);
canvas.drawPath(mPath, mPaint);
把画笔移动(100,100)处开始绘制,效果如图:
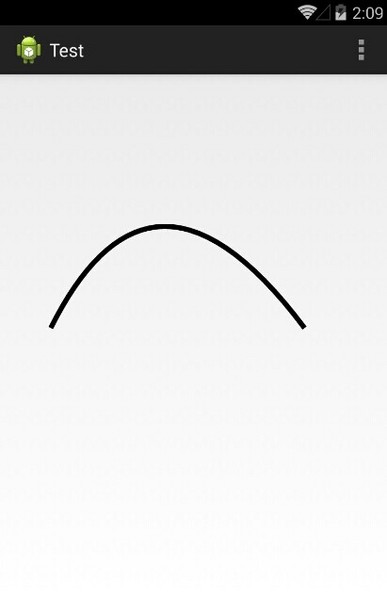
3、quadTo
quadTo 用于绘制圆滑曲线,即贝塞尔曲线。
mPath.quadTo(x1, y1, x2, y2) (x1,y1) 为控制点,(x2,y2)为结束点。
同样地,我们还是得需要moveTo来协助控制。
mPath.moveTo(100, 500);
mPath.quadTo(300, 100, 600, 500);
canvas.drawPath(mPath, mPaint);
效果如图:
4、cubicTo
cubicTo 同样是用来实现贝塞尔曲线的。
mPath.cubicTo(x1, y1, x2, y2, x3, y3) (x1,y1) 为控制点,(x2,y2)为控制点,(x3,y3) 为结束点。
那么,cubicTo 和 quadTo 有什么不一样呢?
官方是这么说的:
Same as cubicTo, but the coordinates are considered relative to the current point on this contour.
说白了,就是多了一个控制点而已。
然后,我们想绘制和上一个一样的曲线,应该怎么写呢?
mPath.moveTo(100, 500);
mPath.cubicTo(100, 500, 300, 100, 600, 500);
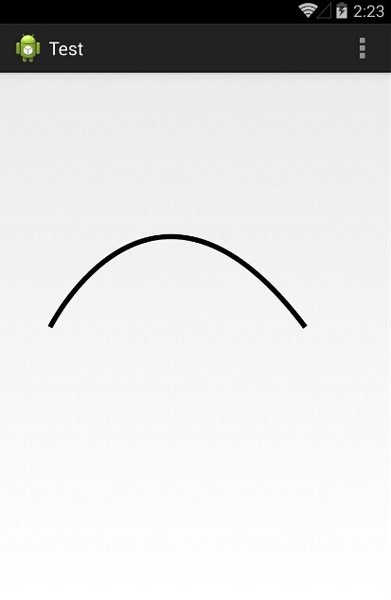
一模一样!
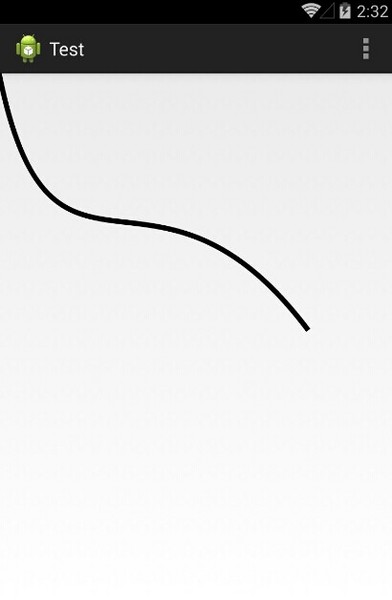
如果我们不加 moveTo 呢?
则以(0,0)为起点,(100,500)和(300,100)为控制点绘制贝塞尔曲线:
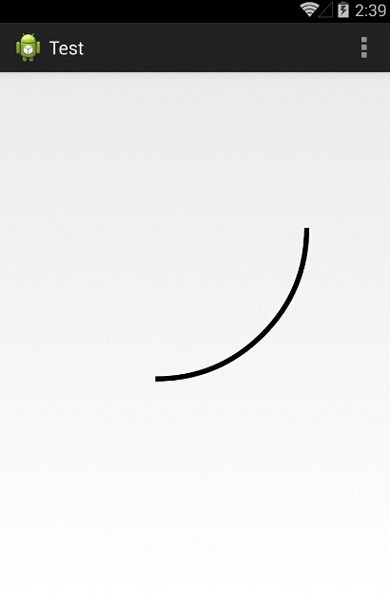
5、arcTo
arcTo 用于绘制弧线(实际是截取圆或椭圆的一部分)。
mPath.arcTo(ovalRectF, startAngle, sweepAngle) , ovalRectF为椭圆的矩形,startAngle 为开始角度,sweepAngle 为结束角度。
mRectF = new RectF(10, 10, 600, 600);
mPath.arcTo(mRectF, 0, 90);
canvas.drawPath(mPath, mPaint);
由于new RectF(10, 10, 600, 600)为正方形,又截取 0 ~ 90 度 ,则所得曲线为四分之一圆的弧线。
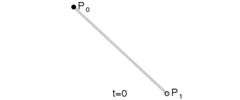
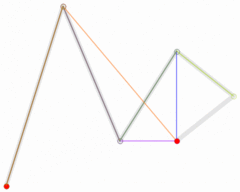
线性贝塞尔曲线演示动画,t在[0,1]区间
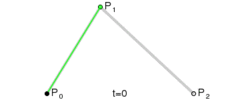
二次贝塞尔曲线演示动画,t在[0,1]区间
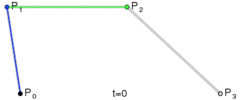
三次贝塞尔曲线演示动画,t在[0,1]区间
四次贝塞尔曲线演示动画,t在[0,1]区间
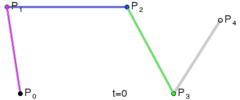
五次贝塞尔曲线演示动画,t在[0,1]区间
参考:
http://blog.csdn.net/stevenhu_223/article/details/9229337
http://www.cnblogs.com/flash3d/archive/2012/01/30/2332176.html
http://www.zhangxinxu.com/wordpress/2014/06/deep-understand-svg-path-bezier-curves-command/
http://blog.csdn.net/harvic880925/article/details/39080931
http://segmentfault.com/a/1190000000721127


 650
650


 被折叠的 条评论
为什么被折叠?
被折叠的 条评论
为什么被折叠?
 到【灌水乐园】发言


