


安装wiringOP库
我们找一个目录
git clone https://github.com/orangepi-xunlong/wiringOP.git
cd wiringOP/
./build
这样你就把wiringOP库安装好了
常用命令
gpio readall 查看引脚
检测i2c有没有开启/打开
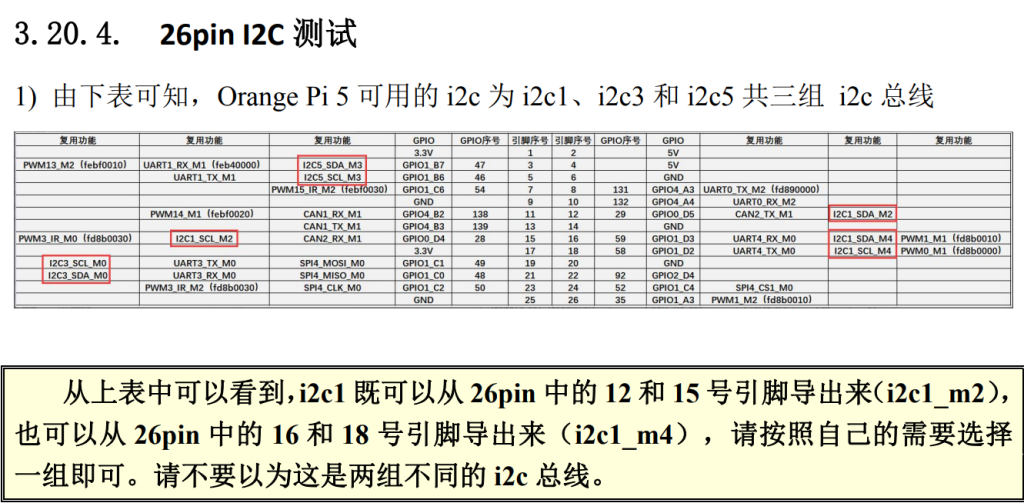
我们首先看看OrangePi_5_RK3588S_用户手册_v2.0,这里面有不同的引脚功能图,文件在最后可下载
我们可以 orangepi-config -> System -> Hardware -> save -> 重启
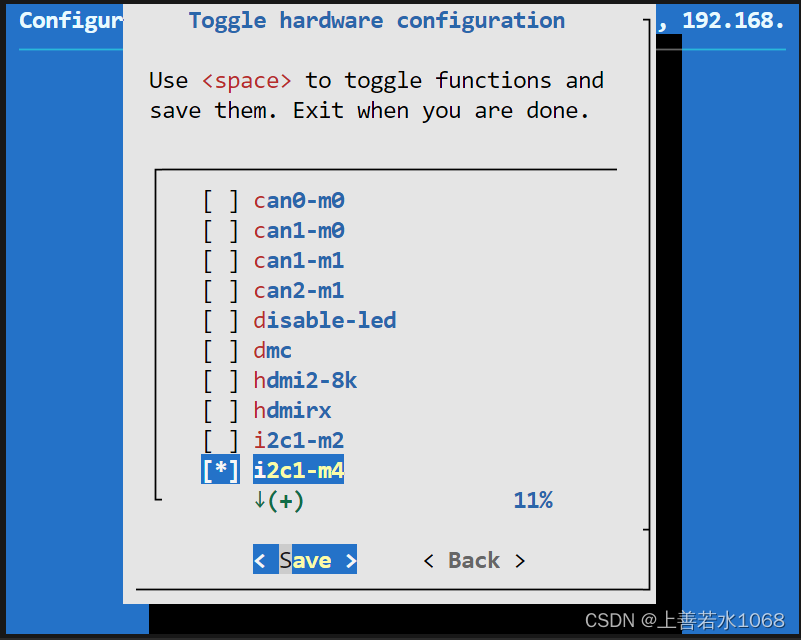

我在16 18引脚插入了一个设备 运行i2cdetect -y 1 可以看到地址
这个1是/dev/i2c-1
我在16 18引脚插入了一个设备 运行i2cdetect -y 1 可以看到地址
这个1是/dev/i2c-1
后面测试i2c参考这学习笔记4 orangepi的i2c和oled屏幕显示_orange pi zero3 oled scl-CSDN博客
#include <errno.h>
#include <string.h>
#include <stdio.h>
#include <stdlib.h>
#include <time.h>
#include <stdint.h>

#include "oled.h"
#include "font.h"

int oled_show(struct display_info *disp) {
	int i;
	char buf[100];

	oled_putstrto(disp, 0, 9+1, "Welcome       to");
	disp->font = font1;

	oled_putstrto(disp, 0, 9+9, "orangepi i2c oled");
	disp->font = font3;

	oled_send_buffer(disp);

return 0;
}

void show_usage(char *progname) {
	printf("\nUsage:\n%s <I2C bus device node >\n", progname);
}

int main(int argc, char **argv) {
	int e;
	char filename[32];
	struct display_info disp;

	if (argc < 2) {
		show_usage(argv[0]);

		return -1;
	}

	memset(&disp, 0, sizeof(disp));
	sprintf(filename, "%s", argv[1]);
	disp.address = OLED_I2C_ADDR;
	disp.font = font2;

	e = oled_open(&disp, filename);

		e = oled_init(&disp);
	oled_show(&disp);
	return 0;
}
OrangePi_5_RK3588S_用户手册_v2.0
链接: https://pan.baidu.com/s/1X2uWDIXXJJvcGogtrqby2Q?pwd=u4xf 提取码: u4xf
详情移步到我的个人网站phlqj.top


 被折叠的 条评论
为什么被折叠?
被折叠的 条评论
为什么被折叠?
 到【灌水乐园】发言


