


obs_graphics_thread
在 obs_graphics_thread 线程中
所有画面源的合成,画面显示以及视频输出都在这个函数里触发
主要有以下三点
- 根据设置的视频输出帧率,每间隔固定时间处理所有源的输入,并融合成一张图像缓存起来
- 如果开启推流和录像,则通过信号通知视频输出线程编码输出视频帧
- 渲染视频到UI窗口,使用户可以编辑推流画面
bool obs_graphics_thread_loop(struct obs_graphics_context *context)
{
    // 记录处理当前帧的绝对时间,用来统计一帧图像耗时
	uint64_t frame_start = os_gettime_ns();
	uint64_t frame_time_ns;

    // raw_active表示是否开始视频输出,控制着视频渲染线程和视频输出线程之间的通信
	update_active_states();

	profile_start(context->video_thread_name);

	gs_enter_context(obs->video.graphics);
	gs_begin_frame();
	gs_leave_context();


    //1. tick_sources()遍历每个sources;
	//调用所有source的tick函数,更新添加的所有视频源一帧图像
	//检查并处理视频的状态(show or hide)是否需要改变
	profile_start(tick_sources_name);
	context->last_time =
		tick_sources(obs->video.video_time, context->last_time);
	profile_end(tick_sources_name);

#ifdef _WIN32
	MSG msg;
	while (PeekMessage(&msg, NULL, 0, 0, PM_REMOVE)) {
		TranslateMessage(&msg);
		DispatchMessage(&msg);
	}
#endif

    //2. output_frame()输出当前视频帧
	//负责图像的合成并缓存到视频帧队列,此时保存的是原始视频格式
	//如果开启推流或者录像,会发送信号通知视频输出线程从视频帧队列取出一帧视频编码输出
	profile_start(output_frame_name);
	output_frames();
	profile_end(output_frame_name);


    //3. 调用render_displays()将当前视频画面显示在窗口中
    //渲染视频帧到UI窗口
	profile_start(render_displays_name);
	render_displays();
	profile_end(render_displays_name);

	//执行需要在 obs_graphics_thread线程中处理的任务,通过obs_queue_task注册任务
	//通过全局搜索 obs_queue_task注册任务接口,只有窗口采集,桌面采集两个源里面用到
	//将这两个源的销毁工作放到渲染线程中去做
	execute_graphics_tasks();


    //计算处理一帧视频的耗时
	frame_time_ns = os_gettime_ns() - frame_start;

	profile_end(context->video_thread_name);

	profile_reenable_thread();

    //休眠 等待下一个间隔的到来
	video_sleep(&obs->video, &obs->video.video_time, context->interval);

	context->frame_time_total_ns += frame_time_ns;
	context->fps_total_ns += (obs->video.video_time - context->last_time);
	context->fps_total_frames++;

    //休眠 等待下一个间隔的到来
	if (context->fps_total_ns >= 1000000000ULL) {
        // 计算视频的实际帧率
		obs->video.video_fps =
			(double)context->fps_total_frames /
			((double)context->fps_total_ns / 1000000000.0);
		//计算处理一帧图像的平均耗时,可以理解为生成一帧图像的耗时
		//如果耗时大于设置fps的帧间隔,则视频处理能力不足,推流的实际帧率不满足设置的帧率
		//视频的处理存在性能瓶颈,需要做优化处理
		obs->video.video_avg_frame_time_ns =
			context->frame_time_total_ns /
			(uint64_t)context->fps_total_frames;

		context->frame_time_total_ns = 0;
		context->fps_total_ns = 0;
		context->fps_total_frames = 0;
	}

	return !stop_requested();
}
视频渲染线程与视频输出线程之间的配合
视频渲染线程负责生产视频帧,视频输出线程负责消耗视频帧,两个线程共同操作一个视频帧缓存队列,是一个标准的1对1生产者-消费者模型。
两个线程的操作的视频帧缓存队列定义在 obs_core -> obs_core_video -> video_output -> cache
可以看到是一个数组实现的一个固定大小的队列
struct obs_core {
	...
	struct obs_core_video video;
}

typedef struct video_output video_t;
struct obs_core_video {
	...
	video_t *video;
}

struct video_output {
	...
	struct cached_frame_info cache[MAX_CACHE_SIZE];
}
static inline void output_frame(struct obs_core_video_mix *video)
{
const bool raw_active = video->raw_was_active;
const bool gpu_active = video->gpu_was_active;
//当前纹理坐标 前一个纹理坐标
int cur_texture = video->cur_texture;
int prev_texture = cur_texture == 0 ? NUM_TEXTURES - 1
: cur_texture - 1;
//定义栈变量frame 用来存放从显存里面map出来的图像数据
struct video_data frame;
bool frame_ready = 0;
memset(&frame, 0, sizeof(struct video_data));
//进入obs图形子系统
profile_start(output_frame_gs_context_name);
gs_enter_context(obs->video.graphics);
profile_start(output_frame_render_video_name);
GS_DEBUG_MARKER_BEGIN(GS_DEBUG_COLOR_RENDER_VIDEO,
output_frame_render_video_name);
//渲染一帧视频纹理到output_texture
render_video(video, raw_active, gpu_active, cur_texture);
GS_DEBUG_MARKER_END();
profile_end(output_frame_render_video_name);
if (raw_active) {
//通过调用obs的图形子系统api gs_stagesurface_map 从surfaces获取到显存的图像数据指针
//将图像数据指针存放在上面定义的栈变量frame中,
//obs图形子系统对openGL D3D的图形api进行了封装,对外提供统一接口进行图像的渲染和存取
//这也是obs-studio项目中牛逼的一个技术点
profile_start(output_frame_download_frame_name);
frame_ready = download_frame(video, prev_texture, &frame);
profile_end(output_frame_download_frame_name);
}
profile_start(output_frame_gs_flush_name);
gs_flush();
profile_end(output_frame_gs_flush_name);
//离开obs图形子系统
gs_leave_context();
profile_end(output_frame_gs_context_name);
//如果开启推流或者录制,并且 download_frame成功,则输出视频帧
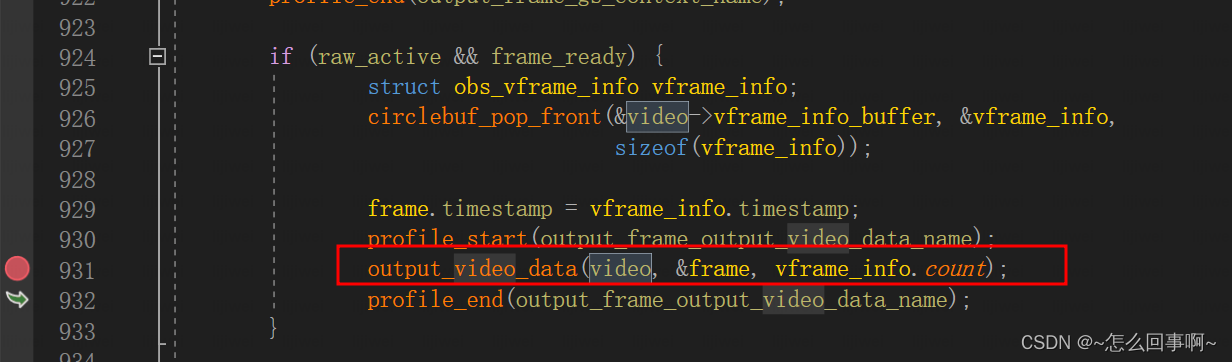
if (raw_active && frame_ready) {
struct obs_vframe_info vframe_info;
circlebuf_pop_front(&video->vframe_info_buffer, &vframe_info,
sizeof(vframe_info));
//给视频帧打上时间戳
frame.timestamp = vframe_info.timestamp;
profile_start(output_frame_output_video_data_name);
//保存视频帧到队列,并通知视频发送线程工作
output_video_data(video, &frame, vframe_info.count);
profile_end(output_frame_output_video_data_name);
}
if (++video->cur_texture == NUM_TEXTURES)
video->cur_texture = 0;
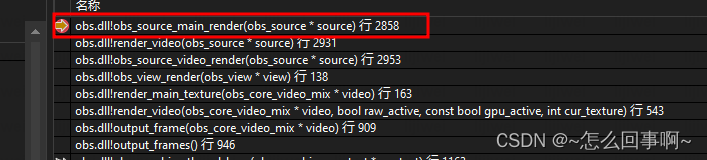
}调用 render_video(),渲染视频数据
static inline void render_video(struct obs_core_video_mix *video,
				bool raw_active, const bool gpu_active,
				int cur_texture)
{
	gs_begin_scene();

	gs_enable_depth_test(false);
	gs_set_cull_mode(GS_NEITHER);

	render_main_texture(video);

	if (raw_active || gpu_active) {
		gs_texture_t *const *convert_textures = video->convert_textures;
		gs_stagesurf_t *const *copy_surfaces =
			video->copy_surfaces[cur_texture];
		size_t channel_count = NUM_CHANNELS;
		gs_texture_t *output_texture = render_output_texture(video);

#ifdef _WIN32
		if (gpu_active) {
			convert_textures = video->convert_textures_encode;
			copy_surfaces = video->copy_surfaces_encode;
			channel_count = 1;
			gs_flush();
		}
#endif

		if (video->gpu_conversion) {
			render_convert_texture(video, convert_textures,
					       output_texture);
		}

#ifdef _WIN32
		if (gpu_active) {
			gs_flush();
			output_gpu_encoders(video, raw_active);
		}
#endif

		if (raw_active) {
			stage_output_texture(video, cur_texture,
					     convert_textures, output_texture,
					     copy_surfaces, channel_count);
		}
	}

	gs_set_render_target(NULL, NULL);
	gs_enable_blending(true);

	gs_end_scene();
}
在开启推流和录像功能时,调用render_output_texture(),渲染输出帧,并保存在video->convert_textures和video->output_textures中;
调用stage_output_texture将画面保存到video->copy_surfaces;
再调用download_frame,从video->copy_surfaces中拷贝出当前视频帧数据到video_data *frame;
这样就拿到了需要输出的视频画面
将frame传入output_video_data(),在该函数中,调用video_output_lock_frame()函数,拷贝input->cache[last_add]给output_frame,需要注意的是,这个拷贝是将cache[]中的指针地址拷贝过来了,通过格式转换函数例如copy_rgb_frame,将input_frame中的数据内容拷贝到output_frame,实际上也就是将视频内容拷贝到了input->cache[last_add]中,再调用video_output_unlock_frame()函数,唤醒信号量video->update_semaphore,通知线程video_thread视频输出数据已就绪,执行数据输出、编码、rtmp推流。
函数output_video_data保存视频帧到缓存队列,并通知视频发送线程工作
static inline void output_video_data(struct obs_core_video_mix *video,
				     struct video_data *input_frame, int count)
{
	const struct video_output_info *info;

	//定义栈变量output_frame 其实待会是要将要缓存帧的首地址复制给他内部的data
	struct video_frame output_frame;
	bool locked;


    //获取视频输出信息
	info = video_output_get_info(video->video);


	//如果有可以缓存的空间,就将缓存队列中可缓存空间的地址复制给output_frame
	//output_frame就代理缓存视频的地址
	//如果没有缓存空间返回false
	locked = video_output_lock_frame(video->video, &output_frame, count,
					 input_frame->timestamp);
	if (locked) {
        //gpu_conversion在 OBSBasic::ResetVideo() 设置为true
		if (video->gpu_conversion) {
            //将图像数据从显存拷贝到内存
			set_gpu_converted_data(&output_frame, input_frame,
					       info);
		} else {
			copy_rgbx_frame(&output_frame, input_frame, info);
		}

        //1.更新可缓存空间-1  2.发送信号量通知视频发送线程工作
		video_output_unlock_frame(video->video);
	}
}
最后再调用render_displays()将当前视频画面显示在窗口中,sleep直到下一帧视频数据时间戳;
编码线程video_thread
在初始化视频时,启动了一个线程函数video_thread(),这个函数一直等待视频帧数据准备就绪的信号唤醒
static void *video_thread(void *param)
{
	struct video_output *video = param;

	os_set_thread_name("video-io: video thread");

	const char *video_thread_name =
		profile_store_name(obs_get_profiler_name_store(),
				"video_thread(%s)", video->context.info.name);

	while (os_sem_wait(video->data.update_semaphore) == 0) {
		if (video->context.stop)
			break;

		profile_start(video_thread_name);
		while (!video->context.stop && !video_output_cur_frame(&video->data)) {
			video->data.total_frames++;
		}

		video->data.total_frames++;
		profile_end(video_thread_name);

		profile_reenable_thread();
	}

	return NULL;
}
在输出的一帧视频画面合成后唤醒该信号,在video_output_unlock_frame()里触发该信号
void video_output_unlock_frame(video_d_t *video)
{
if (!video) return;
pthread_mutex_lock(&video->data_mutex);
video->available_frames--;
os_sem_post(video->update_semaphore);
pthread_mutex_unlock(&video->data_mutex);
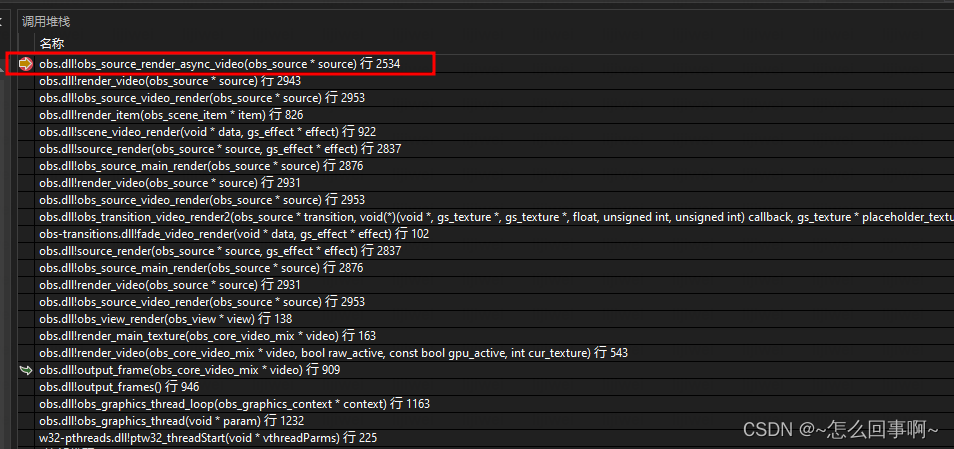
}等到信号后执行video_output_cur_frame函数,获取视频缓存中第一帧,从video->inputs中获取输出类型调用编码器绑定的回调函数input->callback,receive_video(),进行视频数据编码,而video->update_semaphore 信号量是在所有画面合成完成后被唤醒;
video->inputs中保存的是输出类型,包括推流和录像,后面将会说到是如何添加的。
在receive_video中调用do_encode()进行编码;
在do_encode中根据不同的编码器名称进行编码回调,各个编码器模块在程序开始加载的时候会进行注册,编码完成后调用绑定的编码完成回调
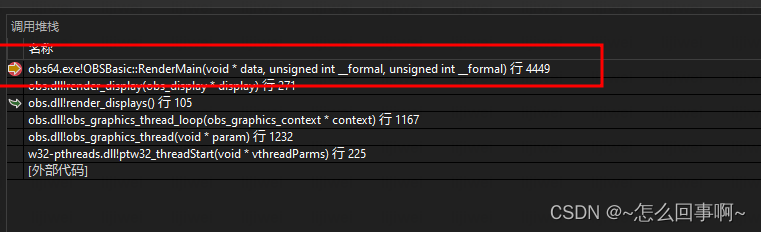
渲染
display 即需要将frame渲染到的窗口,这里遍历一遍,调用
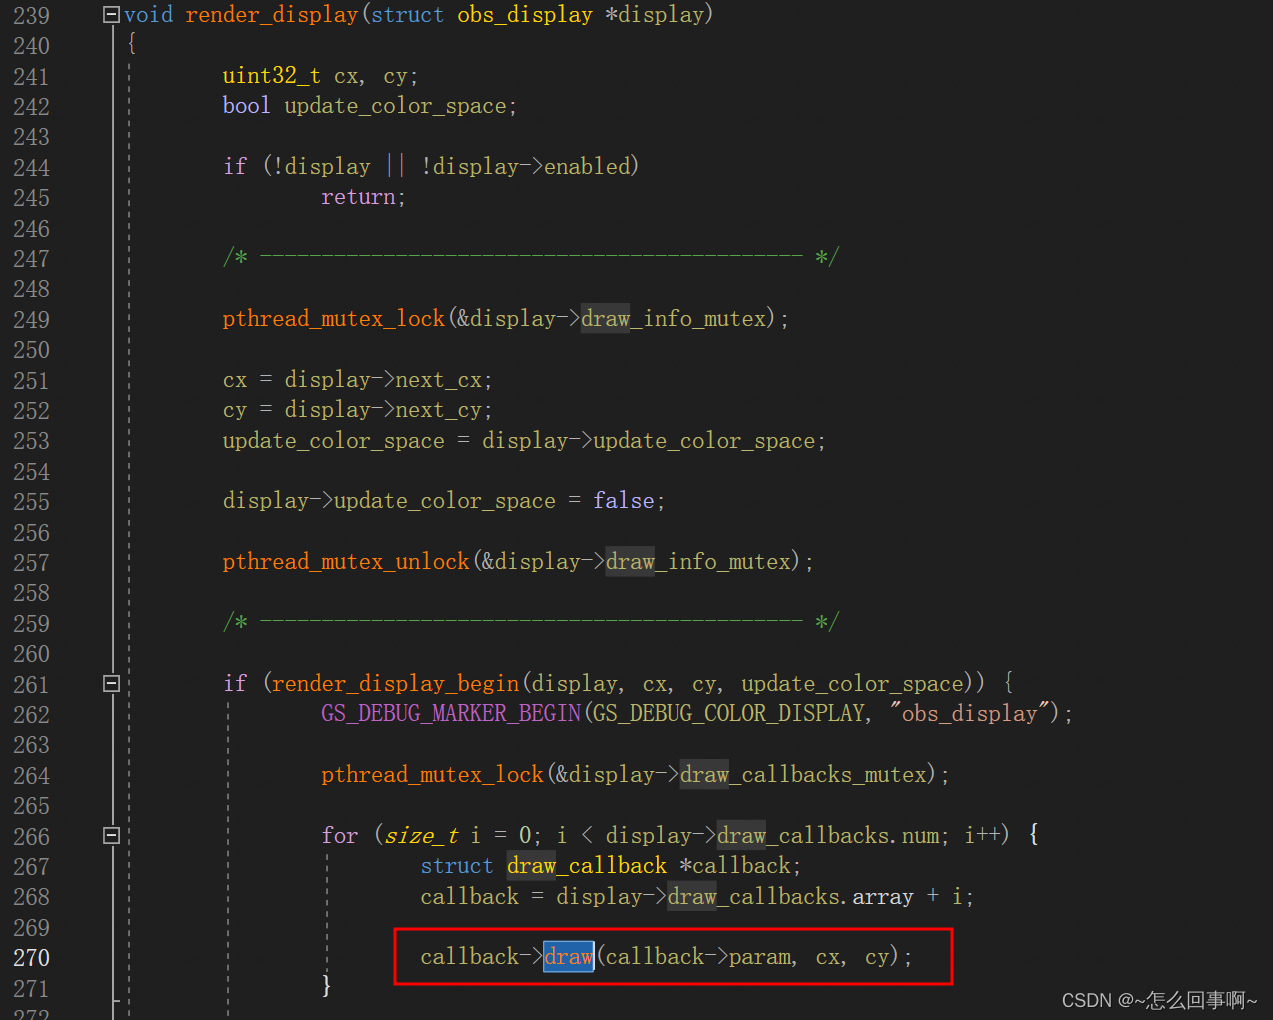
在上面的接口中,调用draw接口 ,callback->draw即
void OBSBasic::RenderMain(void *data, uint32_t, uint32_t)
设置回调的地方:
	auto addDisplay = [this](OBSQTDisplay *window) {
		obs_display_add_draw_callback(window->GetDisplay(),
					      OBSBasic::RenderMain, this);

		struct obs_video_info ovi;
		if (obs_get_video_info(&ovi))
			ResizePreview(ovi.base_width, ovi.base_height);
	};

	connect(ui->preview, &OBSQTDisplay::DisplayCreated, addDisplay);
其中ui->preview 即obs的预览区域:
预览窗口
参照OBSBasic.ui
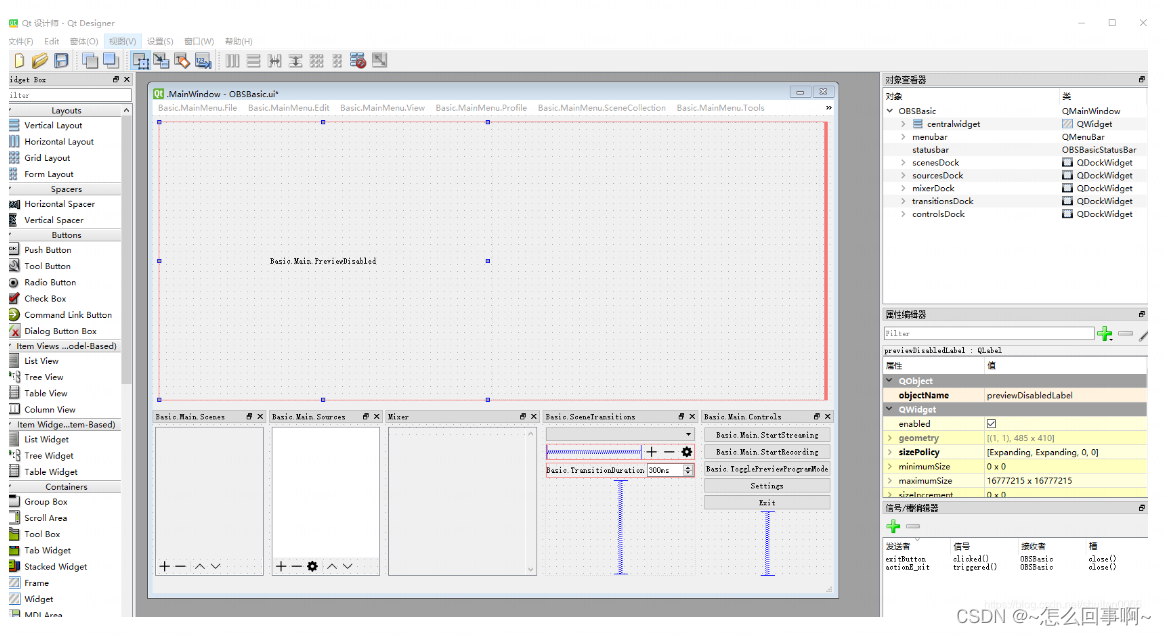
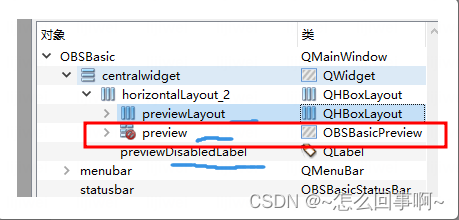
在 ui_OBSBasic.h中,可以看到
预览窗口对应的是 OBSBasicPreview : public OBSQTDisplay
这部分是怎么渲染的呢,
在void OBSBasic::OBSInit() 初始化中,有这么一段语句
auto addDisplay = [this] (OBSQTDisplay *window)
	{
		obs_display_add_draw_callback(window->GetDisplay(),
				OBSBasic::RenderMain, this);

		struct obs_video_info ovi;
		if (obs_get_video_info(&ovi))
			ResizePreview(ovi.base_width, ovi.base_height);
	};

	connect(ui->preview, &OBSQTDisplay::DisplayCreated, addDisplay);
追踪下DisplayCreated信号
void OBSQTDisplay::CreateDisplay()
{
	if (display || !windowHandle()->isExposed())
		return;

	QSize size = GetPixelSize(this);

	gs_init_data info      = {};
	info.cx                = size.width();
	info.cy                = size.height();
	info.format            = GS_RGBA;
	info.zsformat          = GS_ZS_NONE;

	QTToGSWindow(winId(), info.window);

	display = obs_display_create(&info);

	emit DisplayCreated(this);
}
由此可知,当预览窗口创建时,会发出displayCreated信号,该信号会触发addDisplay ,在此槽函数中,添加了OBS 渲染函数
/**
 * Adds a draw callback for this display context
 *
 * @param  display  The display context.
 * @param  draw     The draw callback which is called each time a frame
 *                  updates.
 * @param  param    The user data to be associated with this draw callback.
 */
EXPORT void obs_display_add_draw_callback(obs_display_t *display,
		void (*draw)(void *param, uint32_t cx, uint32_t cy),
		void *param);

/** Removes a draw callback for this display context */
EXPORT void obs_display_remove_draw_callback(obs_display_t *display,
		void (*draw)(void *param, uint32_t cx, uint32_t cy),
		void *param);
摄像头数据的采集与渲染
采集
在win-dshow线程中
在 win-dshow中采集到摄像头数据回调
E:\opensrc\obs\obs-studio\plugins\win-dshow\win-dshow.cpp
void DShowInput::OnVideoData(const VideoConfig &config, unsigned char *data,
			     size_t size, long long startTime,
			     long long endTime, long rotation) {

......
    获取数据帧
	} else if (videoConfig.format == VideoFormat::YVYU ||
		   videoConfig.format == VideoFormat::YUY2 ||
		   videoConfig.format == VideoFormat::HDYC ||
		   videoConfig.format == VideoFormat::UYVY) {
		frame.data[0] = data;
		frame.linesize[0] = cx * 2;

	}

......

    拷贝该数据帧
	obs_source_output_video2(source, &frame);
}


void obs_source_output_video2(obs_source_t *source,
			      const struct obs_source_frame2 *frame)
{
	if (destroying(source))
		return;
	if (!frame) {
		obs_source_output_video_internal(source, NULL);
		return;
	}

	struct obs_source_frame new_frame = {0};
	enum video_range_type range =
		resolve_video_range(frame->format, frame->range);

    // 拷贝该视频帧
	for (size_t i = 0; i < MAX_AV_PLANES; i++) {
		new_frame.data[i] = frame->data[i];
		new_frame.linesize[i] = frame->linesize[i];
	}

	new_frame.width = frame->width;
	new_frame.height = frame->height;
	new_frame.timestamp = frame->timestamp;
	new_frame.format = frame->format;
	new_frame.full_range = range == VIDEO_RANGE_FULL;
	new_frame.max_luminance = 0;
	new_frame.flip = frame->flip;
	new_frame.flags = frame->flags;
	new_frame.trc = frame->trc;

	memcpy(&new_frame.color_matrix, &frame->color_matrix,
	       sizeof(frame->color_matrix));
	memcpy(&new_frame.color_range_min, &frame->color_range_min,
	       sizeof(frame->color_range_min));
	memcpy(&new_frame.color_range_max, &frame->color_range_max,
	       sizeof(frame->color_range_max));

    //放置到队列
	obs_source_output_video_internal(source, &new_frame);
}


static void
obs_source_output_video_internal(obs_source_t *source,
				 const struct obs_source_frame *frame)
{
	if (!obs_source_valid(source, "obs_source_output_video"))
		return;

	if (!frame) {
		pthread_mutex_lock(&source->async_mutex);
		source->async_active = false;
		source->last_frame_ts = 0;
		free_async_cache(source);
		pthread_mutex_unlock(&source->async_mutex);
		return;
	}

	struct obs_source_frame *output = cache_video(source, frame);

	/* ------------------------------------------- */
	pthread_mutex_lock(&source->async_mutex);
	if (output) {
		if (os_atomic_dec_long(&output->refs) == 0) {
			obs_source_frame_destroy(output);
			output = NULL;
		} else {
            //将frame 放置到 async_frames中
			da_push_back(source->async_frames, &output);
			source->async_active = true;
		}
	}
	pthread_mutex_unlock(&source->async_mutex);
}
渲染
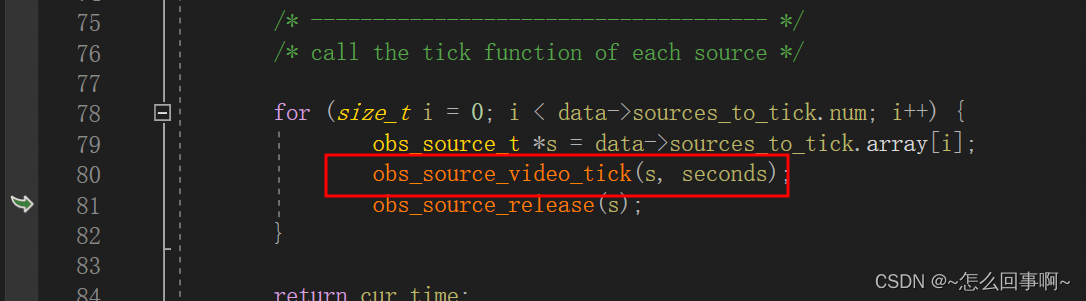
在graphics thread中obs_graphics_thread_loop
tick_sources
在 tick_sources 中 循环调用所有source , obs_source_video_tick中获取视频frame,等待渲染使用
tick_sources
->obs_source_video_tick
->async_tick
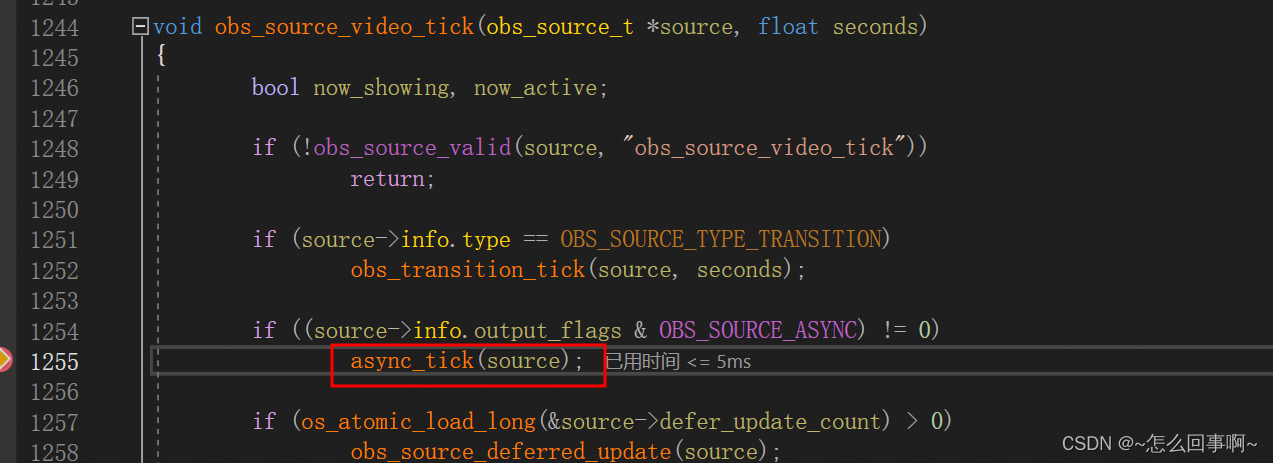
static void async_tick(obs_source_t *source)
{
	uint64_t sys_time = obs->video.video_time;

	pthread_mutex_lock(&source->async_mutex);

	if (deinterlacing_enabled(source)) {
		deinterlace_process_last_frame(source, sys_time);
	} else {
		if (source->cur_async_frame) {
			remove_async_frame(source, source->cur_async_frame);
			source->cur_async_frame = NULL;
		}

		source->cur_async_frame = get_closest_frame(source, sys_time);
	}

	source->last_sys_timestamp = sys_time;

	if (deinterlacing_enabled(source))
		filter_frame(source, &source->prev_async_frame);
	filter_frame(source, &source->cur_async_frame);

	if (source->cur_async_frame)
		source->async_update_texture =
			set_async_texture_size(source, source->cur_async_frame);

	pthread_mutex_unlock(&source->async_mutex);
}
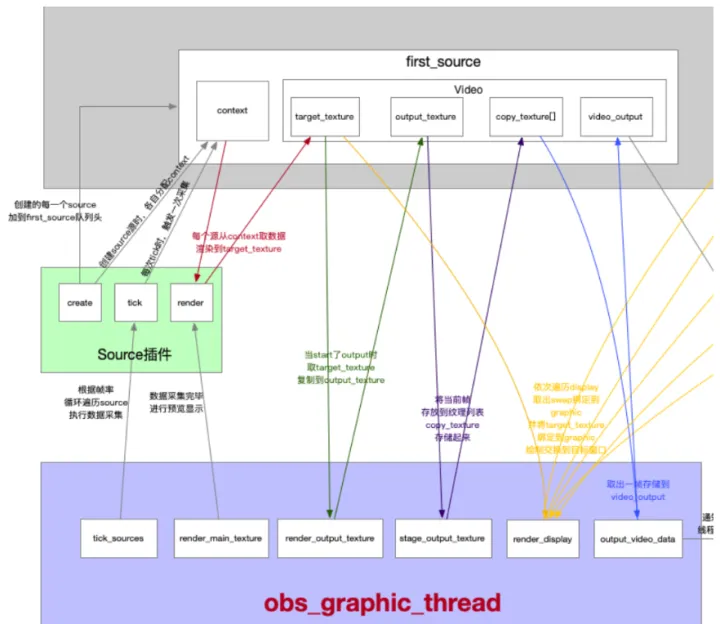
output_frames
render_displays
将数据渲染到UI
遍历每一个UI层的display
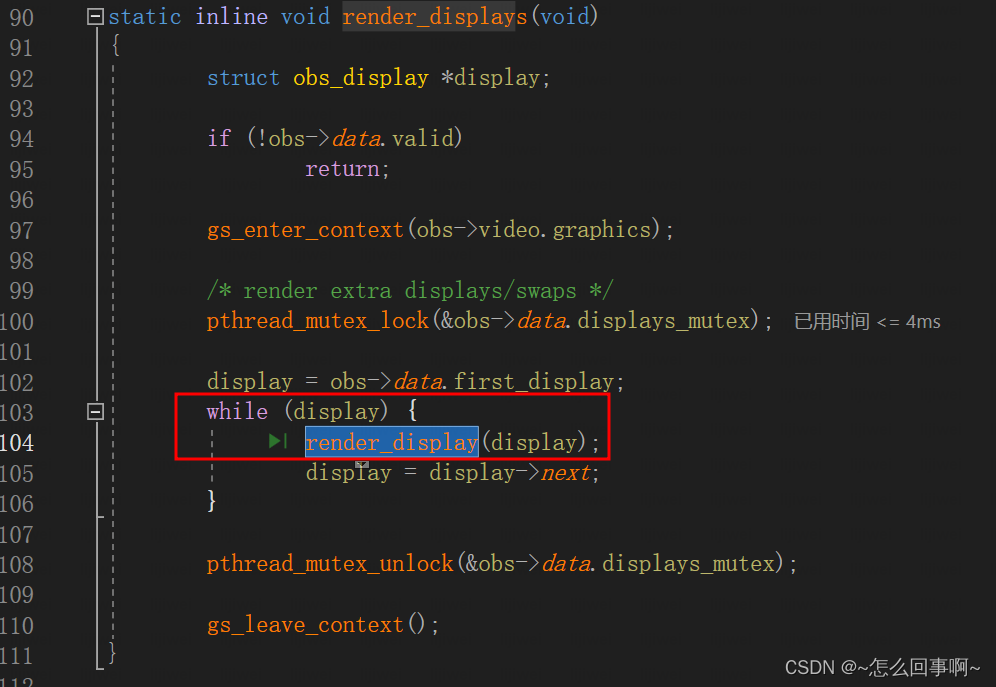
static inline void render_displays(void)
{
struct obs_display *display;
if (!obs->data.valid)
return;
gs_enter_context(obs->video.graphics);
/* render extra displays/swaps */
pthread_mutex_lock(&obs->data.displays_mutex);
display = obs->data.first_display;
while (display) {
render_display(display);
display = display->next;
}
pthread_mutex_unlock(&obs->data.displays_mutex);
gs_leave_context();
}
录屏采集
obs_graphics_thread_loop(obs_graphics_context * context)
tick_sources
tick_sources(unsigned __int64 cur_time, unsigned __int64 last_time)
obs_source_video_tick(obs_source * source, float seconds)

video_tick 进行数据采集,采集的数据放到了source->context.data中,数据读取到后进行渲染
video_tick 在每个插件对应的结构体中进行初始化,例如window-capture 屏幕捕获
struct obs_source_info duplicator_capture_info = {
	.id = "monitor_capture",
	.type = OBS_SOURCE_TYPE_INPUT,
	.output_flags = OBS_SOURCE_VIDEO | OBS_SOURCE_CUSTOM_DRAW |
			OBS_SOURCE_DO_NOT_DUPLICATE | OBS_SOURCE_SRGB,
	.get_name = duplicator_capture_getname,
	.create = duplicator_capture_create,
	.destroy = duplicator_capture_destroy,
	.video_render = duplicator_capture_render,
	.video_tick = duplicator_capture_tick,
	.update = duplicator_capture_update,
	.get_width = duplicator_capture_width,
	.get_height = duplicator_capture_height,
	.get_defaults = duplicator_capture_defaults,
	.get_properties = duplicator_capture_properties,
	.icon_type = OBS_ICON_TYPE_DESKTOP_CAPTURE,
	.video_get_color_space = duplicator_capture_get_color_space,
};
source->info.video_tick 即
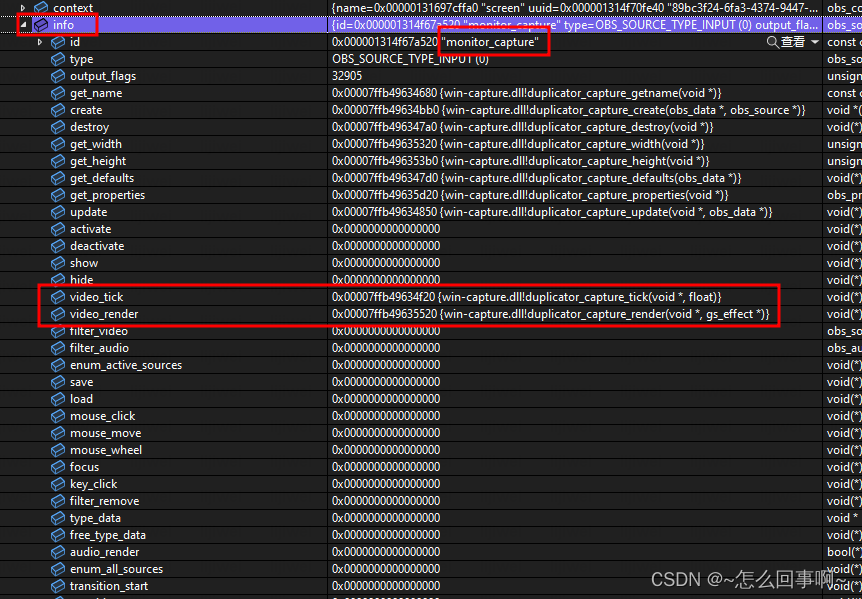
duplicator_capture_tick 即屏幕采集
在 duplicator_capture_tick 中会调用
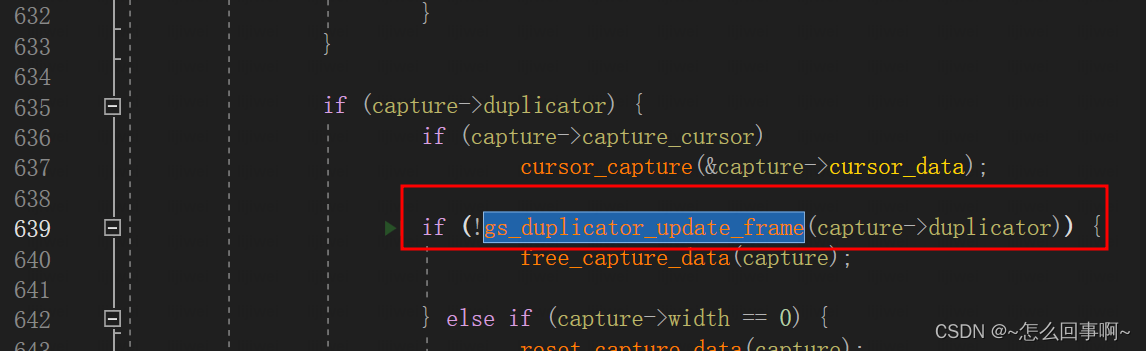
其中 capture即
struct duplicator_capture {
	obs_source_t *source;
	pthread_mutex_t update_mutex;
	char monitor_id[128];
	char id[128];
	char alt_id[128];
	char monitor_name[64];
	enum display_capture_method method;
	bool reset_wgc;
	HMONITOR handle;
	bool capture_cursor;
	bool force_sdr;
	bool showing;
	LONG logged_width;
	LONG logged_height;

	long x;
	long y;
	int rot;
	uint32_t width;
	uint32_t height;
	gs_duplicator_t *duplicator;
	float reset_timeout;
	struct cursor_data cursor_data;

	void *winrt_module;
	struct winrt_exports exports;
	struct winrt_capture *capture_winrt;
};
duplicator即
struct gs_duplicator : gs_obj {
	ComPtr<IDXGIOutputDuplication> duplicator;
	gs_texture_2d *texture;
	bool hdr = false;
	enum gs_color_space color_space = GS_CS_SRGB;
	float sdr_white_nits = 80.f;
	int idx;
	long refs;
	bool updated;

	void Start();

	inline void Release() { duplicator.Release(); }

	gs_duplicator(gs_device_t *device, int monitor_idx);
	~gs_duplicator();
};
gs_duplicator_update_frame 中:

    hr = res->QueryInterface(__uuidof(ID3D11Texture2D),
                 (void **)tex.Assign());

这一步调用dx查询接口,将屏幕帧写入tex

copy_texture(d, tex)

  //copy材质到d->duplicator->texture
因为obs用的都是directX或openGL 的texture来存储data数据,这样做的好处是copy和渲染都直接在显存操作,避免了内存和显存交换数据进行的效率损耗
对应的获取可以用这个接口,从显存map地址可供cpu访问
bool gs_texture_map(gs_texture_t *tex, uint8_t **ptr, uint32_t *linesize)
{
	HRESULT hr;

	if (tex->type != GS_TEXTURE_2D)
		return false;

	gs_texture_2d *tex2d = static_cast<gs_texture_2d *>(tex);

	D3D11_MAPPED_SUBRESOURCE map;
	hr = tex2d->device->context->Map(tex2d->texture, 0,
					 D3D11_MAP_WRITE_DISCARD, 0, &map);
	if (FAILED(hr))
		return false;

	*ptr = (uint8_t *)map.pData;
	*linesize = map.RowPitch;
	return true;
}
output_frames
中调用

即 static void duplicator_capture_render(void *data, gs_effect_t *unused) 数据传送到 opengl 或者d3d中进行处理,显示
当需要推流或录制时:会调用到
output_video_data 中:
os_sem_post通知video_thread线程进行编码
output_video_data告知video_thread新数据到来。
video_thread线程中的流程:
Step1: 等到数据到来,最终调用receive_video函数进行编码;
Step2: receive_video中调用do_encode对数据进行编码;
Step3: 然后在do_encode中还调用send_packet对数据执行发送
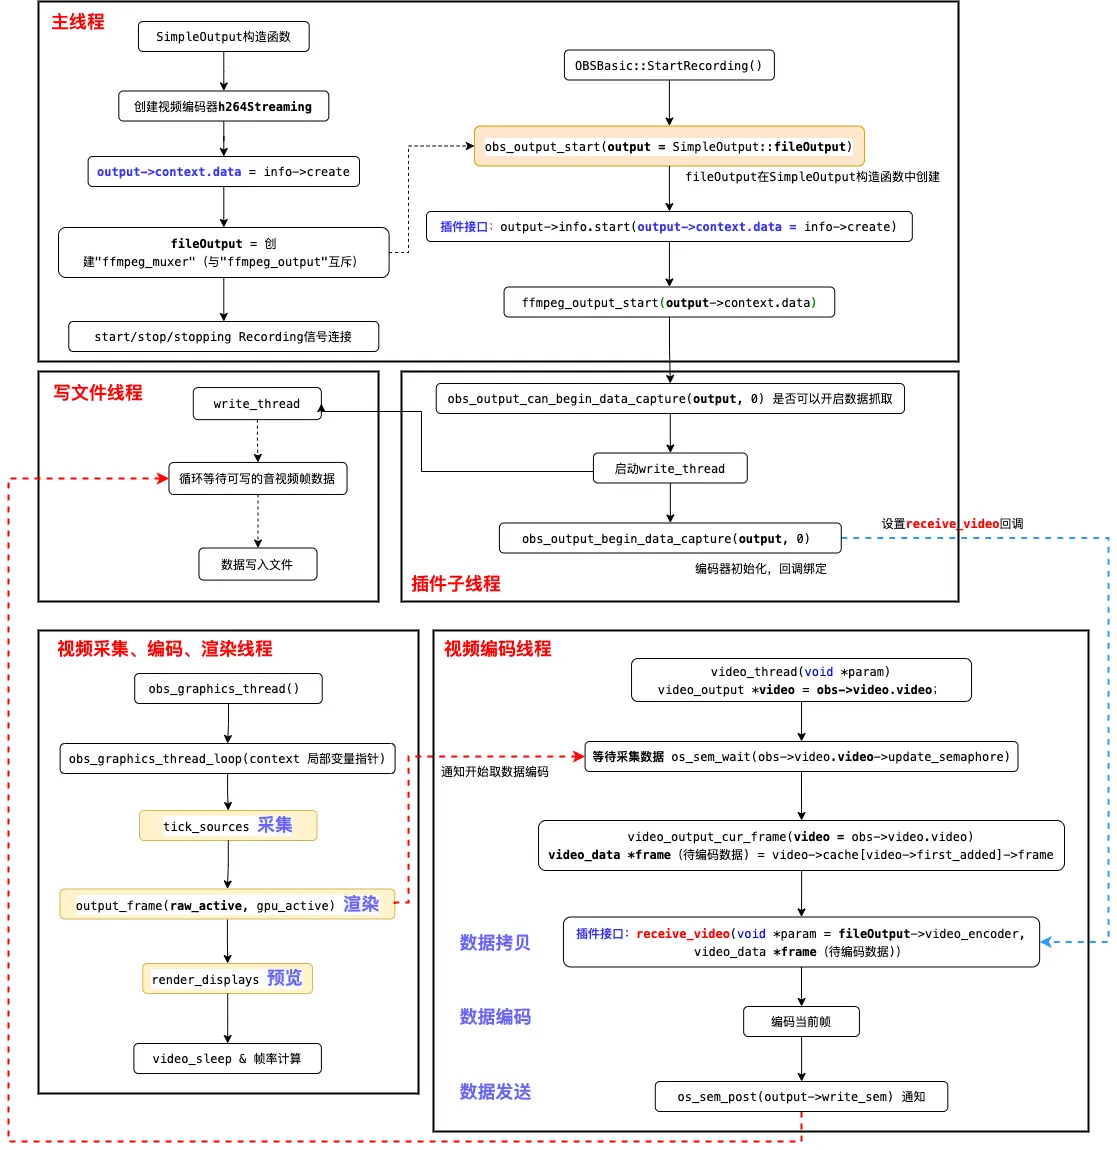
视频显示和视频编码后输出流程图


 2379
2379

 被折叠的 条评论
为什么被折叠?
被折叠的 条评论
为什么被折叠?
 到【灌水乐园】发言


