


Computer Vision Tutorial: A Step-by-Step Introduction to Image Segmentation Techniques_Part 1 计算机视觉教程:逐步介绍图像分割技术
- 一,Introduction
- 二,What is Image Segmentation?
- 三,Why do we need Image Segmentation?
- 四,The Different Types of Image Segmentation
- 五,Region-based Segmentation区域分割
- 六,Edge Detection Segmentation边缘检测分割
- 七,Image Segmentation based on Clustering基于聚类的图像分割
- 八,Mask R-CNN
- 九,Summary of Image Segmentation Techniques 图像分割技术总结
- 十,End Notes最后注意
来源:https://www.analyticsvidhya.com/blog/2019/04/introduction-image-segmentation-techniques-python/
一,Introduction
We are able to build computer vision models that can detect objects, determine their shape, predict the direction the objects will go in, and many other things.You might have guessed it – that’s the powerful technology behind self-driving cars!
The most popular approach I have come across is based on identifying the objects present in an image, aka, object detection.识别图像中存在的物体,又称物体检测
But what if we want to dive deeper? What if just detecting objects isn’t enough – we want to analyze our image at a much more granular level?
in this article, I will introduce you to the concept of image segmentation. It is a powerful computer vision algorithm that builds upon the idea of object detection and takes us to a whole new level of working with image data. 计算机视觉算法基于目标检测的思想.
二,What is Image Segmentation?
Let’s understand image segmentation using a simple example. Consider the below image:

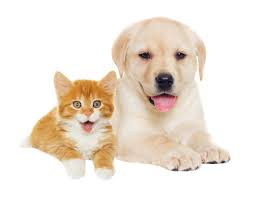
There’s only one object here – a dog. We can build a straightforward cat-dog classifier model and predict that there’s a dog in the given image. But what if we have both a cat and a dog in a single image?建立一个简单的猫狗分类器模型,预测给定图像中有一只狗。
We can train a multi-label classifier, in that instance. Now, there’s another caveat – we won’t know the location of either animal/object in the image.训练一个多标签分类器。警告:我们不知道图像中任何一个动物/物体的位置。
That’s where image localization comes into the picture (no pun intended!). It helps us to identify the location of a single object in the given image. In case we have multiple objects present, we then rely on the concept of object detection (OD). We can predict the location along with the class for each object using OD.这就是图像定位的作用。一旦/如果有多个对象存在,那么我们依赖于目标检测的概念。我们可以使用OD预测每个对象的位置和类。
Before detecting the objects and even before classifying the image, we need to understand what the image consists of. Enter – Image Segmentation.理解图像由什么组成——进入图像分割。
1,So how does image segmentation work?
We can divide or partition the image into various parts called segments. It’s not a great idea to process the entire image at the same time as there will be regions in the image which do not contain any information. By dividing the image into segments, we can make use of the important segments for processing the image. That, in a nutshell, is how image segmentation works.将图像分成几个部分被称为分割。同时处理整个图像不好,因为图像中会有不包含任何信息的区域。通过将图像分割成片段,我们可以利用重要的片段来处理图像。简单来说,这就是图像分割的工作原理。
An image is a collection or set of different pixels. We group together the pixels that have similar attributes using image segmentation.图像是不同像素的集合。我们使用图像分割将具有相似属性的像素分组在一起。
the below visual will give you a practical idea of image segmentation:下面的图像将给你一个有关图像分割的实际思路。
Object Detection 目标检测 Instance Segmentation 实例分割

Object detection builds a bounding box corresponding to each class in the image. But it tells us nothing about the shape of the object. We only get the set of bounding box coordinates. We want to get more information – this is too vague for our purposes.目标检测建立一个边界框来对应于图像中的每个类,但是它没有告诉我们目标的形状,我们仅得到一套边界框坐标,这对我们的目的来说太模糊了。我们想要得到更多的信息。
Image segmentation creates a pixel-wise mask for each object in the image. This technique gives us a far more granular understanding of the object(s) in the image.图像分割为图像中的每个对象创建一个像素级的掩膜。这种技术让我们对图像中的对象有了更细致的理解。
Why do we need to go this deep? Can’t all image processing tasks be solved using simple bounding box coordinates? Let’s take a real-world example to answer this pertinent question.我们为什么要做这么深?难道不是所有的图像处理任务都能用简单的边界框坐标来解决吗?让我们举一个现实世界的例子来回答这个相关的问题。
三,Why do we need Image Segmentation?
Cancer has long been a deadly illness. Even in today’s age of technological advancements, cancer can be fatal if we don’t identify it at an early stage. Detecting cancerous cell(s) as quickly as possible can potentially save millions of lives.
The shape of the cancerous cells plays a vital role in determining the severity of the cancer. You might have put the pieces together – object detection will not be very useful here. We will only generate bounding boxes which will not help us in identifying the shape of the cells.
Image Segmentation techniques make a MASSIVE impact here. They help us approach this problem in a more granular manner and get more meaningful results. A win-win for everyone in the healthcare industry
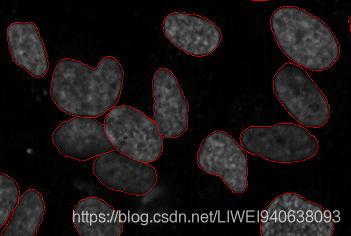
Here, we can clearly see the shapes of all the cancerous cells. There are many other applications where Image segmentation is transforming industries:
- Traffic Control Systems
- Self Driving Cars
- Locating objects in satellite images在卫星图像中定位物体
四,The Different Types of Image Segmentation
We can broadly divide image segmentation techniques into two types. 可以将图像分割技术大致分为两类。Consider the below images:

Can you identify the difference between these two? Both the images are using image segmentation to identify and locate the people present.
- In image 1, every pixel belongs to a particular class (either background or person). Also, all the pixels belonging to a particular class are represented by the same color (background as black and person as pink). This is an example of semantic segmentation。每个像素都属于一个特定的类(背景类或人物类)。所有属于特定类的像素都用相同的颜色表示(背景为黑色,人为粉红色). semantic segmentation 语义分割
- Image 2 has also assigned a particular class to each pixel of the image. However, different objects of the same class have different colors (Person 1 as red, Person 2 as green, background as black, etc.). This is an example of instance segmentation.为图像的每个像素分配了一个特定的类.同一类的不同对象有不同的颜色(Person 1为红色,Person 2为绿色,background为黑色).instance segmentation实例分割

If there are 5 people in an image, semantic segmentation will focus on classifying all the people as a single instance. Instance segmentation, on the other hand,will identify each of these people individually.语义分割将重点放在将所有人分类为单个实例上,实例分割能逐一确认这些人的身份。
Let’s mix things up a bit – we’ll combine learning concepts with implementing them in Python.我们把学习概念和在Python中实现它们结合起来.
五,Region-based Segmentation区域分割
One simple way to segment different objects could be to use their pixel values. An important point to note – the pixel values will be different for the objects and the image’s background if there’s a sharp contrast between them.分割不同对象的一个简单方法是使用它们的像素值。注意一点,如果物体对象和图像的背景之间有鲜明的对比,那么它们的像素值就会不同。
In this case, we can set a threshold value. The pixel values falling below or above that threshold can be classified accordingly (as an object or the background). This technique is known as Threshold Segmentation.在这种情况下,我们可以设置一个阈值。低于或高于该阈值的像素值可以相应地分类(作为一个对象或背景)。这种技术被称为阈值分割Threshold Segmentation
If we want to divide the image into two regions (object and background), we define a single threshold value. This is known as the global threshold.
如果我们想把图像分成两个区域(对象和背景),我们定义一个阈值。这被称为全局阈值。

If we have multiple objects along with the background, we must define multiple thresholds. These thresholds are collectively known as the local threshold.
如果我们有多个对象和背景,我们必须定义多个阈值。这些阈值统称为局部阈值。
Let’s implement what we’ve learned in this section. Download this image and run the below code. It will give you a better understanding of how thresholding works (you can use any image of your choice if you feel like experimenting!).
First, we’ll import the required libraries.导入所需的库
from skimage.color import rgb2gray
import numpy as np
import cv2
import matplotlib.pyplot as plt
%matplotlib inline
from scipy import ndimage
Let’s read the downloaded image and plot it:
image = plt.imread('1.jpeg')
image.shape
plt.imshow(image)

It is a three-channel image (RGB). We need to convert it into grayscale so that we only have a single channel. Doing this will also help us get a better understanding of how the algorithm works.三通道图像(RGB)转换为单通道灰度图像。
gray = rgb2gray(image)
plt.imshow(gray, cmap='gray')
Now, we want to apply a certain threshold to this image. This threshold should separate the image into two parts – the foreground and the background. Before we do that, let’s quickly check the shape of this image:对该图像应用某个阈值。这个阈值应该把图像分成两部分——前景和背景。在此之前,检查一下图像的形状。
gray.shape
The height and width of the image is 192 and 263 respectively. We will take the mean of the pixel values and use that as a threshold. If the pixel value is more than our threshold, we can say that it belongs to an object. If the pixel value is less than the threshold, it will be treated as the background. Let’s code this:图像的高度为192,宽度为263。我们将取像素值的平均值并将其作为阈值。如果像素值超过了阈值,我们就可以说它属于一个对象。如果像素值小于阈值,则将其视为背景。
gray_r = gray.reshape(gray.shape[0]*gray.shape[1])
# gray.reshape(gray.shape[0]*gray.shape[1])即为gray.reshape(871*1136),将gray图像reshape为一维(871*1136).
for i in range(gray_r.shape[0]):
# 写成gray_r.shape[0]而不是gray_r,是因为gray_r.shape=(989456,),依然是二维形式。
    if gray_r[i] > gray_r.mean():
    # 写成gray_r[i],对于gray,也可写成gray[i],gray_r[i]结果为一个数字,gray[i]结果为一个数组。
        gray_r[i] = 1
    else:
        gray_r[i] = 0
gray = gray_r.reshape(gray.shape[0],gray.shape[1]) #将gray_r再reshape为二维
plt.imshow(gray, cmap='gray')
The darker region (black) represents the background and the brighter (white) region is the foreground. We can define multiple thresholds as well to detect multiple objects:较暗的区域(黑色)代表背景,较亮的区域(白色)代表前景。我们也可以定义多个阈值来检测多个对象:
gray = rgb2gray(image)
gray_r = gray.reshape(gray.shape[0]*gray.shape[1])
for i in range(gray_r.shape[0]):
    if gray_r[i] > gray_r.mean():
        gray_r[i] = 3
    elif gray_r[i] > 0.5:
        gray_r[i] = 2
    elif gray_r[i] > 0.25:
        gray_r[i] = 1
    else:
        gray_r[i] = 0
gray = gray_r.reshape(gray.shape[0],gray.shape[1])
plt.imshow(gray, cmap='gray')
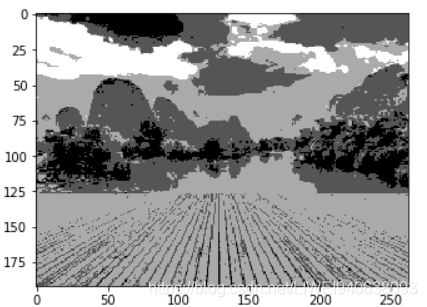
There are four different segments in the above image. You can set different threshold values and check how the segments are made. 在上面的图像中有四个不同的片段。您可以设置不同的阈值,并检查片段是如何构成的。
Some of the advantages of this method are:
- Calculations are simpler计算更简单
- Fast operation speed快的运算速度
- When the object and background have high contrast, this method performs really well当对象和背景具有高对比度时,该方法的性能非常好
But there are some limitations to this approach. When we don’t have significant grayscale difference, or there is an overlap of the grayscale pixel values, it becomes very difficult to get accurate segments.但是这种方法有一些局限性。当灰度差别不明显,或者灰度像素值存在重叠时,就很难得到准确的分割。
六,Edge Detection Segmentation边缘检测分割
What divides two objects in an image? There is always an edge between two adjacent regions with different grayscale values (pixel values). The edges can be considered as the discontinuous local features of an image.是什么将图像中的两个对象分开?具有不同灰度值(像素值)的相邻区域之间总有一条边。边缘可以看作是图像的不连续局部特征。
We can make use of this discontinuity to detect edges and hence define a boundary of the object. This helps us in detecting the shapes of multiple objects present in a given image. Now the question is how can we detect these edges? This is where we can make use of filters and convolutions. Refer to this article if you need to learn about these concepts.我们可以利用这个不连续点来检测边缘,从而定义物体的边界。这有助于我们检测在给定图像中出现的多个物体的形状。我们如何检测这些边呢?这就是我们可以使用过滤器和卷积的地方。如果您需要了解这些概念,请参阅本文:
文章地址:https://www.analyticsvidhya.com/blog/2017/06/architecture-of-convolutional-neural-networks-simplified-demystified/?utm_source=blog&utm_medium=image-segmentation-article
Architecture of Convolutional Neural Networks (CNNs) demystified
卷积神经网络(CNNs)结构的解密
The below visual will help you understand how a filter colvolves over an image :过滤器如何卷积一个图片
 过滤器卷积一个图片的过程如下:
- Take the weight matrix 获取权重矩阵
- Put it on top of the image 过滤器放到图像上
- Perform element-wise multiplication and get the output 执行基于元素的乘法并获得输出
- Move the weight matrix as per the stride chosen 按照选择的步幅移动权重矩阵
- Convolve until all the pixels of the input are used 卷积所有输入的像素
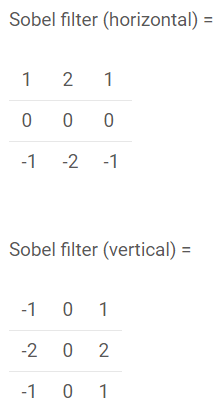
The values of the weight matrix define the output of the convolution. it helps to extract features from the input. Researchers have found that choosing some specific values for these weight matrices helps us to detect horizontal or vertical edges (or even the combination of horizontal and vertical edges).权值矩阵的值定义了卷积的输出,它有助于从输入中提取特征。为这些权重矩阵选择一些特定的值有助于我们检测水平或垂直的边缘或者甚至是水平和垂直边缘的组合。
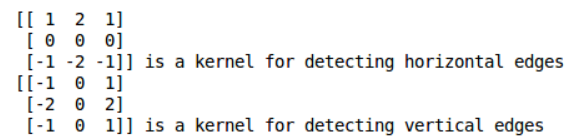
One such weight matrix is the sobel operator. It is typically used to detect edges. The sobel operator has two weight matrices – one for detecting horizontal edges and the other for detecting vertical edges. Let me show how these operators look and we will then implement them in Python.其中一个权值矩阵是sobel算子,它通常用于检测边缘。sobel算子有两个权值矩阵——一个用于检测水平边,另一个用于检测垂直边。这里展示一下这些算子的外观,然后我们在Python中实现它们。
Edge detection works by convolving these filters over the given image.边缘检测是通过在给定图像上进行卷积滤波器来实现的。
image = plt.imread('index.png')
plt.imshow(image)
It should be fairly simple for us to understand how the edges are detected in this image. Let’s convert it into grayscale and define the sobel filter (both horizontal and vertical) that will be convolved over this image:理解如何在这幅图像中检测边缘。将这幅图转换为灰度图并定义sobel过滤器(水平和垂直),它将在此图像上进行卷积。
# converting to grayscale
gray = rgb2gray(image)

# defining the sobel filters
sobel_horizontal = np.array([np.array([1, 2, 1]), np.array([0, 0, 0]), np.array([-1, -2, -1])])
print(sobel_horizontal, 'is a kernel for detecting horizontal edges')

sobel_vertical = np.array([np.array([-1, 0, 1]), np.array([-2, 0, 2]), np.array([-1, 0, 1])])
print(sobel_vertical, 'is a kernel for detecting vertical edges')
Now, convolve this filter over the image using the convolve function of the ndimage package from scipy.现在,使用scipy的ndimage包的卷积函数对图像进行滤波器卷积。
out_h = ndimage.convolve(gray, sobel_horizontal, mode='reflect')
# reflect,反映/反射
out_v = ndimage.convolve(gray, sobel_vertical, mode='reflect')
# here mode determines how the input array is extended when the filter overlaps a border.   mode决定了当滤波器与边界重叠时输入数组的扩展方式。
Let’s plot these results:画出结果
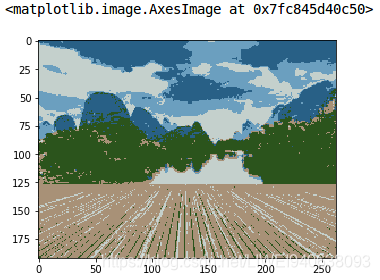
plt.imshow(out_h, cmap='gray')
plt.imshow(out_v, cmap='gray')

Here, we are able to identify the horizontal as well as the vertical edges. There is one more type of filter that can detect both horizontal and vertical edges at the same time. This is called the laplace operator:在这里,我们能够识别水平和垂直的边缘。还有一种类型的过滤器可以同时检测水平和垂直的边缘,叫做拉普拉斯算子。
1 1 1
1 -8 1
1 1 1
Let’s define this filter in Python and convolve it on the same image:
kernel_laplace = np.array([np.array([1, 1, 1]), np.array([1, -8, 1]), np.array([1, 1, 1])])
print(kernel_laplace, 'is a laplacian kernel')

Next, convolve the filter and print the output:
out_l = ndimage.convolve(gray, kernel_laplace, mode='reflect')
plt.imshow(out_l, cmap='gray')

七,Image Segmentation based on Clustering基于聚类的图像分割
We use clustering techniques to divide images into segments.采用聚类技术来分割图像为片段。
In this section, we’ll get an an intuition of what clustering is (it’s always good to revise certain concepts!) and how we can use of it to segment images.
Clustering is the task of dividing the population (data points) into a number of groups, such that data points in the same groups are more similar to other data points in that same group than those in other groups. These groups are known as clusters.聚类是将人口(数据点)划分为若干组,使同一组中的数据点的相似性大于其他组中的数据点。这些组被称为集群.
One of the most commonly used clustering algorithms is k-means. Here, the k represents the number of clusters (not to be confused with k-nearest neighbor). Let’s understand how k-means works:最常用的聚类算法之一是k-means.这里,k表示集群的数量(不要与k最近邻算法混淆)。让我们来了解k-means是如何工作的.
- 1First, randomly select k initial clusters 随机选择k个初始簇
- 2Randomly assign each data point to any one of the k clusters 将每个数据点随机分配给k个簇中的任意一个
- 3Calculate the centers of these clusters 计算这些簇的中心
- 4Calculate the distance of all the points from the center of each cluster 计算所有点到每个簇中心的距离
- 5Depending on this distance, the points are reassigned to the nearest cluster 根据这个距离,这些点被重新分配到最近的集群
- 6Calculate the center of the newly formed clusters 计算新形成的簇的中心
- 7Finally, repeat steps (4), (5) and (6) until either the center of the clusters does not change or we reach the set number of iterations 最后,重复步骤(4)、(5)和(6),直到集群的中心没有改变或者我们达到设定的迭代次数。
The key advantage of using k-means algorithm is that it is simple and easy to understand. We are assigning the points to the clusters which are closest to them.使用k-means算法的主要优点是简单易懂。我们将这些点分配给最接近它们的集群。
Let’s put our learning to the test and check how well k-means segments the objects in an image. We will be using this image, so download it, read it and and check its dimensions:测试一下k-means对图像中物体的分割情况
pic = plt.imread('1.jpeg')/255  # dividing by 255 to bring the pixel values between 0 and 1
print(pic.shape)
plt.imshow(pic)
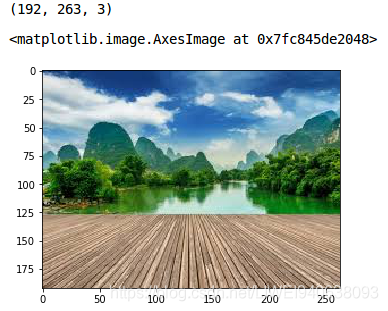
It’s a 3-dimensional image of shape (192, 263, 3). For clustering the image using k-means, we first need to convert it into a 2-dimensional array whose shape will be (lengthwidth, channels). In our example, this will be (192263, 3).为了使用k-means聚类图像,我们首先需要将其转换为形状为(长*宽,通道)的二维数组。
pic_n = pic.reshape(pic.shape[0]*pic.shape[1], pic.shape[2])
pic_n.shape
# (50496, 3)
We can see that the image has been converted to a 2-dimensional array. Next, fit the k-means algorithm on this reshaped array and obtain the clusters. The cluster_centers_ function of k-means will return the cluster centers and labels_ function will give us the label for each pixel (it will tell us which pixel of the image belongs to which cluster).对重构后的数组拟合k-means算法,得到聚类。k-means的cluster_centers_function将返回聚类中心,labels_function 将给我们每个像素的标签(告诉我们图像的哪个像素属于哪个簇)
from sklearn.cluster import KMeans
kmeans = KMeans(n_clusters=5, random_state=0).fit(pic_n)
pic2show = kmeans.cluster_centers_[kmeans.labels_]
I have chosen 5 clusters for this article but you can play around with this number and check the results. Now, let’s bring back the clusters to their original shape, i.e. 3-dimensional image, and plot the results.我选择了5个集群,但是您可以使用这个数字并检查结果。让我们将集群恢复到原来的形状,即三维图像,并绘制结果.
cluster_pic = pic2show.reshape(pic.shape[0], pic.shape[1], pic.shape[2])
plt.imshow(cluster_pic)
We are able to segment the image pretty well using just 5 clusters. I’m sure you’ll be able to improve the segmentation by increasing the number of clusters.我们可以用5个聚类很好地分割图像。我相信您能够通过增加集群的数量来改进分割.
k-means works really well when we have a small dataset. It can segment the objects in the image and give impressive results. But the algorithm hits a roadblock when applied on a large dataset (more number of images). k-means在小的数据集上表现非常好。它可以分割出图像中的目标。但是,对于大型数据集(更多图像)时,该算法遇到了一个障碍。
It looks at all the samples at every iteration, so the time taken is too high. Hence, it’s also too expensive to implement. And since k-means is a distance-based algorithm, it is only applicable to convex datasets and is not suitable for clustering non-convex clusters.它会在每次迭代中查看所有的样本,所以花费的时间太多。k-means是一种基于距离的算法,它只适用于凸数据集,不适用于聚类非凸类簇。
解释:Convex set vs non-convex set凸集和非凸集
参考:https://zh.wikipedia.org/wiki/%E5%87%B8%E9%9B%86
凸集(Convex set)是一个点集合,其中每两点之间的直线点都落在该点集合中。
- 区间是实数的凸集。
- 依据定义,中空的圆形称为圆(circle),它不是凸集;实心的圆形称为圆盘(disk),它是凸集。
- 凸多边形是欧几理得平面上的凸集,它们的每只角都小于180度。
- 单纯形是凸集,对于单纯形的顶点集合来说,单纯形是它们的最小凸集,所以单纯形也是一个凸包。
- 定宽曲线是凸集。
凸集
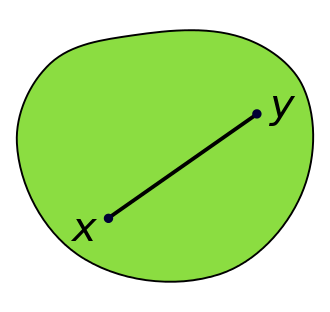
非凸集
八,Mask R-CNN
Data scientists and researchers at Facebook AI Research (FAIR) pioneered a deep learning architecture, called Mask R-CNN, that can create a pixel-wise mask for each object in an image. Facebook AI Research (FAIR)的数据科学家和研究人员提出了一个深度学习框架,叫做Mask R-CNN,这可以为图像中的每个对象创建一个像素级蒙版。
Mask R-CNN is an extension of the popular Faster R-CNN object detection architecture. Mask R-CNN adds a branch to the already existing Faster R-CNN outputs. Mask R-CNN是Faster R-CNN目标检测框架的一个扩展。Mask R-CNN向已经存在的Faster R-CNN输出添加了一个分支。
The Faster R-CNN method generates two things for each object in the image:
- Its class 类别
- The bounding box coordinates 边界框坐标
Mask R-CNN adds a third branch to this which outputs the object mask as well. Mask R-CNN在Faster R-CNN上添加第三个分支,它也输出对象掩码。
Take a look at the below image to get an intuition of how Mask R-CNN works on the inside:看看下面的图片,直观了解一下Mask R-CNN是如何在内部工作的:
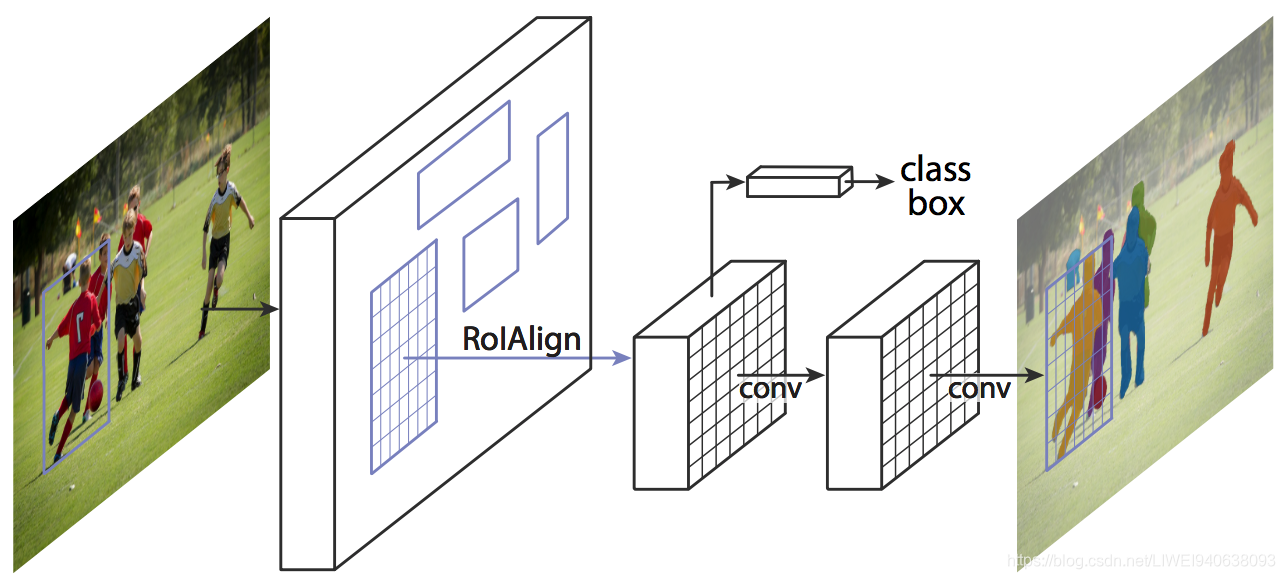
- 1,We take an image as input and pass it to the ConvNet, which returns the feature map for that image。我们将一个图像作为输入,并将其传递给卷积网络,它将返回该图像的特征图
- 2,Region proposal network (RPN) is applied on these feature maps. This returns the object proposals along with their objectness score。将区域建议网络(RPN)应用于这些特征图。这将返回目标建议及其客体性评分。
- 3,A RoI pooling layer is applied on these proposals to bring down all the proposals to the same size。在这些建议上应用了一个RoI池层,以将所有建议降低到相同尺寸。
- 4,Finally, the proposals are passed to a fully connected layer to classify and output the bounding boxes for objects. It also returns the mask for each proposal。最后,建议被传递到全连接层以进行分类并输出对象的边界框。它还返回每个建议的掩码。
Mask R-CNN is the current state-of-the-art for image segmentation and runs at 5 fps. Mask R-CNN是目前最先进的图像分割技术并且运行在5fps。
解释1:RoIPooling和RoIAlign
解释2:Region proposal network (RPN) 区域建议网络
九,Summary of Image Segmentation Techniques 图像分割技术总结
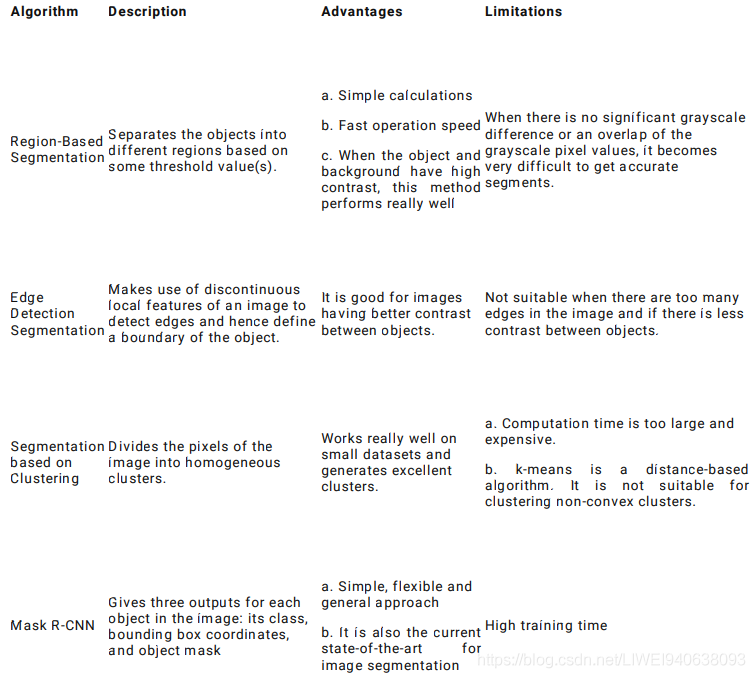
I have summarized the different image segmentation algorithms in the below table… I suggest keeping this handy next time you’re working on an image segmentation challenge or problem!
十,End Notes最后注意
This article is just the beginning of our journey to learn all about image segmentation. In the next article of this series, we will deep dive into the implementation of Mask R-CNN. So stay tuned!本文只是我们学习图像分割的开始。在本系列的下一篇文章中,我们将深入研究Mask R-CNN的实现
Mask R-CNN的实现链接:
https://www.analyticsvidhya.com/blog/2019/07/computer-vision-implementing-mask-r-cnn-image-segmentation/?utm_source=blog&utm_medium=introduction-image-segmentation-techniques-python
I have found image segmentation quite a useful function in my deep learning career. The level of granularity I get from these techniques is astounding. It always amazes me how much detail we are able to extract with a few lines of code. I’ve mentioned a couple of useful resources below to help you out in your computer vision journey:在深度学习中,图像分割是一个非常有用的功能。我从这些技术中获得的粒度级别是惊人的。仅用几行代码就能提取出很多细节。


 2003
2003


 被折叠的 条评论
为什么被折叠?
被折叠的 条评论
为什么被折叠?
 到【灌水乐园】发言


