转载请注明出处:【huachao1001的专栏:http://blog.csdn.net/huachao1001】
本文对Material Design Library里面的库类的使用做一个简单的汇总,方便以后能快速查询、快速上手使用。本文包括以下内容:
Color PaletteToolbarAppBarLayoutCollapsingToolbarLayoutCoordinatorLayoutDrawerLayout、NavigationViewFloating Action Button (FAB)SnackbarTabLayoutTextInputLayout
如有遗漏,欢迎大家留言告知。我会持续补充,谢谢~。
要使用Material Design Library ,首先得将依赖库加入到项目中,在app的build.gradle中(dependencies{ }),添加如下:
compile 'com.android.support:design:24.0.0'
1 Color Palette
我们可以定义状态栏、ActionBar(或ToolBar)、导航栏等等颜色。可以通过如下方式:
修改res/values/styles.xml文件如下:
<resources>
<style name="AppTheme" parent="Theme.AppCompat.Light.DarkActionBar">
<!-- Customize your theme here. -->
<item name="colorPrimary">@color/colorPrimary</item>
<item name="colorPrimaryDark">@color/colorPrimaryDark</item>
<item name="colorAccent">@color/colorAccent</item>
</style>
</resources>
当然了,可自定义的不仅仅就上面示例中的3个,你还可以自定义如下图所示的区域的颜色:
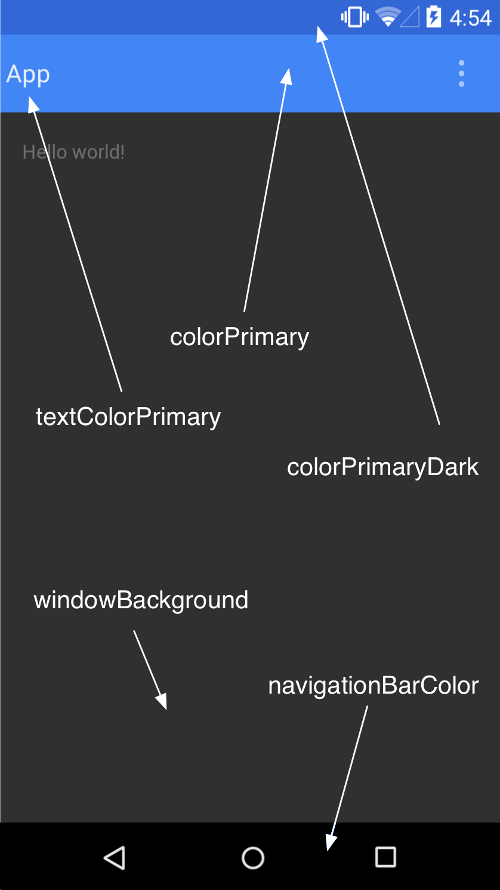
例如,你可以修改窗口背景色:
<item name="android:windowBackground">@color/colorAccent</item>
参考我的另一篇文章【玩转AppBarLayout,更酷炫的顶部栏 】
3 CoordinatorLayout
参考我的另一篇文章【CoordinatorLayout的使用如此简单 】
4 DrawerLayout、NavigationView
在很多应用中都使用到了Drawer导航,在Design Support Library中,提供了DrawerLayout,看看如何使用的吧!
首先,需要将Android.support.v4.widget.DrawerLayout作为布局的根标签,然后android.support.design.widget.NavigationView作为其中的子标签。如下所示:
<?xml version="1.0" encoding="utf-8"?>
<android.support.v4.widget.DrawerLayout xmlns:android="http://schemas.android.com/apk/res/android"
    xmlns:app="http://schemas.android.com/apk/res-auto"
    android:id="@+id/drawer_layout"
    android:layout_width="match_parent"
    android:layout_height="match_parent"
    android:fitsSystemWindows="true">

    <RelativeLayout
        android:layout_width="match_parent"
        android:layout_height="match_parent">

        <TextView
            android:layout_width="wrap_content"
            android:layout_height="wrap_content"
            android:layout_centerInParent="true"
            android:text="hello world!" />

    </RelativeLayout>

    <android.support.design.widget.NavigationView
        android:id="@+id/navigation_view"
        android:layout_width="wrap_content"
        android:layout_height="match_parent"
        android:layout_gravity="start"
        app:headerLayout="@layout/drawer_header"
        app:menu="@menu/drawer" />
</android.support.v4.widget.DrawerLayout>
- 1
- 2
- 3
- 4
- 5
- 6
- 7
- 8
- 9
- 10
- 11
- 12
- 13
- 14
- 15
- 16
- 17
- 18
- 19
- 20
- 21
- 22
- 23
- 24
- 25
- 26
- 27
- 28
- 29
- 1
- 2
- 3
- 4
- 5
- 6
- 7
- 8
- 9
- 10
- 11
- 12
- 13
- 14
- 15
- 16
- 17
- 18
- 19
- 20
- 21
- 22
- 23
- 24
- 25
- 26
- 27
- 28
- 29
NavigationView包含两个引用,一个是导航里面的头部,另一个是菜单项,res/layout/drawer_header如下:
<?xml version="1.0" encoding="utf-8"?>
<LinearLayout xmlns:android="http://schemas.android.com/apk/res/android"
    android:layout_width="match_parent"
    android:layout_height="150dp"
    android:background="?attr/colorPrimaryDark"
    android:gravity="bottom"
    android:orientation="vertical"
    android:padding="16dp"
    android:theme="@style/ThemeOverlay.AppCompat.Dark">

    <TextView
        android:layout_width="match_parent"
        android:layout_height="wrap_content"
        android:text="头部"
        android:textAppearance="@style/TextAppearance.AppCompat.Body1" />

</LinearLayout>
- 1
- 2
- 3
- 4
- 5
- 6
- 7
- 8
- 9
- 10
- 11
- 12
- 13
- 14
- 15
- 16
- 17
- 1
- 2
- 3
- 4
- 5
- 6
- 7
- 8
- 9
- 10
- 11
- 12
- 13
- 14
- 15
- 16
- 17
res/menu/drawer.xml如下:
<?xml version="1.0" encoding="utf-8"?>
<menu xmlns:android="http://schemas.android.com/apk/res/android">

    <group android:checkableBehavior="single">
        <item
            android:id="@+id/home"
            android:checked="true"
            android:icon="@drawable/home"
            android:title="主页" />
        <item
            android:id="@+id/theme"
            android:icon="@drawable/theme"
            android:title="主题" />
        <item
            android:id="@+id/settings"
            android:icon="@drawable/setting"
            android:title="设置" />
    </group>

    <item android:title="二级菜单">
        <menu>
            <item
                android:icon="@drawable/favorite"
                android:title="收藏" />
            <item
                android:icon="@drawable/ablum"
                android:title="相册" />
            <item
                android:icon="@drawable/friends"
                android:title="好友" />
        </menu>
    </item>

</menu>
- 1
- 2
- 3
- 4
- 5
- 6
- 7
- 8
- 9
- 10
- 11
- 12
- 13
- 14
- 15
- 16
- 17
- 18
- 19
- 20
- 21
- 22
- 23
- 24
- 25
- 26
- 27
- 28
- 29
- 30
- 31
- 32
- 33
- 34
- 1
- 2
- 3
- 4
- 5
- 6
- 7
- 8
- 9
- 10
- 11
- 12
- 13
- 14
- 15
- 16
- 17
- 18
- 19
- 20
- 21
- 22
- 23
- 24
- 25
- 26
- 27
- 28
- 29
- 30
- 31
- 32
- 33
- 34
然后,可以在我们的Activity里面响应菜单点击:
public class MainActivity extends Activity
implements NavigationView.OnNavigationItemSelectedListener {
private DrawerLayout mDrawerLayout;
private NavigationView mNavigationView;
@Override
protected void onCreate(Bundle savedInstanceState) {
super.onCreate(savedInstanceState);
setContentView(R.layout.activity_main);
mDrawerLayout = (DrawerLayout) findViewById(R.id.drawer_layout);
mNavigationView = (NavigationView) findViewById(R.id.navigation_view);
mNavigationView.setNavigationItemSelectedListener(this);
}
@Override
public boolean onNavigationItemSelected(MenuItem menuItem) {
String title = (String) menuItem.getTitle();
Toast.makeText(this, "您点击了 " + title, Toast.LENGTH_SHORT).show();
return super.onContextItemSelected(menuItem);
}
}
- 1
- 2
- 3
- 4
- 5
- 6
- 7
- 8
- 9
- 10
- 11
- 12
- 13
- 14
- 15
- 16
- 17
- 18
- 19
- 20
- 21
- 22
- 23
- 24
- 25
- 26
- 27
- 28
- 29
- 30
- 31
- 32
- 33
- 34
- 35
- 1
- 2
- 3
- 4
- 5
- 6
- 7
- 8
- 9
- 10
- 11
- 12
- 13
- 14
- 15
- 16
- 17
- 18
- 19
- 20
- 21
- 22
- 23
- 24
- 25
- 26
- 27
- 28
- 29
- 30
- 31
- 32
- 33
- 34
- 35
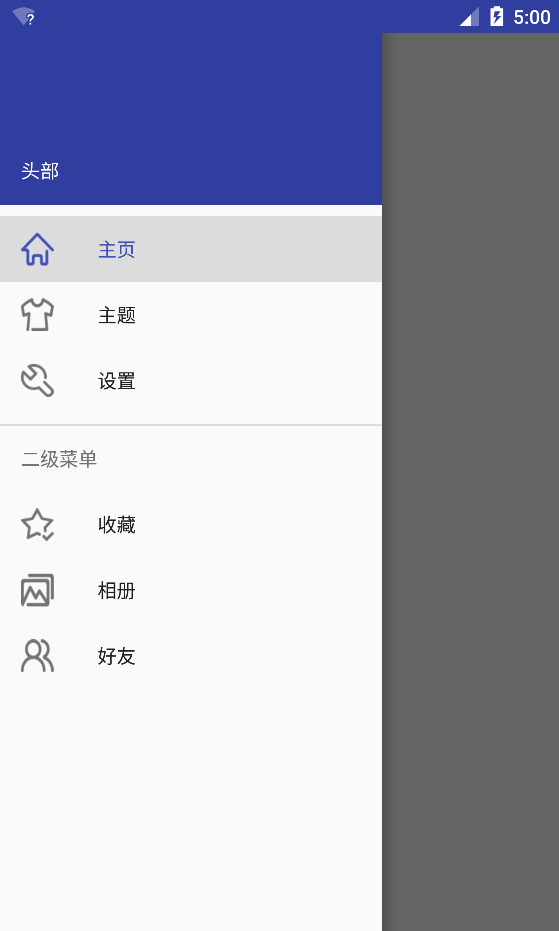
效果如下:
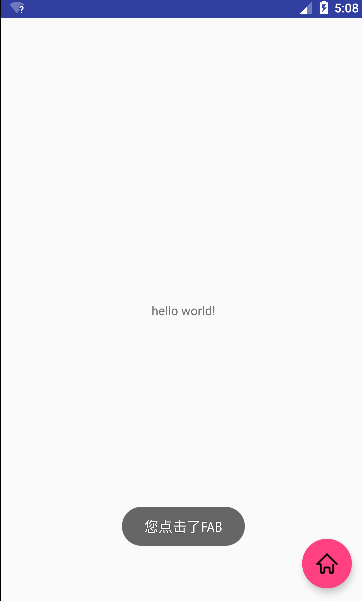
直接将android.support.design.widget.FloatingActionButton放入布局中即可,例如,要放到右下:
 <android.support.design.widget.FloatingActionButton
            android:id="@+id/fab"
            android:layout_width="wrap_content"
            android:layout_height="wrap_content"
            android:layout_alignParentBottom="true"
            android:layout_alignParentRight="true"
            android:layout_marginRight="@dimen/activity_horizontal_margin"
            android:layout_marginBottom="@dimen/activity_vertical_margin"
            android:src="@drawable/ic_done" />
如果需要监听点击,直接通过setOnclickListener即可:
 fab = (FloatingActionButton) findViewById(R.id.fab);
        fab.setOnClickListener(new View.OnClickListener() {
            @Override
            public void onClick(View view) {
                Toast.makeText(MainActivity.this, "您点击了FAB", Toast.LENGTH_SHORT).show();
            }
        });
6 Snackbar
一般情况下,如果你想给用户一个简短的响应反馈,我们会选择使用Toast,现在我们有了另一个选择啦:Snackbar。
看看如何使用
public void onClick(View v) {
View.OnClickListener onClickListener = new View.OnClickListener() {
@Override
public void onClick(View v) {
Toast.makeText(MainActivity.this,
"您点击了Snackbar中的确定", Toast.LENGTH_SHORT).show();
}
};
Snackbar sb = Snackbar.make(v,
"在这里是Snackbar显示内容",
Snackbar.LENGTH_LONG);
sb.setAction("确定", onClickListener);
sb.setActionTextColor(Color.RED);
View view = sb.getView();
((TextView) view.findViewById(R.id.snackbar_text)).setTextColor(Color.GREEN);
view.setBackgroundColor(Color.GRAY);
view.setAlpha(0.5f);
ViewGroup.LayoutParams lp = view.getLayoutParams();
LinearLayout.LayoutParams llp = new LinearLayout.LayoutParams(lp.width, lp.height);
llp.gravity = Gravity.TOP;
view.setLayoutParams(llp);
sb.show();
}
- 1
- 2
- 3
- 4
- 5
- 6
- 7
- 8
- 9
- 10
- 11
- 12
- 13
- 14
- 15
- 16
- 17
- 18
- 19
- 20
- 21
- 22
- 23
- 24
- 25
- 26
- 27
- 28
- 29
- 30
- 31
- 32
- 33
- 34
- 35
- 36
- 37
- 38
- 39
- 40
- 1
- 2
- 3
- 4
- 5
- 6
- 7
- 8
- 9
- 10
- 11
- 12
- 13
- 14
- 15
- 16
- 17
- 18
- 19
- 20
- 21
- 22
- 23
- 24
- 25
- 26
- 27
- 28
- 29
- 30
- 31
- 32
- 33
- 34
- 35
- 36
- 37
- 38
- 39
- 40
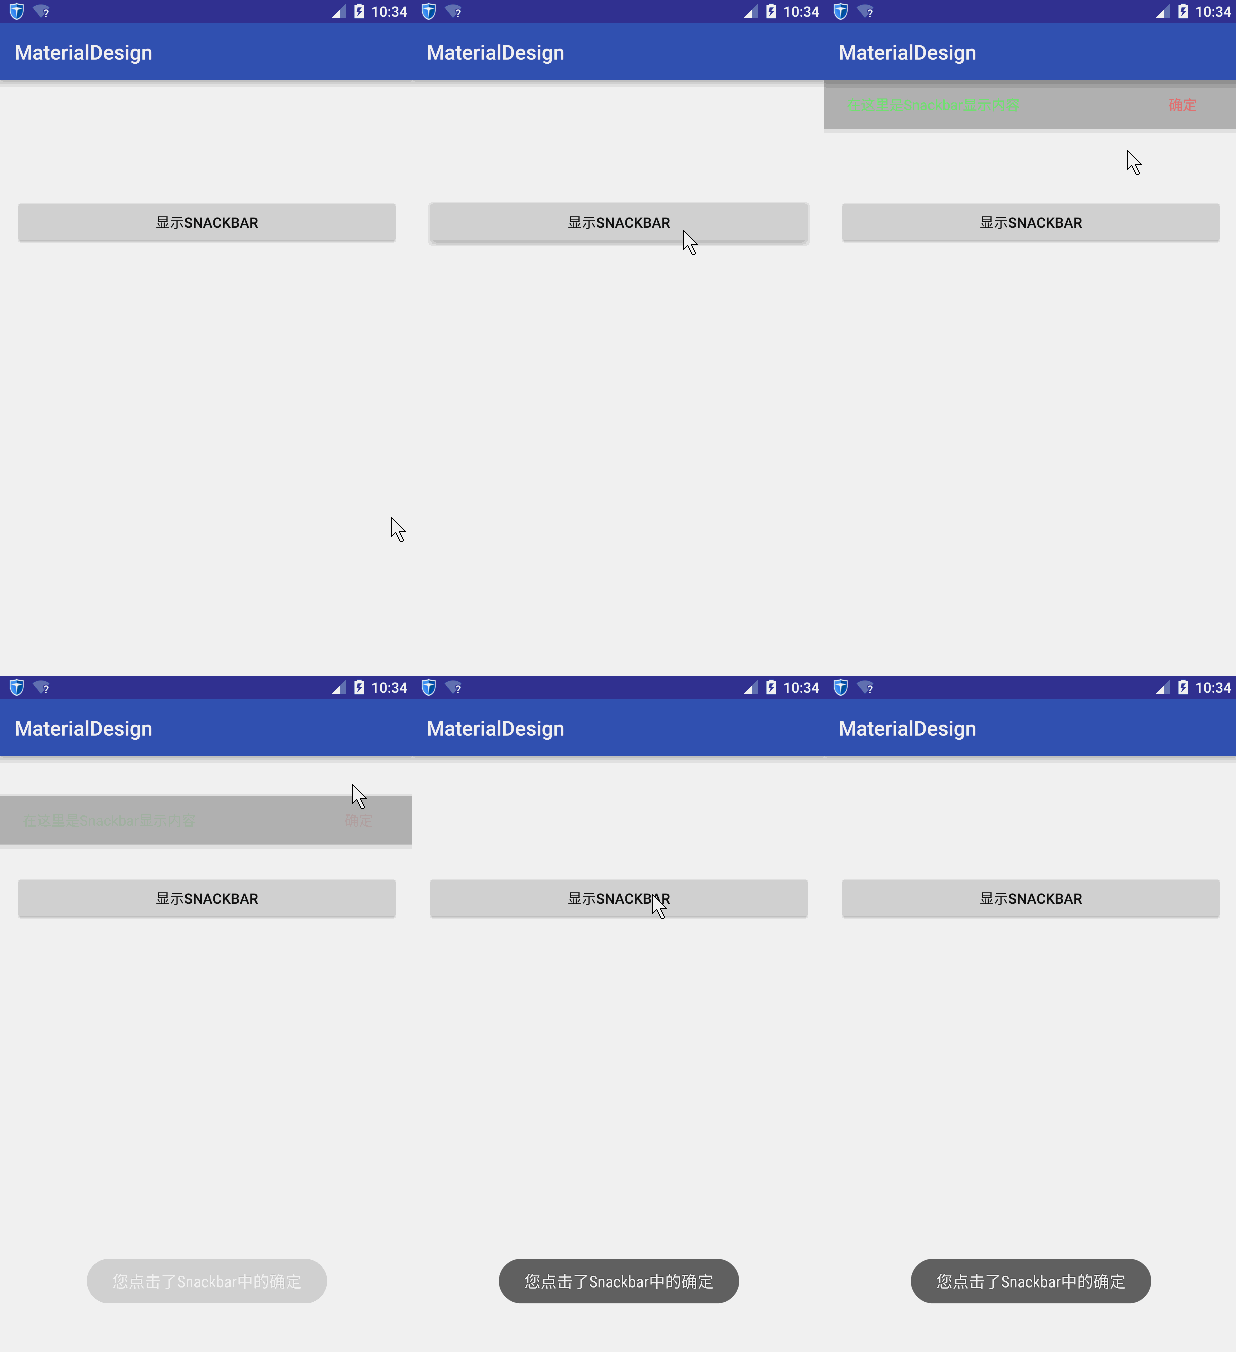
看看效果:
7 TabLayout
先看布局文件:
<?xml version="1.0" encoding="utf-8"?>
<LinearLayout xmlns:android="http://schemas.android.com/apk/res/android"
    xmlns:app="http://schemas.android.com/apk/res-auto"
    xmlns:tools="http://schemas.android.com/tools"
    android:layout_width="match_parent"
    android:layout_height="match_parent"
    android:orientation="vertical"
    tools:context="com.hc.materialdesign.MainActivity">


    <android.support.design.widget.TabLayout
        android:id="@+id/tablayout"
        android:layout_width="match_parent"
        android:layout_height="wrap_content"
        android:background="?attr/colorPrimary"
        android:theme="@style/ThemeOverlay.AppCompat.Dark"
        app:tabGravity="center"
        app:tabMode="fixed" />

    <android.support.v4.view.ViewPager
        android:id="@+id/viewpager"
        android:layout_width="match_parent"
        android:layout_height="0dp"
        android:layout_weight="1" />

</LinearLayout>
- 1
- 2
- 3
- 4
- 5
- 6
- 7
- 8
- 9
- 10
- 11
- 12
- 13
- 14
- 15
- 16
- 17
- 18
- 19
- 20
- 21
- 22
- 23
- 24
- 25
- 26
- 1
- 2
- 3
- 4
- 5
- 6
- 7
- 8
- 9
- 10
- 11
- 12
- 13
- 14
- 15
- 16
- 17
- 18
- 19
- 20
- 21
- 22
- 23
- 24
- 25
- 26
注意到,TabLayout中有两个陌生的属性
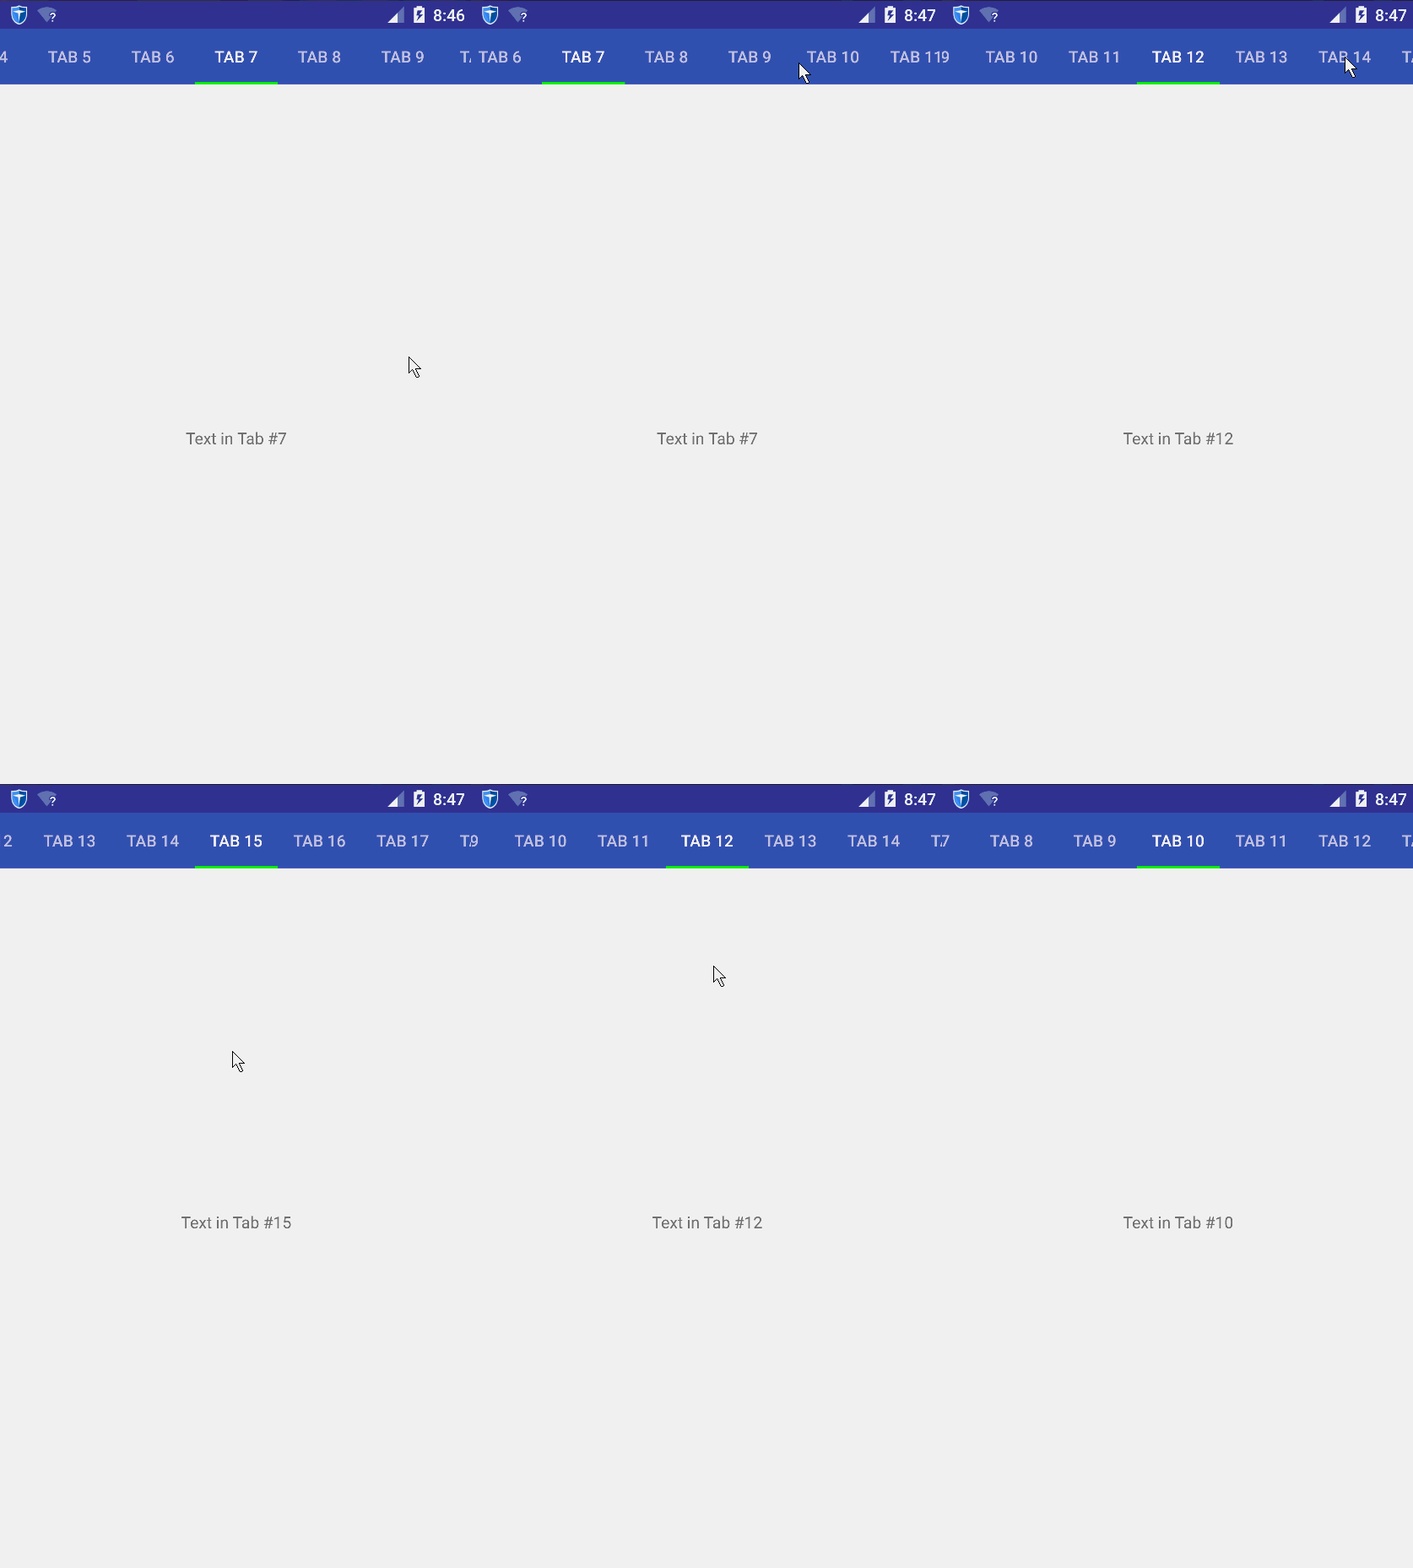
app:tabMode:可以取如下两个值,
fixed:表示Tab不能滚动scrollable:表示Tab可以滚动,此时不管tabGravity取何值,都是按照从左到右排过去,即相当于app:tabGravity="left"(当然了,实际中没有left这个值,只是我们可以这么去理解)
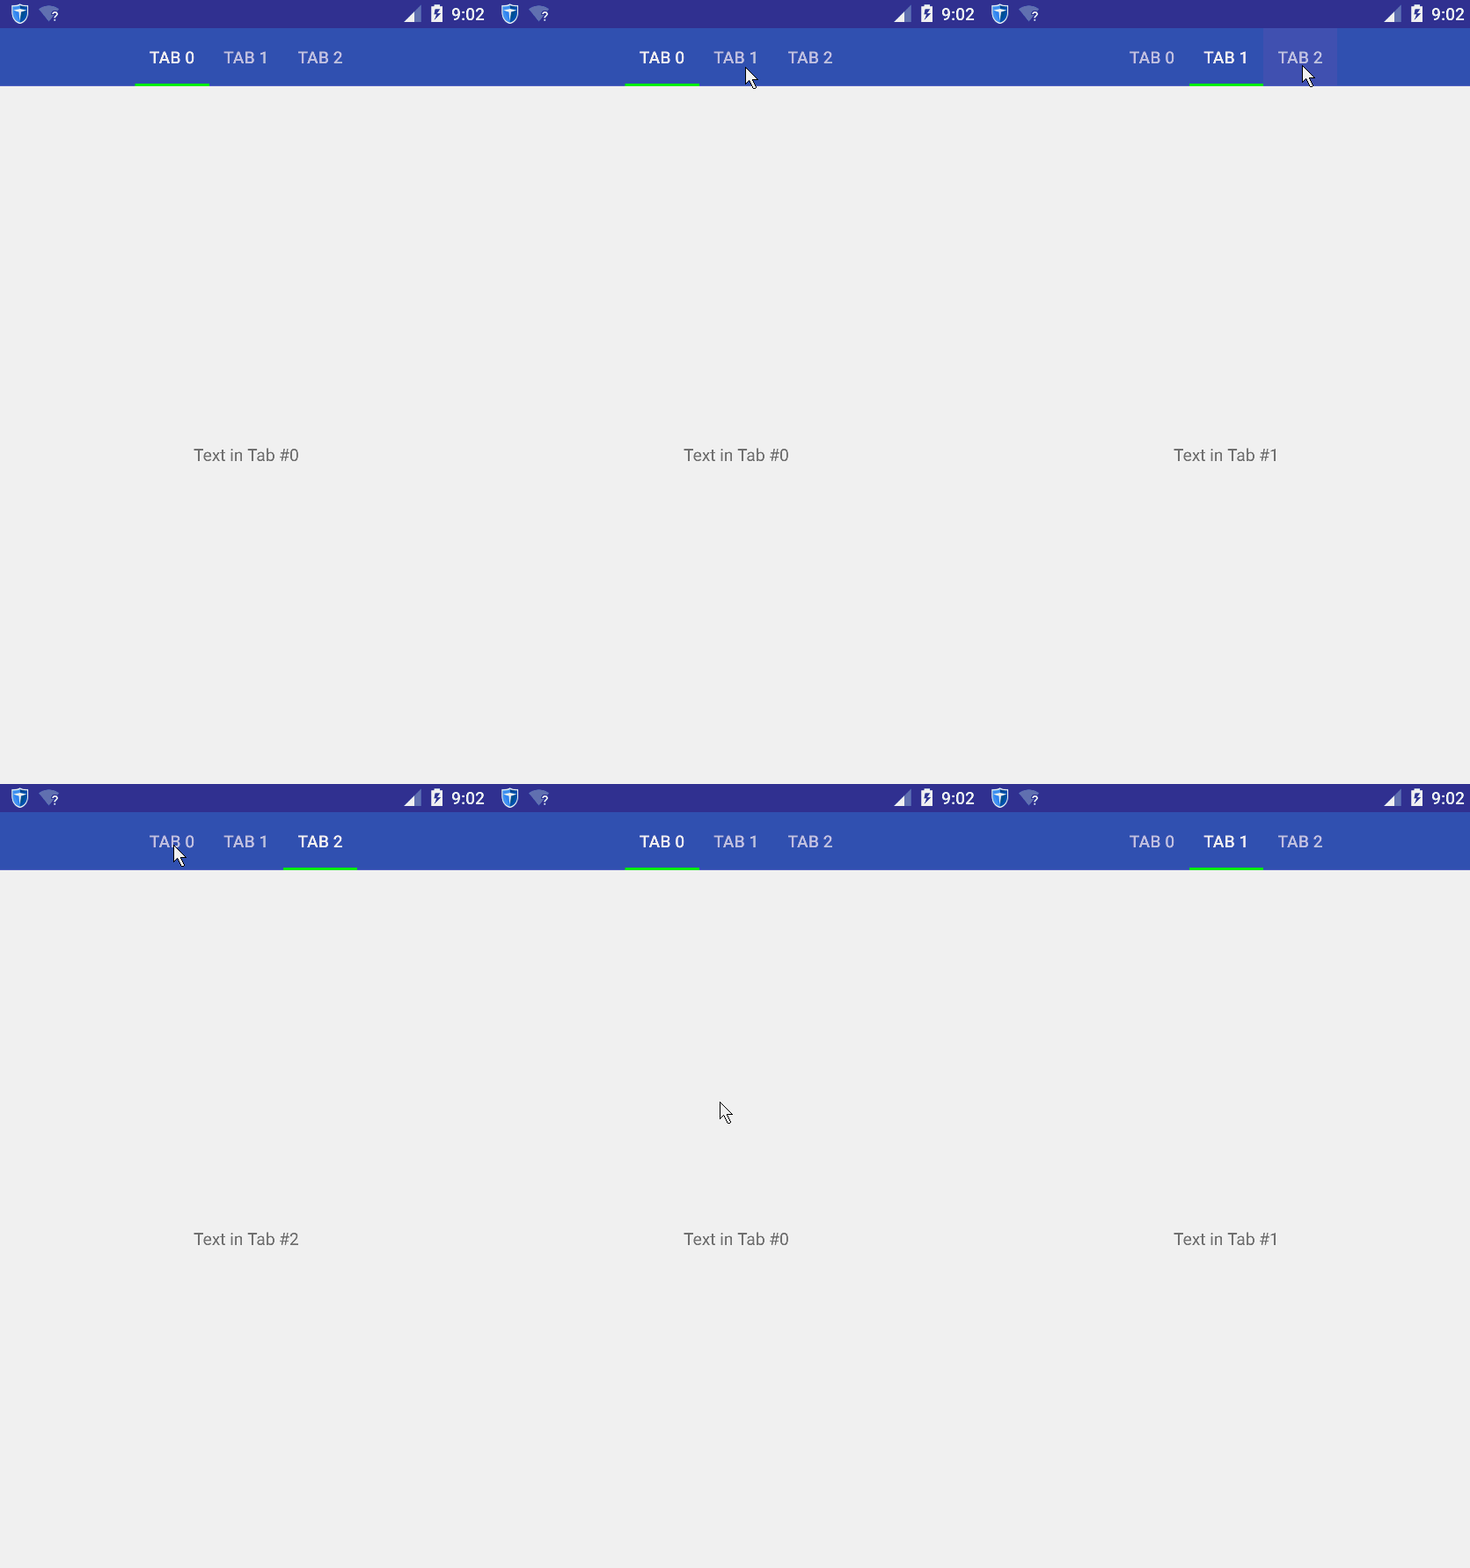
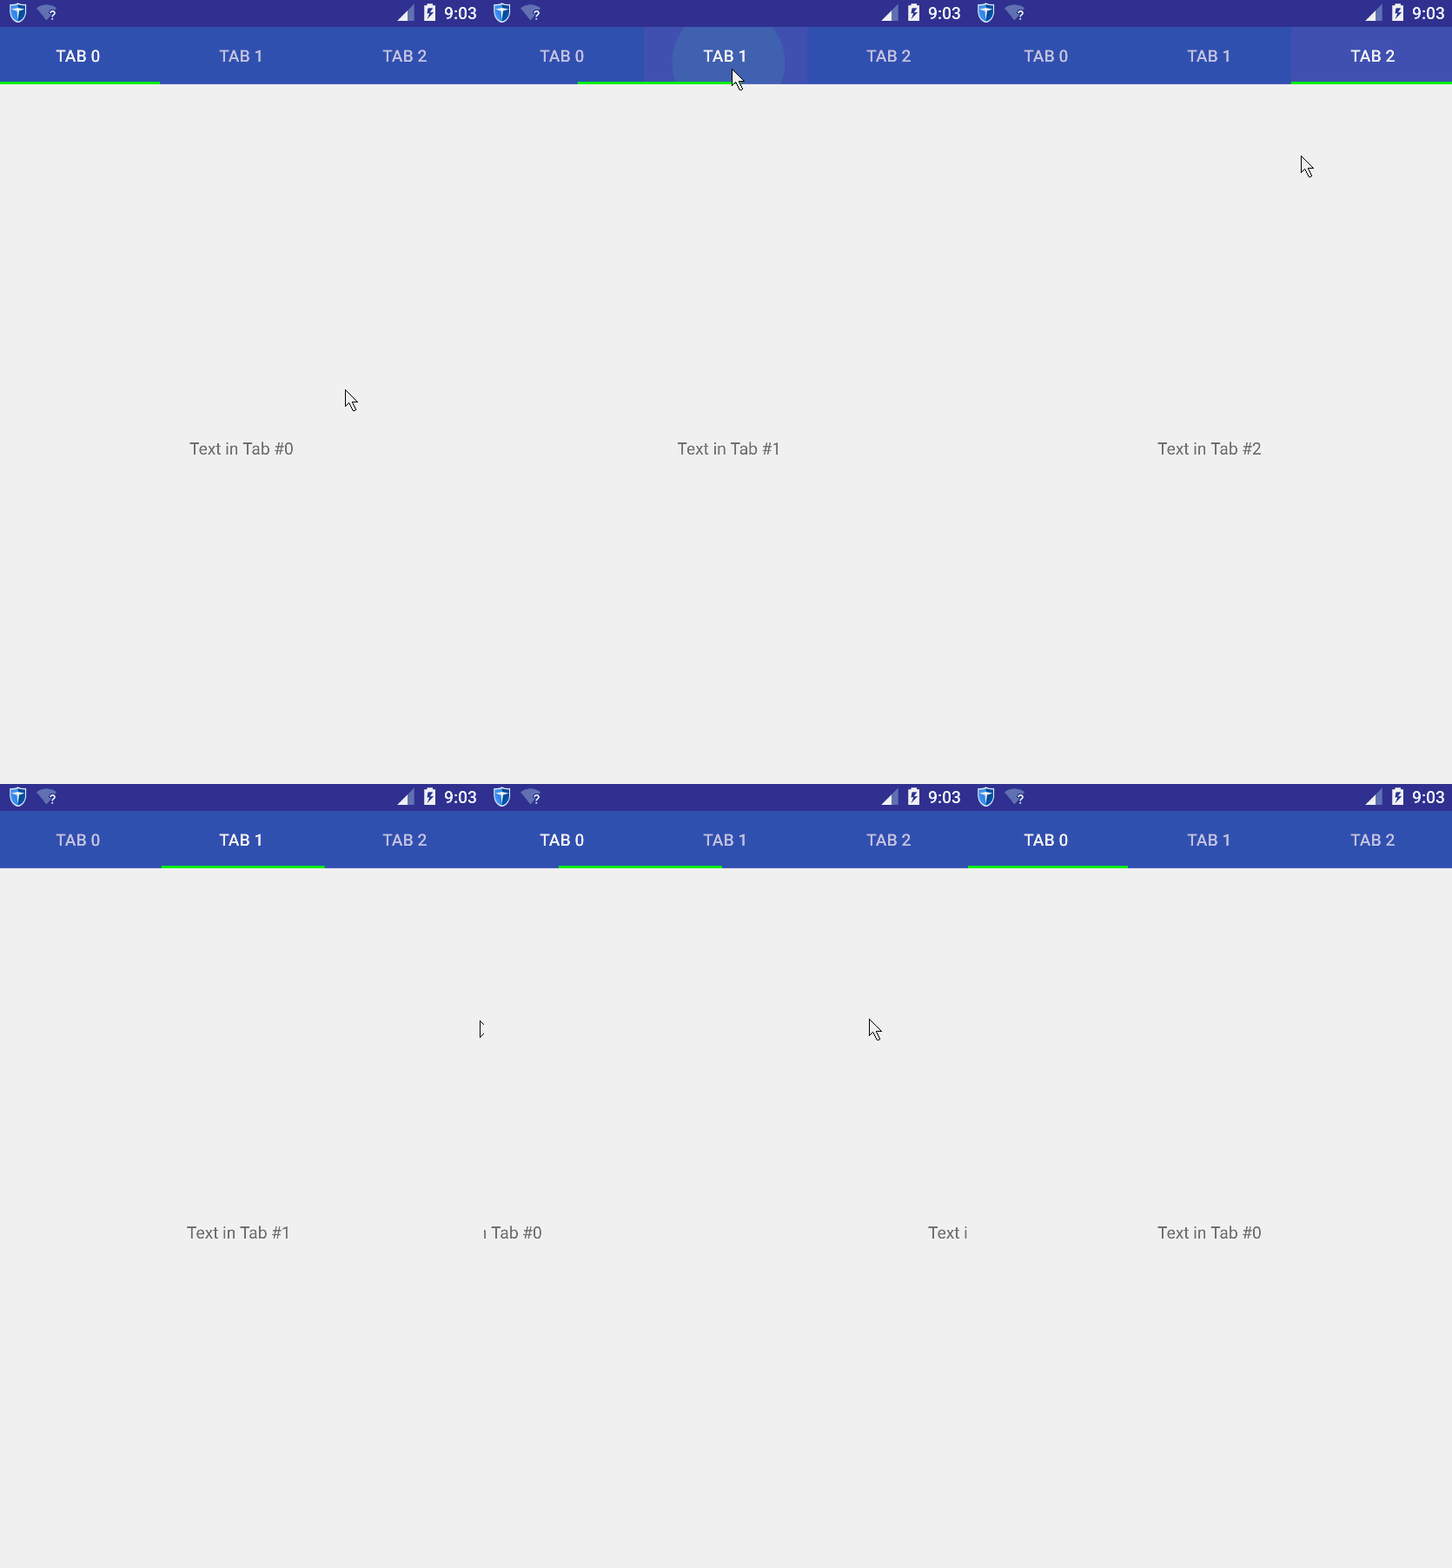
app:tabGravity:可以取如下两个值,
fill:当tabMode取fixed时(即tab不能滚动时),tab的所有子标签填充tab的宽度center:当tabMode去fixed时,tab中所有子标签居中显示。
为了有更加直观的理解,看几张图片:
当app:tabMode="scrollable":
当app:tabMode="fixed"且 app:tabGravity="center":
当app:tabMode=fixed且 app:tabGravity="fill":
好了,接下来看看Activity里面具体代码:
public class MainActivity extends AppCompatActivity {
@Override
protected void onCreate(Bundle savedInstanceState) {
super.onCreate(savedInstanceState);
setContentView(R.layout.activity_main);
MyPagerAdapter adapter = new MyPagerAdapter(getSupportFragmentManager());
ViewPager viewPager = (ViewPager) findViewById(R.id.viewpager);
viewPager.setAdapter(adapter);
TabLayout tabLayout = (TabLayout) findViewById(R.id.tablayout);
tabLayout.setupWithViewPager(viewPager);
tabLayout.setSelectedTabIndicatorColor(Color.GREEN);
}
static class MyPagerAdapter extends FragmentStatePagerAdapter {
public MyPagerAdapter(FragmentManager fm) {
super(fm);
}
@Override
public Fragment getItem(int position) {
return MyFragment.newInstance(position);
}
@Override
public int getCount() {
return 3;
}
@Override
public CharSequence getPageTitle(int position) {
return "Tab " + position;
}
}
}
- 1
- 2
- 3
- 4
- 5
- 6
- 7
- 8
- 9
- 10
- 11
- 12
- 13
- 14
- 15
- 16
- 17
- 18
- 19
- 20
- 21
- 22
- 23
- 24
- 25
- 26
- 27
- 28
- 29
- 30
- 31
- 32
- 33
- 34
- 35
- 36
- 37
- 38
- 39
- 40
- 41
- 42
- 43
- 1
- 2
- 3
- 4
- 5
- 6
- 7
- 8
- 9
- 10
- 11
- 12
- 13
- 14
- 15
- 16
- 17
- 18
- 19
- 20
- 21
- 22
- 23
- 24
- 25
- 26
- 27
- 28
- 29
- 30
- 31
- 32
- 33
- 34
- 35
- 36
- 37
- 38
- 39
- 40
- 41
- 42
- 43
其中MyFragment很简单,只是用于产生一个简单的Fragment:
public class MyFragment extends Fragment {
    private static final String TAB_POSITION = "tab_position";

    public MyFragment() {

    }

    public static MyFragment newInstance(int tabPosition) {
        MyFragment fragment = new MyFragment();
        Bundle args = new Bundle();
        args.putInt(TAB_POSITION, tabPosition);
        fragment.setArguments(args);
        return fragment;
    }

    @Nullable
    @Override
    public View onCreateView(LayoutInflater inflater, ViewGroup container, Bundle savedInstanceState) {
        Bundle args = getArguments();
        int tabPosition = args.getInt(TAB_POSITION);
        TextView tv = new TextView(getActivity());
        tv.setGravity(Gravity.CENTER);
        tv.setText("Text in Tab #" + tabPosition);
        return tv;
    }
}
- 1
- 2
- 3
- 4
- 5
- 6
- 7
- 8
- 9
- 10
- 11
- 12
- 13
- 14
- 15
- 16
- 17
- 18
- 19
- 20
- 21
- 22
- 23
- 24
- 25
- 26
- 27
- 28
- 1
- 2
- 3
- 4
- 5
- 6
- 7
- 8
- 9
- 10
- 11
- 12
- 13
- 14
- 15
- 16
- 17
- 18
- 19
- 20
- 21
- 22
- 23
- 24
- 25
- 26
- 27
- 28
运行效果前面已经贴出来了,这里就不再复制显示了。
8 TextInputLayout
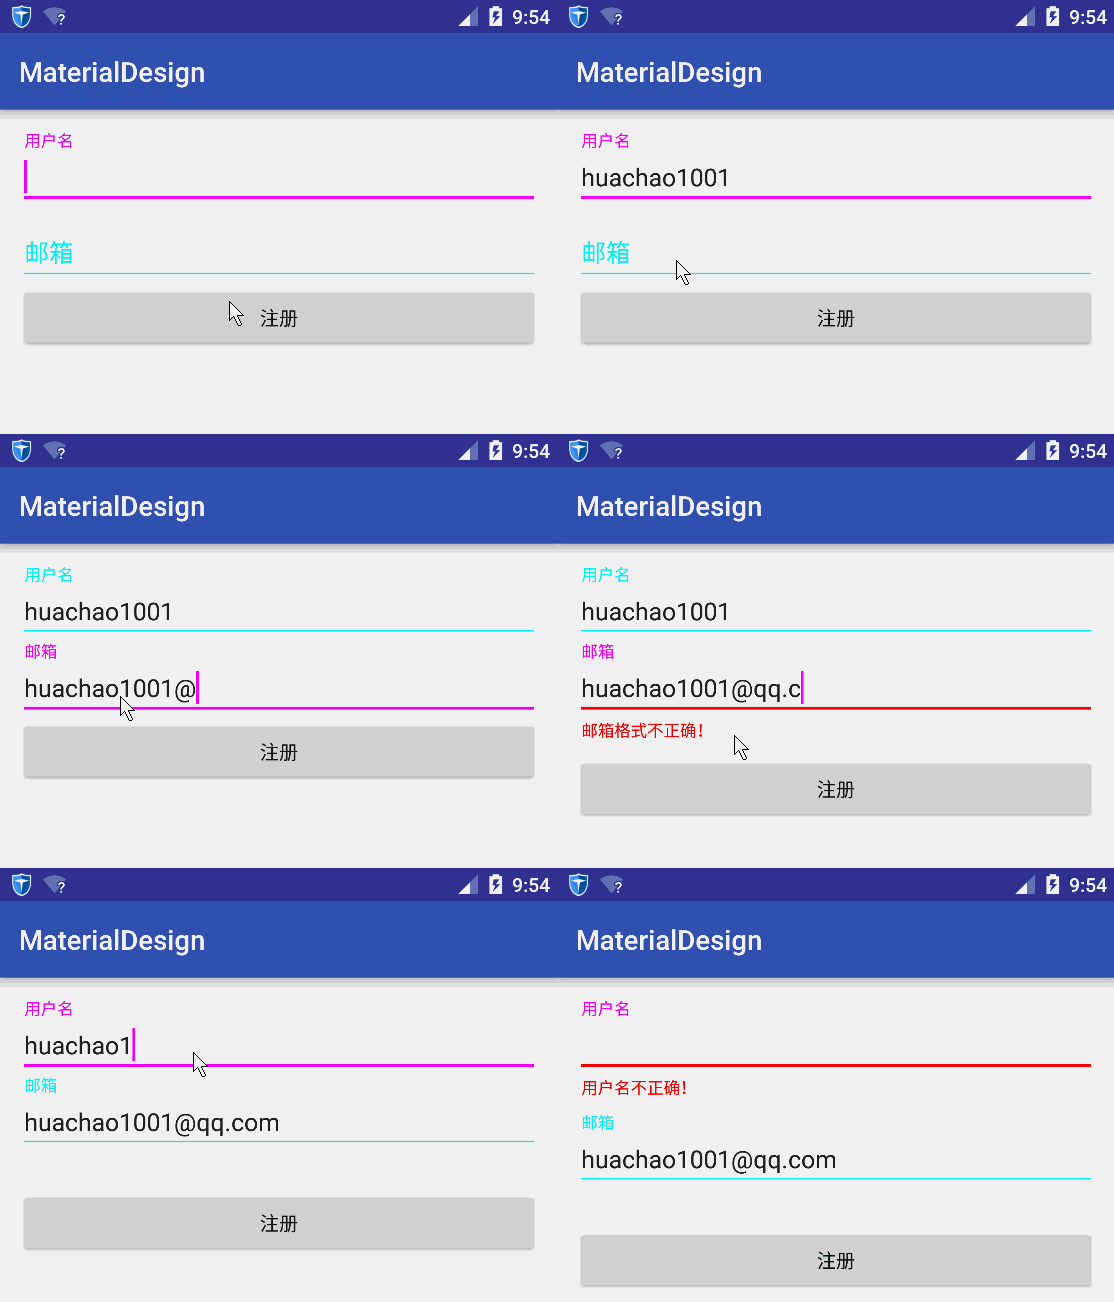
TextInputLayout主要是用在登录注册方面。
先看看效果:
老规矩,从布局文件开始:
<?xml version="1.0" encoding="utf-8"?>
<LinearLayout xmlns:android="http://schemas.android.com/apk/res/android"
    xmlns:app="http://schemas.android.com/apk/res-auto"
    xmlns:tools="http://schemas.android.com/tools"
    android:layout_width="match_parent"
    android:layout_height="match_parent"
    android:orientation="vertical"
    android:padding="@dimen/activity_vertical_margin"
    tools:context="com.hc.materialdesign.MainActivity">


    <android.support.design.widget.TextInputLayout
        android:id="@+id/userName"
        android:layout_width="match_parent"
        android:layout_height="wrap_content">

        <EditText
            android:layout_width="match_parent"
            android:layout_height="wrap_content"
            android:hint="用户名"
            android:inputType="textEmailAddress"
   />

    </android.support.design.widget.TextInputLayout>

    <android.support.design.widget.TextInputLayout
        android:id="@+id/email"
        android:layout_width="match_parent"
        android:layout_height="wrap_content">

        <EditText
            android:layout_width="match_parent"
            android:layout_height="wrap_content"
            android:hint="邮箱"
            android:inputType="textEmailAddress" />

    </android.support.design.widget.TextInputLayout>

    <Button
        android:layout_width="match_parent"
        android:layout_height="wrap_content"
        android:onClick="login"
        android:text="注册" />
</LinearLayout>
- 1
- 2
- 3
- 4
- 5
- 6
- 7
- 8
- 9
- 10
- 11
- 12
- 13
- 14
- 15
- 16
- 17
- 18
- 19
- 20
- 21
- 22
- 23
- 24
- 25
- 26
- 27
- 28
- 29
- 30
- 31
- 32
- 33
- 34
- 35
- 36
- 37
- 38
- 39
- 40
- 41
- 42
- 43
- 44
- 45
- 1
- 2
- 3
- 4
- 5
- 6
- 7
- 8
- 9
- 10
- 11
- 12
- 13
- 14
- 15
- 16
- 17
- 18
- 19
- 20
- 21
- 22
- 23
- 24
- 25
- 26
- 27
- 28
- 29
- 30
- 31
- 32
- 33
- 34
- 35
- 36
- 37
- 38
- 39
- 40
- 41
- 42
- 43
- 44
- 45
可以看到,其实就是将我们平时用的Edit控件放入到android.support.design.widget.TextInputLayout里面,并且里面只能放一个Edit,否则会报错。这点让我不太满意,但是可是是在实现上放入多个Edit不太好控制吧。
再看MainActivity对输入框数据的验证:
public class MainActivity extends AppCompatActivity {
    TextInputLayout userNameWrapper;
    TextInputLayout emailWrapper;
    String emailFormate = "^(\\w)+(\\.\\w+)*@(\\w)+((\\.\\w+)+)$";

    private Pattern pattern = Pattern.compile(emailFormate);


    @Override
    protected void onCreate(Bundle savedInstanceState) {
        super.onCreate(savedInstanceState);
        setContentView(R.layout.activity_main);
        userNameWrapper = (TextInputLayout) findViewById(R.id.userName);
        emailWrapper = (TextInputLayout) findViewById(R.id.email);


    }

    private boolean checkUserName() {
        String userName = userNameWrapper.getEditText().getText().toString();
        if (userName.trim().equals(""))
            return false;
        else
            return true;
    }

    private boolean checkEmail() {
        String email = emailWrapper.getEditText().getText().toString();
        Matcher matcher = pattern.matcher(email);
        return matcher.matches();
    }

    public void login(View v) {
        View view = getCurrentFocus();

        if (view != null) {
            ((InputMethodManager) getSystemService(Context.INPUT_METHOD_SERVICE)).
                    hideSoftInputFromWindow(view.getWindowToken(), InputMethodManager.HIDE_NOT_ALWAYS);
        }
        if (!checkUserName()) {

            userNameWrapper.setError("用户名不正确!");

        } else {
            userNameWrapper.setError("");
            if (!checkEmail()) {
                emailWrapper.setError("邮箱格式不正确!");

            } else {
                emailWrapper.setError("");
            }
        }


    }
}
- 1
- 2
- 3
- 4
- 5
- 6
- 7
- 8
- 9
- 10
- 11
- 12
- 13
- 14
- 15
- 16
- 17
- 18
- 19
- 20
- 21
- 22
- 23
- 24
- 25
- 26
- 27
- 28
- 29
- 30
- 31
- 32
- 33
- 34
- 35
- 36
- 37
- 38
- 39
- 40
- 41
- 42
- 43
- 44
- 45
- 46
- 47
- 48
- 49
- 50
- 51
- 52
- 53
- 54
- 55
- 56
- 57
- 1
- 2
- 3
- 4
- 5
- 6
- 7
- 8
- 9
- 10
- 11
- 12
- 13
- 14
- 15
- 16
- 17
- 18
- 19
- 20
- 21
- 22
- 23
- 24
- 25
- 26
- 27
- 28
- 29
- 30
- 31
- 32
- 33
- 34
- 35
- 36
- 37
- 38
- 39
- 40
- 41
- 42
- 43
- 44
- 45
- 46
- 47
- 48
- 49
- 50
- 51
- 52
- 53
- 54
- 55
- 56
- 57
如果数据是错误的,我们只需通过setError函数来显示即可!
最后,可能你以及注意到,界面中,用到了各种颜色。也就是说,里面的颜色我们是可以定制的,在你的style文件里面添加部分item即可:
<resources>
<style name="AppTheme" parent="Theme.AppCompat.Light.DarkActionBar">
<!-- Customize your theme here. -->
<item name="colorPrimary">@color/colorPrimary</item>
<item name="colorPrimaryDark">@color/colorPrimaryDark</item>
<!-- Label color in TRUE state and bar color FALSE and TRUE State -->
<item name="colorAccent">#00ff00</item>
<item name="colorControlNormal">#00ffff</item>
<item name="colorControlActivated">#ff00ff</item>
<item name="android:textColorHint">#00ffff</item>
<item name="textColorError">#ff0000</item>
</style>
</resources>
- 1
- 2
- 3
- 4
- 5
- 6
- 7
- 8
- 9
- 10
- 11
- 12
- 13
- 14
- 15
- 16
- 17
- 18
- 19
- 1
- 2
- 3
- 4
- 5
- 6
- 7
- 8
- 9
- 10
- 11
- 12
- 13
- 14
- 15
- 16
- 17
- 18
- 19
参考资料:https://www.sitepoint.com/material-design-android-design-support-library/


 2821
2821

 被折叠的 条评论
为什么被折叠?


