


这系列文章主要是学习《系统学习iOS动画》的过程,这本书是学习iOS动画的很好的途径,包括了视图动画,自动布局,图层动画,视图控制器的转场,UIViewPropertyAnimator,3D动画以及其他类型的动画。
今天主要学习的是UIKit动画API,这些API专门用于轻松制作视图动画。UIKit动画API不仅易于使用,而且提供了大量灵活性和强大功能,可以处理大多数动画要求,包括:
- 位置和大小:bounds ,frame, center
- 外形(Appearance):backgroundColor , alpha (可建立淡入和淡出效果)
- 转换(Transformation) : transform : 设置视图的旋转,缩放和/或位置的动画。
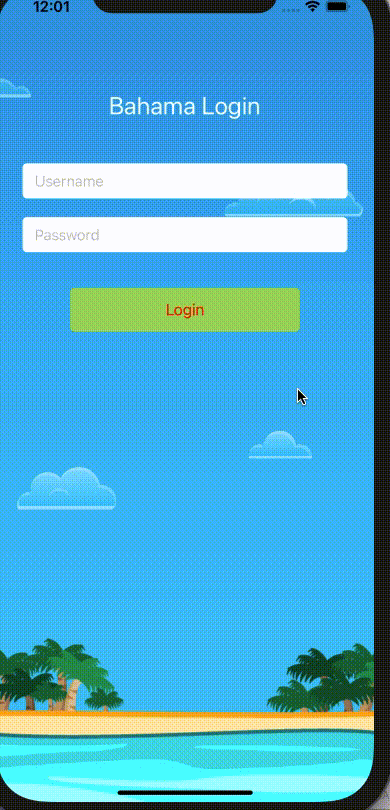
这个是要达到的效果:
首先要添加这些小部件:
import UIKit

class ViewController: UIViewController {
    let screenWidth = UIScreen.main.bounds.size.width
    let screenHeight = UIScreen.main.bounds.size.height
    let titleLabel = UILabel()
    let backgroundImage = UIImageView()
    let usernameTextField = UITextField()
    let passwordTextField = UITextField()
    let loginButton = UIButton()
    let cloud1 = UIImageView()
    let cloud2 = UIImageView()
    let cloud3 = UIImageView()
    let cloud4 = UIImageView()

    override func viewDidLoad() {
        super.viewDidLoad()
        // Do any additional setup after loading the view.

        view.addSubview(backgroundImage)
        view.addSubview(titleLabel)
        view.addSubview(usernameTextField)
        view.addSubview(passwordTextField)
        view.addSubview(loginButton)
        view.addSubview(cloud1)
        view.addSubview(cloud2)
        view.addSubview(cloud3)
        view.addSubview(cloud4)

        backgroundImage.image = UIImage(named: "bg-sunny")
        backgroundImage.frame = CGRect(x: 0, y: 0, width: screenWidth, height: screenHeight)

        titleLabel.text = "Bahama Login"
        titleLabel.textColor = .white
        titleLabel.font = UIFont.systemFont(ofSize: 28)
        let titleWidth = titleLabel.intrinsicContentSize.width
        titleLabel.frame = CGRect(x: (screenWidth - titleWidth) / 2 , y: 120, width: titleWidth, height: titleLabel.intrinsicContentSize.height)

        let textFieldWidth = screenWidth - 60
        usernameTextField.backgroundColor = .white
        usernameTextField.layer.cornerRadius = 5
        usernameTextField.placeholder = "  Username"
        usernameTextField.frame = CGRect(x: 30, y: 202, width: textFieldWidth, height: 40)


        passwordTextField.backgroundColor = .white
        passwordTextField.layer.cornerRadius = 5
        passwordTextField.placeholder = "  Password"
        passwordTextField.frame = CGRect(x: 30, y: 263, width: textFieldWidth, height: 40)

        let buttonWidth = 260
        loginButton.frame = CGRect(x: (Int(screenWidth) - buttonWidth) / 2, y: 343, width: buttonWidth, height: 50)
        loginButton.setTitle("Login", for: .normal)
        loginButton.setTitleColor(.red, for: .normal)
        loginButton.layer.cornerRadius = 5
        loginButton.backgroundColor = .green

        cloud1.frame = CGRect(x: -120, y: 79, width: 160, height: 50)
        cloud1.image = UIImage(named: "bg-sunny-cloud-1")

        cloud2.frame = CGRect(x: 256, y: 213, width: 160, height: 50)
        cloud2.image = UIImage(named: "bg-sunny-cloud-2")


        cloud3.frame = CGRect(x: 284, y: 503, width: 74, height: 35)
        cloud3.image = UIImage(named: "bg-sunny-cloud-3")


        cloud4.frame = CGRect(x:22 , y: 545, width: 115, height: 50)
        cloud4.image = UIImage(named: "bg-sunny-cloud-4")

    }

}
然后在viewWillAppear进行动画的处理,这里先把titleLabel , usernameTextField 以及passwordTextField的x左移view.bounds.width,然后把云的图片alpha都设为0,最后再把login向下移30并且将alpha设为0。
  override func viewWillAppear(_ animated: Bool) {
      super.viewWillAppear(animated)

      titleLabel.center.x -= view.bounds.width
      usernameTextField.center.x -= view.bounds.width
      passwordTextField.center.x -= view.bounds.width

      cloud1.alpha = 0.0
      cloud2.alpha = 0.0
      cloud3.alpha = 0.0
      cloud4.alpha = 0.0

      loginButton.center.y += 30.0
      loginButton.alpha = 0.0
    }
然后在viewDidAppear里面进行处理
- UIView.animate里面右移相同的位置,这样他们就会从屏幕的左边移动到我们之前在frame中设置的x
- 给云朵添加添加透明度变化动画
- 最后给login button 添加透明度变化并且向上移动的动画。
  override func viewDidAppear(_ animated: Bool) {
    super.viewDidAppear(animated)
      UIView.animate(withDuration: 0.5) {
          self.titleLabel.center.x += self.view.bounds.width
      }

      UIView.animate(withDuration: 0.5, delay: 0.3, options: [], animations: {
          self.usernameTextField.center.x += self.view.bounds.width
      }, completion: nil
      )

      UIView.animate(withDuration: 0.5, delay: 0.5, options: [], animations: {
          self.passwordTextField.center.x += self.view.bounds.width
      }, completion: nil)


    UIView.animate(withDuration: 0.5, delay: 0.5, options: [], animations: {
        self.cloud1.alpha = 1.0

    }, completion: nil)
    UIView.animate(withDuration: 0.5, delay: 0.7, options: [], animations: {
        self.cloud2.alpha = 1.0

    }, completion: nil)
    UIView.animate(withDuration: 0.5, delay: 0.9, options: [], animations: {
        self.cloud3.alpha = 1.0

    }, completion: nil)

    UIView.animate(withDuration: 0.5, delay: 1.1, options: [], animations: {
        self.cloud4.alpha = 1.0
    }, completion: nil)
   UIView.animate(withDuration: 0.5, delay: 0.5, usingSpringWithDamping: 0.5, initialSpringVelocity: 0.0,
                       options: [], animations: {
                        self.loginButton.center.y -= 30.0
                        self.loginButton.alpha = 1.0
        }, completion: nil)

  }
接下来还要给login button 添加点击动画,要添加点击动画,那么就要先在viewDidload添加点击响应方法。
loginButton.addTarget(self, action: #selector(handleLogin), for: .touchUpInside)
然后这里还需要一个UIActivityIndicatorView,创建一个UIActivityIndicatorView属性并初始化,
let spinner = UIActivityIndicatorView(style: .whiteLarge)
在viewDidLoad设置好属性,然后添加为login button 的子 view。
spinner.frame = CGRect(x: -20.0, y: 6.0, width: 20.0, height: 20.0)
spinner.startAnimating()
spinner.alpha = 0.0
loginButton.addSubview(spinner)
最后在点击响应方法里面处理点击动画,这里会将loginButton的宽度增大80,然后将loginButton向下移动60,改变loginButton的颜色。然后调整spinner,重新设置spinner到loginButton的Y的中点,并且添加透明度变化动画。
 @IBAction func login() {
    view.endEditing(true)

    UIView.animate(withDuration: 1.5, delay: 0.0, usingSpringWithDamping: 0.2, initialSpringVelocity: 0.0, options: [], animations: {
      self.loginButton.bounds.size.width += 80.0
    }, completion: nil)

    UIView.animate(withDuration: 0.33, delay: 0.0, usingSpringWithDamping: 0.7, initialSpringVelocity: 0.0, options: [], animations: {
      self.loginButton.center.y += 60.0
      self.loginButton.backgroundColor = UIColor(red: 0.85, green: 0.83, blue: 0.45, alpha: 1.0)
      self.spinner.center = CGPoint(
        x: 40.0,
        y: self.loginButton.frame.size.height/2
      )
      self.spinner.alpha = 1.0
    }, completion: nil)
  }
接下来要处理状态标签的动画。
- 声明一个UIImageView属性来展示标签图片
- 声明一个UILabel属性来展示需要展示的状态文字
- 声明一个string数组来保存需要展示的文字。
- 声明一个CGPoint以便后来保存statusPosition的位置
  let status = UIImageView(image: UIImage(named: "banner"))
  let label = UILabel()
  let messages = ["Connecting ...", "Authorizing ...", "Sending credentials ...", "Failed"]
  var statusPosition = CGPoint.zero
在viewDidLoad里面进行标签图片和状态Label的处理。
- 将status隐藏起来,然后将其中心点设为login button的中心点,最后添加为view的子view。
- 设置label的frame,font,textColor,设置居中对齐后添加为status的子view。
- 保存现在status的中心点
status.isHidden = true
status.center = loginButton.center
view.addSubview(status)

label.frame = CGRect(x: 0.0, y: 0.0, width: status.frame.size.width, height: status.frame.size.height)
label.font = UIFont(name: "HelveticaNeue", size: 18.0)
label.textColor = UIColor(red: 0.89, green: 0.38, blue: 0.0, alpha: 1.0)
label.textAlignment = .center
status.addSubview(label)

statusPosition = status.center
添加一个showMessage用来添加状态展示的动画,然后在之前的handleLogin方法里面的第二个 UIView.animate里面的completion调用这个方法。
 func showMessage(index: Int) {
      label.text = messages[index]

      UIView.transition(with: status, duration: 0.33, options: [.curveEaseOut, .transitionFlipFromTop], animations: {
        self.status.isHidden = false
      }, completion: { _ in

      })
    }
展示的动画做完了,还要做移动出去的动画。创建一个removeMessage方法,在里面重新将status向右移界面的宽度,然后在completion将其隐藏,然后在将其中心点设为原先的地方,在调用showMessage显示下一个状态。
    func removeMessage(index: Int) {
      UIView.animate(withDuration: 0.33, delay: 0.0, options: [], animations: {
        self.status.center.x += self.view.frame.size.width
      }, completion: { _ in
        self.status.isHidden = true
        self.status.center = self.statusPosition

        self.showMessage(index: index+1)
      })
    }
在showMessage进行逻辑的处理这里设置延时两秒后在移除这个状态标签,然后进行index判断确保数组不会越界。这里当状态标签全都展示完之后需要调用resetForm来进行状态的还原,比如status的一处遗迹button的还原等。
  func  showMessage(index: Int) {
    label.text = messages[index]

    UIView.transition(with: status, duration: 0.33, options: [.curveEaseOut, .transitionFlipFromTop], animations: {
      self.status.isHidden = false
    }, completion: { _ in
      //transition completion
      delay(2.0) {
        if index < self.messages.count-1 {
          self.removeMessage(index: index)
        } else {
        resetForm()
        }
      }
    })
  }
这里的delay是一个延迟函数
func delay(_ seconds: Double, completion: @escaping ()->Void) {
  DispatchQueue.main.asyncAfter(deadline: .now() + seconds, execute: completion)
}
然后需要进行还原状态的处理:
- 在resetForm里面重新将状态标签隐藏,将其中心点还原
- 把spinner 设为隐
- 将loginButton的颜色、大小、位置还原
func resetForm() {
    UIView.transition(with: status, duration: 0.2, options: .transitionFlipFromTop, animations: {
      self.status.isHidden = true
      self.status.center = self.statusPosition
    }, completion: nil)

    UIView.animate(withDuration: 0.2, delay: 0.0, options: [], animations: {
      self.spinner.center = CGPoint(x: -20.0, y: 16.0)
      self.spinner.alpha = 0.0
      self.loginButton.backgroundColor = UIColor(red: 0.63, green: 0.84, blue: 0.35, alpha: 1.0)
      self.loginButton.bounds.size.width -= 80.0
      self.loginButton.center.y -= 60.0
    }, completion: nil)
  }
到这里就差不多完成啦,就还差一个云的移动的动画没有做。
添加一个animateCloud方法,然后在viewDidAppear里面调用这个方法
- 算出想要的速度
- 根据自身所处x算出想要的动画时间
- 添加位移动画
- 结束后重新设置到屏幕左边,然后重新开始动画。
    func animateCloud(_ cloud: UIImageView) {
      let cloudSpeed = 60.0 / view.frame.size.width
      let duration = (view.frame.size.width - cloud.frame.origin.x) * cloudSpeed
      UIView.animate(withDuration: TimeInterval(duration), delay: 0.0, options: .curveLinear, animations: {
        cloud.frame.origin.x = self.view.frame.size.width
      }, completion: { _ in
        cloud.frame.origin.x = -cloud.frame.size.width
        self.animateCloud(cloud)
      })
    }
到这里登陆动画就做完啦
各参数含义:
- duration:表示动画执行时间。
- delay:动画延迟时间。
- usingSpringWithDamping: 参数的范围为0.0f到1.0f,数值越小「弹簧」的振动效果越明显。可以视为弹簧的劲度系数
- initialSpringVelocity: 表示动画的初始速度,数值越大一开始移动越快。
- options:可选项,一些可选的动画效果,包括重复等。
- animations:表示执行的动画内容,包括透明度的渐变,移动,缩放。
- completion:表示执行完动画后执行的内容。
完整代码:
import UIKit

class ViewController: UIViewController {

    let screenWidth = UIScreen.main.bounds.size.width
    let screenHeight = UIScreen.main.bounds.size.height
    let titleLabel = UILabel()
    let backgroundImage = UIImageView()
    let usernameTextField = TextField()
    let passwordTextField = TextField()
    let loginButton = UIButton()
    let cloud1 = UIImageView()
    let cloud2 = UIImageView()
    let cloud3 = UIImageView()
    let cloud4 = UIImageView()
    let spinner = UIActivityIndicatorView(style: .whiteLarge)

    let status = UIImageView(image: UIImage(named: "banner"))
    let label = UILabel()
    let messages = ["Connecting ...", "Authorizing ...", "Sending credentials ...", "Failed"]

    var statusPosition = CGPoint.zero


    override func viewDidLoad() {
        super.viewDidLoad()
        // Do any additional setup after loading the view.

        view.addSubview(backgroundImage)
        view.addSubview(titleLabel)
        view.addSubview(usernameTextField)
        view.addSubview(passwordTextField)
        view.addSubview(loginButton)
        view.addSubview(cloud1)
        view.addSubview(cloud2)
        view.addSubview(cloud3)
        view.addSubview(cloud4)
        loginButton.addSubview(spinner)

        let textFieldWidth = screenWidth - 60
        let buttonWidth = 260

        backgroundImage.image = UIImage(named: "bg-sunny")
        backgroundImage.frame = CGRect(x: 0, y: 0, width: screenWidth, height: screenHeight)

        titleLabel.text = "Bahama Login"
        titleLabel.textColor = .white
        titleLabel.font = UIFont.systemFont(ofSize: 28)
        let titleWidth = titleLabel.intrinsicContentSize.width
        titleLabel.frame = CGRect(x: (screenWidth - titleWidth) / 2 , y: 120, width: titleWidth, height: titleLabel.intrinsicContentSize.height)

        usernameTextField.backgroundColor = .white
        usernameTextField.layer.cornerRadius = 5
        usernameTextField.placeholder = "  Username"
        usernameTextField.frame = CGRect(x: 30, y: 202, width: textFieldWidth, height: 40)

        passwordTextField.backgroundColor = .white
        passwordTextField.layer.cornerRadius = 5
        passwordTextField.placeholder = "  Password"
        passwordTextField.frame = CGRect(x: 30, y: 263, width: textFieldWidth, height: 40)

        loginButton.frame = CGRect(x: (Int(screenWidth) - buttonWidth) / 2, y: 343, width: buttonWidth, height: 50)
        loginButton.setTitle("Login", for: .normal)
        loginButton.setTitleColor(.red, for: .normal)
        loginButton.layer.cornerRadius = 5
        loginButton.backgroundColor = UIColor(red: 0.63, green: 0.84, blue: 0.35, alpha: 1.0)
        loginButton.addTarget(self, action: #selector(handleLogin), for: .touchUpInside)

        spinner.frame = CGRect(x: -20.0, y: 6.0, width: 20.0, height: 20.0)
        spinner.startAnimating()
        spinner.alpha = 0.0


        cloud1.frame = CGRect(x: -120, y: 79, width: 160, height: 50)
        cloud1.image = UIImage(named: "bg-sunny-cloud-1")

        cloud2.frame = CGRect(x: 256, y: 213, width: 160, height: 50)
        cloud2.image = UIImage(named: "bg-sunny-cloud-2")


        cloud3.frame = CGRect(x: 284, y: 503, width: 74, height: 35)
        cloud3.image = UIImage(named: "bg-sunny-cloud-3")


        cloud4.frame = CGRect(x:22 , y: 545, width: 115, height: 50)
        cloud4.image = UIImage(named: "bg-sunny-cloud-4")

        status.isHidden = true
        status.center = loginButton.center
        view.addSubview(status)

        label.frame = CGRect(x: 0.0, y: 0.0, width: status.frame.size.width, height: status.frame.size.height)
        label.font = UIFont(name: "HelveticaNeue", size: 18.0)
        label.textColor = UIColor(red: 0.89, green: 0.38, blue: 0.0, alpha: 1.0)
        label.textAlignment = .center
        status.addSubview(label)

        statusPosition = status.center


    }

    override func viewWillAppear(_ animated: Bool) {
        super.viewWillAppear(animated)

        titleLabel.center.x -= view.bounds.width
        usernameTextField.center.x -= view.bounds.width
        passwordTextField.center.x -= view.bounds.width

        cloud1.alpha = 0.0
        cloud2.alpha = 0.0
        cloud3.alpha = 0.0
        cloud4.alpha = 0.0

        loginButton.center.y += 30.0
        loginButton.alpha = 0.0
    }

    override func viewDidAppear(_ animated: Bool) {
        super.viewDidAppear(animated)

        UIView.animate(withDuration: 0.5) {
            self.titleLabel.center.x += self.view.bounds.width
        }

        UIView.animate(withDuration: 0.5, delay: 0.3, options: [], animations: {
            self.usernameTextField.center.x += self.view.bounds.width
        }, completion: nil
        )

        UIView.animate(withDuration: 0.5, delay: 0.5, options: [], animations: {
            self.passwordTextField.center.x += self.view.bounds.width
        }, completion: nil)

        UIView.animate(withDuration: 0.5, delay: 0.5, options: [], animations: {
            self.cloud1.alpha = 1.0

        }, completion: nil)
        UIView.animate(withDuration: 0.5, delay: 0.7, options: [], animations: {
            self.cloud2.alpha = 1.0

        }, completion: nil)
        UIView.animate(withDuration: 0.5, delay: 0.9, options: [], animations: {
            self.cloud3.alpha = 1.0

        }, completion: nil)
        UIView.animate(withDuration: 0.5, delay: 1.1, options: [], animations: {
            self.cloud4.alpha = 1.0

        }, completion: nil)

        UIView.animate(withDuration: 0.5, delay: 0.5, usingSpringWithDamping: 0.5, initialSpringVelocity: 0.0,
                       options: [], animations: {
                        self.loginButton.center.y -= 30.0
                        self.loginButton.alpha = 1.0
        }, completion: nil)

        animateCloud(cloud1)
        animateCloud(cloud2)
        animateCloud(cloud3)
        animateCloud(cloud4)
    }

    @objc func handleLogin() {
        view.endEditing(true)

        UIView.animate(withDuration: 1.5, delay: 0.0, usingSpringWithDamping: 0.2, initialSpringVelocity: 0.0, options: [], animations: {
          self.loginButton.bounds.size.width += 80.0
        }, completion: nil)

        UIView.animate(withDuration: 0.33, delay: 0.0, usingSpringWithDamping: 0.7, initialSpringVelocity: 0.0, options: [], animations: {
          self.loginButton.center.y += 60.0
          self.loginButton.backgroundColor = UIColor(red: 0.85, green: 0.83, blue: 0.45, alpha: 1.0)
          self.spinner.center = CGPoint(
            x: 40.0,
            y: self.loginButton.frame.size.height/2
          )
          self.spinner.alpha = 1.0
        }, completion: { _ in
            self.showMessage(index:0)
        })
    }
    func showMessage(index: Int) {
      label.text = messages[index]

      UIView.transition(with: status, duration: 0.33, options: [.curveEaseOut, .transitionFlipFromTop], animations: {
        self.status.isHidden = false
      }, completion: { _ in
        //transition completion
        delay(2.0) {
          if index < self.messages.count-1 {
            self.removeMessage(index: index)

          } else {
            self.resetForm()
          }
        }
      })
    }

    func removeMessage(index: Int) {
      UIView.animate(withDuration: 0.33, delay: 0.0, options: [], animations: {
        self.status.center.x += self.view.frame.size.width
      }, completion: { _ in
        self.status.isHidden = true
        self.status.center = self.statusPosition

        self.showMessage(index: index+1)
      })
    }

    func resetForm() {
      UIView.transition(with: status, duration: 0.2, options: .transitionFlipFromTop, animations: {
        self.status.isHidden = true
        self.status.center = self.statusPosition
      }, completion: nil)

      UIView.animate(withDuration: 0.2, delay: 0.0, options: [], animations: {
        self.spinner.center = CGPoint(x: -20.0, y: 16.0)
        self.spinner.alpha = 0.0
        self.loginButton.backgroundColor = UIColor(red: 0.63, green: 0.84, blue: 0.35, alpha: 1.0)
        self.loginButton.bounds.size.width -= 80.0
        self.loginButton.center.y -= 60.0
      }, completion: nil)
    }

    func animateCloud(_ cloud: UIImageView) {
      let cloudSpeed = 60.0 / view.frame.size.width
      let duration = (view.frame.size.width - cloud.frame.origin.x) * cloudSpeed
      UIView.animate(withDuration: TimeInterval(duration), delay: 0.0, options: .curveLinear, animations: {
        cloud.frame.origin.x = self.view.frame.size.width
      }, completion: { _ in
        cloud.frame.origin.x = -cloud.frame.size.width
        self.animateCloud(cloud)
      })
    }

}

func delay(_ seconds: Double, completion: @escaping ()->Void) {
  DispatchQueue.main.asyncAfter(deadline: .now() + seconds, execute: completion)
}

class TextField: UITextField {

    let padding = UIEdgeInsets(top: 0, left: 5, bottom: 0, right: 5)

    override open func textRect(forBounds bounds: CGRect) -> CGRect {
        return bounds.inset(by: padding)
    }

    override open func placeholderRect(forBounds bounds: CGRect) -> CGRect {
        return bounds.inset(by: padding)
    }

    override open func editingRect(forBounds bounds: CGRect) -> CGRect {
        return bounds.inset(by: padding)
    }
}


 105
105


 被折叠的 条评论
为什么被折叠?
被折叠的 条评论
为什么被折叠?
 到【灌水乐园】发言


