


1.数据读取
import pandas as pd

#设置最大宽度,方便查看数据
pd.set_option('display.max_columns', 100)
pd.set_option('display.width', 500)
data=pd.read_excel(r'./waimai_10k.xlsx',sheet_name='Sheet1',names=['label','content'])
#0是差评,1是好评,打印前5行
print(data.head(5))
output:

   label            content
0      1       没有送水没有送水没有送水
1      1           非常快,态度好。
2      1    方便,快捷,味道可口,快递给力
3      1       菜味道很棒!送餐很及时!
4      1  今天师傅是不是手抖了,微辣格外辣!

print(data['label'].value_counts())

output:
    0    7987  #差评
    1    3999  #好评

print(data.info())

#可以看到没有缺失值

output:

    Data columns (total 2 columns):
 #   Column   Non-Null Count  Dtype
---  ------   --------------  -----
 0   label    11986 non-null  int64
 1   content  11986 non-null  object

print("数据缺失值数量:",data.isnull().sum())

output:
    数据缺失值数量: label     0
                  content    0

print("数据重复值数量:",data.duplicated().sum())

output:
    数据重复值数量: 0
2.评论清洗
#jieba库为中文分词库,中文文本需要通过分词获得单个的词语
import jieba

#导入中文停用词,如果没有中文停用词文件,可以看看我另一篇文章。停用词就是一些没有意义的语气词,或者对主题理解不重要的词,这些词我们可以排除掉
with open(r'./merge_stopword.txt',encoding='utf-8') as f:
    stop_words=f.readlines()

#将评论内容进行分词
data['word_split']=data['content'].apply(lambda x:jieba.lcut(x))
print(data)
output:
          label  ...                                         word_split
0          1  ...                           [没有, 送水, 没有, 送水, 没有, 送水]
1          1  ...                               [非常, 快, ,, 态度, 好, 。]
2          1  ...                [方便, ,, 快捷, ,, 味道, 可口, ,, 快, 递给, 力]
3          1  ...                       [菜, 味道, 很棒, !, 送餐, 很, 及时, !]
4          1  ...              [今天, 师傅, 是不是, 手抖, 了, ,, 微辣, 格外, 辣, !]
...      ...  ...                                                ...
11981      0  ...           [以前, 几乎, 天天, 吃, ,, 现在, 调料, 什么, 都, 不放, ,]
11982      0  ...  [昨天, 订, 凉皮, 两份, ,, 什么, 调料, 都, 没有, 放, ,, 就, 放, ...
11983      0  ...                          [", 凉皮, 太辣, ,, 吃不下, 都, "]
11984      0  ...                     [本来, 迟到, 了, 还, 自己, 点, !, !, !]
11985      0  ...  [肉夹馍, 不错, ,, 羊肉, 泡馍, 酱肉, 包, 很, 一般, 。, 凉面, 没, 想...

#去除停用词
data['clean']=data['word_split'].apply(lambda x: [i for i  in  x if i not in stop_words])
print(data.head(5))
#可以看到有些停用词已经给去掉了
output:
       label  ...                   clean
0      1  ...            [送水, 送水, 送水]
1      1  ...                 [快, 态度]
2      1  ...  [快捷, 味道, 可口, 快, 递给, 力]
3      1  ...         [菜, 味道, 很棒, 送餐]
4      1  ...         [师傅, 手抖, 微辣, 辣]

#定义正则表达式,用于匹配数字、标点符号
pattern=r'[~\a-zA-Zu4e00-u9fa5]' #匹配非英文的字符和非中文
data['remove_special_charater']=data['clean'].apply(lambda x: [re.sub(pattern,"",text) for text in x])
3.构建词云图
from wordcloud import WordCloud
from collections import  Counter
from matplotlib import pyplot as plt

all_words_positive =data[data.label == 1]['remove_special_charater'].values.tolist()
all_words_negitive =data[data.label == 0]['remove_special_charater'].values.tolist()

#将所有的词合并
all_positive_merge=[]
all_negitive_merge=[]
for text in all_words_positive:
    for word in text:
        all_positive_merge.append(word)

for text in all_words_negitive:
    for word in text:
        all_negitive_merge.append(word)
#统计词频
word_count_positive = Counter(all_positive_merge)
word_count_negitive = Counter(all_negitive_merge)

#font_path一定要设置中文字体,不然会显示不出来,可以通过下面这个函数找到电脑中的字体
import  matplotlib.font_manager as fm
fonts=fm.findSystemFonts()
for font in fonts:
    print(font)

# 创建词云对象并生成词云图
word_cloud_positive = WordCloud(font_path='C:\Windows\Fonts\simhei.ttf',width=800, height=400, background_color='white').generate_from_frequencies(word_count_positive)
word_cloud_negitive = WordCloud(font_path='C:\Windows\Fonts\simhei.ttf',width=800, height=400, background_color='white').generate_from_frequencies(word_count_negitive)
# 可视化词云图
plt.figure(figsize=(20, 8))
plt.subplot(1,2,1)
plt.title('好评词云图')
plt.imshow(word_cloud_positive, interpolation='bilinear')
plt.axis("off")
plt.subplot(1,2,2)
plt.title('差评词云图')
plt.imshow(word_cloud_negitive, interpolation='bilinear')
plt.axis("off")
plt.show()
4.构建模型
from tensorflow.keras.preprocessing.text import Tokenizer
from tensorflow.keras.preprocessing.sequence import pad_sequences
unique_words_count = len(data['remove_special_charater'].value_counts())
print("不同词汇的数量:", unique_words_count)
output:
    不同词汇的数量: 11613

#防止图形中文乱码
plt.rcParams['font.sans-serif'] = ['SimHei']
# 文本向量化
tokenizer = Tokenizer(num_words=10000) # 建立一个存在10000字的词典
tokenizer.fit_on_texts(data['remove_special_charater'])
sequences = tokenizer.texts_to_sequences(data['remove_special_charater'])
word_index = tokenizer.word_index
maxlen = 100
# 保证每个序列长度为100不足用0填补
data_pad = pad_sequences(sequences, maxlen=maxlen)
data_df = pd.DataFrame(data_pad)
from sklearn.model_selection import train_test_split

X_temp, X_test, y_temp, y_test = train_test_split(data_df, data['label'], test_size=0.2, random_state=42, stratify=data['label'])
X_train, X_val, y_train, y_val = train_test_split(X_temp, y_temp, test_size=0.2, random_state=42, stratify=y_temp)

from tensorflow.keras.utils import to_categorical

# 将标签转换为one-hot编码
y_train_categorical = to_categorical(y_train, num_classes=2)
y_val_categorical = to_categorical(y_val, num_classes=2)
y_test_categorical = to_categorical(y_test, num_classes=2)
#将预处理好的文本数据和对应的标签划分为训练集、验证集和测试集,并将标签转换为适合神经网络分类任务的one-hot编码形
from tensorflow.keras.models import Sequential
from tensorflow.keras.layers import Dense, Dropout, Flatten
from tensorflow.keras.layers import Embedding
from tensorflow.keras.layers import LSTM, Bidirectional
from keras_self_attention import SeqSelfAttention
from tensorflow.keras.optimizers import Adam
from tensorflow.keras.layers import GlobalMaxPooling1D

self_attention_bilstm = Sequential()
self_attention_bilstm.add(Embedding(input_dim = 5000, # input_dim: 这是整数,指定了输入数据的最大取值(词汇表大小)
                                   output_dim=300, # output_dim: 这是整数,指定了嵌入向量的维度
                                   mask_zero=True))# mask_zero: 这是一个布尔值,指示是否应该将输入中的零(即对应于 input_dim 中索引0的词)视为一个应该被遮蔽的特殊值
self_attention_bilstm.add(Dropout(0.2))
self_attention_bilstm.add(Bidirectional(LSTM(128, activation='relu',  return_sequences=True))) # return_sequences=True: 这是一个布尔值参数,指示 LSTM 层是否应该返回完整的输出序列
self_attention_bilstm.add(Dropout(0.2))
# 添加self_attention
self_attention_bilstm.add(SeqSelfAttention(attention_activation='sigmoid'))
self_attention_bilstm.add(Dense(units=64, activation='relu'))
self_attention_bilstm.add(Dropout(0.2))
self_attention_bilstm.add(GlobalMaxPooling1D()) # 全局最大池化
self_attention_bilstm.add(Dense(units=2, activation='softmax'))

optimizer = Adam(learning_rate=0.001)

# # 编译模型时指定优化器
self_attention_bilstm.compile(optimizer=optimizer, loss='categorical_crossentropy', metrics=['accuracy'])

# 模型训练,由于训练时间的原因,就没有将epochs设置太大
history = self_attention_bilstm.fit(
    X_train, y_train_categorical,
    epochs=5,
    batch_size=32,
    validation_data=(X_val, y_val_categorical)
)

# 评估模型
test_loss, test_acc = self_attention_bilstm.evaluate(X_test, y_test_categorical)
print(f"Test Loss: {test_loss}")
print(f"Test Accuracy: {test_acc}")

output:

    Test Loss: 0.37457871633435014
    Test Accuracy: 0.849457859992981
利用Tensorflow构建Self-Attention LSTM模型,训练轮数、训练批数包括前面词典、序列长度都设置的较小加快了训练过程导致数据信息存在损失最后模型是存在过拟合的,如下:

5.模型评价
import  numpy as np
y_pred_prob = self_attention_bilstm.predict(X_test)
y_pred = np.argmax(y_pred_prob, axis=1)

# 创建包含真实结果和预测结果的DataFrame
results_df = pd.DataFrame({
    '真实结果': y_test,
    '预测结果': y_pred
})

from sklearn.metrics import classification_report, confusion_matrix
# 计算混淆矩阵
confusion_matrix = confusion_matrix(results_df['真实结果'], results_df['预测结果'])

fig, ax = plt.subplots(figsize=(10, 7))
cax = ax.matshow(confusion_matrix, cmap='Blues')
fig.colorbar(cax)
ax.set_xlabel('预测值')
ax.set_ylabel('真实值')
ax.set_xticks(np.arange(2))
ax.set_yticks(np.arange(2))
ax.set_xticklabels(['类别0', '类别1'])
ax.set_yticklabels(['类别0', '类别1'])
for (i, j), val in np.ndenumerate(confusion_matrix):
    ax.text(j, i, f'{val}', ha='center', va='center', color='black')
plt.title('混淆矩阵热力图')
plt.show()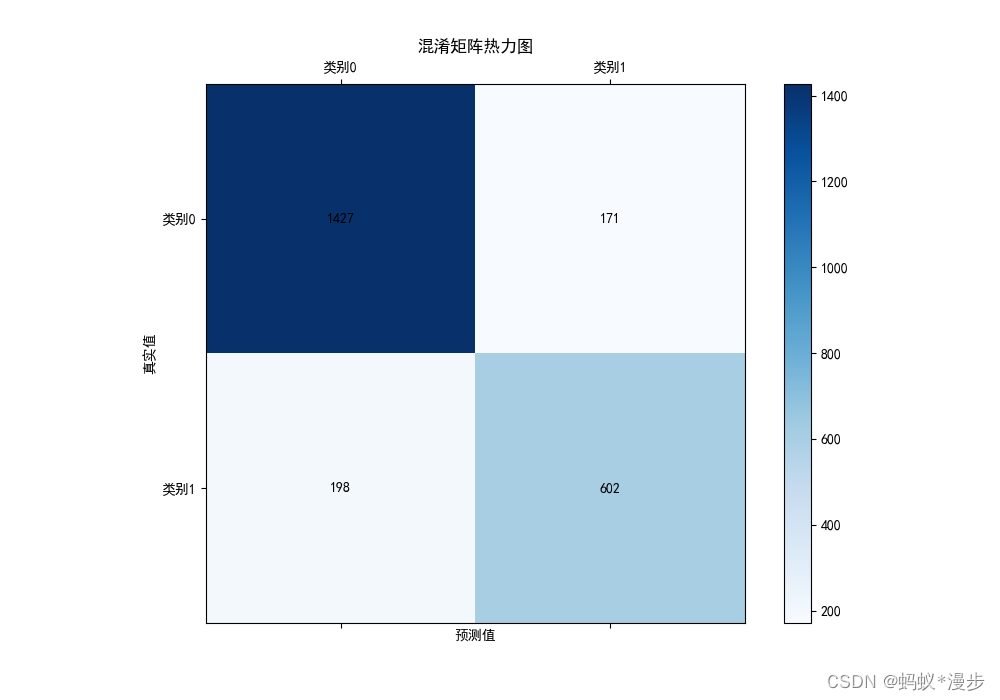


 1765
1765

 被折叠的 条评论
为什么被折叠?
被折叠的 条评论
为什么被折叠?
 到【灌水乐园】发言


