


一、配置MDA的流程:
1、开启RCC的时钟
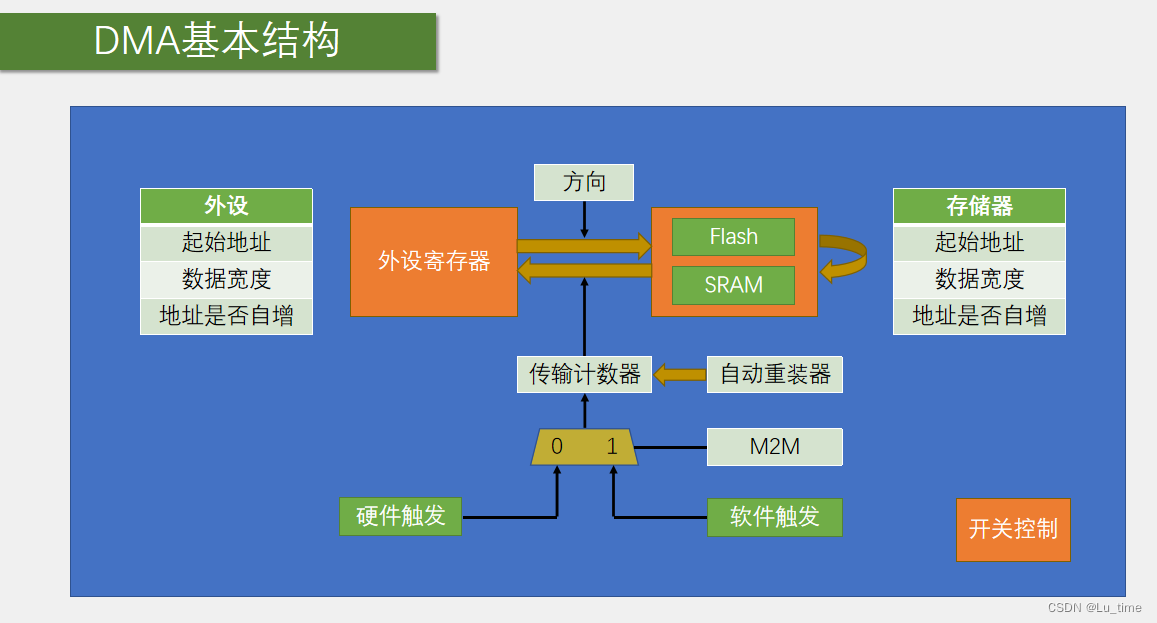
2、初始化DMA:配置他的外设和存储器的起始地址、数据宽度、地址是否自增,他们的方向,有多少个通道,DMA的循环模式,配置触发方式,优先级,最后一步开启DMA。
3、DMA的转运:先把计数器清零,调用专用函数,使能计数器,是从最后一个序列开始自减的,判断是否转运完成标志位,清除标志位。
二、函数模块代码和使用方式
1、这个只有DMA模块
#include "stm32f10x.h"                  // Device header

uint16_t MyDMA_Size;
void MyDMA_Init(uint32_t AddrA,uint32_t AddrB,uint16_t Size)
{
	MyDMA_Size=Size;
	RCC_AHBPeriphClockCmd(RCC_AHBPeriph_DMA1,ENABLE);                      //开启DMA的时钟

	DMA_InitTypeDef DMA_InitStructrue;
	DMA_InitStructrue.DMA_PeripheralBaseAddr=AddrA;
	DMA_InitStructrue.DMA_PeripheralDataSize=DMA_PeripheralDataSize_Byte;   //数据宽度8比特
	DMA_InitStructrue.DMA_PeripheralInc=DMA_PeripheralInc_Enable;	        //地址自增
	DMA_InitStructrue.DMA_MemoryBaseAddr=AddrB;
	DMA_InitStructrue.DMA_MemoryDataSize=DMA_MemoryDataSize_Byte;
	DMA_InitStructrue.DMA_MemoryInc=DMA_MemoryInc_Enable;                  //地址自增
	DMA_InitStructrue.DMA_DIR=DMA_DIR_PeripheralSRC;                       //方向A->B
	DMA_InitStructrue.DMA_BufferSize=Size;                                 //多少通道
	DMA_InitStructrue.DMA_Mode=DMA_Mode_Normal;                            //DMA循环模式,单次
	DMA_InitStructrue.DMA_M2M=DMA_M2M_Enable;                              //软件触发
	DMA_InitStructrue.DMA_Priority=DMA_Priority_Medium; 				//优先级中等
	DMA_Init(DMA1_Channel1,&DMA_InitStructrue);

	DMA_Cmd(DMA1_Channel1,DISABLE);                                      //开DMA
}

void MyMDA_Transfer(void)
{
	DMA_Cmd(DMA1_Channel1,DISABLE);                        //清除计数器
	DMA_SetCurrDataCounter(DMA1_Channel1,MyDMA_Size);     //设置开始转运
	DMA_Cmd(DMA1_Channel1,ENABLE);							//使能计数器,从最后一个倒序,4->1
	while (DMA_GetFlagStatus(DMA1_FLAG_TC1)==RESET);       //转运完成标志位,转运完成标志位置1
	DMA_ClearFlag(DMA1_FLAG_TC1);                         //清除标志位
}
#include "stm32f10x.h"                  // Device header
#include"OLED.h"
#include"Delay.h"
#include"MyDMA.h"
uint8_t DataA[]={0x01,0x02,0x03,0x04};
uint8_t DataB[]={0,0,0,0};
int main(void)
{
	OLED_Init();
	MyDMA_Init((uint32_t)DataA,(uint32_t)DataB,4);

	OLED_ShowString(1,1,"DataA:");
	OLED_ShowHexNum(1,9,(uint32_t)DataA,8);
	OLED_ShowString(3,1,"DataB:");
	OLED_ShowHexNum(3,9,(uint32_t)DataB,8);

	while(1)
	{
		DataA[0]++;
		DataA[1]++;
		DataA[2]++;
		DataA[3]++;
		OLED_ShowHexNum(2,1,DataA[0],2);
		OLED_ShowHexNum(2,4,DataA[1],2);
		OLED_ShowHexNum(2,7,DataA[2],2);
		OLED_ShowHexNum(2,10,DataA[3],2);

//		OLED_ShowHexNum(4,1,DataB[0],2);
//		OLED_ShowHexNum(4,4,DataB[1],2);
//		OLED_ShowHexNum(4,7,DataB[2],2);
//		OLED_ShowHexNum(4,10,DataB[3],2);
//		Delay_ms(1000);
		MyMDA_Transfer();

//		OLED_ShowHexNum(2,1,DataA[0],2);
//		OLED_ShowHexNum(2,4,DataA[1],2);
//		OLED_ShowHexNum(2,7,DataA[2],2);
//		OLED_ShowHexNum(2,10,DataA[3],2);

		OLED_ShowHexNum(4,1,DataB[0],2);
		OLED_ShowHexNum(4,4,DataB[1],2);
		OLED_ShowHexNum(4,7,DataB[2],2);
		OLED_ShowHexNum(4,10,DataB[3],2);
		Delay_ms(1000);

	}
}
2、DMA和AD多通道的第一种方式
#include "stm32f10x.h"                  // Device heade


uint16_t AD_Values[4];

void AD_Init(void)
{
	RCC_APB2PeriphClockCmd(RCC_APB2Periph_ADC1,ENABLE);     //开启ADC时钟
	RCC_APB2PeriphClockCmd(RCC_APB2Periph_GPIOA,ENABLE);
	RCC_AHBPeriphClockCmd(RCC_AHBPeriph_DMA1,ENABLE);
	RCC_ADCCLKConfig(RCC_PCLK2_Div6);       //6分频,对应就是72MHZ/6=12MHZ

	GPIO_InitTypeDef GPIO_InitStructure;
 	GPIO_InitStructure.GPIO_Mode = GPIO_Mode_AIN;    //初始化GPIO为输入模式,其他都为电平无效状态
	GPIO_InitStructure.GPIO_Speed = GPIO_Speed_50MHz;
	GPIO_InitStructure.GPIO_Pin = GPIO_Pin_0|GPIO_Pin_1|GPIO_Pin_2|GPIO_Pin_3;
 	GPIO_Init(GPIOA, &GPIO_InitStructure);

	ADC_InitTypeDef ADC_InitStructure;
	ADC_InitStructure.ADC_Mode=ADC_Mode_Independent;
	ADC_InitStructure.ADC_DataAlign=ADC_DataAlign_Right;       //数据右对齐
	ADC_InitStructure.ADC_ExternalTrigConv=ADC_ExternalTrigConv_None;	//触发源选择软件触发
	ADC_InitStructure.ADC_ContinuousConvMode=DISABLE;                  //转换模式非连续转换模式
	ADC_InitStructure.ADC_NbrOfChannel=4;                        //指定序列为多少个
	ADC_InitStructure.ADC_ScanConvMode=ENABLE;         //转换模式连续扫描模式
	ADC_Init(ADC1,&ADC_InitStructure);
		/*配置ADC的通道和序列*/
	ADC_RegularChannelConfig(ADC1,ADC_Channel_0,1,ADC_SampleTime_55Cycles5);
	ADC_RegularChannelConfig(ADC1,ADC_Channel_1,2,ADC_SampleTime_55Cycles5);
	ADC_RegularChannelConfig(ADC1,ADC_Channel_2,3,ADC_SampleTime_55Cycles5);
	ADC_RegularChannelConfig(ADC1,ADC_Channel_3,4,ADC_SampleTime_55Cycles5);
	/*初始化DMA*/
	DMA_InitTypeDef DMA_InitStructrue;
	DMA_InitStructrue.DMA_PeripheralBaseAddr=(uint32_t)&ADC1->DR;             //外设起始地址
	DMA_InitStructrue.DMA_PeripheralDataSize=DMA_PeripheralDataSize_HalfWord; //十六位半字模式
	DMA_InitStructrue.DMA_PeripheralInc=DMA_PeripheralInc_Disable;	          //地址不自增
	DMA_InitStructrue.DMA_MemoryBaseAddr=(uint32_t)AD_Values;                //存储器起始地址
	DMA_InitStructrue.DMA_MemoryDataSize=DMA_MemoryDataSize_HalfWord;
	DMA_InitStructrue.DMA_MemoryInc=DMA_MemoryInc_Enable;                    //地址自增
	DMA_InitStructrue.DMA_DIR=DMA_DIR_PeripheralSRC;                  //方向:外设->存储器
	DMA_InitStructrue.DMA_BufferSize=4;
	DMA_InitStructrue.DMA_Mode=DMA_Mode_Normal;            //DMA循环模式,单次
	DMA_InitStructrue.DMA_M2M=DMA_M2M_Disable;             //触发,不使用软件触发,使用硬件触发
	DMA_InitStructrue.DMA_Priority=DMA_Priority_Medium;    //优先级,中等优先级
	DMA_Init(DMA1_Channel1,&DMA_InitStructrue);

	DMA_Cmd(DMA1_Channel1,ENABLE);                        //开启DMA
	ADC_Cmd(ADC1,ENABLE);				                  //开启ADC
	ADC_DMACmd(ADC1,ENABLE);							  //ADC使能DMA

	ADC_ResetCalibration(ADC1);                         //复位校准
	while(ADC_GetResetCalibrationStatus(ADC1)==SET);	//等待复位校准完成,复位校准完成(0)就跳出循环
	ADC_StartCalibration(ADC1);                         //开始校准
	while(ADC_GetCalibrationStatus(ADC1)==SET);         //等待校准完成
}
/*
调用这个函数触发传输计数器,软件触发DMA转运,等待转运完成,
转运完成之后,得到的数据自动转运到AD_Values数组
*/
void AD_GetValues(void)
{
	DMA_Cmd(DMA1_Channel1,DISABLE);
	DMA_SetCurrDataCounter(DMA1_Channel1,4);     //设置开始转运
	DMA_Cmd(DMA1_Channel1,ENABLE);

	ADC_SoftwareStartConvCmd(ADC1,ENABLE);             //使用软件触发函数

	while (DMA_GetFlagStatus(DMA1_FLAG_TC1)==RESET);
	DMA_ClearFlag(DMA1_FLAG_TC1);
}
#include "stm32f10x.h"                  // Device header
#include"OLED.h"
#include"AD.h"
#include"Delay.h"


uint16_t AD0,AD1,AD2,AD3;
int main(void)
{
	OLED_Init();
	AD_Init();
	OLED_ShowString(1,1,"AD0:");
	OLED_ShowString(2,1,"AD1:");
	OLED_ShowString(3,1,"AD2:");
	OLED_ShowString(4,1,"AD3:");

	while(1)
	{
		AD_GetValues();
		OLED_ShowNum(1,5,AD_Values[0],4);
		OLED_ShowNum(2,5,AD_Values[1],4);
		OLED_ShowNum(3,5,AD_Values[2],4);
		OLED_ShowNum(4,5,AD_Values[3],4);
		Delay_ms(200);

	}
}
3、DMA和AD多通道的第二种使用方式,比上一个少了一个返回值的AD_GetValues();的函数的写法。
#include "stm32f10x.h"                  // Device heade


uint16_t AD_Values[4];

void AD_Init(void)
{
	RCC_APB2PeriphClockCmd(RCC_APB2Periph_ADC1,ENABLE);     //开启ADC时钟
	RCC_APB2PeriphClockCmd(RCC_APB2Periph_GPIOA,ENABLE);
	RCC_AHBPeriphClockCmd(RCC_AHBPeriph_DMA1,ENABLE);
	RCC_ADCCLKConfig(RCC_PCLK2_Div6);       //6分频,对应就是72MHZ/6=12MHZ

	GPIO_InitTypeDef GPIO_InitStructure;
 	GPIO_InitStructure.GPIO_Mode = GPIO_Mode_AIN;    //初始化GPIO为输入模式,其他都为电平无效状态
	GPIO_InitStructure.GPIO_Speed = GPIO_Speed_50MHz;
	GPIO_InitStructure.GPIO_Pin = GPIO_Pin_0|GPIO_Pin_1|GPIO_Pin_2|GPIO_Pin_3;
 	GPIO_Init(GPIOA, &GPIO_InitStructure);

	ADC_InitTypeDef ADC_InitStructure;
	ADC_InitStructure.ADC_Mode=ADC_Mode_Independent;
	ADC_InitStructure.ADC_DataAlign=ADC_DataAlign_Right;       //数据右对齐
	ADC_InitStructure.ADC_ExternalTrigConv=ADC_ExternalTrigConv_None;	//触发源选择软件触发
	ADC_InitStructure.ADC_ContinuousConvMode=ENABLE;                  //转换模式连续转换模式
	ADC_InitStructure.ADC_NbrOfChannel=4;                        //指定序列是多少个
	ADC_InitStructure.ADC_ScanConvMode=ENABLE;         //转换模式连续扫描模式
	ADC_Init(ADC1,&ADC_InitStructure);
		/*配置ADC的通道和序列*/
	ADC_RegularChannelConfig(ADC1,ADC_Channel_0,1,ADC_SampleTime_55Cycles5);
	ADC_RegularChannelConfig(ADC1,ADC_Channel_1,2,ADC_SampleTime_55Cycles5);
	ADC_RegularChannelConfig(ADC1,ADC_Channel_2,3,ADC_SampleTime_55Cycles5);
	ADC_RegularChannelConfig(ADC1,ADC_Channel_3,4,ADC_SampleTime_55Cycles5);
	/*初始化DMA*/
	DMA_InitTypeDef DMA_InitStructrue;
	DMA_InitStructrue.DMA_PeripheralBaseAddr=(uint32_t)&ADC1->DR;             //外设起始地址
	DMA_InitStructrue.DMA_PeripheralDataSize=DMA_PeripheralDataSize_HalfWord; //十六位半字模式
	DMA_InitStructrue.DMA_PeripheralInc=DMA_PeripheralInc_Disable;	          //地址不自增
	DMA_InitStructrue.DMA_MemoryBaseAddr=(uint32_t)AD_Values;                //存储器起始地址
	DMA_InitStructrue.DMA_MemoryDataSize=DMA_MemoryDataSize_HalfWord;
	DMA_InitStructrue.DMA_MemoryInc=DMA_MemoryInc_Enable;                    //地址自增
	DMA_InitStructrue.DMA_DIR=DMA_DIR_PeripheralSRC;                  //方向:外设->存储器
	DMA_InitStructrue.DMA_BufferSize=4;
	DMA_InitStructrue.DMA_Mode=DMA_Mode_Circular;            //DMA循环模式,打开
	DMA_InitStructrue.DMA_M2M=DMA_M2M_Disable;             //触发,不使用软件触发,使用硬件触发
	DMA_InitStructrue.DMA_Priority=DMA_Priority_Medium;    //优先级,中等优先级
	DMA_Init(DMA1_Channel1,&DMA_InitStructrue);

	DMA_Cmd(DMA1_Channel1,ENABLE);                        //开启DMA
	ADC_Cmd(ADC1,ENABLE);				                  //开启ADC
	ADC_DMACmd(ADC1,ENABLE);							  //ADC使能DMA

	ADC_ResetCalibration(ADC1);                         //复位校准
	while(ADC_GetResetCalibrationStatus(ADC1)==SET);	//等待复位校准完成,复位校准完成(0)就跳出循环
	ADC_StartCalibration(ADC1);                         //开始校准
	while(ADC_GetCalibrationStatus(ADC1)==SET);         //等待校准完成

	ADC_SoftwareStartConvCmd(ADC1,ENABLE);             //使用软件触发函数
}
#include "stm32f10x.h"                  // Device header
#include"OLED.h"
#include"AD.h"
#include"Delay.h"


uint16_t AD0,AD1,AD2,AD3;
int main(void)
{
	OLED_Init();
	AD_Init();
	OLED_ShowString(1,1,"AD0:");
	OLED_ShowString(2,1,"AD1:");
	OLED_ShowString(3,1,"AD2:");
	OLED_ShowString(4,1,"AD3:");

	while(1)
	{

		OLED_ShowNum(1,5,AD_Values[0],4);
		OLED_ShowNum(2,5,AD_Values[1],4);
		OLED_ShowNum(3,5,AD_Values[2],4);
		OLED_ShowNum(4,5,AD_Values[3],4);
		Delay_ms(200);

	}
}


 914
914


 被折叠的 条评论
为什么被折叠?
被折叠的 条评论
为什么被折叠?
 到【灌水乐园】发言


