


This document records the implementation of “Flash Encryption + Secure Boot V2 + NVS Encryption” functions on the ESP32-S3 using the Flash Download Tool.
And the NVS Encryption is based on the Flash Encryption solution.
-
Verify Flash Encryption code:esp-idf/components/bootloader_support/src/flash_encrypt.c
-
Flash Encryption Test Example:esp-idf/examples/security/flash_encryption
Products that Support Flash Encryption:
| Chip | Supported Key Types |
|---|---|
| ESP32 | XTS_AES_128(256-bit Key) |
| ESP32-S2 | XTS_AES_128(256-bit Key) & XTS_AES_256(There are two 256-bit key blocks, the total of 512-bit) |
| ESP32-S3 | XTS_AES_128(256-bit Key) & XTS_AES_256(There are two 256-bit key blocks, the total of 512-bit) |
| ESP32-C2 | SHA256(256-bit Key)& XTS_AES_128(256-bit Key) |
| ESP32-C3 | XTS_AES_128(256-bit Key) |
| ESP32-C6 | XTS_AES_128(256-bit Key) |
| ESP32-H2 | XTS_AES_128(256-bit Key) |
Products that Support Secure Boot V2
| Product | Secure Boot Version |
|---|---|
| ESP32 ECO V3 and above versions | Secure Boot V1 & Secure Boot V2 ( RSA-PSS) |
| ESP32-S2 All versions | Secure Boot V2 ( RSA-PSS) |
| ESP32-S3 All versions | Secure Boot V2 ( RSA-PSS) |
| ESP32-C2 All versions | Secure Boot V2 ( ECDSA) |
| ESP32-C3 ECO V3 and above versions | Secure Boot V2 ( RSA-PSS) |
| ESP32-C6 All versions | Secure Boot V2 (RSA-PSS or ECDSA) |
| ESP32-H2 All versions | Secure Boot V2 (RSA-PSS or ECDSA) |
Overview of Flash Encryption
Flash Encryption is used to encrypt the firmware in the external Flash chip used with ESP32 series products, which can protect the security of applications firmware.
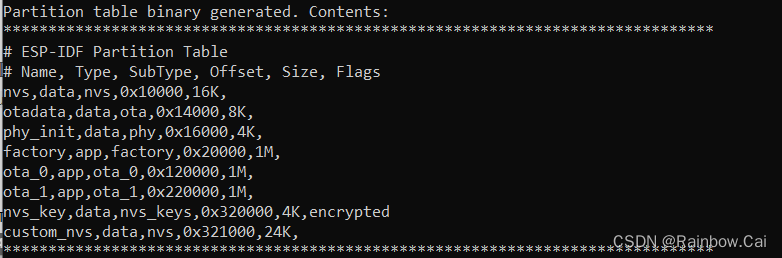
Partition Table Settings . For Example:
# Name,   Type, SubType, Offset,   Size, Flags
# Note: if you have increased the bootloader size, make sure to update the offsets to avoid overlap
nvs,      data, nvs,     ,        0x4000,
otadata,  data, ota,     ,        0x2000,
phy_init, data, phy,     ,        0x1000, encrypted
factory,  app,  factory, ,        1M,
ota_0,    app,  ota_0,   ,        1M,
ota_1,    app,  ota_1,   ,        1M,
nvs_key,  data, nvs_keys,,        0x1000, encrypted
# Custom NVS data partition
custom_nvs, data, nvs,      ,  0x6000,
storage,    data, 0xff,     ,  0x1000, encrypted
This partition table above includes two NVS partitions, the default nvs and the custom custom_nvs partition.
-
The default nvs partition is used to store WiFi or Bluetooth connection informations, as well as write data through the nvs_set API on the software. This
nvspartition does not need to download the correspondingnvs.binwhen the firmware downloading. The defaultnvspartition will beencryptedwhile writing data to thenvspartition via the nvs_set API (Note: Thenvs_get(read) API does not support NVS encryption). -
The custom
custom_nvspartition is used to store multiple files which by thecustom_nvs.csvfile managed . The types of files that can be managed can refer to the CSV File Format instructions. And thecustom_nvs.binneeds to beencryptedwithnvs_keyand downloaded theencrypt_custom_nvs.binto thecustom_nvspartition.
With Flash Encryption enabled, the following types of data are encrypted by default:
- Second Stage Bootloader (Firmware Bootloader)
- Partition Table
- NVS Key Partition
- Otadata
- All app type partitions
The NVS key partition (
nvs_keypartition) is used to store thenvs_key, and thenvs_keyis used to encrypt the defaultnvspartition and the definedcustom_nvspartition.
Other types of data can be encrypted conditionally:
- Any partition marked with the
encryptedflag in the partition table. For details, see Encrypted Partition Flag. - If Secure Boot is enabled,the Secure Boot
public key digestwill beencrypted.
Use a custom_nvs.csv file to Manage multiple files as follows:
key,type,encoding,value
server_cert,namespace,,
server_cert,file,binary,E:\esp\test\customized\server_cert\server_cert.crt
server_key,namespace,,
server_key,file,binary,E:\esp\test\customized\server_key\server.key
server_ca,namespace,,
server_ca,file,binary,E:\esp\test\customized\server_ca\server_ca.crt
The Flash Encryption supports use the specified key to encrypt the firmware when base on the Flash Download Tool .
The Flash Encryption supports use the AES-128(256 bit Key) and AES-256(512 bit Key) .
- The
AES-128(256 bit Key)only need occupies one eFuse BLOCK; - The
AES-256 (512-bit Key)need occupies two eFuse BLOCK.
Users can choose between AES-128 (256-bit Key) or AES-256 (512-bit Key) according to their needs. For detail, please refer to the “Using Host Generated Key” instructions .
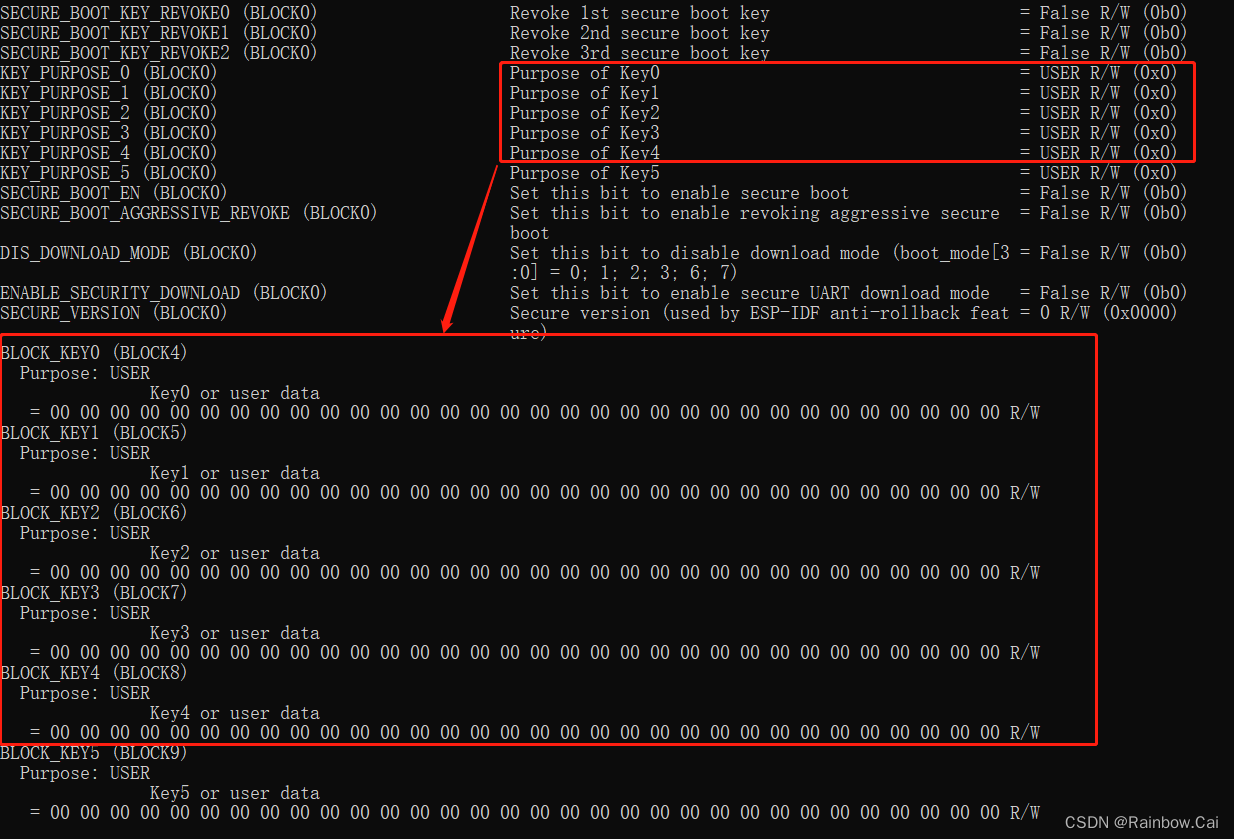
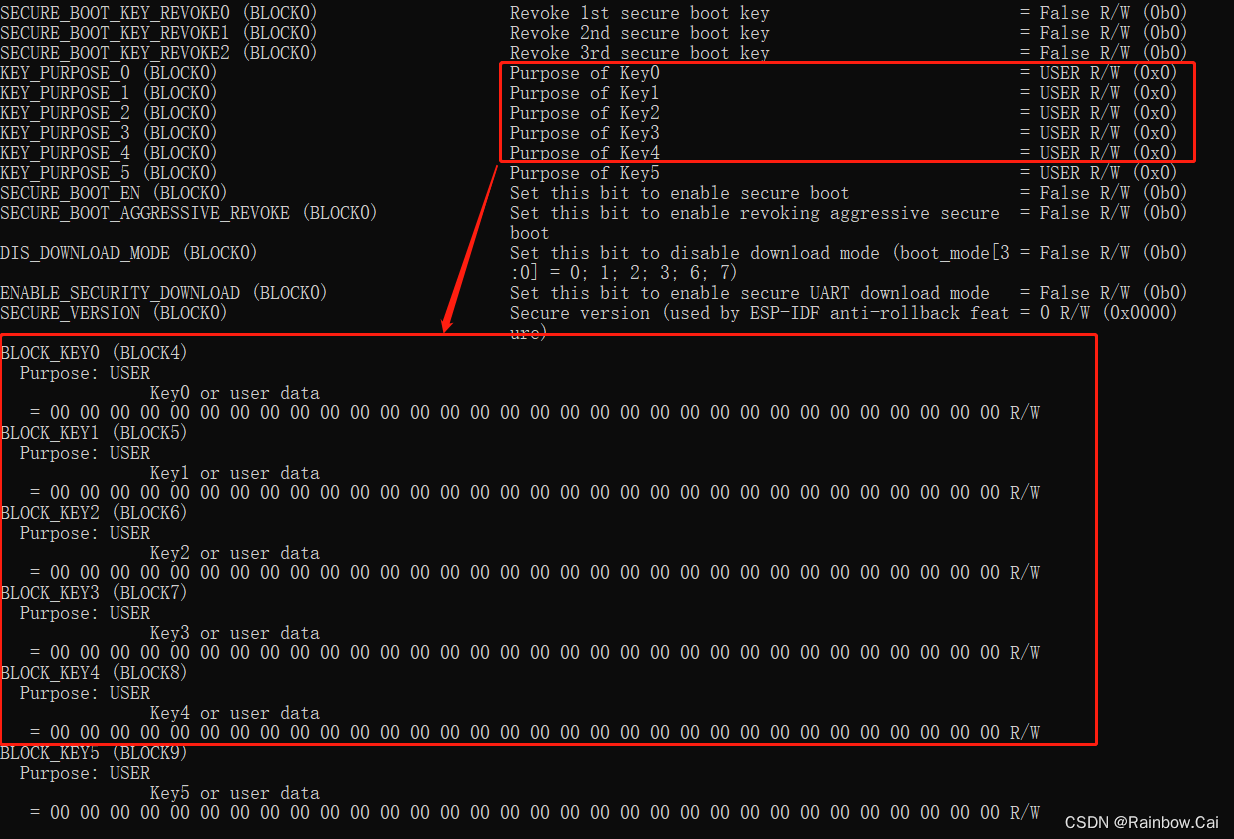
In addition, the Flash Encryption key is stored in the chip’s eFuse BLOCK, but the Flash Encryption key and the Secure Boot public key digest for the ESP32-S3 only support storage in BLOCK_KEY0 (BLOCK4) to BLOCK_KEY4 (BLOCK8). For details, please refer to the eFuse BLOCK description. As follows:
How to Obtain Different Types of Flash Encryption Keys?
Users can use esptool and running the follows commands to generate the Flash Encryption keys . As follows:
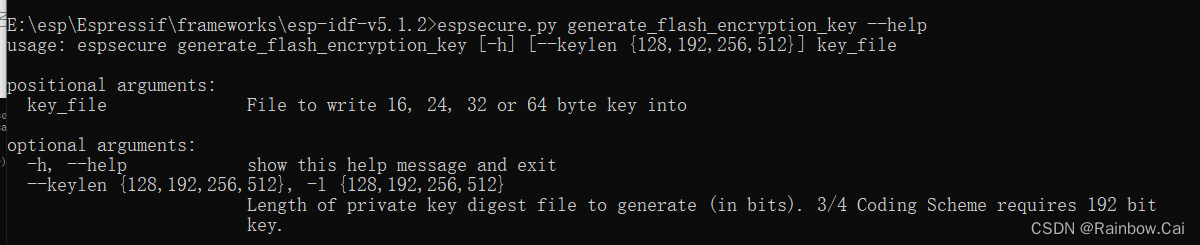
【Only ESP32-C2】Use esptool ,running the follows command to generate theSHA-256(128 bit Key)for Flash Encryption ,please refer to the “Using Host Generated Key” instructions .
espsecure.py generate_flash_encryption_key --keylen 128 flash_encryption_key.bin
【Only ESP32-C2】The SHA-256(128 bit Key) will be written to eFuse BLOCK LOW 128 bit ,As follows:

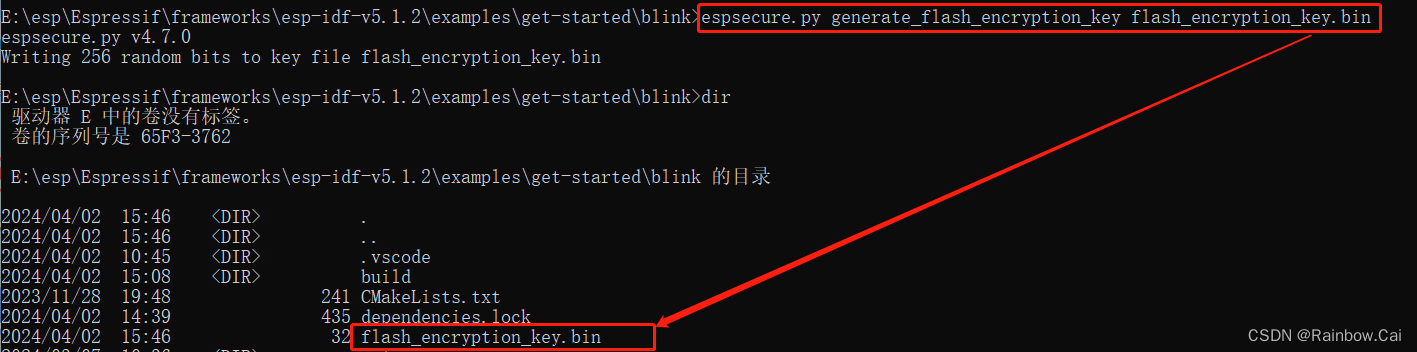
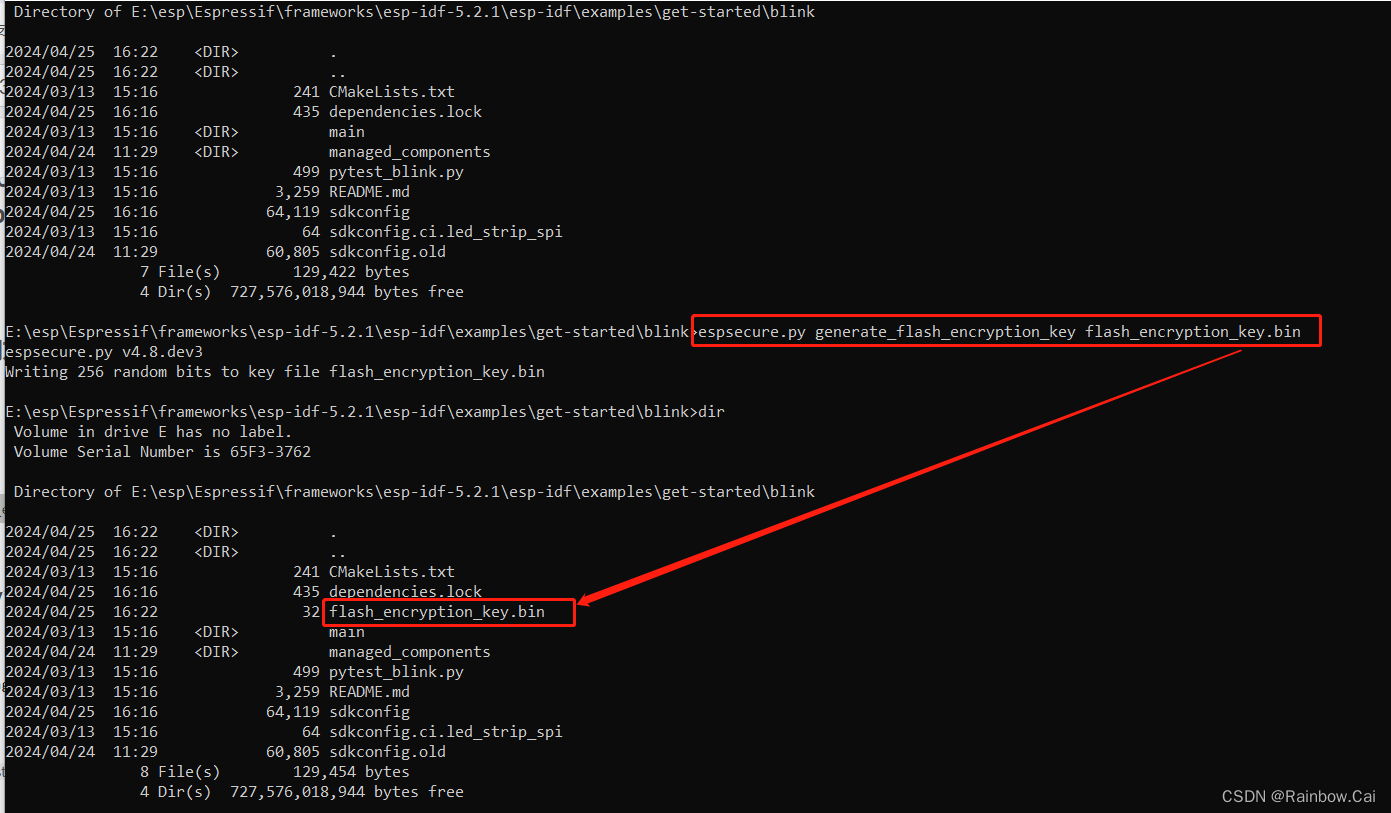
【Other Series Products】Use esptool ,running the follows command to generate theAES-128(256 bit Key)for Flash Encryption ,please refer to the “Using Host Generated Key” instructions .
espsecure.py generate_flash_encryption_key flash_encryption_key.bin
flash_encryption_key.binis the generated (Custom name) Flash encryption key file
When the--keylenparameter is not specified, theAES-128 (256-bit key)is generated by default
【ESP32-S2 / ESP32-S3】Use esptool ,running the follows command to generate theAES-256(512 bit Key)for Flash Encryption ,please refer to the “Using Host Generated Key” instructions .
espsecure.py generate_flash_encryption_key --keylen 512 flash_encryption_key.bin
How to Generate a private key for Secure Boot V2 Signature?
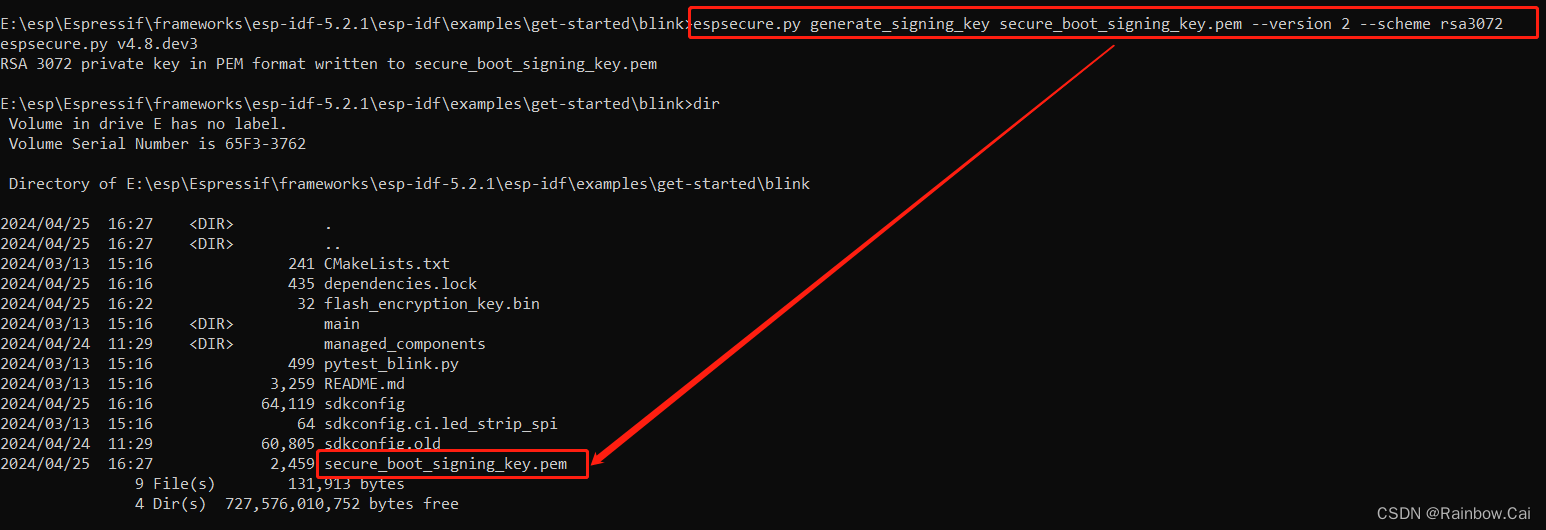
Base on the ESP32S3 chip to enable Secure Boot V2 function will requires users to add a private key for Secure Boot V2 signatures. Secure Boot V2 on ESP32S3 requires the use of a private key of the rsa3072 type.
- Users can use the esptool ,and running the follows command to generate the Secure Boot V2 signature private key
espsecure.py generate_signing_key secure_boot_signing_key.pem --version 2 --scheme rsa3072
secure_boot_signing_key.pemis the generatedkey filewhich can custom name.--version 2selects theSecure Boot V2version.--scheme rsa3072select the type of key.


- Alternatively, you can also install the OpenSSL environment and to generate an RSA 3072 type private key for Secure Boot signing with the following command:
openssl genrsa -out my_secure_boot_signing_key.pem 3072

How to Generate Secure Boot V2 Public Key Digest?
When signing firmware with the Secure Boot V2 private key, a public key and a digest of the public key will be generated based on the Secure Boot V2 private key(public_key_digest.bin).
- The
public keyandpublic key digestwill be written to thesigned block, and thesigned blockwill be written at the end of thebootloader.binandapp.binfirmware, i.e., Secure Boot V2 only signed thebootloader.binandapp.binfirmware. - The Secure Boot V2
public key digestwill be written to the chipeFuseBLOCK and will be used for verify the signed block in the firmware.
So you need to generate the private key digest for Secure Boot V2 , please see: Enable Secure Boot V2 Externally
-
You can use the esptool ,and running the follows command to generate the Secure Boot V2
public key digest.espsecure.py digest_rsa_public_key --keyfile secure_boot_signing_key.pem --output public_key_digest.bin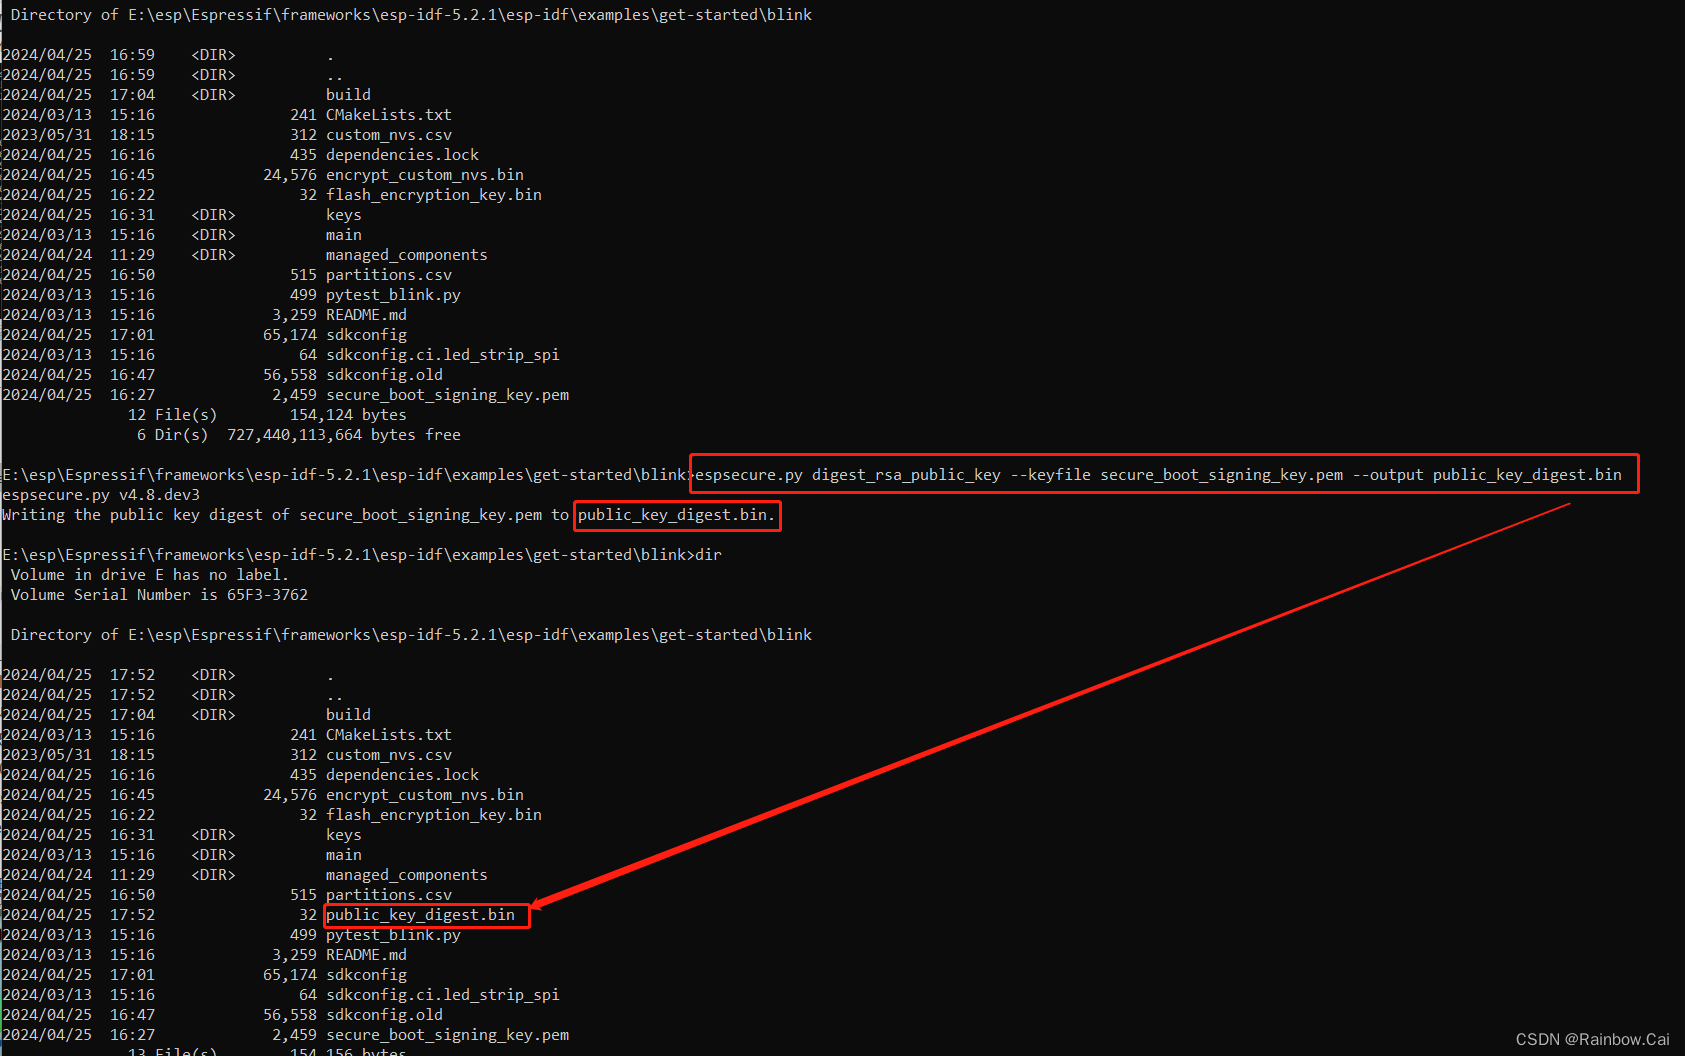
-
After enabling the Secure Boot V2 feature, upon firmware startup, it will check if the second-stage-bootloader (
bootloader.bin) is signed. Then, the signed second-stage-bootloader (bootloader.bin) will be used to verify the signedapp.bin. If the verification passes, the firmware will start normally.
How to Obtain the NVS Key?
Base on the Flash Encryption solution to enable the NVS Encryption ,you need to set the nvs_key partition by yourself. The nvs_key can be automatically generated by the system. You can also use the customized nvs_key.bin file.
- When system detecting that the
nvs_keypartition is empty, the system will automatically generates annvs_keyand writes is to thenvs_keypartition. The log as follows:

- If use the custom
nvs_key.bin, you need to download thenvs_key.binto thenvs_keypartition. In addition, you need to use thecustom_nvs.csvfile to manage multiple files and to encryptcustom_nvs.csvwithnvs_key.bin. Then burned it into thecustom_nvspartition.
You can use the nvs partition tool (esp-idf/components/nvs_flash/nvs_partition_generator)running the nvs_partition_gen.py command to obtain the nvs_key file. As follows:
python E:\esp\Espressif\frameworks\esp-idf-5.2.1\esp-idf\components\nvs_flash\nvs_partition_generator\nvs_partition_gen.py generate-key --keyfile nvs_key.bin
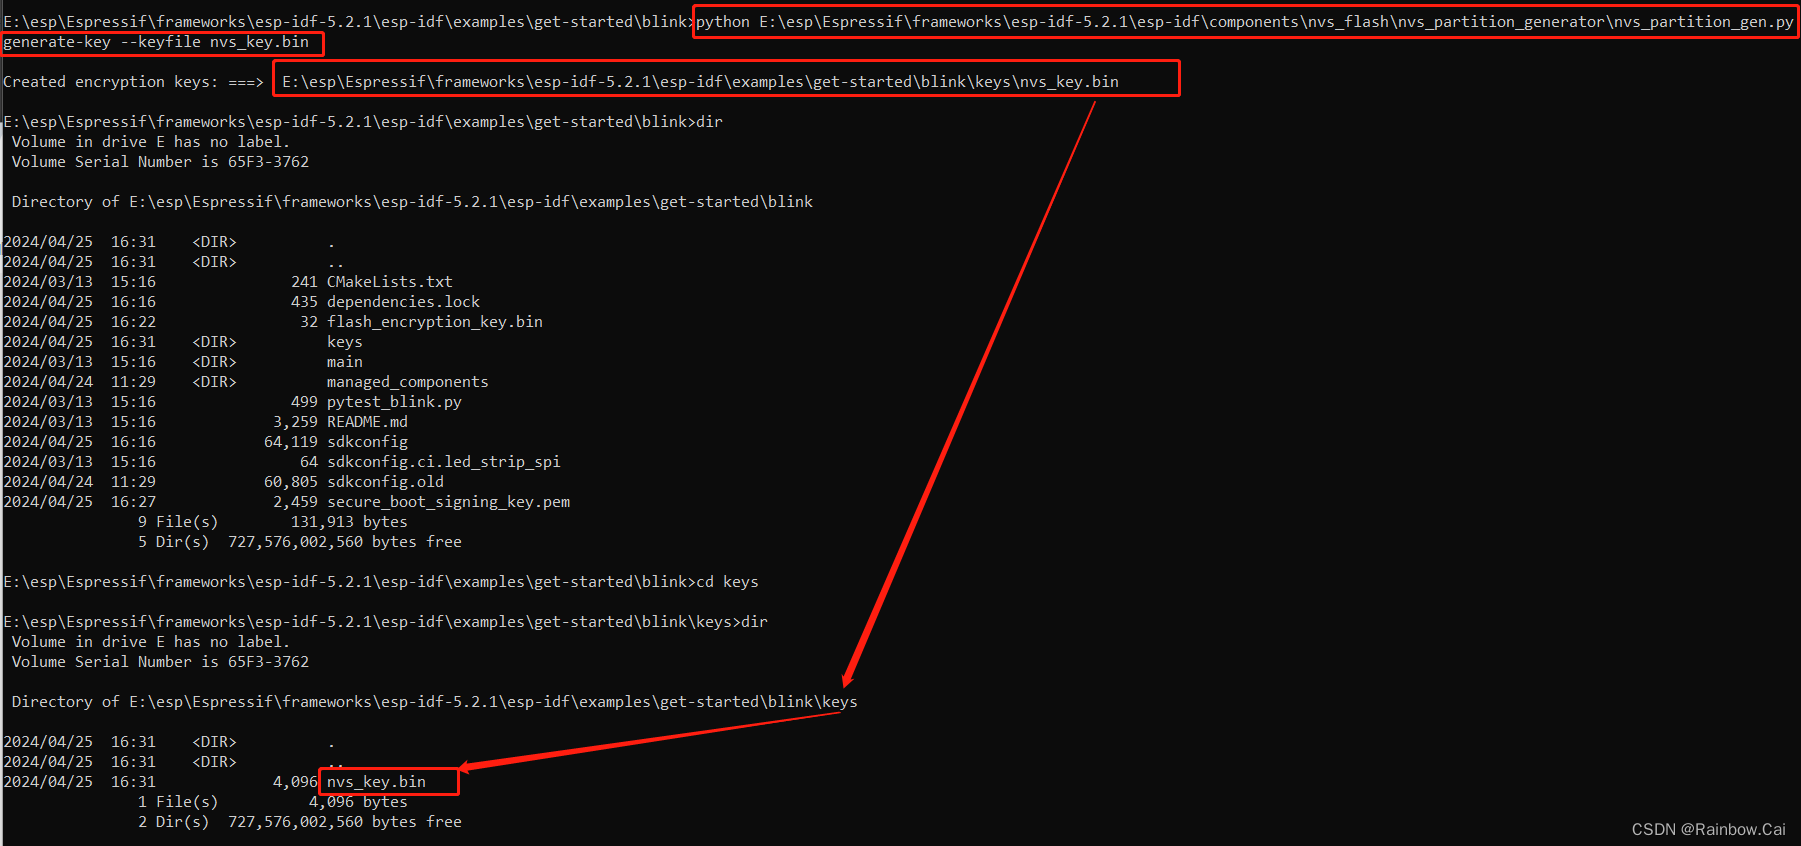
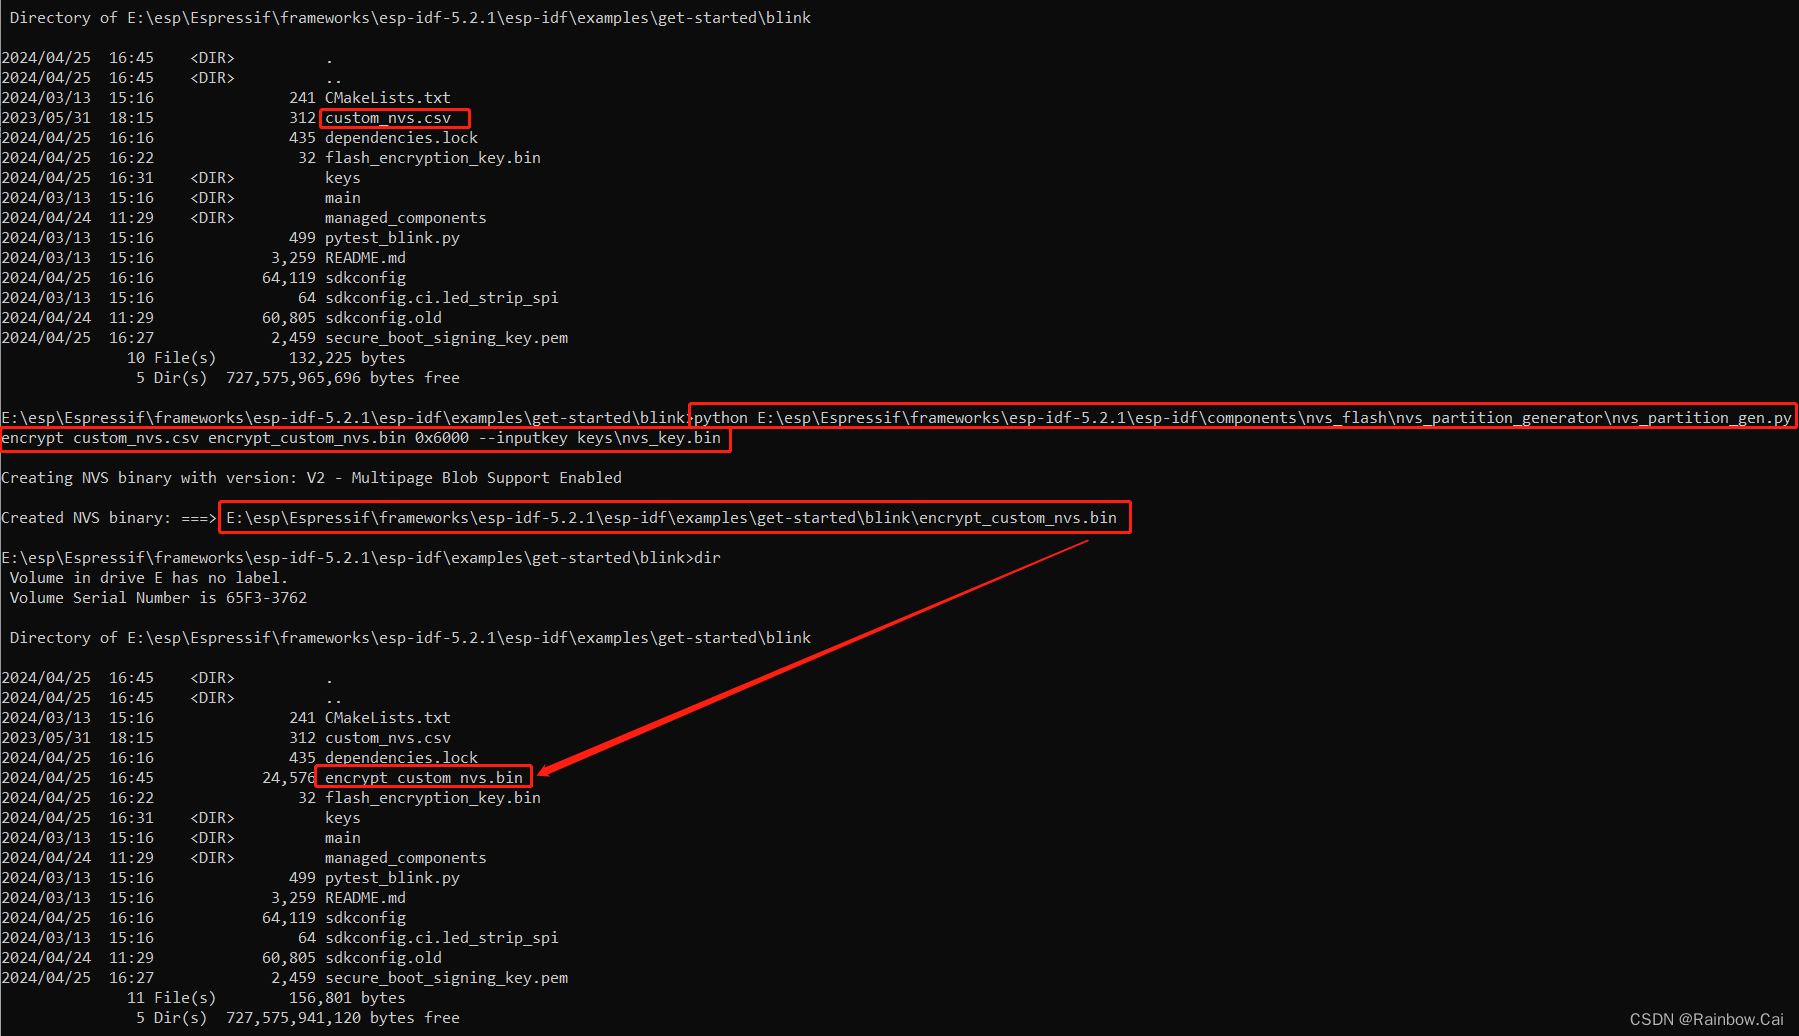
Then use nvs_key.bin to encrypt the custom_nvs.csv file and get the encrypted encrypt_custom_nvs.bin.
python E:\esp\Espressif\frameworks\esp-idf-5.2.1\esp-idf\components\nvs_flash\nvs_partition_generator\nvs_partition_gen.py encrypt custom_nvs.csv encrypt_custom_nvs.bin 0x6000 --inputkey keys\nvs_key.bin
0x6000is size ofencrypt_custom_nvs.binfirmware
If you are using the ESP32S3 series chip and wish to enable the “Flash Encryption + Secure Boot V2 + NVS Encryption” functions , from the perspective of mass production environment, we recommend using the Flash Download Tool (version V3.9.6 or above) to complete all process.
The implementation process for completing “Flash Encryption + Secure Boot V2 + NVS Encryption” using the Flash Download Tool are as follows:
-
Enable the Flash Encryption and Secure Boot V2 setting on Flash Download Tool .
-
Import the
Flash Encryption KeyandSecure Boot public key digeston Flash Download Tool . -
The
Flash Encryption KeyandSecure Boot public key digestwill writing into the chip’s eFuse BLOCK directly during the firmware download process. -
Simultaneously will writing the eFuse control bit (
FLASH_CRYPT_CNT) to enable the Flash Encryption feature and will writing the eFuse control bit (ABS_DONE_1) to enable the Secure Boot V2 feature.
Utilizing the Flash Download Tool to complete the “Flash Encryption + Secure Boot V2 + NVS Encryption” feature offers the following advantages on the operational steps :
- Once the firmware download is completed, all the security and encrypted process are also finished.
- When the chip is powered on for the first time, it is will runing the
ciphertext firmwaredirectly. - The risk of
Power FailureorPower Supply Instabilityin security and encrypted processes can be avoided.
The procedure for using the Flash Download Tool to complete “Flash Encryption + Secure Boot V2 + NVS Encryption” are as follows:
1. Obtain the required keys file follow the preceding instructions
-
Obtain Flash Encryption Keys
Because of the Flash Download Tool only support
AES-128(256 bit Key)on ESP32-S3, so we recommend to use theAES-128(256 bit Key)for ESP32-S3 Flash Encryption .
espsecure.py generate_flash_encryption_key flash_encryption_key.bin
- Obtain Secure Boot V2 Key
espsecure.py generate_signing_key secure_boot_signing_key.pem --version 2 --scheme rsa3072
-
Generate the digest of the
private keyfor Secure Boot V2 , please see: Enable Secure Boot V2 ExternallyWhen enable Secure Boot V2 function on Flash Download Tool , you need to add the Secure Boot V2 Key Digest. So you need to base on the Secure Boot V2 Key to generate the digest of the
public key. Please see: Enable Secure Boot V2 Externally.
espsecure.py digest_rsa_public_key --keyfile secure_boot_signing_key.pem --output public_key_digest.bin
-
Obtain
nvs_key, then usenvs_key.binto encrypt thecustom_nvs.csvfile.You can use the
nvs partition tool(esp-idf/components/nvs_flash/nvs_partition_generator)running thenvs_partition_gen.pycommand to obtain thenvs_keyfile. As follows:python E:\esp\Espressif\frameworks\esp-idf-5.2.1\esp-idf\components\nvs_flash\nvs_partition_generator\nvs_partition_gen.py generate-key --keyfile nvs_key.binThen use
nvs_key.binto encrypt thecustom_nvs.csvfile and get the encryptedencrypt_custom_nvs.bin.python E:\esp\Espressif\frameworks\esp-idf-5.2.1\esp-idf\components\nvs_flash\nvs_partition_generator\nvs_partition_gen.py encrypt custom_nvs.csv encrypt_custom_nvs.bin 0x6000 --inputkey keys\nvs_key.bin0x6000is size ofencrypt_custom_nvs.binfirmware
2. Software Configuration
-
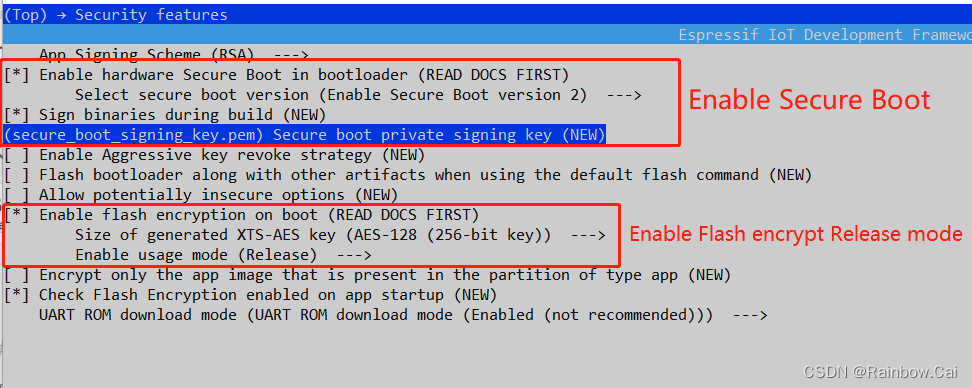
On the Software Configuration,you need to enable
Flash Encryption+Secure Boot V2+NVS Encryptionsetting→ Security features
-
Because of the Flash Download Tool only support
AES-128(256 bit Key)on ESP32-S3, so we recommend to use theAES-128(256 bit Key)for ESP32-S3 Flash Encryption . On the software configuration , you need to select theSize of generated AES-XTS key (AES-128 (256-bit key))configuration. -
Enable usage modeconfiguration can selectReleaseorDevelopment (NOT SECURE)mode.-
When select the Flash Encryption
Releasemode, It is will setting theSPI_BOOT_CRYPT_CNTeFuse bit to0b111. TheReleasemode is recommended for mass production. -
When select the Flash Encryption
Development (NOT SECURE)mode, It is will setting theSPI_BOOT_CRYPT_CNTeFuse bit to0b001. If select theDevelopment (NOT SECURE)mode, the chip support provides one chance for disable Flash encryption . After enabled Flash EncryptionDevelopment (NOT SECURE)mode, if you want to disable the Flash Encryption , you can running the follows command to disable the Flash Encryption.espefuse.py -p port burn_efuse SPI_BOOT_CRYPT_CNT 0x3
-
-
-
Enable NVS Encryption
→ Component config → NVS

-
At the same time, please pay attention to the
UART ROM download modesetting. If you do not want to disable the download mode, it is recommended to selectUART ROM download mode (Enabled (not recommended))configuration. Different download modes configuration options instructions can refer to CONFIG_SECURE_UART_ROM_DL_MODE:→ Security features → UART ROM download mode

-
Since the Flash Encryption and Secure Boot V2 feature will increase the size of the bootloader firmware, so you need to increase the partition table offset setting. As follows:
Default is
0x8000, which can be increased to0xF000.idf.py menuconfig —> Partition Table

3. Then compile the project to get the compiled firmware:
-
Use the follows command to compile the project
idf.py build -
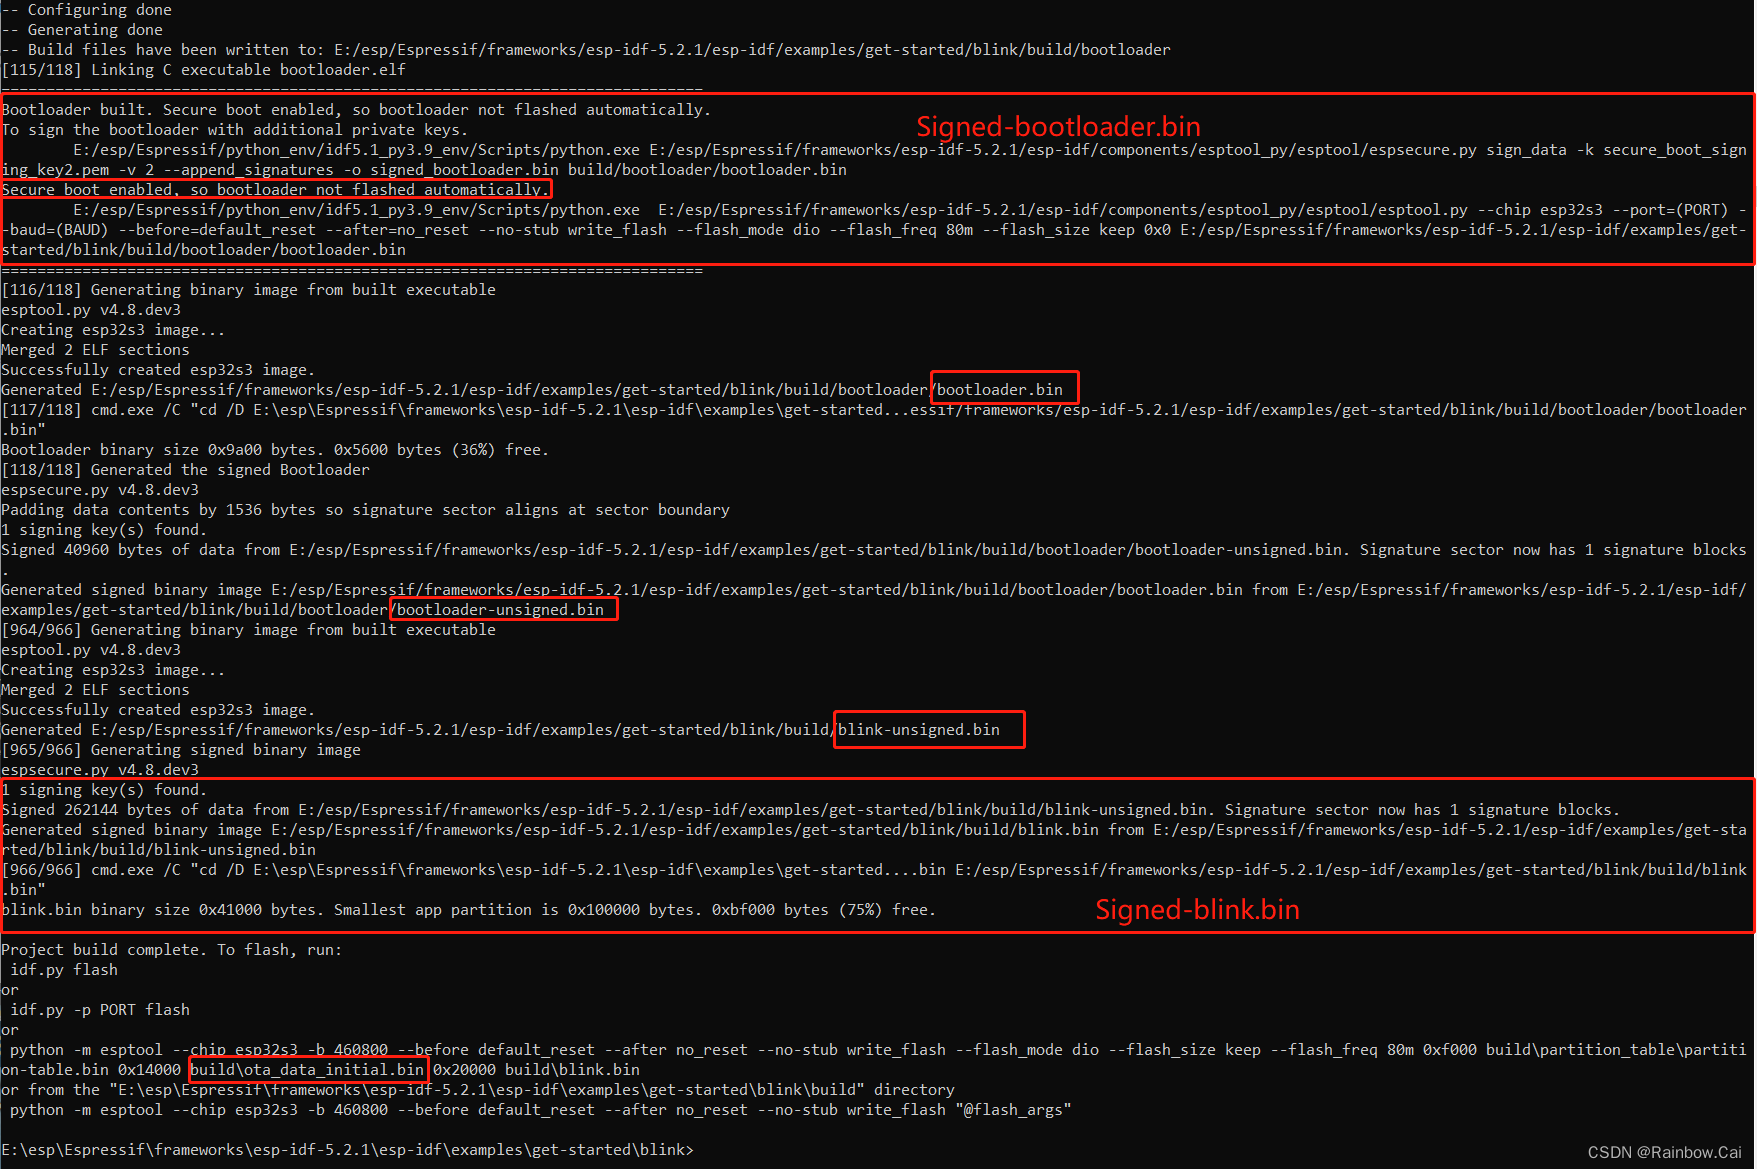
After compiling, the following firmware will generated
- Unsigned and unencrypted
bootloader-unsigned.bin - Unsigned and unencrypted
ota_data_initial.bin - Unsigned and unencrypted
blink-unsigned.bin - Unsigned and unencrypted
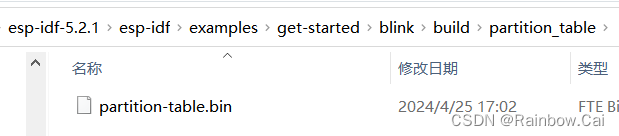
partition-table.bin - Signed and unencrypted
bootloader.bin - Signed and unencrypted
blink.bin
As follows:
- The firmware files can be found in the local path:
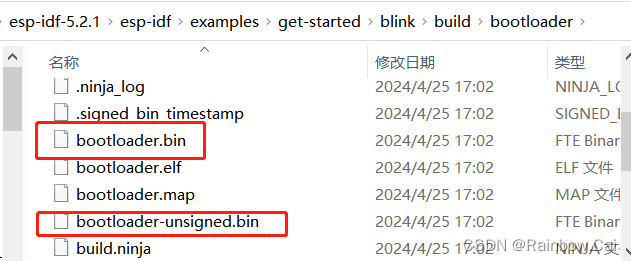
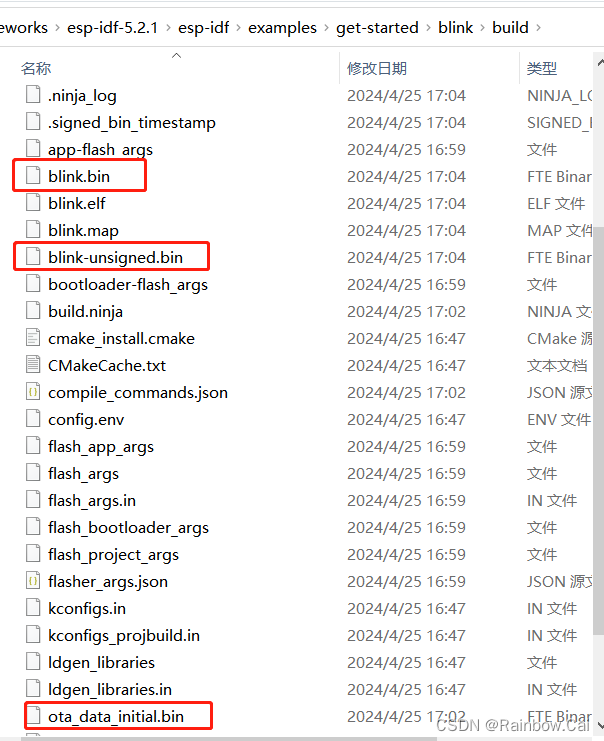
- Unsigned and unencrypted
-
Through the compilation completion log, you can see the
firmware pathandfirmware download address. As follows:
-
The firmware and firmware download address are need to be imported to the Flash Download tool . As follows:
0x0: bootloader.bin (Signedbootloader.bin)
0xf000:partition-table.bin (Unsignedpartition-table.bin)
0x14000:ota_data_initial.bin(Unsignedota_data_initial.bin)
0x20000: blink.bin (Signedblink.bin)
0x320000: nvs_key.bin ( NVS Encryption Key)
0x321000: encrypt_custom_nvs.bin ( Encryptedcustom_nvs.csvfile)
4. Flash Download Tools Configuration
-
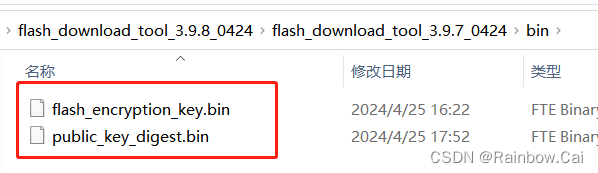
Put the
Flash Encryption Keyand thedigest of the Secure boot V2 public keyinto theflash_download_tool\bindirectory.
-
In the
configure\esp32s3\security.confconfiguration file of the Flash Download Tool , enable theFlash EncryptionandSecure Boot V2configuration option . As follows: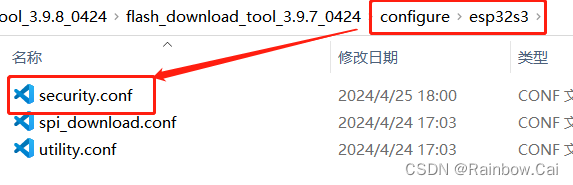
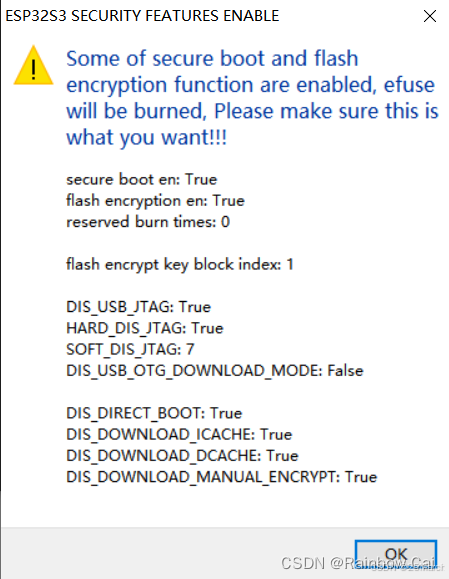
The security configurations to be modified are as follows:
[SECURE BOOT]
secure_boot_en = True
public_key_digest_path = .\bin\public_key_digest.bin
public_key_digest_block_index = 0

[FLASH ENCRYPTION]
flash_encryption_en = True
reserved_burn_times = 0
flash_encrypt_key_block_index = 1

[SECURE OTHER CONFIG]
flash_encryption_use_customer_key_enable = True
flash_encryption_use_customer_key_path = .\bin\flash_encryption_key.bin
flash_force_write_enable = True

[FLASH ENCRYPTION KEYS LOCAL SAVE]
keys_save_enable = False
encrypt_keys_enable = False
encrypt_keys_aeskey_path =

[ESP32S3 EFUSE BIT CONFIG]
dis_usb_jtag = True
hard_dis_jtag = True
soft_dis_jtag = 7
dis_usb_otg_download_mode = True
dis_direct_boot = True
dis_download_icache = True
dis_download_dcache = True
dis_download_manual_encrypt = True
-
[SECURE BOOT]secure_boot_en = True:Enable Secure Bootpublic_key_digest_path = .\bin\public_key_digest.bin:Set the path of theSecure boot V2 Key public key digest. Note: This path (.\bin\public_key_digest.bin) is based on the current path of the Flash Download Tool .public_key_digest_block_index = 0:Set the storage location for theSecure Boot public key digest. Only available for ESP32-C series and ESP32-S series products. And the storage range forSecure Boot public key digestis optional from0~4, That is, theBLOCK_KEY0 ~ BLOCK_KEY4can supported ,correspondingeFuse BLOCK4 ~ BLOCK8。Note:TheESP32-C2can only set to0。As follows:
-
[FLASH ENCRYPTION]flash_encryption_en = True:Enable Flash Encryptionreserved_burn_times = 0: Set the reserved burn times. If set it to0,it is will writing theSPI_BOOT_CRYPT_CNTeFuse bit to0b111;If set it to3,It is will writing toSPI_BOOT_CRYPT_CNTeFuse bit to0xb001. When the Flash Encryption mode is set toReleasemode,this parameter should be set to0.flash_encrypt_key_block_index = 1: Set the storage location for theFlash encryption key. Only available for ESP32-C series and ESP32-S series products. And the storage range forFlash encryption keyis optional from0~4, That is, theBLOCK_KEY0 ~ BLOCK_KEY4can supported ,correspondingeFuse BLOCK4 ~ BLOCK8。Note:TheESP32-C2can only set to0。
-
[SECURE OTHER CONFIG]-
flash_encryption_use_customer_key_enable = True: Whether to use the specified Flash encryption key from the customer -
flash_encryption_use_customer_key_path = .\bin\flash_encrypt_key.bin: Set the path of the Flash encryption key. Note: This path (.\bin\flash_encrypt_key.bin) is based on the current path of the Flash Download Tool . -
flash_force_write_enable = False: Configures whether to skip encryption and secure boot checks when burning firmware. The default isFalse,When set it toFalse,the error log will report when burning a product that has Flash encryption enabled or secure boot enabled.When set it toTrue,if the chip not disable download mode,but enabled theFlash EncryptionorSecure Bootfunction,the Flash Download Tools will won’t check the eFuse security informations.
-
5. Restart the Flash Download Tools
After restart the Flash Download Tools ,it is will read the configure\esp32s3\security.conf configuration informations. As follows:
6. Import all firmware to be Downloaded
According to partition table setting, add all the firmware and firmware downloade address . As follows:
Note: Do not support directly importing the
merged firmware
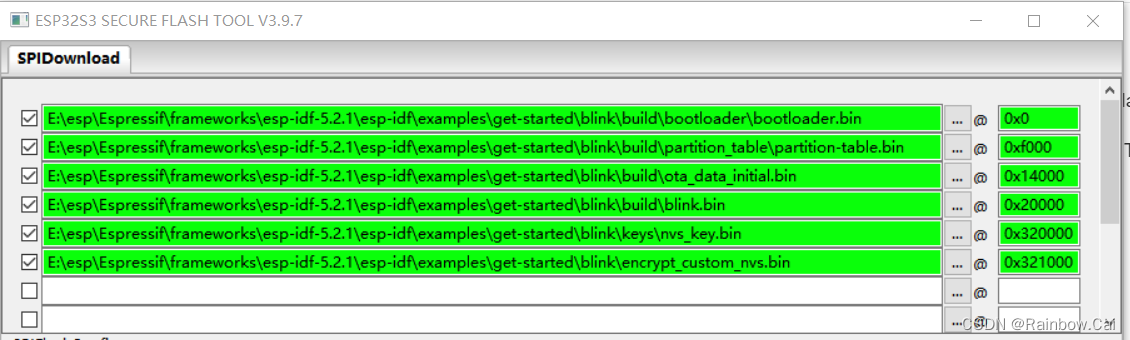
bootloader.binandblink.binareSignedfirmware.nvs_key.binis nvs key for NVS Encryptionencrypt_custom_nvs.binis Encryptedcustom_nvs.bin
7. Burning all firmware
- The firmware will write the
Flash encryption keyandSecure boot V2 Key public key digestto the chipeFuse BLOCKduring the download process. - And wirting the(
SPI_BOOT_CRYPT_CNT) eFuse bit to enableFlash Encryptionand writing theSECURE_BOOT_ENeFuse bit to enableSecure Boot V2. - Then writing all (
configure\esp32s3\security.conf)[ESP32S3 EFUSE BIT CONFIG]configuration setting to chip eFuse .
As follows log from black box :
test offset :  3276800 0x320000
case ok
test offset :  3280896 0x321000
case ok
.
Changing baud rate to 115200
Changed.
NO XMC flash  detected!
ESP32 secure boot v2 skip generate key
burn secure key ...
Burn keys to blocks:
 - BLOCK_KEY0 -> [ae ba 41 be 66 f5 00 35 7d 20 9e 62 5f f7 b4 3a 6a 3c 2a fd f8 3e ac cc 2b 00 bb ae a8 b8 79 5b]
        'KEY_PURPOSE_0': 'USER' -> 'SECURE_BOOT_DIGEST0'.
        Disabling write to 'KEY_PURPOSE_0'.
        Disabling write to key block


Check all blocks for burn...
idx, BLOCK_NAME,          Conclusion
[00] BLOCK0               is not empty
        (written ): 0x00000000800000020040000040040000000f0c0201000200
        (to write): 0x000000000000000000000000090000000000000000800100
        (coding scheme = NONE)
[04] BLOCK_KEY0           is empty, will burn the new value
.
This is an irreversible operation!
BURN BLOCK4  - OK (write block == read block)
BURN BLOCK0  - OK (all write block bits are set)
Reading updated efuses...
Successful
The efuses to burn:
  from BLOCK0
     - SPI_BOOT_CRYPT_CNT
     - SECURE_BOOT_EN

Burning efuses:

    - 'SPI_BOOT_CRYPT_CNT' (Enables flash encryption when 1 or 3 bits are set and disabled otherwise) 0b001 -> 0b111

    - 'SECURE_BOOT_EN' (Set this bit to enable secure boot) 0b0 -> 0b1


Check all blocks for burn...
idx, BLOCK_NAME,          Conclusion
[00] BLOCK0               is not empty
        (written ): 0x00000000800000020040000049040000000f0c0201800300
        (to write): 0x000000000000000000100000001c00000000000000000000
        (coding scheme = NONE)
.
This is an irreversible operation!
BURN BLOCK0  - OK (all write block bits are set)
Reading updated efuses...
Checking efuses...
Successful

WARNING: - compress and encrypt options are mutually exclusive
Will flash uncompressed
Took 0.43s to erase flash block
Took 0.05s to erase flash block
Took 0.08s to erase flash block
Took 1.23s to erase flash block
Took 0.05s to erase flash block
Took 0.24s to erase flash block
The efuses to burn:
  from BLOCK0
     - DIS_USB_JTAG
     - DIS_PAD_JTAG
     - SOFT_DIS_JTAG
     - DIS_DIRECT_BOOT
     - DIS_DOWNLOAD_ICACHE
     - DIS_DOWNLOAD_DCACHE
     - DIS_USB_OTG_DOWNLOAD_MODE
     - DIS_DOWNLOAD_MANUAL_ENCRYPT

Burning efuses:

    - 'DIS_USB_JTAG' (Set this bit to disable function of usb switch to jtag in module of usb device) 0b1 -> 0b1
        The same value for DIS_USB_JTAG is already burned. Do not change the efuse.

    - 'DIS_PAD_JTAG' (Set this bit to disable JTAG in the hard way. JTAG is disabled permanently) 0b1 -> 0b1
        The same value for DIS_PAD_JTAG is already burned. Do not change the efuse.

    - 'SOFT_DIS_JTAG' (Set these bits to disable JTAG in the soft way (odd number 1 means disable ). JTAG can be enabled in HMAC module) 0b111 -> 0b111
        The same value for SOFT_DIS_JTAG is already burned. Do not change the efuse.

    - 'DIS_DIRECT_BOOT' (Disable direct boot mode) 0b1 -> 0b1
        The same value for DIS_DIRECT_BOOT is already burned. Do not change the efuse.

    - 'DIS_DOWNLOAD_ICACHE' (Set this bit to disable Icache in download mode (boot_mode[3:0] is 0; 1; 2; 3; 6; 7)) 0b1 -> 0b1
        The same value for DIS_DOWNLOAD_ICACHE is already burned. Do not change the efuse.

    - 'DIS_DOWNLOAD_DCACHE' (Set this bit to disable Dcache in download mode ( boot_mode[3:0] is 0; 1; 2; 3; 6; 7)) 0b1 -> 0b1
        The same value for DIS_DOWNLOAD_DCACHE is already burned. Do not change the efuse.

    - 'DIS_DOWNLOAD_MANUAL_ENCRYPT' (Set this bit to disable flash encryption when in download boot modes) 0b0 -> 0b1


Check all blocks for burn...
idx, BLOCK_NAME,          Conclusion
[00] BLOCK0               is not empty
        (written ): 0x000000008000000200500000491c0000000f0c0201800300
        (to write): 0x000000000000000000000000000000000010000000000000
        (coding scheme = NONE)
.
This is an irreversible operation!
BURN BLOCK0  - OK (all write block bits are set)
Reading updated efuses...
Checking efuses...
Successful
The firmware download process will complete the following process:
- Writing the
Secure boot V2 Key public key digestto chip eFuseBLOCK_KEY0 (KEY_PURPOSE_0) - Writing the
Flash Encryption keyto chip eFuseBLOCK_KEY1 (KEY_PURPOSE_1) - Wirting the(
SPI_BOOT_CRYPT_CNT) eFuse bit to0b111 - Writing the
SECURE_BOOT_ENeFuse bit to0b1 - Writing the
DIS_USB_JTAGeFuse bit to0b1 - Writing the
DIS_PAD_JTAGeFuse bit to0b1 - Writing the
SOFT_DIS_JTAGeFuse bit to0b111 - Writing the
DIS_DIRECT_BOOTeFuse bit to0b1 - Writing the
DIS_DOWNLOAD_ICACHEeFuse bit to0b1 - Writing the
DIS_DOWNLOAD_DCACHEeFuse bit to0b1 - Writing the
DIS_DOWNLOAD_MANUAL_ENCRYPTeFuse bit to0b1
After the firmware is downloaded, all the Flash Encryption and Secure Boot V2 process are completed.
8. Running the Firmware
Upon the first power-up startup, the firmware will::
- Check whether the Secure Boot V2 feature is enabled
- Check whether the Flash Encryption feature is enabled
- Then, verify Signed and Encrypted firmware
- If the verification succeeds, the firmware will running normally

The running log as follows:
ESP-ROM:esp32s3-20210327
Build:Mar 27 2021
rst:0x1 (POWERON),boot:0x8 (SPI_FAST_FLASH_BOOT)
SPIWP:0xee
mode:DIO, clock div:1
Valid secure boot key blocks: 0
secure boot verification succeeded
load:0x3fce3980,len:0x3a1c
load:0x403c9700,len:0x4
load:0x403c9704,len:0xcbc
load:0x403cc700,len:0x52bc
entry 0x403c9914
I (73) boot: ESP-IDF v5.2.1-dirty 2nd stage bootloader
I (73) boot: compile time Apr 25 2024 17:02:34
I (73) boot: Multicore bootloader
I (77) boot: chip revision: v0.1
I (81) boot.esp32s3: Boot SPI Speed : 80MHz
I (85) boot.esp32s3: SPI Mode : DIO
I (90) boot.esp32s3: SPI Flash Size : 8MB
I (95) boot: Enabling RNG early entropy source...
I (100) boot: Partition Table:
I (104) boot: ## Label Usage Type ST Offset Length
I (111) boot: 0 nvs WiFi data 01 02 00010000 00004000
I (119) boot: 1 otadata OTA data 01 00 00014000 00002000
I (126) boot: 2 phy_init RF data 01 01 00016000 00001000
I (134) boot: 3 factory factory app 00 00 00020000 00100000
I (141) boot: 4 ota_0 OTA app 00 10 00120000 00100000
I (149) boot: 5 ota_1 OTA app 00 11 00220000 00100000
I (157) boot: 6 nvs_key NVS keys 01 04 00320000 00001000
I (164) boot: 7 custom_nvs WiFi data 01 02 00321000 00006000
I (172) boot: End of partition table
I (176) boot: Defaulting to factory image
I (181) esp_image: segment 0: paddr=00020020 vaddr=3c020020 size=0e158h ( 57688) map
I (201) esp_image: segment 1: paddr=0002e180 vaddr=3fc92400 size=01e98h ( 7832) load
I (203) esp_image: segment 2: paddr=00030020 vaddr=42000020 size=1adech (110060) map
I (228) esp_image: segment 3: paddr=0004ae14 vaddr=3fc94298 size=00bc0h ( 3008) load
I (229) esp_image: segment 4: paddr=0004b9dc vaddr=40374000 size=0e398h ( 58264) load
I (248) esp_image: segment 5: paddr=00059d7c vaddr=00000000 size=06254h ( 25172)
I (253) esp_image: Verifying image signature...
I (254) secure_boot_v2: Verifying with RSA-PSS...
I (258) secure_boot_v2: Signature verified successfully!
I (267) boot: Loaded app from partition at offset 0x20000
I (268) secure_boot_v2: enabling secure boot v2...
I (273) secure_boot_v2: secure boot v2 is already enabled, continuing..
I (280) boot: Checking flash encryption...
I (285) flash_encrypt: flash encryption is enabled (0 plaintext flashes left)
I (293) boot: Disabling RNG early entropy source...
I (310) cpu_start: Multicore app
I (319) cpu_start: Pro cpu start user code
I (319) cpu_start: cpu freq: 160000000 Hz
I (320) cpu_start: Application information:
I (322) cpu_start: Project name: blink
I (327) cpu_start: App version: v5.2.1-dirty
I (333) cpu_start: Compile time: Apr 25 2024 17:02:27
I (339) cpu_start: ELF file SHA256: 974df8541...
I (344) cpu_start: ESP-IDF: v5.2.1-dirty
I (349) cpu_start: Min chip rev: v0.0
I (354) cpu_start: Max chip rev: v0.99
I (359) cpu_start: Chip rev: v0.1
I (364) heap_init: Initializing. RAM available for dynamic allocation:
I (371) heap_init: At 3FC958A8 len 00053E68 (335 KiB): RAM
I (377) heap_init: At 3FCE9710 len 00005724 (21 KiB): RAM
I (383) heap_init: At 3FCF0000 len 00008000 (32 KiB): DRAM
I (389) heap_init: At 600FE010 len 00001FD8 (7 KiB): RTCRAM
I (397) spi_flash: detected chip: generic
I (400) spi_flash: flash io: dio
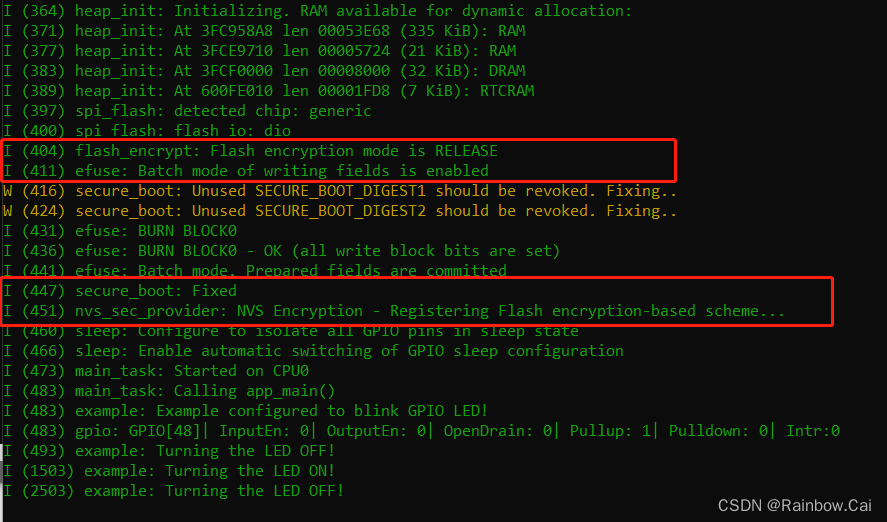
I (404) flash_encrypt: Flash encryption mode is RELEASE
I (411) efuse: Batch mode of writing fields is enabled
W (416) secure_boot: Unused SECURE_BOOT_DIGEST1 should be revoked. Fixing..
W (424) secure_boot: Unused SECURE_BOOT_DIGEST2 should be revoked. Fixing..
I (431) efuse: BURN BLOCK0
I (436) efuse: BURN BLOCK0 - OK (all write block bits are set)
I (441) efuse: Batch mode. Prepared fields are committed
I (447) secure_boot: Fixed
I (451) nvs_sec_provider: NVS Encryption - Registering Flash encryption-based scheme...
I (460) sleep: Configure to isolate all GPIO pins in sleep state
I (466) sleep: Enable automatic switching of GPIO sleep configuration
I (473) main_task: Started on CPU0
I (483) main_task: Calling app_main()
I (483) example: Example configured to blink GPIO LED!
I (483) gpio: GPIO[48]| InputEn: 0| OutputEn: 0| OpenDrain: 0| Pullup: 1| Pulldown: 0| Intr:0
I (493) example: Turning the LED OFF!
I (1503) example: Turning the LED ON!
I (2503) example: Turning the LED OFF!
9. Check the chip’s eFuse informations
You can use the esptool and running the follows command to read the eFuse informations
espefuse.py -p COM4 summary
- The chip‘s security informations are as follows:
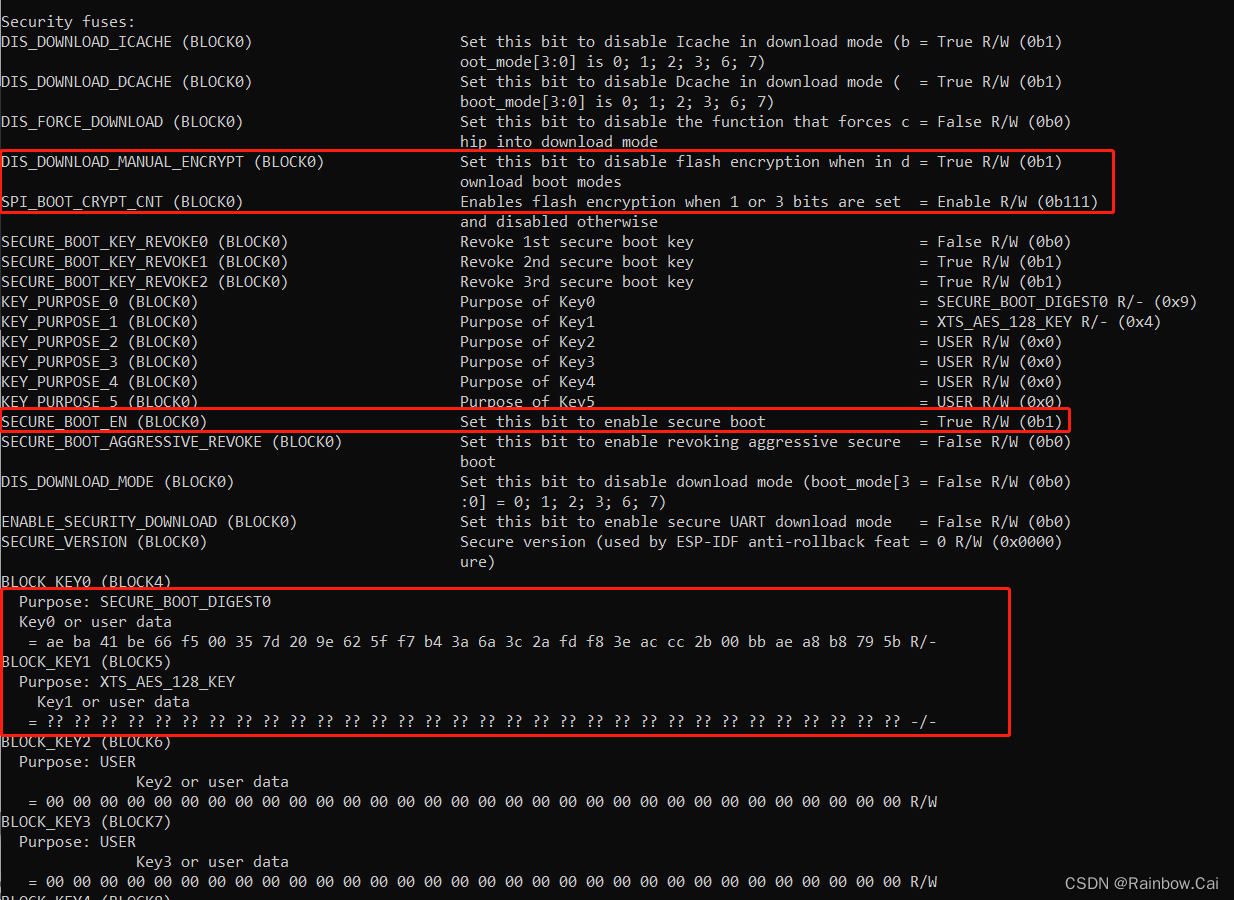
Security fuses:
DIS_DOWNLOAD_ICACHE (BLOCK0)                       Set this bit to disable Icache in download mode (b = True R/W (0b1)
                                                   oot_mode[3:0] is 0; 1; 2; 3; 6; 7)
DIS_DOWNLOAD_DCACHE (BLOCK0)                       Set this bit to disable Dcache in download mode (  = True R/W (0b1)
                                                   boot_mode[3:0] is 0; 1; 2; 3; 6; 7)
DIS_FORCE_DOWNLOAD (BLOCK0)                        Set this bit to disable the function that forces c = False R/W (0b0)
                                                   hip into download mode
DIS_DOWNLOAD_MANUAL_ENCRYPT (BLOCK0)               Set this bit to disable flash encryption when in d = True R/W (0b1)
                                                   ownload boot modes
SPI_BOOT_CRYPT_CNT (BLOCK0)                        Enables flash encryption when 1 or 3 bits are set  = Enable R/W (0b111)
                                                   and disabled otherwise
SECURE_BOOT_KEY_REVOKE0 (BLOCK0)                   Revoke 1st secure boot key                         = False R/W (0b0)
SECURE_BOOT_KEY_REVOKE1 (BLOCK0)                   Revoke 2nd secure boot key                         = True R/W (0b1)
SECURE_BOOT_KEY_REVOKE2 (BLOCK0)                   Revoke 3rd secure boot key                         = True R/W (0b1)
KEY_PURPOSE_0 (BLOCK0)                             Purpose of Key0                                    = SECURE_BOOT_DIGEST0 R/- (0x9)
KEY_PURPOSE_1 (BLOCK0)                             Purpose of Key1                                    = XTS_AES_128_KEY R/- (0x4)
KEY_PURPOSE_2 (BLOCK0)                             Purpose of Key2                                    = USER R/W (0x0)
KEY_PURPOSE_3 (BLOCK0)                             Purpose of Key3                                    = USER R/W (0x0)
KEY_PURPOSE_4 (BLOCK0)                             Purpose of Key4                                    = USER R/W (0x0)
KEY_PURPOSE_5 (BLOCK0)                             Purpose of Key5                                    = USER R/W (0x0)
SECURE_BOOT_EN (BLOCK0)                            Set this bit to enable secure boot                 = True R/W (0b1)
SECURE_BOOT_AGGRESSIVE_REVOKE (BLOCK0)             Set this bit to enable revoking aggressive secure  = False R/W (0b0)
                                                   boot
DIS_DOWNLOAD_MODE (BLOCK0)                         Set this bit to disable download mode (boot_mode[3 = False R/W (0b0)
                                                   :0] = 0; 1; 2; 3; 6; 7)
ENABLE_SECURITY_DOWNLOAD (BLOCK0)                  Set this bit to enable secure UART download mode   = False R/W (0b0)
SECURE_VERSION (BLOCK0)                            Secure version (used by ESP-IDF anti-rollback feat = 0 R/W (0x0000)
                                                   ure)
BLOCK_KEY0 (BLOCK4)
  Purpose: SECURE_BOOT_DIGEST0
  Key0 or user data
   = ae ba 41 be 66 f5 00 35 7d 20 9e 62 5f f7 b4 3a 6a 3c 2a fd f8 3e ac cc 2b 00 bb ae a8 b8 79 5b R/-
BLOCK_KEY1 (BLOCK5)
  Purpose: XTS_AES_128_KEY
    Key1 or user data
   = ?? ?? ?? ?? ?? ?? ?? ?? ?? ?? ?? ?? ?? ?? ?? ?? ?? ?? ?? ?? ?? ?? ?? ?? ?? ?? ?? ?? ?? ?? ?? ?? -/-
BLOCK_KEY2 (BLOCK6)
  Purpose: USER
               Key2 or user data
   = 00 00 00 00 00 00 00 00 00 00 00 00 00 00 00 00 00 00 00 00 00 00 00 00 00 00 00 00 00 00 00 00 R/W
- You can also use the esptool and running the follows command to read the chip’s security informations
esptool.py -p PORT get_security_info
Instructions
-
As long as the download mode is not disabled, it supports reading the chip eFuse informations and re-downloading the firmware.
-
The Flash download tool will verify the chip eFuse informations by default,therefore, when
Flash encryptionorSecure Bootis enabled, thedefault configurationdoes not support re-burning the firmware to chip. If you don’t disable the download mode and want to re-burning theciphertext firmwareorSigned-firmwareafter chip is enabled theFlash EncryptionorSecure Boot,you need to modify the Flash download tool default configurations,As for ESP32S3 example:-
Modify the
esp32s3 > security.conffile default configurationsModify the
flash_force_write_enable = Falseconfiguration toflash_force_write_enable = True -
Modify the
esp32s3 > spi_download.conffile default configurationsModify the
no_stub = Flaseconfiguration tono_stub = True
-
-
If you are use the
esptool,please running the follows command re-burning theciphertext firmwareorSigned-firmware:
esptool.py --chip esp32s3 -p COM4 -b 460800 --before=default_reset --after=no_reset --no-stub write_flash --force --flash_mode dio --flash_freq 80m --flash_size keep 0x0 encrypt_bootloader.bin 0xF000 encrypt_partition.bin 0x20000 encrypt_blink.bin
-
The main difference between the Flash Encryption
Release modeand theDevelop modeis that the value of theSPI_BOOT_CRYPT_CNTcontrol bit is different. TheDevelop mode (0x1)supports one chance to disable the Flash encryption function.Release mode (0x111)does not support disable Flash encryption function. -
Using the Flash encryption key to encrypt the plaintext firmware:
espsecure.py encrypt_flash_data --keyfile flash_encryption_key.bin --address 0x0 --output bootloader-encrypted.bin bootloader.bin -
Using the Flash encryption key to decrypt the ciphertext firmware:
espsecure.py decrypt_flash_data --keyfile flash_encryption_key.bin --address 0x0 --output decrypt_bootloader.bin bootloader-encrypted.bin


 2505
2505

 被折叠的 条评论
为什么被折叠?
被折叠的 条评论
为什么被折叠?
 到【灌水乐园】发言


