


目录
1 什么是Nginx
- Nginx(“engienx”)是一个开源、支持改性能、高并发的WWW服务和代理服务软件。它是由俄罗斯人Igor Sysoev开发的。
- Nginx因为具有高并发(特别是静态资源)、占用系统资源少等特性,且功能丰富而逐渐流行起来。
- Nginx不但是一个优秀的Web服务软件,还可以具有反向代理负载均衡功能和缓存服务功能。在反向代理负载均衡功能方面,它类似于大名鼎鼎的LVS负载均衡以及Haproxy专业代理软件,但是Nginx不熟起来更为简单、方便。
1.1 Nginx可运行的操作系统
Nginx可以运行在Unix、Linux、BSD、Mac OS X、Solaris,以及Windows等操作系统中。当前流行的Nginx Web组合被称为LNMP或LEMP(即Linux Nginx MySQL PHP)。
官方文档可见http://nginx.org/en/
1.2 Nginx重要特性
- 可针对静态资源高速并发访问及缓存;
- 可使用反向代理加速,并且可进行数据缓存;
- 具有简单负载均衡、节点健康检查和容错功能;
- 支持远程FastCGI服务的缓存加速;
- 支持FastCGI、Uwsgi、SCGI、and Memcaches Servers的加速和缓存;
- 支持SSL、TLS、SNI;
- 具有模块化的架构:过滤器包括gzip压缩、ranges支持、chunked相应、XSLT、SSI及图像缩放等功能。在SSI过滤器中,一个包含多个SSI的页面,如果经由FastCGI或反向代理处理,可被并行处理。
它所具备的其它WWW服务特性如下:
- 支持基于名字、端口以及IP的多虚拟主机站点;
- 支持Keep-alive和pipelined连接;
- 可进行简单、方便、灵活的配置和管理;
- 支持修改Nginx配置,并且在写代码上线时,可以平滑重启,不中断业务访问;
- 可自定义访问日志格式,临时缓冲写日志操作,快速日志轮询及通过rsyslog处理日志;
- 可利用信号控制Nginx进程;
- 支持3xx-5xx http状态码重定向;
- 支持rewrite模块,支持URI重写及正则表达式匹配;
- 支持基于客户端IP地址和HTTP基本认证的访问控制;
- 支持PUT、DELETE、MKCOL、COPY以及MOVE等较为特殊的HTTP请求方法;
- 支持FLV流和MP4流技术产品应用;
- 支持http响应速率限制;
- 支持邮件服务代理。
1.3 企业面试需要解答如下Nginx HTTP服务的特色及优点
- 支持高并发:能支持几万并发链接(特别是静态小文件业务环境)
- 资源消耗少:在3万并发连接下,开启10个Nginx县城消耗不到200MB内存。
- 可以做HTTP反向代理及加速缓存,即负载均衡功能,内置对RS节点服务器健康检查功能,这相当于专业haproxy软件或lvs功能。
- 具备squid等专业缓存软件等的缓存功能。
- 支持异步网络IO事件模型epoll(Linux 2.6+)
1.4 Nginx作为Web服务器的主要应用场景
- 使用Bginx运行HTML、JS、CSS、小图片等静态数据(此功能类似Lighttpd软件)。
- Nginx结合FastCGI运行PHP等动态程序(例如使用fastcgi_pass方式)。
- Nginx结合tomcat/resin等支持Java动态程序(常用proxy_pass方式)。
1.5 Nginx和Lighttpd对比
Nginx
- 基于异步网络I/O模型(epoll、kqueue)。
- 具备支持高性能,高并发的特性,并发连续可达数万。
- 对于小文件(小于1MB的静态文件)高并发支持很好,性能很高。
- 不支持类似apache的DSO模式,扩展库必须编译进主程序(缺点)。
- 进程占用系统资源比较低。
- 支持Web、反向proxy、cache三大重点功能,并且都很优秀。
- 市场份额在逐年快速增加。
Lighttpd
- 基于异步网络I/O模型,性能、并发都和Nginx相近。
- 扩展库是SO模式,比Nginx灵活。
- 目前国内的使用率比较低,安全性没有Apache和Nginx好。
- 通过插件(mod_secdownload)可实现文件URL地址加密(优点)。
- 社区不活跃,市场份额较低。
1.6 为什么Nginx总体性能比Apache高
- Nginx使用最新的epoll(Linux 2.6内核)和kqueue(freebsd)异步网络I/O模型,而Apache则使用的是传统的select模型。目前Linux下能够承受高并发访问的Squid、Memcached软件都采用的是epoll模型。
- 处理大量连续的读写,Apache所采用的select网络I/O模型比较低效。下面有个例子可以明显看出二者之间的差距。
- 假设你在大学读书,住的宿舍楼有很多间房间,你的朋友要来找你。select版宿管大妈就会带着你的朋友挨个房间去找,直到找到你为止。而epoll版宿管大妈会先记下每位入住同学的房间号,你的朋友来找你时,只需告诉你的朋友你住在哪个房间即可,不用亲自带着你的朋友满宿舍楼找人了。如果同时来了100个人,都要找自己住这栋楼的同学时,select 版和epoll版宿管大妈,谁的效率更高,就很明显了。
- 因此,epoll的这种机制,能够高效的处理成千上万的并发连接,而且性能不会随着连接数增加而下降太多。
1.7 业务选择
- 静态业务:若是高并发场景,尽量采用Nginx或Lighttpd,首选Nginx。
- 动态业务:理论上采用Nginx和Apache均可,建议选着Nginx,要避免相同业务访问软件多样化,额外增加维护成本。动态业务可以有Nginx兼做前端代理,再根据页面元素的类型或目录,向后转发到后端相应的服务器进行处理。
- 如果既有静态业务也有动态业务就采用Nginx。
2 Linux下安装软件的几种办法
1、rpm-ivh 包名.rpm
有依赖问题,安装A,A需要先安装B……
缺点: 不能定制。
2、yum安装自动解决rpm安装的依赖问题,安装更简单化。
优点: 简单、易用、高效
缺点: 不能定制。
3、编译(C语言源码-编译二进制等)
./configure (配置),make(编译) ,make install (安装)
优点: 可以定制
缺点: 复杂、效率低。
4、定制化制作rpm包,搭建yum仓库,把我定制的rpm包放到yum仓库,进行yum安装。
优点: 结合了2的优点和3的优点。
缺点:复杂
有关rpm包定制及yum仓库搭建请看老男孩老师的博客:
3 编译安装Nginx
# 操作系统环境
Centos 6.9
Server(web01)
eth0:192.168.90.8/24
eth1:172.16.1.8/24
Client(m01)
    eth0:192.168.90.61/24
    eth0:172.16.1.61/24
# 先从官网获取Nginx的源码包,这里版本是1.6.3的
[root@web01 tools]# pwd
/home/oldboy/tools
[root@web01 tools]# wget -q http://nginx.org/download/nginx-1.6.3.tar.gz
[root@web01 tools]# yum install openssl openssl-devel -y
[root@web01 tools]# yum install pcre pcre-devel -y
[root@web01 tools]# rpm -qa pcre pcre-devel
pcre-devel-7.8-7.el6.x86_64
pcre-7.8-7.el6.x86_64
[root@web01 tools]# useradd www -s /sbin/nologin -M
[root@web01 tools]# tar -xf nginx-1.6.3.tar.gz
[root@web01 tools]# cd nginx-1.6.3
[root@web01 nginx-1.6.3]# ./configure --help        #查看帮助
[root@web01 nginx-1.6.3]# ./configure --user=www --group=www --with-http_ssl_module --with-http_stub_status_module --prefix=/application/nginx-1.6.3/
[root@web01 nginx-1.6.3]# echo $?
0
[root@web01 nginx-1.6.3]# make
[root@web01 nginx-1.6.3]# echo $?
0
[root@web01 nginx-1.6.3]# make install
[root@web01 nginx-1.6.3]# echo $?
0
[root@web01 nginx-1.6.3]# ln -s /application/nginx-1.6.3/ /application/nginx
[root@web01 nginx-1.6.3]# ls /application/nginx
conf  html  logs  sbin
#启动nginx
[root@web01 ~]# /application/nginx/sbin/nginx
[root@web01 ~]# netstat -lntup|grep 80
tcp        0      0 0.0.0.0:80                  0.0.0.0:*                   LISTEN      9113/nginx
[root@web01 ~]# lsof -i :80
COMMAND  PID USER   FD   TYPE DEVICE SIZE/OFF NODE NAME
nginx   9113 root    6u  IPv4  55007      0t0  TCP *:http (LISTEN)
nginx   9114  www    6u  IPv4  55007      0t0  TCP *:http (LISTEN)
#测试,显示以下页面即成功
ps:编译Nginx软件时,可以使用./configure --help查看相关参数帮助,下面是本次编译时指定的参数及简单说明:
    --prefix=PATH               #设置安装路径
    --user=USER                 #进程用户权限
    --group=GROUP               #进程用户组权限
    --with-http_stub_status_module  #激活状态信息
    --with-http_ssl_module      #激活ssl功能
Nginx的大部分功能模块都会默认编译到软件中,不需要单独指定编译参数。
3.1 Nginx报错及解决办法
1、启动Nginx报错nginx:[emerg] getpwnam(“nginx”) failed
- 这是因为没有对应的Nginx服务用户所致,执行useradd nginx -s /sbin/nologin -M创建用户即可。
2、缺少gcc编译器
- yum -y install gcc-c++
3、yum grouplist查看一下这四个包是否在装机是安装过了(Base、Compatibility libraries、Debugging Tools、Development tools),若是有没有安装的则yum -y groupinstall “Base” ” Compatibility libraries ” ……
4、浏览器、wget或者curl等软件访问不了Nginx页面。
- 此类问题的排查私立又分在Nginx服务端和客户端排查,服务端排查。
服务端排查:
首先关闭selinux和iptables;
再到服务器本地检查端口、进程URL(确认端口80是否存在:netstat -lntup|grep
80;查看是否有http进程存在;在服务器本地进行wget http://x.x.x.x测试)。
客户端排查:
首先在客户端上ping服务器端IP
其次在客户端上telnet服务器端IP、端口(telnet x.x.x.x 80)
在客户端使用wget命令检测,wget x.x.x.x(curl x.x.x.x):模拟用户访问,排除http服务自身问题,根据输出再排错。
4 自定义Web站点
[root@web01 nginx]# diff conf/nginx.conf conf/nginx.conf.default
[root@web01 conf]# egrep -v "^$|#" nginx.conf.default >nginx.conf
[root@web01 conf]# cat nginx.conf
worker_processes  1;        #worker进程的数量,一般和CPU核数一样
events {                #事件区块开始
    worker_connections  1024;       #每个worker进程支持的最大连接数
}                   #事件区块结束
http {                  #http区块开始
    include       mime.types;       #Nginx支持的媒体类型库文件包含
    default_type  application/octet-stream;     #默认的媒体类型
    sendfile        on;         #开启高效传输模式
    keepalive_timeout  65;          #设置连接超时
    server {            #第一个server区块开始,表示一个独立的虚拟主机的建立
        listen       80;    #提供服务默认的端口
        server_name  www.rsq.com;   #提供服务的域名主机名
        location / {
            root   html;
            index  index.html index.htm;
        }
        error_page   500 502 503 504  /50x.html;
        location = /50x.html {
            root   html;
        }
    }
}
# 检测语法
[root@web01 conf]# /application/nginx/sbin/nginx -t
nginx: the configuration file /application/nginx-1.6.3//conf/nginx.conf syntax is ok
nginx: configuration file /application/nginx-1.6.3//conf/nginx.conf test is successful
# 重载服务
[root@web01 conf]# /application/nginx/sbin/nginx -s reload
# 自定义web访问站点
[root@web01 conf]# cd /application/nginx/html/
[root@web01 html]# ls
50x.html  index.html
[root@web01 html]# >index.html
[root@web01 html]# vim index.html    #若是没有首页,会报403错误
# 去浏览器中测试(可以在windows下修改hosts解析,把本地ip对应域名,然后即可访问)
5 生产环境中常用的Nginx模块
| Nginx http模块功能 | 模块说明 |
|---|---|
| ngx_http_core_module | 包括一些核心的http参数配置,对应Nginx的配置为http区块部分 |
| ngx_http_access_module | 访问控制模块,用来控制网站用户对Nginx的访问 |
| ngx_http_gzip_module | 压缩模块,对Nginx返回的数据压缩,属于性能优化模块 |
| ngx_http_fastcgi_module | fastcgi模块,和动态应用相关的模块,例如PHP |
| ngx_http_proxy_module | proxy代理模块 |
| ngx_http_upstream_module | 负载均衡模块,可以实现网站的负载均衡功能及节点的健康检查 |
| ngx_http_rewrite_module | URL地址重写模块 |
| ngx_http_limit_conn_module | 显示用户并发连接数及请求数模块 |
| ngx_http_limit_req_module | 根据定义的key限制Nginx请求过程的速率 |
| ngx_http_log_module | 访问日志模块,以指定的格式记录Nginx酷虎访问日志等信息 |
| ngx_http_auth_basic_module | Web认证模块,设置Web用户通过账号密码访问Nginx |
| ngx_http_ssl_module | ssl模块,用于加密的http连接,如https |
| ngx_http_stub_status_module | 记录Nginx基本访问状态信息等的模块 |
6 虚拟主机概念及类型
6.1 虚拟主机概念
所谓虚拟主机,在Web服务里就是一个独立的网站站点,这个站点对应独立的域名(也可能是IP或端口),具有独立的程序及资源目录,可以独立地对外提供服务供用户访问。
这个独立的站点在配置里是由一定格式的标签段标记,对于Apache软件来说,一个虚拟主机的标签段通常被包含在
<VirtualHost></VirtualHost>内,而Nginx软件则使用一个server{}标签来标示一个虚拟主机,一个Web服务里可以有多个虚拟主机标签对,即同时可以支持多个虚拟主机站点。
6.2 虚拟主机类型
基于域名的虚拟主机。通过域名来区分虚拟主机
应用:外部表网站基于端口的虚拟主机。通过端口来区分虚拟主机
应用:公司内部网站,网站的后台基于IP的虚拟主机。几乎不用,不只是ifconfig别名,配置文件可以。
6.2.1 基于域名的虚拟主机配置
[root@web01 conf]# cat nginx.conf
worker_processes  1;
events {
    worker_connections  1024;
}
http {
    include       mime.types;
    default_type  application/octet-stream;
    sendfile        on;
    keepalive_timeout  65;
    server {
        listen       80;
        server_name  www.rsq.com;
        location / {
            root   html/www;
            index  index.html index.htm;
        }
    }
    server {
        listen       80;
        server_name  bbs.rsq.com;
        location / {
            root   html/bbs;
            index  index.html index.htm;
        }
    }

}
[root@web01 conf]# cd ..
[root@web01 nginx]# mkdir html/{www,bbs} -p
[root@web01 nginx]# echo "www" > html/www/index.html
[root@web01 nginx]# echo "bbs" > html/bbs/index.html
[root@web01 nginx]# /application/nginx/sbin/nginx -t
nginx: the configuration file /application/nginx-1.6.3//conf/nginx.conf syntax is ok
nginx: configuration file /application/nginx-1.6.3//conf/nginx.conf test is successful
[root@web01 nginx]# /application/nginx/sbin/nginx -s reload
[root@web01 nginx]# lsof -i :80
COMMAND   PID USER   FD   TYPE DEVICE SIZE/OFF NODE NAME
nginx    9113 root    6u  IPv4  55007      0t0  TCP *:http (LISTEN)
nginx   13810  www    6u  IPv4  55007      0t0  TCP *:http (LISTEN)
# 用管理机当客户端来测试访问
# 修改/etc/hosts文件
[root@m01 ~]# cat /etc/hosts
172.16.1.8      web01 www.rsq.com bbs.rsq.com
[root@m01 ~]# ping www.rsq.com
[root@m01 ~]# ping bbs.rsq.com
[root@m01 ~]# curl www.rsq.com
www
[root@m01 ~]# curl bbs.rsq.com
bbs
# 当server中定义的index.html网站站点中没有时,一般客户端访问时会报403禁止访问。这个时候可以在server location中定义"autoindex on;" 。这样客户端可以直接访问目录站点结构。修改配置文件如下标记的地方。
[root@web01 conf]# vim nginx.conf
    server {
        listen       80;
        server_name  bbs.rsq.com;
        location / {
            root   html/bbs;
            index  index.html index.htm;
        autoindex on;
        }
    }

}
[root@web01 conf]# /application/nginx/sbin/nginx -s reload
# 在windows中测试访问会出现如下页面显示
6.2.2 基于端口的虚拟主机
# 修改如下标记两个监听端口(下面测试的是不同端口不同域名测试访问)
[root@web01 conf]# cat nginx.conf
worker_processes  1;
events {
    worker_connections  1024;
}
http {
    include       mime.types;
    default_type  application/octet-stream;
    sendfile        on;
    keepalive_timeout  65;
    server {
        listen       80;
        server_name  www.rsq.com;
        location / {
            root   html/www;
            index  index.html index.htm;
        }
    }
    server {
        listen       81;
        server_name  bbs.rsq.com;
        location / {
            root   html/bbs;
            index  index.html index.htm;
        autoindex on;
        }
    }
    server {
        listen       82;
        server_name  blog.rsq.com;
        location / {
            root   html/blog;
            index  index.html index.htm;
            autoindex on;
        }
    }
}
[root@web01 conf]# /application/nginx/sbin/nginx -s reload
# 测试访问
# 在访问的时候需要在域名后加端口,否则会默认访问80端口所在的web站点

# 也可以相同域名不同端口去访问(纯端口不同)
[root@web01 conf]# cat nginx.conf
worker_processes  1;
events {
    worker_connections  1024;
}
http {
    include       mime.types;
    default_type  application/octet-stream;
    sendfile        on;
    keepalive_timeout  65;
    server {
        listen       80;
        server_name  www.rsq.com;
        location / {
            root   html/www;
            index  index.html index.htm;
        }
    }

    server {
        listen       81;
        server_name  www.rsq.com;
        location / {
            root   html/bbs;
            index  index.html index.htm;
        autoindex on;
        }
    }
    server {
        listen       82;
        server_name  www.rsq.com;
        location / {
            root   html/blog;
            index  index.html index.htm;
            autoindex on;
        }
    }
}
6.2.3 基于IP的虚拟主机
# 首先需要添加两个ip别名,用于区分
[root@web01 ~]# ifconfig eth0:0 192.168.90.101/24 up
[root@web01 ~]# ip addr add 192.168.90.102/24 dev eth0 label eth0:1
[root@web01 ~]# ifconfig
# 会多出来以下两条信息
eth0:0    Link encap:Ethernet  HWaddr 00:0C:29:24:63:5A
          inet addr:192.168.90.101  Bcast:192.168.90.255  Mask:255.255.255.0
          UP BROADCAST RUNNING MULTICAST  MTU:1500  Metric:1

eth0:1    Link encap:Ethernet  HWaddr 00:0C:29:24:63:5A
          inet addr:192.168.90.102  Bcast:0.0.0.0  Mask:255.255.255.0
          UP BROADCAST RUNNING MULTICAST  MTU:1500  Metric:1
# 客户端测试
[root@m01 ~]# ping 192.168.90.101
PING 192.168.90.101 (192.168.90.101) 56(84) bytes of data.
64 bytes from 192.168.90.101: icmp_seq=1 ttl=64 time=1.97 ms
^C
--- 192.168.90.101 ping statistics ---
1 packets transmitted, 1 received, 0% packet loss, time 537ms
rtt min/avg/max/mdev = 1.979/1.979/1.979/0.000 ms
[root@m01 ~]# ping 192.168.90.102
PING 192.168.90.102 (192.168.90.102) 56(84) bytes of data.
64 bytes from 192.168.90.102: icmp_seq=1 ttl=64 time=0.609 ms
^C
--- 192.168.90.102 ping statistics ---
1 packets transmitted, 1 received, 0% packet loss, time 610ms
rtt min/avg/max/mdev = 0.609/0.609/0.609/0.000 ms
# 服务端修改配置文件如下
[root@web01 conf]# cat nginx.conf
worker_processes  1;
events {
    worker_connections  1024;
}
http {
    include       mime.types;
    default_type  application/octet-stream;
    sendfile        on;
    keepalive_timeout  65;
    server {
        listen       192.168.90.8:80;
        server_name  www.rsq.com;
        location / {
            root   html/www;
            index  index.html index.htm;
        }
    }
    server {
        listen       192.168.90.101:80;
        server_name  www.rsq.com;
        location / {
            root   html/bbs;
            index  index.html index.htm;
        autoindex on;
        }
    }
    server {
        listen       192.168.90.102:80;
        server_name  www.rsq.com;
        location / {
            root   html/blog;
            index  index.html index.htm;
            autoindex on;
        }
    }
}
# 重启(若是重载不好使就要使用重启,先stop然后再start,最好不要用restart)
[root@web01 conf]# /application/nginx/sbin/nginx -s stop
[root@web01 conf]# /application/nginx/sbin/nginx
# 客户端测试
[root@m01 ~]# curl 192.168.90.8
www
[root@m01 ~]# curl 192.168.90.101
bbs
[root@m01 ~]# curl 192.168.90.102
blog
# 删除ip别名
[root@web01 ~]# ifconfig eth0:0 down
[root@web01 ~]# ip addr del 192.168.90.102 dev eth0 label eth0:1
6.3 Nginx配置虚拟主机步骤
- 增加一个完整的server标签段到结尾处。注意,要放在http的结束大括号前,也就是将server标签段放入http标签。
- 更改server_name及对应网页的root根目录,如果需要其他参数,可以增加或修改。
- 创建server_name域名对应网页的根目录,并且建立测试文件,如果没有index首页,访问会出现403
错误。 - 检查Nginx配置文件语法,平滑重启Nginx服务,快速检查启动结果。
- 在客户端对server_name处配置的域名做host解析或DNS配置,并检查(ping 域名看返回的IP对不对)。
- 在Win32浏览器中输入地址访问,或者在Linux客户端做hosts解析,用wget或curl接地址访问。
Nginx虚拟主机的官方帮助网址为:
6.4 虚拟主机配置策略优化
# 先修改配置文件,把server{}全部删除掉,添加上include。
[root@web01 conf]# mkdir extra
[root@web01 conf]# cat nginx.conf
worker_processes  1;
events {
    worker_connections  1024;
}
http {
    include       mime.types;
    default_type  application/octet-stream;
    sendfile        on;
    keepalive_timeout  65;
    include extra/*.conf;
    #include extra/www.conf;
    #include extra/bbs.conf;
#include extra/blog.conf;
}
[root@web01 conf]# cp nginx.conf.basement1 extra/a
[root@web01 conf]# cd extra/
[root@web01 extra]# sed -n '10,17p' a >www.conf
[root@web01 extra]# sed -n '18,26p' a >bbs.conf
[root@web01 extra]# sed -n '27,35p' a >blog.conf
[root@web01 extra]# cat www.conf
    server {
        listen       80;
        server_name  www.rsq.com;
        location / {
            root   html/www;
            index  index.html index.htm;
        }
}
[root@web01 extra]# cat bbs.conf
    server {
        listen       80;
        server_name  bbs.rsq.com;
        location / {
            root   html/bbs;
            index  index.html index.htm;
        autoindex on;
        }
}
[root@web01 extra]# cat blog.conf
    server {
        listen       80;
        server_name  blog.rsq.com;
        location / {
            root   html/blog;
            index  index.html index.htm;
            autoindex on;
        }
    }
# 重启(这里平滑重启会出错)
[root@web01 extra]# /application/nginx/sbin/nginx -s stop
[root@web01 extra]# /application/nginx/sbin/nginx
# 测试
# 在测试之前需要更改hosts解析文件
[root@m01 ~]# curl www.rsq.com
www
[root@m01 ~]# curl bbs.rsq.com
bbs
[root@m01 ~]# curl blog.rsq.com
blog
6.5 虚拟主机别名
# 修改/application/nginx/conf/extra/www.conf配置文件
[root@web01 extra]# cat www.conf
    server {
        listen       80;
        server_name  www.rsq.com rsq.com;
        location / {
            root   html/www;
            index  index.html index.htm;
        }
    }
[root@web01 extra]# /application/nginx/sbin/nginx -s reload
# 客户端测试,需要把rsq.com添加hosts解析配置文件
[root@m01 ~]# vim /etc/hosts
[root@m01 ~]# curl rsq.com
www
7 Nginx status静态页面介绍
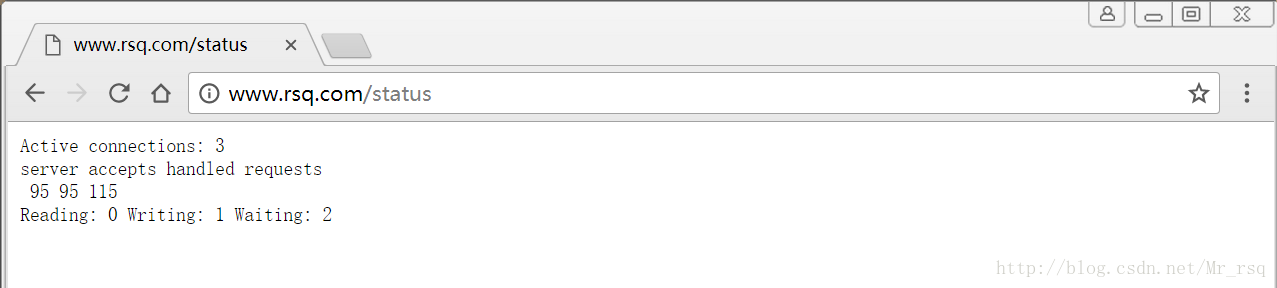
7.1 Nginx status介绍
Nginx软件的功能模块中有一个ngx_http_stub_status_module模块,这个模块的主要功能是记录Nginx的基本访问状态信息,让使用者了解Nginx的工作状态,例如:连接数等信息。要想使用状态模块,在编译Nginx时必须增加http_stub_status_module支持。
# 可通过如下方法检查编译安装Nginx时是否设定支持上述模块支持:
[root@web01 ~]# /application/nginx/sbin/nginx -V
nginx version: nginx/1.6.3
built by gcc 4.4.7 20120313 (Red Hat 4.4.7-18) (GCC)
TLS SNI support enabled
configure arguments: --user=www --group=www --with-http_ssl_module --with-http_stub_status_module --prefix=/application/nginx-1.6.3/
7.2 配置status并测试
cat >>/application/nginx/conf/extra/status.conf<<EOF
##status
server{
listen 80;
server_name status.rsq.com;
location / {
stub_status on;
access_log off;
allow 192.168.90.0/24;
deny all;
}
}
EOF
# 不用修改主配置文件,直接重载即可
[root@web01 extra]# /application/nginx/sbin/nginx -s reload
# 客户端测试


 2489
2489

 被折叠的 条评论
为什么被折叠?
被折叠的 条评论
为什么被折叠?
 到【灌水乐园】发言


