《深入浅出WPF》学习笔记整理
第八章
路由:起点和终点之间有若干中转,事件从起点出发后经过每个中转时要做出选择,以正确的路径到达终点。
WPF事件的路由环境是UI组件树:每个结点不是布局组件就是控件。
WPF中”树“有:一逻辑树(Logical Tree)、二可视元素树(Visual Tree)。
在Logcal Tree上导航或查找元素,可借助LogicalTreeHelper类的static方法。在Visual Tree上导航或查找元素,可借助VisualTreeHelper类的static方法。
事件模型中3个关键点:事件的拥有者、事件的响应者、事件的订阅关系。A关注B的某个事件是否发生,则称A订阅B的事件。也即:B.Event与A.EventHandler关联起来,而事件激发就是B.Event被调用,此时与之关联的A.EventHandler也会被调用。
直接事件
直接事件模型(CLR事件模型):CLR事件本质是一个用event关键字修饰的委托实例。是传统.NET开发中对象相互协同的主要手段。
例如:窗体上一个Button,双击,自动创建Button_Click方法并跳转其中。这样一个直接事件模型就实现了。
//Form.Designer.cs中订阅关系确立的代码
this.Button.Click+=new System.EventHandler(this.Button_Click);
弊端:
- 每对消息是”发送——>接收“的专线联系。
- 事件的宿主必须能够直接访问事件的响应者,不然无法建立订阅关系。
路由事件
事件的拥有者只负责激发消息,响应者通过事件侦听器对特定类型事件进行侦听。当有此类事件传递至此,响应者使用事件处理器来响应,并决定事件是否可以继续传递。
使用WPF内置路由事件
<Window x:Class="WpfApplication1_8_27.MainWindow"
        xmlns="http://schemas.microsoft.com/winfx/2006/xaml/presentation"
        xmlns:x="http://schemas.microsoft.com/winfx/2006/xaml"
        Title="MainWindow" Height="200" Width="200">
    <Grid x:Name="gridRoot" Background="Lime">
        <Grid x:Name="gridA" Margin="10" Background="Blue">
            <Grid.ColumnDefinitions>
                <ColumnDefinition/>
                <ColumnDefinition/>
            </Grid.ColumnDefinitions>
            <Canvas x:Name="canvasLeft" Grid.Column="0" Background="Red" Margin="10">
                <Button x:Name="buttonLeft" Content="Left" Width="40" Height="100" Margin="10"/>
            </Canvas>
            <Canvas x:Name="canvasRight" Grid.Column="1" Background="Yellow" Margin="10">
                <Button x:Name="buttonRight" Content="Right" Width="40" Height="100" Margin="10"/>
            </Canvas>
        </Grid>
    </Grid>
</Window>


单击”buttonLeft“和"buttonRight",则Button.Click事件会沿上图路线传送。此时没有Button.Click事件的侦听对象,所以会一路上传。
安装gridRoot对Button.Click的侦听器:
namespace WpfApplication1_8_27
{
    /// <summary>
    /// MainWindow.xaml 的交互逻辑
    /// </summary>
    public partial class MainWindow : Window
    {
        public MainWindow()
        {
            InitializeComponent();
            this.gridRoot.AddHandler(Button.ClickEvent, new RoutedEventHandler(this.ButtonClicked));
        }

        private void ButtonClicked(object sender,RoutedEventArgs e)//自己编写而非程序生成
        {
            MessageBox.Show((e.OriginalSource as FrameworkElement).Name);
        }
    }
}
程序运行后,单击"Left"按钮,弹出左边对话框。单击"Right"按钮,弹出右边对话框。

需要注意的是:路由事件的消息是从内部一层一层传递到最外层的gridRoot,由gridRoot元素交给ButtonClicked方法来处理。所以,ButtonClicked的参数sender实际上是gridRoot而不是被单击的Button。如果需要查看事件的源头则使用e.OriginalSource,且用as/is强制转换成正确的类型。
其中,上面的路由事件添加命令也可以在XAML中完成:
this.gridRoot.AddHandler(Button.ClickEvent, new RoutedEventHandler(this.ButtonClicked));//可替换为
<Grid x:Name="gridRoot" Background="Lime" Button.Click="ButtonClicked">
<!--或者-->
<Grid x:Name="gridRoot" Background="Lime" ButtonBase.Click="ButtonClicked">
在拼写Button.Click、ButtonBase.Click时没有提示,直至拼写到”=“
自定义路由事件
创建步骤:
- 声明并注册路由事件:声明一个public static readonly修饰的RoutedEvent类型字段,然后用EventManager的RegisterRoutedEvent方法注册。
- 为路由事件添加CLR事件包装:把路由事件曝露得像个传统直接事件,使用add、remove替换get、set 。
- 创建可以激发路由事件的方法:创建消息(RoutedEventArgs)并与路由事件关联,调用RaiseEvent方法发送出去。(传统CLR事件用Invoke激发)
public abstract class ButtonBase:ContentControl,ICommandSource
{
    //声明并注册路由事件
      public static readonly RoutedEvent ClickEvent = EventManager.RegisterRoutedEvent("Click", RoutingStrategy.Bubble, typeof(RoutedEventHandler), typeof(ButtonBase));

        //为路由事件添加CLR事件包装
   public event RoutedEventHandler Click
    {
        add { this.AddHandler(ClickEvent, value); }
        remove { this.RemoveHandler(ClickEvent, value); }
    }
    //激发路由事件的方法,此方法在用户单击鼠标时会被Windows调用
    protected virtual void OnClick()
   {
       RoutedEventArgs newEvent = new RoutedEventArgs(ButtonBase.ClickEvent, this);
       this.RaiseEvent(newEvent);
   }
    //..
}
其中参数如下:
EventManager.RegisterRoutedEvent("Click", RoutingStrategy.Bubble, typeof(RoutedEventHandler), typeof(ButtonBase));
- 第一个为string类型,路由事件的名称。
- 第二个为路由事件的策略,Bubble(冒泡式,由激发者向上级容器一层一层传递)、Tunnel(隧道式,UI树根向激发事件的控件移动)、Direct(直达式,模仿CLR直接事件)。
- 第三个为指定事件处理器的类型,参数与事件处理器的返回值一致。
- 第四个参数指明事件宿主类型。
示例:创建一个路由事件,用以报告事件发生的时间。
这个示例需要先写C#代码,后写XAML代码
namespace WpfApplication1_8_27
{
    /// <summary>
    /// MainWindow.xaml 的交互逻辑
    /// </summary>

    //创建一个ReportTimeEventArgs类的派生类,并添加ClickTime属性
    class ReportTimeEventArgs : RoutedEventArgs
    {
        //用以承载时间消息的事件参数
        public ReportTimeEventArgs(RoutedEvent routedEvent, object source) : base(routedEvent, source)
        { }
        public DateTime ClickTime { get; set; }
    }

    class TimeButton : Button
    {
        //声明和注册路由事件
        public static readonly RoutedEvent ReportTimeEvent = EventManager.RegisterRoutedEvent("ReportTime", RoutingStrategy.Bubble, typeof(EventHandler<ReportTimeEventArgs>), typeof(TimeButton));

        //CLR事件包装器
        public event RoutedEventHandler ReportTime
        {
            add { this.AddHandler(ReportTimeEvent, value); }
            remove { this.RemoveHandler(ReportTimeEvent, value); }
        }

        //激发路由事件,借用Click事件的激发方法
        protected override void OnClick()
        {
            base.OnClick(); //写完OnClick(),自动添加

            ReportTimeEventArgs args = new ReportTimeEventArgs(ReportTimeEvent, this);
            args.ClickTime = DateTime.Now;
            this.RaiseEvent(args);
        }
    }

    public partial class MainWindow : Window
    {
        public MainWindow()
        {
            InitializeComponent();
        }

        //ReportTimeEvent路由事件处理器
        private void ReportTimeHandler(object sender,ReportTimeEventArgs e)
        {
            FrameworkElement element = sender as FrameworkElement;
            string timeStr = e.ClickTime.ToLongTimeString();
            string content = string.Format("{0}到达{1}", timeStr, element.Name);
            this.listbox1.Items.Add(content);
        }
    }
}
<Window x:Class="WpfApplication1_8_27.MainWindow"
        xmlns="http://schemas.microsoft.com/winfx/2006/xaml/presentation"
        xmlns:x="http://schemas.microsoft.com/winfx/2006/xaml"
        xmlns:local="clr-namespace:WpfApplication1_8_27"
        Title="MainWindow" Height="200" Width="200"
       local:TimeButton.ReportTime="ReportTimeHandler" >
    <Grid x:Name="grid_1" local:TimeButton.ReportTime="ReportTimeHandler">
        <Grid x:Name="grid_2" local:TimeButton.ReportTime="ReportTimeHandler">
            <Grid x:Name="grid_3" local:TimeButton.ReportTime="ReportTimeHandler">
                <StackPanel x:Name="stack_panel_1" local:TimeButton.ReportTime="ReportTimeHandler">
                    <ListBox x:Name="listbox1"/>
                    <local:TimeButton x:Name="timeButton" Width="80" Height="80" Content="报时" local:TimeButton.ReportTime="ReportTimeHandler"/>
                </StackPanel>
            </Grid>
        </Grid>
    </Grid>
</Window>
在UI界面上,以Window为根,套了三层Grid和一层StackPanel。在最里面的StackPanel中放置一个ListBox和一个TimeButton(刚创建的Button派生类),从最内层的TimeButton到最外层的Window都侦听着TimeButton.ReportTimeEvent这个路由事件。
TimeButton–>StackPanel–>Grid–>Grid–>Grid–>Window

当把TimeReportEvent策略改为Tunnel时:

如何让一个路由事件在某个结点不再继续传递?
- 路由事件携带的事件参数必须是RoutedEventArgs类或者其派生类的实例。
- RoutedEventArgs类具有一个bool类型的Handled,但其为True就表示路由事件已经被处理了,则该事件不再往下传递了。
修改上述示例中的ReportTimeEvent处理器,则路由事件经过grid_2后就被处理了,不再向下传递。
namespace WpfApplication1_8_27
{
    /// <summary>
    /// MainWindow.xaml 的交互逻辑
    /// </summary>

    //创建一个ReportTimeEventArgs类的派生类,并添加ClickTime属性
    class ReportTimeEventArgs : RoutedEventArgs
    {
        //用以承载时间消息的事件参数
        public ReportTimeEventArgs(RoutedEvent routedEvent, object source) : base(routedEvent, source)
        { }
        public DateTime ClickTime { get; set; }
    }

    class TimeButton : Button
    {
        //声明和注册路由事件
        public static readonly RoutedEvent ReportTimeEvent = EventManager.RegisterRoutedEvent("ReportTime", RoutingStrategy.Tunnel, typeof(EventHandler<ReportTimeEventArgs>), typeof(TimeButton));

        //CLR事件包装器
        public event RoutedEventHandler ReportTime
        {
            add { this.AddHandler(ReportTimeEvent, value); }
            remove { this.RemoveHandler(ReportTimeEvent, value); }
        }

        //激发路由事件,借用Click事件的激发方法
        protected override void OnClick()
        {
            base.OnClick(); //写完OnClick(),自动添加

            ReportTimeEventArgs args = new ReportTimeEventArgs(ReportTimeEvent, this);
            args.ClickTime = DateTime.Now;
            this.RaiseEvent(args);
        }
    }

    public partial class MainWindow : Window
    {
        public MainWindow()
        {
            InitializeComponent();
        }

        //ReportTimeEvent路由事件处理器,此处添加了RoutedEventArgs的Handled=true的处理,让路由事件在grid_2之后不再传递
        private void ReportTimeHandler(object sender,ReportTimeEventArgs e)
        {
            FrameworkElement element = sender as FrameworkElement;
            string timeStr = e.ClickTime.ToLongTimeString();
            string content = string.Format("{0}到达{1}", timeStr, element.Name);
            this.listbox1.Items.Add(content);

            if(element==this.grid_2) //添加部分
            {
                e.Handled = true;  //添加部分
            }
        }
    }
}
程序运行结果如下:

路由事件虽好,但不要滥用,事件该由谁来捕捉处理,传到这个地方就应该处理掉。
RoutedEventArgs的Source与OriginalSource
路由事件的消息是沿着VisualTree传递的,而路由事件的消息则包含在RoutedEventArgs实例中。
Source与OriginalSource都表示路由事件传递的起点,Source是LogicalTree上的消息源头,而OriginalSource是VisualTree上的源头。
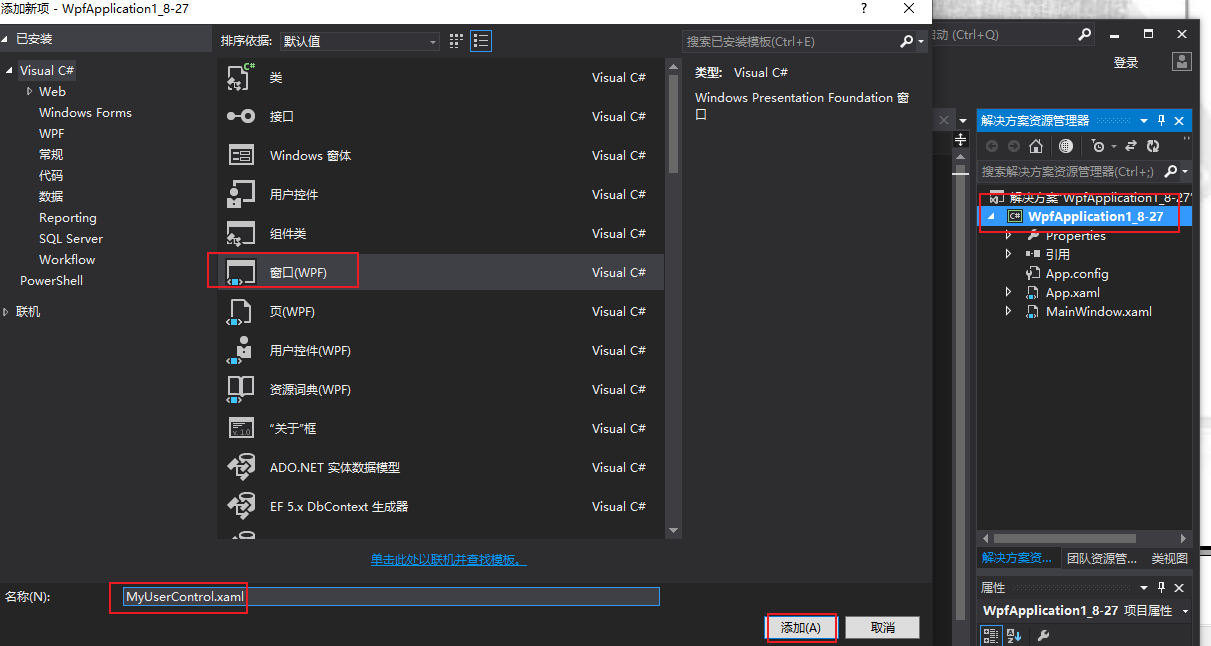
在当前工程中添加一个窗体:

没有复现出来。
附加事件Attached Event
附加事件就是路由事件,是对附加事件宿主的真实写照。
示例:设计一个名为Student的类,如果Student的Name属性值发生变化就激发一个路由事件,就使用界面元素来捕捉这个事件。
<Window x:Class="WpfApplication1_8_27_1.MainWindow"
        xmlns="http://schemas.microsoft.com/winfx/2006/xaml/presentation"
        xmlns:x="http://schemas.microsoft.com/winfx/2006/xaml"
        Title="MainWindow" Height="200" Width="200">
    <Grid x:Name="gridMain">
        <Button x:Name="button1" Content="OK" Width="80" Height="80" Click="Button_Click"/>
    </Grid>
</Window>
public class Student
{
    //声明并定义路由事件
    public static readonly RoutedEvent NameChangedEvent = EventManager.RegisterRoutedEvent("NameChanged", RoutingStrategy.Bubble, typeof(RoutedEventHandler), typeof(Student));
    public int Id { get; set; }
    public string Name { get; set; }
}

namespace WpfApplication1_8_27_1
{
    /// <summary>
    /// MainWindow.xaml 的交互逻辑
    /// </summary>
    public partial class MainWindow : Window
    {
        public MainWindow()
        {
            InitializeComponent();

            //为外层Grid添加路由事件侦听器
            this.gridMain.AddHandler(Student.NameChangedEvent, new RoutedEventHandler(this.StudentNameChangedHandler));
        }

        //Click事件处理器
        private void Button_Click(object sender, RoutedEventArgs e)
        {
            Student stu = new Student() { Id = 101, Name = "Tim" };
            stu.Name = "Tom";

            //准备事件消息并发送路由事件
            RoutedEventArgs arg = new RoutedEventArgs(Student.NameChangedEvent, stu);
            this.button1.RaiseEvent(arg);
        }

        //Grid捕捉到NameChangedEvent后的处理器
        private void StudentNameChangedHandler(object sender,RoutedEventArgs e)
        {
            MessageBox.Show((e.OriginalSource as Student).Id.ToString());
        }
    }
}
后台代码中,当界面上唯一的Button被单击后会触发Button_Click。应为Student不是UIElement的派生类,所以不具有RaiseEvent方法,需要借用Button的RaiseEvent。
在窗体构造器中为Grid元素添加了对Student.NameChangedEvent的侦听,这与添加路由事件的侦听没有区别。Grid捕捉到路由事件后会显示事件消息源Student的Id

理论上Student类已经具有附加事件了,但官方规定要为其添加一个CLR包装艺编XAML编辑器识别并进行智能提示。但,Student类并非派生自UIElement,不具有AddHandler、RemoveHandler方法。
- 为目标UI元素添加附加事件侦听器的包装器是一个Add *Handler的public static方法(事件的侦听者-DependencyObject,事件的处理器-RoutedEventHandler委托类型)
- 解除UI元素对附加事件侦听的包装器是一个Remove*Handler的public static方法,星号为事件名称。
public class Student
{
    //声明并定义路由事件
    public static readonly RoutedEvent NameChangedEvent = EventManager.RegisterRoutedEvent("NameChanged", RoutingStrategy.Bubble, typeof(RoutedEventHandler), typeof(Student));

    //为界面元素添加路由事件侦听
    public static void AddNameChangedHandler(DependencyObject d,RoutedEventHandler h) //程序中发生改变的地方1
    {
        UIElement e = d as UIElement;
        if(e != null)
        {
            e.AddHandler(Student.NameChangedEvent, h);
        }
    }

    //移除侦听
    public static void RemoveNameChangedHandler(DependencyObject d,RoutedEventHandler h)
    {
        UIElement e = d as UIElement;
        if(e != null)
        {
            e.RemoveHandler(Student.NameChangedEvent, h);
        }
    }
    public int Id { get; set; }
    public string Name { get; set; }
}

namespace WpfApplication1_8_27_1
{
    /// <summary>
    /// MainWindow.xaml 的交互逻辑
    /// </summary>
    public partial class MainWindow : Window
    {
        public MainWindow()
        {
            InitializeComponent();

            //为外层Grid添加路由事件侦听器
           // this.gridMain.AddHandler(Student.NameChangedEvent, new RoutedEventHandler(this.StudentNameChangedHandler));
            Student.AddNameChangedHandler(this.gridMain, new RoutedEventHandler(this.StudentNameChangedHandler));  //程序中发生改变的地方2
        }

        //Click事件处理器
        private void Button_Click(object sender, RoutedEventArgs e)
        {
            Student stu = new Student() { Id = 101, Name = "Tim" };
            stu.Name = "Tom";

            //准备事件消息并发送路由事件
            RoutedEventArgs arg = new RoutedEventArgs(Student.NameChangedEvent, stu);
            this.button1.RaiseEvent(arg);
        }

        //Grid捕捉到NameChangedEvent后的处理器
        private void StudentNameChangedHandler(object sender,RoutedEventArgs e)
        {
            MessageBox.Show((e.OriginalSource as Student).Id.ToString());
        }
    }
}


 6739
6739

 被折叠的 条评论
为什么被折叠?


