


一:背景减法
对于一个稳定的监控场景而言,在没有运动目标,光照没有变化的情况下,视频图像中各个像素点的灰度值是符合随机概率分布的。由于摄像机在采集图像的过程中,会不可避免地引入噪声,这些灰度值以某一个均值为基准线,在附近做一定范围内的随机振荡,这种场景就是所谓的“背景”。
背景减法(Background subtraction)是当前运动目标检测技术中应用较为广泛的一类方法,它的基本思想和帧间差分法相类似,都是利用不同图像的差分运算提取目标区域。不过与帧间差分法不同的是,背景减法不是将当前帧图像与相邻帧图像相减,而是将当前帧图像与一个不断更新的背景模型相减,在差分图像中提取运动目标。
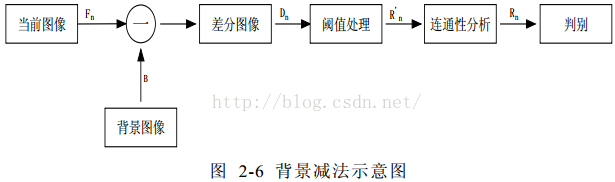
背景减法的运算过程如图2-6 所示。首先利用数学建模的方法建立一幅背景图像帧B ,记当前图像帧为fn,背景帧和当前帧对应像素点的灰度值分别记为B(x, y )和fn(x , y ) ,按照式2.17 将两帧图像对应像素点的灰度值进行相减,并取其绝对值,得到差分图像D n:

设定阈值 T ,按照式2.18 逐个对像素点进行二值化处理,得到二值化图像 Rn' 。其中,灰度值为255 的点即为前景(运动目标)点,灰度值为0 的点即为背景点;对图像 Rn'进行连通性分析,最终可得到含有完整运动目标的图像Rn 。

背景减法计算较为简单,由于背景图像中没有运动目标,当前图像中有运动目标,将两幅图像相减,显然可以提取出完整的运动目标,解决了帧间差分法提取的目标内部含有“空洞”的问题。
利用背景减法实现目标检测主要包括四个环节:背景建模,背景更新,目标检测,后期处理。其中,背景建模和背景更新是背景减法中的核心问题。背景模型建立的好坏直接影响到目标检测的效果。所谓背景建模,就是通过数学方法,构建出一种可以表征“背景”的模型。获取背景的最理想方法是在没有运动目标的情况下获取一帧“纯净”的图像作为背景,但是,在实际情况中,由于光照变化、雨雪天气、目标运动等诸多因素的影响,这种情况是很难实现。
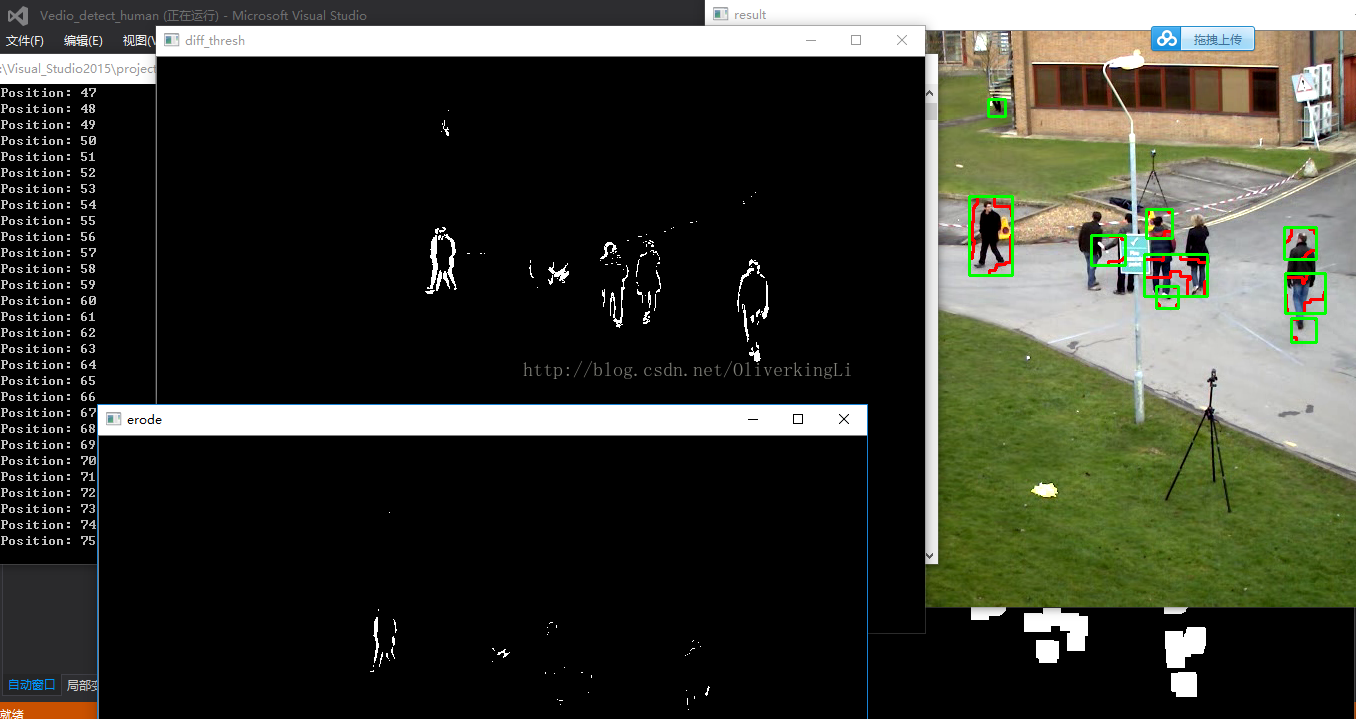
代码实现:
// Vedio_detect_human.cpp : 定义控制台应用程序的入口点。
//

#include "stdafx.h"
// 运动物体检测——背景减法
#include "opencv2/opencv.hpp"
using namespace cv;
#include <iostream>
using namespace std;
// 运动物体检测函数声明
Mat MoveDetect(Mat background, Mat frame);

int main()
{

	VideoCapture video("D:\\opencv\\soft\\3.3.0\\win\\opencv\\sources\\samples\\data\\vtest.avi");//定义VideoCapture类video
	if (!video.isOpened())  //对video进行异常检测
	{
		cout << "video open error!" << endl;
		return 0;
	}
	// 获取帧数
	int frameCount = video.get(CV_CAP_PROP_FRAME_COUNT);
	// 获取FPS
	double FPS = video.get(CV_CAP_PROP_FPS);
	// 存储帧
	Mat frame;
	// 存储背景图像
	Mat background;
	// 存储结果图像
	Mat result;
	for (int i = 0; i < frameCount; i++)
	{
		// 读帧进frame
		video >> frame;
		imshow("frame", frame);
		// 对帧进行异常检测
		if (frame.empty())
		{
			cout << "frame is empty!" << endl;
			break;
		}
		// 获取帧位置(第几帧)
		int framePosition = video.get(CV_CAP_PROP_POS_FRAMES);
		cout << "framePosition: " << framePosition << endl;
		// 将第一帧作为背景图像
		if (framePosition == 1)
			background = frame.clone();
		// 调用MoveDetect()进行运动物体检测,返回值存入result
		result = MoveDetect(background, frame);
		imshow("result", result);
		// 按原FPS显示
		if (waitKey(1000.0 / FPS) == 27)
		{
			cout << "ESC退出!" << endl;
			break;
		}
	}
	return 0;
}
Mat MoveDetect(Mat background, Mat frame)
{
	Mat result = frame.clone();
	// 1.将background和frame转为灰度图
	Mat gray1, gray2;
	cvtColor(background, gray1, CV_BGR2GRAY);
	cvtColor(frame, gray2, CV_BGR2GRAY);
	// 2.将background和frame做差
	Mat diff;
	absdiff(gray1, gray2, diff);
	imshow("diff", diff);
	// 3.对差值图diff_thresh进行阈值化处理
	Mat diff_thresh;
	threshold(diff, diff_thresh, 50, 255, CV_THRESH_BINARY);
	imshow("diff_thresh", diff_thresh);
	// 4.腐蚀
	Mat kernel_erode = getStructuringElement(MORPH_RECT, Size(3, 3));
	Mat kernel_dilate = getStructuringElement(MORPH_RECT, Size(15, 15));
	erode(diff_thresh, diff_thresh, kernel_erode);
	imshow("erode", diff_thresh);
	// 5.膨胀
	dilate(diff_thresh, diff_thresh, kernel_dilate);
	imshow("dilate", diff_thresh);
	// 6.查找轮廓并绘制轮廓
	vector<vector<Point>> contours;
	findContours(diff_thresh, contours, CV_RETR_EXTERNAL, CV_CHAIN_APPROX_NONE);
	// 在result上绘制轮廓
	drawContours(result, contours, -1, Scalar(0, 0, 255), 2);
	// 7.查找正外接矩形
	vector<Rect> boundRect(contours.size());
	for (int i = 0; i < contours.size(); i++)
	{
		boundRect[i] = boundingRect(contours[i]);
		// 在result上绘制正外接矩形
		rectangle(result, boundRect[i], Scalar(0, 255, 0), 2);
	}
	// 返回result
	return result;
}
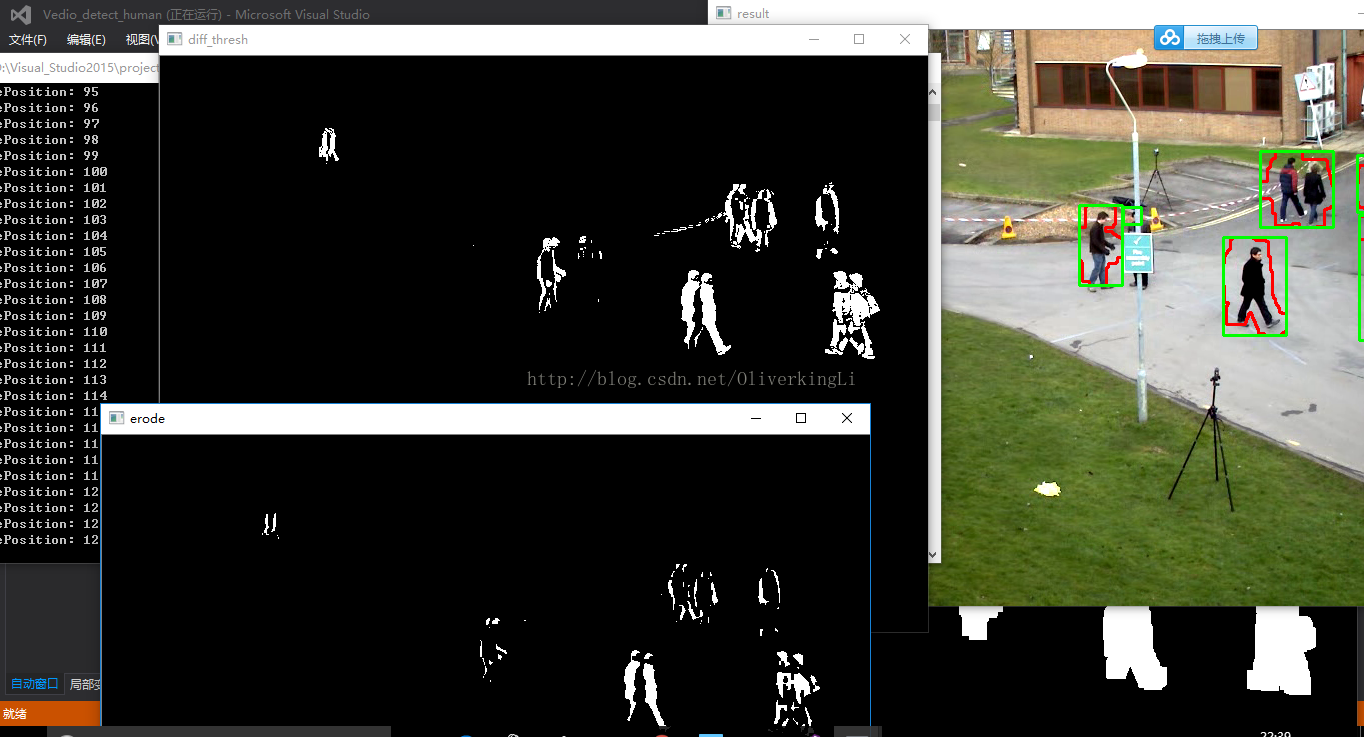
二:帧差法
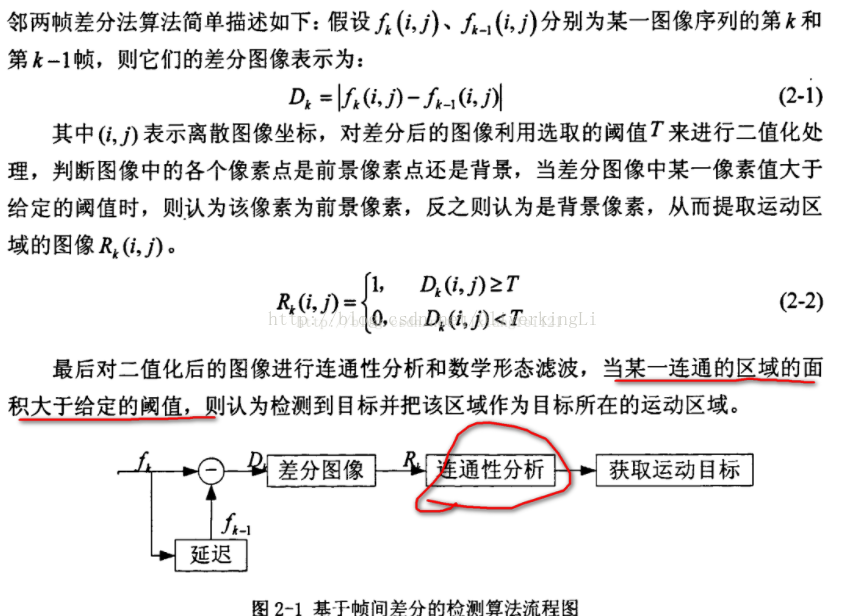
帧间差分方法利用图像序列中相邻两帧或者三帧图像对应像素值相减,然后取差值图像进行阈值化处理提取出图像中的运动区域:
代码:
// Vedio_detect_human.cpp : 定义控制台应用程序的入口点。
//

#include "stdafx.h"
// 运动物体检测——帧差法
#include "opencv2/opencv.hpp"
using namespace cv;
#include <iostream>
using namespace std;
// 运动物体检测函数声明
Mat MoveDetect(Mat temp, Mat frame);

int main()
{
	// 定义VideoCapture类video
	VideoCapture video("D:\\opencv\\soft\\3.3.0\\win\\opencv\\sources\\samples\\data\\vtest.avi");
	if (!video.isOpened())  //对video进行异常检测
	{
		cout << "video open error!" << endl;
		return 0;
	}
	// 获取帧数
	int frameCount = video.get(CV_CAP_PROP_FRAME_COUNT);
	// 获取FPS
	double FPS = video.get(CV_CAP_PROP_FPS);
	// 存储帧
	Mat frame;
	// 存储前一帧图像
	Mat temp;
	// 存储结果图像
	Mat result;
	for (int i = 0; i < frameCount; i++)
	{
		// 读帧进frame
		video >> frame;
		imshow("frame", frame);
		// 对帧进行异常检测
		if (frame.empty())
		{
			cout << "frame is empty!" << endl;
			break;
		}
		// 获取帧位置(第几帧)
		int framePosition = video.get(CV_CAP_PROP_POS_FRAMES);
		cout << "framePosition: " << framePosition << endl;
		// 如果为第一帧(temp还为空)
		if (i == 0)
		{
			// 调用MoveDetect()进行运动物体检测,返回值存入result
			result = MoveDetect(frame, frame);
		}
		//若不是第一帧(temp有值了)
		else
		{
			// 调用MoveDetect()进行运动物体检测,返回值存入result
			result = MoveDetect(temp, frame);
		}
		imshow("result", result);
		// 按原FPS显示
		if (waitKey(1000.0 / FPS) == 27)
		{
			cout << "ESC退出!" << endl;
			break;
		}
		temp = frame.clone();
	}
	return 0;


}
Mat MoveDetect(Mat temp, Mat frame)
{
	Mat result = frame.clone();
	// 1.将background和frame转为灰度图
	Mat gray1, gray2;
	cvtColor(temp, gray1, CV_BGR2GRAY);
	cvtColor(frame, gray2, CV_BGR2GRAY);
	// 2.将background和frame做差
	Mat diff;
	absdiff(gray1, gray2, diff);
	imshow("diff", diff);
	// 3.对差值图diff_thresh进行阈值化处理
	Mat diff_thresh;
	threshold(diff, diff_thresh, 50, 255, CV_THRESH_BINARY);
	imshow("diff_thresh", diff_thresh);
	// 4.腐蚀
	Mat kernel_erode = getStructuringElement(MORPH_RECT, Size(3, 3));
	Mat kernel_dilate = getStructuringElement(MORPH_RECT, Size(18, 18));
	erode(diff_thresh, diff_thresh, kernel_erode);
	imshow("erode", diff_thresh);
	// 5.膨胀
	dilate(diff_thresh, diff_thresh, kernel_dilate);
	imshow("dilate", diff_thresh);
	// 6.查找轮廓并绘制轮廓
	vector<vector<Point>> contours;
	findContours(diff_thresh, contours, CV_RETR_EXTERNAL, CV_CHAIN_APPROX_NONE);
	// 在result上绘制轮廓
	drawContours(result, contours, -1, Scalar(0, 0, 255), 2);
	// 7.查找正外接矩形
	vector<Rect> boundRect(contours.size());
	for (int i = 0; i < contours.size(); i++)
	{
		boundRect[i] = boundingRect(contours[i]);
		// 在result上绘制正外接矩形
		rectangle(result, boundRect[i], Scalar(0, 255, 0), 2);
	}
	// 返回result
	return result;
}
优点:
- 帧间差分方法简单、运算量小且易于实现。
- 帧间差分方法进行运动目标检测可以较强地适应动态环境的变化,有效地去除系统误差和噪声的影响,对场景中光照的变化不敏感而且不易受阴影的影响。
缺点:
- 不能完全提取所有相关的特征像素点,也不能得到运动目标的完整轮廓,只能得到运动区域的大致轮廓;
- 检测到的区域大小受物体的运动速度制约:对快速运动的物体,需要选择较小的时间间隔,如果选择不合适,当物体在前后两帧中没有重叠时,会被检测为两个分开的物体;对于慢速运动的物体,应该选择较大的时间差,如果时间选择不适当,当物体在前后两帧中几乎完全重叠时,则检测不到物体。
- 容易在运动实体内部差生空洞现象。
三:光流法
简介:在计算机视觉中,Lucas–Kanade光流算法是一种两帧差分的光流估计算法。它由Bruce D. Lucas 和 Takeo
Kanade提出。
光流的概念:(Optical flow or optic flow)
它是一种运动模式,这种运动模式指的是一个物体、表面、边缘在一个视角下由一个观察者(比如眼睛、摄像头等)
和背景之间形成的明显移动。光流技术,如运动检测和图像分割,时间碰撞,运动补偿编码,三维立体视差,都是
利用了这种边缘或表面运动的技术。
二维图像的移动相对于观察者而言是三维物体移动的在图像平面的投影。
有序的图像可以估计出二维图像的瞬时图像速率或离散图像转移。
光流算法:
它评估了两幅图像的之间的变形,它的基本假设是体素和图像像素守恒。它假设一个物体的颜色在前后两帧没有巨大
而明显的变化。基于这个思路,我们可以得到图像约束方程。不同的光流算法解决了假定了不同附加条件的光流问题。
Lucas–Kanade算法:
这个算法是最常见,最流行的。它计算两帧在时间t 到t + δt之间每个每个像素点位置的移动。 由于它是基于图像信号
的泰勒级数,这种方法称为差分,这就是对于空间和时间坐标使用偏导数。
图像约束方程可以写为I (x ,y ,z ,t ) = I (x + δx ,y + δy ,z + δz ,t + δt )
I(x, y,z, t) 为在(x,y,z)位置的体素。
我们假设移动足够的小,那么对图像约束方程使用泰勒公式,我们可以得到:

H.O.T. 指更高阶,在移动足够小的情况下可以忽略。从这个方程中我们可以得到:

或者

我们得到:

V x ,V y ,V z 分别是I(x,y,z,t)的光流向量中x,y,z的组成。  ,
,  ,
,  和
和  则是图像在(x ,y ,z ,t )这一点向相应方向的差分 。
所以
I x V x + I y V y + I z V z = − I t。
写做:

这个方程有三个未知量,尚不能被解决,这也就是所谓光流算法的光圈问题。那么要找到光流向量则需要另一套解决的方案。而Lucas-Kanade算法
是一个非迭代的算法:
假设流(Vx,Vy,Vz)在一个大小为m*m*m(m>1)的小窗中是一个常数,那么从像素1...n , n = m 3 中可以得到下列一组方程:


三个未知数但是有多于三个的方程,这个方程组自然是个超定方程,也就是说方程组内有冗余,方程组可以表示为:

记作:
为了解决这个超定问题,我们采用最小二乘法:
 or
or

得到:

其中的求和是从1到n。
这也就是说寻找光流可以通过在四维上图像导数的分别累加得出。我们还需要一个权重函数W(i, j,k) ,  来突出窗口中心点的
坐标。高斯函数做这项工作是非常合适的,
这个算法的不足在于它不能产生一个密度很高的流向量,例如在运动的边缘和黑大的同质区域中的微小移动方面流信息会很快的褪去。它的优点在于
有噪声存在的鲁棒性还是可以的。
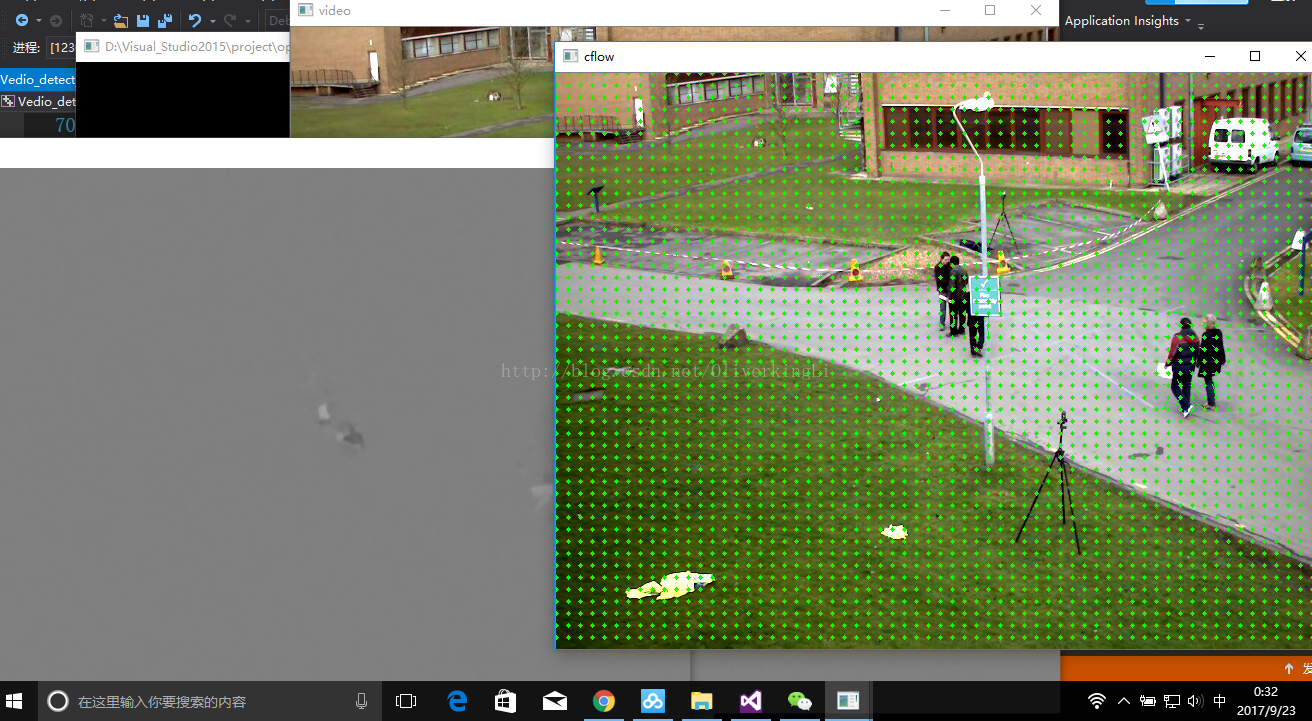
简单来说,上图表现的就是光流,光流描述的是图像上每个像素点的灰度的位置(速度)变化情况,光流的研究是利用图像序列中的像素强度数据的时域变化和相关性来确定各自像素位置的“运动”。研究光流场的目的就是为了从图片序列中近似得到不能直接得到的运动场。
光流法的前提假设:
(1)相邻帧之间的亮度恒定;
(2)相邻视频帧的取帧时间连续,或者,相邻帧之间物体的运动比较“微小”;
(3)保持空间一致性;即,同一子图像的像素点具有相同的运动;
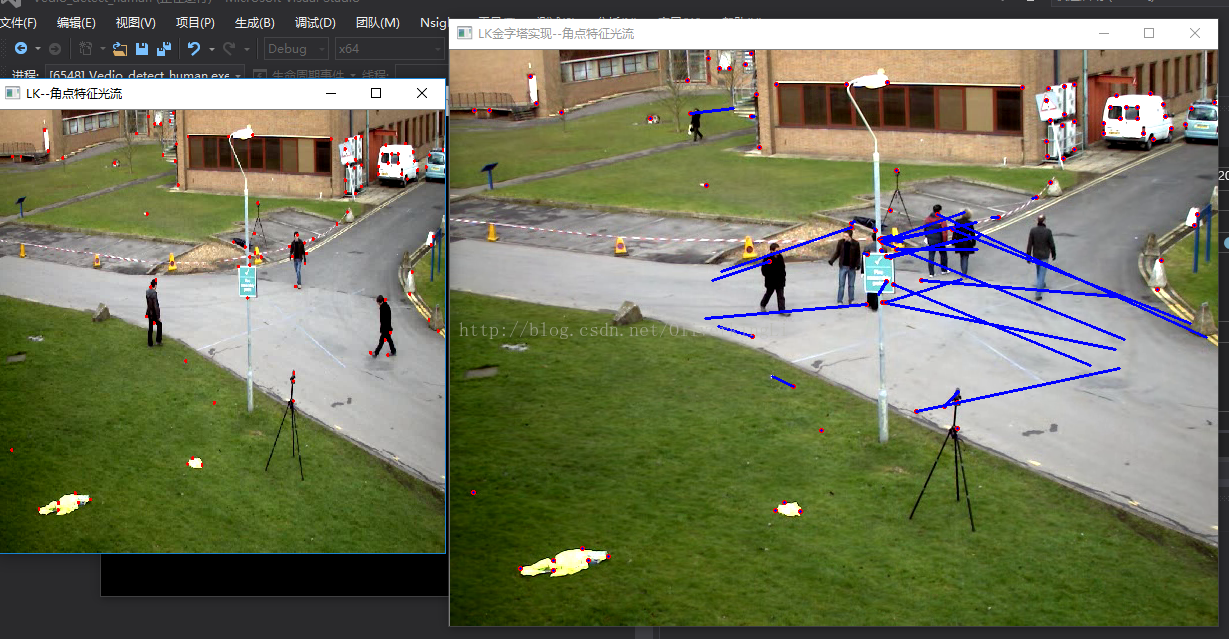
代码1:
// Vedio_detect_human.cpp : 定义控制台应用程序的入口点。
//

#include "stdafx.h"
// 运动物体检测——光流法--LK金字塔
#include<iostream>
#include<opencv2\highgui\highgui.hpp>
#include<opencv2\nonfree\nonfree.hpp>
#include<opencv2\video\tracking.hpp>

using namespace std;
using namespace cv;

Mat image1, image2;
vector<Point2f> point1, point2, pointCopy;
vector<uchar> status;
vector<float> err;

int main()
{
	VideoCapture video("D:\\opencv\\soft\\3.3.0\\win\\opencv\\sources\\samples\\data\\vtest.avi");
	// 获取视频帧率
	double fps = video.get(CV_CAP_PROP_FPS);
	// 两幅画面中间间隔
	double pauseTime = 1000 / fps;
	video >> image1;
	Mat image1Gray, image2Gray;
	cvtColor(image1, image1Gray, CV_RGB2GRAY);
	goodFeaturesToTrack(image1Gray, point1, 100, 0.01, 10, Mat());
	pointCopy = point1;
	// 绘制特征点位
	for (int i = 0; i<point1.size(); i++)
	{
		circle(image1, point1[i], 1, Scalar(0, 0, 255), 2);
	}
	namedWindow("LK--角点特征光流", 0);
	imshow("LK--角点特征光流", image1);
	while (true)
	{
		video >> image2;
		// 图像为空或Esc键按下退出播放
		if (!image2.data || waitKey(pauseTime) == 27)
		{
			break;
		}
		cvtColor(image2, image2Gray, CV_RGB2GRAY);
		// LK金字塔实现
		calcOpticalFlowPyrLK(image1Gray, image2Gray, point1, point2, status, err, Size(20, 20), 3);
		for (int i = 0; i<point2.size(); i++)
		{
			circle(image2, point2[i], 1, Scalar(0, 0, 255), 2);
			line(image2, pointCopy[i], point2[i], Scalar(255, 0, 0), 2);
		}
		imshow("LK金字塔实现--角点特征光流", image2);
		swap(point1, point2);
		image1Gray = image2Gray.clone();
	}
	return 0;
}
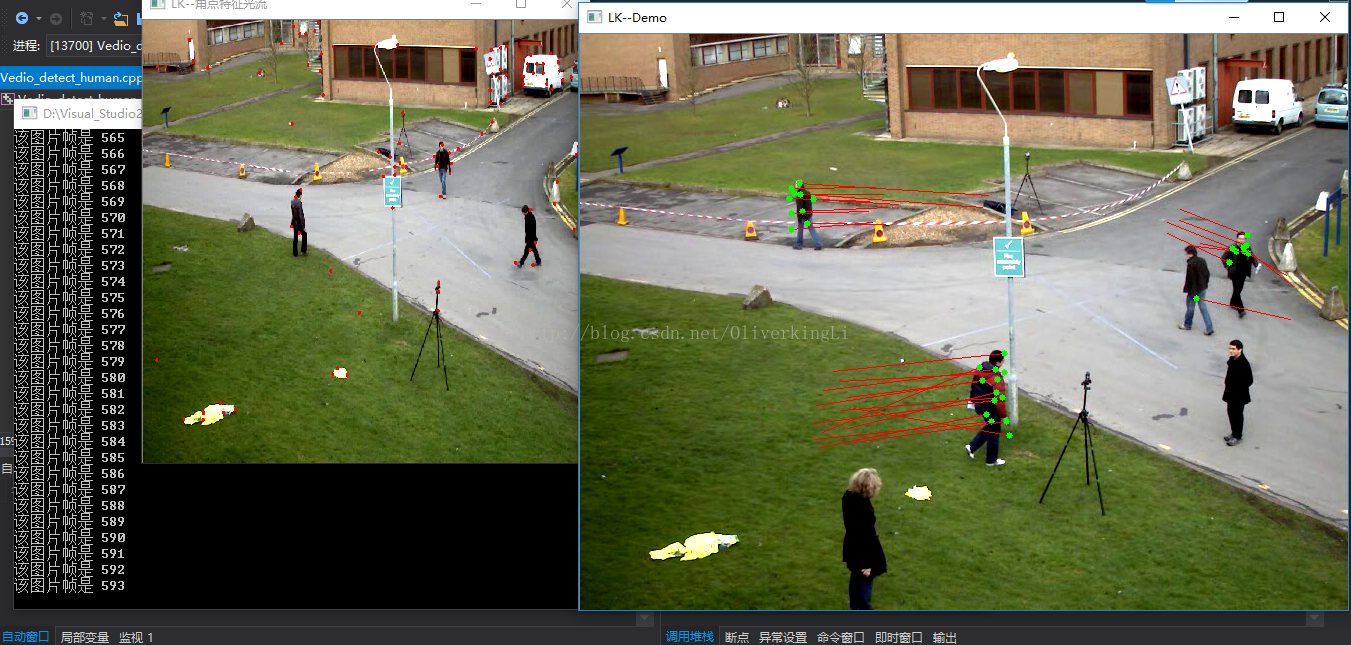
代码2:
// Vedio_detect_human.cpp : 定义控制台应用程序的入口点。
//

#include "stdafx.h"
// 运动物体检测——光流法--LK金字塔
#include <iostream>
#include <opencv2/opencv.hpp>
#include <opencv2/core/core.hpp>
#include <opencv2/highgui/highgui.hpp>
#include <opencv2/imgproc/imgproc.hpp>  // Gaussian Blur
#include <opencv2/ml/ml.hpp>
#include <opencv2/contrib/contrib.hpp>

using namespace cv;
using namespace std;

void duan_OpticalFlow(Mat &frame, Mat & result);
bool addNewPoints();
bool acceptTrackedPoint(int i);

Mat image;
vector<Point2f> point1, point2, pointCopy;
Mat curgray;    // 当前图片
Mat pregray;    // 预测图片
vector<Point2f> point[2]; // point0为特征点的原来位置,point1为特征点的新位置
vector<Point2f> initPoint;    // 初始化跟踪点的位置
vector<Point2f> features; // 检测的特征
int maxCount = 1000;         // 检测的最大特征数
double qLevel = 0.01;   // 特征检测的等级
double minDist = 10.0;  // 两特征点之间的最小距离
vector<uchar> status; // 跟踪特征的状态,特征的流发现为1,否则为0
vector<float> err;

int main()
{
	Mat matSrc;
	Mat matRst;

	VideoCapture cap("D:\\opencv\\soft\\3.3.0\\win\\opencv\\sources\\samples\\data\\vtest.avi");
	int totalFrameNumber = cap.get(CV_CAP_PROP_FRAME_COUNT);

	cap >> image;
	Mat imageGray, image2Gray;
	cvtColor(image, imageGray, CV_RGB2GRAY);
	goodFeaturesToTrack(imageGray, point1, 100, 0.01, 10, Mat());
	pointCopy = point1;
	// 绘制特征点位
	for (int i = 0; i<point1.size(); i++)
	{
		circle(image, point1[i], 1, Scalar(0, 0, 255), 2);
	}
	namedWindow("LK--角点特征光流", 0);
	imshow("LK--角点特征光流", image);

	// perform the tracking process
	cout << "开始检测视频,按下ESC键推出。" << endl;
	for (int nFrmNum = 0; nFrmNum < totalFrameNumber; nFrmNum++) {
		// 读取视频
		cap >> matSrc;
		if (!matSrc.empty())
		{
			duan_OpticalFlow(matSrc, matRst);
			cout << "该图片帧是 " << nFrmNum << endl;
		}
		else
		{
			cout << "获取视频帧数错误!" << endl;
		}
		if (waitKey(1) == 27) break;
	}

	waitKey(0);

	return 0;
}

void duan_OpticalFlow(Mat &frame, Mat & result)
{
	cvtColor(frame, curgray, CV_BGR2GRAY);
	frame.copyTo(result);
	// 添加特征点
	if (addNewPoints())
	{
		goodFeaturesToTrack(curgray, features, maxCount, qLevel, minDist);
		point[0].insert(point[0].end(), features.begin(), features.end());
		initPoint.insert(initPoint.end(), features.begin(), features.end());
	}

	if (pregray.empty())
	{
		curgray.copyTo(pregray);
	}

	calcOpticalFlowPyrLK(pregray, curgray, point[0], point[1], status, err);
	// 去除部分不好的光电
	int k = 0;
	for (size_t i = 0; i<point[1].size(); i++)
	{
		if (acceptTrackedPoint(i))
		{
			initPoint[k] = initPoint[i];
			point[1][k++] = point[1][i];
		}
	}

	point[1].resize(k);
	initPoint.resize(k);
	// 现实特征点和运动轨迹
	for (size_t i = 0; i<point[1].size(); i++)
	{
		line(result, initPoint[i], point[1][i], Scalar(0, 0, 255));
		circle(result, point[1][i], 3, Scalar(0, 255, 0), -1);
	}
	// 更新该次结果作为下一次的参考
	swap(point[1], point[0]);
	swap(pregray, curgray);

	imshow("LK--Demo", result);
	// waitKey(0);
}

bool addNewPoints()
{
	return point[0].size() <= 10;
}

bool acceptTrackedPoint(int i)
{
	return status[i] && ((abs(point[0][i].x - point[1][i].x) +
		abs(point[0][i].y - point[1][i].y)) > 2);
}
opencv源码给出的demo:
// Vedio_detect_human.cpp : 定义控制台应用程序的入口点。
//

#include "stdafx.h"
// 运动物体检测——光流法--LK金字塔
#include <stdio.h>
#include <iostream>
#include <opencv2/opencv.hpp>
#include <opencv2/core/core.hpp>
#include <opencv2/highgui/highgui.hpp>
#include <opencv2/imgproc/imgproc.hpp>  // Gaussian Blur
#include <opencv2/ml/ml.hpp>
#include <opencv2/contrib/contrib.hpp>

#include <opencv2/video/tracking.hpp>


using namespace cv;

static void convertFlowToImage(const Mat &flow_x, const Mat &flow_y, Mat &img_x, Mat &img_y, double lowerBound, double higherBound) {
#define CAST(v, L, H) ((v) > (H) ? 255 : (v) < (L) ? 0 : cvRound(255*((v) - (L))/((H)-(L))))
	for (int i = 0; i < flow_x.rows; ++i) {
		for (int j = 0; j < flow_y.cols; ++j) {
			float x = flow_x.at<float>(i, j);
			float y = flow_y.at<float>(i, j);
			img_x.at<uchar>(i, j) = CAST(x, lowerBound, higherBound);
			img_y.at<uchar>(i, j) = CAST(y, lowerBound, higherBound);
		}
	}
#undef CAST
}

static void drawOptFlowMap(const Mat& flow, Mat& cflowmap, int step, double, const Scalar& color)
{
	for (int y = 0; y < cflowmap.rows; y += step)
		for (int x = 0; x < cflowmap.cols; x += step)
		{
			const Point2f& fxy = flow.at<Point2f>(y, x);
			line(cflowmap, Point(x, y), Point(cvRound(x + fxy.x), cvRound(y + fxy.y)),
				color);
			circle(cflowmap, Point(x, y), 2, color, -1);
		}
}

int main(int argc, char** argv)
{
	// IO operation

	const char* keys =
	{
		"{ f  | vidFile      | ex2.avi | filename of video }"
		"{ x  | xFlowFile    | flow_x | filename of flow x component }"
		"{ y  | yFlowFile    | flow_y | filename of flow x component }"
		"{ i  | imgFile      | flow_i | filename of flow image}"
		"{ b  | bound | 15 | specify the maximum of optical flow}"
	};

	//CommandLineParser cmd(argc, argv, keys);
	//string vidFile = cmd.get<string>("vidFile");
	//string xFlowFile = cmd.get<string>("xFlowFile");
	//string yFlowFile = cmd.get<string>("yFlowFile");
	//string imgFile = cmd.get<string>("imgFile");
	//int bound = cmd.get<int>("bound");
	string vidFile = "vidFile";
	string xFlowFile = "xFlowFile";
	string yFlowFile = "yFlowFile";
	string imgFile = "imgFile";
	int bound = 80;


	namedWindow("video", 1);
	namedWindow("imgX", 1);
	namedWindow("imgY", 1);
	namedWindow("Demo", 1);
	//VideoCapture capture(vidFile);
	VideoCapture capture("D:\\opencv\\soft\\3.3.0\\win\\opencv\\sources\\samples\\data\\vtest.avi");

	if (!capture.isOpened()) {
		printf("Could not initialize capturing..\n");
		return -1;
	}

	int frame_num = 0;
	Mat image, prev_image, prev_grey, grey, frame, flow, cflow;

	while (true) {
		capture >> frame;
		if (frame.empty())
			break;
		imshow("video", frame);

		if (frame_num == 0) {
			image.create(frame.size(), CV_8UC3);
			grey.create(frame.size(), CV_8UC1);
			prev_image.create(frame.size(), CV_8UC3);
			prev_grey.create(frame.size(), CV_8UC1);

			frame.copyTo(prev_image);
			cvtColor(prev_image, prev_grey, CV_BGR2GRAY);

			frame_num++;
			continue;
		}

		frame.copyTo(image);
		cvtColor(image, grey, CV_BGR2GRAY);

		// calcOpticalFlowFarneback(prev_grey,grey,flow,0.5, 3, 15, 3, 5, 1.2, 0 );
		calcOpticalFlowFarneback(prev_grey, grey, flow, 0.702, 5, 10, 2, 7, 1.5, cv::OPTFLOW_FARNEBACK_GAUSSIAN);

		prev_image.copyTo(cflow);
		drawOptFlowMap(flow, cflow, 12, 1.5, Scalar(0, 255, 0));
		imshow("cflow", cflow);

		Mat flows[2];
		split(flow, flows);
		Mat imgX(flows[0].size(), CV_8UC1);
		Mat imgY(flows[0].size(), CV_8UC1);
		convertFlowToImage(flows[0], flows[1], imgX, imgY, -bound, bound);
		//char tmp[20];
		//sprintf(tmp, "_%04d.jpg", int(frame_num));
		//imwrite(xFlowFile + tmp, imgX);
		//imwrite(yFlowFile + tmp, imgY);
		//imwrite(imgFile + tmp, image);

		std::swap(prev_grey, grey);
		std::swap(prev_image, image);
		frame_num = frame_num + 1;

		imshow("imgX", imgX);
		imshow("imgY", imgY);
		imshow("Demo", image);
		if (waitKey(1) == 27) break;
	}
	waitKey(0);
	return 0;
}


 773
773

 被折叠的 条评论
为什么被折叠?
被折叠的 条评论
为什么被折叠?
 到【灌水乐园】发言


