


Install and run
The following instructions use 32-bit software packages. The 64-bit software packages do not yet integrate seamlessly with each other, so are not recommended.
Table of Content:
1. 1. Install Python
2. 2. Setuptools
3. 3. Subversion (optional)
Subversion Server & Client
Subversion Bindings
4. 4. mod_python (optional)
5. 5. Plug-ins (optional)
6. 6. Genshi
7. 7. Trac
Option 1
Option 2
Configure Trac environment
8. 8. Account Manager Plug-in
1. Install Python
Although Python 2.5.x is not the latest version of Python available, it is the latest version supported by all the software components needed to run Trac.
- Download Python-2.5.4.msi to your computer, and run it (double-click on python-2.5.4.msi in your download folder).
- Click the Run button in the Open File - Security Warning dialogue box, if it appears.
- Click the Next > button to Install for all users
- Click the Next > button to use C:/Python25 as the destination directory
- Click the Next > button to install all of the Python components
- Wait for the installation to complete, and then click the Finish button
- Add the install directory (default is C:/Python25), and C:/Python25/Scripts directory to the windows %PATH% environment variable (dont worry if it doesn't exist now):
- Click the Windows Start button
- Right-click the My Computer icon
- Click the Properties option at the bottom of the pop-up menu
- Click the Advanced tab
- Click the Environment Variables button
- Scroll down the System variables listbox to the Path Variable
- Select the Path Variable and click the Edit button below it - DO NOT click on the edit button above
- Scroll to the right-hand end of the Variable value field, and type;C:/Python25;C:/Python25/Scripts
- Click the OK button in the Edit System Variable window
- Click the OK button in the Environment Variables window
- Click the OK button in the System Properties window
2. Setuptools
- Download ez_setup.py from PEAK (Python Enterprise Application Kit) to your Python (default isC:/Python25) directory.
- Open a command window
- Click the Windows Start button
- Click Run
A dialogue box titled Run should appear - Type cmd in to the Open drop-down field, and click the OK button
A black window should appear
- Type cd C:/Python25 and press the Return key
- Type ez_setup.py and press the Return key
Verify no messages containing errors appeared
3. Subversion (optional)
Trac can integrate with Subversion version control software. Read more about the integration between Trac and Subversion from the wiki: TracSubversion.
Subversion Server & Client
- Download Setup-Subversion-1.6.4.msi to your computer, and run it (double-click on Setup-Subversion-1.6.4.msi in your download folder).
- Click the Run button in the Open File - Security Warning dialogue box, if it appears.
- Click the Next button on the Welcome to the Subversion Setup Wizard screen
- Click the Next button on the Information screen
- Click the Next button to select Binding for Apache 2.0.x
- Type C:/Subversion/ in to the Install subversion to: field, and click the Next button
- Click the Finish button
- Open a command window
- Click the Windows Start button
- Click Run
A dialogue box titled Run should appear - Type cmd in to the Open drop-down field, and click the OK button
A black window should appear
- Type cd C:/Subversion/bin and press the Return key
- Type mkdir C:/svnrepositories and press the Return key
- Type svnadmin create C:/svnrepositories/myproject and press the Return key
- Ensure that the User Account Control at Windows Security Center is turned off, if it exists.
- Type sc create svnserver binpath= "C:/Subversion/bin/svnserve.exe --service -r c:/svnrepositories" displayname= "Subversion Server (svnserver)" depend= Tcpip start= auto and press the Return key
- Type net start svnserver and press the Return key
Subversion Bindings
- Open a command window
- Click the Windows Start button
- Click Run
A dialogue box titled Run should appear - Type cmd in to the Open drop-down field, and click the OK button
A black window should appear
- Type cd C:/Python25/Scripts and press the Return key
- Type easy_install -Z http://subversion.tigris.org/files/documents/15/46482/svn-python-1.6.4.win32-py2.5.exe and press the Return key
Verify no messages containing errors appeared
4. mod_python (optional)
mod_python is needed if you want to use Apache HTTP server.
- Download mod_python-3.3.1.win32-py2.5-Apache2.2.exe to your computer from Apache, and run it (double-click on mod_python-3.3.1.win32-py2.5-Apache2.0.exe in your download folder).
- Click the Run button in the Open File - Security Warning dialogue box, if it appears.
- Click the Next > button
- Click the Next > button to confirm the Python directory
- Click the Next > button to install
- Select the directory where Apache is installed
- Click the OK button
- Click the Finish button
5. Plug-ins (optional)
See TracPlugins for details about plugin installation. For example: to install the SpamFilter plugin
- Open a command window
- Click the Windows Start button
- Click Run
A dialogue box titled Run should appear - Type cmd in to the Open drop-down field, and click the OK button
A black window should appear
- Type mkdir C:/src and press the Return key
- Type cd C:/src and press the Return key
- Type svn checkout http://svn.edgewall.org/repos/trac/sandbox/spam-filter/trunk spam-filter and press the Return key
Verify no messages containing errors appeared - Type cd spam-filter and press the Return key
- Type python setup.py install and press the Return key
Verify no messages containing errors appeared
6. Genshi
- Open a command window
- Click the Windows Start button
- Click Run
A dialogue box titled Run should appear - Type cmd in to the Open drop-down field, and click the OK button
A black window should appear
- Type mkdir C:/src and press the Return key
- Type cd C:/src and press the Return key
- Type svn checkout http://svn.edgewall.org/repos/genshi/trunk genshi and press the Returnkey
- Type cd genshi and press the Return key
- Type python setup.py install and press the Return key
Verify no messages containing errors appeared
7. Trac
- Open a command window
- Click the Windows Start button
- Click Run
A dialogue box titled Run should appear - Type cmd in to the Open drop-down field, and click the OK button
A black window should appear
- Choose ONE of the following options:
Option 1
- Type cd C:/Python25/Scripts and press the Return key
- Type easy_install Trac and press the Return key
Verify no messages containing errors appeared
Option 2
- Type mkdir C:/src and press the Return key
- Type cd C:/src and press the Return key
- Type svn checkout http://svn.edgewall.org/repos/trac/trunk trac and press the Return key
Verify no messages containing errors appeared - Type cd trac and press the Return key
- Type python setup.py install and press the Return key
Verify no messages containing errors appeared
Configure Trac environment
- Type mkdir C:/trac and press the Return key
- Type cd C:/Python25/Scripts and press the Return key
- Type trac-admin /trac initenv and press the Return key
- Type in your project name (keep it succinct) and press the Return key
- Press the Return key to select the default Database connection string
- Press the Return key to select svn as the default Repository type
- Type in the full path of your repository; e.g. /svnrepositories/myproject, and press the Return key
- Verify the installation of Trac works:
- Type in tracd --port 8000 C:/trac to start the Trac daemon
- Click the Windows Start button
- Click Run
A dialogue box titled Run should appear - Type http://localhost:8000
A browser window should open to a page with Available Projects - Click on your project's name, and you should be taken to your project's Trac home page.
8. Account Manager Plug-in
- Open a command window
- Click the Windows Start button
- Click Run
A dialogue box titled Run should appear - Type cmd in to the Open drop-down field, and click the OK button
A black window should appear
- Type cd C:/Python25/Scripts and press the Return key
- Type easy_install http://trac-hacks.org/svn/accountmanagerplugin/trunk and press theReturn key
Verify no messages containing errors appeared - Type trac-admin C:/trac permission add anonymous TRAC_ADMIN and press the Return key
- Click the Windows Start button
- Click Run
A dialogue box titled Run should appear - Type notepad C:/trac/conf/trac.ini in to the Open drop-down field, and click the OK button
- Copy the block of text below
[components]
acct_mgr.admin.accountmanageradminpage = enabled
acct_mgr.api.accountmanager = enabled
acct_mgr.db.sessionstore = enabled
acct_mgr.htfile.htdigeststore = enabled
acct_mgr.pwhash.htdigesthashmethod = enabled
acct_mgr.web_ui.accountmodule = enabled
acct_mgr.web_ui.loginmodule = enabled
acct_mgr.web_ui.registrationmodule = enabled
trac.web.auth.loginmodule = disabled
- Scroll down to the [header_logo] section, and place the cursor on the blank line above it
- Paste the text you copied above in to the document
- Save the file, and close notepad
- Create an empty C:/trac/conf/passwords.txt
- Click the Windows Start button
- Click Run
A dialogue box titled Run should appear - Type notepad C:/trac/conf/passwords.txt in to the Open drop-down field, and click the OKbutton
- Save the file, and close notepad
- Click the Windows Start button
- Click Run
A dialogue box titled Run should appear - Type http://localhost:8000/trac/admin
A browser window should open to an Administration page - Click the Configuration hyperlink under Accounts in the menu on the left-hand side of the page
- Select 1 from the drop-down list-box next to the HtDigestStore heading
- Select 1 from the drop-down list-box next to the SessionStore heading
- Type C:/trac/conf/passwords.txt in to the filename: field in the HtDigestStore section
- Type trac in to the realm: field under the HtDigestStore section
- Click the Save button
- Click the Users hyperlink under the Accounts section in the menu on the left-hand side of the page
- Type a username in to the Username: field on the right-hand side of the page in the Add Account:section
- Type a password in to the Password: field on the right-hand side of the page in the Add Account:section
- Type the password in to the Confirm password: field on the right-hand side of the page in the Add Account: section
- Type a name in to the Name: field on the right-hand side of the page in the Add Account: section
- Type an e-mail address in to the Email: field on the right-hand side of the page in the Add Account:section
- Click the Add button
- Click the Permissions hyperlink under the General section in the menu on the left-hand side of the page
- Type the username in to the Subject: field on the right-hand side of the page in the Grant Permissions: section (this will become your admin user)
- Select TRAC_ADMIN from the Action: drop-down list-box
- Click the Add button
- Check TRAC_ADMIN in the Action section in the center of the page
- Click the Remove selected items button
(You will need to log in as your admin user to access the admin panels from this point forward)
More information about the TracEnvironment setup, and the TracStandalone web front-end is available.
Plugins install
Some very useful plugin include:
· Advancedticketworkflowplugin: Advanced workflow operations Trac plugin
· Autocompleteusers: complete the known trac users, AJAX style
· Tracaccountmanager: User account management plugin for Trac
· Tracspamfilter: Plugin for spam filtering
Present ticket workflow setting
Graphical representation of present workflow :
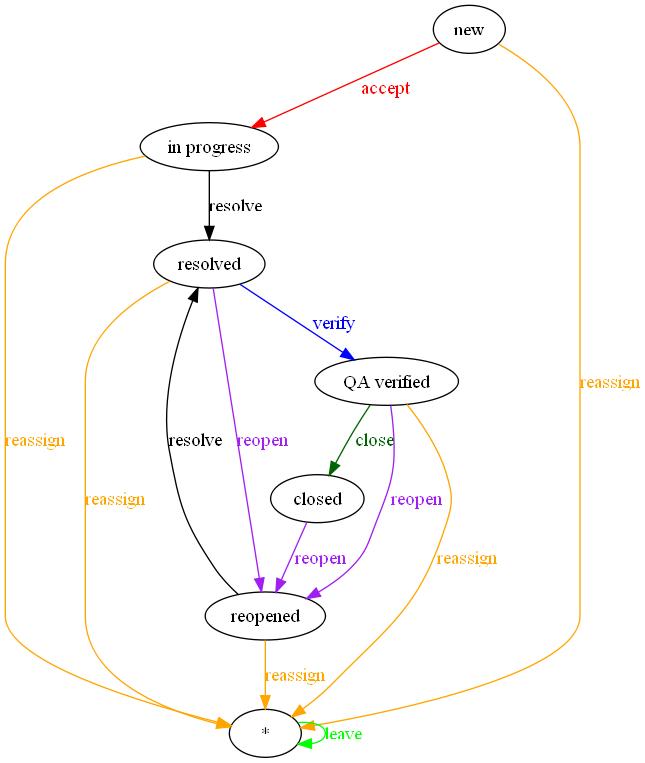
Setting in conf/trac.ini :
[ticket-workflow]
accept = new -> in progress
accept.operations = set_owner_to_self
accept.permissions = TICKET_MODIFY
close = QA verified -> closed
close.operations = set_owner_to_self
close.permissions = TICKET_MODIFY
leave = * -> *
leave.default = 1
leave.operations = leave_status
reassign = new,in progress,resolved,reopened,QA verified -> *
reassign.operations = set_owner
reassign.permissions = TICKET_MODIFY
reopen = resolved, QA verified, closed -> reopened
reopen.operations = del_resolution, set_owner
reopen.permissions = TICKET_MODIFY
resolve = in progress, reopened -> resolved
resolve.operations = set_owner_to_component_owner, set_resolution
resolve.permissions = TICKET_MODIFY
verify = resolved -> QA verified
verify.operations = set_resolution
verify.permissions = TICKET_MODIFY
Workflow Transitions
The workflow uses the following statuses:
- new: New ticket;
- in progress: A ticket is accepted and assigned for implementation;
- reopened: A ticket has not been implemented properly;
- resolved: A ticket has been implemented and it has to be verified by QA;
- QA verified: A ticket has been successfully tested and it has to be closed by Release Manager;
- closed: Closed ticket.
The following picture shows the transitions using state chart diagram:
http://projects.edgewall.com/trac/attachment/wiki/NewWorkflow/trac-enh-workflow.png?format=raw
The following table describes transitions between statuses:
| From/To | new | in progress | reopened | resolved | QA verified | closed |
| new | reassign | accept | ||||
| in progress | reassign | resolve | ||||
| reopened | reassign | resolve | ||||
| resolved | reopen | reassign | verify | |||
| QA verified | reopen | reassign | close | |||
| closed | reopen |
The following actions are used for transitions:
| Action Name | Trac Action | Description | Team in Action |
| reassign | reassign ticket to user | Reassign a ticket to another person and keep its status | It depends on status |
| accept | accept ticket | Accept ticket for implementation and assign it to currently logged user | Development Team |
| resolve | resolve as resolution | Send a ticket to verification and assign it to component owner when it has been implemented | Development Team |
| reopen | reopen ticket | Return a ticket to development because it has not been implemented properly | QA Team |
| verify | verify ticket | Send a ticket to release when it has been verified | QA Team |
| leave | Leave without change | Leave without change | It depends on status |
| close | close ticket | Close ticket | QA or Release Management Team |
The following table lists actions for every status in details:
| Status | Available Actions | Target Status |
| new | leave as new | new |
| in progress | leave as in progress | in progress |
| reopened | leave as reopened | reopened |
| resolved | leave as resolved | resolved |
| QA verified | leave as QA verified | QA verified |
| closed | leave as closed | closed |


 1397
1397

 被折叠的 条评论
为什么被折叠?
被折叠的 条评论
为什么被折叠?
 到【灌水乐园】发言


