


目录
5.3 实现对应的 drv_open/drv_read/drv_write 等函数,填入 file_operations 结构体
5.4 把 file_operations 结构体告诉内核:register_chrdev
1. 字符设备驱动程序框架
字符设备驱动程序的框架:

编写驱动程序的套路:
- 确定主设备号,也可以让内核分配
- 定义自己的 file_operations 结构体
- 实现对应的 drv_open/drv_read/drv_write 等函数,填入 file_operations 结构体
- 把 file_operations 结构体告诉内核:register_chrdev
- 谁来注册驱动程序啊?得设置入口函数:安装驱动程序时,就会去调用这个入口函数
- 有入口函数就应该有出口函数:卸载驱动程序时,出口函数调用 unregister_chrdev
- 其他完善:提供设备信息,自动创建设备节点:class_create, device_create
驱动怎么操作硬件?
- 通过 ioremap 映射寄存器的物理地址得到虚拟地址,读写虚拟地址
驱动怎么和 APP 传输数据
- 通过 copy_to_user、copy_from_user 这 2 个函数
2. 实现的功能
先编写驱动程序:
- 实现 led_open 函数,在里面初始化 LED 引脚
- 实现 led_write 函数,在里面根据 APP 传来的值控制 LED
- 再编写测试程序
3. 总体框图

4. 简单的 LED 驱动代码
#include <linux/kernel.h>
#include <linux/module.h>
#include <linux/slab.h>
#include <linux/init.h>
#include <linux/fs.h>
#include <linux/delay.h>
#include <linux/poll.h>
#include <linux/mutex.h>
#include <linux/wait.h>
#include <linux/uaccess.h>
#include <linux/device.h>
#include <asm/io.h>
static int major;
static struct class *led_class;
/* registers */
// IOMUXC_SNVS_SW_MUX_CTL_PAD_SNVS_TAMPER3 地址:0x02290000 + 0x14
static volatile unsigned int *IOMUXC_SNVS_SW_MUX_CTL_PAD_SNVS_TAMPER3;
// GPIO5_GDIR 地址:0x020AC004
static volatile unsigned int *GPIO5_GDIR;
//GPIO5_DR 地址:0x020AC000
static volatile unsigned int *GPIO5_DR;
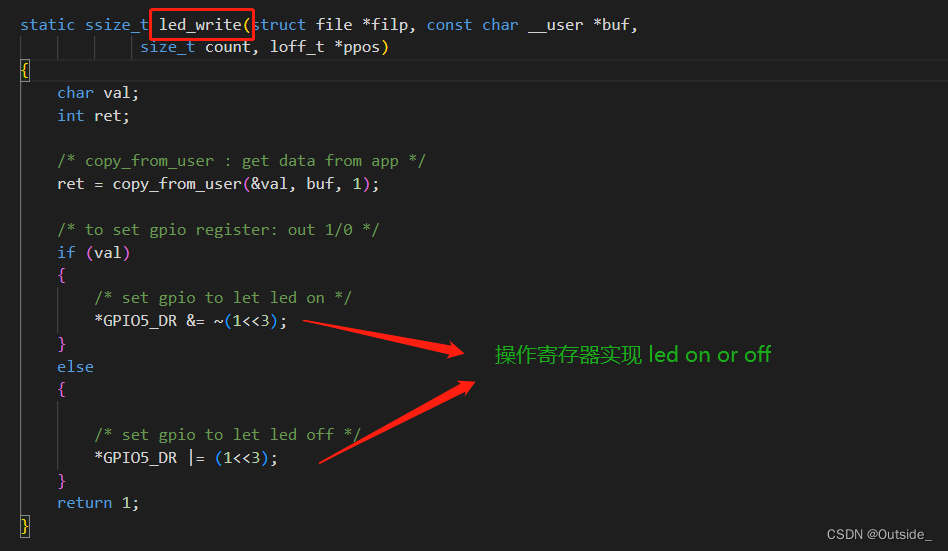
static ssize_t led_write(struct file *filp, const char __user *buf,
size_t count, loff_t *ppos)
{
char val;
int ret;
/* copy_from_user : get data from app */
ret = copy_from_user(&val, buf, 1);
/* to set gpio register: out 1/0 */
if (val)
{
/* set gpio to let led on */
*GPIO5_DR &= ~(1<<3);
}
else
{
/* set gpio to let led off */
*GPIO5_DR |= (1<<3);
}
return 1;
}
static int led_open(struct inode *inode, struct file *filp)
{
/* enable gpio5
* configure gpio5_io3 as gpio
* configure gpio5_io3 as output
*/
*IOMUXC_SNVS_SW_MUX_CTL_PAD_SNVS_TAMPER3 &= ~0xf;
*IOMUXC_SNVS_SW_MUX_CTL_PAD_SNVS_TAMPER3 |= 0x5;
*GPIO5_GDIR |= (1<<3);
return 0;
}
static struct file_operations led_fops = {
.owner = THIS_MODULE,
.write = led_write,
.open = led_open,
};
/* 入口函数 */
static int __init led_init(void)
{
printk("%s %s %d\n", __FILE__, __FUNCTION__, __LINE__);
major = register_chrdev(0, "100ask_led", &led_fops);
/* ioremap */
// IOMUXC_SNVS_SW_MUX_CTL_PAD_SNVS_TAMPER3 地址:0x02290000 + 0x14
IOMUXC_SNVS_SW_MUX_CTL_PAD_SNVS_TAMPER3 = ioremap(0x02290000 + 0x14, 4);
// GPIO5_GDIR 地址:0x020AC004
GPIO5_GDIR = ioremap(0x020AC004, 4);
//GPIO5_DR 地址:0x020AC000
GPIO5_DR = ioremap(0x020AC000, 4);
led_class = class_create(THIS_MODULE, "myled");
device_create(led_class, NULL, MKDEV(major, 0), NULL, "myled"); /* /dev/myled */
return 0;
}
static void __exit led_exit(void)
{
iounmap(IOMUXC_SNVS_SW_MUX_CTL_PAD_SNVS_TAMPER3);
iounmap(GPIO5_GDIR);
iounmap(GPIO5_DR);
device_destroy(led_class, MKDEV(major, 0));
class_destroy(led_class);
unregister_chrdev(major, "100ask_led");
}
module_init(led_init);
module_exit(led_exit);
MODULE_LICENSE("GPL");
5. 各部分解释
5.1 确定主设备号,也可以让内核分配

5.2 定义自己的 file_operations 结构体

5.3 实现对应的 drv_open/drv_read/drv_write 等函数,填入 file_operations 结构体
5.4 把 file_operations 结构体告诉内核:register_chrdev

5.5 驱动和 APP 传输数据


 1287
1287


 被折叠的 条评论
为什么被折叠?
被折叠的 条评论
为什么被折叠?
 到【灌水乐园】发言


