


TensorFlow+深度学习笔记4
标签(空格分隔): TensorFlow+深度学习笔记
本周掌握的知识
- 理解梯度弥散与梯度爆炸的概念;
- 学习理解 ResNet;
- 运行了Github上ResNet的源码,训练出自己的ResNet模型,并对模型进行了测试
Task 5:Deeper Network++
上周大家已经了解了 8 层的 AlexNet 和 16 层的 VGG,应该会有个感受:层数更多的 VGG 好像效果更好。而实际上很多世界顶尖研究人员已经通过大量实验发现,层数越多的网络对图像特征的提取和学习能力更强。但是层数深也会导致一个问题:梯度弥散。如何在层数加深的情况下避免梯度弥散问题,ResNet 提供了一种解决方案。
1 学习清单
1) 理解概念:梯度弥散与梯度爆炸。
2) 学习理解 ResNet。
3) 使用 ResNet 在 ImageNet 数据集上 train,保存模型。然后进行 test(读取训练好的模型,跑测试集的所有图像,得到准确率百分数)以及 inference(读入一个比如猫的图像,做预测)
2 参考资料
3 周报内容
1) 跟上周一样,解释网络每一个层的功能、具体如何实现(比如卷积是怎么做的、pooling 怎么做、fully connected 怎么做)、每个参数对应的意义。贴上代码,并解释每一句关键代码的意义。
2) 不能只用现有模型,需要自己训练模型!详细记录 train、test、inference 的过程,以及解释代码。
理解概念:梯度弥散与梯度爆炸
这个部分的知识我参考了链接梯度弥散与梯度爆炸 (侵删)
下面是我的理解:
首先回顾深度学习做的是什么:
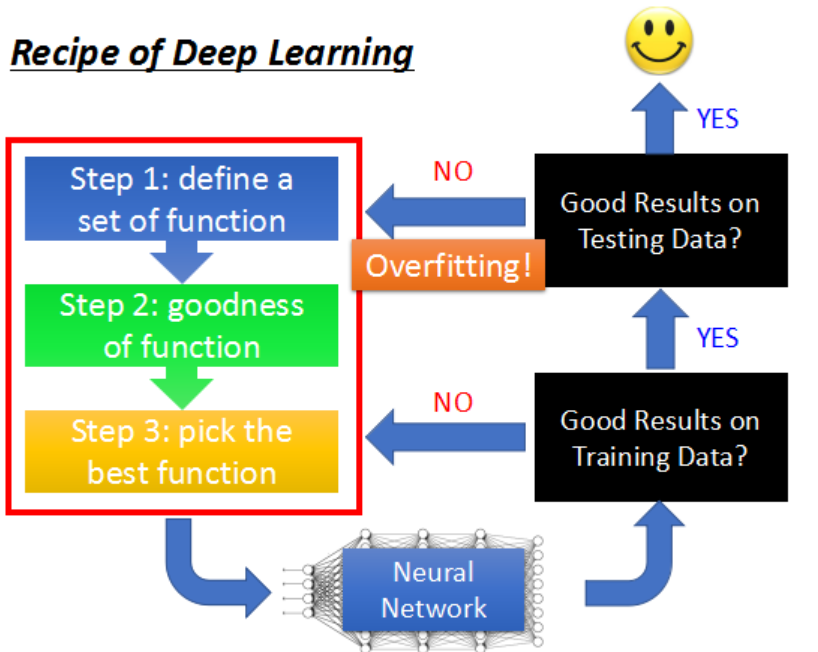
过拟合问题就是我们训练出来的模型在训练集上测试精度是很高的,但是在测试集上面测试的话精度就会不如人意。这是因为产生了过拟合,使得模型不具备泛化性。
在前几周的实验中,分别实现了两种CNN来识别MNIST数据集,其中Deep CNN的识别率要高一些,这是因为层数越多的网络对图像特征的提取和学习能力更强。但是是否层数越多神经网络越好?答案是否定的,原因如下:
当我们使用sigmoid funciton 作为激活函数时,随着神经网络隐藏层层数的增加,训练误差反而增大。这是因为越靠近输出层的隐藏层,其梯度越大,参数更新越快,就会越快收敛。而靠近输入层的隐藏层梯度小,参数更新慢,几乎就和初始状态一样,随机分布。
参考链接给了两张图:
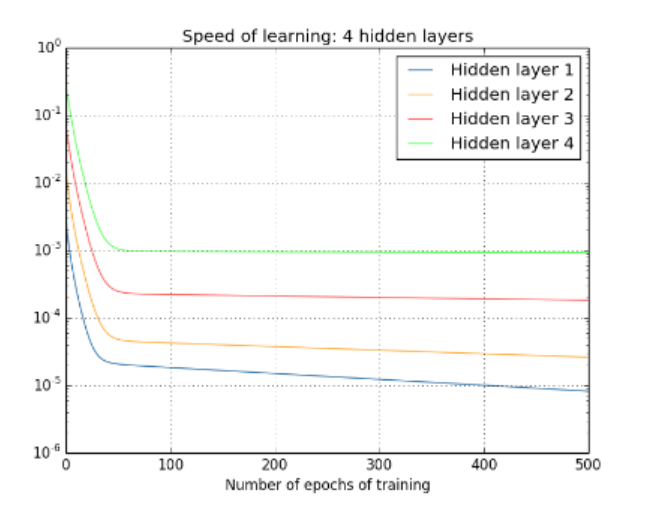

这里可以看出4个隐藏层的收敛速度是这样的:
Hidden layer4 > Hidden layer3 > Hidden layer2 > Hidden layer1
在上面这个4层隐藏层网络结构中,第4层的收敛速度比第1层的收敛速度整整快了100倍。
这就是梯度弥散的概念。
在另一种情况中,靠近输入层的隐藏层的梯度通过训练变大,而靠近输出层的隐藏层的梯度指数级增大,这种现象就叫做梯度爆炸。
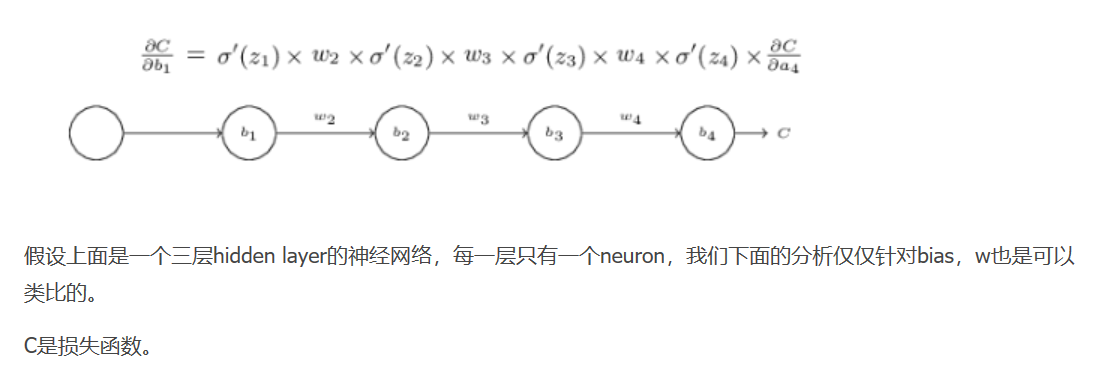
链接还给出了比较详细的数学证明过程:
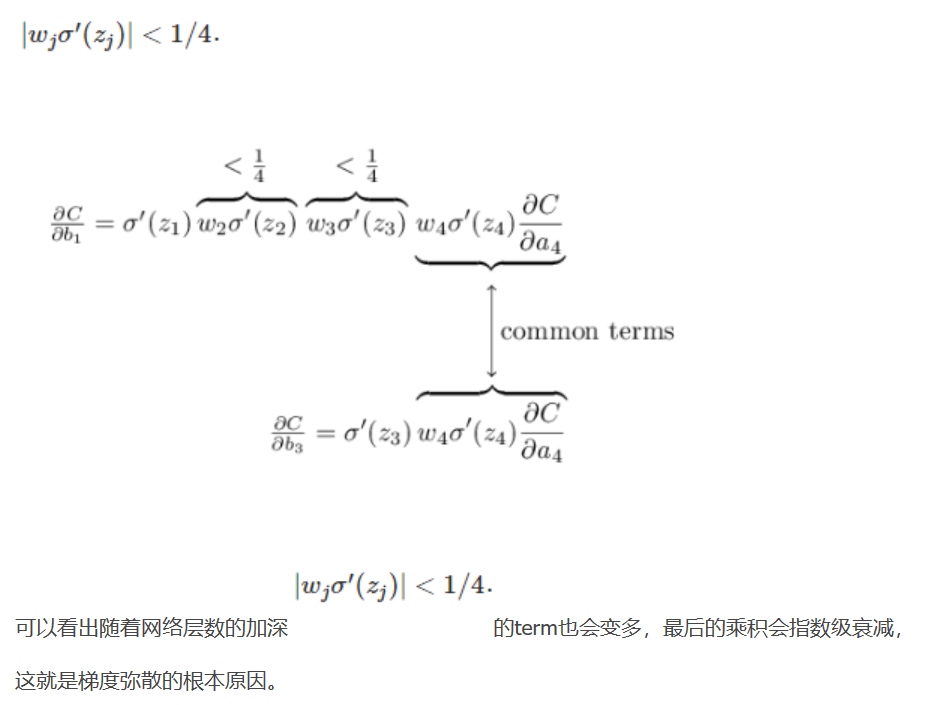
如果我们把参数w变得足够大,虽然解决了梯度弥散问题,但是会造成梯度爆炸问题。
给出了两种解决方案:
- 将sigmoid function换成ReLU
- Maxout
学习理解ResNet
这部分的参考连接有:
1 对ResNet的理解
2 ResNet解析
3 Deep Residual Learning for Image Recognition
深的网络容易引起梯度弥散;而浅的网络的识别效果又比较差。这样就陷入了网络识别精确率与网络结构层数的权衡两难中。ResNet引入了残差网络结构,通过残差网络,可以把网络变得很深,最终网络分类的效果也是很好的。
残差网络基本结构:
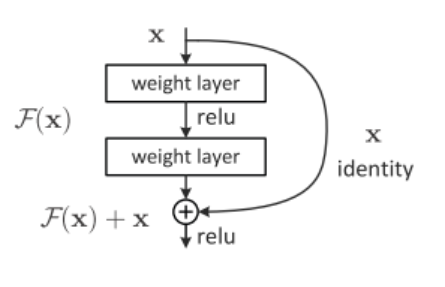
shortcut connection的两种方式:
通过在每隔两层引入一个shortcut connection,这样就可以解决梯度弥散问题。从而可以把网络结构做得很深:

ResNet的解读

可以把残差网络理解成一个Ensambing系统,删除网络中的一部分可以理解为少一些投票的人。上图的论文印证了一个猜想:最后的分类错误率和删除残差单元的个数成正比。也就是说删除的投票人数和错误率成正比。
从前面的讨论来看其实ResNet网络很深的路径其实很少,大部分路径都集中在中等长度上。表面上ResNet看起来很深,实际起作用的网络并不是很深。
这里要强调的是:ResNet没有从根源上解决深度网络的梯度弥散问题,ResNet其实只是一个多人投票系统
ResNet代码解读
这个部分我参考了连接2的ResNet代码,将会对作者的代码进行解释:
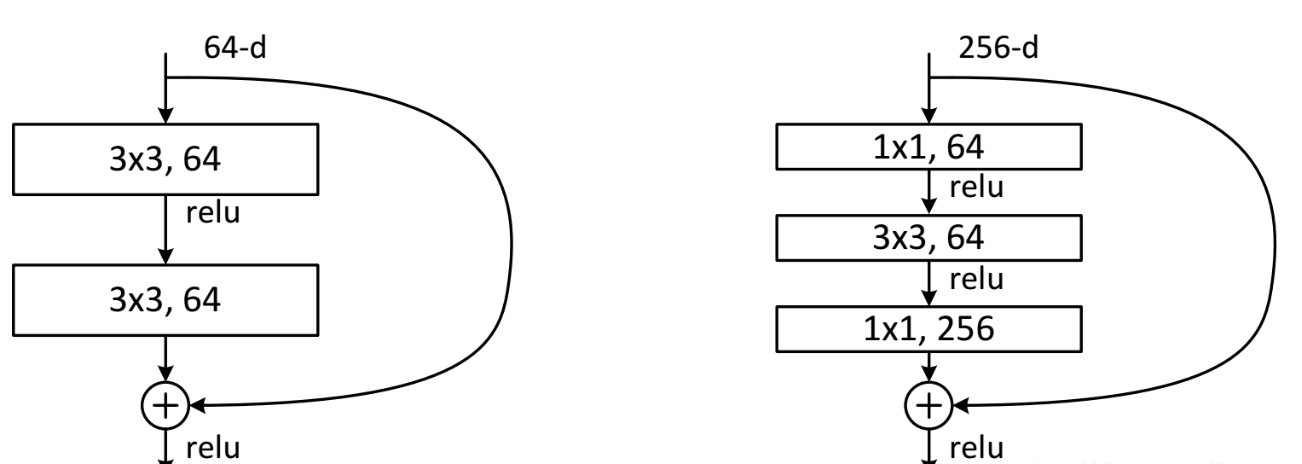
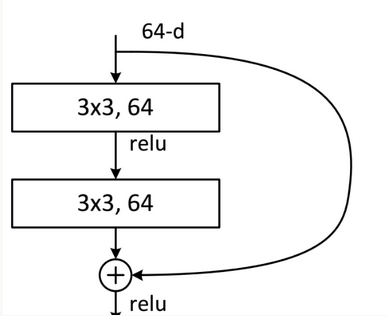
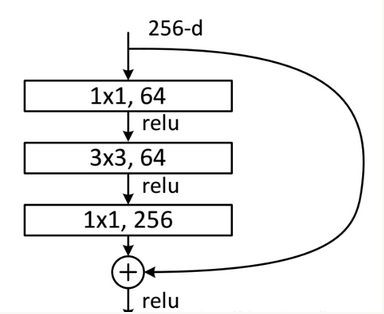
这部分代码最重要的是理解下面两个函数的结构,它们分别对应论文提到的shortcut connection的两种方式。
_residual()函数结构:
_bottleneck_residual()函数结构:
# coding: utf-8
# Copyright 2016 The TensorFlow Authors. All Rights Reserved.
#
# Licensed under the Apache License, Version 2.0 (the "License");
# you may not use this file except in compliance with the License.
# You may obtain a copy of the License at
#
#     http://www.apache.org/licenses/LICENSE-2.0
#
# Unless required by applicable law or agreed to in writing, software
# distributed under the License is distributed on an "AS IS" BASIS,
# WITHOUT WARRANTIES OR CONDITIONS OF ANY KIND, either express or implied.
# See the License for the specific language governing permissions and
# limitations under the License.
# ==============================================================================

"""ResNet model.

Related papers:
https://arxiv.org/pdf/1603.05027v2.pdf
https://arxiv.org/pdf/1512.03385v1.pdf
https://arxiv.org/pdf/1605.07146v1.pdf
"""
from collections import namedtuple

import numpy as np
import tensorflow as tf
#six是一个专门用来兼容 Python 2 和 Python 3 的库
import six

from tensorflow.python.training import moving_averages


HParams = namedtuple('HParams',
                     'batch_size, num_classes, min_lrn_rate, lrn_rate, '
                     'num_residual_units, use_bottleneck, weight_decay_rate, '
                     'relu_leakiness, optimizer')


class ResNet(object):
  """ResNet model."""

  def __init__(self, hps, images, labels, mode):
    """ResNet constructor.

    Args:
      hps: Hyperparameters.
      images: Batches of images. [batch_size, image_size, image_size, 3]
      labels: Batches of labels. [batch_size, num_classes]
      mode: One of 'train' and 'eval'.
    """
    self.hps = hps
    self._images = images
    self.labels = labels
    self.mode = mode

    self._extra_train_ops = []

  def build_graph(self):
    """Build a whole graph for the model."""
    #global_step经常在滑动平均,学习速率变化的时候需要用到,系统会自动更新这个参数的值,从1开始。
    #也就是说global_step就是一个计数器
    self.global_step = tf.train.get_or_create_global_step()
    #创建model
    self._build_model()
    #如果输入的mode字段是‘train’,就会训练模型
    if self.mode == 'train':
      self._build_train_op()
    ##将图形、训练过程等数据合并在一起
    self.summaries = tf.summary.merge_all()

  def _stride_arr(self, stride):
    """Map a stride scalar to the stride array for tf.nn.conv2d."""
    return [1, stride, stride, 1]

  def _build_model(self):
    """Build the core model within the graph."""
    with tf.variable_scope('init'):
      x = self._images
      #  _conv(self, name, x, filter_size, in_filters, out_filters, strides)
      # filter的size为3,输入通道为3,输出通道为16, 水平和垂直的步长都为1
      x = self._conv('init_conv', x, 3, 3, 16, self._stride_arr(1))

    strides = [1, 2, 2]
    activate_before_residual = [True, False, False]
    #判断是否使用bottleneck,如果使用filters = [16, 64, 128, 256],否则filters = [16, 16, 32, 64]
    if self.hps.use_bottleneck:
      res_func = self._bottleneck_residual
      filters = [16, 64, 128, 256]
    else:
      res_func = self._residual
      filters = [16, 16, 32, 64]
      # Uncomment the following codes to use w28-10 wide residual network.
      # It is more memory efficient than very deep residual network and has
      # comparably good performance.
      # https://arxiv.org/pdf/1605.07146v1.pdf
      # filters = [16, 160, 320, 640]
      # Update hps.num_residual_units to 4

    #unit1 res_func根据self.hps.use_bottleneck来判断是_bottleneck_residual还是_residual
    with tf.variable_scope('unit_1_0'):
      x = res_func(x, filters[0], filters[1], self._stride_arr(strides[0]),
                   activate_before_residual[0])
    for i in six.moves.range(1, self.hps.num_residual_units):
      with tf.variable_scope('unit_1_%d' % i):
        x = res_func(x, filters[1], filters[1], self._stride_arr(1), False)

    #unit2 res_func根据self.hps.use_bottleneck来判断是_bottleneck_residual还是_residual
    with tf.variable_scope('unit_2_0'):
      x = res_func(x, filters[1], filters[2], self._stride_arr(strides[1]),
                   activate_before_residual[1])
    for i in six.moves.range(1, self.hps.num_residual_units):
      with tf.variable_scope('unit_2_%d' % i):
        x = res_func(x, filters[2], filters[2], self._stride_arr(1), False)

    #unit3 res_func根据self.hps.use_bottleneck来判断是_bottleneck_residual还是_residual
    with tf.variable_scope('unit_3_0'):
      x = res_func(x, filters[2], filters[3], self._stride_arr(strides[2]),
                   activate_before_residual[2])
    for i in six.moves.range(1, self.hps.num_residual_units):
      with tf.variable_scope('unit_3_%d' % i):
        x = res_func(x, filters[3], filters[3], self._stride_arr(1), False)

    with tf.variable_scope('unit_last'):
      #批规范化
      x = self._batch_norm('final_bn', x)
      #relu处理过拟合问题
      x = self._relu(x, self.hps.relu_leakiness)
      #求平均值
      x = self._global_avg_pool(x)

    with tf.variable_scope('logit'):
      #全连接层
      logits = self._fully_connected(x, self.hps.num_classes)
      self.predictions = tf.nn.softmax(logits)

    with tf.variable_scope('costs'):
      #损失函数 详细连接参考https://blog.csdn.net/mao_xiao_feng/article/details/53382790
      xent = tf.nn.softmax_cross_entropy_with_logits(
          logits=logits, labels=self.labels)
      #求loss,要做一步tf.reduce_mean操作,对向量求均值
      self.cost = tf.reduce_mean(xent, name='xent')
      self.cost += self._decay()

      tf.summary.scalar('cost', self.cost)

  def _build_train_op(self):
    """Build training specific ops for the graph."""
    #学习率
    self.lrn_rate = tf.constant(self.hps.lrn_rate, tf.float32)
    #进行记录和汇总
    tf.summary.scalar('learning_rate', self.lrn_rate)

    #需要训练的变量列表
    trainable_variables = tf.trainable_variables()
    grads = tf.gradients(self.cost, trainable_variables)

    if self.hps.optimizer == 'sgd':
      #梯度下降优化器
      optimizer = tf.train.GradientDescentOptimizer(self.lrn_rate)
    elif self.hps.optimizer == 'mom':
      #动量优化器
      optimizer = tf.train.MomentumOptimizer(self.lrn_rate, 0.9)

    apply_op = optimizer.apply_gradients(
        zip(grads, trainable_variables),
        global_step=self.global_step, name='train_step')

    train_ops = [apply_op] + self._extra_train_ops
    self.train_op = tf.group(*train_ops)

  # TODO(xpan): Consider batch_norm in contrib/layers/python/layers/layers.py
  # 批规范化。在深度网络的训练中,每一层网络的输入都会因为前一层网络参数的变化导致其分布
  # 发生改变,这就要求我们必须使用一个很小的学习率和对参数很好的初始化,但是这么做会让训
  # 练过程变得慢而且复杂。作者把这种现象称作Internal Covariate Shift。通过Batch Normalization可以很好的解决这个问题
  def _batch_norm(self, name, x):
    """Batch normalization."""
    with tf.variable_scope(name):
      params_shape = [x.get_shape()[-1]]

      #初始化beta
      beta = tf.get_variable(
          'beta', params_shape, tf.float32,
          initializer=tf.constant_initializer(0.0, tf.float32))
      #初始化gamma
      gamma = tf.get_variable(
          'gamma', params_shape, tf.float32,
          initializer=tf.constant_initializer(1.0, tf.float32))

      #判断是在训练还是测试
      if self.mode == 'train':
        #初始化mean, variance, moving_mean, moving_variance
        mean, variance = tf.nn.moments(x, [0, 1, 2], name='moments')

        moving_mean = tf.get_variable(
            'moving_mean', params_shape, tf.float32,
            initializer=tf.constant_initializer(0.0, tf.float32),
            trainable=False)
        moving_variance = tf.get_variable(
            'moving_variance', params_shape, tf.float32,
            initializer=tf.constant_initializer(1.0, tf.float32),
            trainable=False)

        self._extra_train_ops.append(moving_averages.assign_moving_average(
            moving_mean, mean, 0.9))
        self._extra_train_ops.append(moving_averages.assign_moving_average(
            moving_variance, variance, 0.9))
      else:
        #初始化mean, variance
        mean = tf.get_variable(
            'moving_mean', params_shape, tf.float32,
            initializer=tf.constant_initializer(0.0, tf.float32),
            trainable=False)
        variance = tf.get_variable(
            'moving_variance', params_shape, tf.float32,
            initializer=tf.constant_initializer(1.0, tf.float32),
            trainable=False)
        tf.summary.histogram(mean.op.name, mean)
        tf.summary.histogram(variance.op.name, variance)
      # epsilon used to be 1e-5. Maybe 0.001 solves NaN problem in deeper net.
      y = tf.nn.batch_normalization(
          x, mean, variance, beta, gamma, 0.001)
      y.set_shape(x.get_shape())
      return y

  # 分为两个子层。论文提到的shortcut connection的第一种方式
  def _residual(self, x, in_filter, out_filter, stride,
                activate_before_residual=False):
    """Residual unit with 2 sub layers."""
    if activate_before_residual:
      with tf.variable_scope('shared_activation'):
        x = self._batch_norm('init_bn', x)
        x = self._relu(x, self.hps.relu_leakiness)
        orig_x = x
    else:
      with tf.variable_scope('residual_only_activation'):
        orig_x = x
        x = self._batch_norm('init_bn', x)
        x = self._relu(x, self.hps.relu_leakiness)

    with tf.variable_scope('sub1'):
      #_conv(self, name, x, filter_size, in_filters, out_filters, strides)
      #卷积核的size为3
      x = self._conv('conv1', x, 3, in_filter, out_filter, stride)

    with tf.variable_scope('sub2'):
      x = self._batch_norm('bn2', x)
      x = self._relu(x, self.hps.relu_leakiness)
      #卷积核的size为3,水平步长和垂直步长都为1
      x = self._conv('conv2', x, 3, out_filter, out_filter, [1, 1, 1, 1])

    with tf.variable_scope('sub_add'):
      if in_filter != out_filter:
        #tf.nn.avg_pool实现平均池化层
        orig_x = tf.nn.avg_pool(orig_x, stride, stride, 'VALID')
        #pad操作
        orig_x = tf.pad(
            orig_x, [[0, 0], [0, 0], [0, 0],
                     [(out_filter-in_filter)//2, (out_filter-in_filter)//2]])
      x += orig_x

    tf.logging.debug('image after unit %s', x.get_shape())
    return x

  # 分为三个子层。论文提到的shortcut connection的第二种方式
  def _bottleneck_residual(self, x, in_filter, out_filter, stride,
                           activate_before_residual=False):
    """Bottleneck residual unit with 3 sub layers."""
    if activate_before_residual:
      with tf.variable_scope('common_bn_relu'):
        x = self._batch_norm('init_bn', x)
        x = self._relu(x, self.hps.relu_leakiness)
        orig_x = x
    else:
      with tf.variable_scope('residual_bn_relu'):
        orig_x = x
        x = self._batch_norm('init_bn', x)
        x = self._relu(x, self.hps.relu_leakiness)

    with tf.variable_scope('sub1'):
      #_conv(self, name, x, filter_size, in_filters, out_filters, strides)
      #卷积核的size为1
      x = self._conv('conv1', x, 1, in_filter, out_filter/4, stride)

    with tf.variable_scope('sub2'):
      #_conv(self, name, x, filter_size, in_filters, out_filters, strides)
      #卷积核的size为3,水平步长和垂直步长都为1
      x = self._batch_norm('bn2', x)
      x = self._relu(x, self.hps.relu_leakiness)
      x = self._conv('conv2', x, 3, out_filter/4, out_filter/4, [1, 1, 1, 1])

    with tf.variable_scope('sub3'):
      #_conv(self, name, x, filter_size, in_filters, out_filters, strides)
      #卷积核的size为1,水平步长和垂直步长都为1
      x = self._batch_norm('bn3', x)
      x = self._relu(x, self.hps.relu_leakiness)
      x = self._conv('conv3', x, 1, out_filter/4, out_filter, [1, 1, 1, 1])

    with tf.variable_scope('sub_add'):
      if in_filter != out_filter:
        orig_x = self._conv('project', orig_x, 1, in_filter, out_filter, stride)
      x += orig_x

    tf.logging.info('image after unit %s', x.get_shape())
    return x

  def _decay(self):
    """L2 weight decay loss."""
    costs = []
    for var in tf.trainable_variables():
      if var.op.name.find(r'DW') > 0:
        #tf.nn.l2_loss()这个函数的作用是利用 L2 范数来计算张量的误差值,但是没有开方并且只取 L2 范数的值的一半
        #output = sum(t ** 2) / 2
        costs.append(tf.nn.l2_loss(var))
        # tf.summary.histogram(var.op.name, var)

    return tf.multiply(self.hps.weight_decay_rate, tf.add_n(costs))

  #卷积函数,返回同样大小的图像
  def _conv(self, name, x, filter_size, in_filters, out_filters, strides):
    """Convolution."""
    with tf.variable_scope(name):
      n = filter_size * filter_size * out_filters
      #生成卷积核数据
      kernel = tf.get_variable(
          'DW', [filter_size, filter_size, in_filters, out_filters],
          tf.float32, initializer=tf.random_normal_initializer(
              stddev=np.sqrt(2.0/n)))
      #padding方式为SAME,返回同样大小的图像
      return tf.nn.conv2d(x, kernel, strides, padding='SAME')

  #ReLU函数,避免过拟合
  def _relu(self, x, leakiness=0.0):
    """Relu, with optional leaky support."""
    return tf.where(tf.less(x, 0.0), leakiness * x, x, name='leaky_relu')

  def _fully_connected(self, x, out_dim):
    """FullyConnected layer for final output."""
    #x的行数为batch的大小,列数没有指定
    x = tf.reshape(x, [self.hps.batch_size, -1])
    #生成权重
    w = tf.get_variable(
        'DW', [x.get_shape()[1], out_dim],
        initializer=tf.uniform_unit_scaling_initializer(factor=1.0))
    #生成偏移值
    b = tf.get_variable('biases', [out_dim],
                        initializer=tf.constant_initializer())
    #matmul(x, weights) + biases
    return tf.nn.xw_plus_b(x, w, b)

  #求平均值
  def _global_avg_pool(self, x):
    assert x.get_shape().ndims == 4
    return tf.reduce_mean(x, [1, 2])
训练模型,并test以及inference
训练模型:
我使用的代码除开需要安装TensorFlow还需要安装Bazel,这里是Ubuntu下面Bazel安装的官方教程Installing Bazel on Ubuntu
我使用的数据集是CIFAR-10,数据集下载链接CIFAR-10
然后选择gpu来训练会快一些,但是遇到了下面的问题:
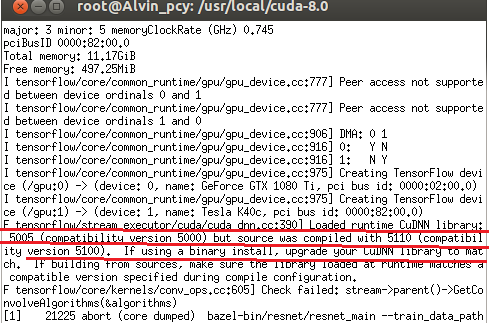
这个错误就是需要将cudnn更新为5.1。我使用了这个连接来更新虚拟机上面的cudnn:TensorFlow下运行mnist遇到的问题、更新cudnn方法。好不容易更新完cudnn,并且测试可以使用时候,以为可以使用gpu训练了,然后又出现下面的问题:爆显卡内存!
输入的命令:

命令行显示:
我的Amax是更新过了的,按照网站的教程测试通过了,排除这个问题,我再网上找了很多解决方法,于是将命令行改成下面的情况:

没有解决,还是爆显存。
于是我尝试修改CUDA_VISIBLE_DEVICES参数为2,成功运行:
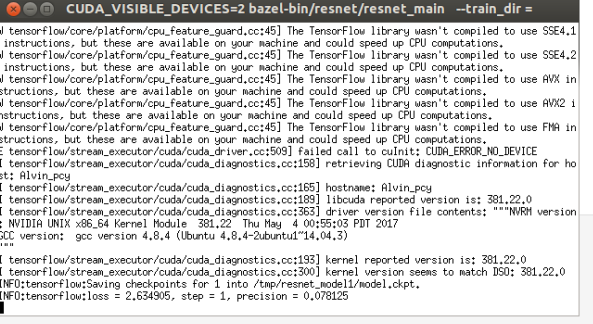
但是我发现速度并没有提高,和CPU计算的速度差不多,其实这里显示了一个错误,就是GPU根本没有调用成功。于是我最后使用了CPU来训练(解决这个问题的时候更新)。
测试模型:
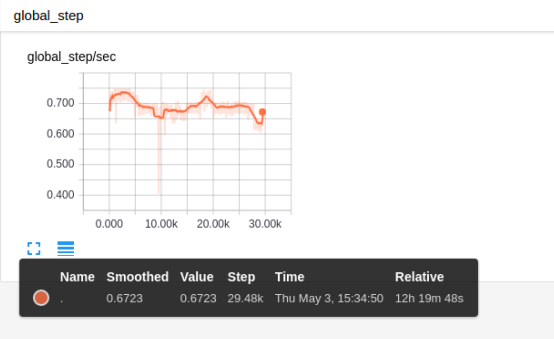
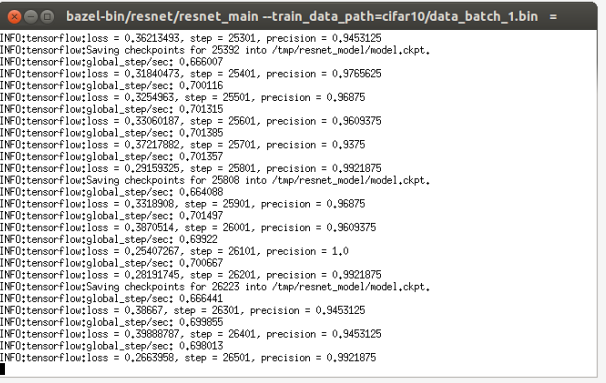
训练了12多小时,这里我犯了一个错误,就是这12个小时中的10个小时我是一直用来训练data_batch_1.bin的,而2、3、4、5都没有训练到。在第10个小时的时候,大概训练到20k步的时候我发现精度很早就已经稳定了,于是我中止训练:(下图是在data_batch_1.bin上训练10个小时后的结果)
我测试了一下模型,结果如下:
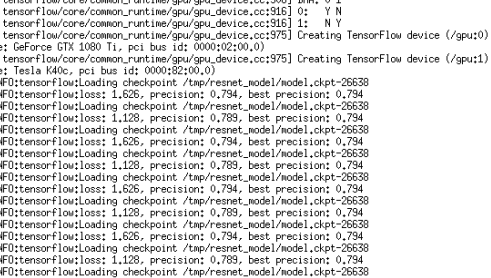
可以看到准确率只有79%左右,很明显是我只在data_batch_1.bin上训练,没有在2,3,4,5上面训练,导致模型精度不高,于是我继续使用CPU在data_batch_2.bin上面训练了2个多小时,最终模型的测试结果如下:
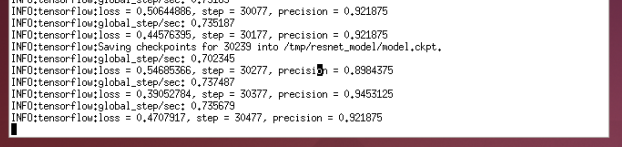
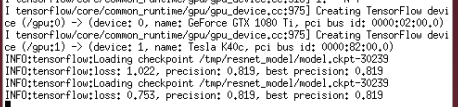
可以看到模型的精度有所提升(81.9%),相信继续在data_batch_3/4/5.bin训练下去模型精度会更高(持续更新)。
inference:
这个部分我使用连接1的3个模型做了测试,对比了不同层数的ResNet的精确度:
识别的图像:
层数为50的结果:

层数为101的结果:

层数为152的结果:
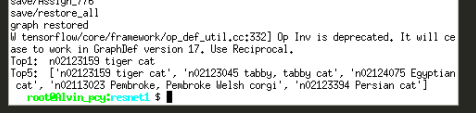
从这个结果可以看出层数越多,模型的识别率越高


 1553
1553


 被折叠的 条评论
为什么被折叠?
被折叠的 条评论
为什么被折叠?
 到【灌水乐园】发言


