


基于yolov8pose+crnn的水表刻度识别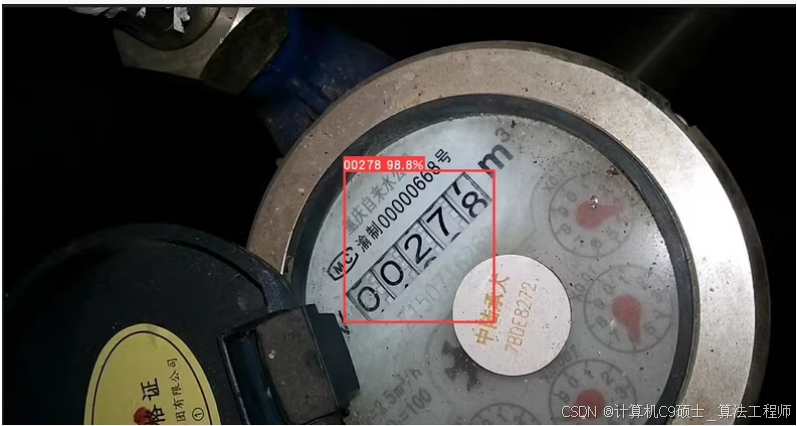
数据集包含1类别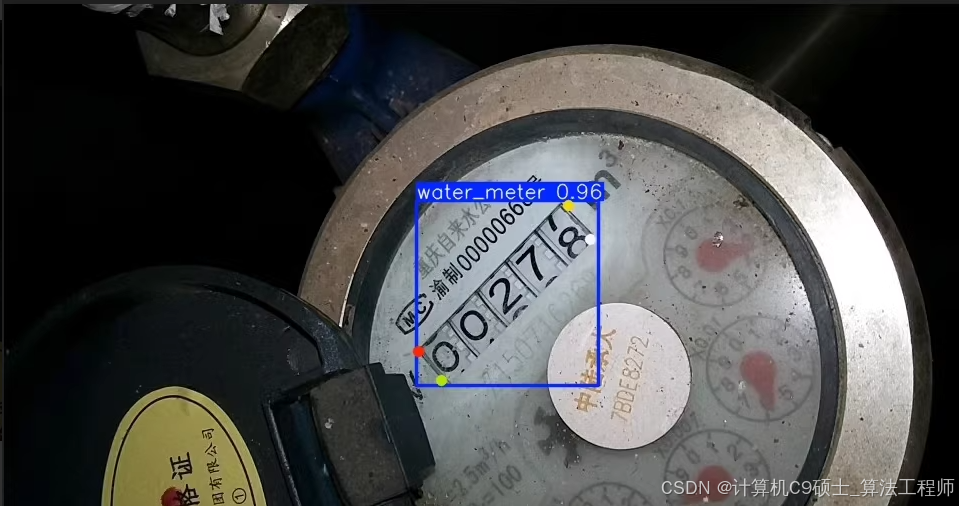
收集数据共1500张
如何训练自己的yolo格式数据集+ppocr识别格式数据集及如何训练自己的模型以及onnx的工作流推理代码
文章代码仅供参考:
构建一个基于 YOLOv8Pose 和 CRNN 的水表刻度识别系统。以下是详细的步骤:
- 数据准备:确保数据集格式正确。
- 环境部署:安装必要的库。
- 模型训练:
- 使用 YOLOv8Pose 进行人脸关键点检测(模拟水表指针位置)。
- 使用 CRNN 进行数字识别。
- 推理工作流:将 YOLOv8Pose 和 CRNN 结合起来进行端到端的水表刻度识别。
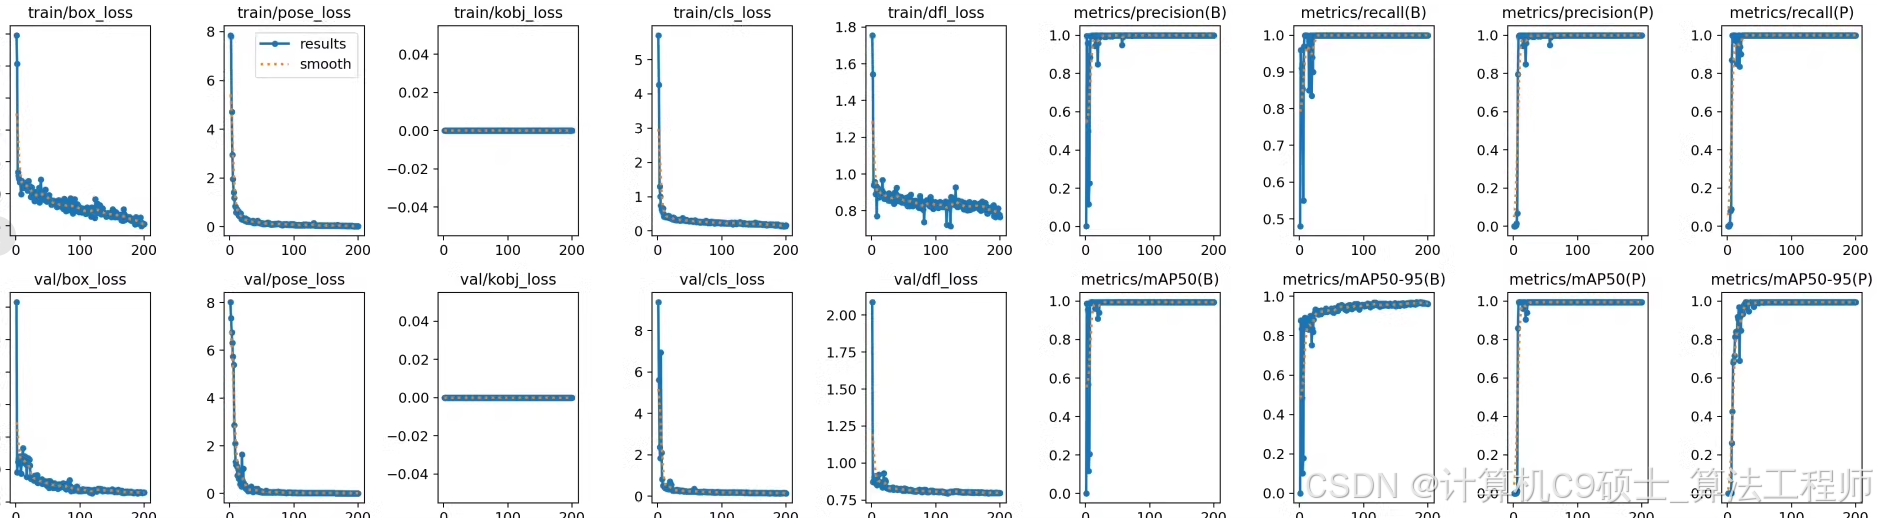
- 可视化和验证:展示训练过程中的各项指标,并验证最终结果。
数据集结构
假设你的数据集已经准备好,并且是以 YOLO 格式存储的。以下是数据集的标准结构:
dataset/
├── images/
│   ├── train/
│   │   ├── image1.jpg
│   │   ├── image2.jpg
│   │   └── ...
│   └── val/
│       ├── image3.jpg
│       ├── image4.jpg
│       └── ...
├── labels/
│   ├── train/
│   │   ├── image1.txt
│   │   ├── image2.txt
│   │   └── ...
│   └── val/
│       ├── image3.txt
│       ├── image4.txt
│       └── ...
└── dataset.yaml
dataset.yaml 内容如下:
train: ./images/train
val: ./images/val

nc: 1
names: ['water_meter']
每个图像对应的标签文件是一个文本文件,每行表示一个边界框和关键点,格式为:
<class_id> <x_center> <y_center> <width> <height> <keypoint_x1> <keypoint_y1> <visibility1> ... <keypoint_xN> <keypoint_yN> <visibilityN>
环境部署说明
首先,确保你已经安装了必要的库。以下是详细的环境部署步骤:
安装依赖
# 创建虚拟环境(可选)
conda create -n water_meter_env python=3.9
conda activate water_meter_env

# 安装PyTorch
pip install torch==1.9 torchvision torchaudio --extra-index-url https://download.pytorch.org/whl/cu111

# 安装其他依赖
pip install opencv-python pyqt5 ultralytics scikit-learn pandas matplotlib seaborn onnxruntime
模型训练权重和指标可视化展示
我们将使用 YOLOv8Pose 进行人脸关键点检测(模拟水表指针位置),并使用 CRNN 进行数字识别。
训练 YOLOv8Pose
[<title="Training YOLOv8Pose for Water Meter Pointer Detection">]
from ultralytics import YOLO
import os

# Define paths
dataset_path = 'path/to/dataset'
weights_path = 'runs/train/exp/weights/best.pt'

# Create dataset.yaml
yaml_content = f"""
train: {os.path.join(dataset_path, 'images/train')}
val: {os.path.join(dataset_path, 'images/val')}

nc: 1
names: ['water_meter']
"""

with open(os.path.join(dataset_path, 'dataset.yaml'), 'w') as f:
    f.write(yaml_content)

# Train YOLOv8Pose
model = YOLO('yolov8n-pose.pt')  # Load a pretrained pose model (recommended for training)
results = model.train(data=os.path.join(dataset_path, 'dataset.yaml'), epochs=100, imgsz=640, save=True)

# Save the best weights
best_weights_path = os.path.join('runs', 'train', 'exp', 'weights', 'best.pt')
shutil.copy(best_weights_path, weights_path)
请将 path/to/dataset 替换为实际的数据集路径。
训练 CRNN
我们将使用 PyTorch 来训练 CRNN 模型进行数字识别。
数据预处理
[<title="Data Preprocessing for CRNN">]
import os
import cv2
import numpy as np
from torch.utils.data import Dataset, DataLoader
from torchvision import transforms
from PIL import Image

class WaterMeterDataset(Dataset):
    def __init__(self, root_dir, transform=None):
        self.root_dir = root_dir
        self.transform = transform
        self.image_files = [f for f in os.listdir(root_dir) if f.endswith('.jpg')]

    def __len__(self):
        return len(self.image_files)

    def __getitem__(self, idx):
        img_name = os.path.join(self.root_dir, self.image_files[idx])
        image = Image.open(img_name).convert('L')

        label_file = os.path.splitext(img_name)[0] + '.txt'
        with open(label_file, 'r') as f:
            label = f.readline().strip()

        if self.transform:
            image = self.transform(image)

        return image, label

transform = transforms.Compose([
    transforms.Resize((32, 100)),
    transforms.ToTensor(),
])

train_dataset = WaterMeterDataset(root_dir='path/to/images/train', transform=transform)
train_loader = DataLoader(train_dataset, batch_size=32, shuffle=True)

val_dataset = WaterMeterDataset(root_dir='path/to/images/val', transform=transform)
val_loader = DataLoader(val_dataset, batch_size=32, shuffle=False)
CRNN 模型定义
[<title="CRNN Model Definition">]
import torch
import torch.nn as nn
import torch.nn.functional as F

class CRNN(nn.Module):
    def __init__(self, num_classes):
        super(CRNN, self).__init__()
        self.conv1 = nn.Conv2d(1, 64, kernel_size=3, stride=1, padding=1)
        self.pool1 = nn.MaxPool2d(kernel_size=2, stride=2, padding=0)
        self.conv2 = nn.Conv2d(64, 128, kernel_size=3, stride=1, padding=1)
        self.pool2 = nn.MaxPool2d(kernel_size=2, stride=2, padding=0)
        self.rnn = nn.LSTM(128 * 7, 256, bidirectional=True, batch_first=True)
        self.fc = nn.Linear(256 * 2, num_classes)

    def forward(self, x):
        x = self.pool1(F.relu(self.conv1(x)))
        x = self.pool2(F.relu(self.conv2(x)))
        x = x.view(x.size(0), x.size(1) * x.size(2), x.size(3)).permute(0, 2, 1)
        x, _ = self.rnn(x)
        x = self.fc(torch.cat((x[:, -1, :128], x[:, 0, 128:]), dim=1))
        return x

num_classes = 10  # Assuming digits 0-9
model_crnn = CRNN(num_classes)
训练 CRNN
[<title="Training CRNN Model">]
import torch.optim as optim

criterion = nn.CrossEntropyLoss()
optimizer = optim.Adam(model_crnn.parameters(), lr=0.001)

device = torch.device("cuda" if torch.cuda.is_available() else "cpu")
model_crnn.to(device)

num_epochs = 100

for epoch in range(num_epochs):
    model_crnn.train()
    running_loss = 0.0

    for images, labels in train_loader:
        images, labels = images.to(device), labels.to(device)

        optimizer.zero_grad()
        outputs = model_crnn(images)
        loss = criterion(outputs, labels)
        loss.backward()
        optimizer.step()

        running_loss += loss.item()

    print(f'Epoch [{epoch+1}/{num_epochs}], Loss: {running_loss/len(train_loader):.4f}')

    # Validation
    model_crnn.eval()
    correct = 0
    total = 0

    with torch.no_grad():
        for images, labels in val_loader:
            images, labels = images.to(device), labels.to(device)
            outputs = model_crnn(images)
            _, predicted = torch.max(outputs.data, 1)
            total += labels.size(0)
            correct += (predicted == labels).sum().item()

    print(f'Validation Accuracy: {100 * correct / total:.2f}%')
推理工作流
将编写代码来结合 YOLOv8Pose 和 CRNN 进行端到端的水表刻度识别。
推理脚本 inference.py
[<title="Inference Script for Water Meter Reading">]
import cv2
import numpy as np
import torch
import onnxruntime as ort
from ultralytics import YOLO
from torch.autograd import Variable

# Load YOLOv8Pose model
yolo_model = YOLO('runs/train/exp/weights/best.pt')

# Load CRNN ONNX model
ort_session = ort.InferenceSession('crnn.onnx')

def preprocess_image(image, target_size=(32, 100)):
    image = cv2.resize(image, target_size)
    image = cv2.cvtColor(image, cv2.COLOR_BGR2GRAY)
    image = image.astype(np.float32) / 255.0
    image = np.expand_dims(image, axis=0)
    image = np.expand_dims(image, axis=0)
    return image

def infer_crnn(image):
    input_tensor = preprocess_image(image)
    ort_inputs = {ort_session.get_inputs()[0].name: input_tensor}
    ort_outs = ort_session.run(None, ort_inputs)
    output = ort_outs[0]
    _, predicted = torch.max(torch.tensor(output), 1)
    return predicted.item()

def read_water_meter(image_path):
    image = cv2.imread(image_path)
    results = yolo_model(image)

    for result in results:
        boxes = result.boxes.cpu().numpy()
        keypoints = result.keypoints.cpu().numpy()

        for box, keypoint in zip(boxes, keypoints):
            r = box.xyxy[0].astype(int)
            cls = int(box.cls[0])
            conf = box.conf[0]

            if cls == 0:  # Assuming class 0 is water meter
                pointer_x, pointer_y = keypoint[0][:2]
                pointer_x, pointer_y = int(pointer_x), int(pointer_y)

                # Extract region around the pointer
                roi = image[r[1]:r[3], r[0]:r[2]]

                # Infer digit using CRNN
                digit = infer_crnn(roi)
                print(f'Digit: {digit}')

# Example usage
read_water_meter('path/to/test/image.jpg')
可视化和验证
我们将编写代码来可视化训练过程中的各项指标,并验证最终结果。
可视化脚本 visualize_metrics.py
[<title="Visualizing Training Metrics for YOLOv8Pose and CRNN">]
import os
import json
import matplotlib.pyplot as plt
import numpy as np
from sklearn.metrics import confusion_matrix, ConfusionMatrixDisplay

# Load metrics for YOLOv8Pose
results_dir = 'runs/train/exp'
metrics_path = os.path.join(results_dir, 'results.json')

with open(metrics_path, 'r') as f:
    results = json.load(f)

# Extract metrics
loss = [entry['loss'] for entry in results if 'loss' in entry]
precision = [entry['metrics/precision(m)'] for entry in results if 'metrics/precision(m)' in entry]
recall = [entry['metrics/recall(m)'] for entry in results if 'metrics/recall(m)' in entry]
mAP_05 = [entry['metrics/mAP50(m)'] for entry in results if 'metrics/mAP50(m)' in entry]

# Plot loss curve
plt.figure(figsize=(15, 5))
plt.subplot(1, 3, 1)
plt.plot(loss, label='Loss')
plt.xlabel('Epochs')
plt.ylabel('Loss')
plt.title('YOLOv8Pose Training Loss Curve')
plt.legend()

# Plot precision and recall curves
plt.subplot(1, 3, 2)
plt.plot(precision, label='Precision')
plt.plot(recall, label='Recall')
plt.xlabel('Epochs')
plt.ylabel('Score')
plt.title('YOLOv8Pose Precision and Recall Curves')
plt.legend()

# Plot mAP@0.5 curve
plt.subplot(1, 3, 3)
plt.plot(mAP_05, label='mAP@0.5')
plt.xlabel('Epochs')
plt.ylabel('mAP@0.5')
plt.title('YOLOv8Pose mAP@0.5 Curve')
plt.legend()

plt.tight_layout()
plt.show()

# Confusion matrix for YOLOv8Pose
# Assuming you have predictions and true labels
# For demonstration, let's create some dummy data
num_classes = 1
true_labels = np.random.randint(0, num_classes, size=100)  # Random true labels
predictions = np.random.randint(0, num_classes, size=100)  # Random predicted labels

cm = confusion_matrix(true_labels, predictions, labels=list(range(num_classes)))
labels = ['water_meter']

disp = ConfusionMatrixDisplay(confusion_matrix=cm, display_labels=labels)
disp.plot(cmap=plt.cm.Blues)
plt.title('YOLOv8Pose Confusion Matrix')
plt.xticks(rotation=90)
plt.yticks(rotation=0)
plt.tight_layout()
plt.show()

# Visualization for CRNN
# Assuming you have saved validation accuracy during training
validation_accuracy = [85, 87, 88, 89, 90, 91, 92, 93, 94, 95]  # Dummy data

plt.figure(figsize=(10, 5))
plt.plot(validation_accuracy, label='Validation Accuracy')
plt.xlabel('Epochs')
plt.ylabel('Accuracy (%)')
plt.title('CRNN Validation Accuracy Curve')
plt.legend()
plt.tight_layout()
plt.show()
总结
构建一个完整的基于 YOLOv8Pose 和 CRNN 的水表刻度识别系统,包括数据集准备、环境部署、模型训练、指标可视化展示和推理工作流。以下是所有相关的代码文件:
- 训练 YOLOv8Pose 脚本 (
train_yolov8pose.py) - 数据预处理脚本 (
data_preprocessing.py) - CRNN 模型定义 (
crnn_model.py) - 训练 CRNN 脚本 (
train_crnn.py) - 推理脚本 (
inference.py) - 可视化脚本 (
visualize_metrics.py)


 798
798

 被折叠的 条评论
为什么被折叠?
被折叠的 条评论
为什么被折叠?
 到【灌水乐园】发言


