


一、今天学习有关Paint的相关知识点,之前绘制图形时一味只学会了最基本的原理,对于里面深层次的东西向来没有进行深入的研究。现在想来实在惭愧。现将代码总结如下。
以免日后遗忘。共勉~
1、基于画笔实现绘制圆角图片
<pre name="code" class="java">	/**
	 * 获取圆角图片
	 * @return
	 */
	private Bitmap getRoudBitMap(Drawable mDrawable){
		//将当前图片转化为BitMapDrawable
		BitmapDrawable mBitmapDrawable=(BitmapDrawable) mDrawable;

		Bitmap mBitmap=mBitmapDrawable.getBitmap();

		final int color=0xff424242;
		//获取图片的背景画布,进行绘制。资料说是利用当前bitMap的大小重新创建一个新的BitMap对象,然后对这个对象进行绘制
		Bitmap mBitmap_new=Bitmap.createBitmap(mBitmap.getWidth(), mBitmap.getHeight(), Config.ARGB_8888);

		Canvas mCanvas=new Canvas(mBitmap_new);

		Rect mRect=new Rect(20, 0, mBitmap.getWidth()-20, mBitmap.getHeight());

		final RectF mRectF=new RectF(mRect);

		Paint mPaint=new Paint(Paint.ANTI_ALIAS_FLAG);
		//设置ARGB颜色为透明效果 ,绘制画布的背景(应该可以替换成颜色绘制。待会实践一下)
		mCanvas.drawARGB(0, 0, 0, 0);
		//设置不带颜色的画笔进行绘制,也即是没有边框
		mCanvas.drawRoundRect(mRectF, 45, 45, mPaint);

		mPaint.setColor(color);

		mPaint.setXfermode(new PorterDuffXfermode(android.graphics.PorterDuff.Mode.SRC_IN));

		mCanvas.drawBitmap(mBitmap, mRect, mRectF, mPaint);

		return mBitmap_new;
	}
2、实现含有倒影的图片
	/**
	 * 获取倒影drawable
	 * @return
	 */
	private Bitmap getDaolingDrawable(Drawable mDrawable){
		if(null!=mDrawable){
			BitmapDrawable mBitmapDrawable=(BitmapDrawable)mDrawable;

			Bitmap mBitmap=mBitmapDrawable.getBitmap();

			int height=mBitmap.getHeight();

			int width=mBitmap.getWidth();

			Matrix  mMatrix=new Matrix();
			//缩放到-1时意思为为显示当前图形的背面。获取到翻转的图形效果
			mMatrix.preScale(1, -1);
			//创建倒影图片
			Bitmap mBitmapDaoying=Bitmap.createBitmap(mBitmap,0,height/2,width,height/2,mMatrix,false);

			Bitmap  mBitmapDaoyingAndSource=Bitmap.createBitmap(width, height+height/2+grap, Config.ARGB_8888);

			Canvas mCanvas=new Canvas(mBitmapDaoyingAndSource);

			mCanvas.drawBitmap(mBitmap, 0, 0, null);

//			Paint mPaint=new Paint();

//			mCanvas.drawRect(0, height, width, height+grap, mPaint);

			mCanvas.drawBitmap(mBitmapDaoying, 0, height+grap, null);

			Paint mPaint2=new Paint();
			//设置线性渐变开始的位置以及颜色变化
			LinearGradient mLinearGradient=new LinearGradient(0, height, 0, mBitmapDaoyingAndSource.getHeight()+grap, 0x90ffffff, 0x00ffffff, TileMode.CLAMP);
			mPaint2.setShader(mLinearGradient);
			mPaint2.setXfermode(new PorterDuffXfermode(android.graphics.PorterDuff.Mode.DST_IN));

			mCanvas.drawRect(0, height, width, mBitmapDaoyingAndSource.getHeight()+grap, mPaint2);
			return mBitmapDaoyingAndSource;
		}else{
			return null;
		}
	}
3、研究有关画笔的特殊绘制技巧
new PorterDuffXfermode(android.graphics.PorterDuff.Mode.SRC_IN)基于实现特殊绘制效果是设置Mode参数。android里面涉及Paint的绘制参数依据前景以及背景进行区分
android.graphics.Paint
public Xfermode setXfermode (Xfermode xfermode)
Set or clear the xfermode object. Pass null to clear any previous xfermode.
As a convenience, the parameter passed is also returned.
设置两张图片相交时的模式。
在正常的情况下,在已有的图像上绘图将会在其上面添加一层新的形状。如果新的Paint是完全不透明的,那么它将完全遮挡住下面的Paint;如果它是部分透明的,那么它将会被染上下面的颜色。
canvas原有的图片可以理解为背景,就是dst;
新画上去的图片可以理解为前景,就是src。
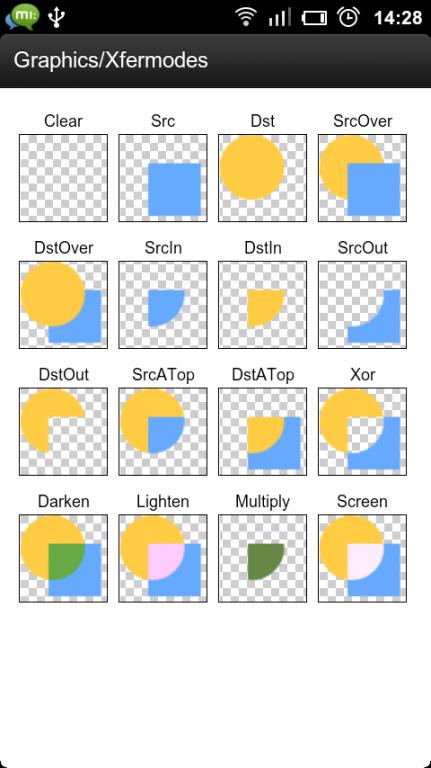
以上的图片为android ApiDemo实现截图效果。


 1982
1982


 被折叠的 条评论
为什么被折叠?
被折叠的 条评论
为什么被折叠?
 到【灌水乐园】发言


