


水面自动驾驶,无人船视角水面全景分割与目标检测数据集。
part1:全景分割数据集可用于usv无人船自动驾驶,水面全景分割等场景,数据集共1GB,2800张标准图像(PNG mask图标注方式
Static Obstacle: 静态障碍物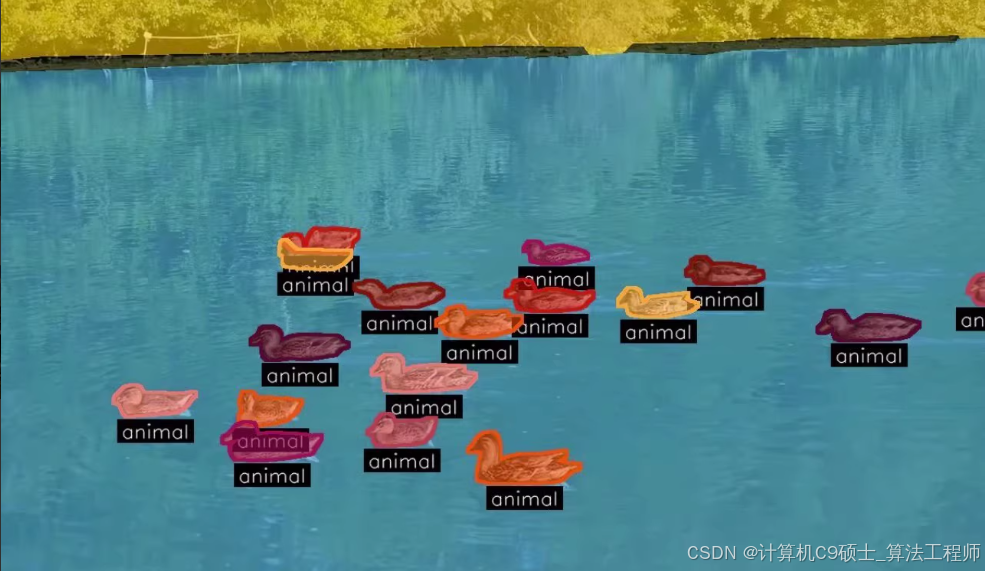
Water: 水
Sky: 天空
Boat/ship: 船/舰船
Row boats: 划艇
Paddle board: 滑板划艇
Buoy: 浮标
Swimmer: 游泳者
Animal: 动物
Float: 浮动物体
Other: 其他
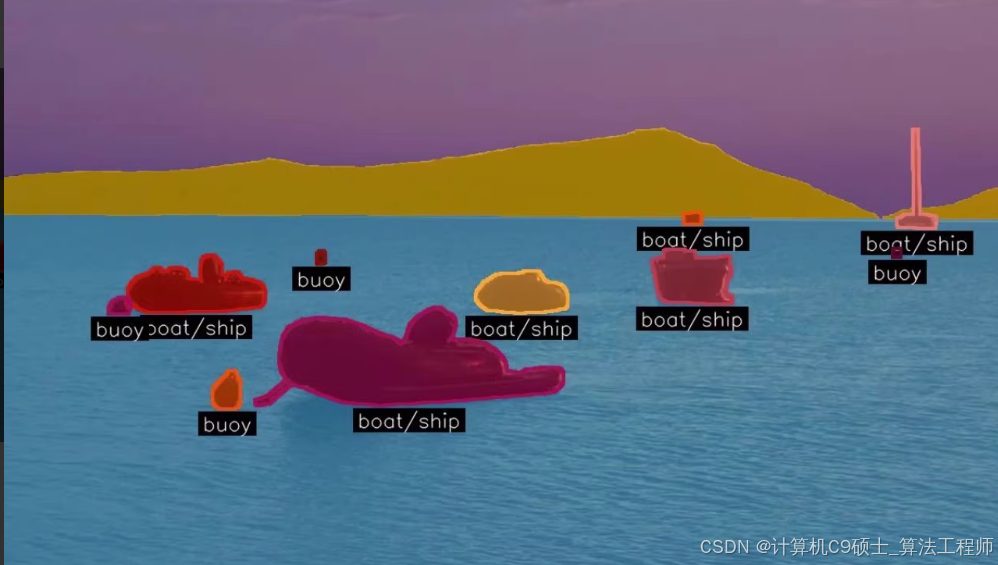
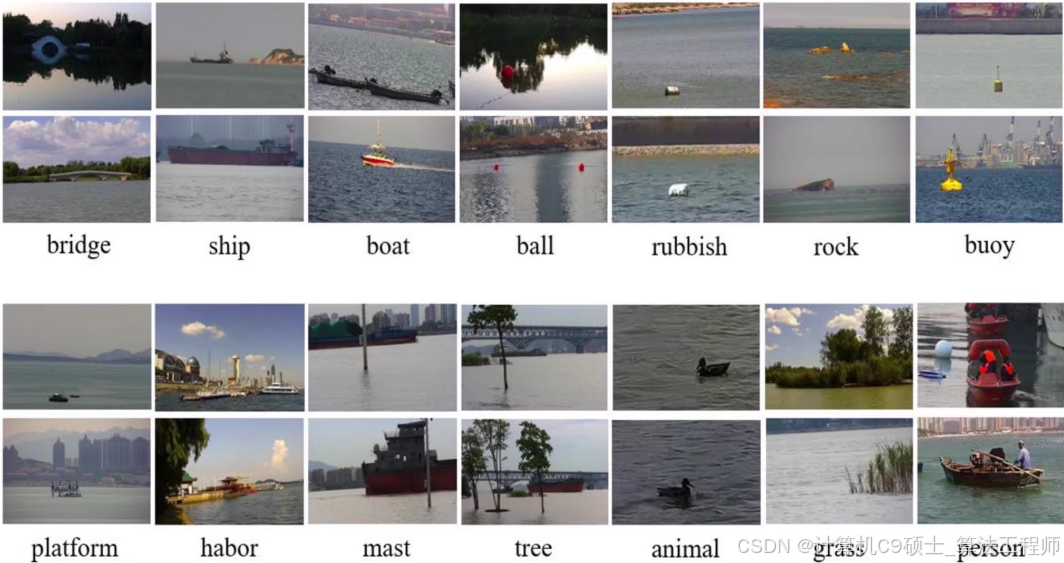
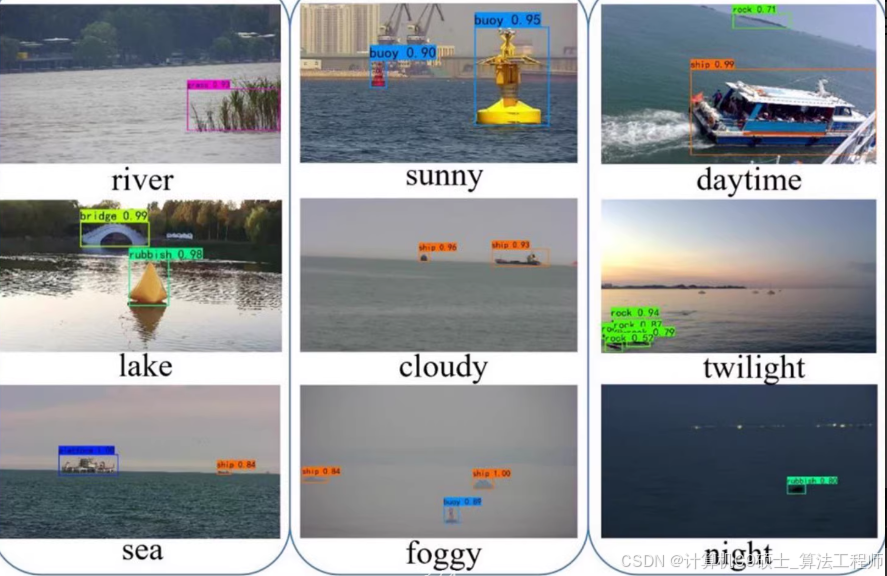
part2:usv无人船目标检测数据集,共7000余张图像,1.7GB数据量,标注桥,货船,小游船,球,垃圾,岩石,浮标,水面平台,船坞,桅杆,树,动物,草地,人类共14类目标20000余标注,涵盖雨,雾,黑夜等多种情况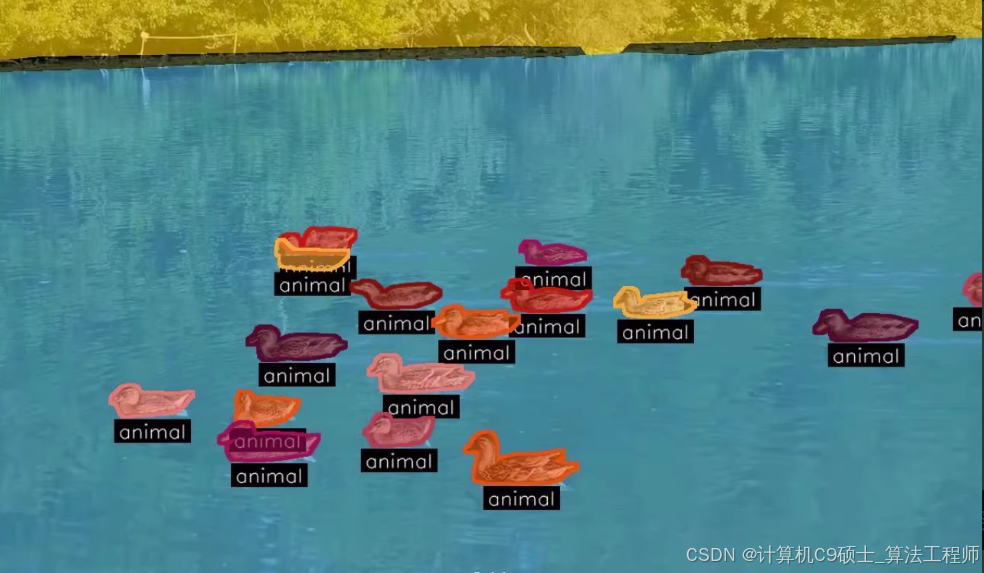 在这里插入图片描述
好的,让我们继续细化如何使用这些数据集进行全景分割和目标检测,并提供详细的步骤和代码示例。
1. 数据准备
1.1. 数据集结构
确保你的数据集按照以下结构组织:
全景分割数据集结构:
panorama_segmentation/
│
├── images/
│   ├── train/
│   ├── val/
│   └── test/
│
├── masks/
│   ├── train/
│   ├── val/
│   └── test/
│
└── data.yaml
目标检测数据集结构:
object_detection/
│
├── images/
│   ├── train/
│   ├── val/
│   └── test/
│
├── labels/
│   ├── train/
│   ├── val/
│   └── test/
│
└── data.yaml
1.2. 创建数据配置文件
全景分割数据集配置文件 (data.yaml):
train: ./panorama_segmentation/images/train
val: ./panorama_segmentation/images/val
test: ./panorama_segmentation/images/test

nc: 10  # 类别数量(10类)
names: ['Static Obstacle', 'Water', 'Sky', 'Boat/ship', 'Row boats', 'Paddle board', 'Buoy', 'Swimmer', 'Animal', 'Float', 'Other']  # 类别名称

# 下载数据集
download: ''
目标检测数据集配置文件 (data.yaml):
train: ./object_detection/images/train
val: ./object_detection/images/val
test: ./object_detection/images/test

nc: 14  # 类别数量(14类)
names: ['Bridge', 'Cargo Ship', 'Small Yacht', 'Ball', 'Trash', 'Rock', 'Buoy', 'Water Platform', 'Dock', 'Mast', 'Tree', 'Animal', 'Grass', 'Human']  # 类别名称

# 下载数据集
download: ''
2. 安装YOLOv8
确保你已经安装了YOLOv8。YOLOv8是YOLO系列的最新版本,可以从Ultralytics的GitHub仓库中获取。
git clone https://github.com/ultralytics/yolov8.git
cd yolov8
pip install -r requirements.txt
3. 训练模型
3.1. 训练全景分割模型
使用YOLOv8进行全景分割。以下是一个示例命令:
python train.py --data ./panorama_segmentation/data.yaml --img 640 --batch 16 --epochs 100 --name yolov8_custom_segmentation --weights yolov8n-seg.pt
3.2. 训练目标检测模型
使用YOLOv8进行目标检测。以下是一个示例命令:
python train.py --data ./object_detection/data.yaml --img 640 --batch 16 --epochs 100 --name yolov8_custom_detection --weights yolov8n.pt
4. 评估模型
4.1. 运行评估
在验证集上评估训练好的模型:
全景分割模型评估:
python val.py --data ./panorama_segmentation/data.yaml --weights runs/train/yolov8_custom_segmentation/weights/best.pt
目标检测模型评估:
python val.py --data ./object_detection/data.yaml --weights runs/train/yolov8_custom_detection/weights/best.pt
4.2. 可视化结果
你可以使用val命令的--save标志来可视化结果:
全景分割模型可视化:
python val.py --data ./panorama_segmentation/data.yaml --weights runs/train/yolov8_custom_segmentation/weights/best.pt --save
目标检测模型可视化:
python val.py --data ./object_detection/data.yaml --weights runs/train/yolov8_custom_detection/weights/best.pt --save
5. 使用PyQt5构建系统
5.1. 安装PyQt5
pip install PyQt5
5.2. 创建PyQt5应用
创建一个简单的PyQt5应用来展示分割结果和检测结果。
import sys
from PyQt5.QtWidgets import QApplication, QWidget, QVBoxLayout, QLabel, QPushButton, QFileDialog
from PyQt5.QtGui import QPixmap
from PyQt5.QtCore import Qt
import cv2
import numpy as np
import torch

class MainWindow(QWidget):
    def __init__(self):
        super().__init__()
        self.initUI()
        self.segmentation_model = torch.hub.load('ultralytics/yolov8', 'custom', path='runs/train/yolov8_custom_segmentation/weights/best.pt')
        self.detection_model = torch.hub.load('ultralytics/yolov8', 'custom', path='runs/train/yolov8_custom_detection/weights/best.pt')

    def initUI(self):
        self.setWindowTitle('水面全景分割与目标检测')
        self.setGeometry(100, 100, 800, 600)

        layout = QVBoxLayout()

        self.image_label = QLabel(self)
        layout.addWidget(self.image_label)

        self.load_button = QPushButton('加载图片', self)
        self.load_button.clicked.connect(self.load_image)
        layout.addWidget(self.load_button)

        self.setLayout(layout)

    def load_image(self):
        file_dialog = QFileDialog()
        file_dialog.setFileMode(QFileDialog.ExistingFile)
        if file_dialog.exec_():
            file_name = file_dialog.selectedFiles()[0]
            self.image_label.setPixmap(QPixmap(file_name))
            self.detect_defects(file_name)

    def detect_defects(self, file_name):
        img = cv2.imread(file_name)

        # 全景分割
        segmentation_results = self.segmentation_model(img)
        segmented_img = segmentation_results[0].plot()

        # 目标检测
        detection_results = self.detection_model(img)
        detected_img = detection_results[0].plot()

        # 合并结果
        combined_img = np.hstack([segmented_img, detected_img])

        combined_img = cv2.cvtColor(combined_img, cv2.COLOR_BGR2RGB)
        height, width, channel = combined_img.shape
        bytes_per_line = 3 * width
        q_img = QImage(combined_img.data, width, height, bytes_per_line, QImage.Format_RGB888)
        self.image_label.setPixmap(QPixmap.fromImage(q_img))

if __name__ == '__main__':
    app = QApplication(sys.argv)
    window = MainWindow()
    window.show()
    sys.exit(app.exec_())
6. 其他建议
- 数据增强:使用数据增强技术来提高模型的鲁棒性。
- 模型集成:集成多个模型以提高性能。
- 模型量化:量化模型以适应边缘设备。
7. 示例代码
7.1. 数据预处理示例
import cv2
import os

def resize_images(input_dir, output_dir, size=(640, 640)):
    if not os.path.exists(output_dir):
        os.makedirs(output_dir)

    for filename in os.listdir(input_dir):
        if filename.endswith(('.jpg', '.png', '.jpeg')):
            img_path = os.path.join(input_dir, filename)
            img = cv2.imread(img_path)
            img_resized = cv2.resize(img, size)
            output_path = os.path.join(output_dir, filename)
            cv2.imwrite(output_path, img_resized)

# 示例用法
resize_images('./panorama_segmentation/images/train', './panorama_segmentation/images/train_resized')
resize_images('./object_detection/images/train', './object_detection/images/train_resized')
8. 运行和调试
确保你的环境配置正确,并且所有依赖项都已安装。运行PyQt5应用时,确保模型文件路径正确,并且数据集路径正确。


 被折叠的 条评论
为什么被折叠?
被折叠的 条评论
为什么被折叠?
 到【灌水乐园】发言


