


基于深度学习的表情(情绪)识别系统
使用Keras库构建一个卷积神经网络(CNN),并基于FER2013数据集进行训练
训练一个表情识别模型需要遵循以下步骤,包括数据准备、模型设计、编译和训练。使用Keras库构建一个卷积神经网络(CNN),并基于FER2013数据集进行训练。以下是详细的指南:
文
文章及代码仅供参考
1. 数据准备
获取FER2013数据集
你下载FER2013数据集。这个数据集包含了48x48像素的灰度面部图像,标注了七种情绪:愤怒、厌恶、恐惧、快乐、悲伤、惊讶和平静。
数据预处理
- 分割数据:将数据分为训练集、验证集和测试集。
- 图像增强:通过旋转、缩放、平移等操作来增加数据集的多样性。
- 标准化:将像素值归一化到[0, 1]范围,这有助于加速训练过程。
- 标签编码:将情绪标签转换为独热编码(one-hot encoding)。
from keras.preprocessing.image import ImageDataGenerator
from sklearn.model_selection import train_test_split
import numpy as np

# 假设X是图像数据,y是标签
# X, y = ...

# 分割数据集
X_train, X_val, y_train, y_val = train_test_split(X, y, test_size=0.2, random_state=42)

# 图像增强
datagen = ImageDataGenerator(
    rotation_range=15,
    width_shift_range=0.1,
    height_shift_range=0.1,
    shear_range=0.1,
    zoom_range=0.1,
    horizontal_flip=True,
    fill_mode='nearest'
)

datagen.fit(X_train)
2. 模型设计
定义一个简单的卷积神经网络架构。根据你的计算资源和时间限制,你可以调整网络的复杂度。
from keras.models import Sequential
from keras.layers import Conv2D, MaxPooling2D, Flatten, Dense, Dropout

model = Sequential()

model.add(Conv2D(32, kernel_size=(3, 3), activation='relu', input_shape=(48, 48, 1)))
model.add(Conv2D(64, (3, 3), activation='relu'))
model.add(MaxPooling2D(pool_size=(2, 2)))
model.add(Dropout(0.25))

model.add(Conv2D(128, (3, 3), activation='relu'))
model.add(MaxPooling2D(pool_size=(2, 2)))
model.add(Conv2D(128, (3, 3), activation='relu'))
model.add(MaxPooling2D(pool_size=(2, 2)))
model.add(Dropout(0.25))

model.add(Flatten())
model.add(Dense(1024, activation='relu'))
model.add(Dropout(0.5))
model.add(Dense(7, activation='softmax'))  # 7种情绪类别

model.summary()
3. 编译模型
选择适当的损失函数、优化器和评估指标。对于多分类问题,通常使用categorical_crossentropy作为损失函数。
model.compile(loss='categorical_crossentropy',
              optimizer='adam',
              metrics=['accuracy'])
4. 训练模型
使用训练数据训练模型,并在验证集上评估性能。你可以设置回调函数如ModelCheckpoint来保存最佳模型,或者EarlyStopping来防止过拟合。
from keras.callbacks import ModelCheckpoint, EarlyStopping

checkpoint = ModelCheckpoint('best_model.h5', monitor='val_accuracy', save_best_only=True, mode='max')
early_stop = EarlyStopping(monitor='val_loss', patience=10)

history = model.fit(datagen.flow(X_train, y_train, batch_size=64),
                    epochs=50,
                    validation_data=(X_val, y_val),
                    callbacks=[checkpoint, early_stop])
5. 测试模型
在独立的测试集上评估模型性能。
test_loss, test_acc = model.evaluate(X_test, y_test)
print(f'Test accuracy: {test_acc}')
6. 保存模型
训练完成后,可以保存整个模型以便以后加载和使用。
model.save('emotion_model.h5')
注意事项
- GPU加速:如果可能的话,使用GPU来加速训练过程。
- 超参数调整:尝试不同的学习率、批次大小、网络结构等以找到最佳配置。
- 数据质量:确保数据集的质量,避免数据偏差影响模型性能。
- 正则化:考虑使用L2正则化或Dropout层来减少过拟合。
- 迁移学习:对于小数据集,可以考虑使用预训练模型进行迁移学习。
以
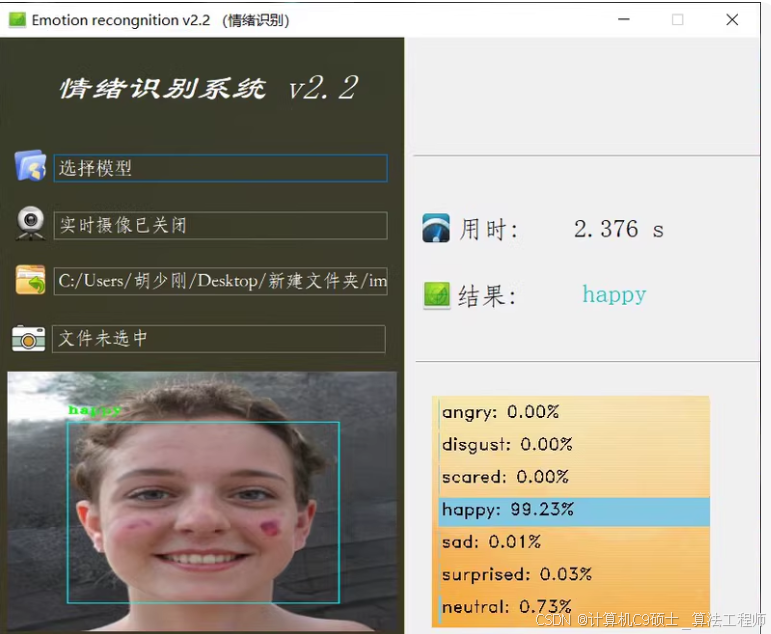
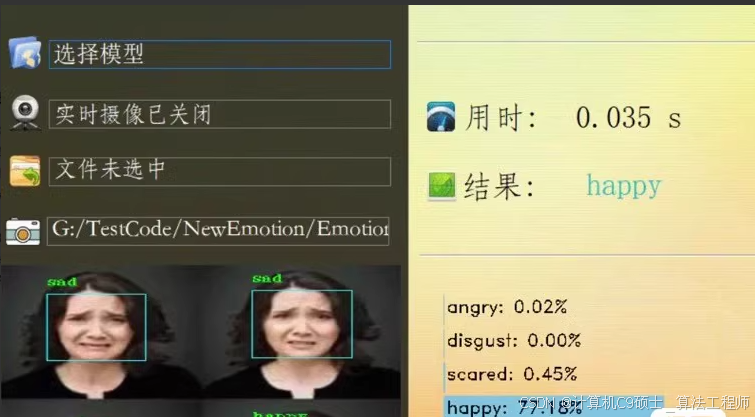
基于深度卷积神经网络实现的人脸表情识别系统,系统程序由Keras, OpenCv, PyQt5的库实现,训练测试集采用fer2013表情库
系统可通过摄像头获取实时画面并识别其中的人脸表情,也可以通过读取图片识别
人脸表情识别系统介绍
1.背景
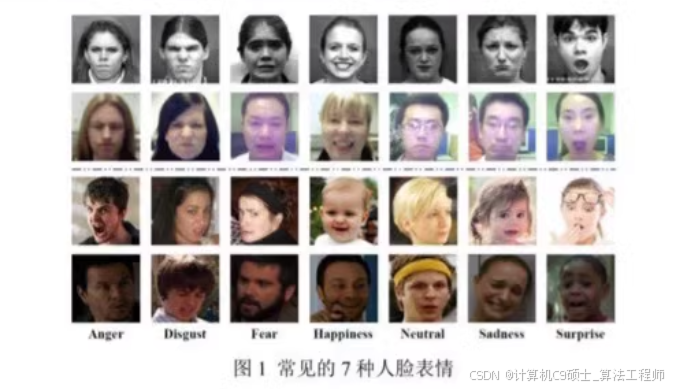
人类的面部表情是其最直接有效的情绪表达方式,针对表情识别技术的研究被认为是未来人机情感交互的主要发展方向川。美国的心理学家Ekman和Friesen经过大量的实验与测试后,将人类的表情定义为以下六类:生气(Angry)、厌恶(Disgust)、恐惧(Fear)、高兴(Happiness). 悲伤(Sadness)和惊讶(Surprise)。
实际情况下为了和无表情有所区分,一般还增加一类:正常(Neutral), 共计7种基础表情,如图1所示。在这个人工智能技术成为热门的时代,人脸表情识别已成为其中的一-项研 究热点,而卷积神经网络、深度信念网络和多层感知器等端对端的算法在人脸面部表情识别领域的运用尤为广泛。
Anger
Digest
Far
llappiacss Ncutnal
Sadacs Surprthe
图1常见的7种人脸表情
目前,人脸识别( Facial Recognition, FR)精度已经超过人眼,人脸表情识别作为FR技术的一个重要组成部分,在计算机视觉、人机交互和情感计算中有着广泛的研究前景,包括人机交互、情绪分析、智能安全、娱乐、网络教育、智能医疗等。人脸表情识别的主要框架分为三个步骤:图像预处理、人脸检测和表情分类,
实现一个基于深度学习的表情(情绪)识别系统,使用Keras、OpenCV和PyQt5库。以下是详细的步骤和代码示例:
1. 环境搭建
确保你已经安装了以下依赖:
- Python 3.9
- Keras
- OpenCV
- PyQt5
你可以使用Anaconda来管理环境和依赖。
创建并激活conda环境
conda create -n emotion_recognition python=3.9
conda activate emotion_recognition
安装依赖包
conda install opencv pyqt
pip install keras tensorflow
2. 准备模型
下载或训练好表情识别模型。这里假设你已经有了预训练好的模型文件emotion_model.h5。
3. 编写代码
主程序文件 main.py
import sys
from PyQt5.QtWidgets import QApplication, QMainWindow, QLabel, QPushButton, QVBoxLayout, QWidget, QFileDialog, QMessageBox
from PyQt5.QtGui import QPixmap, QImage
from PyQt5.QtCore import Qt, QTimer
import cv2
import numpy as np
from keras.models import load_model

class EmotionRecognition(QMainWindow):
    def __init__(self):
        super().__init__()
        self.initUI()
        self.model = load_model('emotion_model.h5')  # 加载预训练模型
        self.cap = None
        self.timer = QTimer(self)
        self.timer.timeout.connect(self.update_frame)

    def initUI(self):
        self.setWindowTitle('情绪识别系统 v2.2')
        self.setGeometry(100, 100, 800, 600)

        # 左侧图像显示区域
        self.image_label = QLabel(self)
        self.image_label.setAlignment(Qt.AlignCenter)
        self.image_label.setGeometry(20, 100, 400, 400)

        # 右侧文件导入区域
        file_layout = QVBoxLayout()
        self.file_label = QLabel('文件导入', self)
        self.file_path_label = QLabel('', self)
        self.load_image_button = QPushButton('选择图片', self)
        self.load_video_button = QPushButton('选择视频', self)
        self.camera_button = QPushButton('摄像头检测', self)
        self.stop_camera_button = QPushButton('停止检测', self)

        self.load_image_button.clicked.connect(self.load_image)
        self.load_video_button.clicked.connect(self.load_video)
        self.camera_button.clicked.connect(self.start_camera)
        self.stop_camera_button.clicked.connect(self.stop_camera)

        file_layout.addWidget(self.file_label)
        file_layout.addWidget(self.file_path_label)
        file_layout.addWidget(self.load_image_button)
        file_layout.addWidget(self.load_video_button)
        file_layout.addWidget(self.camera_button)
        file_layout.addWidget(self.stop_camera_button)

        # 右侧检测结果区域
        result_layout = QVBoxLayout()
        self.result_label = QLabel('检测结果', self)
        self.time_label = QLabel('', self)
        self.emotion_label = QLabel('', self)
        self.probabilities_label = QLabel('', self)

        result_layout.addWidget(self.result_label)
        result_layout.addWidget(self.time_label)
        result_layout.addWidget(self.emotion_label)
        result_layout.addWidget(self.probabilities_label)

        # 总布局
        main_layout = QVBoxLayout()
        main_layout.addWidget(self.image_label)
        main_layout.addLayout(file_layout)
        main_layout.addLayout(result_layout)

        container = QWidget()
        container.setLayout(main_layout)
        self.setCentralWidget(container)

    def load_image(self):
        file_name, _ = QFileDialog.getOpenFileName(self, "选择图片", "", "Image Files (*.png *.jpg *.jpeg)")
        if file_name:
            image = cv2.imread(file_name)
            results = self.predict_emotion(image)
            annotated_image = self.annotate_results(image, results)
            self.display_image(annotated_image)
            self.update_result_labels(results)

    def load_video(self):
        file_name, _ = QFileDialog.getOpenFileName(self, "选择视频", "", "Video Files (*.mp4 *.avi)")
        if file_name:
            self.cap = cv2.VideoCapture(file_name)
            self.timer.start(30)  # 每30ms刷新一次帧

    def start_camera(self):
        self.cap = cv2.VideoCapture(0)
        self.timer.start(30)

    def stop_camera(self):
        if self.cap is not None:
            self.cap.release()
            self.cap = None
        self.timer.stop()
        self.image_label.clear()

    def update_frame(self):
        ret, frame = self.cap.read()
        if ret:
            results = self.predict_emotion(frame)
            annotated_frame = self.annotate_results(frame, results)
            self.display_image(annotated_frame)
            self.update_result_labels(results)
        else:
            self.stop_camera()

    def predict_emotion(self, image):
        gray = cv2.cvtColor(image, cv2.COLOR_BGR2GRAY)
        face_cascade = cv2.CascadeClassifier(cv2.data.haarcascades + 'haarcascade_frontalface_default.xml')
        faces = face_cascade.detectMultiScale(gray, scaleFactor=1.1, minNeighbors=5, minSize=(30, 30))

        if len(faces) > 0:
            x, y, w, h = faces[0]
            roi_gray = gray[y:y+h, x:x+w]
            roi_gray = cv2.resize(roi_gray, (48, 48))
            roi_gray = roi_gray.astype('float32') / 255.0
            roi_gray = np.expand_dims(roi_gray, axis=0)
            roi_gray = np.expand_dims(roi_gray, axis=-1)
            predictions = self.model.predict(roi_gray)
            return predictions
        else:
            return None

    def annotate_results(self, image, results):
        if results is not None:
            emotion_index = np.argmax(results)
            label = f'{self.model.classes[emotion_index]}'
            cv2.putText(image, label, (10, 30), cv2.FONT_HERSHEY_SIMPLEX, 1, (0, 255, 0), 2)
        return image

    def display_image(self, image):
        rgb_image = cv2.cvtColor(image, cv2.COLOR_BGR2RGB)
        h, w, ch = rgb_image.shape
        bytes_per_line = ch * w
        convert_to_Qt_format = QImage(rgb_image.data, w, h, bytes_per_line, QImage.Format_RGB888)
        p = convert_to_Qt_format.scaled(400, 400, Qt.KeepAspectRatio)
        self.image_label.setPixmap(QPixmap.fromImage(p))

    def update_result_labels(self, results):
        if results is not None:
            time_label_text = f'用时: {results.info["time"]:.3f} s'
            emotion_label_text = f'结果: {self.model.classes[np.argmax(results)]}'
            probabilities_text = '\n'.join([f'{label}: {prob:.2f}%' for label, prob in zip(self.model.classes, results[0])])

            self.time_label.setText(time_label_text)
            self.emotion_label.setText(emotion_label_text)
            self.probabilities_label.setText(probabilities_text)
        else:
            self.time_label.setText('')
            self.emotion_label.setText('')
            self.probabilities_label.setText('')

if __name__ == '__main__':
    app = QApplication(sys.argv)
    ex = EmotionRecognition()
    ex.show()
    sys.exit(app.exec_())


 509
509

 被折叠的 条评论
为什么被折叠?
被折叠的 条评论
为什么被折叠?
 到【灌水乐园】发言


