


相关文章
Android 动画之视图动画
Android 动画之插值器
Android 动画之属性动画ValueAnimator
Android 动画之属性动画ObjectAnimator
Android 动画之集合动画AnimatorSet
Android 动画之布局动画
系统的Interpolator(插值器)
先来看下系统提供的一些插值器属性
| java | xml | 解释 |
|---|---|---|
| AccelerateDecelerateInterpolator | @android:anim/accelerate_decelerate_interpolator | 先加速后减速 |
| AccelerateInterpolator | @android:anim/accelerate_interpolator | 从0开始加速运动 |
| AnticipateInterpolator | @android:anim/anticipate_interpolator | 先退后再加速向前 |
| AnticipateOvershootInterpolator | @android:anim/anticipate_overshoot_interpolator | 先退后再加速超过终点再返回终点 |
| BounceInterpolator | @android:anim/bounce_interpolator | 到终点的时候回弹直到停止 |
| CycleInterpolator | @android:anim/cycle_interpolator | 以正弦的方式运动 |
| DecelerateInterpolator | @android:anim/decelerate_interpolator | 减速向前 |
| LinearInterpolator | @android:anim/linear_interpolator | 匀速运动 |
| OvershootInterpolator | @android:anim/overshoot_interpolator | 加速运动超过终点再返回终点 |
在代码中的应用:
animation.setInterpolator(new LinearInterpolator());或者在xml中设置
<set
....
    android:interpolator="@android:anim/accelerate_interpolator"
....>
        ....
</set>
以实际的效果来看,会比较好理解,我这里以匀速运动做对比来比较各种动画的效果。
自定义的Interpolator(插值器)
上面是系统提供给我们的一些插值器,如果我们不需要这些效果,那么我们只能自己来实现插值器了。先来看下系统的插值器是怎么实现的。
看下LinearInterpolator和AccelerateInterpolator的实现。
LinearInterpolator.java
public class LinearInterpolator implements Interpolator {

    public LinearInterpolator() {
    }

    public LinearInterpolator(Context context, AttributeSet attrs) {
    }

    public float getInterpolation(float input) {
        return input;
    }
}
AccelerateInterpolator.java
public class AccelerateInterpolator implements Interpolator {
    private final float mFactor;
    private final double mDoubleFactor;

    public AccelerateInterpolator() {
        mFactor = 1.0f;
        mDoubleFactor = 2.0;
    }

    public AccelerateInterpolator(float factor) {
        mFactor = factor;
        mDoubleFactor = 2 * mFactor;
    }

    public AccelerateInterpolator(Context context, AttributeSet attrs) {
        TypedArray a = context.obtainStyledAttributes(attrs, com.android.internal.R.styleable.AccelerateInterpolator);

        mFactor = a.getFloat(com.android.internal.R.styleable.AccelerateInterpolator_factor, 1.0f);
        mDoubleFactor = 2 * mFactor;

        a.recycle();
    }

    public float getInterpolation(float input) {
        if (mFactor == 1.0f) {
            return input * input;
        } else {
            return (float)Math.pow(input, mDoubleFactor);
        }
    }
}
通过查看源码,知道它们之间最大的差别就是getInterpolation的实现不同,其它插值器也是一样的,都是通过实现不同的getInterpolation而达到特殊的效果。既然这样,那我们可以自定义自己的插值器了,从而实现特定的效果。要显示自己的插值器,必须实现Interpolator这个接口,好了要实现的方式也知道,我要做的就是怎么去实现getInterpolation方法了,下面提供一个我自己定义的插值器。
(注意:getInterpolation方法中input的参数是从0到1的,0表示开始,1表示结束。而返回值也是一样的,0表示起点,1表示结束点,所以这里也就解释了CycleInterpolator结束后返回到起点,查看它的源码我们就知道了)
public class MyInterpolator implements Interpolator {

    @Override
    public float getInterpolation(float input) {
        Log.d("TAG", "getInterpolation:"+input);
        if (input >= 0 && input <= 0.5) {
            return -4*input;
        } else {
            return 6*input-5;
        }
    }
}
效果:
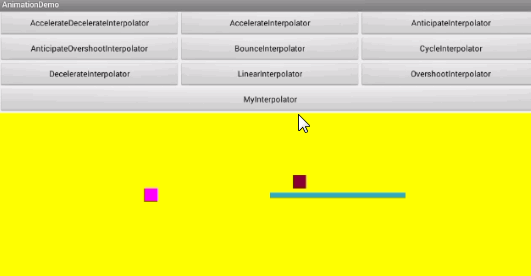
自定义插值器的最重要的知识点就是input的参数和返回值了,input参数从0开始,到1结束。而返回值0对应起点,1对应终点,所以0到1这个过程,你完全可以根据自己的想法去实现不一样的动画效果。


 593
593

 被折叠的 条评论
为什么被折叠?
被折叠的 条评论
为什么被折叠?
 到【灌水乐园】发言


