


Gitlab + SonarQube 实现 代码自动审查 两种方案 小白式操作
一、gitlab
(一)gitlab 下载安装
1.更新配置 yum
curl -s https://packages.gitlab.com/install/repositories/gitlab/gitlab-ce/script.rpm.sh | sudo bash

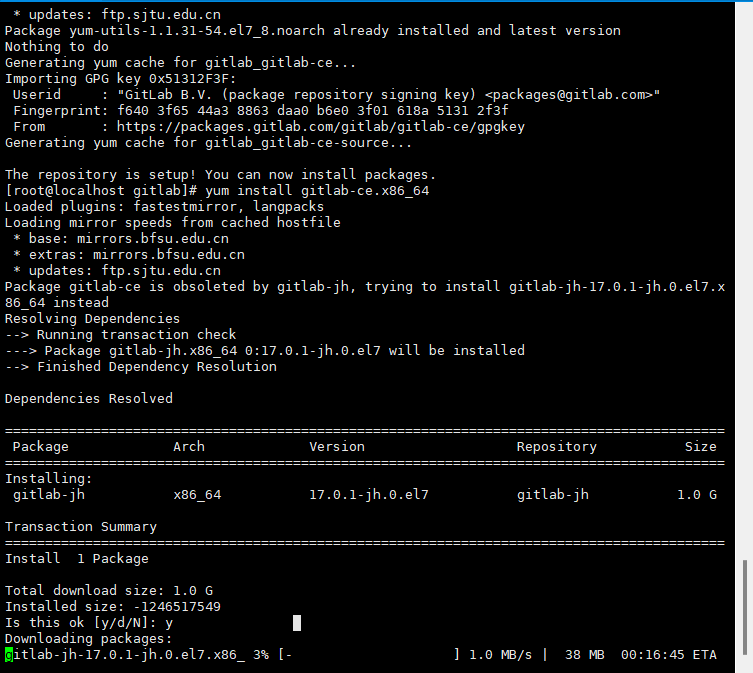
2.安装gitlab
yum install gitlab-ce.x86_64
需要 输入一个 Y
3.修改gitlab默认端口
vi /etc/gitlab/gitlab.rb
修改 ip 和 端口

4.重新配置 重启服务
 gitlab-ctl reconfigure
 gitlab-ctl start
gitlab-ctl reconfigure 命令执行很慢别急等等
5.配置clone地址
vi /opt/gitlab/embedded/service/gitlab-rails/config/gitlab.yml

这里修改了 https (个人理解 )
6.访问
访问本地地址 +端口号
我的 192.168.88.16:8001
出现这个界面就弄好了
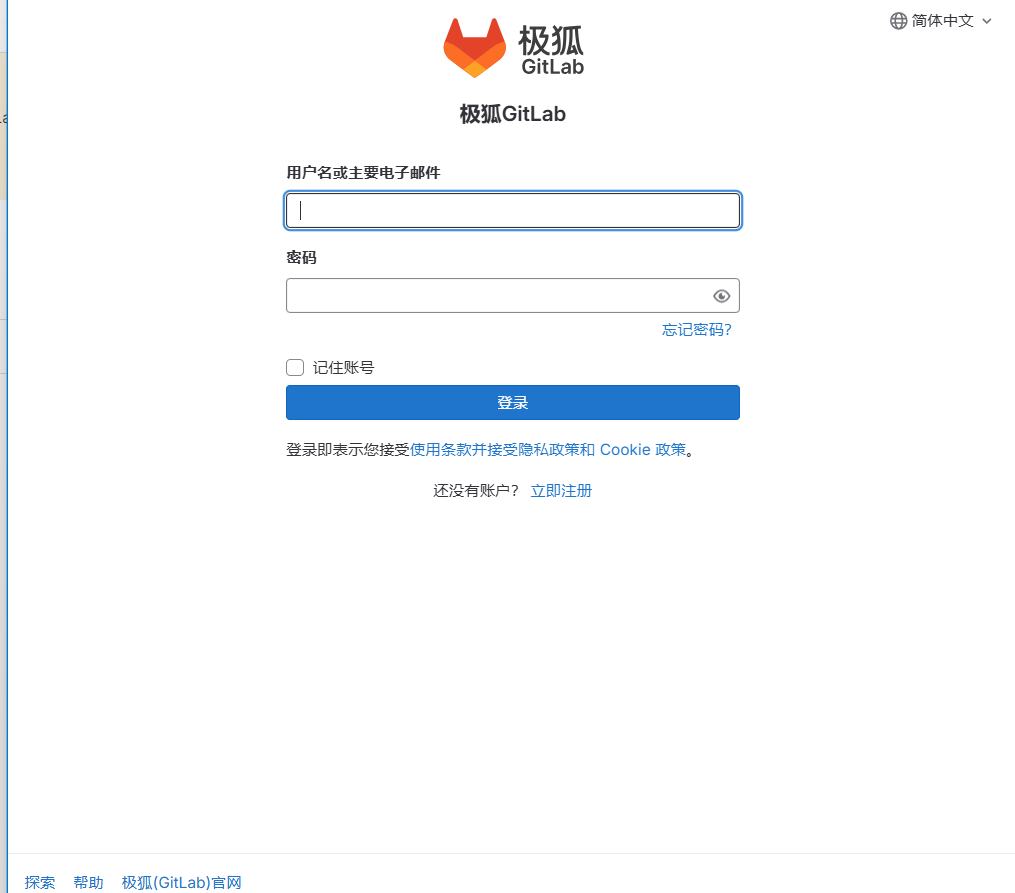
账号: root
密码:不知道的话 输入这行命令查看
cat /etc/gitlab/initial_root_password
我这一步卡了好久 还以为是出错了 因为前几天弄得还不是这样的,不知道为什么这样了,可能是更新了,之前是直接就进入了管理界面 ,现在添加了个人用户 而且注册的话需要管理员账户进行设置
进去之后
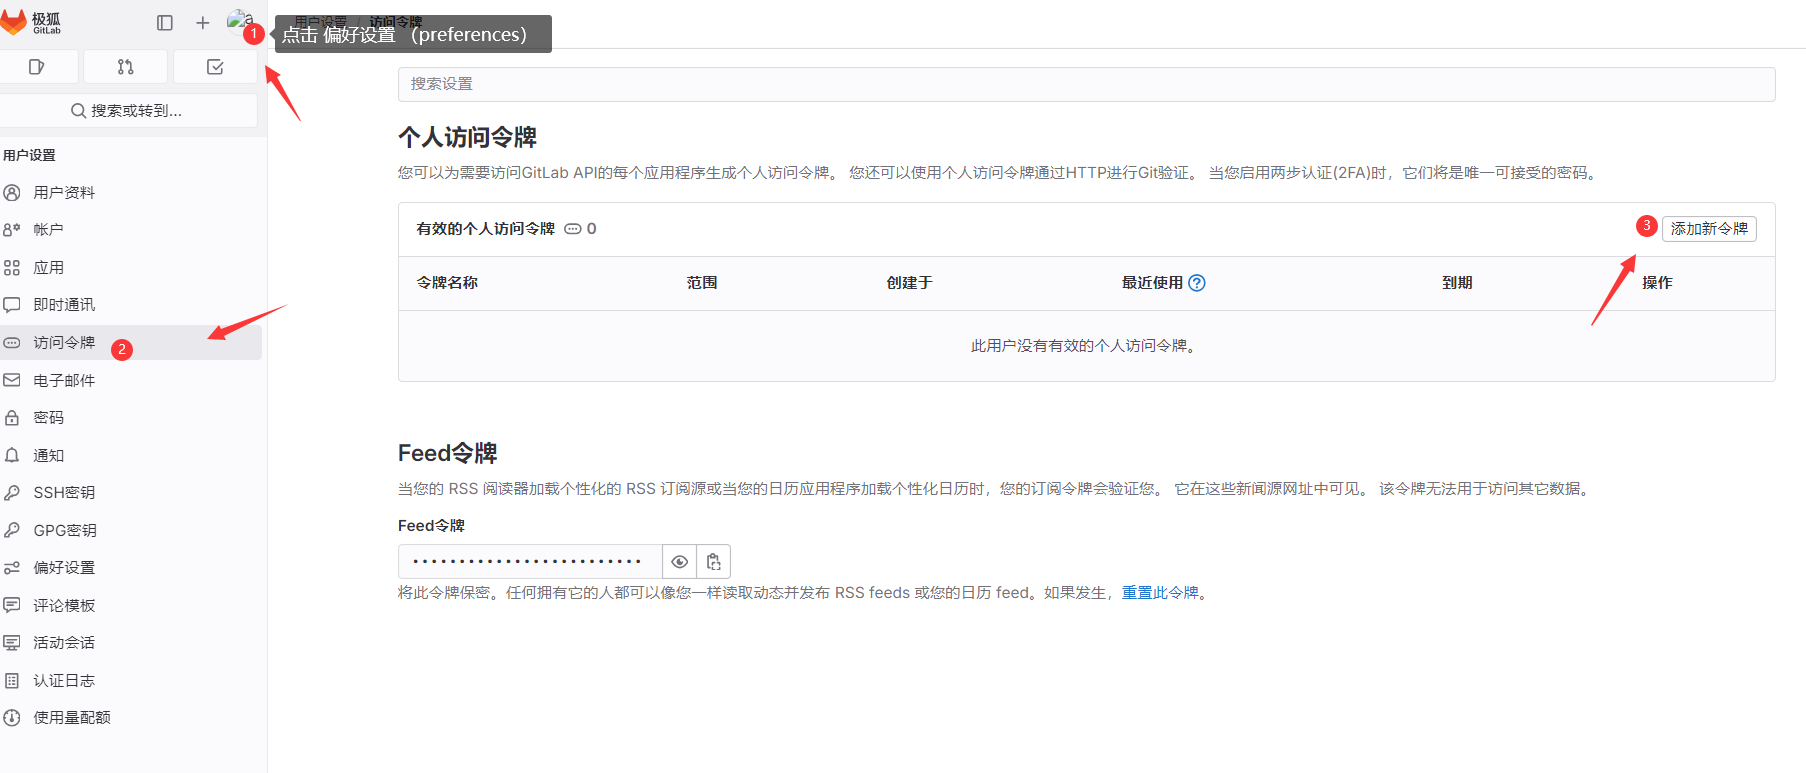
打开偏好设置(preferences) 可以修改密码 使用中文等
(二)gitlab 生成令牌
偏好设置 -> 访问令牌 -> 创建令牌 添加权限
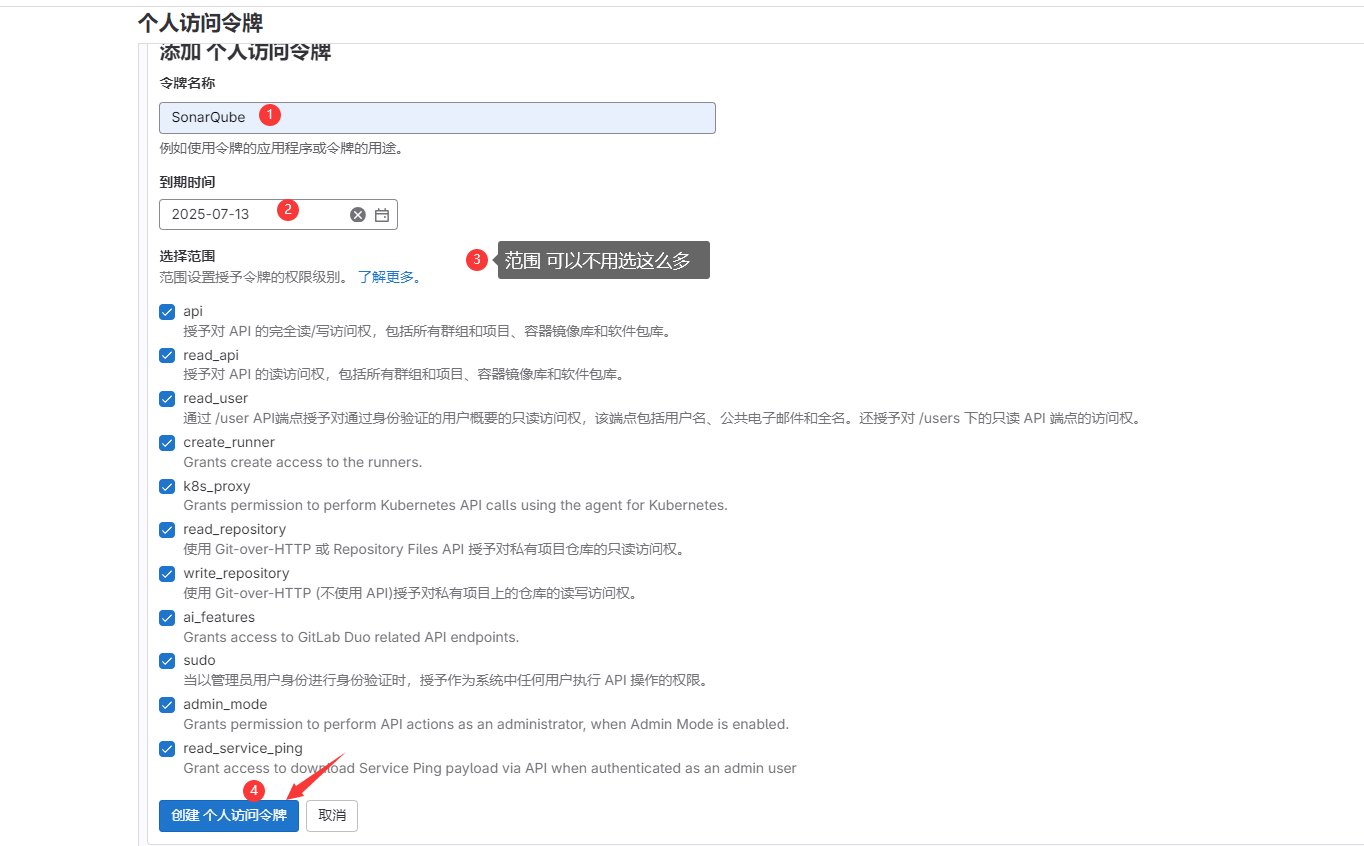
我的令牌 glpat-K8dtUppnBqD6SzJTEW1L
二、SonarQube
(一)修改服务器参数
vim /etc/sysctl.conf
#末尾添加如下两行
vm.max_map_count = 262144
fs.file-max = 65536
2.vim /etc/security/limits.conf
#末尾添加如下内容:
*    soft    nofile    65536
*    hard    nofile    65536
3.重启服务器
init 6
(二)安装 docker
yum install -y yum-utils device-mapper-persistent-data lvm2

yum-config-manager --add-repo https://mirrors.aliyun.com/docker-ce/linux/centos/docker-ce.repo
sed -i 's+download.docker.com+mirrors.aliyun.com/docker-ce+' /etc/yum.repos.d/docker-ce.repo

yum clean all

yum makecache fast

yum -y install docker-ce

systemctl   enable  docker  --now
(三)下载安装SonarQube
使用docker-compose 方法安装SonarQube
1.下载docker-compose
使用网络上的教程发现不能下载(也可能是我的操作有问题)
直接去GitHub上 下载
https://github.com/docker/compose/releases
找到对应的版本
#将文件复制到/usr/local/bin环境变量下面
mv docker-compose /usr/local/bin

#给他一个执行权限
chmod +x /usr/local/bin/docker-compose

#查看是否安装成功
docker-compose -version
原文链接:https://blog.csdn.net/m0_37899908/article/details/131268835
我下载的是 2.27.1 的版本 下载之后传到了linux 上 然后 使用
docker compose version 命令 即可表明 部署完成

2.下载SonarQube
参考链接 :
https://www.cnblogs.com/hahaha111122222/p/13809954.html
2.1创建挂载目录
# 创建目录
mkdir -p ~/sonarqube && cd ~/sonarqube
# 创建所有的sonarqube映射文件
mkdir -p ~/sonarqube/postgres && \
mkdir -p ~/sonarqube/data && \
mkdir -p ~/sonarqube/extensions && \
mkdir -p ~/sonarqube/logs && \
mkdir -p ~/sonarqube/conf
# 创建数据库挂载
mkdir -p ~/sonarqube/postgresql &&\
mkdir -p ~/sonarqube/datasql
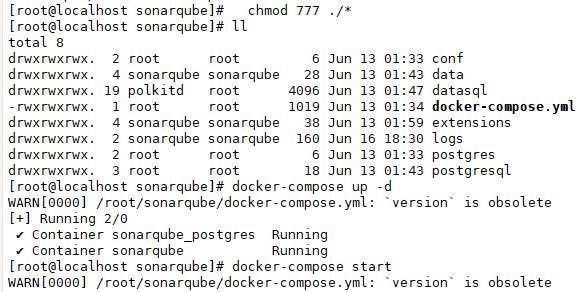
# 目录设置为 777 权限,避免权限问题
chmod 777 ./*
2.2创建 docker-compose.yml 文件
在sonarqube目录下,将以下内如复制到yml文件:
vim ~/sonarqube/docker-compose.yml
PS:如果清楚相应sonar版本对应的插件版本内容,可以在这个文件中添加 相关内容。我这里没有给出。需要自行百度。
各个版本对应的sonarqube版本也不同,需要指定版本可以去百度搜索,推荐 SonarQube 9.9.6 LTS 第一个就是 离线的话我不清楚怎么配置 docker compose的方式最简单 无需配置数据库和es 。
version: "3"
services:
  sonarqube:
    #image: sonarqube:lts-community
    image: sonarqube:9.9-community
	restart: always
    container_name: sonarqube
    depends_on:
      - postgresdb
    environment:
	  TZ: Asia/Shanghai
      SONAR_JDBC_URL: jdbc:postgresql://postgresdb:5432/sonar
      SONAR_JDBC_USERNAME: sonar
      SONAR_JDBC_PASSWORD: sonar
    volumes:
      - sonarqube_data:/opt/sonarqube/data
      - sonarqube_extensions:/opt/sonarqube/extensions
      - sonarqube_logs:/var/log/sonarqube/logs
	  - /etc/localtime:/etc/localtime:ro
    ports:
      - 9000:9000
  postgresdb:
    image: postgres:15
	restart: always
    container_name: postgres
	ports:
      - 5432:5432
    environment:
	  TZ: Asia/Shanghai
      POSTGRES_USER: sonar
      POSTGRES_PASSWORD: sonar
	  POSTGRES_DB: sonar
    volumes:
      - postgresql:/var/lib/postgresql
      - postgresql_data:/var/lib/postgresql/data
	  - /etc/localtime:/etc/localtime:ro
volumes:
  sonarqube_data:
  sonarqube_extensions:
  sonarqube_logs:
  postgresql:
  postgresql_data:
version: "3.8"

services:
  sonarqube:
    depends_on:
      - db
    image: mc1arke/sonarqube-with-community-branch-plugin:latest
    restart: always
    container_name: sonarqube
    ports:
      - 9000:9000
    networks:
      - sonarnet
    environment:
      - SONAR_JDBC_URL=jdbc:postgresql://db:5432/sonar
      - SONAR_JDBC_USERNAME=sonar
      - SONAR_JDBC_PASSWORD=sonar
    volumes:
      - sonarqube_conf:/opt/sonarqube/conf
      - sonarqube_data:/opt/sonarqube/data
      - sonarqube_logs:/opt/sonarqube/logs
  db:
    image: postgres:11
    restart: always
    container_name: postgres
    networks:
      - sonarnet
    environment:
      - POSTGRES_USER=sonar
      - POSTGRES_PASSWORD=sonar
    volumes:
      - postgresql:/var/lib/postgresql
      - postgresql_data:/var/lib/postgresql/data

volumes:
  sonarqube_data:
  sonarqube_conf:
  sonarqube_logs:
  postgresql:
  postgresql_data:

networks:
  sonarnet:
version: '3'
services:
  postgres:
    image: postgres:14.5
    restart: always
    container_name: postgres
    ports:
      - 5432:5432
    volumes:
      - /docker/sonar/postgres/postgresql:/var/lib/postgresql
      - /docker/sonar/postgres/data:/var/lib/postgresql/data
      - /etc/localtime:/etc/localtime:ro
    environment:
      TZ: Asia/Shanghai
      POSTGRES_USER: sonar
      POSTGRES_PASSWORD: sonar
      POSTGRES_DB: sonar

  sonar:
    image: sonarqube:9.8.0-community
    container_name: sonar
    depends_on:
      - postgres
    volumes:
      - /docker/sonar/sonarqube/extensions:/opt/sonarqube/extensions
      - /docker/sonar/sonarqube/logs:/opt/sonarqube/logs
      - /docker/sonar/sonarqube/data:/opt/sonarqube/data
      - /docker/sonar/sonarqube/conf:/opt/sonarqube/conf
      # 设置与宿主机时间同步      - /etc/localtime:/etc/localtime:ro
    ports:
      - 9000:9000
    command:
      # 内存设置      - -Dsonar.ce.javaOpts=-Xmx2048m
      - -Dsonar.web.javaOpts=-Xmx2048m
      # 设置服务代理路径      - -Dsonar.web.context=/
      # 此设置用于集成gitlab时,回调地址设置      - -Dsonar.core.serverBaseURL=http://172.16.3.253:9000
    environment:
      TZ: Asia/Shanghai
      SONARQUBE_JDBC_USERNAME: sonar
      SONARQUBE_JDBC_PASSWORD: sonar
      SONARQUBE_JDBC_URL: jdbc:postgresql://postgres:5432/sonar
version: '3'
services:
  postgres:
    image: postgres
    restart: always
    container_name: sonarqube_postgres
    ports:
      - 5432:5432
    volumes:
      - ~/sonarqube/postgresql/:/var/lib/postgresql
      - ~/sonarqube/datasql/:/var/lib/postgresql/data
    environment:
      TZ: Asia/Shanghai
      POSTGRES_USER: sonar
      POSTGRES_PASSWORD: sonar
      POSTGRES_DB: sonar
    networks:
      - sonar-network
  sonar:
    image: sonarqube
    restart: always
    container_name: sonarqube
    depends_on:
      - postgres
    volumes:
      - ~/sonarqube/extensions:/opt/sonarqube/extensions
      - ~/sonarqube/logs:/opt/sonarqube/logs
      - ~/sonarqube/data:/opt/sonarqube/data
      - ~/sonarqube/conf:/opt/sonarqube/conf
    ports:
      - 9000:9000
    environment:
      SONARQUBE_JDBC_USERNAME: sonar
      SONARQUBE_JDBC_PASSWORD: sonar
      SONARQUBE_JDBC_URL: jdbc:postgresql://postgres:5432/sonar
    networks:
      - sonar-network
networks:
  sonar-network:
    driver: bridge
version: "3"

services:
  sonarqube:
    image: sonarqube:community
    depends_on:
      - db
    environment:
      SONAR_JDBC_URL: jdbc:postgresql://db:5432/sonar
      SONAR_JDBC_USERNAME: sonar
      SONAR_JDBC_PASSWORD: sonar
    volumes:
      - sonarqube_data:/opt/sonarqube/data
      - sonarqube_extensions:/opt/sonarqube/extensions
      - sonarqube_logs:/opt/sonarqube/logs
    ports:
      - "9000:9000"
  db:
    image: postgres:12
    environment:
      POSTGRES_USER: sonar
      POSTGRES_PASSWORD: sonar
    volumes:
      - postgresql:/var/lib/postgresql
      - postgresql_data:/var/lib/postgresql/data

volumes:
  sonarqube_data:
  sonarqube_extensions:
  sonarqube_logs:
  postgresql:
  postgresql_data:
注意配置文件的缩进 如果缩进有问具体就会报错 yaml 有问题
要注意的是 这个 配置文件版本太低了 然后运行后会 警告 version is solete (版本过时)然后就会执行 。令人难受的是 我 docker 镜像没配置,导致我无法连接 很难受 耽误了很久,在最下面补充 配置docker 镜像加速
2.3 启动!!!!
上一个 yml 用下述 启动
docker-compose -f docker-compose.yml up
第二个用下述启动
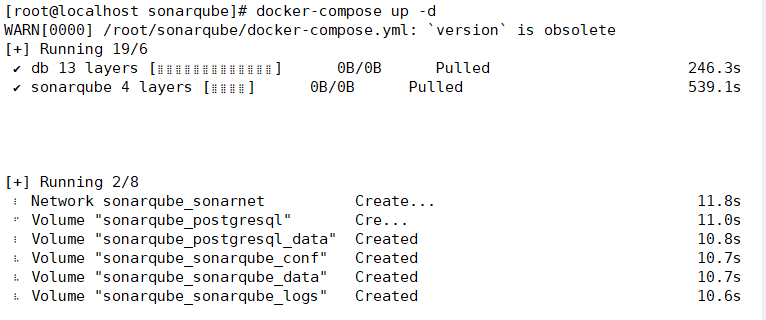
docker-compose up -d
docker-compose start
下述是启动和停止
启动:docker-compose up -d
停止:docker-compose downll
启动:docker-compose start
停止:docker-compose stop
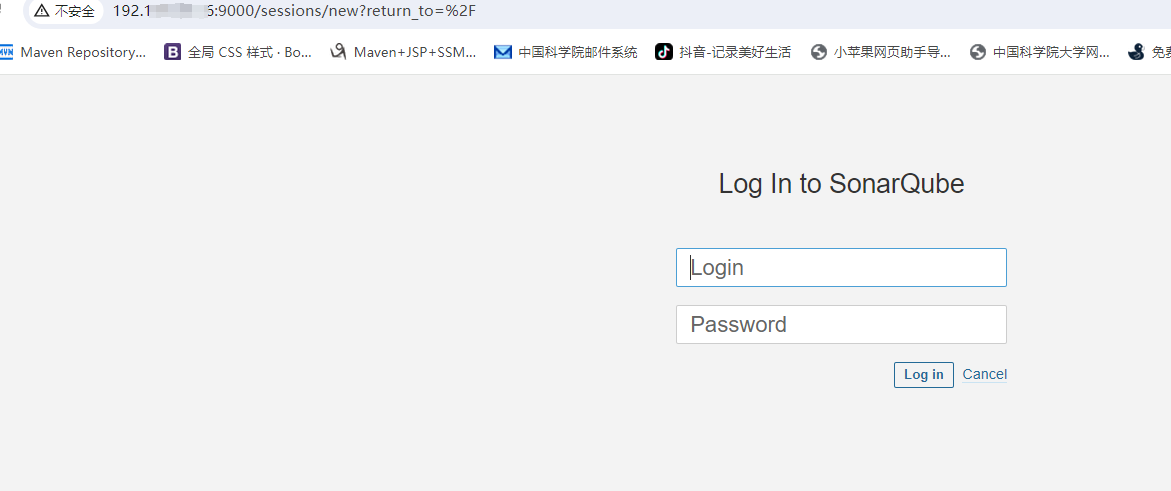
2.4 web 访问
在浏览器输入 自己的 ip:9000
192.168.88.18:9000
账号密码都是 admin
2.5补充:配置 docker 镜像加速
去阿里云官网找到加速地址
https://cr.console.aliyun.com/cn-beijing/instances/mirrors
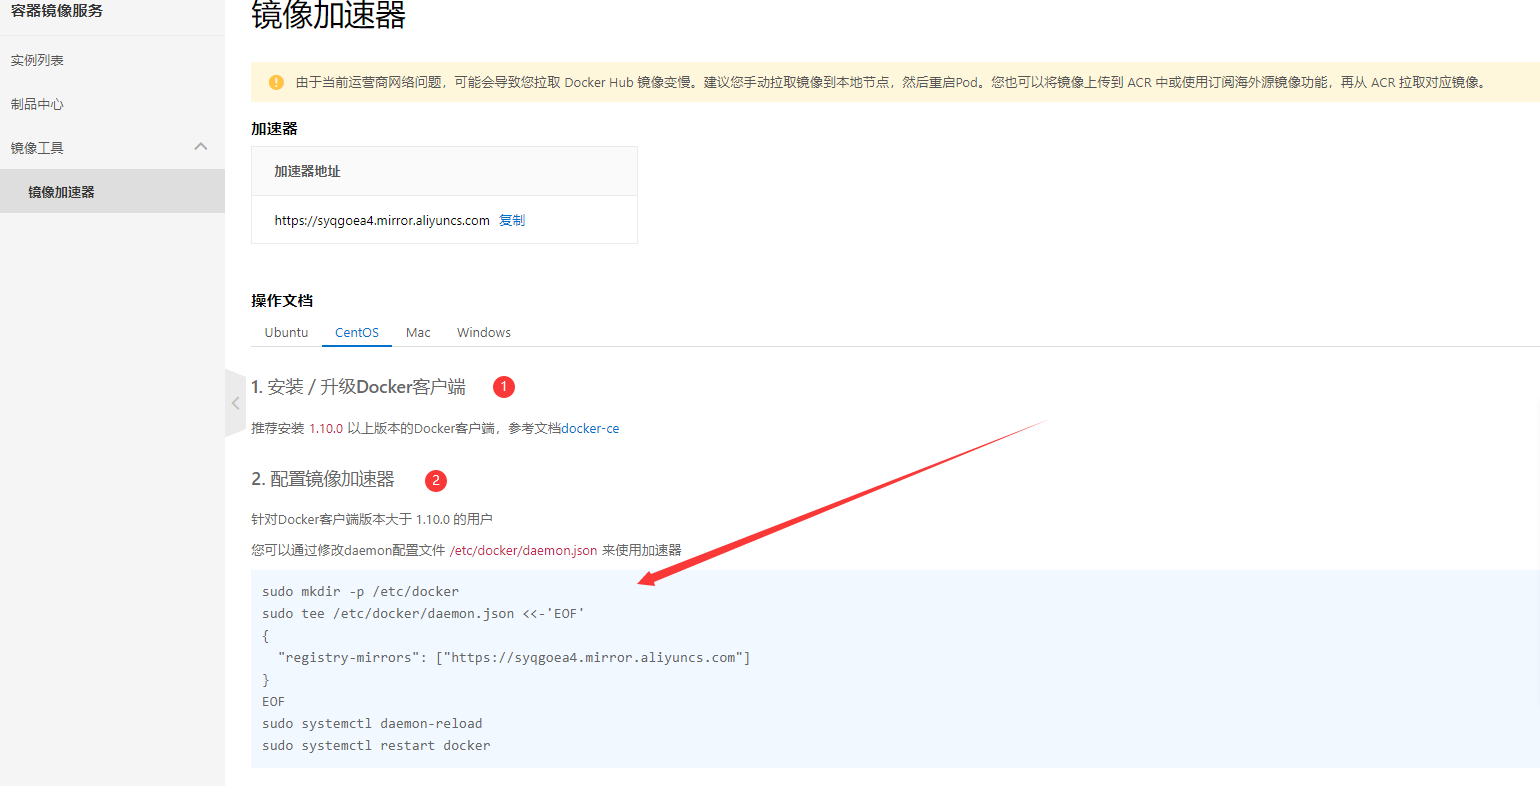
然后 按行执行 即可
sudo mkdir -p /etc/docker

sudo tee /etc/docker/daemon.json <<-'EOF'
{
  "registry-mirrors": ["https://syqgoea4.mirror.aliyuncs.com"]
}
EOF

sudo systemctl daemon-reload

sudo systemctl restart docker
部署到一个服务器上发现 访问 sonarqube 后就不能访问 gitlab 或者同时访问时 特别卡 , 因此 进行 分割,克隆,将sonarqube 单独存放在 一个服务器上,希望电脑支撑的住 🙏
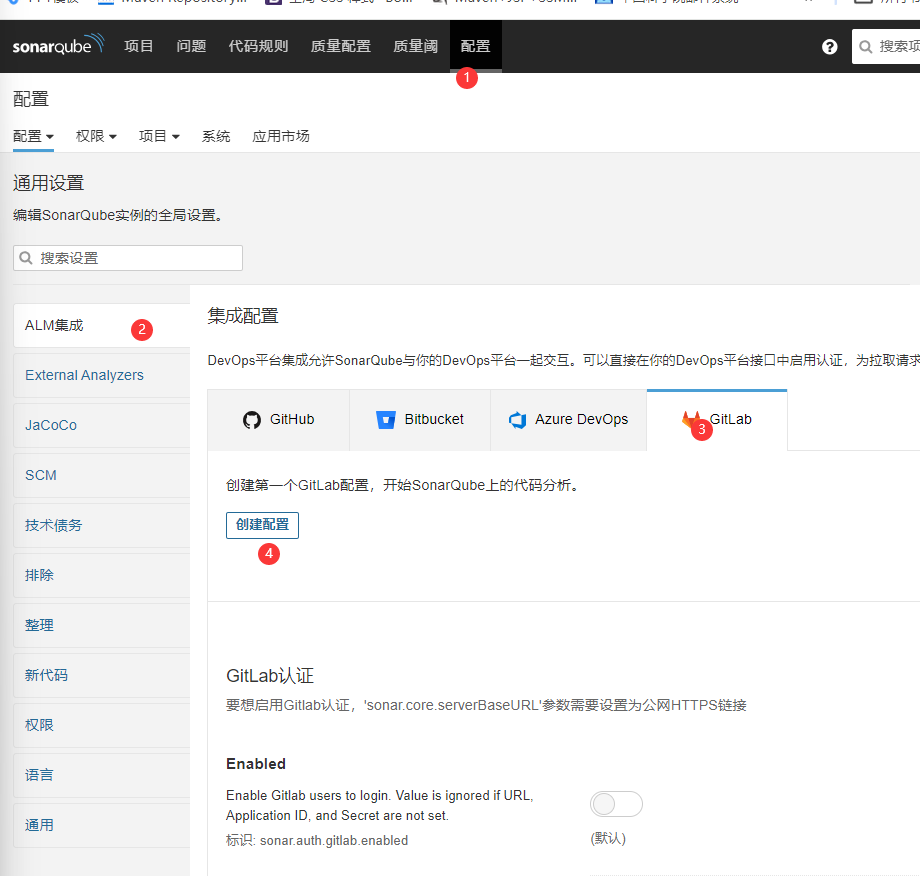
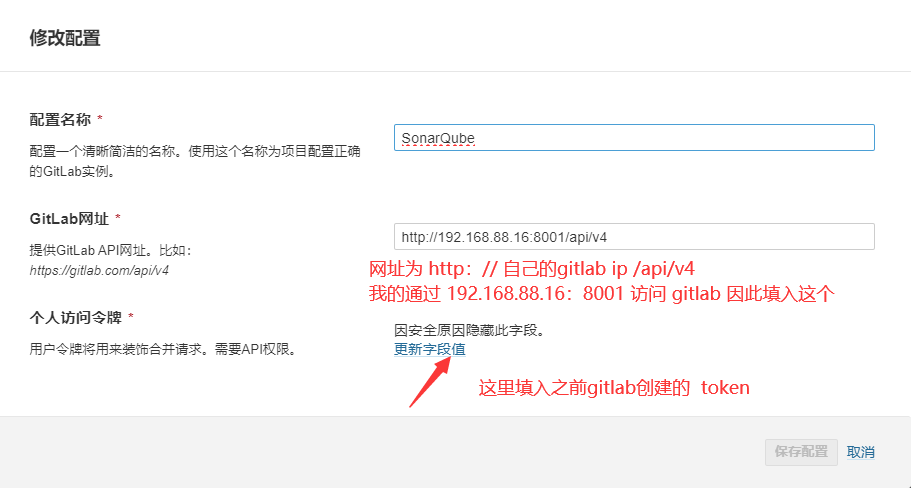
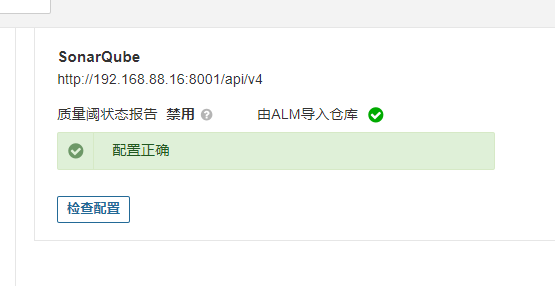
(四)配置SonarQube
1.配置SonarQube 地址
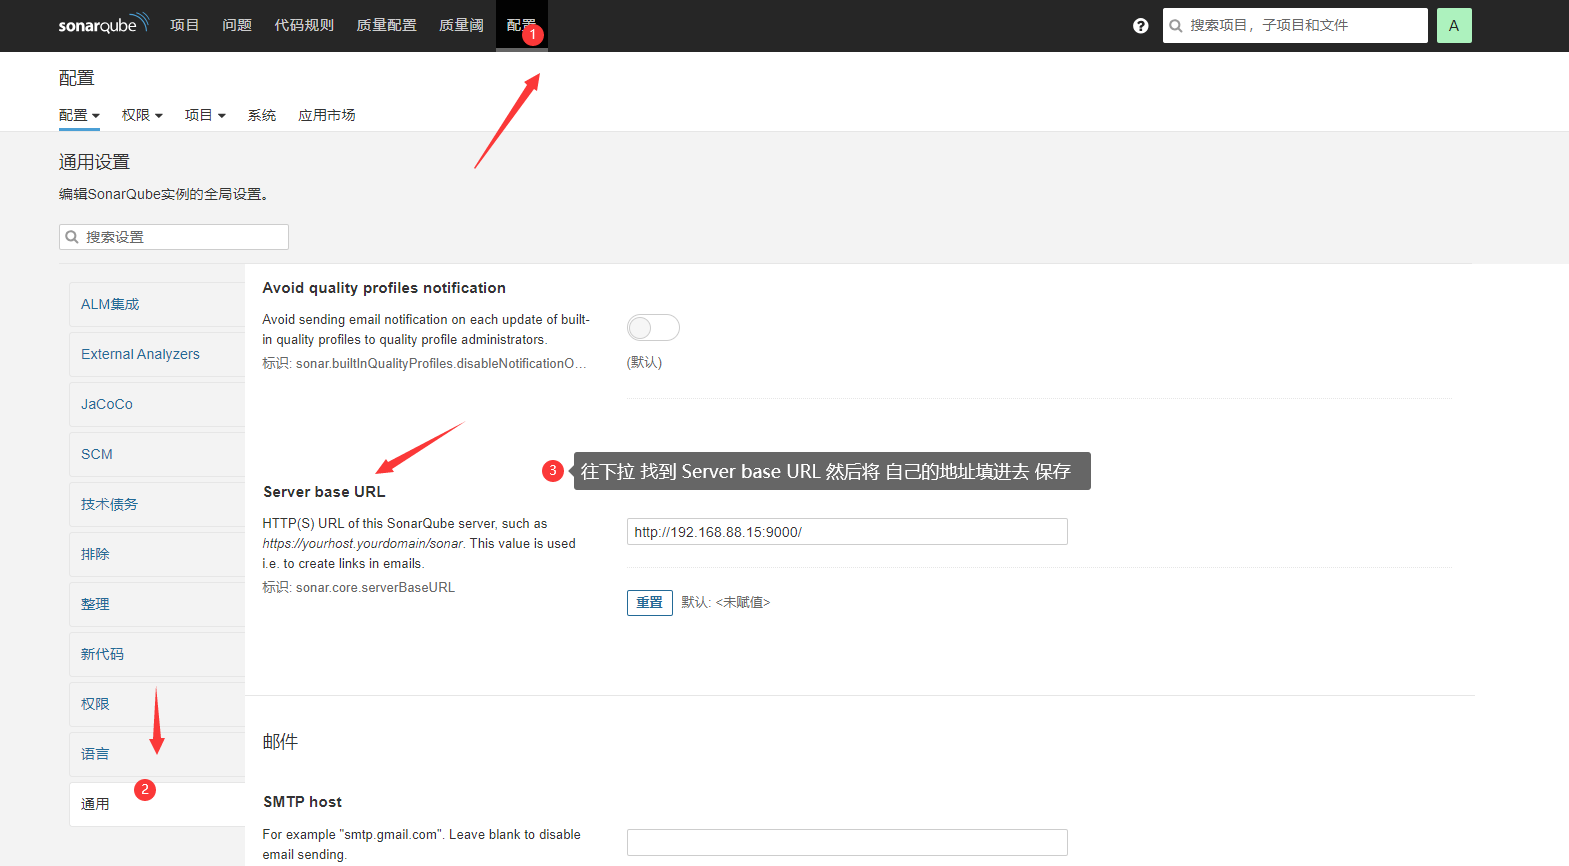
2.配置Gitlab授权
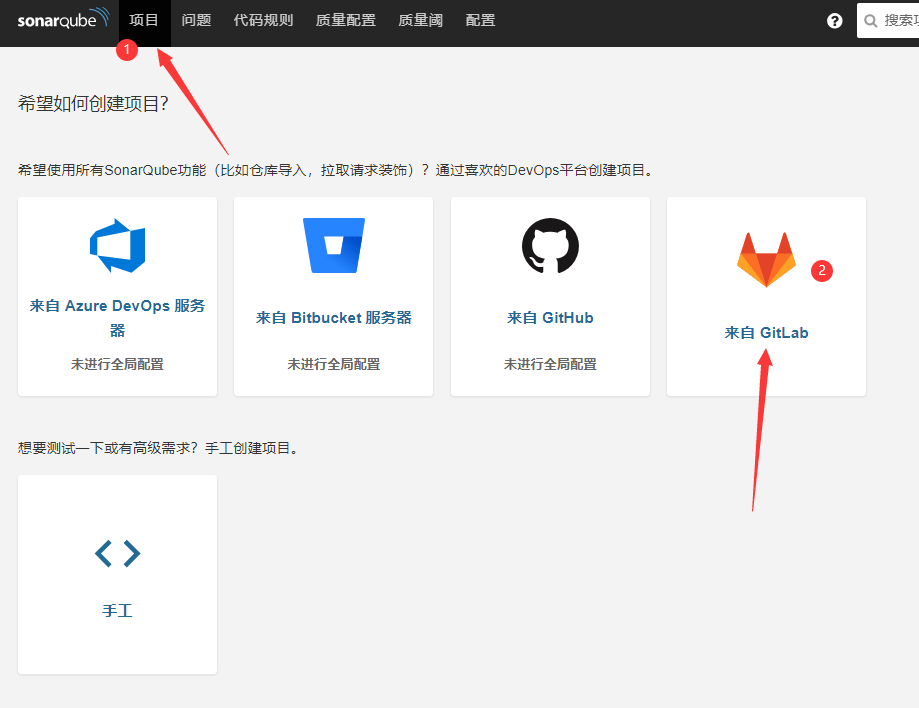
三、GitLab 关联 SonarQube 实现代码扫描
参考链接
https://blog.csdn.net/lmzf2011/article/details/123834999?spm=1001.2014.3001.5506
GitLab 关联 SonarQube 实现CI/CD代码扫描 - 掘金
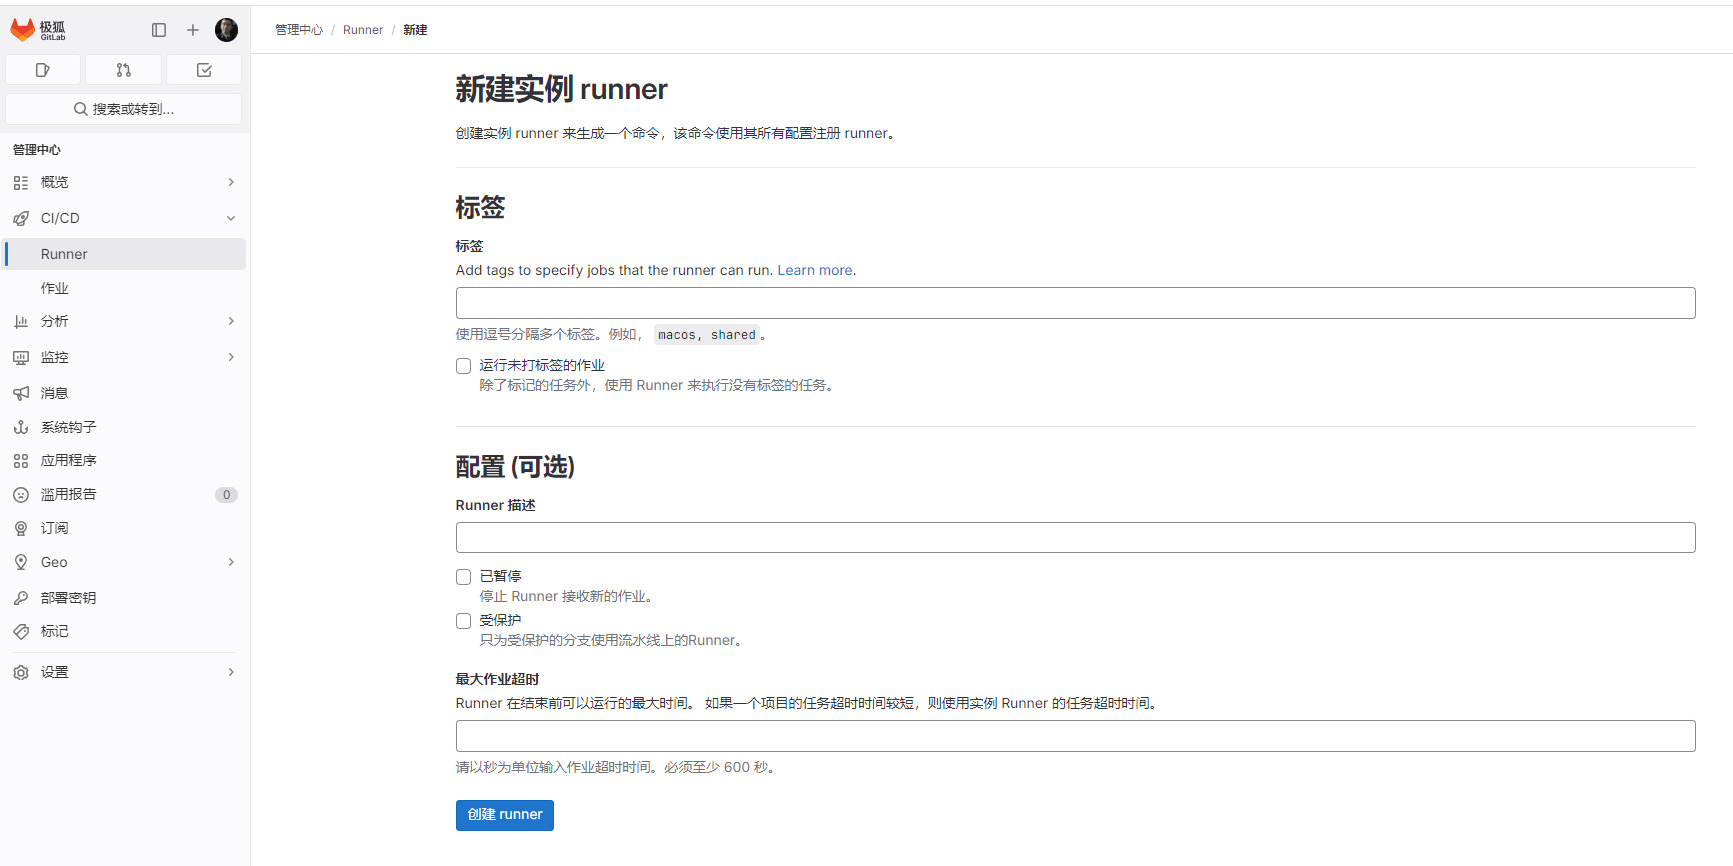
(一)安装runner
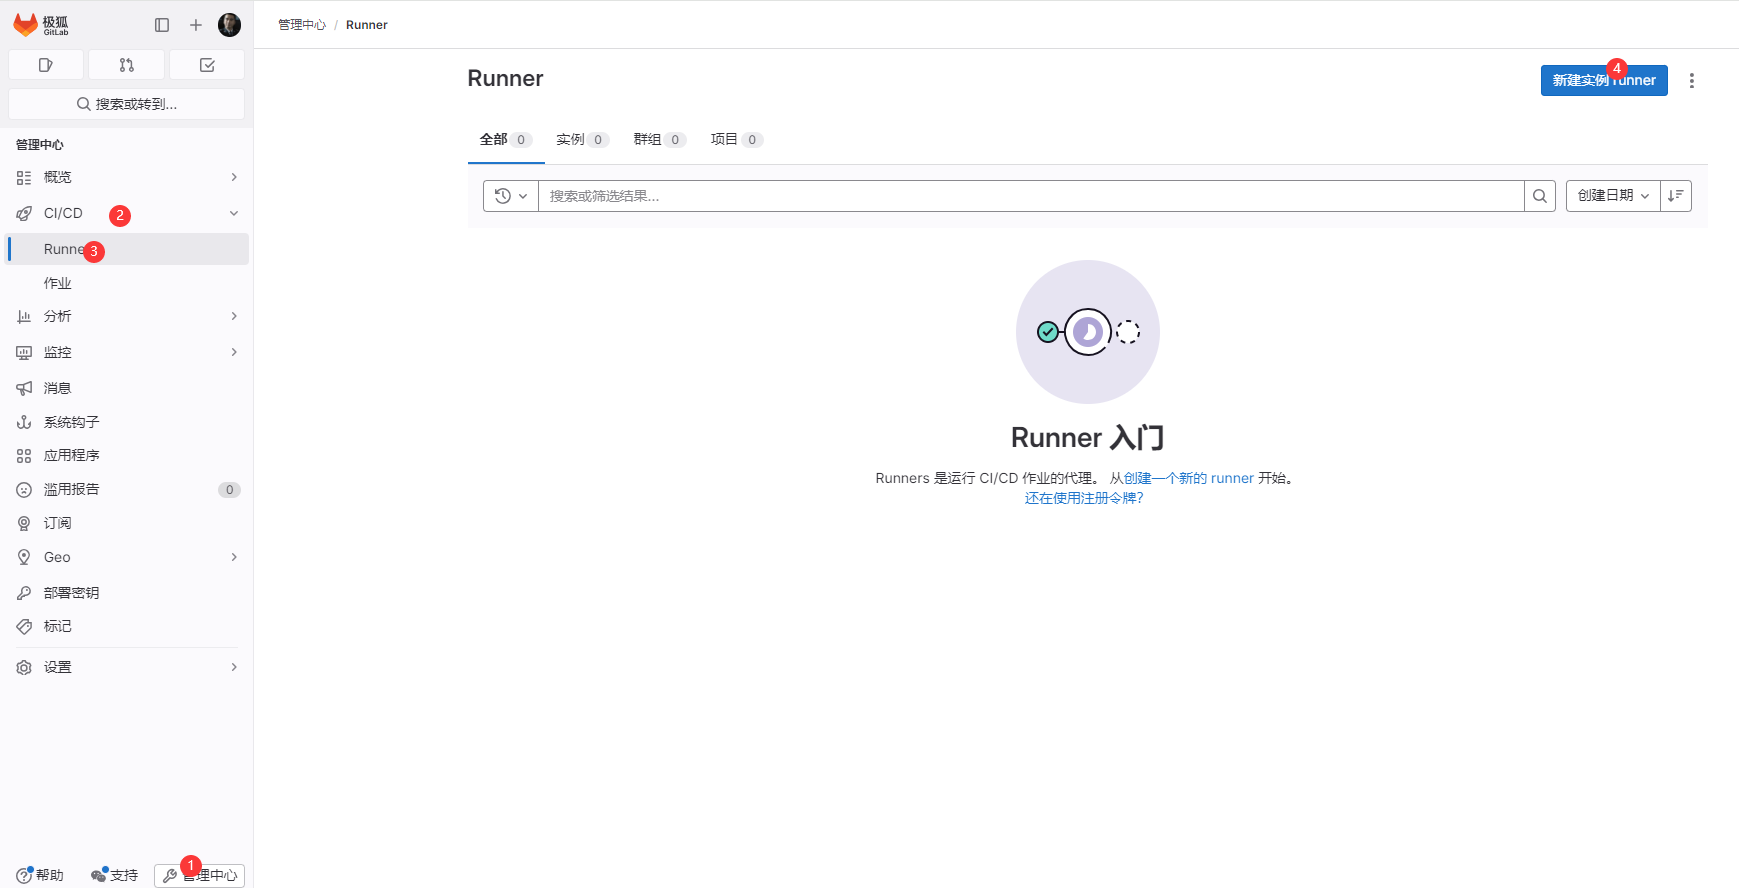
根据情况创建 runner
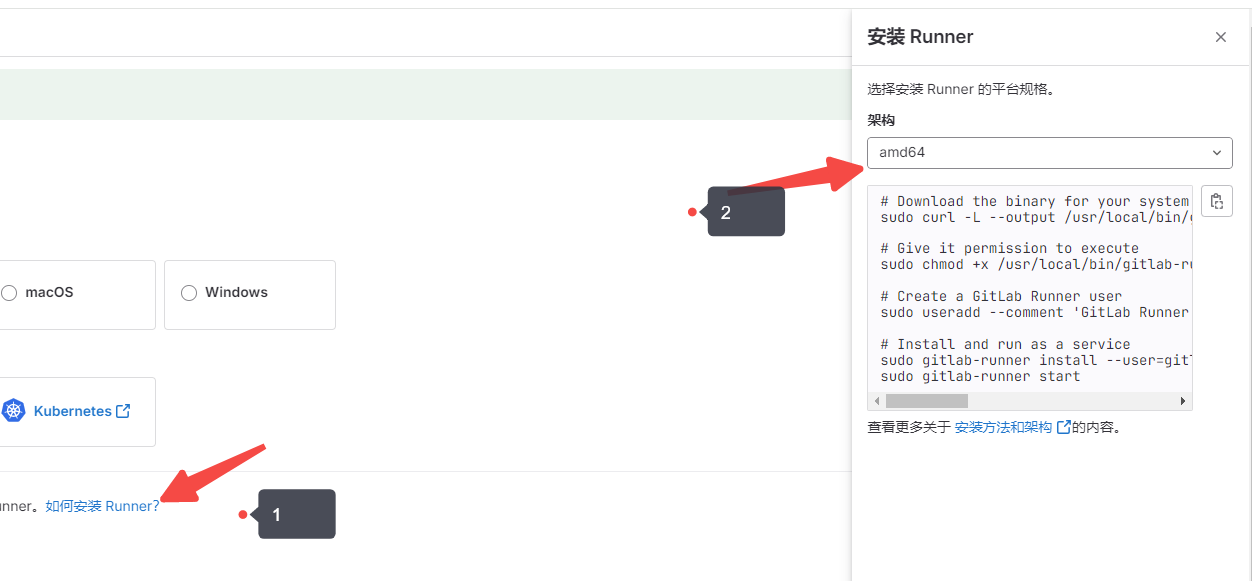
安装runner
# Download the binary for your system
sudo curl -L --output /usr/local/bin/gitlab-runner https://gitlab-runner-downloads.gitlab.cn/latest/binaries/gitlab-runner-linux-amd64

# Give it permission to execute
sudo chmod +x /usr/local/bin/gitlab-runner

# Create a GitLab Runner user
sudo useradd --comment 'GitLab Runner' --create-home gitlab-runner --shell /bin/bash

# Install and run as a service
sudo gitlab-runner install --working-directory /home/gitlab-runner --user gitlab-runner
sudo gitlab-runner start
gtilab 创建runner的时候 .根据这个 安装 不同 gitlab 版本 对应的安装方式不同,看这个就行了
安装runner 需要 进行手动输入内容
由于之前太麻烦没有截图 现在回忆 一下
1.出现 ip :然后就卡住 了 需要敲一次回车
2.然后 对 runner 进行命名 输入 你想要给该 runner起的名字 (这个最好和开始创建的名字一样)
3.然后输入 shell 可以参照 下图

然后就安装成功了
(二)安装 sonar scanner
下载安装 要注意对应版本 可能下载的版本不同
wget https://binaries.sonarsource.com/Distribution/sonar-scanner-cli/sonar-scanner-cli-4.2.0.1873-linux.zip

unzip sonar-scanner-cli-4.2.0.1873-linux.zip

 mv sonar-scanner-cli-4.2.0.1873-linux /user/local
修改配置 vim /etc/profile
export SONAR_HOME=/usr/local/sonar-scanner-4.6.2.2472-linux

export PATH=$PATH:$SONAR_HOME/bin

source /etc/profile
(三)配置SonarQube 和 Gitlab CI
参考链接
https://blog.csdn.net/lmzf2011/article/details/123834999?spm=1001.2014.3001.5506
首先需要创建 runner sonar scanner 这个在这就不做赘述 参考链接
创建好之后 打开 sonarqube
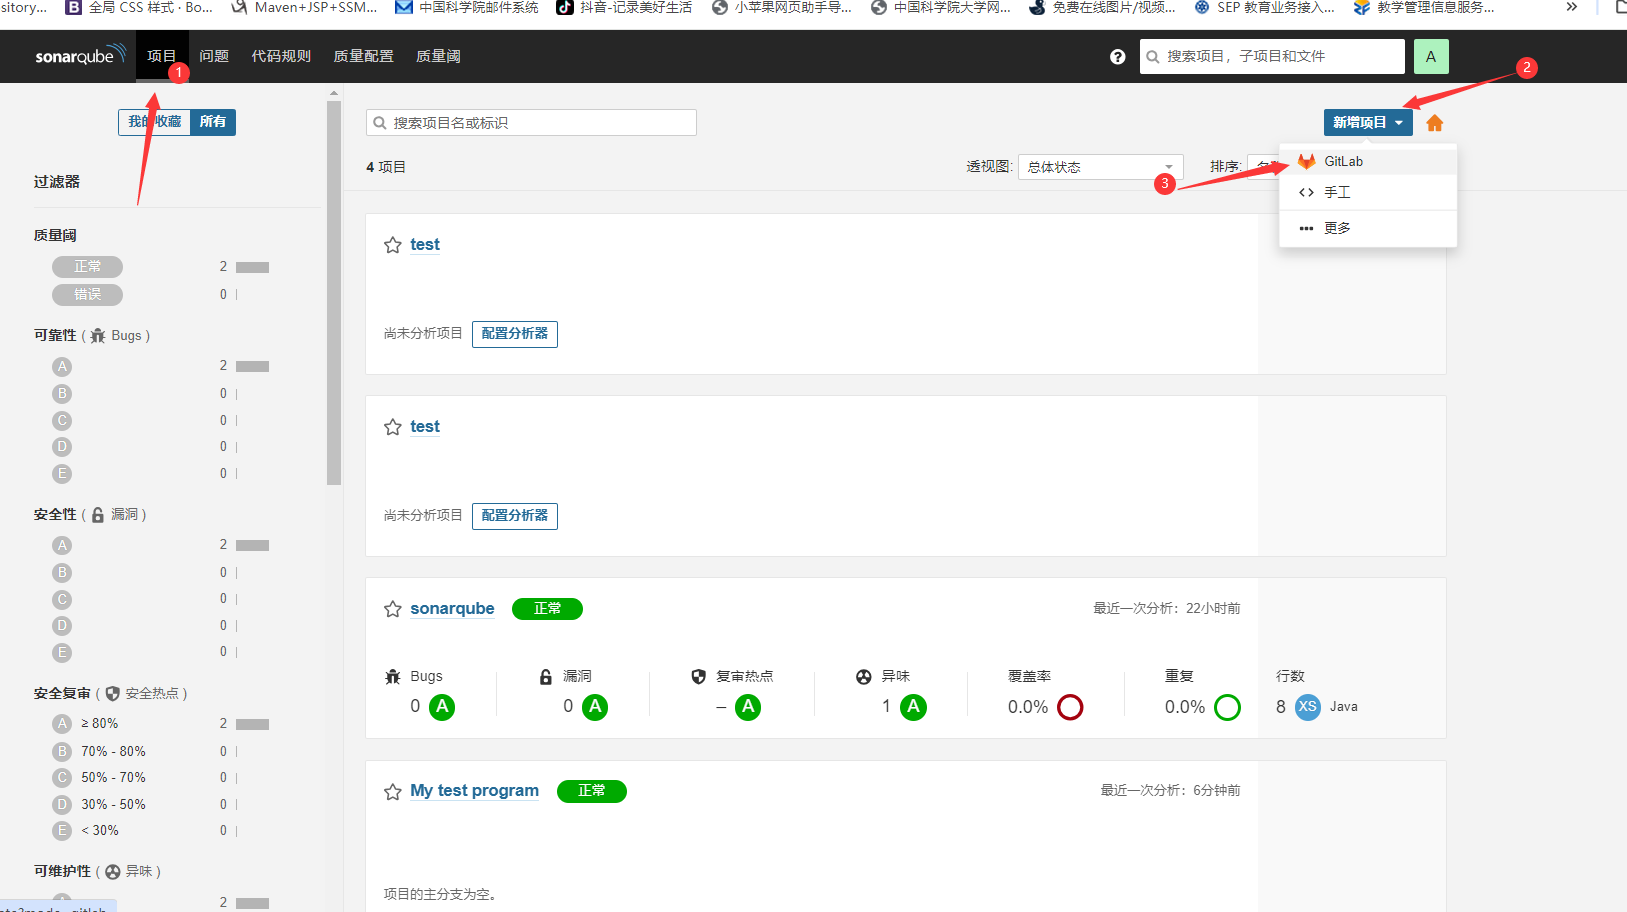
我这里已经配置好了 如果没有配置好 ,箭头的位置十一个齿轮
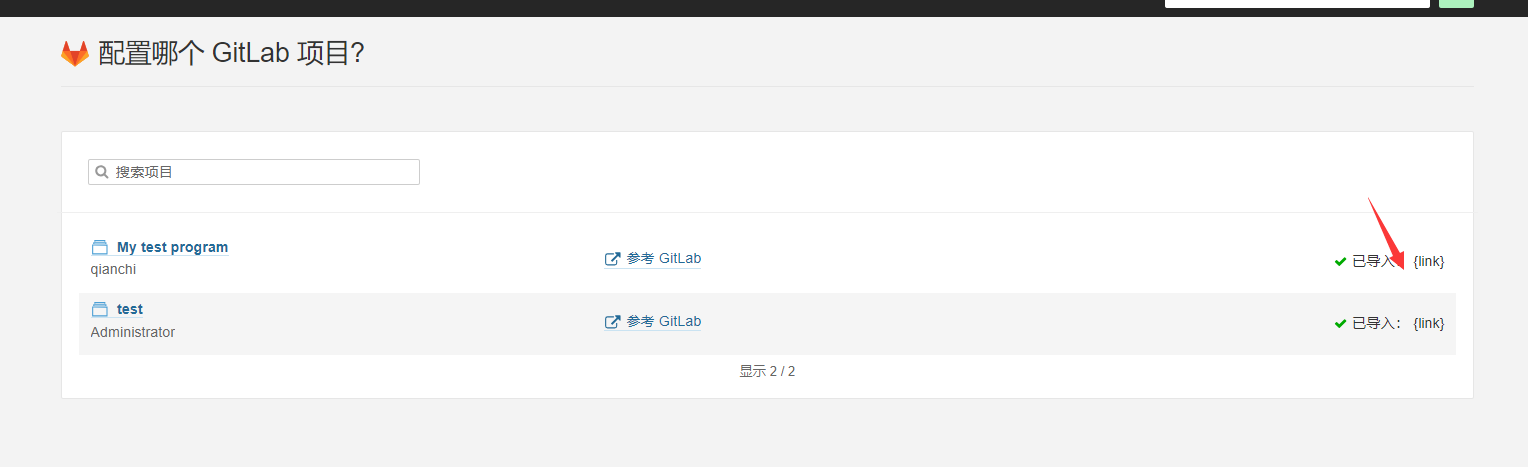

然后按照步骤一步一步来就行,一是在仓库中设置,二是在仓库中创建两个配置文件即可。
四、gitlab仓库配置ssh协议免密上传代码
这个没弄好 跳过,后续将会补充 (也差不多了 有点乱仅供参考)
git remote add [shortname] [url]			#shortname是自定义的名称,表示为这个远程仓库设置一个名称

#示例:添加一个远程仓库地址
[root@git Dosier_Project]# git remote add my_gitlab_repository http://192.168.88.16:8001/root/test.git
[root@git Dosier_Project]# git push -u my_gitlab_repository master:dev
#提交当前本地的master分支到名为my_gitlab_repository远程仓库的指定dev分支
[root@git Dosier_Project]# git remote -v		#查看保存了哪些远程仓库
[root@git Dosier_Project]# git remote add gitlab_Dossier_Project http://192.168.118.130/root/dossier_project.git
[root@git Dosier_Project]# git remote -v								#查看保存了哪些远程仓库
gitlab_Dossier_Project  http://192.168.118.130/root/dossier_project.git (fetch)
gitlab_Dossier_Project  http://192.168.118.130/root/dossier_project.git (push)
my_gitlab_repository    http://192.168.88.16:8001/root/test.git (fetch)
my_gitlab_repository    http://192.168.88.16:8001/root/test.git (push)

my_gitlab_repository
git push my_gitlab_repository  main:dev
#提交到远程分支,main:dev表示本地main分支提交到远程dev分支
Username for 'http://192.168.88.16:8001': root						#需要输入账号密码
Password for 'http://root@192.168.88.16:8001': !QAZ@WSX
## 创建令牌

此令牌用于执行分析时认证时使用,如果这个令牌存在问题,可以随时在你的用户账号下取消这个令牌。

sonarqube:

```
384f2bc828d4c31c3fbd420dc1f6e1e858259d5a
```

创建了新令牌 "384f2bc828d4c31c3fbd420dc1f6e1e858259d5a" 。请立即复制,不会再显示第二次!
test: 2a864f51d6a1dfbaacb5357e625166ab2c4a96a6
五 、代码合并实现强制打回
2024.6.28 **!!!!**这里有需要的东西 等有时间再试一下
2024.7.5 试完了还是先提交到代码仓库在进行阻断,虽然设置门禁,但是只会阻断流水线,但是不能阻断代码往仓库的提交。
GitLab 集成 SonarQube 后,可以通过 SonarQube 的质量门禁(Quality Gates)功能来实现对有问题的合并请求(Merge Requests)进行打回。当代码提交触发 SonarQube 进行代码质量分析后,如果分析结果不符合预设的质量标准,SonarQube 可以阻止合并请求的合并。这样,只有当代码质量满足要求时,合并请求才能被合并到主分支中。
具体来说,可以在 文件中配置 SonarQube 扫描任务,并设置质量门禁等待结果(-Dsonar.qualitygate.wait=true),这样 GitLab CI/CD 流水线会等待 SonarQube 分析完成后再继续执行后续步骤。如果质量门禁失败,流水线将会标记为失败,并且可以配置 GitLab 阻止合并请求的合并 3。
此外,SonarQube 还提供了与 GitLab 的集成功能,允许从 GitLab 项目中创建 SonarQube 项目,并通过 GitLab 的 Web 界面直接访问 SonarQube 的代码质量报告 78。这样,开发者可以更方便地查看代码质量分析结果,并根据需要进行代码的修改和优化。
stages:
  - sonarqube-check

sonarqube-check:
  image:
    name: sonarsource/sonar-scanner-cli:latest
    entrypoint: [""]
  variables:
    SONAR_USER_HOME: "${CI_PROJECT_DIR}/.sonar"  # 定义分析任务缓存的位置
    GIT_DEPTH: "0"  # 告诉git获取项目的所有分支,这是分析任务所必需的
    SCANNER_HOME: "/usr/local/sonar-scanner-4.2.0.1873-linux"
  cache:
    key: "${CI_JOB_NAME}"
    paths:
      - .sonar/cache
  script:
    # 执行SonarQube扫描,添加了 -Dsonar.qualitygate.wait=true 参数来等待质量门禁的结果
    - sonar-scanner -Dsonar.sources=. -Dsonar.host.url=http://192.168.88.15:9000 -Dsonar.login=9f9836525ec70974b14ae1fc34aeca2b60e8ffbe -Dsonar.qualitygate.wait=true
  allow_failure: false  # 如果质量门禁失败,流水线将失败
  only:
    - merge_requests  # 只在合并请求中运行
    - main  # 或者您的主分支名称
    - develop  # 根据需要添加其他分支
  tags:
    - gitlab-ci-sonarqube
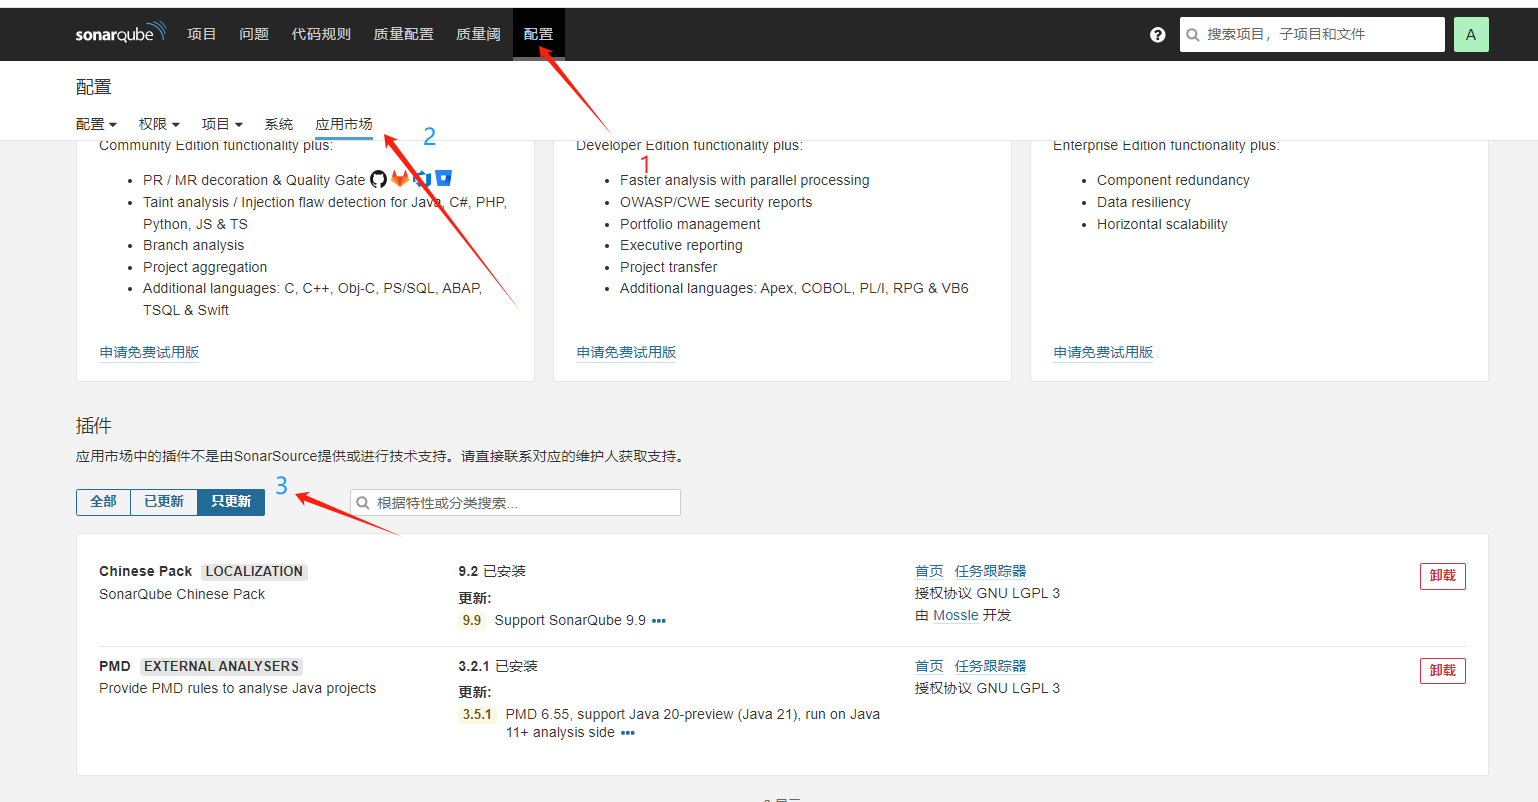
六、sonarqube 插件
(一)多分支插件
社区版本的是不支持多分支扫描的 ,只支持主分支扫描 可以通过 插件的方式 进行多分支扫描
插件地址 : https://github.com/mc1arke/sonarqube-community-branch-plugin
可以离线安装 也可以直接下载到目录 (还有更好的方法就是下载的时候直接下带有插件的sonarqube 网上有教程)
因为网络问题 采用离线安装的方式
-
首先到插件地址找到对应版本的插件 如果版本不对 可能无法成功。
-
下载之后 将下载的文件 放入到
/root/sonarqube/extensions/plugins(我是采用docker compose的方式 目录可能不同 找到sonarqube 文件夹就行了)
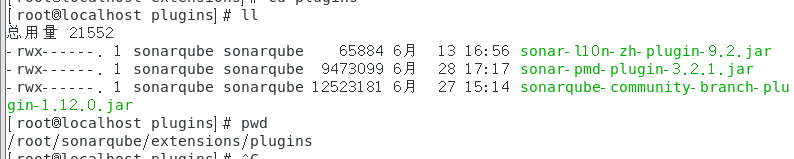
-
配置sonarqube配置文件
vim ~/sonarqube/conf/sonar.propertiessonar.web.javaAdditionalOpts=-javaagent:./extensions/plugins/sonarqube-community-branch-plugin-1.12.0.jar=web sonar.ce.javaAdditionalOpts=-javaagent:./extensions/plugins/sonarqube-community-branch-plugin-1.12.0.jar=ce -
重启
可以 从web端重启 sonarqube 也可以重启docker
PS:如果 没有 plugins 文件夹 可以自己建 我的就是自己建的 但是位置一定要保持一直,另外如果 都能弄好之后 没有反应,可以将文件夹 权限设置未 777 这里不做赘述。所有插件一样。
(二)中文插件
中文插件 和分支插件一样 不需要配置 只需要放到目录重启即可 当然这是离线情况下或者 在线无法安装的情况
中文插件网址 :https://github.com/xuhuisheng/sonar-l10n-zh
在网址中下载对应版本的中文插件,网址内有对应的版本 下载之后 将插件放到
/root/sonarqube/extensions/plugins 即可
重启sonarqube 完成!
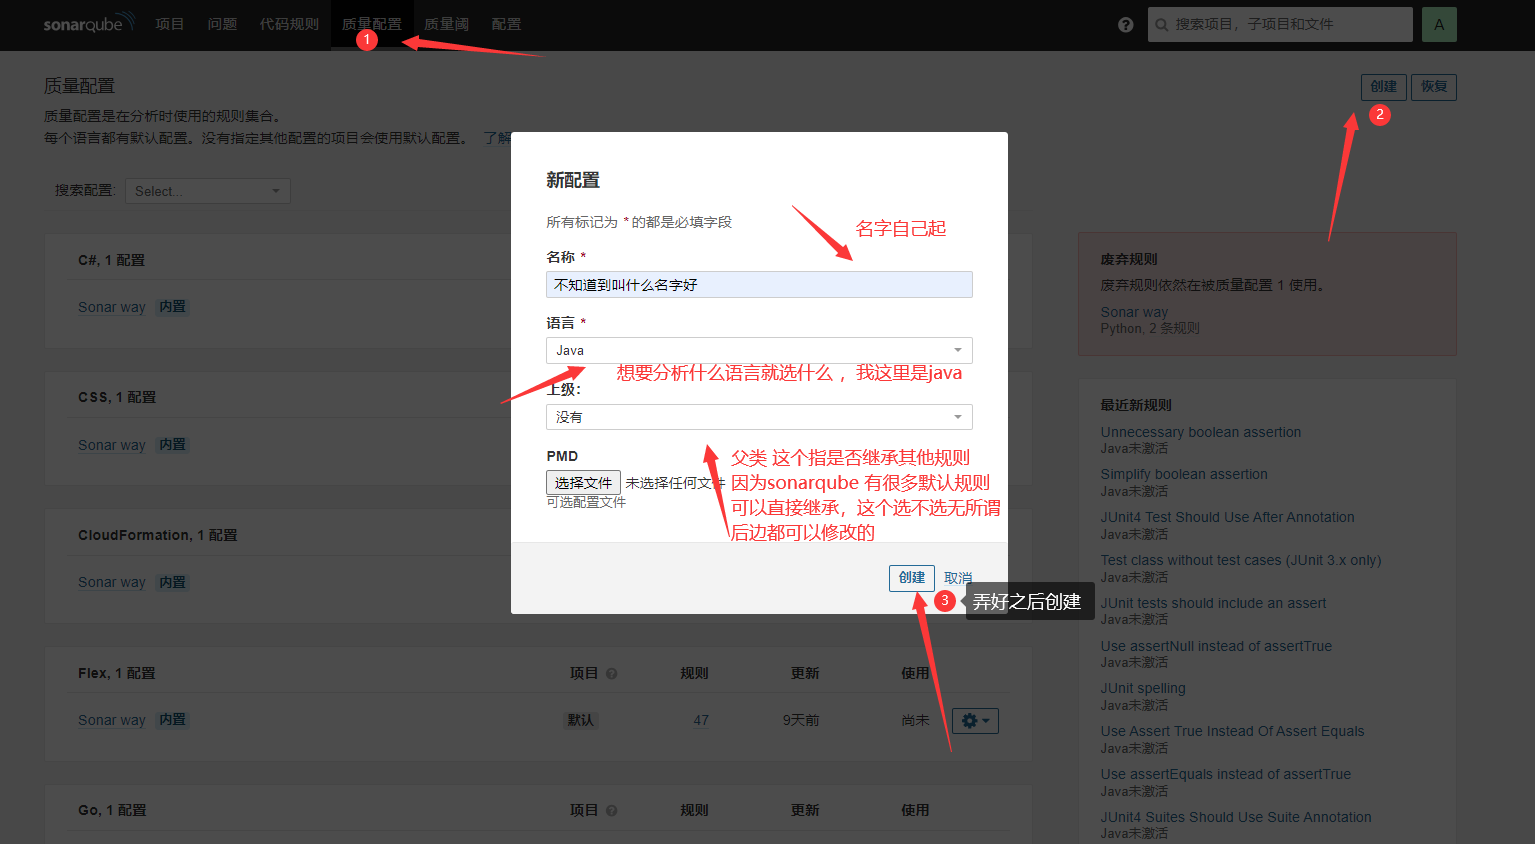
(三)P3C 规则插件 && 配置新规则
和其他插件一样 同样是用过导入的方式,将做好的jar 包导入到
/root/sonarqube/extensions/plugins 重启 即可看到插件内容
但是现在只是导入了 SonarQube 默认是的自带的规则 想要使用 新导入的规则需要添加 .
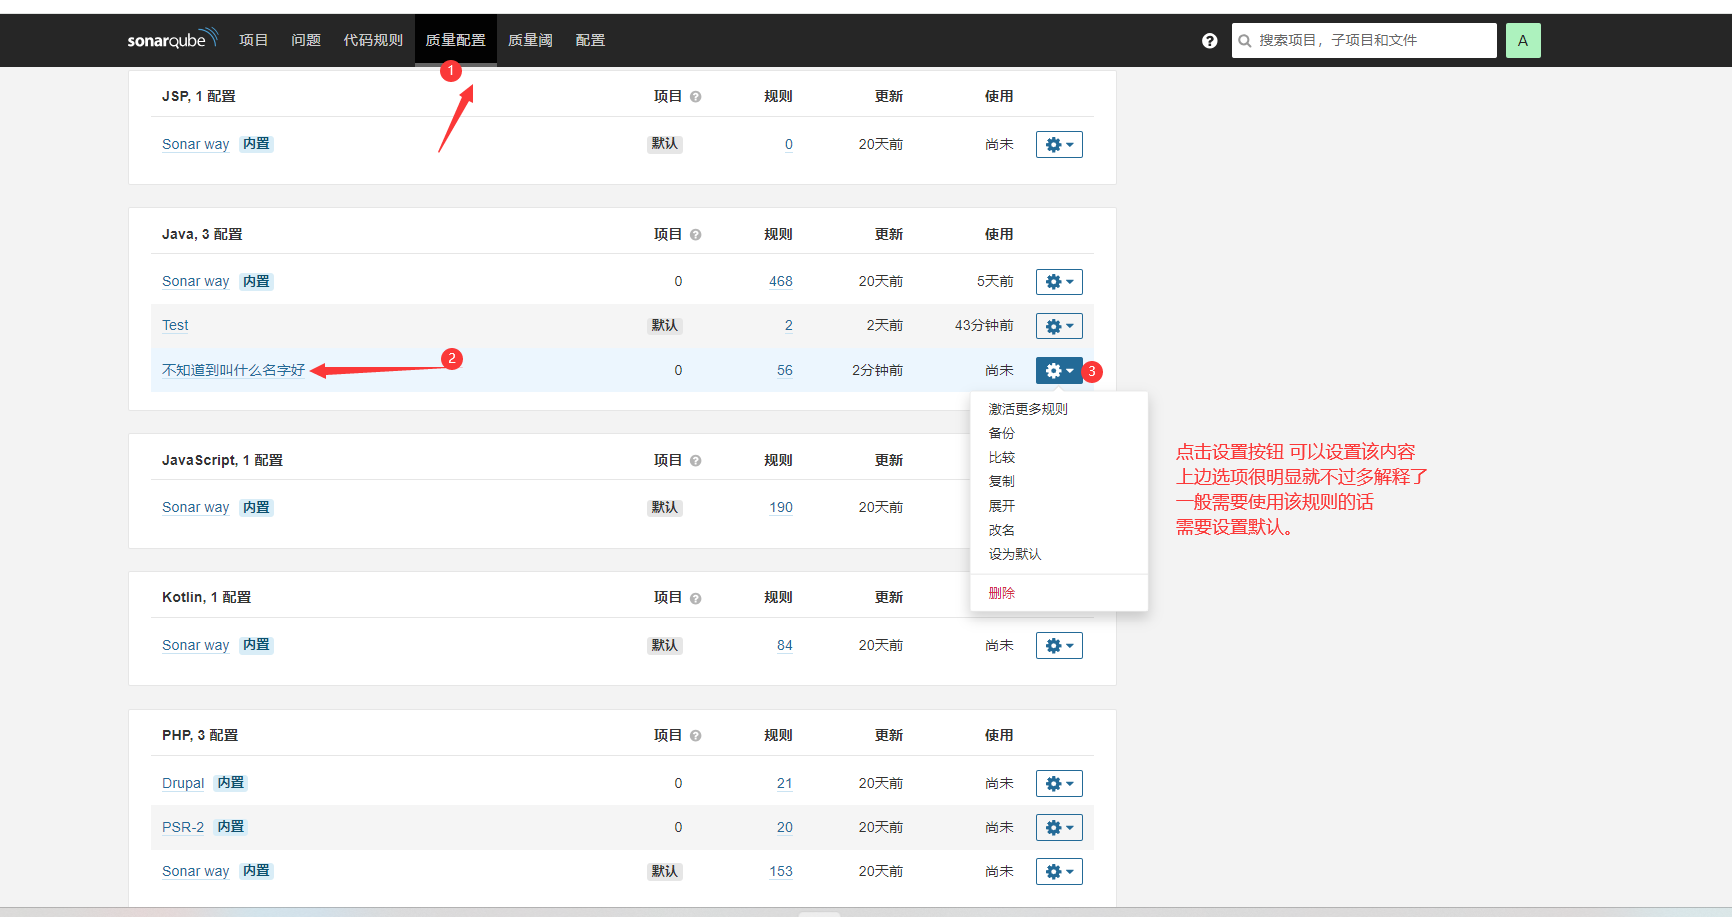
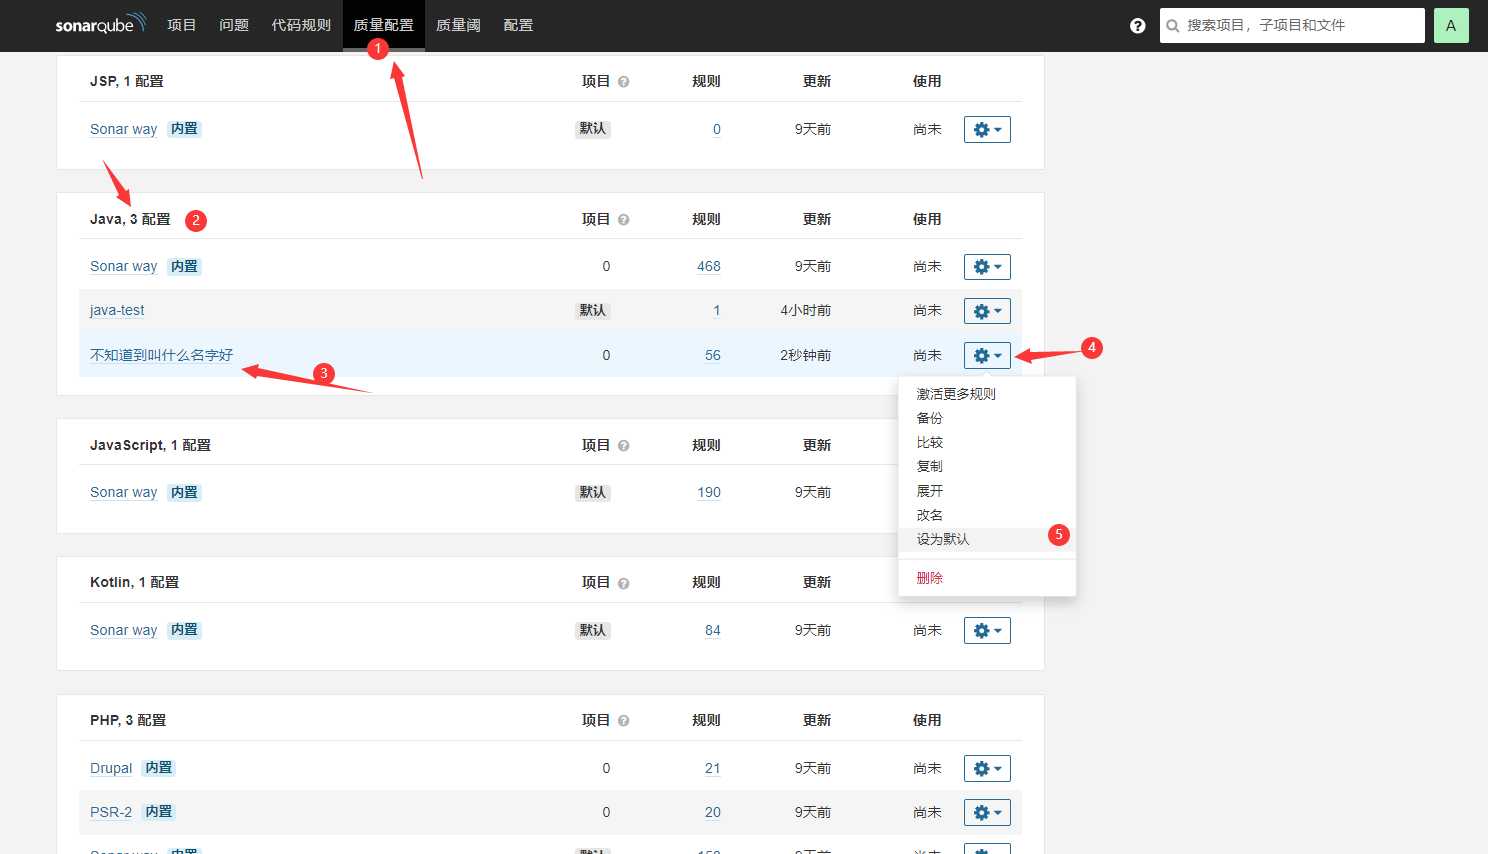
质量配置 -》创建 -》输入相关内容(名字最好英文)&&选择语言 有需要可以选择父类(中文翻译为上级)
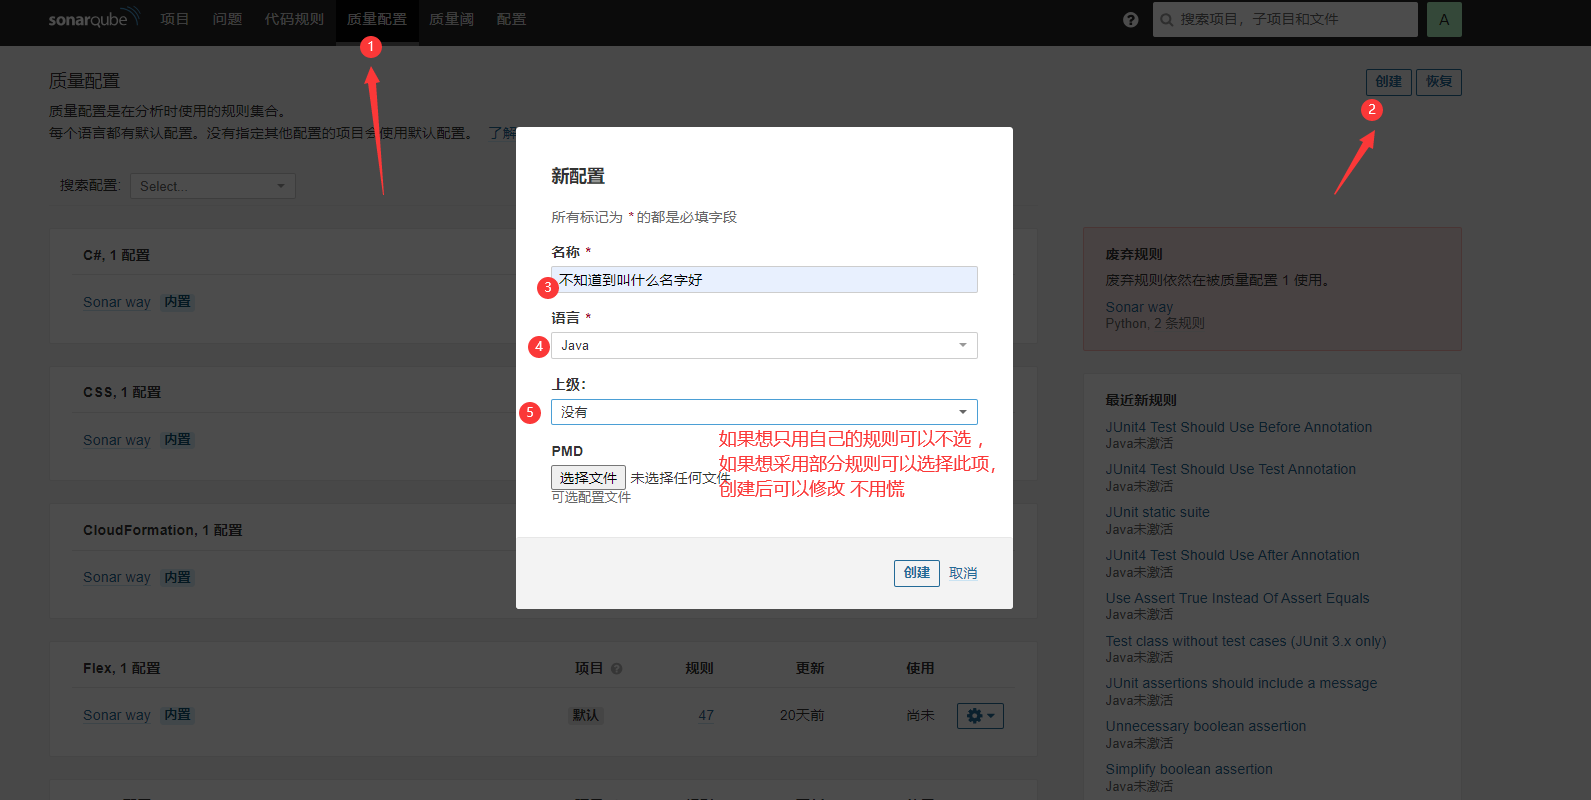
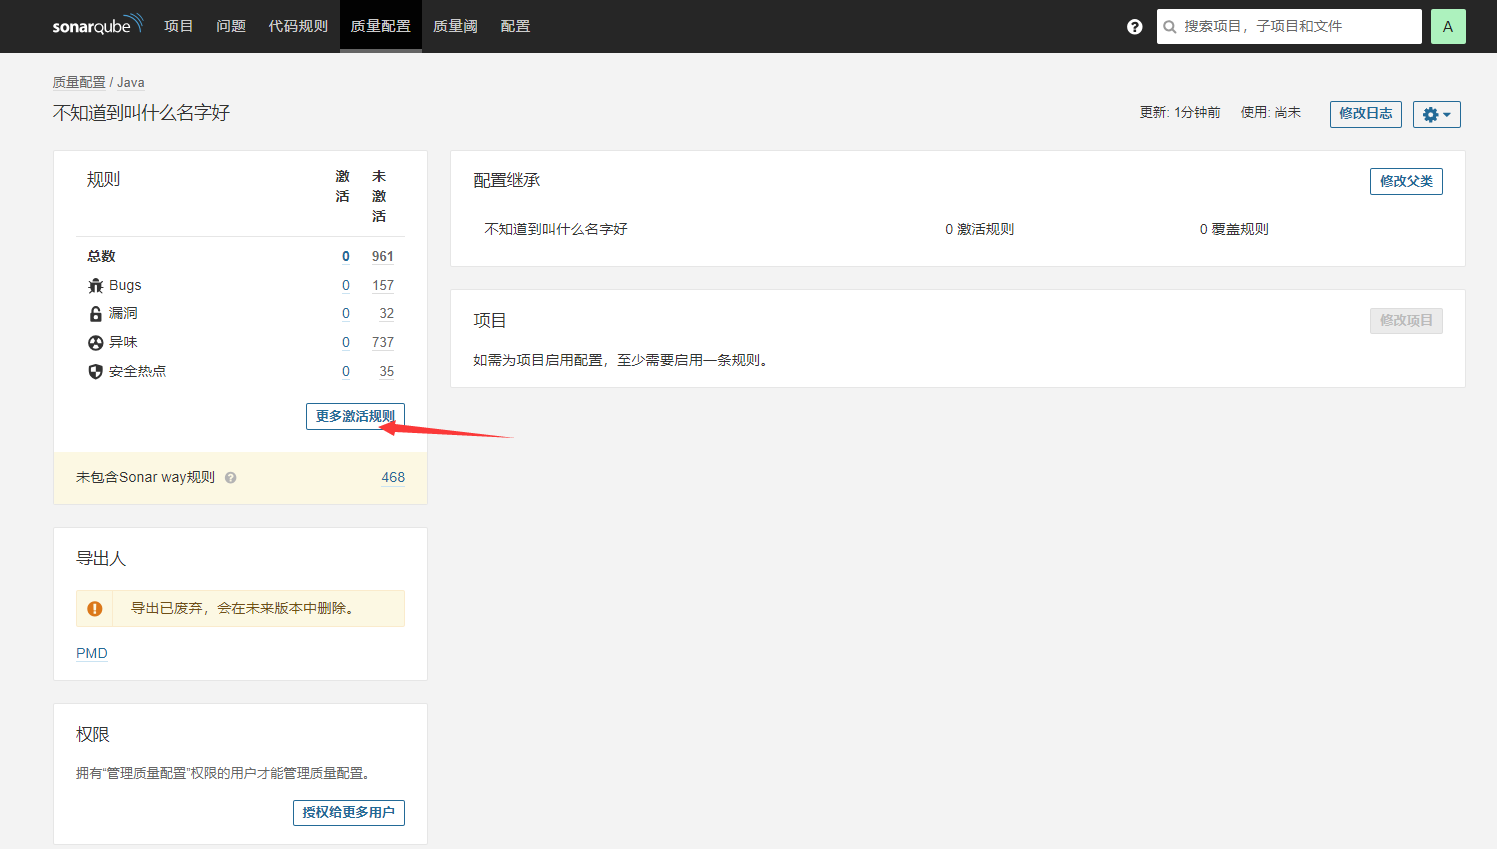
创建好之后默认是什么都没有的 需要激活规则
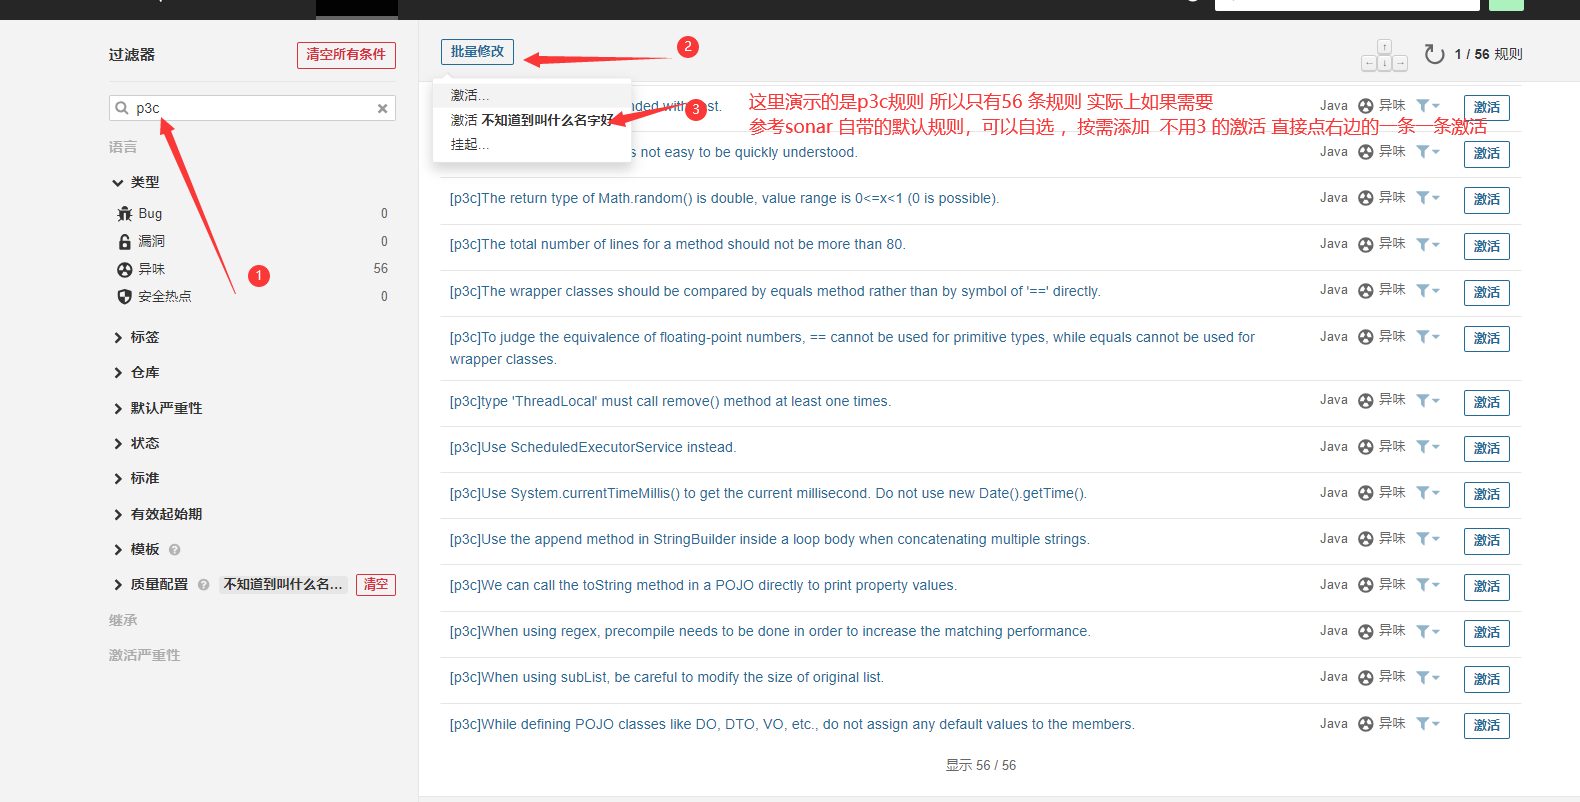
逐条激活 可以选择 规则 严重程度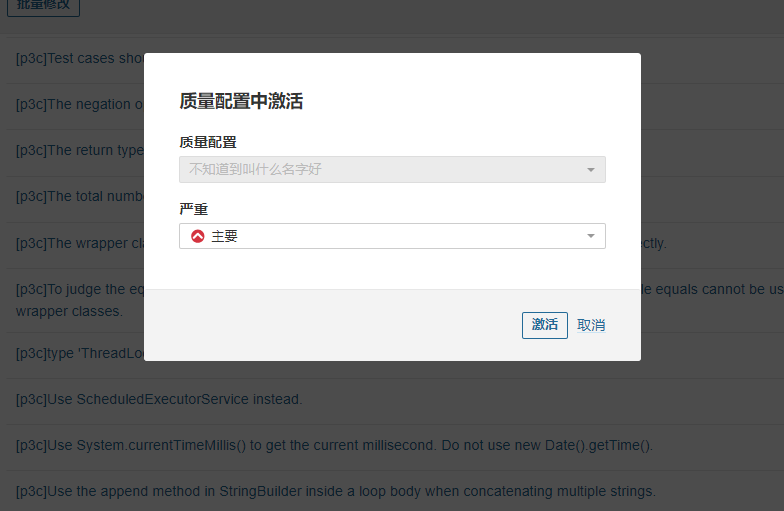
设置好后可以设置为默认规则 即可完成配置
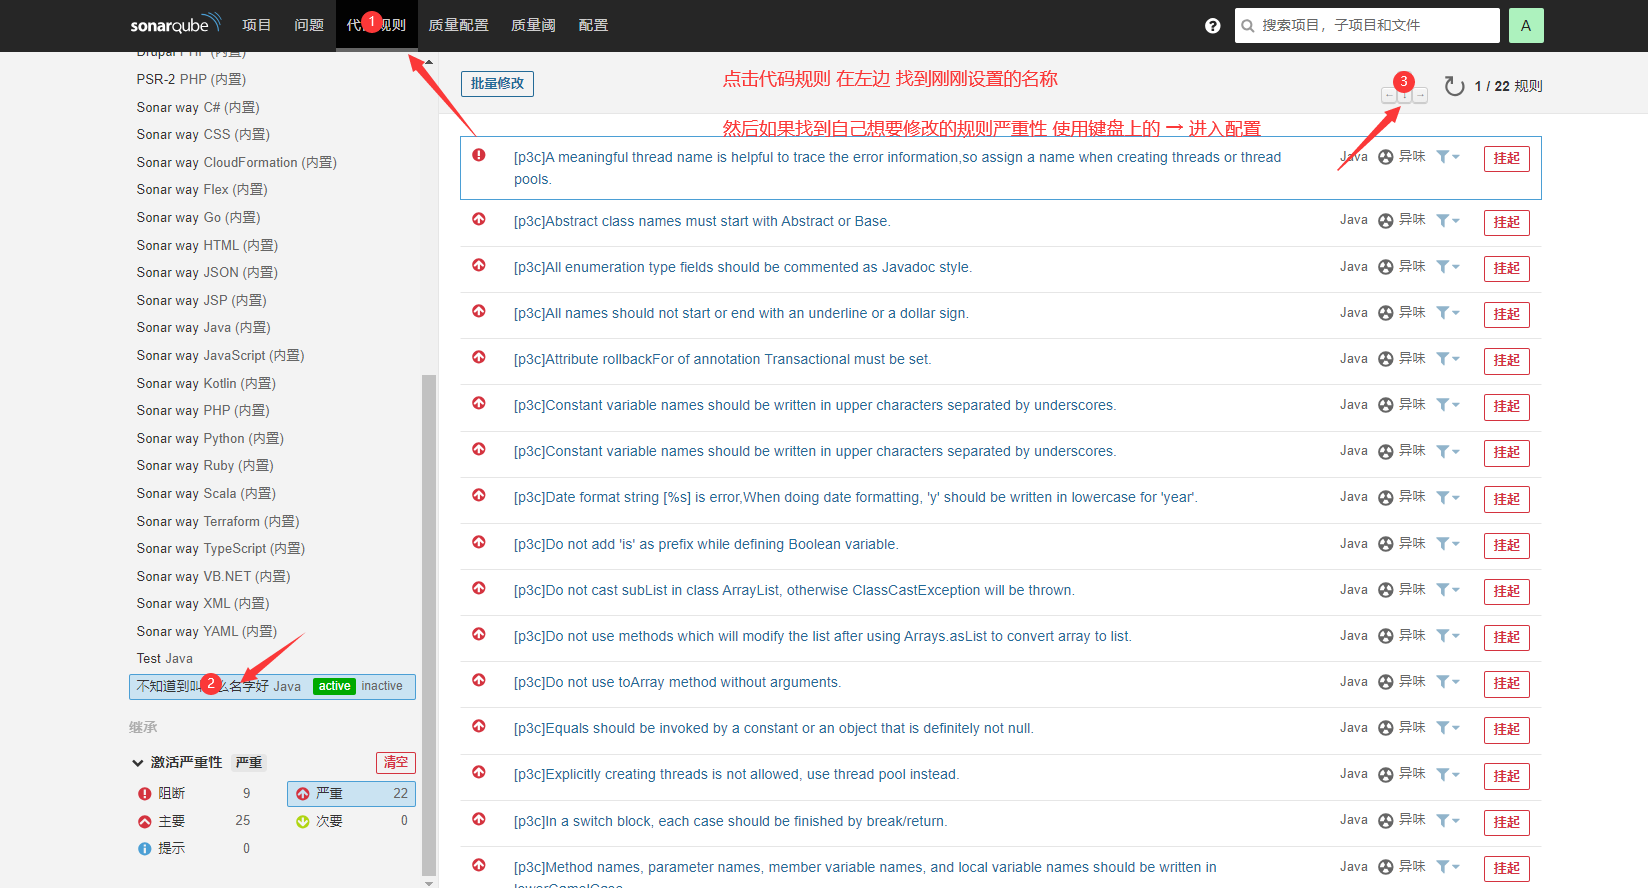
PS:如果想修改严重程度 目前了解到的只能一条一条修改,当然是我没有找到更好的批量修改的方法,再创建之前可以修改,创建之后如果想修改的话可以按照如下步骤:
键盘 ↑ ↓ ← → 均可 或者直接点击单条规则的名字即可。
七、sonar+gitlab提交阻断 增量扫描
经过一个月的调研 各种方法的尝试,最终感觉还是这个方案 最符合开发要求,即 在提交代码的过程中 进行强制代码审查,并且可以自定义规则,可以采用离线的方式并且几乎不需要人工 有问题就不让交 想交必须将错误改好才能提交成功,参考链接:
https://blog.csdn.net/matrixlzp/article/details/137006879?spm=1001.2014.3001.5506
下面进行配置
(一)安装Sonar-Scanner
这里不再赘述 参考 《三 (二)》
(二)在项目中添加脚本
1.首先找到项目地址
gitlab 项目是以对象形式存储的,而每一个对象都有一个hash 值 ,通过这个hash值来找到项目的存储位置
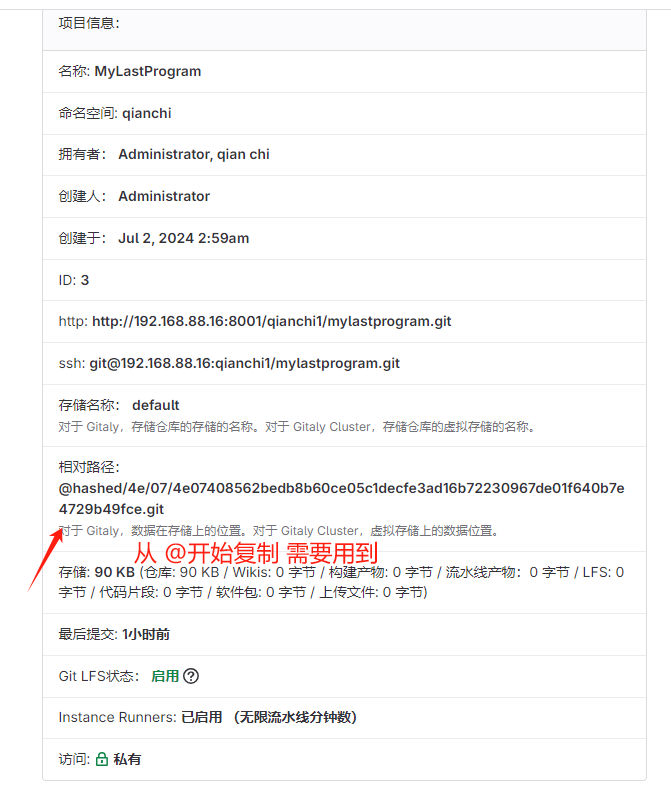
以root 用户登陆 -> 管理中心 -> 需要配置的项目 -> 复制相对路径 (一会要用到)
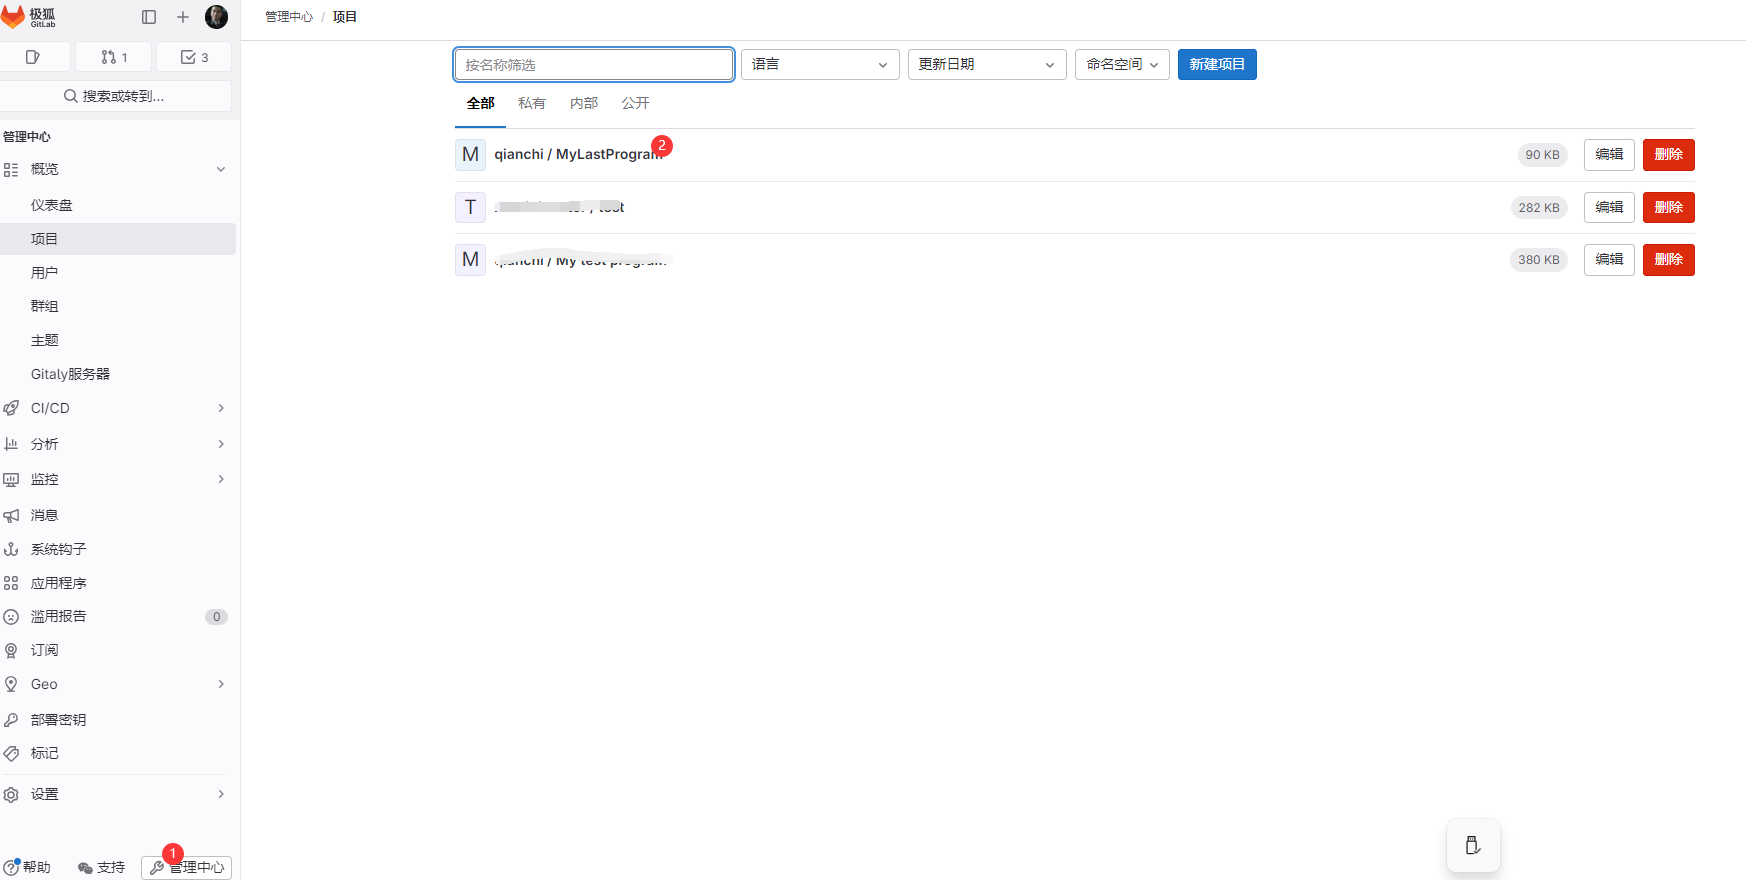
这一步实际上是找到 项目所在的地址 从而在 项目中添加 钩子,在服务端拒绝提交的代码
2.配置钩子脚本文件
弄好之后 打开后台 我的gitlab 是放在了 /var/opt 目录下,然后将刚刚的内容进行拼接,需要进入到该目录下进行修改 我的建议是一步一步进入,因为可能路径不对 。结合我自己的 例子如下:
cd /var/opt/gitlab/git-data/repositories/@hashed/4e/07/4e07408562bedb8b60ce05c1decfe3ad16b72230967de01f640b7e4729b49fce.git
进入到该目录后 创建服务端 hook文件
# 创建 custom_hooks 文件夹
mkdir custom_hooks

# 进入 custom_hooks 文件夹
cd custom_hooks

# 创建 pre-receive 文件
touch pre-receive

# 修改 pre-receive 文件
vim pre-receive
文件内容如下: (这里我做了修改 可以扫描所有分支 但是前提是有多分支插件 如何添加多分支插件参考 《六 (一)》 )
#!/bin/bash

echo "开始代码扫描..."

GIT_VERSION=`git version`
echo "git版本是:$GIT_VERSION"

# 获取当前路径
BASE_PATH=`pwd`
echo "当前路径是:$BASE_PATH"

ACCOUNT=`whoami`
echo "当前账户是:$ACCOUNT"

# 从标准输入流读入参数
read normalInput
ARR=($normalInput)
OLD_REVISION=${ARR[0]}
CURRENT_REVISION=${ARR[1]}
BRANCH=${ARR[2]}

echo "旧修订ID:$OLD_REVISION"
echo "新修订ID:$CURRENT_REVISION"

echo "当前项目:$GL_PROJECT_PATH"
PROJECT_NAME=$(echo $GL_PROJECT_PATH | awk 'BEGIN{FS="/"}{print $NF}')
echo "项目名称:$PROJECT_NAME"

echo "当前分支:$BRANCH"
BRANCH_NAME=$(echo $BRANCH | awk 'BEGIN{FS="/"}{print $NF}')
echo "分支名称:$BRANCH_NAME"

export SONAR_SCANNER=/usr/local/sonar-scanner
PATH=$SONAR_SCANNER/bin:$PATH
export PATH
# 过滤出当前提交中的 java 文件
FILES=`git diff --name-only $OLD_REVISION $CURRENT_REVISION  | grep -e "\.java$"`

    if [ -n "$FILES" ]; then
		SONARDIR=$BASE_PATH/"sonar"
		mkdir -p "${SONARDIR}"

		TEMPDIR=$BASE_PATH/"tmp"
		for FILE in ${FILES}; do
		   # 创建目录并舍弃输出
		   mkdir -p "${TEMPDIR}/`dirname ${FILE}`" >/dev/null
		   # 创建文件
		   git show $CURRENT_REVISION:$FILE > ${TEMPDIR}/${FILE}
		done;

		echo "进入临时文件夹"
		cd $TEMPDIR
		pwd

		SONAR_USER_HOME=$SONARDIR sonar-scanner -Dsonar.language=java -Dsonar.projectKey=$PROJECT_NAME -Dsonar.host.url=http://192.168.88.15:9000 -Dsonar.login=b6a1b3052a4d57fd4d31a071b17fea79b17a15b2 -Dsonar.branch.name=$BRANCH_NAME -Dsonar.projectVersion=1.0 -Dsonar.java.binaries=./ -Dsonar.scm.disabled=true

		sleep 5s

		rt=$(curl -u '上边的令牌:' sonarqube地址:端口/api/qualitygates/project_status?projectKey="$PROJECT_NAME"\&branch="$BRANCH_NAME" | awk -F ":" '{print $3}' | awk -F "," '{print $1}')
		echo "代码检测结果$rt"
		echo "删除临时文件夹"
		rm -rf $TEMPDIR
		if [ $rt = "\"ERROR\"" ];then
		  echo "代码检测失败,拒绝提交"
		  exit 1
		elif [ $rt = "\"OK\"" ];then
		  echo "代码检测成功,进入仓库"
		  exit 0
		fi
fi
(可以看到脚本文件中存在了创建临时文件夹,如遇突发状况,导致文件夹创建之后未临时删除,可能会堆积,这里可以检查)
弄好之后修改文件夹权限 这一步就完成了
chmod 777 pre-receive
其中 -Dsonar.host.url 需要填写自己的sonarqube地址:端口,-Dsonar.login 后边的是自己的令牌 上边的内容有如何生成令牌 ,我之前就对这个令牌很懵,我在这里再弄一遍。
3.补充:获取令牌的两种方法
-
方法一
使用管理员账户 点击A -> 点击我的账号

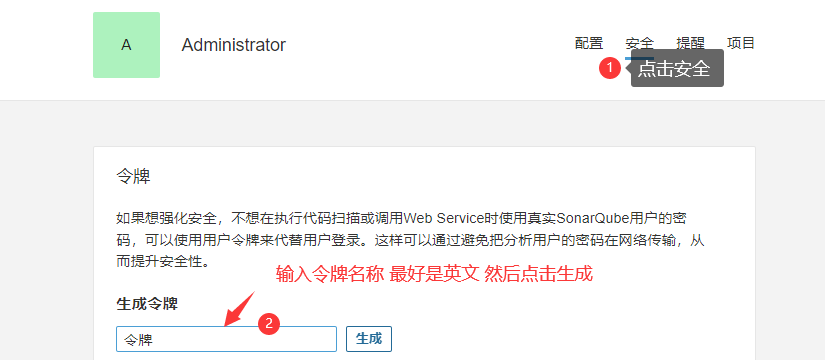
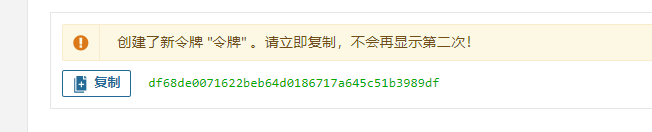
这个令牌要记住 因为只显示一次 如果想查看 需要到服务器上查看 很麻烦 或者在生成一个 .
完成
-
方法二
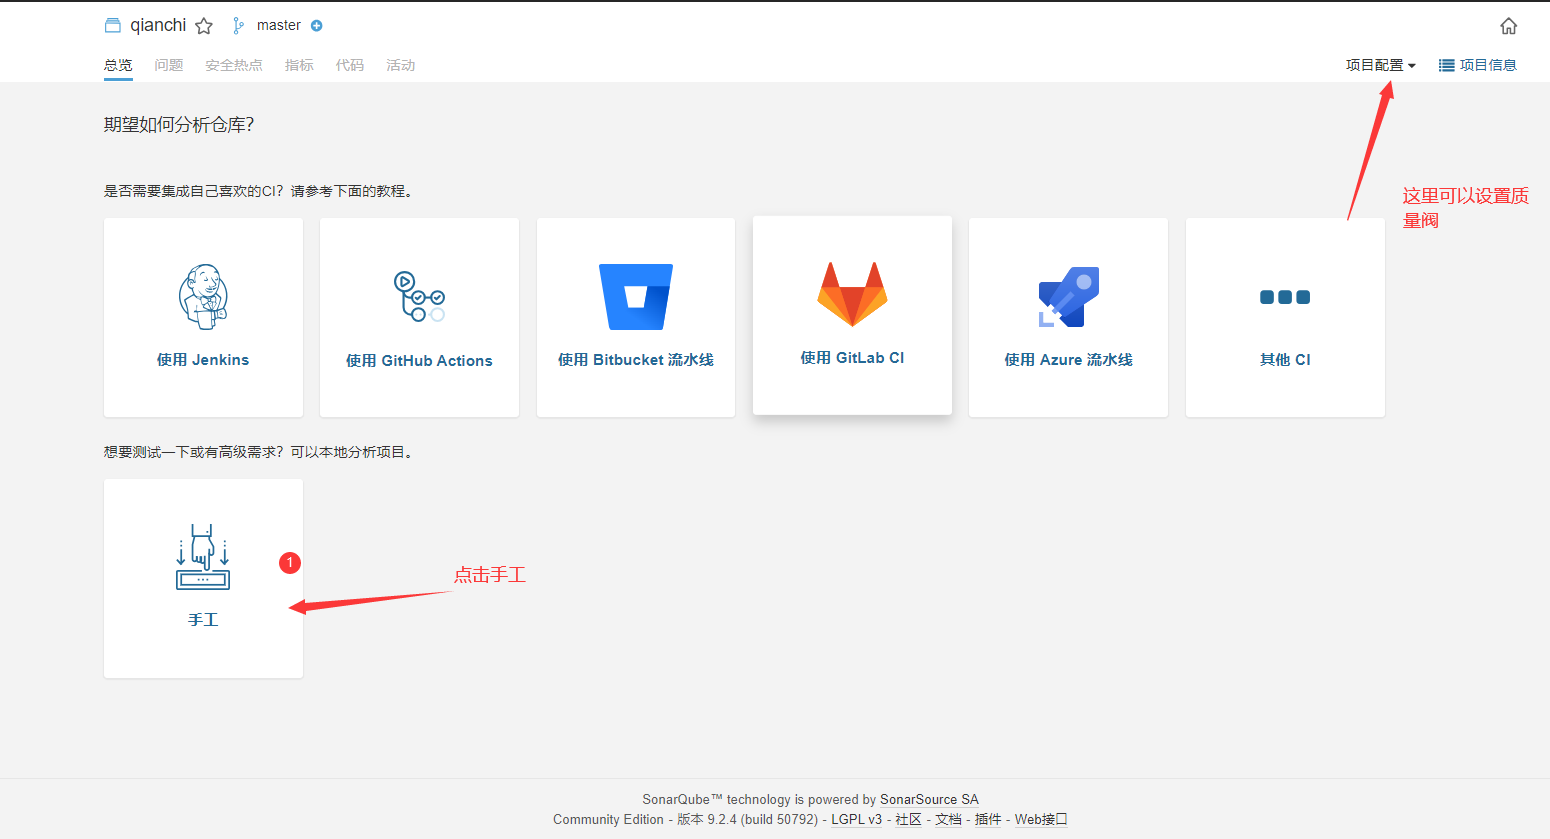
随便创建一个 sonarqube 项目
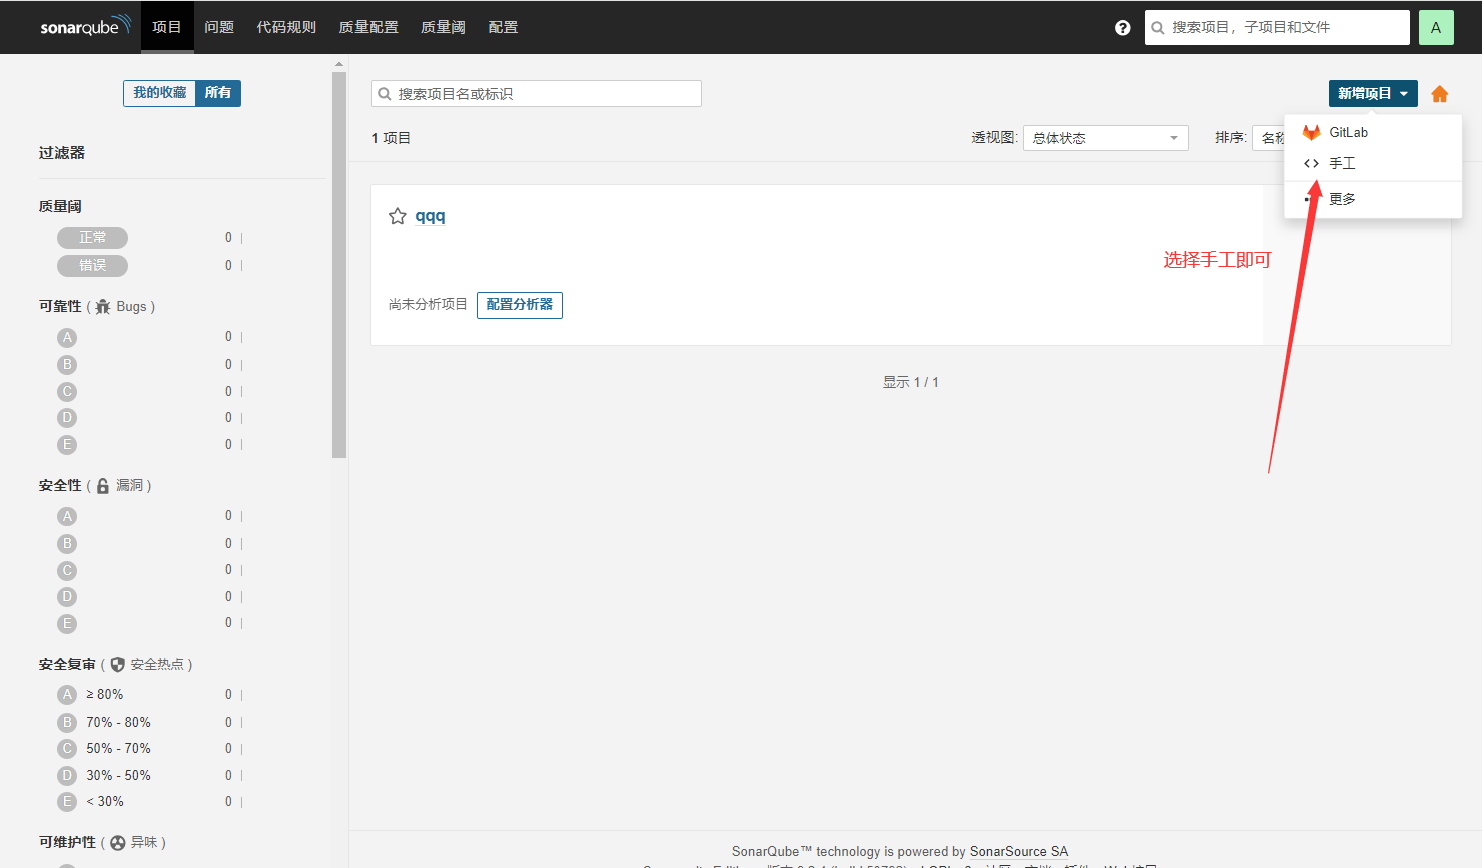
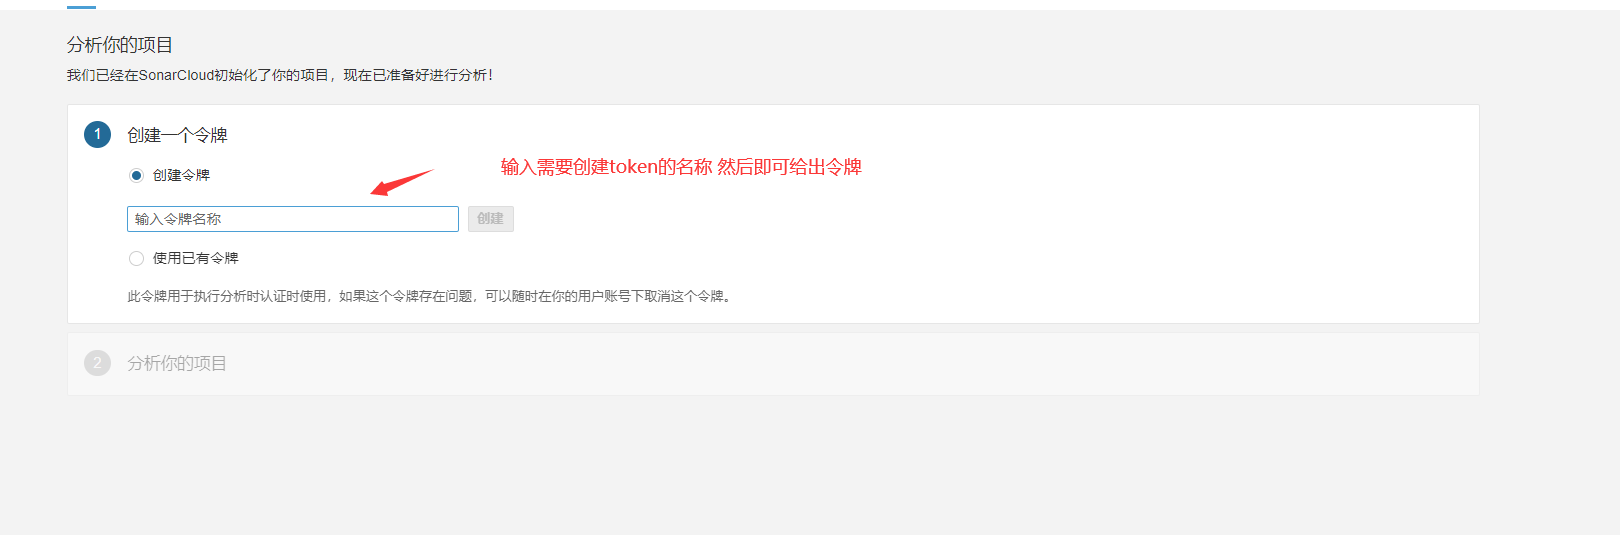
进入之后要设置名称 这里就不截图了 自己输入即可。然后进入如下界面
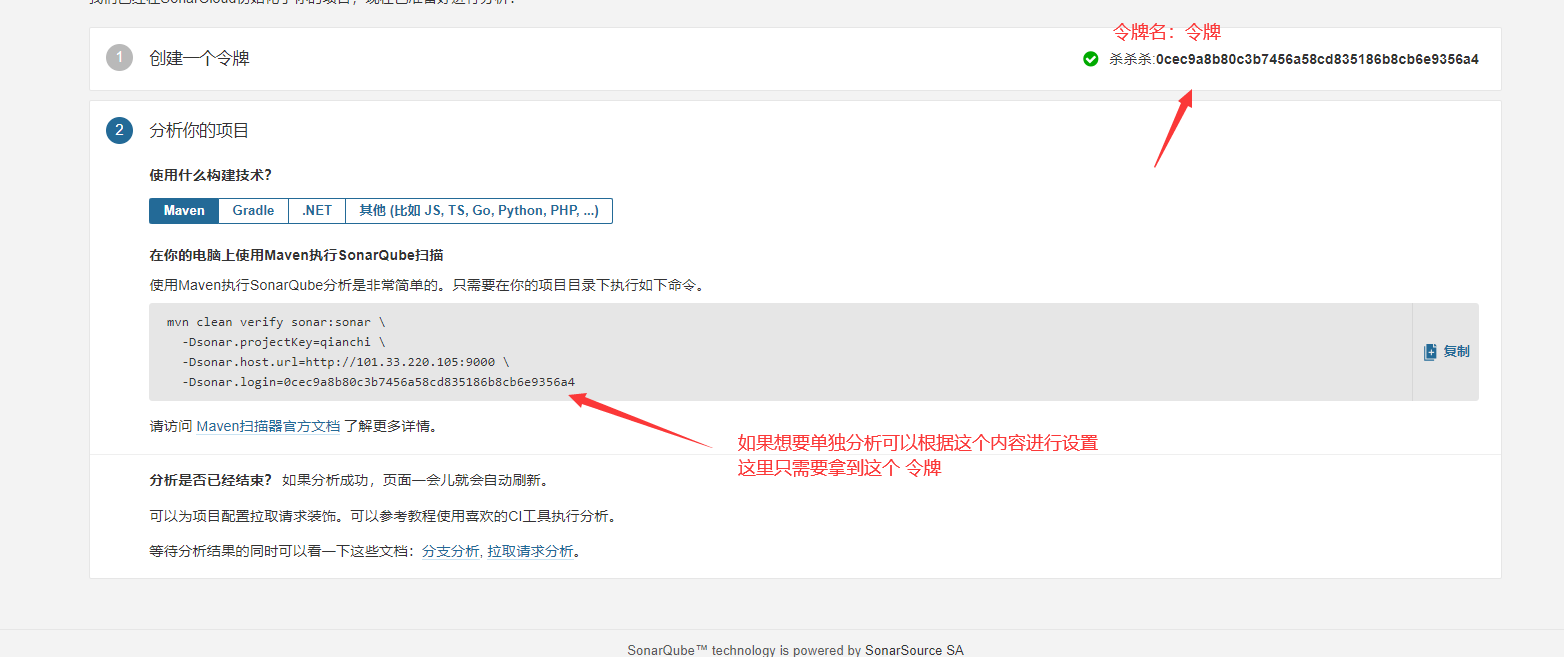
杀杀杀: 0cec9a8b80c3b7456a58cd835186b8cb6e9356a4
完成!
(三)配置sonarqube 设置质量阀
前边两步 在gitlab 中设置了扫描器以及钩子脚本文件 ,现在需要设置阻断规则,将不符合代码规则的内容进行阻断。通过质量阀来实现
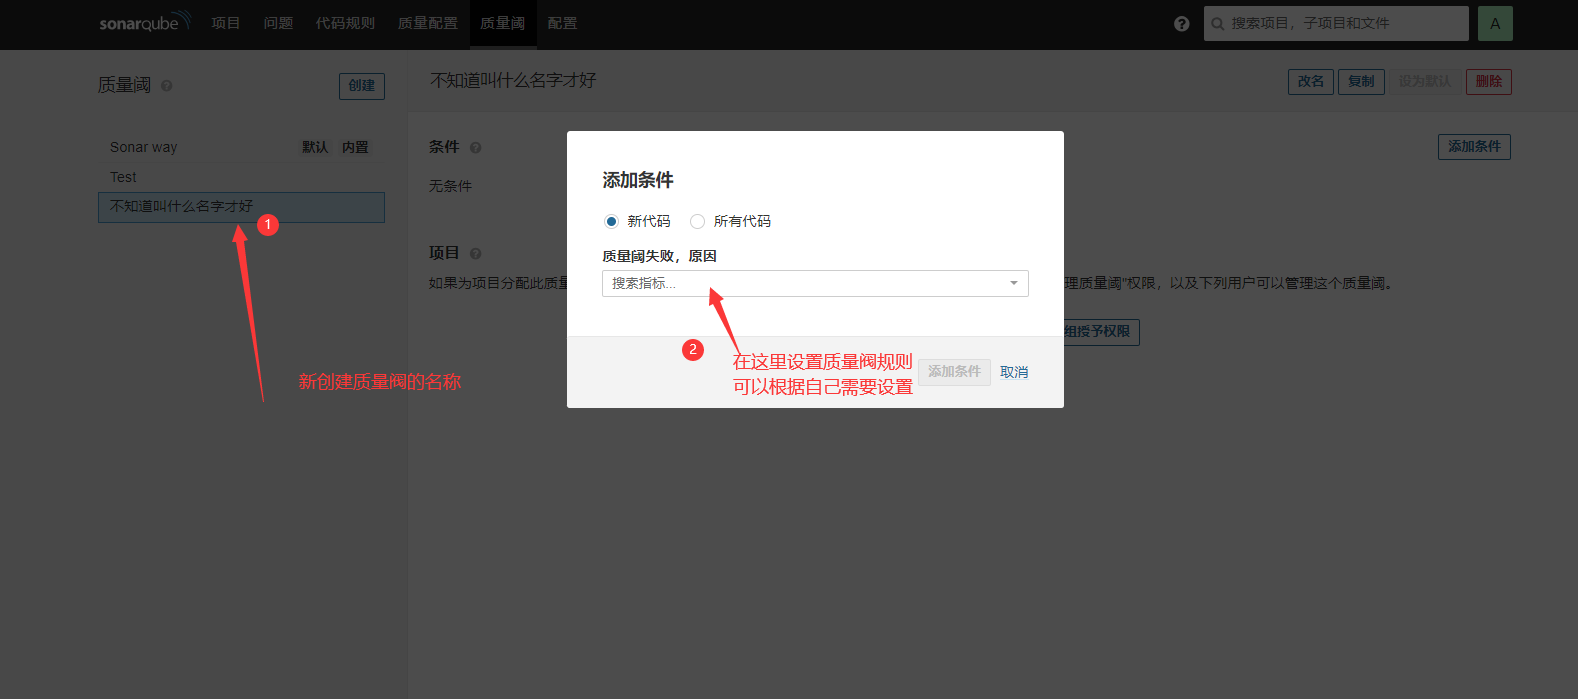
1.首先创建质量阀
(先进行规则配置一样的)
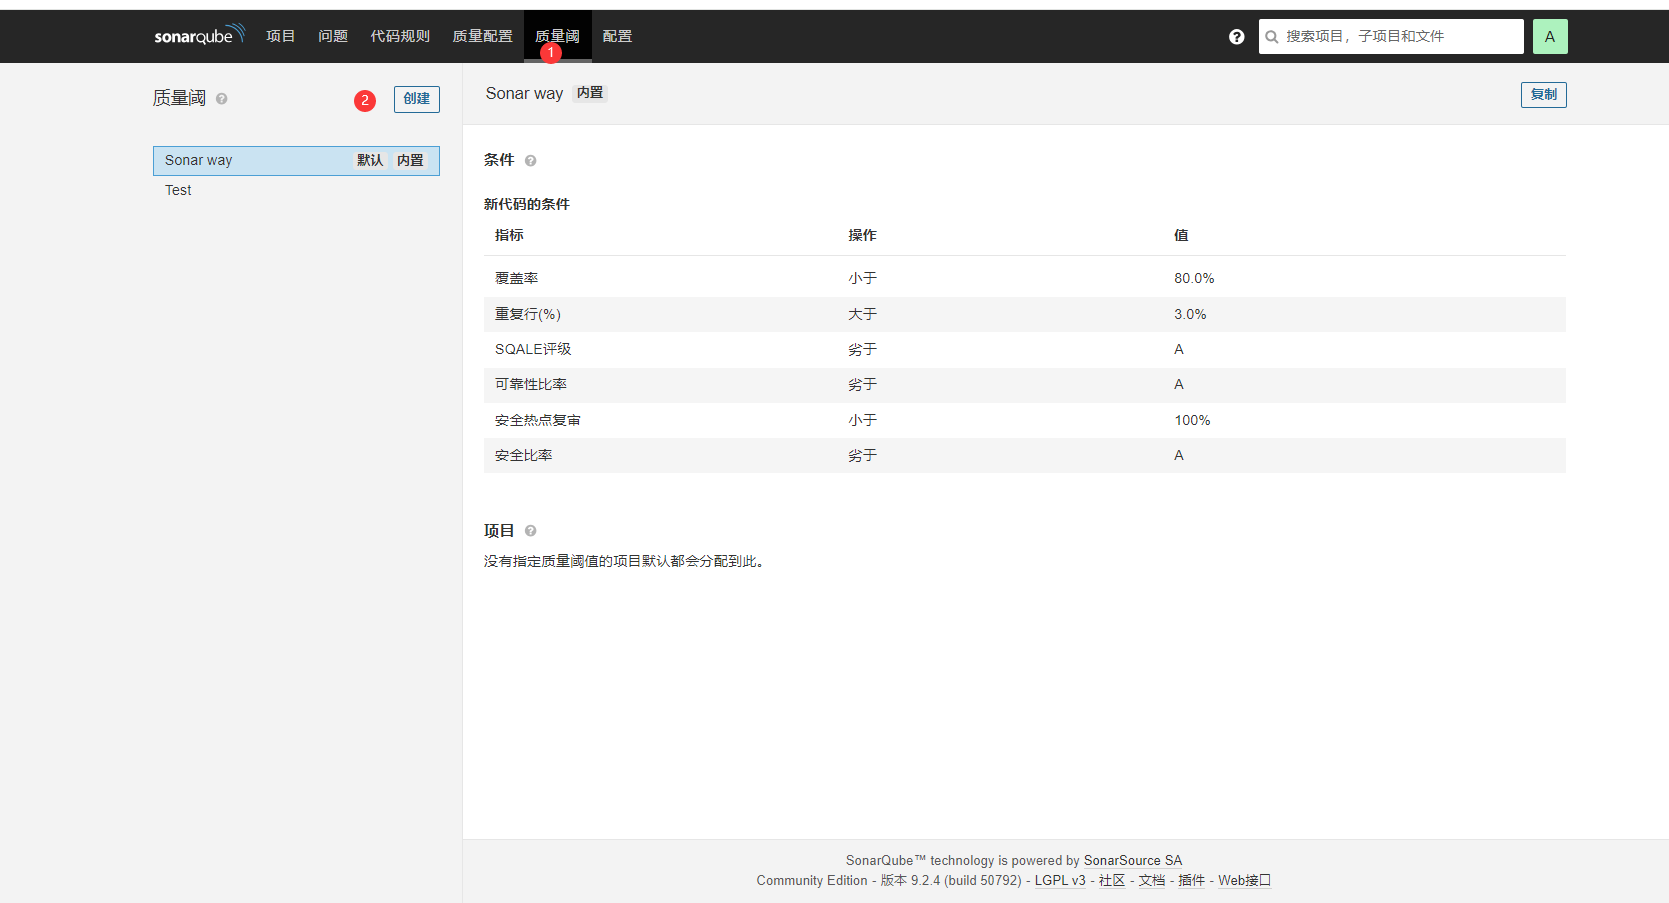
需要设置一个质量阀名称 ,设置好之后设置质量阀内容
 我这里设置 只要出现阻断问题就会阻断提交
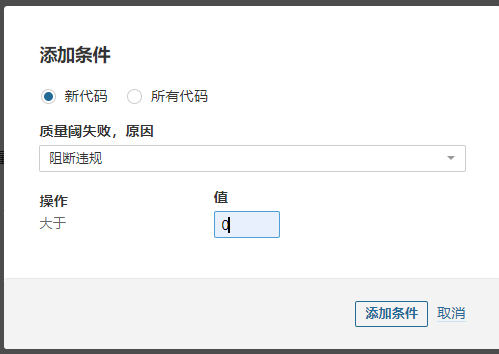
然后添加条件。这里质量阀就设置完成了 。质量阀就相当于是一个门禁,只要符合规则的就让过去,不符合规则的就不让过去,那么这个规则 是什么呢,下面进行规则设置
2.规则配置
因为我们没有选择继承规则,也没有复制默认的规则,现在这个里边没有任何规则,需要我们自己添加规则。
点击更多激活规则 以p3c 规则(这个规sonar是没有的 需要添加插件 参考 《六 (三)》)为例,可以自己选的,想要什么规则就直接激活即可,然后规则的严重程度(是否能通过门禁)也是可以自己设置的。
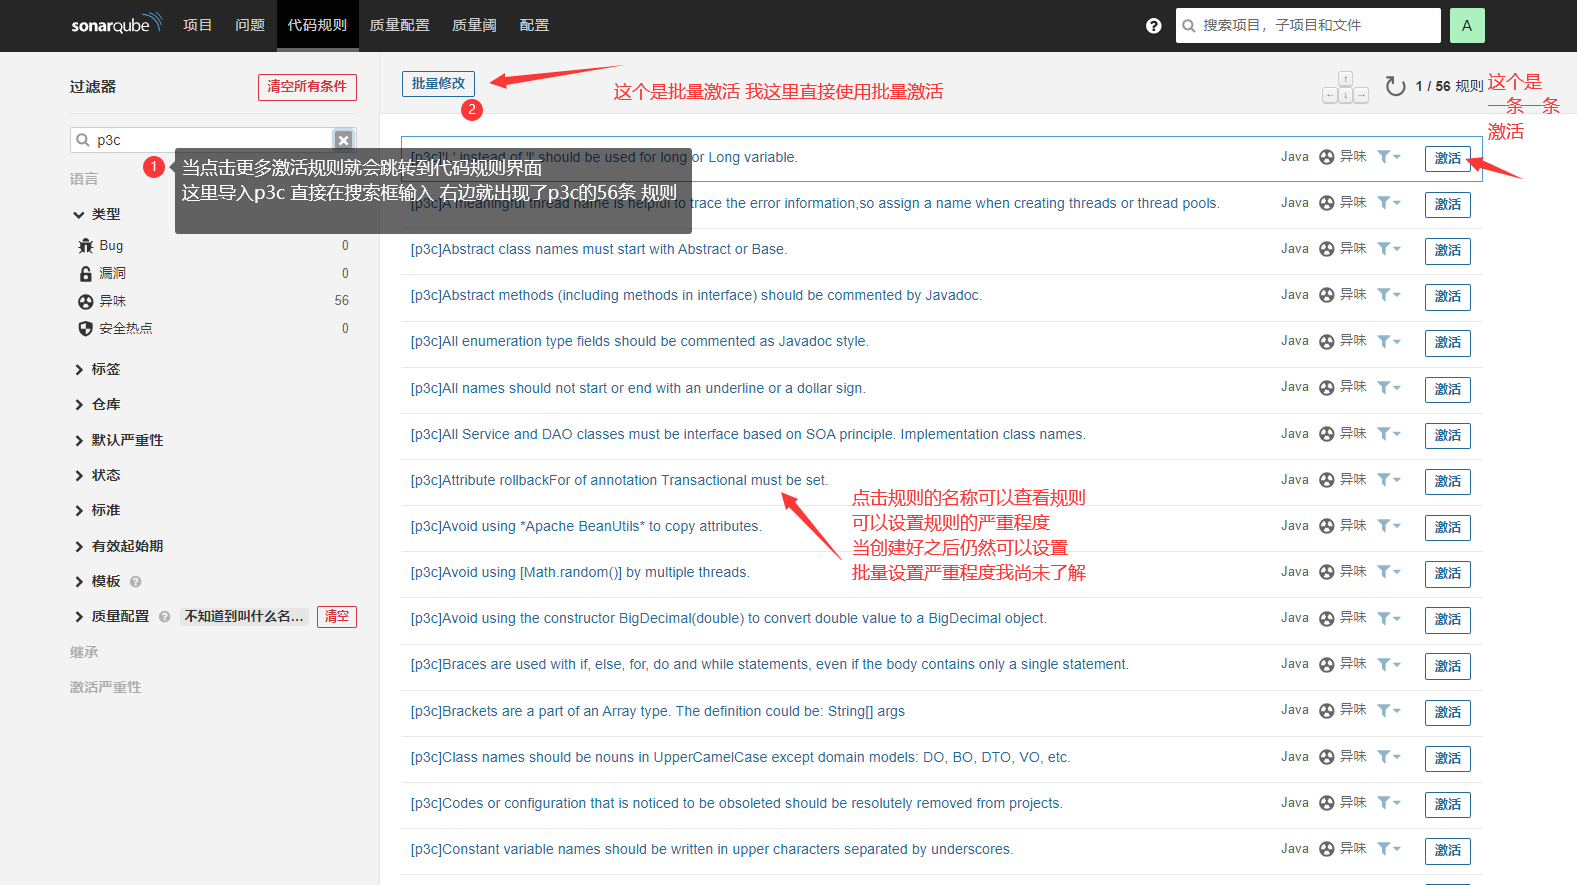
激活之后才可以设置规则严重程度 这里就不做展示了。可以点刚创建的规则,然后点击想要修改的规则严重程度 修改即可
完成上述步骤之后,将刚刚找到刚刚创建的规则,设置为默认规则
现在 门禁有了,门禁卡也有了,只剩下了将这些 东西配置到自己的项目中了
3.为项目配置质量阀和规则
**PS:**这里存在一个问题,就是如果你不提交代码,就不会执行 那个钩子脚本,不执行钩子脚本 sonarqube 就没有那个项目 没有那个项目就不能在sonarqube web端设置规则和质量阀 我个人的解决方案是不管对错或者说先交一个不会影响的内容,然后再把他删掉,或者交一个一定对的,这样就可以执行钩子了。然后sonarqube就会进行分析。然后就有这个项目了。这算一个坑吧,我这里是没有解决,因为我以为gitlab 已经关联上 sonarqube 的项目了 ,sonarqube上直接有,但我实际操作发现并不是这样的,暂时只能留下来把。下面针对的是sonarqube 上已经有gitlab 的项目的情况,没有如果没有好办法就按照我的笨方法先交一下。
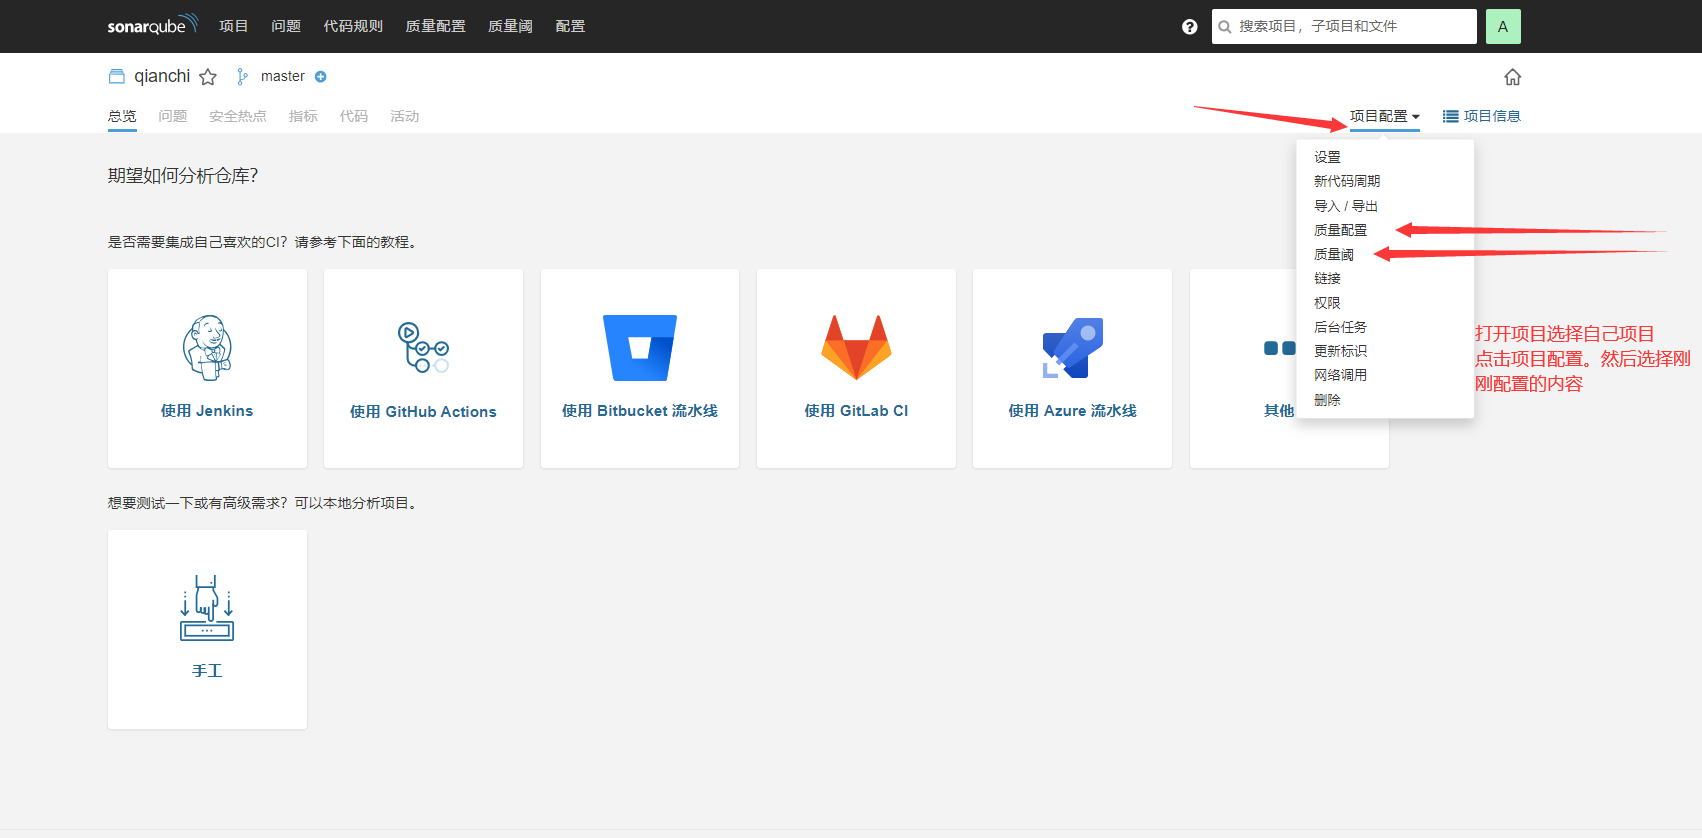
配置质量阀

配置规则
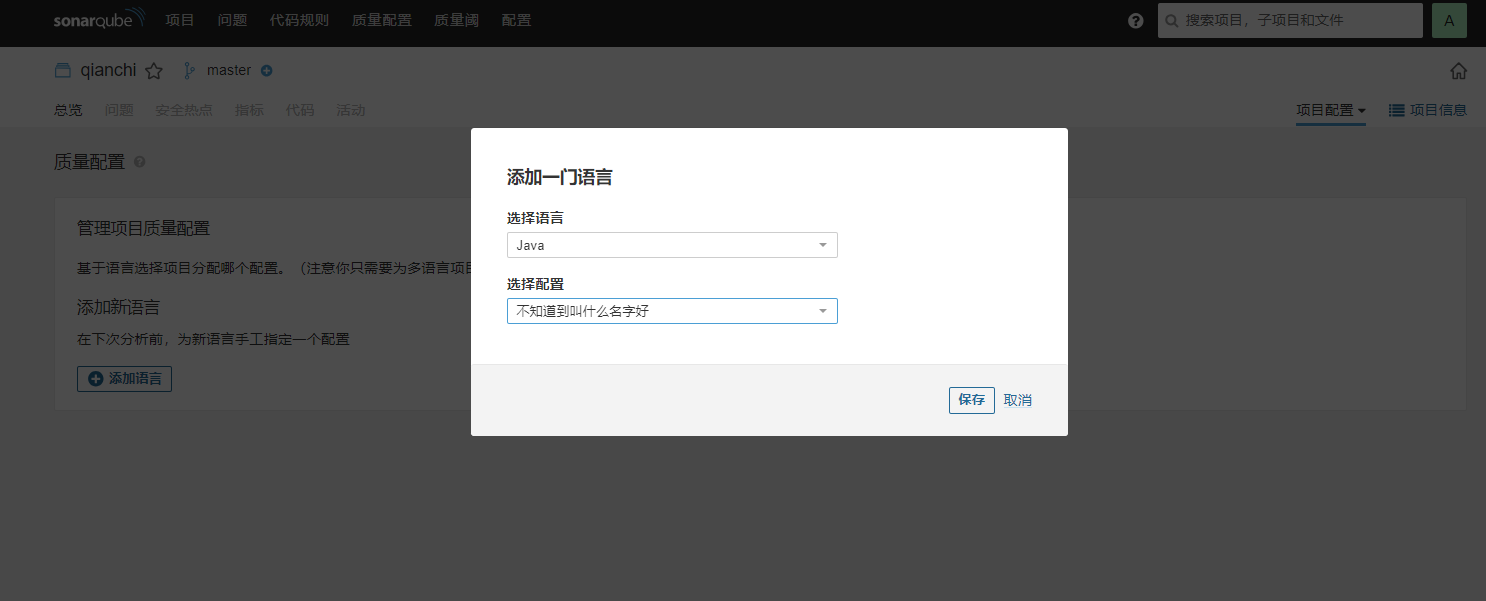
保存,然后idea 提交代码的时候就会进行阻断啦
(四)测试
1.提交正确代码
先提交了一份没有问题的代码,里边什么也没有只有 maven 项目的默认内容, 提交, 正常使用 ,也进行了代码检测。其中,在脚本语言中 扫描的是有新添加内容的代码块,只有一个文件类文件。
git 控制台会打印如下信息。
Total 9 (delta 2), reused 0 (delta 0), pack-reused 0
remote: 开始代码扫描...
remote: git版本是:git version 2.44.1.gl1
remote: 当前路径是:/var/opt/gitlab/git-data/repositories/@hashed/4e/07/4e07408562bedb8b60ce05c1decfe3ad16b72230967de01f640b7e4729b49fce.git
remote: 当前账户是:git
remote: 旧修订ID:f4492e7c5ac159aeccfdb3b1ad39eee2f9e4ed15
remote: 新修订ID:26fedb01dfdb0342cd37cb015b9057aa4d308f17
remote: 当前项目:qianchi1/mylastprogram
remote: 项目名称:mylastprogram
remote: 当前分支:refs/heads/master
remote: 分支名称:master
remote: 进入临时文件夹
remote: /var/opt/gitlab/git-data/repositories/@hashed/4e/07/4e07408562bedb8b60ce05c1decfe3ad16b72230967de01f640b7e4729b49fce.git/tmp
remote: INFO: Scanner configuration file: /usr/local/sonar-scanner/conf/sonar-scanner.properties
remote: INFO: Project root configuration file: NONE
remote: INFO: SonarQube Scanner 4.2.0.1873
remote: INFO: Java 11.0.3 AdoptOpenJDK (64-bit)
remote: INFO: Linux 3.10.0-1160.el7.x86_64 amd64
remote: INFO: User cache: /var/opt/gitlab/git-data/repositories/@hashed/4e/07/4e07408562bedb8b60ce05c1decfe3ad16b72230967de01f640b7e4729b49fce.git/sonar/cache
remote: INFO: SonarQube server 9.2.4
remote: INFO: Default locale: "en_US", source code encoding: "UTF-8"
remote: INFO: Load global settings
remote: INFO: Load global settings (done) | time=1163ms
remote: INFO: Server id: 46AF5D23-AZAQxKHWhqPhYLrsUKY2
remote: INFO: User cache: /var/opt/gitlab/git-data/repositories/@hashed/4e/07/4e07408562bedb8b60ce05c1decfe3ad16b72230967de01f640b7e4729b49fce.git/sonar/cache
remote: INFO: Load/download plugins
remote: INFO: Load plugins index
remote: INFO: Load plugins index (done) | time=1021ms
remote: INFO: Plugin [l10nzh] defines 'l10nen' as base plugin. This metadata can be removed from manifest of l10n plugins since version 5.2.
remote: INFO: Load/download plugins (done) | time=33953ms
remote: INFO: Process project properties
remote: INFO: Process project properties (done) | time=0ms
remote: INFO: Execute project builders
remote: INFO: Execute project builders (done) | time=1ms
remote: INFO: Project key: mylastprogram
remote: INFO: Base dir: /var/opt/gitlab/git-data/repositories/@hashed/4e/07/4e07408562bedb8b60ce05c1decfe3ad16b72230967de01f640b7e4729b49fce.git/tmp
remote: INFO: Working dir: /var/opt/gitlab/git-data/repositories/@hashed/4e/07/4e07408562bedb8b60ce05c1decfe3ad16b72230967de01f640b7e4729b49fce.git/tmp/.scannerwork
remote: INFO: Load project settings for component key: 'mylastprogram'
remote: INFO: Load project branches
remote: INFO: Load project branches (done) | time=36ms
remote: INFO: Load project pull requests
remote: INFO: Load project pull requests (done) | time=48ms
remote: INFO: Load branch configuration
remote: INFO: Load branch configuration (done) | time=1ms
remote: INFO: Load quality profiles
remote: INFO: Load quality profiles (done) | time=379ms
remote: INFO: Load active rules
remote: INFO: Load active rules (done) | time=16148ms
remote: INFO: Branch name: master
remote: INFO: Indexing files...
remote: INFO: Project configuration:
remote: INFO: 1 file indexed
remote: INFO: Quality profile for java: Test
remote: INFO: ------------- Run sensors on module mylastprogram
remote: INFO: Load metrics repository
remote: INFO: Load metrics repository (done) | time=440ms
remote: INFO: Sensor JavaSensor [java]
remote: INFO: Configured Java source version (sonar.java.source): none
remote: INFO: JavaClasspath initialization
remote: INFO: JavaClasspath initialization (done) | time=31ms
remote: INFO: JavaTestClasspath initialization
remote: INFO: JavaTestClasspath initialization (done) | time=0ms
remote: INFO: Java "Main" source files AST scan
remote: INFO: 1 source file to be analyzed
remote: INFO: Load project repositories
remote: INFO: Load project repositories (done) | time=4ms
remote: INFO: 1/1 source file has been analyzed
remote: WARN: Dependencies/libraries were not provided for analysis of SOURCE files. The 'sonar.java.libraries' property is empty. Verify your configuration, as you might end up with less precise results.
remote: WARN: Unresolved imports/types have been detected during analysis. Enable DEBUG mode to see them.
remote: INFO: Java "Main" source files AST scan (done) | time=6029ms
remote: INFO: No "Test" source files to scan.
remote: INFO: No "Generated" source files to scan.
remote: INFO: Sensor JavaSensor [java] (done) | time=6649ms
remote: INFO: Sensor PmdSensor [pmd]
remote: INFO: Execute PMD 6.15.0
remote: INFO: Java version: 1.6
remote: INFO: PMD configuration: /var/opt/gitlab/git-data/repositories/@hashed/4e/07/4e07408562bedb8b60ce05c1decfe3ad16b72230967de01f640b7e4729b49fce.git/tmp/.scannerwork/pmd.xml
remote: INFO: Execute PMD 6.15.0 (done) | time=703ms
remote: INFO: Sensor PmdSensor [pmd] (done) | time=704ms
remote: INFO: Sensor JaCoCo XML Report Importer [jacoco]
remote: INFO: 'sonar.coverage.jacoco.xmlReportPaths' is not defined. Using default locations: target/site/jacoco/jacoco.xml,target/site/jacoco-it/jacoco.xml,build/reports/jacoco/test/jacocoTestReport.xml
remote: INFO: No report imported, no coverage information will be imported by JaCoCo XML Report Importer
remote: INFO: Sensor JaCoCo XML Report Importer [jacoco] (done) | time=2ms
remote: INFO: Sensor CSS Rules [javascript]
remote: INFO: No CSS, PHP, HTML or VueJS files are found in the project. CSS analysis is skipped.
remote: INFO: Sensor CSS Rules [javascript] (done) | time=0ms
remote: INFO: Sensor C# Project Type Information [csharp]
remote: INFO: Sensor C# Project Type Information [csharp] (done) | time=0ms
remote: INFO: Sensor C# Analysis Log [csharp]
remote: INFO: Sensor C# Analysis Log [csharp] (done) | time=38ms
remote: INFO: Sensor C# Properties [csharp]
remote: INFO: Sensor C# Properties [csharp] (done) | time=0ms
remote: INFO: Sensor SurefireSensor [java]
remote: INFO: parsing [/var/opt/gitlab/git-data/repositories/@hashed/4e/07/4e07408562bedb8b60ce05c1decfe3ad16b72230967de01f640b7e4729b49fce.git/tmp/target/surefire-reports]
remote: INFO: Sensor SurefireSensor [java] (done) | time=1ms
remote: INFO: Sensor HTML [web]
remote: INFO: Sensor HTML [web] (done) | time=4ms
remote: INFO: Sensor VB.NET Project Type Information [vbnet]
remote: INFO: Sensor VB.NET Project Type Information [vbnet] (done) | time=0ms
remote: INFO: Sensor VB.NET Analysis Log [vbnet]
remote: INFO: Sensor VB.NET Analysis Log [vbnet] (done) | time=36ms
remote: INFO: Sensor VB.NET Properties [vbnet]
remote: INFO: Sensor VB.NET Properties [vbnet] (done) | time=0ms
remote: INFO: Sensor com.github.mc1arke.sonarqube.plugin.scanner.ScannerPullRequestPropertySensor
remote: INFO: Sensor com.github.mc1arke.sonarqube.plugin.scanner.ScannerPullRequestPropertySensor (done) | time=1ms
remote: INFO: ------------- Run sensors on project
remote: INFO: Sensor Zero Coverage Sensor
remote: INFO: Sensor Zero Coverage Sensor (done) | time=50ms
remote: INFO: Sensor Java CPD Block Indexer
remote: INFO: Sensor Java CPD Block Indexer (done) | time=7ms
remote: INFO: SCM Publisher is disabled
remote: INFO: CPD Executor 1 file had no CPD blocks
remote: INFO: CPD Executor Calculating CPD for 0 files
remote: INFO: CPD Executor CPD calculation finished (done) | time=0ms
remote: INFO: Analysis report generated in 406ms, dir size=85.9 kB
remote: INFO: Analysis report compressed in 76ms, zip size=12.6 kB
remote: INFO: Analysis report uploaded in 8388ms
remote: INFO: ANALYSIS SUCCESSFUL, you can browse http://192.168.88.15:9000/dashboard?id=mylastprogram&branch=master
remote: INFO: Note that you will be able to access the updated dashboard once the server has processed the submitted analysis report
remote: INFO: More about the report processing at http://192.168.88.15:9000/api/ce/task?id=AZB2qVaeQq2zQIhR6n61
remote: INFO: Analysis total time: 40.020 s
remote: INFO: ------------------------------------------------------------------------
remote: INFO: EXECUTION SUCCESS
remote: INFO: ------------------------------------------------------------------------
remote: INFO: Total time: 1:42.960s
remote: INFO: Final Memory: 16M/89M
remote: INFO: ------------------------------------------------------------------------
remote:   % Total    % Received % Xferd  Average Speed   Time    Time     Time  Current
remote:                                  Dload  Upload   Total   Spent    Left  Speed
remote:
remote:   0     0    0     0    0     0      0      0 --:--:-- --:--:-- --:--:--     0
remote: 100    64  100    64    0     0    337      0 --:--:-- --:--:-- --:--:--   336
remote: 100    64  100    64    0     0    336      0 --:--:-- --:--:-- --:--:--   336
remote: 代码检测结果"NONE"
remote: 删除临时文件夹
remote: 代码检测成功,进入仓库
To 192.168.88.16:qianchi1/mylastprogram.git
 	refs/heads/master:refs/heads/master	f4492e7..26fedb0
Done

2.提交错误代码
提交带有错误的文件 ,设置的错误为 小写 Long 型 ”l“ Long warn = 1l; 提交 发现进行了阻断
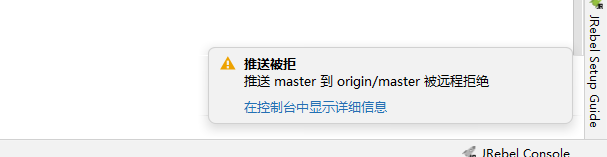
在 git 控制台中可以看到如下内容
Enumerating objects: 17, done.
Counting objects:   5% (1/17)
Counting objects:  11% (2/17)
Counting objects:  17% (3/17)
Counting objects:  23% (4/17)
Counting objects:  29% (5/17)
Counting objects:  35% (6/17)
Counting objects:  41% (7/17)
Counting objects:  47% (8/17)
Counting objects:  52% (9/17)
Counting objects:  58% (10/17)
Counting objects:  64% (11/17)
Counting objects:  70% (12/17)
Counting objects:  76% (13/17)
Counting objects:  82% (14/17)
Counting objects:  88% (15/17)
Counting objects:  94% (16/17)
Counting objects: 100% (17/17)
Counting objects: 100% (17/17), done.
Delta compression using up to 8 threads
Compressing objects:  16% (1/6)
Compressing objects:  33% (2/6)
Compressing objects:  50% (3/6)
Compressing objects:  66% (4/6)
Compressing objects:  83% (5/6)
Compressing objects: 100% (6/6)
Compressing objects: 100% (6/6), done.
Writing objects:  11% (1/9)
Writing objects:  22% (2/9)
Writing objects:  33% (3/9)
Writing objects:  44% (4/9)
Writing objects:  55% (5/9)
Writing objects:  66% (6/9)
Writing objects:  77% (7/9)
Writing objects:  88% (8/9)
Writing objects: 100% (9/9)
Writing objects: 100% (9/9), 659 bytes | 329.00 KiB/s, done.
Total 9 (delta 2), reused 0 (delta 0), pack-reused 0
remote: 开始代码扫描...
remote: git版本是:git version 2.44.1.gl1
remote: 当前路径是:/var/opt/gitlab/git-data/repositories/@hashed/4e/07/4e07408562bedb8b60ce05c1decfe3ad16b72230967de01f640b7e4729b49fce.git
remote: 当前账户是:git
remote: 旧修订ID:cf3f50e108b20d64a6bba212b1d136d96023017c
remote: 新修订ID:495824e7143471ea82c91db1407f3b40f718f528
remote: 当前项目:qianchi1/mylastprogram
remote: 项目名称:mylastprogram
remote: 当前分支:refs/heads/master
remote: 分支名称:master
remote: 进入临时文件夹
remote: /var/opt/gitlab/git-data/repositories/@hashed/4e/07/4e07408562bedb8b60ce05c1decfe3ad16b72230967de01f640b7e4729b49fce.git/tmp
remote: INFO: Scanner configuration file: /usr/local/sonar-scanner/conf/sonar-scanner.properties
remote: INFO: Project root configuration file: NONE
remote: INFO: SonarQube Scanner 4.2.0.1873
remote: INFO: Java 11.0.3 AdoptOpenJDK (64-bit)
remote: INFO: Linux 3.10.0-1160.el7.x86_64 amd64
remote: INFO: User cache: /var/opt/gitlab/git-data/repositories/@hashed/4e/07/4e07408562bedb8b60ce05c1decfe3ad16b72230967de01f640b7e4729b49fce.git/sonar/cache
remote: INFO: SonarQube server 9.2.4
remote: INFO: Default locale: "en_US", source code encoding: "UTF-8"
remote: INFO: Load global settings
remote: INFO: Load global settings (done) | time=487ms
remote: INFO: Server id: 46AF5D23-AZAQxKHWhqPhYLrsUKY2
remote: INFO: User cache: /var/opt/gitlab/git-data/repositories/@hashed/4e/07/4e07408562bedb8b60ce05c1decfe3ad16b72230967de01f640b7e4729b49fce.git/sonar/cache
remote: INFO: Load/download plugins
remote: INFO: Load plugins index
remote: INFO: Load plugins index (done) | time=167ms
remote: INFO: Plugin [l10nzh] defines 'l10nen' as base plugin. This metadata can be removed from manifest of l10n plugins since version 5.2.
remote: INFO: Load/download plugins (done) | time=377ms
remote: INFO: Process project properties
remote: INFO: Process project properties (done) | time=0ms
remote: INFO: Execute project builders
remote: INFO: Execute project builders (done) | time=1ms
remote: INFO: Project key: mylastprogram
remote: INFO: Base dir: /var/opt/gitlab/git-data/repositories/@hashed/4e/07/4e07408562bedb8b60ce05c1decfe3ad16b72230967de01f640b7e4729b49fce.git/tmp
remote: INFO: Working dir: /var/opt/gitlab/git-data/repositories/@hashed/4e/07/4e07408562bedb8b60ce05c1decfe3ad16b72230967de01f640b7e4729b49fce.git/tmp/.scannerwork
remote: INFO: Load project settings for component key: 'mylastprogram'
remote: INFO: Load project settings for component key: 'mylastprogram' (done) | time=26ms
remote: INFO: Load project branches
remote: INFO: Load project branches (done) | time=583ms
remote: INFO: Load project pull requests
remote: INFO: Load project pull requests (done) | time=104ms
remote: INFO: Load branch configuration
remote: INFO: Load branch configuration (done) | time=56ms
remote: INFO: Load quality profiles
remote: INFO: Load quality profiles (done) | time=76ms
remote: INFO: Load active rules
remote: INFO: Load active rules (done) | time=5710ms
remote: INFO: Branch name: master
remote: INFO: Indexing files...
remote: INFO: Project configuration:
remote: INFO: 1 file indexed
remote: INFO: Quality profile for java: Test
remote: INFO: ------------- Run sensors on module mylastprogram
remote: INFO: Load metrics repository
remote: INFO: Load metrics repository (done) | time=67ms
remote: INFO: Sensor JavaSensor [java]
remote: INFO: Configured Java source version (sonar.java.source): none
remote: INFO: JavaClasspath initialization
remote: INFO: JavaClasspath initialization (done) | time=65ms
remote: INFO: JavaTestClasspath initialization
remote: INFO: JavaTestClasspath initialization (done) | time=1ms
remote: INFO: Java "Main" source files AST scan
remote: INFO: 1 source file to be analyzed
remote: INFO: Load project repositories
remote: INFO: Load project repositories (done) | time=26ms
remote: INFO: 1/1 source file has been analyzed
remote: WARN: Dependencies/libraries were not provided for analysis of SOURCE files. The 'sonar.java.libraries' property is empty. Verify your configuration, as you might end up with less precise results.
remote: WARN: Unresolved imports/types have been detected during analysis. Enable DEBUG mode to see them.
remote: INFO: Java "Main" source files AST scan (done) | time=1720ms
remote: INFO: No "Test" source files to scan.
remote: INFO: No "Generated" source files to scan.
remote: INFO: Sensor JavaSensor [java] (done) | time=2656ms
remote: INFO: Sensor PmdSensor [pmd]
remote: INFO: Execute PMD 6.15.0
remote: INFO: Java version: 1.6
remote: INFO: PMD configuration: /var/opt/gitlab/git-data/repositories/@hashed/4e/07/4e07408562bedb8b60ce05c1decfe3ad16b72230967de01f640b7e4729b49fce.git/tmp/.scannerwork/pmd.xml
remote: INFO: Execute PMD 6.15.0 (done) | time=330ms
remote: INFO: Sensor PmdSensor [pmd] (done) | time=377ms
remote: INFO: Sensor JaCoCo XML Report Importer [jacoco]
remote: INFO: 'sonar.coverage.jacoco.xmlReportPaths' is not defined. Using default locations: target/site/jacoco/jacoco.xml,target/site/jacoco-it/jacoco.xml,build/reports/jacoco/test/jacocoTestReport.xml
remote: INFO: No report imported, no coverage information will be imported by JaCoCo XML Report Importer
remote: INFO: Sensor JaCoCo XML Report Importer [jacoco] (done) | time=41ms
remote: INFO: Sensor CSS Rules [javascript]
remote: INFO: No CSS, PHP, HTML or VueJS files are found in the project. CSS analysis is skipped.
remote: INFO: Sensor CSS Rules [javascript] (done) | time=0ms
remote: INFO: Sensor C# Project Type Information [csharp]
remote: INFO: Sensor C# Project Type Information [csharp] (done) | time=1ms
remote: INFO: Sensor C# Analysis Log [csharp]
remote: INFO: Sensor C# Analysis Log [csharp] (done) | time=76ms
remote: INFO: Sensor C# Properties [csharp]
remote: INFO: Sensor C# Properties [csharp] (done) | time=1ms
remote: INFO: Sensor SurefireSensor [java]
remote: INFO: parsing [/var/opt/gitlab/git-data/repositories/@hashed/4e/07/4e07408562bedb8b60ce05c1decfe3ad16b72230967de01f640b7e4729b49fce.git/tmp/target/surefire-reports]
remote: INFO: Sensor SurefireSensor [java] (done) | time=1ms
remote: INFO: Sensor HTML [web]
remote: INFO: Sensor HTML [web] (done) | time=3ms
remote: INFO: Sensor VB.NET Project Type Information [vbnet]
remote: INFO: Sensor VB.NET Project Type Information [vbnet] (done) | time=0ms
remote: INFO: Sensor VB.NET Analysis Log [vbnet]
remote: INFO: Sensor VB.NET Analysis Log [vbnet] (done) | time=15ms
remote: INFO: Sensor VB.NET Properties [vbnet]
remote: INFO: Sensor VB.NET Properties [vbnet] (done) | time=0ms
remote: INFO: Sensor com.github.mc1arke.sonarqube.plugin.scanner.ScannerPullRequestPropertySensor
remote: INFO: Sensor com.github.mc1arke.sonarqube.plugin.scanner.ScannerPullRequestPropertySensor (done) | time=1ms
remote: INFO: ------------- Run sensors on project
remote: INFO: Sensor Zero Coverage Sensor
remote: INFO: Sensor Zero Coverage Sensor (done) | time=7ms
remote: INFO: Sensor Java CPD Block Indexer
remote: INFO: Sensor Java CPD Block Indexer (done) | time=20ms
remote: INFO: SCM Publisher is disabled
remote: INFO: CPD Executor Calculating CPD for 1 file
remote: INFO: CPD Executor CPD calculation finished (done) | time=20ms
remote: INFO: Load New Code definition
remote: INFO: Load New Code definition (done) | time=28ms
remote: INFO: Analysis report generated in 120ms, dir size=86.1 kB
remote: INFO: Analysis report compressed in 44ms, zip size=12.9 kB
remote: INFO: Analysis report uploaded in 43ms
remote: INFO: ANALYSIS SUCCESSFUL, you can browse http://192.168.88.15:9000/dashboard?id=mylastprogram&branch=master
remote: INFO: Note that you will be able to access the updated dashboard once the server has processed the submitted analysis report
remote: INFO: More about the report processing at http://192.168.88.15:9000/api/ce/task?id=AZB3XM1kQq2zQIhR6n7B
remote: INFO: Analysis total time: 18.010 s
remote: INFO: ------------------------------------------------------------------------
remote: INFO: EXECUTION SUCCESS
remote: INFO: ------------------------------------------------------------------------
remote: INFO: Total time: 23.675s
remote: INFO: Final Memory: 17M/89M
remote: INFO: ------------------------------------------------------------------------
remote:   % Total    % Received % Xferd  Average Speed   Time    Time     Time  Current
remote:                                  Dload  Upload   Total   Spent    Left  Speed
remote:
remote:   0     0    0     0    0     0      0      0 --:--:-- --:--:-- --:--:--     0
remote: 100   361  100   361    0     0  42636      0 --:--:-- --:--:-- --:--:-- 45125
remote: 代码检测结果"ERROR"
remote: 删除临时文件夹
remote: 代码检测失败,拒绝提交
error: failed to push some refs to '192.168.88.16:qianchi1/mylastprogram.git'
To 192.168.88.16:qianchi1/mylastprogram.git
!	refs/heads/master:refs/heads/master	[remote rejected] (pre-receive hook declined)
Done
在仓库中也未发现 代码仓库中存在 有相关问题的 代码段
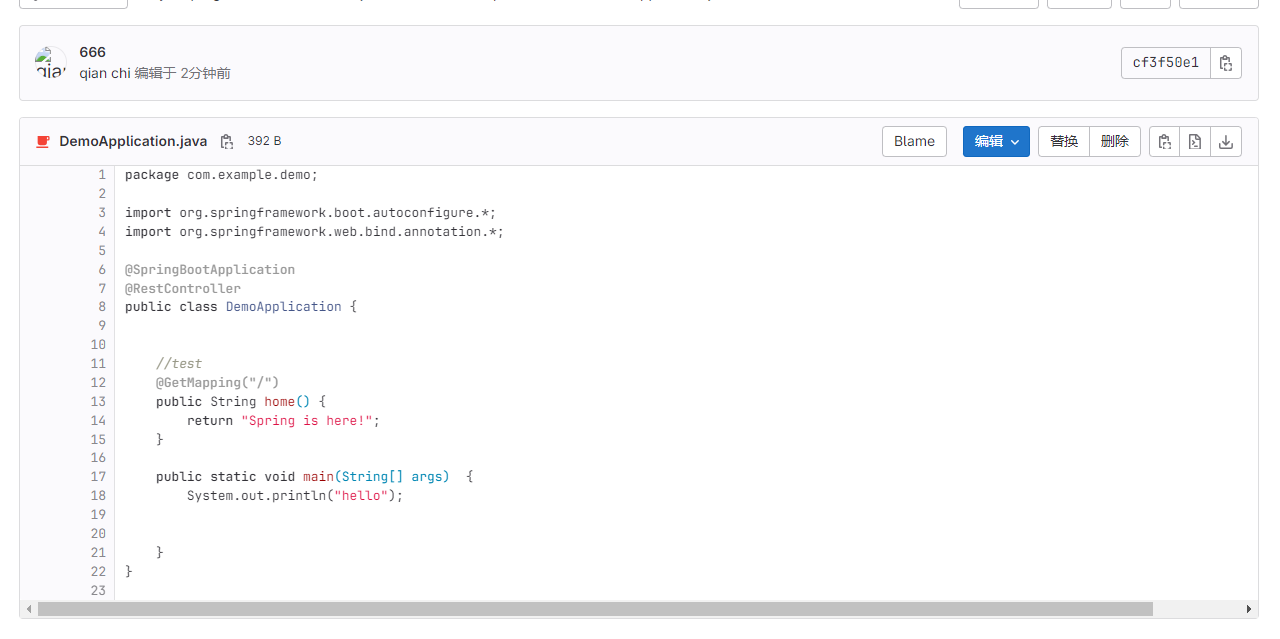
在 git 控制台 给出了网址 可以访问 进行查看 在sonarqube web端 也发现了提交内容的错误

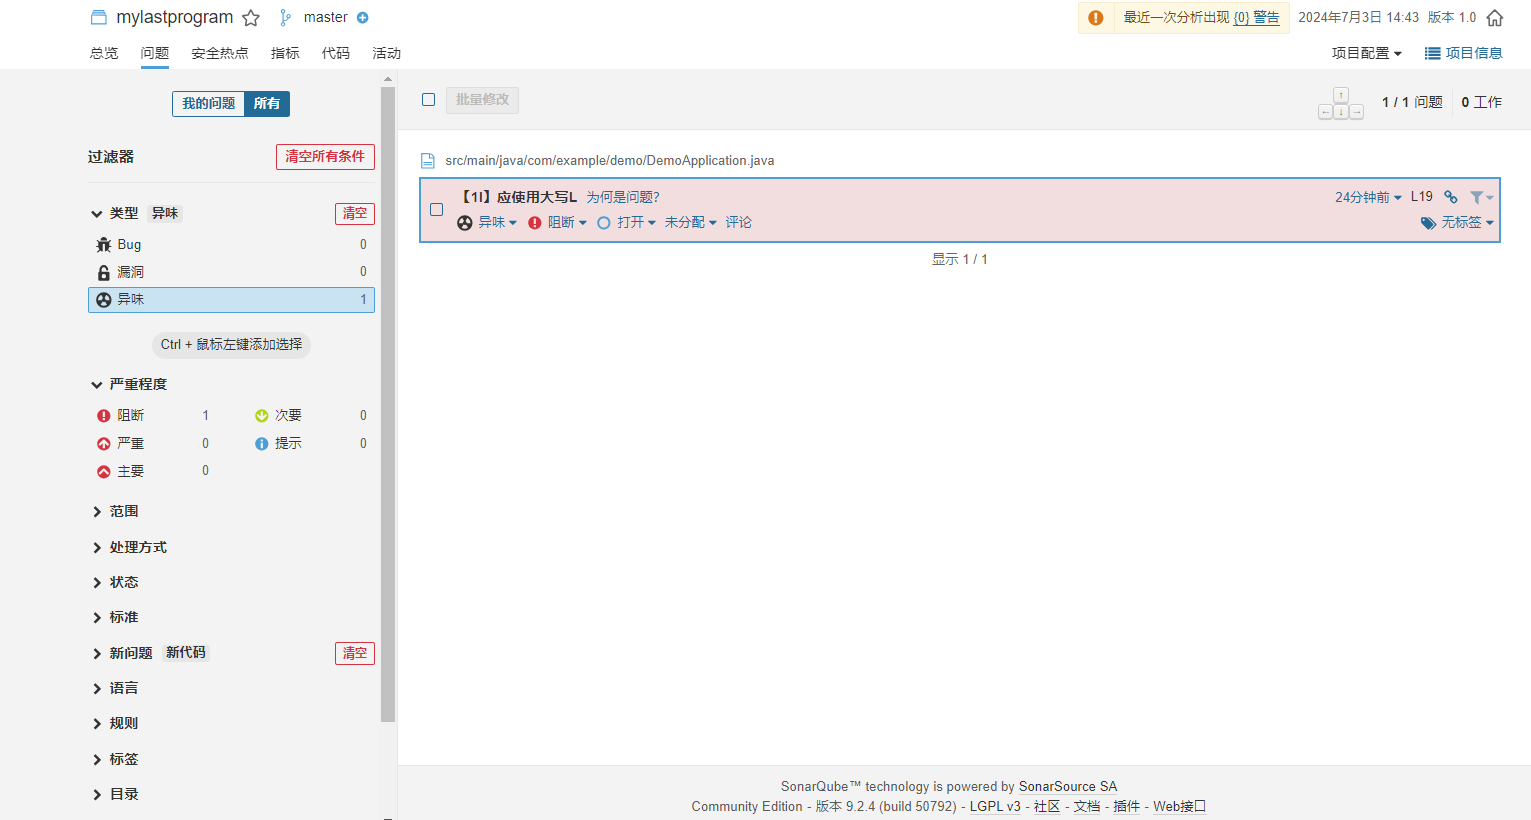
也进行了其他测试 ,这里就不赘述了,有需要自己探索。已知的是 支持多分支 提交。
八、问题及解决
(一)电脑重启后 无法访问 sonarqube
1.问题描述 : 电脑关机 /重启后 无法在浏览器端访问 sonarqube,在服务器上使用docker-compose up -d 命令显示没有配置文件

2.原因:疑似是权限的问题,因为修改文件权限就可解决 ,但本质上可能是docker的问题,具体原因未进行探究。待永久化解决。
3.解决方案:
首先 cd ~/sonarqube
然后 chmod 777 ./*
最后重新启动容器(先停止在启动)
成功
	docker-compose down
	docker-compose stop
docker-compose up -d
docker-compose start
上边的启动不了就用这个
`docker-compose -f docker-compose.yml up
(二)远程无法连接服务器 服务器报错
1.问题描述 :
远程无法访问 无法访问服务器
服务器报错
kernel:NMI watchdog: BUG: soft lockup - CPU#0 stuck for 21s! [server.rb:289:
2.原因 :内核死机,资源不足导致 cpu死锁 这里的原因应该是资源不足带不动 这么多东西
3.解决方案
echo 30 > /proc/sys/kernel/watchdog_thresh
查看
tail -1 /proc/sys/kernel/watchdog_thresh
30临时生效
sysctl -w kernel.watchdog_thresh=30
– 永久生效
echo 30 > /proc/sys/kernel/watchdog_thresh
– 临时生效
sysctl -w kernel.watchdog_thresh=30
可以通过修改/proc/sys/kernel/softlockup_thresh来修改超时的阈值
(三)服务器无法ping 其他以及外部环境
-
问题描述
服务器无法ping 同外环境 ping www.baidu.com 是 提示无法解析网址
-
原因 VMware 重启后 网络服务关闭
-
解决方案
首先重启 了 VmNet8 没有效果
然后
win + r
输入
services.msc
进入 服务 发现 vm net 相关的服务关闭 然后 将 vm 相关的服务打开 设置启动方式
解决
(四)服务部署在云端,注册域名之后无法访问 (默认80端口可以访问)
1.问题描述:部署在自己电脑上内存不足,导致电脑经常卡死,因此尝试将SonarQube部署在云端服务器上,申请了腾讯云的服务器,为了可以外部访问,申请了域名 ,但是可以正常访问80端口但是无法访问 9000端口所在的sonarqube 服务。
2.原因:
sonarqube 使用docker 部署 需要开启ipv4 转发
3.解决方案:
查看是否开启ipv4转发
sysctl net.ipv4.ip_forward
如果返回0,则代表关闭了ip路由转发
解决方法:
1、修改配置开启ipv4转发
vi /etc/sysctl.conf
修改net.ipv4.ip_forward=1 ,如果没有该值则单独添加一行,保存
2、应用修改配置
sysctl -p
使配置生效,正常应该返回一行包含net.ipv4.ip_forward=1
(五)设置好钩子阻断之后发现配置未生效
1.问题描述:设置好钩子阻断之后发现配置未生效,各个位置均为发现问题
2.原因: idea 加入了PMD 的插件 例如:alibaba sonarlist PMD 。等插件,导致检测规则发生冲突
3.解决方案:停用即可
cker-compose -f docker-compose.yml up
[外链图片转存中…(img-bUMrUThW-1720754842714)]
(二)远程无法连接服务器 服务器报错
1.问题描述 :
远程无法访问 无法访问服务器
服务器报错
kernel:NMI watchdog: BUG: soft lockup - CPU#0 stuck for 21s! [server.rb:289:
2.原因 :内核死机,资源不足导致 cpu死锁 这里的原因应该是资源不足带不动 这么多东西
3.解决方案
echo 30 > /proc/sys/kernel/watchdog_thresh
查看
tail -1 /proc/sys/kernel/watchdog_thresh
30临时生效
sysctl -w kernel.watchdog_thresh=30
– 永久生效
echo 30 > /proc/sys/kernel/watchdog_thresh
– 临时生效
sysctl -w kernel.watchdog_thresh=30
可以通过修改/proc/sys/kernel/softlockup_thresh来修改超时的阈值
(三)服务器无法ping 其他以及外部环境
-
问题描述
服务器无法ping 同外环境 ping www.baidu.com 是 提示无法解析网址
-
原因 VMware 重启后 网络服务关闭
-
解决方案
首先重启 了 VmNet8 没有效果
然后
win + r
输入
services.msc
进入 服务 发现 vm net 相关的服务关闭 然后 将 vm 相关的服务打开 设置启动方式
解决
(四)服务部署在云端,注册域名之后无法访问 (默认80端口可以访问)
1.问题描述:部署在自己电脑上内存不足,导致电脑经常卡死,因此尝试将SonarQube部署在云端服务器上,申请了腾讯云的服务器,为了可以外部访问,申请了域名 ,但是可以正常访问80端口但是无法访问 9000端口所在的sonarqube 服务。
2.原因:
sonarqube 使用docker 部署 需要开启ipv4 转发
3.解决方案:
查看是否开启ipv4转发
sysctl net.ipv4.ip_forward
如果返回0,则代表关闭了ip路由转发
解决方法:
1、修改配置开启ipv4转发
vi /etc/sysctl.conf
修改net.ipv4.ip_forward=1 ,如果没有该值则单独添加一行,保存
2、应用修改配置
sysctl -p
使配置生效,正常应该返回一行包含net.ipv4.ip_forward=1
(五)设置好钩子阻断之后发现配置未生效
1.问题描述:设置好钩子阻断之后发现配置未生效,各个位置均为发现问题
2.原因: idea 加入了PMD 的插件 例如:alibaba sonarlist PMD 。等插件,导致检测规则发生冲突
3.解决方案:停用即可


 959
959

 被折叠的 条评论
为什么被折叠?
被折叠的 条评论
为什么被折叠?
 到【灌水乐园】发言


