


Halcon 一维测量
提示:这里可以添加系列文章的所有文章的目录,目录需要自己手动添加
例如:第一章 Python 机器学习入门之pandas的使用
提示:写完文章后,目录可以自动生成,如何生成可参考右边的帮助文档
前言
参考文档:Halcon 官方文档 Solution Guide III-A1D Measuring
参考项目:Halcon %HALCONEXAMPLES%\solution_guide\1d_measuring\ 文件夹下项目
提示:以下是本篇文章正文内容,下面案例可供参考
一、边缘对尺寸测量
项目路径:Halcon %HALCONEXAMPLES%\solution_guide\1d_measuring\measure_switch.hdev
1.Halcon代码
read_image (Image, 'bin_switch/bin_switch_1')  从文件夹中读取图片,并将图片传给变量Image
get_image_size (Image, Width, Height) 获取图片Image的长宽信息
dev_close_window () 将默认的主窗体关闭
dev_open_window_fit_image (Image, 0, 0, 640, 640, WindowHandle) 创建一个可以保留图像长宽比的窗体,
//dev_open_window_fit_image(Image: : Row, Column, Width, Height, Background : WindowHandle)
//Row,Column 为窗体创建时,窗体左上角的位置坐标,Width,Heightwe,为创建的窗体的长宽
set_display_font (WindowHandle, 14, 'mono', 'true', 'false') 设置窗体显示的字体的格式,后两个参数设为'true'时分别为粗体与斜体
dev_display (Image)


*
* Define the rectangular ROI within which the edges will be detected
* and create the measure.
* 设置检测边缘对的ROI矩形的参数
Row := 385 ROI矩形y坐标
Column := 385 ROI矩形中心的x坐标
Phi := rad(-60) ROI矩形的角度
Length1 := 60 ROI矩形的长度
Length2 := 10 ROI矩形的宽
Interpolation := 'nearest_neighbor' 拟合矩形的模式为 'nearst_neighbor'
//Interpolation插值计算参数共有三种参数 'neatest_neighbor','bilinear','bicubic'
//'neatest_neighbor'测量中的灰度值就会从最近的像素的灰度值中获得,即通过恒定内插法。这是最快速的方法。然而,在这种模式下,几何精度会略低。
//'bilinear'使用双线性插值 这种方式最精确,时间最长
//'bicubic'使用双三次插值
gen_measure_rectangle2 (Row, Column, Phi, Length1, Length2, Width, Height, Interpolation, MeasureHandle)//创建一个搜索边缘对用的ROI,当ROI角度不是水平或垂直时,ROI部分区域的灰度是通过插值得到的
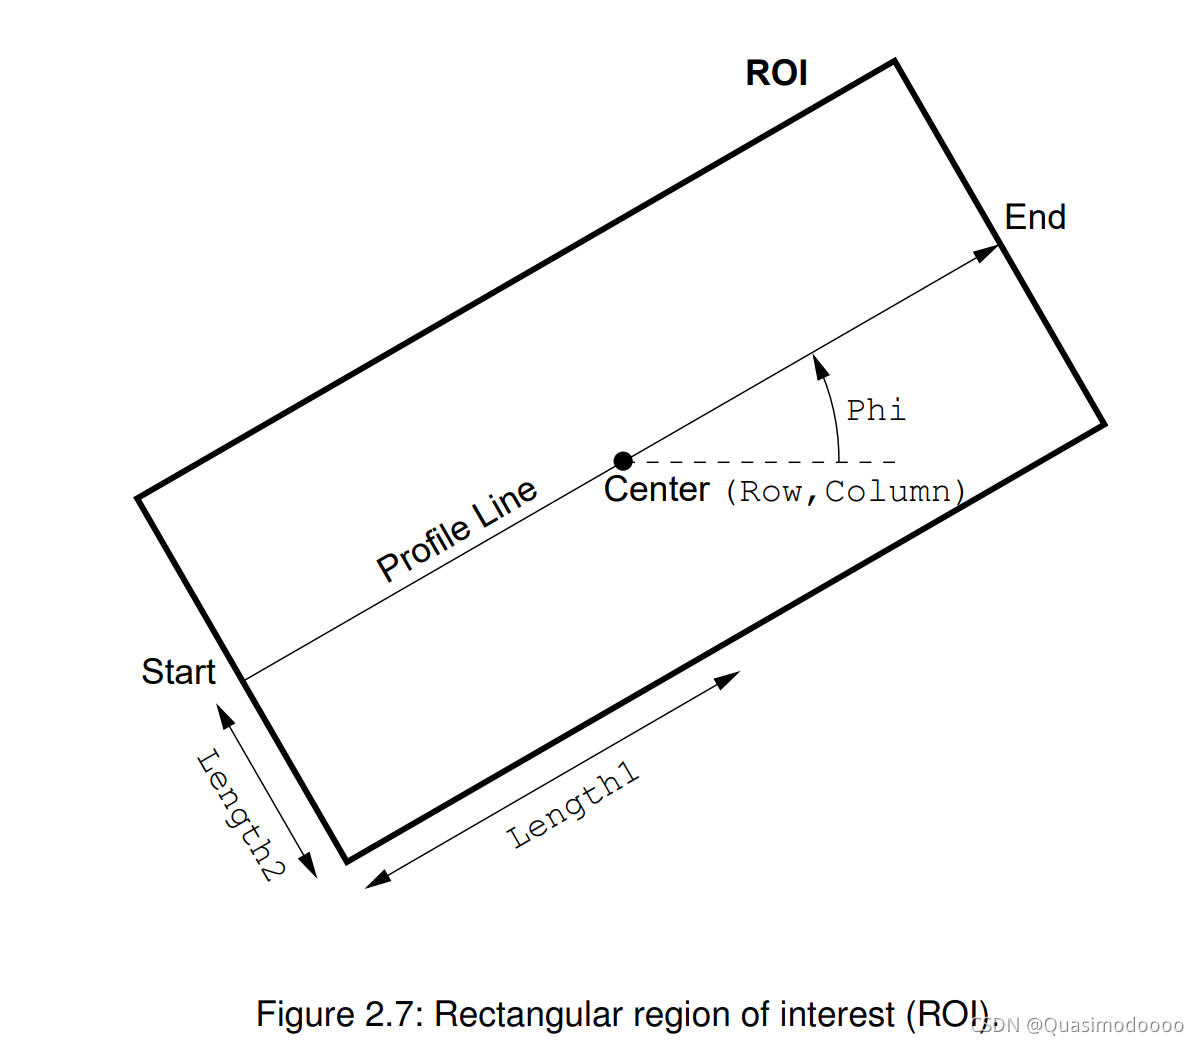
ROI矩形参数说明
* 边缘对检测方法参数设置
* Determine all edge pairs that have a negative transition, i.e., edge pairs
* that enclose dark regions.
Sigma := 1.1 ROI矩形进行平滑处理的系数
Threshold := 20 边缘对的阈值
Transition := 'negative' 'negative'为从白到黑,'positive'为从黑到白,'all'为任何极性 当设置为'negative'时,第一条边暗从白到黑进行,另一条边按从黑到白进行搜索
Select := 'all'  'first','best','last','all',参数分别为抓取第一对、最好、最后一对、以及全部边缘对
measure_pairs (Image, MeasureHandle, Sigma, Threshold, Transition, Select, RowEdgeFirst, ColumnEdgeFirst, AmplitudeFirst, RowEdgeSecond, ColumnEdgeSecond, AmplitudeSecond, IntraDistance, InterDistance)
*
* RowEdgeFirst获取的第一条边的中点的y坐标的集合,ColumnEdgeFirst获取的第一条边的中点的x坐标的集合
* RowEdgeSecond获取的第二条边的中点的y坐标的集合, ColumnEdgeSecond获取的第二条边的中点的x坐标的集合
* Visualize the results


dev_display (Image)
dev_set_draw ('margin')  设置Rectangle的填充模式为边缘 'margin'和'fill'两种参数
dev_set_color ('black')  设置Rectangle的填充颜色为黑色
gen_rectangle2 (Rectangle, Row, Column, Phi, Length1, Length2) 在Image上填充一个Rectangle用于显示搜索区域

p_disp_dimensions (RowEdgeFirst, ColumnEdgeFirst, RowEdgeSecond, ColumnEdgeSecond, IntraDistance, InterDistance, Phi, Length2, WindowHandle)//
* 显示测量的边缘对的尺寸,Phi为显示的边缘对的角度,
* RowEdgeFirst,ColumnEdgeFirst 为第一条边的中点坐标的集合,以这个坐标为中点,画长度为Length2*2的线
* RowEdgeSecond,ColumnEdgeSecond 为第二条边的中点坐标的集合,以这个坐标为中点,画长度为Length2*2的线
* IntraDistance为边缘对间的距离
* InterDistance为一对边缘对与另一对的距离
* Free the memory that has been allocated for the measure.
close_measure (MeasureHandle)关闭测量句柄
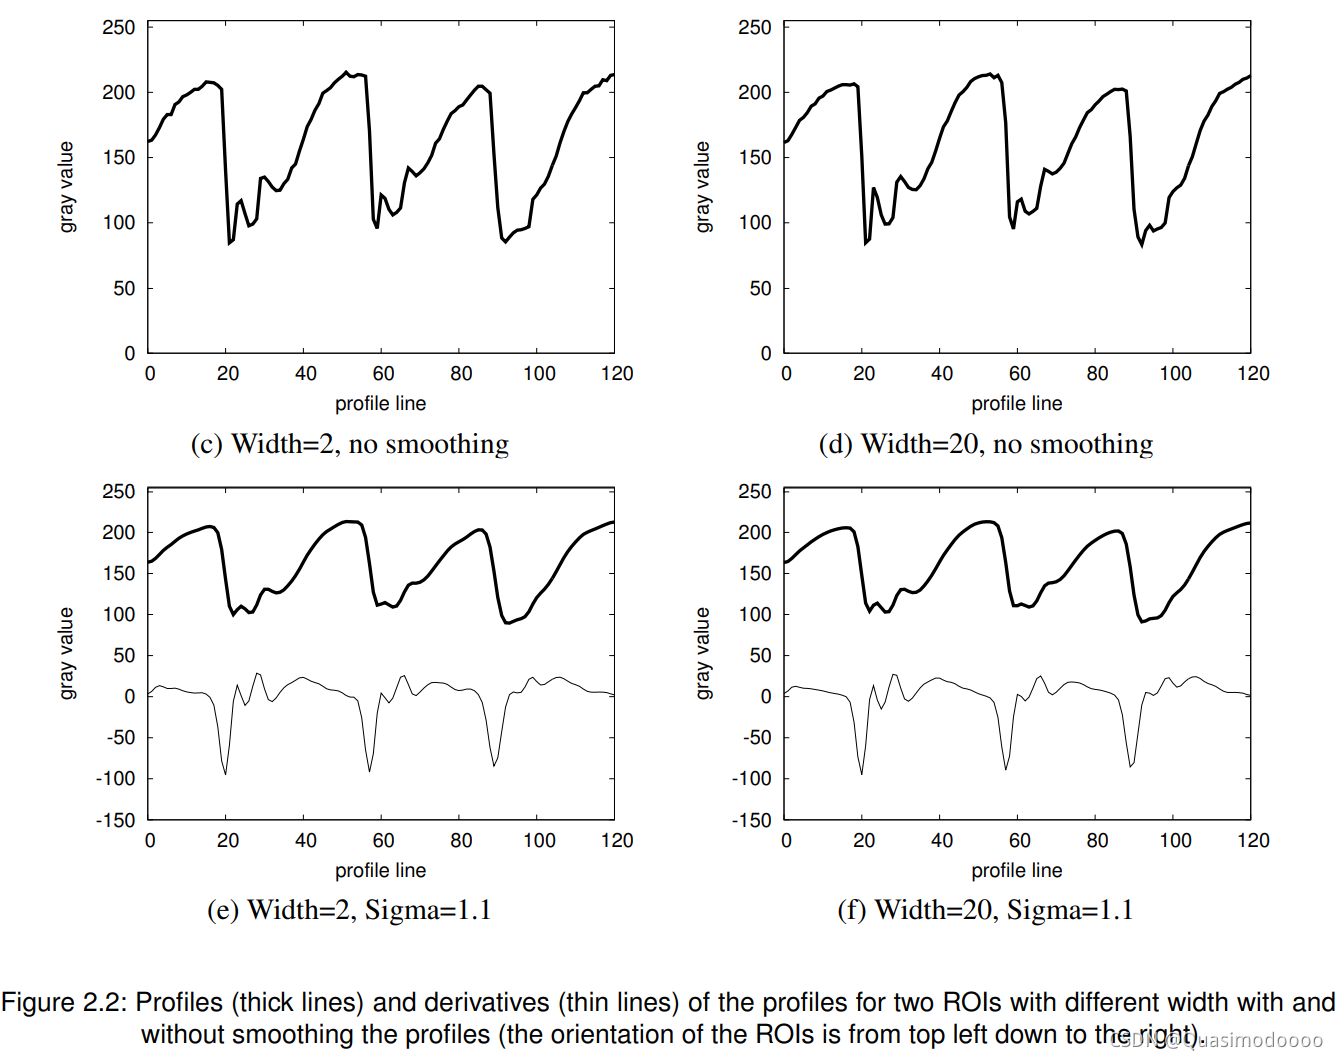
The profile is then smoothed with a Gaussian smoothing filter (see the thick lines in figure 2.2e and f), whose
standard deviation is specified with the parameter Sigma of the measuring operators (e.g., measure_pairs).
Now, the first derivative of the smoothed profile is calculated (thin lines in figure 2.2e-f).
高斯平滑滤波器对剖面进行平滑处理(见图2.2e和f中的粗线),其标准偏差由测量运算符(如measure_pairs的参数Sigma指定。
其标准偏差由测量运算符(如measure_pairs)的参数Sigma指定。
现在,计算出平滑曲线的一阶导数(图2.2e-f的细线)。请注意,导数的振幅是用一个系数√缩放的2π - Sigma。

二、
1.
代码如下(示例):
2.
总结
提示:这里对文章进行总结:
例如:


 698
698


 被折叠的 条评论
为什么被折叠?
被折叠的 条评论
为什么被折叠?
 到【灌水乐园】发言


