


PanoWarp Tutorial
Deformation, stitching and Web viewing
Program © 1998-2016 Guillaume Dargaud.
Free use and distribution.
Last updated on 2015/12/09
Pencil and paper /n./: an archaic information storage and transmission device that works by depositing smears of graphite on bleached wood pulp. More recent developments in paper-based technology include improved ' write-once' update devices which use tiny rolling heads similar to mouse balls to deposit colored pigment. All these devices require an operator skilled at so-called ' handwriting' technique.
— From the Jargon File.
1. Necessary tools
Downloads
For this tutorial, you should download and install the following programs:
 Paint Shop Pro from Jasc Software. Shareware. You could also use PhotoShop if you can afford it...
- PanoWarp.exe from me. Freeware for Win95/Win98 (6Mb).
- PhotoVista from Live Picture. Shareware, but we won't need the functions of the 'pay' version. Note that they have changed their program and the classes are now organized differently. You can get the old classes here.
- Java Pano Viewer from Live Picture. Freeware. Obviously you need a Java-capable browser, like IE3/4/5 or Netscape 3/4.
Introduction to PanoWarp.exe
Some time ago I decided to revive my passion for panoramas using the PC. At home I had a few panoramas made from pictures glued together on the wall. On the PC it should be easy to scan and stitch separate images together, right ? Think again ! It is exactly the same problem than drawing a flap map of the earth.
So one afternoon of Win98 bug frustration I decided to hack together a utility to deform the pictures using spherical trigonometry so they'd fit together. This utility is called PanoWarp, and here is the tutorial for it.
PanoWarp v2.1 is free to download and use. Sorry this is not a PhotoShop/PSP plugin filter, but the Adobe SDK was a bit thick and the user input necessary here is more than just 'sliders'. If you have any problem with the install, contact me. This small prog leaves a rather big footprint, but I don't want to waste time anymore with M$ compilers; the LabWindows/CVI run-time engine takes room.
It's free, but if you want to support me, go buy some of my pictures or leave a tip. You want the source code ? You'll have to buy several pictures ! :-)
-
History:
- v1.0 — 1998/09/07 — First release.
- v1.1 — 1998/09/21 — Added paste capability.
- v1.2 — 1998/06/14 — Added Progress Dialog. Added [Ctrl][C].
- v1.3 — 1999/12/13 — Added dpi resolution for countries still in the middle age. Minor enhancements. Compiled for CVI 5.5.
- v1.4 — 2001/01/25 — Added PNG support. Identified (but not resolved) paste bug.
- v1.5 — 2001/04/16 — Increased size of max images. Added support for greyscale and 32 bit images (PNG only, alpha channel is removed).
- v2.0 — 2001/05/06 — Added JPEG support.
- v2.1 — 2001/05/10 — Memory footprint greatly reduced and several bugs corrected.
- v2.2 — 2001/07/17 — Added PC screen resolutions for digital cameras. Added auto resolution option.
- v2.3 — 2002/09/24 — Corrected bug when reading greyscale images.
- v2.5 — 2005/07/13 — Minor modifications.
2. Taking the pictures
![[P1_P2.jpg]1st pic and 2nd pictures of the panorama](http://www.gdargaud.net/Hack/Pano/P1_P2.jpg)
I'll be fairly brief here: the pictures need to overlap at least 10-20% (more with wide angle lenses), they must be horizontal and they should preferably have the horizon centered (but we can correct for that in step 3). You can take horizontal or vertical shots and you should preferably use a wide angle lens to avoid taking too many pics. My preference goes to a 20mm. Do not use a fisheye (I don't know the formula to correct for those and I don't have one to try).
Manually set the exposure by pointing the camera to a direction 90° from the sun. Take a series of pics all exposed the same. Do not use a polarizing filter or you'll have too much sky contrast. Better use a tripod. For perfect results you should rotate the camera around its optical center (different for each lens). To determine it, put an object near the camera. As you rotate the camera around a point somewhere underneath the lens, there should not be any observed parallax of the near object with the far background. If you don't understand what I'm talking about, you can just ignore it, it's important only for pictures with both near and far objects. Personally, all the panoramas on my site were taken with a hand-held camera, sometimes not even centered for a practical reason (like from the 2rd floor of the Eiffel Tower...).
Note about 360° pictures: they are usually not very interesting when taken from mountain summits: the valley is far below, barely visible because of the contrast, and the summit you are on is... not visible. Better take such pictures from mountain passes instead.
Then scan the resulting pictures to the same resolution and same color correction/contrast and save them as PNG or JPEG (*.png, *.jpg). Don't do any filtering, color correction... yet. Don't worry about the black borders of my sample pictures, they were taken with my camera in panorama mode (12x36mm). If you use Vuescan (and you should), do a preview of the image with most clear area, set the various options properly and [Device][Lock Exposure], do another preview, [Device][Lock Image Color], and go into batch mode to scan all the pictures without changing anything.
3. Deformation
![[PanoDeform1.gif]PanoWarp view](http://www.gdargaud.net/Hack/Pano/PanoDeform1.gif)
Take a look at the two pics above. They should blend one into another, right ? But if you look closely, you will notice that the shadow of the building that spans across the gap forms an angle. My PanoWarp program will correct this problem by changing the shape of the pictures.
I wrote this program to do by hand and better what PhotoVista or QuickTime VR do automatically, namely the warping of the pictures. Let me explain. When you take a picture, a point referenced by X,Y,Z in 3D space becomes a point on the film, referenced by x,y. Or more exactly the camera sees points within a certain horizontal angle aleft to aright and a vertical angle flow to fhigh. Just like you cannot put a sphere on a flat surface, you cannot blend picture to picture, but 3D angles like a and f will blend.
For instance if you use a f=20mm lens on a 24x36mm camera, for a landscape the angles are: tana=36/2f. Giving a from -42° to 42° and f from -31° to 31°. If the camera has the horizon on the top third (classical composition), the tilt angle y is -10° and f will go from to -41° to 21°.
So basically, starting from a set of pictures, we want to go back to a from 0 to 360°.
When you start PanoWarp, you should first set the type of lens used (20mm, 35mm...) and the scanning resolution (on the film). I have helped by providing several standard image sizes corresponding to Kodak PhotoCD (from 64x96 to 4096x6144 pixels). For instance a 24x36mm picture scanned as 512x768 corresponds to 21.33 pixels/mm (542dpi). If you scanned a print (for instance 10x15cm at n dpi), just do the ratio n/25.4*15/3.6 to get the px/mm to input. It is very important to set the proper resolution and focal lens, otherwise your results won't stitch.
![[P1def.jpg]Deformed picture](http://www.gdargaud.net/Hack/Pano/P1def.jpg)
Then load the leftmost picture by clicking on [Open] and selecting a bitmap file. A normal preview is displayed (you can resize the window). Width and Height are the resolution of the picture. LenX and LenY are the size of the picture in mm (should be about 36 and 24 if you have set the proper resolution). The spanning angles ±a (horizontal) and ±f (vertical) are also shown.
Point the vertical slider on the horizon (see pic above). This will adjust the tilt angle y and its equivalent horizon height H (in mm) if px/mm is set right. See the Factor number ? It's the factor (in px/deg) that converts from a/f angles to pixels on the new image. By default it gets adjusted so that the deformed image has the same width than the original one (NewW=2*amax*Factor). When you have several pictures in the same panorama, the tilt angle may vary a little. Adjust it, but keep the factor value always the same.
All set ? Go from [Normal] to [Deform] and the prog computes the deformed pictures. It may take a while. On a 233MHz PII, a 512x768 picture takes about 5 seconds. The result is displayed in the same window (you can use the [TrueSize] button to adjust the screen size).
![[Normal1.gif]Original image 1](http://www.gdargaud.net/Hack/Pano/Normal1.gif)
![[Warp1.gif]Warped image 1](http://www.gdargaud.net/Hack/Pano/Warp1.gif)
First example of warping: horizontal picture, 20mm lens, centered horizon (left). The resulting warped picture (right) is barrel-shaped.
![[Normal2.gif]Original image 2](http://www.gdargaud.net/Hack/Pano/Normal2.gif)
![[Warp2.gif]Warped image 2](http://www.gdargaud.net/Hack/Pano/Warp2.gif)
Second example of warping: vertical picture, 20mm lens, horizon near the top (left). The resulting warped picture (right) has an expanded bottom part. Note: for a vertical picture, use the same PCD and px/mm settings as for a horizontal one.
Is the result OK ? In particular, the horizon should be a perfectly straight line; if not, verify the lens focal, the angle of the horizon and the px/mm resolution. Press [Copy] to copy the picture to the clipboard. Now let's go to Paint Shop Pro.
4. Stitching with Paint Shop Pro
![[Blend.jpg]Blending the pictures](http://www.gdargaud.net/Hack/Pano/Blend.jpg)
Open a [File][New] picture of dimension NewW*number of pictures and NewH+20% with 16 million colors and transparent background (you can always [Image][Canvas size] if they don't all fit in). [Ctrl][E] to paste the clipboard in the picture. Move it to the left side, leaving some room on the left.
Go PanoWarp the next picture and copy the result to the clipboard. Come back to PSP. Paste it as new layer [Ctrl][L], set the layer blend mode set to Difference, Opacity=100, Group=0. Move it more or less next to the first picture. Now you see the intersection shown as the difference of both pics. Select the [Mover] tool and adjust the position of the 2nd layer in order to get the intersection as black as possible. Since the pictures are in different layers, you can always readjust their position.
Select the [Eraser] tool with a low hardness to erase the parts of the pics that span too far, but always leave some overlap. You can use different kinds of layer blend mode. If you don't see the layer palette, go to [View][Toolbars]. For comfort, use the [Layer visibility toggle] or the [Layer Opacity], and remember to select the layer before trying to erase something.
Note: You should save your work as *.PSP in order to keep the layer information. We will convert to JPG only at the very end.
Repeat those steps for all pictures. The first and last picture should have a common area (hey, you want 360° or not ?).
If there was some exposition difference between the pictures, now's the time to adjust them layer by layer with [Color][Adjust][Brightness/Contrast] or similar functions.
If you are not doing a 360 degree panorama, you can basically stop here. Others read on...
5. Complete 360°
Now check the horizontality of the resulting picture. If you have a recent version of Paint Shop Pro, the line tool will give you the angle: zoom out of the image so you see it completely, then draw a line from the left to the right of the picture, choosing a point on the horizon (the same point), as you move the mouse, the line tools shows you an angle, like 91.6° (you will have to rotate the picture 1.6° to the right) or 88.2 (you will have to rotate the picture 1.8° to the left). Cancel the line with [Ctrl][Z] before doing the rotation with [Ctrl][R] (remember to select [All layers]). Alternatively, if you see some images where the horizon is not truly horizontal, you can rotate them individually by not selecting the [All Layers] option.
If the line tool does not show the angle, use the following more complex method: take a point P1(X1,Y1) on the horizon of the 1st picture and the same point P2(X2,Y2) on the last picture. We have to rotate the picture by atan((Y2-Y1)/(X2-X1)*180/p), as a close enough approximation that's 57*(Y2-Y1)/(X2-X1). Go in [Image][Rotate] and write the number for the free rotation (if positive, the direction is left) and select [All layers].
Take a piece on the right and copy it (in a new layer) on the left, at the exact same height (watch your mouse coordinates). Use the eraser as before to blend it with the 1st picture. Then save a copy of your work [Ctrl][S], [Layer][Merge][All], do a general [Clip]ping of the whole picture, being very careful about the left and right borders (they have to match to the pixel).
For a Java animated panorama, make sure the horizon is at the center of the pic, even if that leaves out a lot of empty sky. [Image][Canvas size] and Copy/paste the sky to extend it if you need to.
Finish up by [Clone brush]ing the eventual gaps between the pictures. A little [Image][Sharpen][Sharpen] or [Image][Edge][Enhance] at the end and you can now save and [save a copy] as JPG, you can use a higher compression rate than normal (30 works fine). We are done with PSP.
Note: if you have problem with Paint Shop Pro, there is a good Usenet Newsgroup called comp.graphics.apps.paint-shop-pro.
6. Creating the IVR file
PhotoVista can do the last two steps automagically, but: you have to pay for it, you don't have any control on the result, and personally I think the result sucks in terms of quality. We'll use PhotoVista only to produce the IVR file needed in the next step, and the trial version is enough for that.
Open PhotoVista (run as trial is fine). Then [File][Open panorama] and select the JPG file we previously saved. The [Projection type] is sphere (or is it cylinder ? I gotta check), the horizontal field of view should be 360°.
[File][Save as] junk.jpg. JPEG quality does not matter (we won't use this file). You get a message "A second file, Junk.ivr, was also created". Now you can delete Junk.jpg. Rename Junk.ivr and open it with a text editor. Replace junk with the name of your own JPG file on the line "texture ImageTexture { url "junk.jpg" }" (it should be in the same directory).
![[PanoFolder.gif]Folder content](http://www.gdargaud.net/Hack/Pano/PanoFolder.gif)
Now make sure you have unzipped the Java Pano Viewer in the same directory. You should now have your file.jpg, the corresponding file.ivr, pano.class and the RealSpace directory containing the a to e classes. 2001/5/21 update: Note that Live Pictures have changed their program (the classes are now zipped) and the classes are now organized differently. You can get the old classes here if you don't want to spend time looking for differences.
Create an HTML file based on this one:
<HTML>
<HEAD>
 <TITLE>Live Picture Java Viewer</TITLE>
</HEAD>
<BODY>
 <APPLET code="pano.class" width=300 height=150>
  <PARAM name=file value="file.ivr">
  <PARAM name=autoSpin value="7">
 </APPLET>
</BODY>
</HTML>

And here is the result (view the present HTML file and the Java Viewer help file for more details). And always remember to put a link to a flat view of the picture, for people without Java.
Well, that's all folks. I hope that was clear enough. The pictures used in this tutorial were taken in 1997 at the Dome C research station, on the high Antarctic plateau. I have a page with all my panoramas displayed. And remember to check out the rest of my site, in particular the wallpaper page where you can even buy real pictures !
![[VertPano_Tilted.jpg]Loading a rotated image into PanoWarp in order to make a vertical panorama.](http://www.gdargaud.net/Hack/Pano/VertPano_Tilted.jpg)
Assembling a vertical panorama
This program is geared towards making horizontal panoramas by assembling images taken around a vertical axis (left to right or the opposite). But it is perfectly possible to make a vertical panorama by assembling pictures taken one above the other. Here's an example of 3 pictures used to make a 180° of double Arch in Utah.
![[VertPano_Warped.jpg]Warped picture, ready to save.](http://www.gdargaud.net/Hack/Pano/VertPano_Warped.jpg)
In order to do this you must first take your series of shots perfectly one above the other (use a tripod that can lock left-right while allowing up-down motions) and keep a 20% overlap between pictures. Scan them. Then rotate them 90° to the right with you graphic program. Save them and then warp them with PanoWarp leaving the horizon bar in the middle (Tilt angle of 0, see image above and left). Save the warped images. Then assemble the warped images with your graphic program just like for a standard horizontal panorama (picture below. And as a final step, rotate everything back 90° to the left. That's it.
You can view several examples of vertical panoramas on a specific page, some of them you really can't tell...
![[VertPano_Assembly.jpg]Assembling the warped pictures into a vertical panorama.](http://www.gdargaud.net/Hack/Pano/VertPano_Assembly.jpg)
Warping FishEye images (aka defishing)
-
History:
- v1.1 — 2005/07/14 — Added FishEyeWarp.exe to also warp images taken with fisheye lenses, either horizontally like
- v1.2 — 2005/07/25 — 2 bugs in FishEyeWarp: vertical images were mirrored and the image ratio has been changed from 2Pi:1 to a more realistic 360:90 (equivalent to spherical projection).
- v1.3 — 2006/04/26 — Serious user interface improvements (you can now drag the reference points). Added field rotation (the orange point). Minor bug corrections.
- v1.4 — 2006/08/15 — Minor bug corrections.
- v1.5 — 2006/08/15 — Fixed versioning problem leading to wrong deformation.
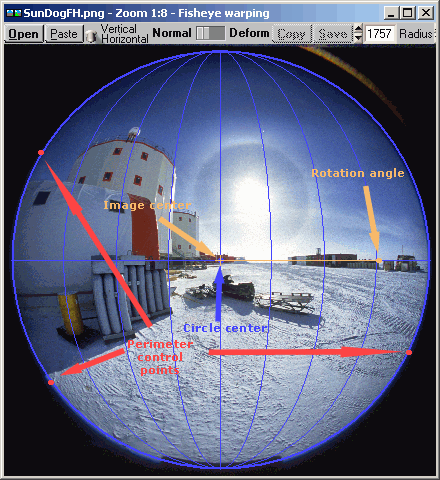
Right: Fisheye image, before and after horizontal correction (mouseover effect). Notice how the 'vertical' lines end up being truly vertical in the resulting image and how the black circle simply goes away.
Fisheye lens seem an obvious choice to make panoramas with their 180° field of view. Unfortunately the optical conversion is different and normal lenses. I wrote a variant program to handle images provided by this type of lens: it just correct the circular image into a square suitable for panorama assembly, particularly for indoor images. And in doing so it finds other applications besides the assembly of panoramas.
The program FishEyeWarp.exe is included within the installer of PanoWarp. Its use is very simple: Load an image (which MUST have the image circle visible, using a 15mm lens won't work, sorry), just move the blue dots defining the position of the circle to match the image circle (alternately you can move the center and select the radius manually), press [Deform] and save. That's it for this program, the rest happens into your favorite graphic application where you assemble the results.
For better results you should:
- have your camera on a perfectly horizontal tripod
- rotate the camera around its optical center (avoids parallax)
- expose in manual for image uniformity (if using a digital camera, also set the color balance to some fixed setting).
- take at least 3 images (the more the better)
- when warping a bunch of images, the radius should stay the same (change only the center)
- when setting the image circle in the program, check that the ellipses are aligned with the 'verticals' of the image, and that after the deformation they become true verticals.
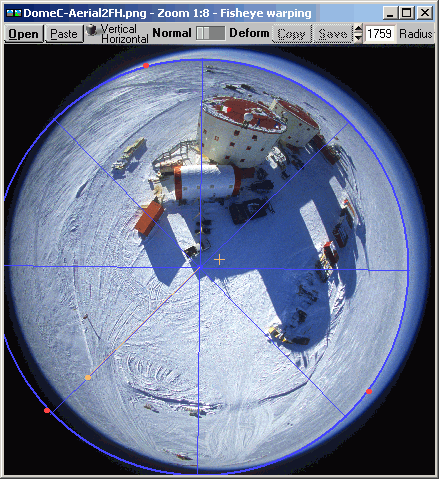
In version 1.1, I've added the ability to deform FishEye images taken by pointing the lens vertically (either up or down). This way you can take a 360° panorama in one shot... But for this you need the entire image circle on the film (8mm lens on 24x36 surface area film for instance, a digital smaller CCD won't cut it).
Right: Fisheye image, before and after vertical correction (mouseover effect). This second example is intentionally a bit more complicated than should be: the manual circle was placed on the fisheye circle as expected, using the 3 positioning red dots. Then the center of the circle was moved to align the circle onto the horizon. And finally the radius was increased to take all the sky, even if lots of dark now get on the image. Also a rotation was applied so that the 'cut' of the unrolled panorama would be on a mostly blank area. The result in the program window is upside down because the camera was pointing down and the proportion is not correct because the prog just fit it in the existing window. Just save or copy/paste the result and you obtain the image shown below.
![[FisheyeAfterV-Pano.jpg]The fisheye image, once 'unrolled' into a horizontal panorama](http://www.gdargaud.net/Hack/Pano/FisheyeAfterV-Pano.jpg)
Note that if you are using a standard fisheye lens on a digital camera, thanks to the smaller sensor part of the image will be cut off. You can still straighten the images with FisheyeWarp. Nothing particular to do if the picture has an horizontal ratio. If you took it with a vertical ratio, first rotate it 90° in a graphic program, then straighten it with my prog, and rotate it back into your graphic app. No pixel lost.
If you want to see more fisheye images and their various transforms, look at my fisheye gallery.
Creating Bird's Eye images (aka small planets)
![[PanoParking_.jpg]This image, from my Concordia panorama page, is a full 360x180° panorama assembled from 9 fisheye images. It's a spherical projection with a complete field of view, meaning you can see the top and bottom as well. Let's see what we can do with it...](http://www.gdargaud.net/Photo/Birdseye/PanoParking_.jpg)
-
History:
- v1.0 — 2006/08/15 — First version.
- v1.1 — 2006/09/16 — Minor update: average colors in corners and center.
Right: This image, from my Concordia panorama page, is a full 360x180° panorama assembled from 9 fisheye images. It's a spherical projection with a complete field of view, meaning you can see the top and bottom as well. Let's see what we can do with it... 
![[PanoParking_BEW.jpg]The same image, after transformation into a Bird's Eye view, could easily be renamed 'planet Antarctica'.](http://www.gdargaud.net/Photo/Birdseye/PanoParking_BEW.jpg)
Left: The same image, after transformation into a Bird's Eye view, could easily be renamed 'planet Antarctica'.
As you saw above, the program FisheyeWarp, when used in vertical mode, can transform a fisheye image into a 360x90° panorama. Half of it is missing (everything that was in the back of the photographer). The same formula can be applied in reverse, but if you start from a full panoramic image, there's no need to discard all those good pixels, resulting in a total fisheye image with a 360° field of view in every direction. I later discovered that this type of image is also known as a polar panorama.
The bottom of the panorama converges into a single point at the center of the image, the top gets stretched into the perimeter of the circle, and the horizon turns into a circle halfway, giving it some kind of 'planet effect', like Earth seen from space... or from the eyes of a bird, hence the name of the program. So no need to purchase the legendary Nikkor 6mm/f5.6 lens which is the only lens in existence with a 210° field of view (and probably the most expensive as well as impractical and fragile lens in existence): you can do the same with a bunch of images, a panorama program and this little program.
![[BirdsEyeUIR.png]A view of the program's user interface, with the effect reversed: the top becomes the center and the bottom becomes the perimeter...](http://www.gdargaud.net/Photo/Birdseye/BirdsEyeUIR.png)
Right: A view of the program's user interface, with the effect reversed: the top becomes the center and the bottom becomes the perimeter...
The program BirdsEyeWarp.exe is included within the installer of PanoWarp. Its use is very simple: Load a full panoramic image (which SHOULD have a ratio of 2:1), select a starting angle (just click on the part of the image you would like to maintain on top) press the [BirdsEye] button and save. That's about it, with an additional option to reverse the effect (puts the top at the center). The program also works on panoramic images with missing top and bottom, but you end up with a black hole in the middle of the result. And if your start image is less than 360° horizontally, it still works but the results doesn't have much use.
If you want more, I have a small gallery of bird's eye images.

This freeware written with LabWindows/CVI.
Counters: Page:175856, Section:5364990, Site:44121536.
Forward to the next Hack page. Back to my contact page, my computer page or my home page.


 1434
1434


 被折叠的 条评论
为什么被折叠?
被折叠的 条评论
为什么被折叠?
 到【灌水乐园】发言


