


目录
2.1 单一曲线选择复选框on_rdbSinglePlot_clicked(bool checked)
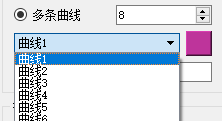
3.1 多条曲线数量选择on_spbNumberG_editingFinished()
3.2 修改曲线数量的复选框on_rdbMultiPlot_clicked(bool checked)
3.4、多条曲线模式下选择任意曲线名称下拉框on_btnCurveSel_currentIndexChanged(int index)
3.5、修改曲线的名字on_txtCurveRename_editingFinished()
3.6 曲线颜色更换按钮on_btnColorSel_clicked()
4.1 重新绘制坐标轴范围,自动适应坐标轴resetAxisRange(double xAxis, double yAxis)
五、半字节处理slots_singlePlotHMByte()
六、多字节处理slots_singlePlotMByte()
七、多曲线数据处理函数slots_multiPlotCurve()
工程下载链接:温度助接手下载链
之前讲过绘图控件引入了文件qcustomplot.c和qcustomplot.h,并在temperassistant.c中包含其绘图控件资源的头文件
#include "qcustomplot.h"绘图控件的制作过程见我之前的笔记————《绘图控件qcustomplot配置笔记》
一、初始化绘图控件initPlot()
在temperassistant.h的public:手动声明
void initPlot();//初始化绘图控件在temperassistant.c中写入初始化控件代码。
/**
 * @brief TemperAssistant::initPlot 初始化自定义绘图曲线
 */
void TemperAssistant::initPlot()
{
    // set some pens, brushes and backgrounds:
    ui->customPlot->xAxis->setBasePen(QPen(Qt::white, 1));//轴线颜色和粗细
    ui->customPlot->yAxis->setBasePen(QPen(Qt::white, 1));//轴线颜色和粗细
    ui->customPlot->xAxis->setTickPen(QPen(Qt::white, 1));//轴线颜色和粗细
    ui->customPlot->yAxis->setTickPen(QPen(Qt::white, 1));//轴线颜色和粗细
    ui->customPlot->xAxis->setSubTickPen(QPen(Qt::white, 1));//网格浅色点线
    ui->customPlot->yAxis->setSubTickPen(QPen(Qt::white, 1));//网格浅色点线
    ui->customPlot->xAxis->setTickLabelColor(Qt::white);
    ui->customPlot->yAxis->setTickLabelColor(Qt::white);
    ui->customPlot->xAxis->grid()->setPen(QPen(QColor(140, 140, 140), 1, Qt::DotLine));
    ui->customPlot->yAxis->grid()->setPen(QPen(QColor(140, 140, 140), 1, Qt::DotLine));
    ui->customPlot->xAxis->grid()->setSubGridPen(QPen(QColor(80, 80, 80), 1, Qt::DotLine));
    ui->customPlot->yAxis->grid()->setSubGridPen(QPen(QColor(80, 80, 80), 1, Qt::DotLine));
    ui->customPlot->xAxis->grid()->setSubGridVisible(true);//显示x轴子网格线
    ui->customPlot->yAxis->grid()->setSubGridVisible(true);
    ui->customPlot->xAxis->grid()->setZeroLinePen(Qt::NoPen);
    ui->customPlot->yAxis->grid()->setZeroLinePen(Qt::NoPen);
    ui->customPlot->xAxis->setUpperEnding(QCPLineEnding::esSpikeArrow);//箭头形状
    ui->customPlot->yAxis->setUpperEnding(QCPLineEnding::esSpikeArrow);
    QLinearGradient plotGradient;
    plotGradient.setStart(0, 0);
    plotGradient.setFinalStop(0, 350);
    plotGradient.setColorAt(1, QColor(80, 80, 80));//渐变填充背景颜色设置
    plotGradient.setColorAt(1, QColor(50, 50, 50));
    ui->customPlot->setBackground(plotGradient);
    QLinearGradient axisRectGradient;
    axisRectGradient.setStart(0, 0);
    axisRectGradient.setFinalStop(0, 350);
    axisRectGradient.setColorAt(1, QColor(80, 80, 80));
    axisRectGradient.setColorAt(1, QColor(30, 30, 30));
    ui->customPlot->axisRect()->setBackground(axisRectGradient);

    ui->customPlot->xAxis->setRange(0, 10, Qt::AlignCenter);
    ui->customPlot->yAxis->setRange(0, 10, Qt::AlignCenter);

    //设定右上角图形标注和字体
    ui->customPlot->legend->setBorderPen(QPen(QColor(140, 140, 140,0)));// legend 边框颜色透明
    ui->customPlot->legend->setVisible(true);
    ui->customPlot->legend->setTextColor(QColor(255,255,255,150)); // legend 字体颜色,白色
    ui->customPlot->legend->setBrush(QColor(74,74,74,0));   //legend背景色设为灰色但背景透明,允许图像在legend区域可见
    ui->customPlot->legend->setWrap(20); // 超过20行就换一列

    ui->customPlot->setInteractions(QCP::iRangeDrag | QCP::iRangeZoom | QCP::iSelectPlottables);//设置基本坐标轴(左侧Y轴和下方X轴)可拖动、可缩放、曲线可选、legend可选、设置伸缩比例,使所有
}
在temperassistant.c初始化函数中将绘图控件初始化函数进行初始化
this->initPlot();//初始化绘图控件绘图控件的函数请参见这里:绘图控件常用属性介绍
二、选择单条曲线
2.1 单一曲线选择复选框on_rdbSinglePlot_clicked(bool checked)

在temperassistant.h的private slots:自动声明
void on_rdbSinglePlot_clicked(bool checked);//单条曲线复选框在temperassistant.h的public:手动声明
    typedef struct {
        bool isActive = false;
        qint32 size = 0;// 1~3
        uint8_t data[3];
    }DataBuffer;
    enum DataType{
        DT_uint8_t = 0,
        DT_uint16_t = 1,
        DT_uint32_t = 2,
        DT_int8_t = 3,
        DT_int16_t = 4,
        DT_int32_t = 5,
        DT_float = 6,
    };
    Q_ENUM(DataType)

    DataType dataType = DT_uint8_t; // 曲线数据点 类型
    QTimer timer;
在temperassistant.c中写入代码。
/***************************单条曲线****************************/
/**
 * @brief TemperAssistant::on_rdbSinglePlot_clicked 点击选择单条曲线复选框
 * @param checked
 */
void TemperAssistant::on_rdbSinglePlot_clicked(bool checked)
{
    if(checked){
        ui->statusBar->showMessage(tr("显示单一曲线"));//状态显示栏
        this->configSinglePlot();  // 添加一条曲线
        ui->spbNumberG->setEnabled(false); // 禁用多条曲线的两个控件
        ui->cbbDataType->setEnabled(true);
        timer.disconnect(SIGNAL(timeout()));//每次点击前将计时信号清除
        switch(dataType)//选择选择的数据类型
        {
        case DT_int8_t:
        case DT_uint8_t:
            connect(&timer, SIGNAL(timeout()), this, SLOT(slots_singlePlotByte()));
            qDebug()<<"进入uint8_t";
            break;
        case DT_int16_t:
        case DT_uint16_t:
            connect(&timer, SIGNAL(timeout()), this, SLOT(slots_singlePlotHMByte()));
            qDebug()<<"进入uint16_t";
            break;
        case DT_int32_t:
        case DT_uint32_t:
        case DT_float:
            connect(&timer, SIGNAL(timeout()), this, SLOT(slots_singlePlotMByte()));
            break;
        }
        this->dataBuf.clear();// 清空数据缓存
        timer.start(20); // 启动定时器 20ms
    }
}
2.2 如何在Qt中的Qcombobox控件中添加数据
为QComboBox添加文本有两种方式:
2.2.1 利用addItem方法添加(动态添加)
这种方法适合动态添加,即添加的数据会随运行的程序改变而改变,但是断开以后会再次消失,这就是动态添加combobox对象的数据。
就像串口的comboBox就是

2.2.2 直接在ui界面里添加(固定添加)
这种方法适合于固定添加,即不会随着程序运行的过程改变下拉列表的数据;
双击ui界面中的combobox对象弹出如下界面添加就可以了

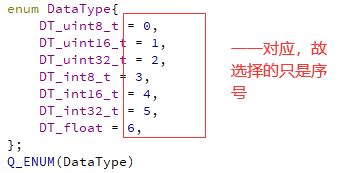
总结其关系如下:
| 枚举成员变量名称 | 实际判断数值序号 | 复选框选项显示界面 |
|
| 0 |
|
|
| 1 |
|
|
| 2 |
|
|
| 3 |
|
|
| 4 |
|
|
| 5 |
|
|
| 6 |
|
在teperassistant.ui中我们可以看到添加的文本

QComboBox列表项的访问
QComboBox 存储的项是一个列表,但是 QComboBox 不提供整个列表用于访问,可以通过索引访问某个项。访问项的一些函数主要有以下几种:
- int currentlndex():返回当前项的序号,第一个项的序号为0。
- QString currentText():返回当前项的文字。
- QVariant currentData(int role = Qt::UserRole):返回当前项的关联数据,数据的缺省角色为 role = Qt::UserRole,角色的意义在后续章节会详细介绍。
- QString itemText(int index):返回指定索引号的项的文字。
- QVariant itemData(int index, int role = Qt%:UserRole):返回指定索引号的项的关联数据。
- int count():返回项的个数。
2.2.3 鼠标放上面显示文字

2.3 更换曲线数据类型

在temperassistant.h的private slots:自动声明
void on_cbbDataType_currentIndexChanged(int index);//更换曲线数据类型在temperassistant.c中写入代码。
/**
 * @brief TemperAssistant::on_cbbDataType_currentIndexChanged 更换曲线数据类型
 * @param index
 */
void TemperAssistant::on_cbbDataType_currentIndexChanged(int index)
{
    this->dataType = (DataType)index;
    if( ui->rdbSinglePlot->isChecked() ){
        emit ui->rdbSinglePlot->clicked(true); // 触发点击事件,更换定时器超时槽函数
    }
}
this->dataType = (DataType)index;选择当前的序号,判断单一曲线复选框是否选中
并将其传入void TemperAssistant::on_rdbSinglePlot_clicked(bool checked)
2.4 添加一条曲线configSinglePlot()
在temperassistant.h的public:手动声明
void configSinglePlot();//增加一条曲线在temperassistant.h的public:手动声明曲线数量
qint32 graphsCount = 0;//曲线数量在temperassistant.c中写入代码。
/**
 * @brief TemperAssistant::configSinglePlot 添加一条曲线
 */
void TemperAssistant::configSinglePlot()
{
    /* 清空原有曲线 */
    qint32 tmpCG;
    tmpCG = ui->customPlot->clearGraphs();
    ui->btnCurveSel->clear();
    ui->statusBar->showMessage(tr("clear %1 Graphs").arg(tmpCG));

    /* 新增一条曲线 */
    this->addNewGraph();
    graphsCount = 1;
    ui->customPlot->replot(QCustomPlot::rpQueuedReplot);

    /* 更新坐标提示 */
    if( ui->actionCoorTips->isChecked() ){
        emit ui->actionCoorTips->triggered(false);
        emit ui->actionCoorTips->triggered(true);
    }
}
2.5 新增一条曲线addNewGraph()
在temperassistant.h的public:手动声明
void addNewGraph();//新增一条曲线在temperassistant.h的public:声明颜色
    const QColor colorTable[20] = {
        QColor("#FB0873"), QColor("#3AFFF0"),QColor("#F8CF45"),QColor("#A553A8"),
        QColor("#87FF8D"), QColor("#F7595B"),QColor("#55C6DE"),QColor("#E8FF4C"),
        QColor("#E4008A"), QColor("#5AFFCA"),QColor("#F7A148"),QColor("#817FBC"),
        QColor("#AAFF6C"), QColor("#F62869"),QColor("#4EF1F5"),QColor("#FAE947"),
        QColor("#BE349B"), QColor("#71FFA1"),QColor("#F77550"),QColor("#62ACD2")};
在temperassistant.c中写入代码。
/**
 * @brief TemperAssistant::addNewGraph 添加新的曲线
 */
void TemperAssistant::addNewGraph()
{
    // add new graphs and set their look:
    ui->customPlot->addGraph();

    qint32 currentNum = 0;// 当前曲线的索引号
    currentNum = ui->customPlot->graphCount()-1;

    /* 使用随机颜色 */
    qint32 colorIndex = qrand()%20;// 伪随机
    QPen pen;         // 画笔,绘制曲线颜色,形状等
    pen.setWidth(1);  //线宽
    pen.setStyle(Qt::PenStyle::SolidLine);// a plain line
    pen.setColor(colorTable[colorIndex]);// 在20种颜色中随机选择一种
    ui->customPlot->graph(currentNum)->setPen(pen); // line color blue for first graph
    ui->customPlot->graph(currentNum)->setName(tr("曲线%1").arg(currentNum+1));//默认曲线名字
    ui->customPlot->graph(currentNum)->setSelectable(QCP::stNone);// 禁止鼠标选择曲线

    /* 添加对曲线的控制参数 */
    ui->btnCurveSel->addItem(ui->customPlot->graph(currentNum)->name());
}
三、增加多条曲线
3.1 多条曲线数量选择on_spbNumberG_editingFinished()

在temperassistant.h的private slots:自动声明
void on_spbNumberG_editingFinished();//多条曲线数量选择在temperassistant.c中写入代码。
/**
* @brief TemperAssistant::on_spbNumberG_editingFinished 修改曲线数量
*/
void TemperAssistant::on_spbNumberG_editingFinished()
{
emit ui->rdbMultiPlot->clicked(true); // 触发"多条曲线"点击事件,修改曲线数量
}3.2 修改曲线数量的复选框on_rdbMultiPlot_clicked(bool checked)

在temperassistant.h的private slots:自动声明
void on_rdbMultiPlot_clicked(bool checked);//多条曲线复选框在temperassistant.c中写入代码。
/**
 * @brief TemperAssistant::on_rdbMultiPlot_clicked 选择多条曲线
 * @param checked
 */
void TemperAssistant::on_rdbMultiPlot_clicked(bool checked)
{
    if(checked){
        /* 修改数据显示函数 */
        timer.disconnect(SIGNAL(timeout()));
        connect(&timer, SIGNAL(timeout()), this, SLOT(slots_multiPlotCurve()));
        ui->cbbDataType->setEnabled(false); // 不需要数据类型选择,因为有固定的通信协议
        ui->statusBar->showMessage(tr("显示多条曲线"));
        ui->spbNumberG->setEnabled(true);
        this->configMultiPlot(); // 添加曲线
        this->rxBuffer.clear();//将接收数据清零
        timer.start(20); // 启动定时器 20ms
    }
}
3.3 增加多条曲线configMultiPlot()
在temperassistant.h的public:手动声明
void configMultiPlot();//增加多条曲线在temperassistant.c中写入代码。
/**
* @brief TemperAssistant::configMultiPlot 添加多条曲线
*/
void TemperAssistant::configMultiPlot()
{
/* 清空原有曲线 */
qint32 tmpCG;
tmpCG = ui->customPlot->clearGraphs();
ui->btnCurveSel->clear();
ui->statusBar->showMessage(tr("clear %1 Graphs").arg(tmpCG));
/* 添加多条曲线 */
qint32 numGraphs = ui->spbNumberG->value();
for(qint32 i=0; i<numGraphs; i++)
{
// set line style
this->addNewGraph();
}
graphsCount = numGraphs;
ui->customPlot->replot(QCustomPlot::rpQueuedReplot);//将多条曲线绘制在表格上
/* 更新坐标提示 */
if( ui->actionCoorTips->isChecked() )
{
emit ui->actionCoorTips->triggered(false);
emit ui->actionCoorTips->triggered(true);
}
ui->statusBar->showMessage(tr("添加%1条曲线").arg(numGraphs));//提示栏显示增加曲线数量
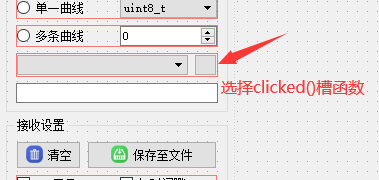
}3.4、多条曲线模式下选择任意曲线名称下拉框on_btnCurveSel_currentIndexChanged(int index)
程序中经常使用下拉框控件QComboBox,当QComboBox选项改变的时候产生currentIndexChanged信号。

在temperassistant.h的private slots:手动声明
void on_btnCurveSel_currentIndexChanged(int index);//下拉框选择曲线在temperassistant.c中写入代码。
/**
 * @brief TemperAssistant::on_btnCurveSel_currentIndexChanged 多条曲线模式下选择任意曲线名称下拉框
 * @param index
 */
void TemperAssistant::on_btnCurveSel_currentIndexChanged(int index)
{
    if(ui->btnCurveSel->currentText().isEmpty())return;//如果下拉框为空白,则退出
    QString curveName = ui->customPlot->graph(index)->name();//获取当前曲线名称
    ui->txtCurveRename->setText( curveName );//将文本框修改名称赋给当前曲线名称
    QColor curveColor = ui->customPlot->graph(index)->pen().color();//为当前曲线上色
    ui->btnColorSel->setPalette(QPalette( curveColor ));//调色板属性
    ui->btnColorSel->setAutoFillBackground(true);       // 色块填充
    ui->btnColorSel->setStyleSheet(tr("background-color: %1").arg(curveColor.name()));//当前色块背景和当前曲线颜色相同
}
3.5、修改曲线的名字on_txtCurveRename_editingFinished()

命名为:txtCurveRename

在temperassistant.h的private slots:自动声明
void on_txtCurveRename_editingFinished();//修改曲线的名字在temperassistant.c中写入代码。
/**
 * @brief TemperAssistant::on_txtCurveRename_editingFinished 修改曲线名字
 */
void TemperAssistant::on_txtCurveRename_editingFinished()
{
    if(ui->customPlot->graphCount() == 0) return ;//曲线为0条时返回
    qint32 index = ui->btnCurveSel->currentIndex();
    QString newName = ui->txtCurveRename->text();//读取文本框中的文字
    ui->customPlot->graph(index)->setName(newName);//图例上显示新的名字
    ui->customPlot->replot(QCustomPlot::rpQueuedReplot);//将其绘制在表格上
}
3.6 曲线颜色更换按钮on_btnColorSel_clicked()
在temperassistant.h的private slots:自动声明
void on_btnColorSel_clicked();//曲线颜色更换按钮在temperassistant.c中写入代码。
/**
 * @brief TemperAssistant::on_btnColorSel_clicked 修改曲线颜色
 */
void TemperAssistant::on_btnColorSel_clicked()
{
    qint32 index = ui->btnCurveSel->currentIndex();
    QColorDialog *colorDialog = new QColorDialog();
    colorDialog->setWindowTitle("选择颜色");
    QColor color = ui->btnColorSel->palette().background().color();
    color = colorDialog->getColor(color);
    if(color.isValid() )
    {
        ui->btnColorSel->setPalette(QPalette( color ));
        ui->btnColorSel->setStyleSheet(tr("background-color: %1").arg(color.name()));
        ui->customPlot->graph(index)->setPen(QPen(color));
        ui->customPlot->replot(QCustomPlot::rpQueuedReplot);
        /* 更新坐标点的颜色 */
        if( ui->actionCoorTips->isChecked() )
        {
            emit ui->actionCoorTips->triggered(false);
            emit ui->actionCoorTips->triggered(true);
        }
    }
}
四、单字节处理slots_singlePlotByte()
该处理函数是由【2.1 单一曲线选择复选框on_rdbSinglePlot_clicked(bool checked)】跳转而来
我们来梳理一下其关系:

如果选择了 uint8_t/int8_t,每一个字节就是一个数据点,HEX发送 0x12 0x340x56 0x78 的时候,第一个数据将会被认为是 18(0x12 的十进制数),第二个数据会被认为是 52(0x34 的十进制数)。
在temperassistant.h的public:手动声明
void slots_singlePlotByte(); // a Byte在temperassistant.h的public:手动声明坐标轴X累加变量
double posX = 0;在temperassistant.c中写入代码。
/* 单一曲线显示处理,定时器超时槽函数 */
/**
 * @brief TemperAssistant::slots_singlePlotByte 20毫秒超时更新曲线,单字节处理
 */
void TemperAssistant::slots_singlePlotByte()
{
//    qDebug()<<"20毫秒进入一次";
    if(rxBuffer.isEmpty()) return; // 数据缓存为空
    quint32 dataSize = rxBuffer.size();
    QVector<double> tmpPosX(dataSize), tmpData(dataSize); // 用于绘图数据点,距离上一次绘图的数据量
    qDebug()<<"20毫秒进入一次";
    switch(dataType)
    {
    qDebug()<<"数据类型选择";
    case DT_int8_t :
        for(quint32 i=0; i<dataSize ; i++)
        {
            tmpPosX[i] = posX++;     // x轴累加,20毫秒累加一次
            tmpData[i] = rxBuffer.at(i);//牵引出当前字符
        }
        break;
    case DT_uint8_t :
        for(quint32 i=0; i<dataSize ; i++)
        {
            tmpPosX[i] = posX++;     // x轴累加
            tmpData[i] = (quint8)rxBuffer.at(i);//牵引出当前位置下的字符
        }
        break;
    default:break;
    }
    ui->customPlot->graph(0)->addData(tmpPosX, tmpData); // 将数据添加到图上
    qDebug()<<"将数据添加到图上";
    this->resetAxisRange(posX,tmpData.at(tmpData.count()-1)); // 调整坐标轴
    ui->customPlot->replot(QCustomPlot::rpQueuedReplot);//重新绘制图像,比单纯的:ui->customPlot->replot()好用
    rxBuffer.clear();
}
4.1 重新绘制坐标轴范围,自动适应坐标轴resetAxisRange(double xAxis, double yAxis)
在temperassistant.h的public:手动声明
void resetAxisRange(double xAxis, double yAxis);//自动适应坐标轴在temperassistant.c中写入代码。
ui->customPlot->xAxis->setRange(xAxis+0, 100, Qt::AlignRight);//+代表左移,X轴起始点为0,总长为100,数据从最左边绘制
/**
 * @brief TemperAssistant::resetAxisRange 重绘坐标轴的范围
 * @param xAxis
 * @param yAxis
 */
void TemperAssistant::resetAxisRange(double xAxis, double yAxis)
{
    ui->customPlot->xAxis->setRange(xAxis+0, 100, Qt::AlignRight);
    QCPRange yRange = ui->customPlot->yAxis->range();
    if(yAxis > (yRange.upper))
    {
        yRange.upper = yAxis + 20;
        yRange.lower = yRange.upper - 100;
    }
    else if( yAxis < (yRange.lower))
    {
        yRange.lower = yAxis - 20;
        yRange.upper = yRange.lower + 100;
    }
    ui->customPlot->yAxis->setRange(yRange);
} 
五、半字节处理slots_singlePlotHMByte()
如果选择了 uint16_t/int16_t,每两个字节就是一个数据点,并且是低位字节在前,HEX发送 0x12 0x34 0x56 0x78 的时候,第一个数据会被认为是13330(0x3412),第二个数据将会被认为是 30806(0x7856)。
在temperassistant.h的public slots:手动声明
void slots_singlePlotHMByte();//双字节数据处理函数在temperassistant.c中写入代码。
/**
 * @brief TemperAssistant::slots_singlePlotHMByte 20毫秒超时更新曲线,半字数据曲线
 */
void TemperAssistant::slots_singlePlotHMByte()
{
    if(rxBuffer.isEmpty()) return; // 数据缓存为空返回
    QByteArray tmpArray;//存放奇数字节
    if( (rxBuffer.size()&0x01) != 0)//如果是奇数个字节数
    { // 奇偶性判断是否2的倍数
        tmpArray = rxBuffer.right(1);// 提取最左边的一个字节
        rxBuffer.chop(1);//将该字节删除
    }
    quint32 dataSize = rxBuffer.size()/2;//字节大小/2来判断字节数
    if(dataSize == 0)//如果字节数小于2
    {
        rxBuffer.clear();//将接收的字节清零
        if(!tmpArray.isEmpty())//如果字节数不为空,即tmpArray有字节
        {
            rxBuffer.append(tmpArray);//将其在dataBuf后面拼接
        }
        return;
    }
    union ArrayToX{ // 整形数据转换成浮点数
        qint16  data_hw;     // half word 2字节
        quint16 data_uhw;    // unsigned half word
    }tmp[dataSize];
    memcpy(&tmp, rxBuffer.data(), rxBuffer.size());
    QVector<double> tmpPosX(dataSize), tmpData(dataSize); // 用于绘图数据点,距离上一次绘图的数据量
    switch(dataType){
    case DT_int16_t :
        for(quint32 i=0; i<dataSize; i++)
        {
            tmpPosX[i] = posX++;     // x轴累加
            tmpData[i] = qFromLittleEndian<qint16>(&tmp[i].data_hw);
        }
        break;
    case DT_uint16_t :
        for(quint32 i=0; i<dataSize; i++)
        {
            tmpPosX[i] = posX++;     // x轴累加
            tmpData[i] = qFromLittleEndian<quint16>(&tmp[i].data_uhw);
        }
        break;
    default:break;
    }
    ui->customPlot->graph(0)->addData(tmpPosX, tmpData); // 将数据添加到图上,坐标点
    this->resetAxisRange(posX,tmpData.at(tmpData.count()-1)); // 调整坐标轴
    ui->customPlot->replot(QCustomPlot::rpQueuedReplot);
    rxBuffer.clear();//将接收清空
    if(!tmpArray.isEmpty())//如果接收的奇数字节不为空
    {
        rxBuffer.append(tmpArray);//将接收到的奇数的哪个字符串拼接到接收的接收数组上面
    }
}
六、多字节处理slots_singlePlotMByte()
如果选择了 uint32_t/int32_t,每 4 个字节就是一个数据点,并且是低位字节在前,HEX发送 0x12 0x34 0x56 0x78 的时候,第一个数据会被认为是2018915346(0x78563412)
在temperassistant.h的public slots:手动声明
void slots_singlePlotMByte();//多字节数据处理函数在temperassistant.c中写入代码。
/**
 * @brief TemperAssistant::slots_singlePlotMByte 超时更新曲线,多字节数据曲线
 */
void TemperAssistant::slots_singlePlotMByte()
{
    if(rxBuffer.isEmpty()) return;// 数据缓存为空
    QByteArray tmpArray;
    qint32 dataMod = rxBuffer.size()%4; // 处理不足4字节的数据
    if( dataMod != 0)
    {
        tmpArray = rxBuffer.right(dataMod);
        rxBuffer.chop(dataMod);
    }
    quint32 dataSize = rxBuffer.size()/4;
    if(dataSize == 0)
    {   // 数据量少于4
        rxBuffer.clear();
        if(!tmpArray.isEmpty()){
            rxBuffer.append(tmpArray);
        }
        return;
    }
    union ArrayToX
    {   // 数组数据转换其他数据类型
        qint32  data_w;     // word 4字节
        quint32 data_uw;    // unsigned word
        float data_f;       // float
    }tmp[dataSize];

    memcpy(&tmp, rxBuffer.data(), rxBuffer.size());

    QVector<double> tmpPosX(dataSize), tmpData(dataSize); // 用于绘图数据点,距离上一次绘图的数据量

    switch(dataType)
    {
    case DT_int32_t :
        for(quint32 i=0; i<dataSize; i++)
        {
            tmpPosX[i] = posX++;     // x轴累加
            tmpData[i] = qFromLittleEndian<qint32>(&tmp[i].data_w);
        }
        break;
    case DT_uint32_t :
        for(quint32 i=0; i<dataSize; i++)
        {
            tmpPosX[i] = posX++;     // x轴累加
            tmpData[i] = qFromLittleEndian<quint32>(&tmp[i].data_uw);
        }
        break;
    case DT_float :
        for(quint32 i=0; i<dataSize; i++)
        {
            tmpPosX[i] = posX++;     // x轴累加
            tmpData[i] = qFromLittleEndian<float>(&tmp[i].data_f);
        }
        break;
    default:break;
    }
    ui->customPlot->graph(0)->addData(tmpPosX, tmpData); // 将数据添加到图上
    this->resetAxisRange(posX,tmpData.at(tmpData.count()-1)); // 调整坐标轴
    ui->customPlot->replot(QCustomPlot::rpQueuedReplot);
    rxBuffer.clear();
}
memcpy() 用来复制内存,其原型为:
void * memcpy ( void * dest, const void * src, size_t num );
memcpy() 会复制 src 所指的内存内容的前 num 个字节到 dest 所指的内存地址上。
如果选择 float,同样是每 4 个字节是一个数据点,并且数据格式是遵循IEEE754 标准的浮点格式,由符号位,指数位,尾数部分组成。通常单片机对浮点数据的存储方式都遵循这一标准,所以可以无需转换,像整型数据一样直接发送浮点型数据既可以,例如: HAL_UART_Transmit(&huart1,(uint8_t)&Data_f, 4, 0xffff); Data_f 就是一个浮点型数据,直接根据首地址发送 4 个字节的数据即可(前提是单片机是小端字节序, STM32 系列的芯片就是小端字节序)。
七、多曲线数据处理函数slots_multiPlotCurve()
多曲线发送格式:
文本方式发送 “0=23;1=14;2=22;” 对应曲线1、曲线2、曲线3。

在进行多数据处理函数之前,我们先介绍一下QT的正则表达式:
qt本身为c++语言,在c++中"\"用来escape(转义),表示其本身是需要转义的,故在一个正则表达式中包含“\”需要用“\\”表示。
一些不便书写的字符,采用在前面加 "\" 的方法。这些字符其实我们都已经熟知了。
表达式 可匹配
\r, \n 代表回车和换行符
\t 制表符
\\ 代表 "\" 本身7.1 正则表达式相关函数用法
QRegExp::indexIn() 搜索字符串以找到匹配的字串,返回索引值,失败返回-1
pos(int n) 第n个组的位置(默认值为0)
capturedTexts() 捕捉到的字符串列表, 对应的还有captureCount() ,获取表达式中含有的捕捉组的数目
matchedLength() 匹配的长度
QString::split()函数拆分字符串:
QString str = "polluter pays principle";
QStringList words = str.split(" ");
//根据空格拆分字符串一个字符串能被分成为一个装有子串的QStringList,我们把"polluter pays principle"分成三个子串: "polluter", "pays", 和 "principle"。
在temperassistant.h的public slots:手动声明
void slots_multiPlotCurve(); // 绘制多条曲线处理函数在temperassistant.c中写入代码。
/**
 * @brief TemperAssistant::slots_multiPlotCurve 超时更新曲线,多条曲线显示处理
 */
void TemperAssistant::slots_multiPlotCurve()
{
    if(rxBuffer.isEmpty()) return;// 数据缓存为空
    qDebug()<<"进入多字节处理";
    /* 删除所有空格 */
    QString tmp = rxBuffer;
    tmp.remove(QRegExp("\\s"));//QT的正则表达式类,移除空格
    rxBuffer = tmp.toLatin1();//将QString转QByteArray的ASCII方法
    /*验证最后的数据为';',表示至少接收到一帧完整的数据*/
    if(rxBuffer.endsWith(';'))//断是否以逗号结束。
    { // 接收到完整的数据
        QRegExp reg("(\\d+=-?\\d+\\.?\\d*;)", Qt::CaseInsensitive);//不区分大小写
        qint32 pos = 0;//查到的整个正则段的位置索引
        // 遍历所有匹配的字符串
        while ((pos = reg.indexIn(rxBuffer, pos)) != -1)//从第零个字符位置开始查找
        {
            pos += reg.matchedLength();//matchedLength() 匹配的长度
            /* 解析字符串,以'='划分两部分 */
            QStringList valueData = reg.capturedTexts().at(0).split('='); // 划分为两部分有效数据
            qint32 graphNum = valueData.at(0).toInt();  // 第一部分是曲线编号
            QString strData = valueData.at(1);          // 第二部分是曲线数据
            if( graphNum >= graphsCount )
            {
                continue;//结束单次循环
            }
            strData.remove(';');  // 移除';'号
            float curveData = strData.toFloat();//转化为浮点数据
            ui->customPlot->graph(graphNum)->addData(posX, curveData);//选择虚线进行画图
        }
        ui->customPlot->xAxis->setRange(posX+0, 100, Qt::AlignRight);// 调整坐标轴 // Y轴不调整
        ui->customPlot->replot(QCustomPlot::rpQueuedReplot);
        posX++;
        rxBuffer.clear();
    }
}


 806
806


 被折叠的 条评论
为什么被折叠?
被折叠的 条评论
为什么被折叠?
 到【灌水乐园】发言


