


我们低代码开发平台免费开放后,收到最大的需求就是“单据转换”,主要是我们以前所面对的行业的需求压根没法通过单据转换这样的配置来实现,所以我们一直都是用后台插件的形式处理他们的个性化计算,转换需求。但是免费开放后,面对的都是各种各样的行业,有很多需求用单据转换确实更简单和容易些。
我们采用了流程化的方式来实现单据转换,同一个单据可以支持多个转换流程,每个流程支持多个转换节点,每个节点完成不同的转换需求,逻辑很合理。

以流程的方式实现单据转换
所以昨天有朋友看了我们截图后私信想了解下我们图片上的“日期字段”的格式化按钮怎么做的。一看就是一个搞开发的朋友,对于开发的朋友我基本上都会详细解答!
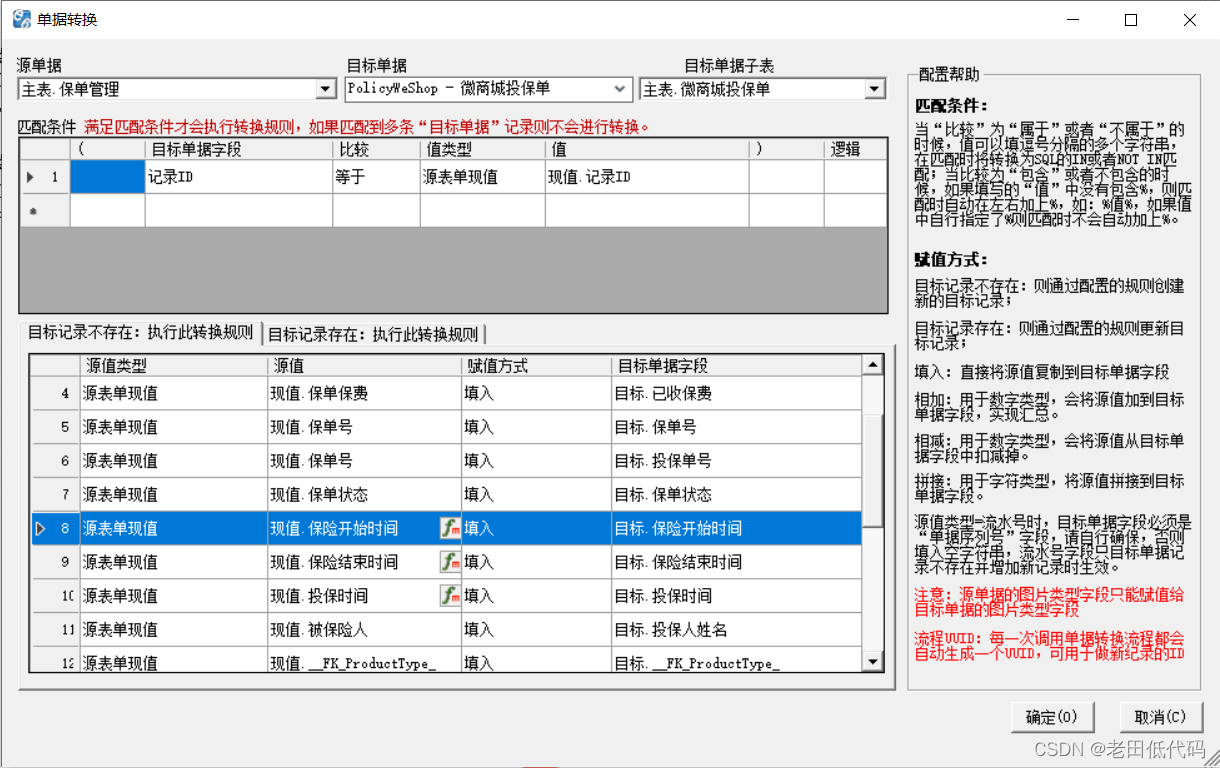
日期字段的单元格后面显示fm按钮
这种实现其实非常简单,因为DataGridView为我们提供了很多自定义显示的方式。要实现单元格中除了显示文字内容,还需要显示一个按钮并且能点击,需要几点:
1、在DataGridView的CellPainting事件中绘制此单元格;
this.DataGridView.CellPainting += new DataGridViewCellPaintingEventHandler(DataGridView_CellPainting);
void DataGridView_CellPainting(object sender, DataGridViewCellPaintingEventArgs e)
{
  if (e.RowIndex < 0 || e.ColumnIndex < 0) return;

  string columnName = this.DataGridView.Columns[e.ColumnIndex].Name;
  if (columnName == "你的这一个单元格的ColumnName")
  {
    e.PaintBackground(e.ClipBounds, true);
    e.PaintContent(e.ClipBounds);

    Rectangle rect = new Rectangle(e.CellBounds.X + e.CellBounds.Width - btnW, e.CellBounds.Y + (e.CellBounds.Height - btnW) / 2, btnW, btnW);
    ControlPaint.DrawButton(e.Graphics, rect, ButtonState.Flat);

    // Properties.Resources.Format为工程的Resources.resx中的图标
    e.Graphics.DrawImage(Properties.Resources.Format, rect);
    e.Handled = true;
  }
}
2、在DataGridView的CellMouseClick事件中处理按钮点击;
this.DataGridView.CellMouseClick += new DataGridViewCellMouseEventHandler(DataGridView_CellMouseClick);
private void DataGridView_CellMouseClick(object sender, DataGridViewCellMouseEventArgs e)
{
  string columnName = this.DataGridView.Columns[e.ColumnIndex].Name;

  if (columnName == "你的这一个单元格的ColumnName")
  {
    Rectangle cellBounds = this.GetCellRectangle(this.DataGridView, e.ColumnIndex, e.RowIndex);
    Rectangle rect = new Rectangle(cellBounds.Width - btnW, (cellBounds.Height - btnW) / 2, btnW, btnW);
    if (rect.Contains(e.Location))
    {
      // 这里打开格式化设置的Form
      return;
    }
  }
}
3、正确获得单元格相对于Form的坐标(很重要,否则鼠标点击时候不能正确判断点击按钮)
private Rectangle GetCellRectangle(DataGridView gridView, int colIndex, int rowIndex)
{
  //DataGridView的坐标
  int gridX = gridView.Location.X;
  int gridY = gridView.Location.Y;
  //单元格在DataGridView中的坐标
  Rectangle cellRect = gridView.GetCellDisplayRectangle(colIndex, rowIndex, false);

  int cellX = cellRect.X;
  int cellY = cellRect.Y;

  //单元格相对于form的坐标
  int x = gridX + cellX;
  int y = gridY + cellY;

  return new Rectangle(x, y, cellRect.Width, cellRect.Height);
}
其实了解原理后非常简单的实现,希望有需要的朋友参考使用。直接拷贝代码修改下即可运行。


 3800
3800


 被折叠的 条评论
为什么被折叠?
被折叠的 条评论
为什么被折叠?
 到【灌水乐园】发言


