


17.异步方法
18.邮件发送
19.EasyCode
20.spring mvc
21.字符编码过滤器
22.映射请求
23.获取一般参数
24.rest client
25.参数格式处理
26.获取特殊参数
27.实体对象属性校验
28.前端渲染
29.后端渲染
30.session 存值
31.拦截器
32.统一异常处理
33.文件上传
34.Lombok
35.ssm 项目整合
36.项目考查
17.异步方法
在某些请求中,需要执行比较耗时的方法比如发送邮件或文件上传,但又不希望影响前端响应。通常常使用异步方法,从 Spring3 开始提供了 @Async 注解,该注解可以被标在方法上,以便异步地调用该方法。调用者将在调用时立即返回,方法的实际执行将提交给 Spring TaskExecutor 的任务中,由指定的线程池中的线程执行。
异步方法使用有如下两步:
1.配置 xml 开启允许异步,默认是基于单线程执行, 所有的定时任务与异步方法串行执行,这就可能导致运行时间久的任务,会影响到下一个运行周期的任务。如果需要基于多线程执行,则需要配置线程池数量。
<task:executor id="executor" pool-size="5"  />
<task:annotation-driven executor="executor"/>
2.控制器中调用服务层的异步方法
import org.springframework.beans.factory.annotation.Autowired;
import org.springframework.stereotype.Controller;

@Controller
public class UserController {
    @Autowired
    UserService userService;

    public void asyncMethod() throws InterruptedException {
        userService.asyncMethod();
        System.out.println("2");
    }
}
3.服务层的异步方法
import org.springframework.scheduling.annotation.Async;
import org.springframework.stereotype.Service;

@Service
public class UserService {

    @Async
    public void asyncMethod() throws InterruptedException {
        Thread.sleep(1000);
        System.out.println(1);
    }
}
注意:异步方法在同一个类中不串联调用,否则将导致异步失效,即异步方法不能写在控制层且由控制层调用。
18.邮件发送
Spring Email 抽象的核心是 MailSender 接口。顾名思义,MailSender 的实现能够通过连接 Email 服务器实现邮件发送的功能。Spring 自带的一个 MailSender 的实现 JavaMailSenderImpl。它会使用 JavaMail API 来发送 Email。
<dependency>
    <groupId>org.springframework</groupId>
    <artifactId>spring-context-support</artifactId>
    <version>5.2.12.RELEASE</version>
</dependency>
<dependency>
    <groupId>javax.mail</groupId>
    <artifactId>mail</artifactId>
    <version>1.4.7</version>
</dependency>
配置邮件发送类 JavaMailSenderImpl
<bean id="javaMailSender" class="org.springframework.mail.javamail.JavaMailSenderImpl">
<property name="host" value="smtp.qq.com"/>
<property name="port" value="25"/>
<property name="username" value="1533481985@qq.com"/>
<property name="password" value="nktxzgxrfgdjjjai"/>
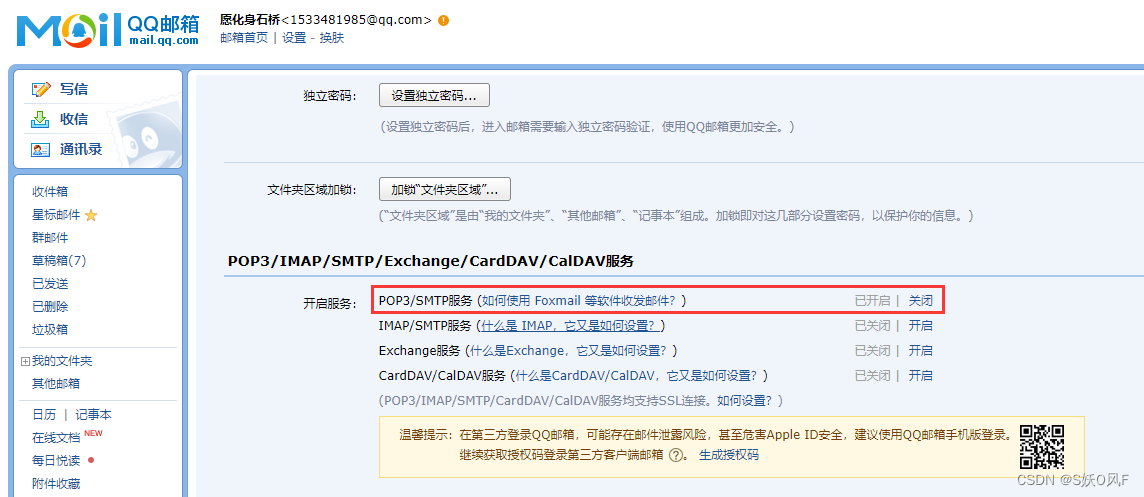
</bean>注意:在 host 中 smtp 是邮件发送的基本协议,类似于 http、ftp、jdbc 等协议。后面的 qq 说明使用的是 qq 邮箱服务,如果使用 163 则为 smtp.163.com,同时一定要在发送者邮箱中开启 SMTP。
QQ 邮箱开启 smtp 需要在浏览器中登录 QQ 邮箱,然后点击:设置->账户->POP3/IMAP/SMTP/Exchange/CardDAV/CalDAV服务。开启成功后会获取第三方登录使用的密码,将密码填入 JavaMailSenderImpl 即可发送常见的邮件。
发送邮件
@RunWith(SpringJUnit4ClassRunner.class)
@ContextConfiguration(value = "classpath:application-context.xml")
public class AppTest {

    @Resource
    JavaMailSenderImpl mailSender;

    @Test
    public void shouldAnswerWithTrue() {
        SimpleMailMessage message = new SimpleMailMessage();//消息构造器
        message.setFrom("1533481985@qq.com");//发件人
        message.setTo("1774297879@qq.com");//收件人
        message.setSubject("Spring Email Test");//主题
        message.setText("hello world!!");//正文
        mailSender.send(message);
        System.out.println("邮件发送完毕");

    }

    @Test
    public void sendEmailWithAttachment() throws MessagingException {
        MimeMessage message = mailSender.createMimeMessage();
        MimeMessageHelper helper = new MimeMessageHelper(message, true);//构造消息helper,第二个参数表明这个消息是multipart类型的
        helper.setFrom("1533481985@qq.com");//发件人
        helper.setTo("1774297879@qq.com");//收件人
        helper.setSubject("Spring Email Test");//主题
        helper.setText("hello world!!");//正文
        //使用Spring的FileSystemResource来加载fox.png
        FileSystemResource image = new FileSystemResource("D:\\jetbrains-agent.jar");
        System.out.println(image.exists());
        helper.addAttachment("jetbrains-agent.jar", image);//添加附加,第一个参数为添加到Email中附件的名称,第二个人参数是图片资源
        mailSender.send(message);
        System.out.println("邮件发送完毕");
    }

    @Test
    public void sendRichEmail() throws MessagingException{
        MimeMessage message = mailSender.createMimeMessage();
        MimeMessageHelper helper = new MimeMessageHelper(message, true,"utf-8");
        helper.setFrom("1533481985@qq.com");//发件人
        helper.setTo("1774297879@qq.com");//收件人
        helper.setSubject("Spring Email Test");//主题
        helper.setText("<html><body><img src='https://p1.ssl.qhimgs1.com/sdr/400__/t01f477654f584e80d1.jpg'/>"
                + "<h4>Hello World!!!</h4>"
                + "<a href='http://58.42.239.163:8888/'>点我激活</a>"
                + "</body></html>", true);//第二个参数表明这是一个HTML
        mailSender.send(message);
    }
}
19.EasyCode
Easycode 是 idea 的一个插件,可以直接对数据的表生成 entity、controller、service、dao、mapper.xml 无需任何编码,简单而强大。由于最新版本存在诸多 bug 推荐使用快照版 EasyCode-1.2.4-SNAPSHOT。
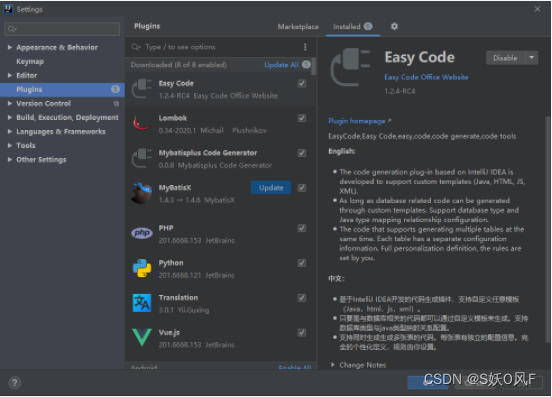
Easycode 使用时需要用 idea 连接数据库。
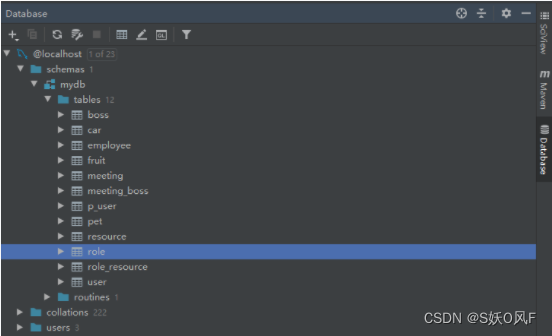
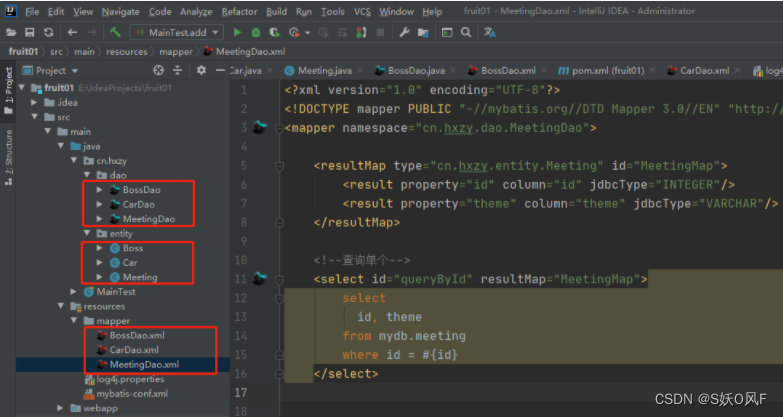
在需要生成代码的数据表上右键选择 Easycode->generater code,然后配置生成的代码包路径和生成的模板。

最后点击 OK 即可生成相应代码。
20.spring mvc
使用 spring mvc 主要解决之前 Servlet 冗余的问题,通常使用 maven 的 web 项目,并导入相关依赖。
1.加入依赖
<dependency>
    <groupId>org.springframework</groupId>
    <artifactId>spring-webmvc</artifactId>
    <version>5.2.12.RELEASE</version>
</dependency>
<dependency>
    <groupId>com.fasterxml.jackson.core</groupId>
    <artifactId>jackson-databind</artifactId>
    <version>2.12.3</version>
</dependency>
依赖关系:
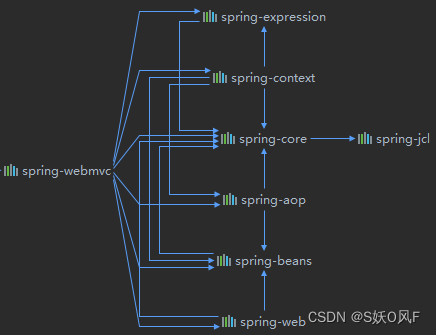
注意:jackson 是全世界现今非常主流且性能非常好的对象序列化 json 与反序列化类库。与国内的阿里巴巴的 fastjson 相媲美。
2.在 web.xml 配置 DispatcherServlet,用来匹配所有请求,并指定它的创建时机为 web 应用启动时。
<servlet>
    <servlet-name>springDispatcherServlet</servlet-name>
    <servlet-class>org.springframework.web.servlet.DispatcherServlet</servlet-class>
    <init-param>
        <param-name>contextConfigLocation</param-name>
        <param-value>classpath:spring-mvc.xml</param-value>
    </init-param>
    <load-on-startup>1</load-on-startup>
</servlet>
<servlet-mapping>
    <servlet-name>springDispatcherServlet</servlet-name>
    <url-pattern>/</url-pattern>
</servlet-mapping>
3.在 resource 下创建 spring-mvc.xml 文件,内容如下:
<?xml version="1.0" encoding="UTF-8"?>
<beans xmlns="http://www.springframework.org/schema/beans"
       xmlns:xsi="http://www.w3.org/2001/XMLSchema-instance"
       xmlns:context="http://www.springframework.org/schema/context"
       xmlns:mvc="http://www.springframework.org/schema/mvc"
       xsi:schemaLocation="http://www.springframework.org/schema/beans
       http://www.springframework.org/schema/beans/spring-beans.xsd
		http://www.springframework.org/schema/context
		http://www.springframework.org/schema/context/spring-context.xsd
		http://www.springframework.org/schema/mvc
		http://www.springframework.org/schema/mvc/spring-mvc.xsd">

    <!-- 控制器在哪个包 -->
    <context:component-scan base-package="cn.hx.springmvc.controller" />
    <!-- 当请求找不到 requestMapping 时去找静态资源 -->
    <mvc:default-servlet-handler />
    <!-- 开启注解驱动-->
    <mvc:annotation-driven />
    <!-- 视图解析 -->
    <bean class="org.springframework.web.servlet.view.InternalResourceViewResolver"
            id="internalResourceViewResolver">
        <!-- 前缀 -->
        <property name="prefix" value="/WEB-INF/jsp/" />
        <!-- 后缀 -->
        <property name="suffix" value=".jsp" />
    </bean>
</beans>
4编写控制器
import org.springframework.stereotype.Controller;
import org.springframework.web.bind.annotation.RequestMapping;

@Controller
public class IndexController {

    @RequestMapping("/index")
    public String index() {
        System.out.println("index");
        return "index";
    }
}
注意:包扫描也可以使用如下方式扫描指定的注解。凡是 Controller 与 ControllerAdvice 注解的都扫描为 spring mvc 的
<context:component-scan base-package="cn.hx.springmvc">
    <context:include-filter type="annotation"
            expression="org.springframework.stereotype.Controller"/>
    <context:include-filter type="annotation"
            expression="org.springframework.web.bind.annotation.ControllerAdvice"/>
</context:component-scan>
如上操作即可完成 spring mvc 的配置,当浏览器客户端发送请求时,会被 web.xml 中的 springDispatcherServlet 匹配上,请求就进入 spring mvc 内部,内部会将所有的 RequestMapping 的路径与请求路径匹配,如果匹配便会调用方法,最后获取方法的返回值与 internalResourceViewResolver 的前缀和后缀拼接,转发到对应视图,将视图返回浏览器客户端。
在 spring mvc 中重定向非常简单只需要在返回字符串前拼接 redirect 关键字即可,如果没有该关键字就是转发。
@GetMapping("aa/bb")
public String index() {
    return "redirect:/index";
}
21.字符编码过滤器
在前面的 jsp Servlet 开发中遇到中文乱码时比较实用的解决办法是使用过滤器统一编码,使用过滤器可以解决服务端和客户端之间的中文字符编码不统一的问题。在 web.xml 中加入由 spring-mvc 提供的字符编码过滤器器 CharacterEncodingFilter,并为该拦截器配置初始化参数 encoding 为 utf-8 即可使所有的请求和响应都以 utf-8 的编码传输。
本课件使用的版本在大多数情况下基本上可以不用配置,但是在文件上传时若不配置则后台将会收到乱码。
<filter>
    <filter-name>characterEncodingFilter</filter-name>
    <filter-class>org.springframework.web.filter.CharacterEncodingFilter</filter-class>
    <init-param>
        <param-name>encoding</param-name>
        <param-value>UTF-8</param-value>
    </init-param>
</filter>
<filter-mapping>
    <filter-name>characterEncodingFilter</filter-name>
    <url-pattern>/*</url-pattern>
</filter-mapping>
如上便为字符编码过滤器,从源码可以看出,该过滤器可以兼容多种字符编码,开发人员需要将本网站使用的字符编码传入过滤器的初始化参数即可。
22.映射请求
在 spring mvc 中使用 @RequestMapping 注解用来映射对应的请求路径,与 servlet 中注解的地址作用相同。该注解可以修饰类和方法,但是它没有 servlet 地址那么严格需要以斜杠开头。
修饰类:提供初步的请求映射信息,也就是请求的父路径。
方法处:提供进一步的细分映射信息。叠加类定义处的 URL。若类定义处未标注则是自己的 URL。
使用 method 属性来指定请求方式,也可以简写使用 @PostMapping,与下面的等效。
@RequestMapping(value = "/testMethod", method = RequestMethod.POST)可以使用 params 和 headers 来更加精确的映射请求。params 和 headers 支持简单的表达式。
@RequestMapping(value = "testParamsAndHeaders", params = { "username","age!=10" }, headers = { "Accept-Language=en-US,zh;q=0.8" })请求参数和请求头必须满足对应的要求才能调用,否则将不能调用该接口。
@RequestMapping 中支持通配符
@RequestMapping("/testAntPath/*/abc")
? 匹配一个字符
* 匹文件名中任意字符串(但不包括/)
** 匹配多层路径
注意:spring MVC 接口方法参数支持 servlet 中的常用对象,如 request、response、session 等,框架会自动从 Tomcat 容器中获取该对象注入到形参的位置。
- HttpServletRequest
- HttpServletResponse
- HttpSession
- java.security.Principal
- Locale
- InputStream
- OutputStream
- Reader
- Writer
public void testServletAPI(Writer out) throws IOException {
    out.write("hello springmvc");
}
23.获取一般参数
spring MVC 极大的简化获取客户端浏览器参数的方式,开发人员不在需要 request 对象获取参数,一般的,只需要用户的方法参数名和前端传入的参数名对应,即可自动接收到对应参数,如果在参数名不一致时可以使用 RequestParam 注解进行映射,同时还可以使用该注解设置该参数必传且不为空,设置默认值等。
1.@RequestParam
如果方法的参数名与请求里面的键相同时可以省略。
@RequestMapping
public String testRequestParam(
        @RequestParam(value = "username") String un,
        @RequestParam(value = "age", defaultValue = "0") int age) {
   return "index";
}
@RequestParam 来映射请求参数.
value 值即请求参数的参数名
required 该参数是否必须,默认为 true
defaultValue 请求参数的默认值,如果参数有默认值,则 required 自动变为 false
还可以使用对象接受参数,spring MVC 会自动创建对象并将客户端参数设置到对应的对象中。
@RequestMapping
public String testPojo(User user) {
    return "success";
}
并且支持级联属性如:role.id、dept.address 等,该值会自动注入 user 里面的 role 和 dept 里面。
2.@PathVariable
在很多主流应用中,简单和少量的参数一般不采用问号拼接,而是直接拼接在接口的末尾。使用 @PathVariable 注解可以用来映射 URL 中的占位符到目标方法的参数。需要注意的是使用 @PathVariable 修饰的参数的方法在映射时优先级低于精确匹配的优先级。
@RequestMapping("/index/{id}")
public String testPathVariable(@PathVariable("id") Integer id) {
  System.out.println("testPathVariable: " + id);
}
注意:在使用 @PathVariable 注解时虽然优先级低于精确匹配但它的优先级会高于静态资源如静态资源为 /css/style.css 会被 @RequestMapping("{path}/{name}")映射,所以一般使用 @PathVariable 是都只获取最后一个测试即可。
24.rest client (自学)
在实际开发中为了数据安全通常会使用 post 方式设计数据接收接口,在实际开发中可能来不及写页面与 ajax 验证接口的可用性,这时就需要一款工具软件来测试相关接口。常用的接口调试工具有 postman、soap ui、restTemplate 等,idea 为了开发人员为了调试方便,默认安装并开启 rest client 插件用于调试接口。
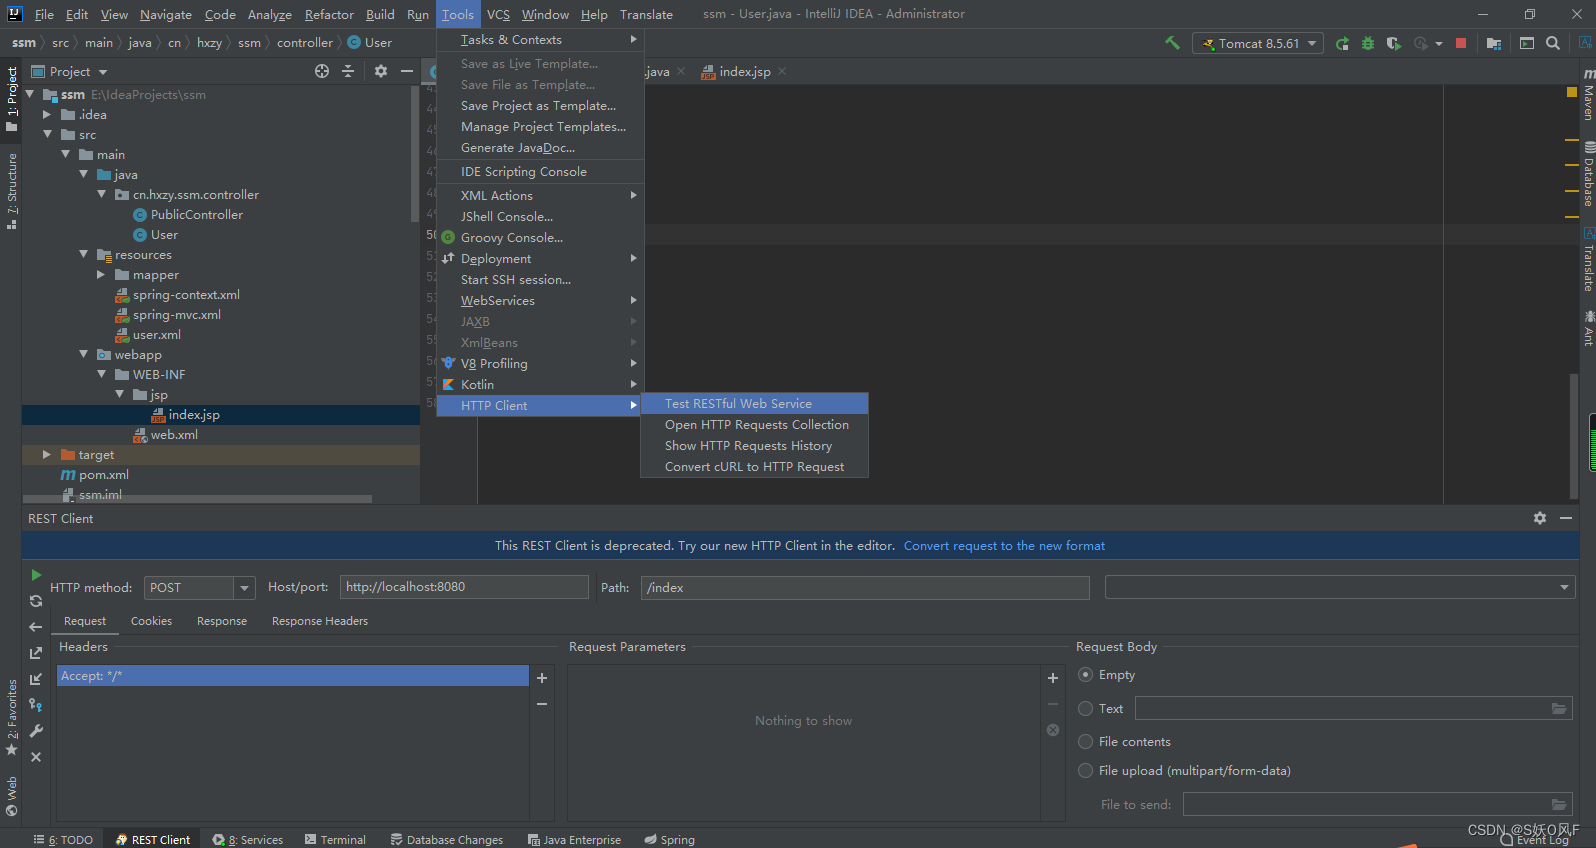
1.HTTP method 用于指定请求方式,常用的请求方式有 GET 和 POST 方式
2.host/port 主要配置请求的协议、主机和端口,具体的接口路径由 Path 指定
3.Headers 用于指定请求头,详情请参照笔记章节的请求头详解。
4.Request Parameters 可以添加普通请求参数。
5.Request Body 用于指定请求时的文件,原生 json 请求等。
25.参数格式处理
在前后端开发中,参数格式一直都是一个比较头疼的问题,就时间来说有使用 2021-1-28 17:33:16、2021/1/28、2021-1-28,使用 DateTimeFormat 注解可以很好的为前端数据注入时间指定对应的格式。同理在数学上有时数字会使用每隔 3 位加一个逗号等情况,使用 NumberFormat 注解完成数据格式处理。
案例:
@DateTimeFormat(pattern="yyyy-MM-dd")
private Date birth;
案例:
1,456,333.5
@NumberFormat(pattern="#,###,###.#")
private Float salary;
指定前端时间注入格式还有另一种解决办法,使用 InitBinder 注解可以使整个类中的时间格式全部使用指定格式。
@RequestMapping("date")
public String date(Date date){
    System.out.println(date);
    return "hello";
}

@InitBinder
public void initBinder(ServletRequestDataBinder binder){
    binder.registerCustomEditor(Date.class, new CustomDateEditor(new SimpleDateFormat("yyyy-MM-dd"),
        true));
}
26.获取特殊参数
在实际开发中经常会获取客户端浏览器请求头里面的某些参数,比较原始的方法是在接口方法参数中注入 request 对象,通过 request 对象获取请求头里面的参数。当然还可以通过注解 RequestHeader 获取请求头里面的参数。@RequestHeader 用法与 @RequestParam 类似,只是@RequestHeader 不能省略。
public String testRequestHeader(@RequestHeader(value = "Accept-Language") String al) {
    return SUCCESS;
}
@CookieValue 可以获取请求头里面的一个 Cookie 值。用法与 @RequestParam 类似,只是 @CookieValue 也不能省略。
public String testCookieValue(@CookieValue("JSESSIONID") String sessionId) {
    return SUCCESS;
}
27.实体对象属性校验
在实际开发中,用户参数校验是一项必不可少的开发逻辑,不但需要做到前端校验(使用 JavaScript 进行参数校验),后端获取到参数后也要做相应的校验。其中比较常用的一种是使用 hibernate 提供的一种通用的校验规范,在后面学习的 Springboot 框架中便是使用这一校验规则。
导入相关依赖
<dependency>
  <groupId>org.hibernate</groupId>
  <artifactId>hibernate-validator</artifactId>
  <version>6.1.0.Final</version>
</dependency>
实体上加入校验注解
@NotEmpty
private String lastName;

@Email
private String email;

@Past//当前时间的前面
@DateTimeFormat(pattern="yyyy-MM-dd")
private Date birth;
在需要校验的接口方法参数上加入校验注解,前端数据过来时就会自动校验。
@GetMapping(value = "/")
public String index2(@Validated User user, Errors result) {
    System.out.println("我被调用了" + user);
    for (FieldError error : result.getFieldErrors()) {
        System.out.println(error.getField() + ":" + error.getDefaultMessage());
    }
    return "hello";
}
28.前端渲染
频播放
前端渲染指后台响应一般由 json 字符串的方式返回,再由专业前端开发工程师渲染前端页面,是现在前后端分离开发项目主要技术手段。在前后端分离开发中后端使用 @ResponseBody 注解将返回的对象以 json 格式传给前端,而不是寻找响应视图。@ResponseBody 加在方法上,则该方法返回的对象序列化成 json 字符串,如果 @ResponseBody 加在控制器类上,则该类的全部方法都返回 json 字符串,可简写为 @RestController。通过源码可以看到 @RestController 是 @Controller 与 @ResponseBody 的复合注解。
@ResponseBody
@RequestMapping("/user")
public User testJson(User user){
    return user;
}
注意:当实体包含时间时,会自动转换为该时间的 long 类型。如果需要按照指定格式序列化成 json 使用 @JsonFormat(pattern = "yyyy-MM-dd", timezone = "GMT+8") 注解,其中的 timezone ="GMT+8" 表示东八区。
@Target(ElementType.TYPE)
@Retention(RetentionPolicy.RUNTIME)
@Documented
@Controller
@ResponseBody
public @interface RestController {
	String value() default "";
}
29.后端渲染
传统模式还是使用 jsp 渲染页面,通过客户端浏览器调用对应路径的接口,该接口会将数据存入 request 然后转发到对应的 jsp 渲染页面,浏览器收到的是已经渲染好的页面。在 spring MVC 中使用模型视图 ModelAndView 即可指明转发的视图和携带的数据。
public ModelAndView testModelAndView(){
    ModelAndView modelAndView = new ModelAndView("index");
    //添加模型数据到 ModelAndView 中.
    modelAndView.addObject("time", new Date());
    return modelAndView;
}
2.模型视图 Map 也可以完成在 request 域中存入数据,在对应转发的 jsp 上也能获取数据。但是由于所写代码可读性差,不建议使用。在实际开发中,如果不想由对象指定视图可以使用 Model 或 ModeMap 取代 Map 在 request 中存入数据。
public String testMap(Map<String, Object> map){
    map.put("names", Arrays.asList("Tom", "Jerry", "Mike"));
    return "index";
}
30.session 存值
在默认情况下,ModelMap 中的属性作用域是 request 级别是,也就是说,当本次请求结束后,ModelMap 中的属性将销毁。如果希望在多个请求中共享 ModelMap 中的属性,必须将其属性转存到 session 中,这样 ModelMap 的属性才可以被跨请求访问。
spring 允许我们有选择地指定 ModelMap 中的哪些属性需要转存到 session 中,以便下一个请求属对应的 ModelMap 的属性列表中还能访问到这些属性。这一功能是通过类定义处标注 @SessionAttributes 注解来实现的。
在清除 Session 中的数据时不能调用 HttpSession 中的 removeAttribute("attributeName") 方法,需要调用接口 SessionStatus 中的 setComplete 方法。接口SessionStatus 的唯一实现是类 SimpleSessionStatus,调用 setComplete 方法将 boolean 类型的属性 complete 设置为 true。
@Controller
@SessionAttributes("loginUser")
public class IndexController {
@RequestMapping(value="/login",method=RequestMethod.POST)
public String login(String username,String password,Model model) {
User u = userService.login(username, password);
model.addAttribute("loginUser", u);
return "redirect:/user/users";
}@SessionAttributes 参数
- names:这是一个字符串数组。里面应写需要存储到 session 中数据的可能名称。
- types:根据指定参数的类型,将模型中对应类型的参数存储到 session 中 。
- value:其实和 names 功能是一样的。
@SessionAttribute 是用于获取已经存储的 session 数据,并且作用在方法的层面上。一般放在方法参数上。
31.拦截器
拦截器和先前学习的过滤器用法相似,都是用来做权限验证的,但是该组件属于 spring mvc (过滤器属于 tomcat),定义拦截器比过滤器要简单很多,只需要实现 HandlerInterceptor 接口,并实现相应的方法即可。其中方法返回 Boolean 类型的结果,若返回值为 true,则继续调用后续的拦截器和目标方法。若返回值为 false,则不会再调用后续的拦截器和目标方法。
public class FirstInterceptor implements HandlerInterceptor{
   /**
    * 该方法在目标方法之前被调用.
    */
   @Override
   public boolean preHandle(HttpServletRequest request,
         HttpServletResponse response, Object handler) throws Exception {
      System.out.println("[FirstInterceptor] preHandle");
      return true;//true 表示放行 false 表示不放行
   }

   /**
    * 调用目标方法之后, 但渲染视图之前.
    */
   @Override
   public void postHandle(HttpServletRequest request,
         HttpServletResponse response, Object handler,
         ModelAndView modelAndView) throws Exception {
      System.out.println("[FirstInterceptor] postHandle");
   }

   /**
    * 渲染视图之后被调用. 释放资源
    */
   @Override
   public void afterCompletion(HttpServletRequest request,
         HttpServletResponse response, Object handler, Exception ex)
         throws Exception {
      System.out.println("[FirstInterceptor] afterCompletion");
   }

}
在 spring mvc 配置文件中配置一个或多个拦截器,同时还可以配置拦截器的拦截路径(mapping)和放行路径(exclude-mapping),spring 使用 ant 风格的路径。在开发中需要用到字符串字符串匹配时使用:AntPathMatcher。
AntPathMatcher matcher = new AntPathMatcher();
String path = "/test/a/b";
String pattern = "/test/**";
boolean isMatch=matcher.match(pattern, path);- ?(匹配单个字符)
- *(匹配除/外任意字符)
- **/(匹配任意多个目录)。
配置拦截器如下:
<mvc:interceptors>
    <mvc:interceptor>
        <mvc:mapping path="/**"/>
        <mvc:exclude-mapping path="/login"/>
        <mvc:exclude-mapping path="/register"/>
        <mvc:exclude-mapping path="/css/**"/>
        <mvc:exclude-mapping path="/js/**"/>
        <bean class="cn.hx.controller.FirstInterceptor"></bean>
    </mvc:interceptor>
</mvc:interceptors>
32.统一异常处理
在项目开发中,免不了出现各种大大小小的异常,spring mvc 提供一套非常完善的异常处理机制,以至于我们在项目中,所有的异常都可以往外抛出,最后由我们的异常处理类来完成异常处理。异常处理分为局部异常处理、全局异常处理和返回 json 的异常处理。
1.处理局部异常(在 Controller 内)
@ExceptionHandler
public ModelAndView exceptionHandler(Exception ex){
    ModelAndView mv = new ModelAndView("error");
    mv.addObject("exception", ex);
    System.out.println("in testExceptionHandler");
    return mv;
}

@RequestMapping("error")
public String error(){
    int i = 5/0;
    return "hello";
}
2.处理全局异常(在 ControllerAdvice 中)
@ControllerAdvice
public class MyControllerAdvice {
    @ExceptionHandler
    public ModelAndView exceptionHandler(Exception ex){
        ModelAndView mv = new ModelAndView("error");
        mv.addObject("exception", ex);
        System.out.println("in testControllerAdvice");
        return mv;
    }
}
3.返回 json 字符串的异常处理
@ResponseBody
@ControllerAdvice
public class MyControllerAdvice {

    @ExceptionHandler
    public Map exceptionHandler(Exception ex){
        Map map=new HashMap();
        map.put("exception", ex.getMessage());
        System.out.println("in testExceptionHandler");
        return map;
    }
}
33.文件上传
在 spring mvc 中想要完成文件上传需要配置 MultipartResolver,MultipartResolver 是一个接口,它的实现类分为 CommonsMultipartResolver 类和 StandardServletMultipartResolver 类。
其中 CommonsMultipartResolver 使用 commons Fileupload 来处理 multipart 请求,所以在使用时,必须要引入相应的 commons-fileupload 依赖;而 StandardServletMultipartResolver 是基于 Servlet 3.0 来处理 multipart 请求的,所以不需要引用其他依赖,但是必须使用支持 Servlet 3.0 的容器才可以,以 tomcat 为例,从 Tomcat 7.0.x 的版本开始就支持 Servlet 3.0 了。
1.配置 CommonsMultipartResolver
<dependency>
    <groupId>commons-fileupload</groupId>
    <artifactId>commons-fileupload</artifactId>
    <version>1.3.3</version>
</dependency>
配置 CommonsMultipartResolver
<bean id="multipartResolver" class="org.springframework.web.multipart.commons.CommonsMultipartResolver">
    <!-- 设定默认编码 -->
    <property name="defaultEncoding" value="UTF-8"></property>
    <!-- 设定文件上传的最大值为5MB,5*1024*1024 -->
    <property name="maxUploadSize" value="5242880"></property>
</bean>
2.配置 StandardServletMultipartResolver
<bean id="multipartResolver"
          class="org.springframework.web.multipart.support.StandardServletMultipartResolver"/>
这里并没有配置文件大小等参数,这些参数的配置在 web.xml 中
<servlet>
    <servlet-name>springmvc</servlet-name>
    <servlet-class>org.springframework.web.servlet.DispatcherServlet</servlet-class>
    <init-param>
        <param-name>contextConfigLocation</param-name>
        <param-value>classpath:spring-mvc.xml</param-value>
    </init-param>
    <load-on-startup>1</load-on-startup>
    <multipart-config>
        <!-- 最大上传文件大小(配置不能限制) -->
        <max-file-size>297152</max-file-size>
        <!-- 最大请求大小(配置不能限制) -->
        <max-request-size>4194304</max-request-size>
    </multipart-config>
</servlet>
控制器接收文件使用 MultipartFile 对象接收。
@PostMapping(value = "/upload")
public void index2(String desc, MultipartFile file) throws IOException {
    File file1 = new File("C://" + file.getOriginalFilename());
    file.transferTo(file1);
}
OriginalFilename 原始的文件名,其他和 jsp Servlet 章节一样,同时也支持 ajax 上传。
34.Lombok (自学)
IntelliJ IDEA 是一款非常优秀的集成开发工具,功能强大,而且插件众多。lombok 是开源的代码生成库,是一款非常实用的小工具,我们在编辑实体类时可以通过 lombok 注解减少 getter、setter 等方法的编写,在更改实体类时只需要修改属性即可,减少了很多重复代码的编写工作。本文小编只介绍 IntelliJ IDEA 中 lombok 插件的安装和配置以及简单的使用方法。
1.使用 lombok 需要安装 lombok 插件。

2.添加 maven 依赖。
<dependency>
  <groupId>org.projectlombok</groupId>
  <artifactId>lombok</artifactId>
  <version>1.18.8</version>
</dependency>
3.在实体上通过 @Data 注解完成。
import lombok.Data;

@Data
public class User {
    private Integer id;
    private String name;
    private String password;
}
4.编译后后的类文件
public class User {
    private Integer id;
    private String name;
    private String password;

    public User() {
    }

    public Integer getId() {
        return this.id;
    }

    public String getName() {
        return this.name;
    }

    public String getPassword() {
        return this.password;
    }

    public void setId(Integer id) {
        this.id = id;
    }

    public void setName(String name) {
        this.name = name;
    }

    public void setPassword(String password) {
        this.password = password;
    }

    public boolean equals(Object o) {
        if (o == this) {
            return true;
        } else if (!(o instanceof User)) {
            return false;
        } else {
            User other = (User)o;
            if (!other.canEqual(this)) {
                return false;
            } else {
                label47: {
                    Object this$id = this.getId();
                    Object other$id = other.getId();
                    if (this$id == null) {
                        if (other$id == null) {
                            break label47;
                        }
                    } else if (this$id.equals(other$id)) {
                        break label47;
                    }

                    return false;
                }

                Object this$name = this.getName();
                Object other$name = other.getName();
                if (this$name == null) {
                    if (other$name != null) {
                        return false;
                    }
                } else if (!this$name.equals(other$name)) {
                    return false;
                }

                Object this$password = this.getPassword();
                Object other$password = other.getPassword();
                if (this$password == null) {
                    if (other$password != null) {
                        return false;
                    }
                } else if (!this$password.equals(other$password)) {
                    return false;
                }

                return true;
            }
        }
    }

    protected boolean canEqual(Object other) {
        return other instanceof User;
    }

    public int hashCode() {
        int PRIME = true;
        int result = 1;
        Object $id = this.getId();
        int result = result * 59 + ($id == null ? 43 : $id.hashCode());
        Object $name = this.getName();
        result = result * 59 + ($name == null ? 43 : $name.hashCode());
        Object $password = this.getPassword();
        result = result * 59 + ($password == null ? 43 : $password.hashCode());
        return result;
    }

    public String toString() {
        return "User(id=" + this.getId() + ", name=" + this.getName() + ", password=" + this.getPassword() + ")";
    }
}
35.ssm 项目整合
1.添加 spring mvc(spring-webmvc:5.2.12.RELEASE、jackson-databind:2.12.3)、spring(spring-aspects、spring-jdbc):5.2.12.RELEASE 和 mybatis(mybatis:3.4.6、mybatis-spring:1.3.2、mysql-connector-java:5.1.38、logback-classic:1.2.3) 依赖。
2.在 web.xml 中配置启动 spring 容器的监听(ContextLoaderListener)及 spring 的配置文件位置(context-param)。配置 spring mvc 的 DispatcherServlet 和 CharacterEncodingFilter。
3.在 springmvc 配置文件中配置开启注解驱动(mvc:annotation-driven)、静态资源处理(mvc:default-servlet-handler)、组件扫描(context:component-scan)、视图解析(InternalResourceViewResolver)。
4.在 spring 配置文件中配置包扫描(context:component-scan)、 mybatis 的数据源(DriverManagerDataSource)、mybatis session 工厂(SqlSessionFactoryBean)、接口查找配置类(MapperScannerConfigurer)、事务配置(DataSourceTransactionManager)、事务注解驱动(tx:annotation-driven)
参考代码:地址
注意:
在 spring 包扫描中排除 @Controller 与 @ControllerAdvice,同理 spring mvc 包扫描中只包含这两个注解。
36.项目考查
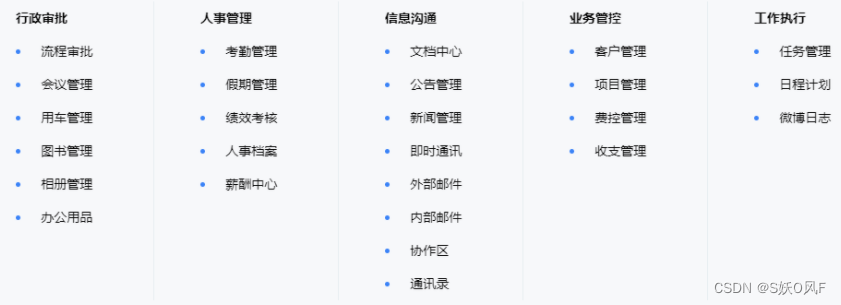
1.挑选合适的后台模板,参考示例项目中的 OA 系统完成开发。
2.书写符合阿里巴巴代码规范的业务逻辑完成,普通用户和超级管理员页面的相关业务逻辑。
3.使用 java 的面向对象的开发思想,分层结构 controller,service,dao,entity,interceptor 等。
4.设计好相关权限,未登录的用户不能访问任何页面,不同角色只能访问对应的页面。
5.在相关不符合现实逻辑的情况下可以修改页面逻辑。
6.具体功能上可参照如下,但总体功能不低于 6 个。
最后提交内容:
1.专业视频(从启动 tomcat 开始 )
2.项目源码及数据库脚本
3.专业 ppt
4.部署好项目的 tomcat


 3万+
3万+


 被折叠的 条评论
为什么被折叠?
被折叠的 条评论
为什么被折叠?
 到【灌水乐园】发言


