


引言
JavaScript语言上手很快,一般的HTML/CSS/JAVASCRIP三剑客支持的浏览器模式的入门文章已经太多了,而介绍nodejs的博客往往不是过于简单,就是过于高深,哪怕CSDN这样的平台也少见合适的教程。这里介绍怎样用vue-cli(脚手架)搭建一个小应用的【全】【部】细节,附加完整的代码与代码解析。
以喜闻乐见的扫雷为例。
准备工作
1. 第1步,安装nodejs和npm
2. 第2部,安装cnpm和vue-cli
打开VisualStudio,打开终端(terminal)窗口,输入
npm install cnpm - g
npm是nodejs的包管理器,install是安装的意思,cnpm工具可以在国内环境更快地下载外部包,-g是global的缩写,代表全局安装。
再输入
cnpm install @vue/cli至此,需要的资源包引入完成。
3. 第3步,创建项目,用脚手架搭出框架
输入下面的指令,demo可以替换为你的项目的名称
vue create demo回车后提示选择vue的版本,这里选vue2,按键盘上的向下键1次,再回车。

此时显示如下的提示
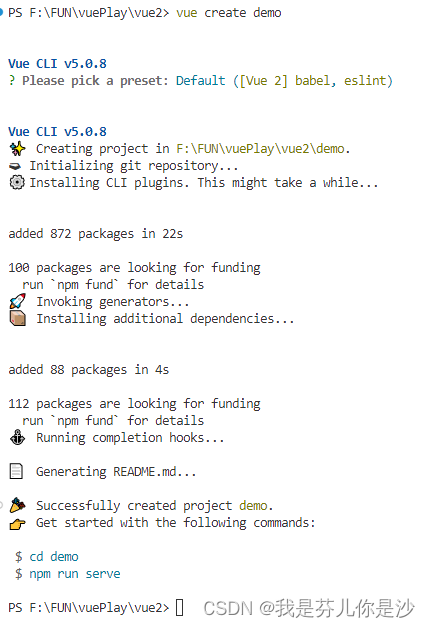
根据提示,输入
cd demodemo替换为你的项目的名称,与前面create里的名称一致。cd是change directory的意思,就是进入了项目文件夹。
输入
npm run serve完整代码
src/main.js
// The Vue build version to load with the `import` command
// (runtime-only or standalone) has been set in webpack.base.conf with an alias.
import Vue from 'vue'
// import App from './App'
// import router from './router'

// Vue.config.productionTip = false

/* eslint-disable no-new */
new Vue({
  el: '#app',
  // router,
  // components: { App },
  // template: '<App/>',
  data: {
    Myname: '',
    greeting: '你好呀',
    level: 0,
    n: 0,
    blockstate: [],
    bombs: [],
    count: [],
    done: false,
    index: 0,
    firstMove: true,
    showCnt: [],
    moveCount: 0,
    canPlay: false
  },
  methods: {
    change () {
      if (this.Myname === '') {
        this.greeting = '你好,在干嘛鸭'
      }
      this.greeting = `${this.Myname},你好,我是会用Vue框架的小芬子`
      console.log(this.greeting)
    },
    initBoard () {
      let x = parseInt(this.level)
      if (x < 2) {
        return
      }
      this.blockstate = Array(x * x).fill('square-button')
      this.n = x
      this.firstMove = true
      this.showCnt = Array(this.n * this.n).fill('  ')
      this.bombs = []
      this.count = Array(this.n * this.n).fill(0)
      this.moveCount = 0
      this.canPlay = true
    },
    flag () {
      if (this.blockstate[this.index] === 'square-button') {
        this.$set(this.blockstate, this.index, 'flagged-button')
      } else if (this.blockstate[this.index] === 'flagged-button') {
        this.$set(this.blockstate, this.index, 'square-button')
      }
    },
    flagit (index) {
      this.index = index
    },
    move () {
      if (!this.canPlay) {
        return
      }
      if (this.firstMove) {
        this.initGame(this.index)
        this.firstMove = false
      }
      this.judge(this.index)
      if (this.canPlay && this.moveCount >= this.n * this.n - this.n) {
        this.win()
      }
    },
    findNear (row, col) {
      let list = []
      if (col >= 1 && row >= 1) {
        let y = (row - 1) * this.n + (col - 1)
        list.push(y)
      }
      if (col <= this.n - 2 && row <= this.n - 2) {
        let y = (row + 1) * this.n + (col + 1)
        list.push(y)
      }
      if (col <= this.n - 2 && row >= 1) {
        let y = (row - 1) * this.n + (col + 1)
        list.push(y)
      }
      if (col >= 1 && row <= this.n - 2) {
        let y = (row + 1) * this.n + (col - 1)
        list.push(y)
      }
      if (col >= 1) {
        let y = row * this.n + col - 1
        list.push(y)
      }
      if (col <= this.n - 2) {
        let y = row * this.n + col + 1
        list.push(y)
      }
      if (row >= 1) {
        let y = (row - 1) * this.n + col
        list.push(y)
      }
      if (row <= this.n - 2) {
        let y = (row + 1) * this.n + col
        list.push(y)
      }
      console.log(list)
      return list
    },
    lose () {
      this.canPlay = false
      alert(`${this.Myname},失败是成功他妈,请不要气馁,继续造娃`)
    },
    win () {
      this.canPlay = false
      alert(`${this.Myname},成功是失败他儿子,请不要骄傲`)
    },
    initGame (index) {
      while (this.bombs.length < this.n) {
        let x = this.getRandom()
        if (!(this.bombs.includes(x) || index === x)) {
          this.bombs.push(x)
        }
      }
      for (let row = 0; row < this.n; row++) {
        for (let col = 0; col < this.n; col++) {
          if (this.bombs.indexOf(row * this.n + col) !== -1) {
            this.count[row * this.n + col] = 20
            let ys = this.findNear(row, col)
            ys.forEach(item => { this.count[item] += 1 })
          }
        }
      }
    },
    judge (index) {
      if (this.blockstate[index] === 'flagged-button') {
        return
      }
      if (this.count[index] === 0) {
        this.$set(this.blockstate, this.index, 'safe-button')
        let row = Math.floor(index / this.n)
        let col = index % this.n
        console.log(index)
        let ys = this.findNear(row, col)
        ys.forEach(item => {
          if (this.blockstate[item] === 'button-square') {
            this.judge(item)
          }
        })
      } else if (this.count[index] > 9) {
        this.$set(this.blockstate, index, 'bomb-button')
        this.lose()
      } else {
        this.$set(this.blockstate, index, 'safe-button')
        this.showCnt[index] = String(this.count[index])
      }
      this.moveCount += 1
    },
    getRandom () {
      return Math.floor(Math.random() * this.n * this.n)
    }
  }
})
index.html
<!DOCTYPE html>
<html>
  <head>
    <meta charset="utf-8">
    <meta name="viewport" content="width=device-width,initial-scale=1.0">
    <script src="src\main.js"></script>
    <title>vue1</title>
  </head>
  <body>
    <div id="app" style="display: flex; justify-content: center; align-items: center; ">
      <div style="text-align: center;">
        <br>
        请给我一个称呼吧!
        <input type="text" v-model="Myname" placeholder="请输入姓名" @change="change"/>
        <br>
        {{greeting}}
        <br>
        <div>

          <input type="number" v-model="level" placeholder="请输入难度" @change="initBoard"/>
            <div class="row" v-for="rowIndex in n" :key="rowIndex">
              <button v-for="columnIndex in n" :id="(rowIndex-1) * n + columnIndex" :class="blockstate[(rowIndex-1) * n + columnIndex-1]"
              @contextmenu.prevent="flag" @mouseenter="flagit((rowIndex-1) * n + columnIndex-1)"
              @click = "move">{{showCnt[(rowIndex-1) * n + columnIndex-1]}}</button>
            </div>
            <br>
            <button @click="initBoard">重新开始</button>
        </div>
      </div>
    </div>
    <style>
      .square-button {
        width: 50px; /* 设置按钮宽度 */
        height: 50px; /* 设置按钮高度 */
        background-color: gray; /* 设置按钮背景颜色为灰色 */
        border: none; /* 去除按钮边框 */
        margin: 5px; /* 设置按钮间距 */
        padding: 0; /* 清除按钮默认的内边距 */
        vertical-align: top;
      }
      .flagged-button{
        width: 50px; /* 设置按钮宽度 */
        height: 50px; /* 设置按钮高度 */
        background-color: red; /* 设置按钮背景颜色为灰色 */
        border: none; /* 去除按钮边框 */
        margin: 5px; /* 设置按钮间距 */
        padding: 0; /* 清除按钮默认的内边距 */
      vertical-align: top;
      }
      .safe-button{
        width: 50px; /* 设置按钮宽度 */
        height: 50px; /* 设置按钮高度 */
        background-color: green; /* 设置按钮背景颜色为灰色 */
        border: none; /* 去除按钮边框 */
        margin: 5px; /* 设置按钮间距 */
        padding: 0; /* 清除按钮默认的内边距 */
      vertical-align: top;
      }
      .bomb-button{
        width: 50px; /* 设置按钮宽度 */
        height: 50px; /* 设置按钮高度 */
        background-color: black; /* 设置按钮背景颜色为灰色 */
        border: none; /* 去除按钮边框 */
        margin: 5px; /* 设置按钮间距 */
        padding: 0; /* 清除按钮默认的内边距 */
      vertical-align: top;
      }
      </style>
  </body>
</html>
vue特性解释
index.html第14行如下
<input type="text" v-model="Myname" placeholder="请输入姓名" @change="change"/>这是一个输入框。v-model是vue模型的一个标识,v-model="Myname"对应main.js里vue对象的data中有一个Myname变量。每次输入的值有变化,Myname的值也相应变化。
index.html第16行如下
{{greeting}}{{}}是vue里的文本绑定,实时显示greeting变量的当前值
index.html的第21-25行如下
 <div class="row" v-for="rowIndex in n" :key="rowIndex">
              <button v-for="columnIndex in n" :id="(rowIndex-1) * n + columnIndex" :class="blockstate[(rowIndex-1) * n + columnIndex-1]"
              @contextmenu.prevent="flag" @mouseenter="flagit((rowIndex-1) * n + columnIndex-1)"
              @click = "move">{{showCnt[(rowIndex-1) * n + columnIndex-1]}}</button>
            </div>
v-for代表循环,columnIndex in n就是执行n次,rowIndex in n也是执行n次。注意这里的n可变,是第20行的输入框输入number后initBoard事件生成的整数值。n=2, 生成2*2的棋盘,n=3就是3*3。注意这里的n不取2以下的值,initBoard事件过滤了n<=1的情形。
main.js第3行
import Vue from 'vue'import指令,因为这里没有用到electron
main.js第11行
el: '#app',表示这个vue对象在id为app的区域内有效
main.js第38-51行
    initBoard () {
      let x = parseInt(this.level)
      if (x < 2) {
        return
      }
      this.blockstate = Array(x * x).fill('square-button')
      this.n = x
      this.firstMove = true
      this.showCnt = Array(this.n * this.n).fill('  ')
      this.bombs = []
      this.count = Array(this.n * this.n).fill(0)
      this.moveCount = 0
      this.canPlay = true
    },
这是棋盘初始化操作。level就是第二个input输入的值,转为x,若x小于2,则不更新棋盘,也就是之前提过的过滤掉小于行列小于2的棋盘。
blockstate数组存放n*n个棋盘格子的状态,状态有4种:square-button初始状态,flagged-button红旗状态,safe-button没有雷,bomb-button踩到的地雷格子。
这里初始化为全部square-button
main.js的59-61行
flagit (index) {
      this.index = index
    },
结合index.html的22-24行
 <button v-for="columnIndex in n" :id="(rowIndex-1) * n + columnIndex" :class="blockstate[(rowIndex-1) * n + columnIndex-1]"
              @contextmenu.prevent="flag" @mouseenter="flagit((rowIndex-1) * n + columnIndex-1)"
              @click = "move">{{showCnt[(rowIndex-1) * n + columnIndex-1]}}</button>
这个逻辑需要特意说明。
如果我们不用mouseenter事件更新当前选择的格子的下标index,而之间在右键事件(contextmenu.prevent)中,调用{flagit();flag())之类的函数,直接传入rowIndex和columnIndex参数,那么所有的格子都会执行右键事件,这和我们的初衷相违背。所以这里借用mouseenter事件。
main.js的75-111行的findNear(index)函数返回棋盘上所有与index格子相邻的格子的下标,即左右上下左上右上左下右下。
main.js的120-136行的initGame(index)传入index是为了避免第一步的格子是雷。这个函数初始化了炸弹的位置,并计算了每个格子周围有几个雷,传入count数组,count[i]是下标i的格子四周的雷的个数。count[i]=20代表是雷。
今天就到这里!有疑问请评论留言


 764
764


 被折叠的 条评论
为什么被折叠?
被折叠的 条评论
为什么被折叠?
 到【灌水乐园】发言


