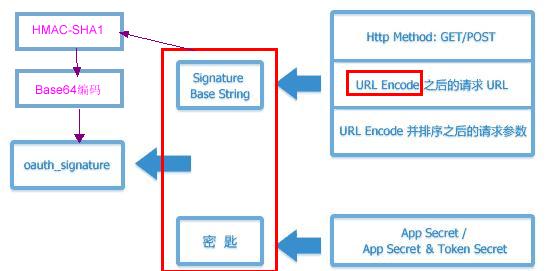
在腾讯微博API OAuth认证介绍中,我们可以看到关于请求签名的介绍(http://open.t.qq.com/resource.php?i=1,2#tag0):所有TOKEN请求和受保护的资源请求必须被签名,微博开放平台会根据签名来判断请求的合法性。签名算法使用Signature Base String和密钥(Secret)生成签名,参数oauth_signature用于指定签名。这几句话对oauth_signature产生过程介绍的比较简单,通过阅读其它的资料,我们可知在oauth_signature生成值的过程中我们需要进行URL编码,使用HMAC-SHA1加密算法进行签名,最后进行Base64编码:

上图显示我们需要URL编码方法。有过Java网络编程或者Web开发的朋友应该对中文乱码问题不会很陌生,有一种解决方法是对中文进行编码,也就是调用URLEncoder.encode(s, enc),在这里我们是否也可以使用这个方法呢?通过阅读Oauth提供的帮助文档(http://tools.ietf.org/html/draft-hammer-oauth-10#section-3.6 )我们可以得知OAuth中需要的Encode()方法与URLEncoder.encode(s, enc)存在差异:OAuth中需要把“+”和“*”这两个字符也使用“%XX”表示,而“~”不需要使用“%XX”表示,修改后的Encode()方法如下:
- public static String encode(String s)
- {
- if (s == null)
- {
- return "";
- }
- String encoded = "";
- try
- {
- encoded=URLEncoder.encode(s, ENCODING);
- } catch (UnsupportedEncodingException e)
- {
- throw new RuntimeException(e.getMessage(), e);
- }
- StringBuilder sBuilder =new StringBuilder();
- for(int i=0;ichar c = encoded.charAt(i);
- if (c == '+')
- {
- sBuilder.append("%20");
- }
- else if (c == '*')
- {
- sBuilder.append("%2A");
- }
- //URLEncoder.encode()会把“~”使用“%7E”表示,因此在这里我们需要变成“~”
- else if ((c == '%')&& ((i + 1) < encoded.length())&&((i + 2) < encoded.length())&
- (encoded.charAt(i + 1) == '7')&&(encoded.charAt(i + 2) == 'E'))
- {
- sBuilder.append("~");
- i+=2;
- }
- else
- {
- sBuilder.append(c);
- }
- }
- return sBuilder.toString();
- }
Encode()方法编写完毕后,我们需要编写“HmacSHA1”签名算法,由于我对算法没有任何知识,所以不知道怎么写这个算法,这个使用我们就需要借助百度或者谷歌进行搜索,当然我们还可以参考OAuth官网给我们提供的参开代码,寻找过程比较繁琐,这个在视频中给大家演示。HmacSHA1签名算法如下:
- package com.szy.weibo.oauth;
- import java.io.UnsupportedEncodingException;
- import java.security.InvalidKeyException;
- import java.security.NoSuchAlgorithmException;
- import javax.crypto.Mac;
- import javax.crypto.spec.SecretKeySpec;
- /**
- *@author coolszy
- *@date 2011-5-29
- *@blog http://blog.csdn.net/coolszy
- */
- public class HMAC_SHA1
- {
- private static final String MAC_NAME = "HmacSHA1";
- private static final String ENCODING = "US-ASCII";
- /**
- * 使用 HMAC-SHA1 签名方法对对encryptText进行签名
- *
- * @param encryptText
- * 被签名的字符串
- * @param encryptKey
- * 密钥
- * @return
- * @throws NoSuchAlgorithmException
- * @throws UnsupportedEncodingException
- * @throws InvalidKeyException
- * @see
- * "http://tools.ietf.org/html/draft-hammer-oauth-10#section-3.4.2">HMAC-SHA1
- */
- public static byte[] HmacSHA1Encrypt(String encryptText, String encryptKey) throws NoSuchAlgorithmException, UnsupportedEncodingException, InvalidKeyException
- {
- Mac mac = Mac.getInstance(MAC_NAME);
- SecretKeySpec spec = new SecretKeySpec(encryptKey.getBytes("US-ASCII"), MAC_NAME);
- mac.init(spec);
- byte[] text = encryptText.getBytes(ENCODING);
- return mac.doFinal(text);
- }
- }
当我们的参数进行HmacSHA1签名后,最后我们还需进行Base64的编码。这个我也不知道怎么写,只能百度,代码如下:
- package
com.szy.weibo.oauth;
-
- /**
- *@author coolszy
- *@date 2011-5-29
- *@blog http://blog.csdn.net/coolszy
- */
-
- public
class
Base64
- {
- private
static
final
char
last2byte = (
char
) Integer.parseInt(
"00000011"
,
2
);
- private
static
final
char
last4byte = (
char
) Integer.parseInt(
"00001111"
,
2
);
- private
static
final
char
last6byte = (
char
) Integer.parseInt(
"00111111"
,
2
);
- private
static
final
char
lead6byte = (
char
) Integer.parseInt(
"11111100"
,
2
);
- private
static
final
char
lead4byte = (
char
) Integer.parseInt(
"11110000"
,
2
);
- private
static
final
char
lead2byte = (
char
) Integer.parseInt(
"11000000"
,
2
);
- private
static
final
char
[] encodeTable =
new
char
[]
- { 'A'
,
'B'
,
'C'
,
'D'
,
'E'
,
'F'
,
'G'
,
'H'
,
'I'
,
'J'
,
'K'
,
'L'
,
'M'
,
'N'
,
'O'
,
'P'
,
'Q'
,
'R'
,
'S'
,
'T'
,
'U'
,
'V'
,
'W'
,
'X'
,
'Y'
,
'Z'
,
'a'
,
'b'
,
'c'
,
'd'
,
'e'
,
'f'
,
'g'
,
'h'
,
'i'
,
'j'
,
'k'
,
'l'
,
'm'
,
'n'
,
'o'
,
'p'
,
'q'
,
'r'
,
's'
,
't'
,
'u'
,
'v'
,
'w'
,
'x'
,
'y'
,
'z'
,
'0'
,
'1'
,
'2'
,
'3'
,
'4'
,
'5'
,
'6'
,
'7'
,
'8'
,
'9'
,
'+'
,
'/'
};
-
- /**
- * Base64 encoding.
- *
- * @param from
- * The src data.
- * @return
- */
- public
static
String encode(
byte
[] from)
- {
- StringBuffer to = new
StringBuffer((
int
) (from.length *
1.34
) +
3
);
- int
num =
0
;
- char
currentByte =
0
;
- for
(
int
i =
0
; i < from.length; i++)
- {
- num = num % 8
;
- while
(num <
8
)
- {
- switch
(num)
- {
- case
0
:
- currentByte = (char
) (from[i] & lead6byte);
- currentByte = (char
) (currentByte >>>
2
);
- break
;
- case
2
:
- currentByte = (char
) (from[i] & last6byte);
- break
;
- case
4
:
- currentByte = (char
) (from[i] & last4byte);
- currentByte = (char
) (currentByte <<
2
);
- if
((i +
1
) < from.length)
- {
- currentByte |= (from[i + 1
] & lead2byte) >>>
6
;
- }
- break
;
- case
6
:
- currentByte = (char
) (from[i] & last2byte);
- currentByte = (char
) (currentByte <<
4
);
- if
((i +
1
) < from.length)
- {
- currentByte |= (from[i + 1
] & lead4byte) >>>
4
;
- }
- break
;
- }
- to.append(encodeTable[currentByte]);
- num += 6
;
- }
- }
- if
(to.length() %
4
!=
0
)
- {
- for
(
int
i =
4
- to.length() %
4
; i >
0
; i--)
- {
- to.append("="
);
- }
- }
- return
to.toString();
- }
- }
至此在oauth_signature值生成过程中需要的几个方法我们已经编写完毕。下面我们在编写一个辅助方法:
1.oauth_timestamp:时间戳, 其值是距1970 00:00:00 GMT的秒数,必须是大于0的整数。
这个我们可以直接使用JDK给我们提供的类方法即可:
- /**
- * 产生时间戳
- *
- * @return
- */
- private String generateTimeStamp()
- {
- return String.valueOf(System.currentTimeMillis() / 1000);
- }
2.oauth_nonce:单次值,随机生成的32位字符串,防止重放攻击(每次请求必须不同)。
需要产生32位字符串,这个过程也比较简单,我们Random几次。对MD5加密了解的朋友应该知道MD5加密后是32位的,因此我们可以尝试使用MD5进行加密,最后代码如下:
- /**
- * 产生单次值
- *
- * @param is32
- * 产生字符串长度是否为32位
- * @return
- */
- private String generateNonce(boolean is32)
- {
- Random random = new Random();
- // 产生123400至9999999随机数
- String result = String.valueOf(random.nextInt(9876599) + 123400);
- if (is32)
- {
- // 进行MD5加密
- try
- {
- MessageDigest md = MessageDigest.getInstance("MD5");
- md.update(result.getBytes());
- byte b[] = md.digest();
- int i;
- StringBuffer buf = new StringBuffer("");
- for (int offset = 0; offset < b.length; offset++)
- {
- i = b[offset];
- if (i < 0)
- i += 256;
- if (i < 16)
- buf.append("0");
- buf.append(Integer.toHexString(i));
- }
- result = buf.toString();
- } catch (NoSuchAlgorithmException e)
- {
- e.printStackTrace();
- }
- }
- return result;
- }
这个方法有个参数判断是否为32位,为什么要这么写等我们调用这个方法的时候在给大家解释。
本节课程下载地址:http://u.115.com/file/clizvrhw


 2万+
2万+

 被折叠的 条评论
为什么被折叠?


