


本文的数据集是存放在两个文件夹:1和2,其中每个文件夹包含200张彩色图像。每张图像的大小为(32x32x3),均为.png。
关于TF2.0中TFrecord的一些基础内容请参考:TFRecord :TensorFlow 数据集存储格式
参考以上教程,我们设计输入和输出都为图像的端到端卷积网络。步骤如下:
- 准备数据
- 将数据写入TFrecord文件
- 读取TFrecord文件
- 用Keras写一个简单网络并运行。
准备数据
首先,把两个文件夹(1和2)的数据准备好,我们假设文件夹1中的数据为train_image,文件夹2中的数据为train_label,要保存的TFrecord文件名为train.tfrecords。
import os
import tensorflow as tf

train_dir = '1/'
label_dir = '2/'
tfrecord_file = 'train.tfrecords'
将数据写入TFrecord文件
首先,获取两个文件夹中所有图像的路径列表
train_filenames = [train_dir + filename for filename in os.listdir(train_dir)]
label_filenames = [label_dir + filename for filename in os.listdir(label_dir)]使用TFRecordWriter类将数据写入TFrecord文件
Class TFRecordWriter:A class to write records to a TFRecords file.
__init__(
    path, # tfrecord文件
    options=None
)
所有写入操作在with block中进行,在写入时主要用到该类的write方法。
具体过程如下:
with tf.io.TFRecordWriter(tfrecord_file) as writer:
    for image, label in zip(train_filenames, label_filenames):
        image = open(image, 'rb').read()     # 读取数据集图片到内存,image 为一个 Byte 类型的字符串
        label = open(label, 'rb').read()
        feature = {                             # 建立 tf.train.Feature 字典
            'image': tf.train.Feature(bytes_list=tf.train.BytesList(value=[image])),  # 图片是一个 Bytes 对象
            'label': tf.train.Feature(bytes_list=tf.train.BytesList(value=[label]))   # 图片是一个 Bytes 对象
        }
        example = tf.train.Example(features=tf.train.Features(feature=feature)) # 通过字典建立 Example
        writer.write(example.SerializeToString())   # 将Example序列化并写入 TFRecord 文件
    writer.close()
其中zip函数试将两个列表中的元素封装到一个元组中,最后返回包含所有元组的列表,参考:
>>> x = [1, 2, 3]
>>> y = [4, 5, 6]
>>> zipped = zip(x, y)
>>> list(zipped)
[(1, 4), (2, 5), (3, 6)]
>>> x2, y2 = zip(*zip(x, y)) # *操作是反向操作
>>> x == list(x2) and y == list(y2)
True
open函数打开一个文件,rb表示读取数据已bytes返回,引用官方文档的解释: Files opened in binary mode (including 'b' in the mode argument) return contents as bytes objects without any decoding.
read函数则是从一个打开的文件中读取字符串(尽可能的多读)。引用官方的说法:
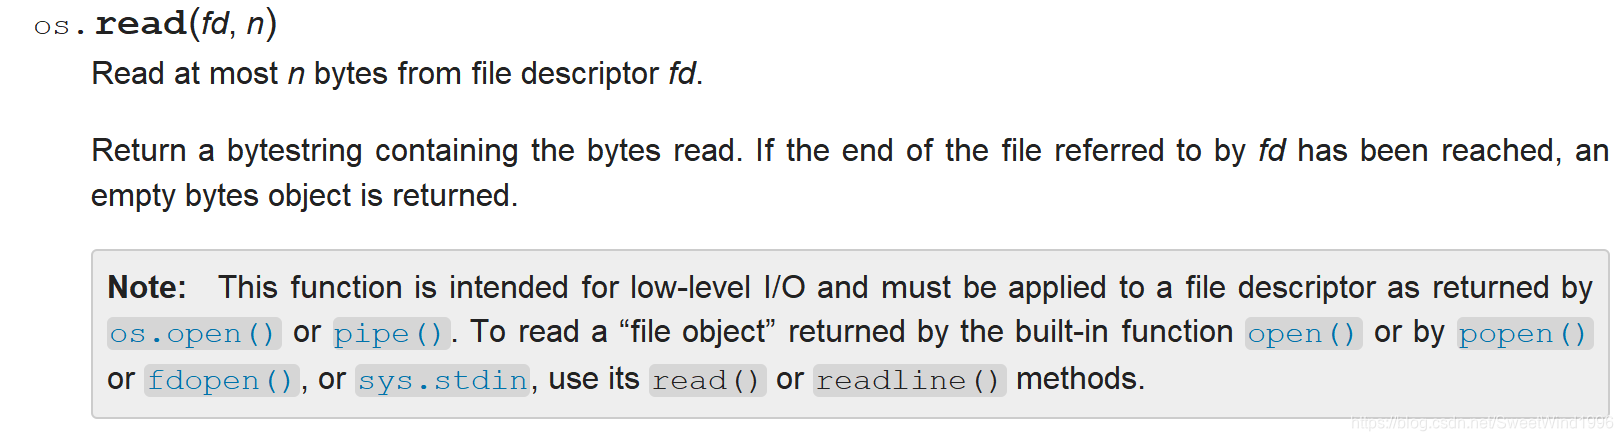
由此可以看出,此处image和label接收的是一个bytestring类型的返回值。
在开始的时候我们给出了一个TFrecord的教程地址,看过之后可以知道TFrecord文件中包含的都是examples,每个example包含一个feature字典。tf.train.Example的包含一个属性,引用官网的表述:
Properties features:Features features
features的内容是通过tf.train.Features接收的(注意tf.train.Features和tf.train.Feature的区别),层层深入我们可以发现他们之间的关系,引用官网内容:
tf.train.Features.FeatureEntry
Properties key:string key value:Feature value
该类为tf.train.Features参数,是一个协议类,其属性为一个字典
tf.train.Features
Properties feature:repeated FeatureEntry feature
该类以是用作消息协议,其属性是FeatureEntry feature
也就是说将我们数据组织成一个字典后,传入该类最后通过出入tf.train.Example类我们就得到了一个example,最后再通过write函数将该example写入TFrecord文件即可。现在我们需要知道的是如何将我们的数据组织称字典格式,这里就要用到另一个类:tf.train.Feature。
该类也是一个消息协议,有三个属性:
Properties
bytes_list :BytesList bytes_list float_list:FloatList float_list
int64_list:Int64List int64_list
我们可以看到每个属性都是一个列表,每个列表代表不一样的数据类型。根据上文我们知道此次我们使用的bytesString类型的数据。所以我们选择第一种属性,另外上面有说tf.train.Features.FeatureEntry要求传入的是一个字典,所以我们要将数据组织成字典格式,就有:
        feature = {                             # 建立 tf.train.Feature 字典
            'image': tf.train.Feature(bytes_list=tf.train.BytesList(value=[image])),  # 图片是一个 Bytes 对象
            'label': tf.train.Feature(bytes_list=tf.train.BytesList(value=[label]))   # 图片是一个 Bytes 对象
        }
tf.train.BytesList同样是一个消息类,有一个value属性,用以接收bytes value。
这样我们得到了一个example,最后通过for循环就可以将所有的数据写入TFrecord文件中啦。
从TFrecord文件中读取数据
读取TFrecord文件主要是读取其中的example,tf.io.parse_single_example函数用于解析单个example协议。
tf.io.parse_single_example(
    serialized,
    features,
    example_names=None,
    name=None
)
我们主要用到其前两个参数
serialized: A scalar string Tensor, a single serialized Example. See_parse_single_example_rawdocumentation for more details.features: Adictmapping feature keys toFixedLenFeatureorVarLenFeaturevalues.
传入一个example和字典格式,就可以将其内容解析出来(写入可以理解为序列化过程,这里解析可以理解为反序列化过程)。
有了这个之后我们就先把刚才写入并保存的TFrecord文件读取出来。
tfrecord_file = 'train.tfrecords'
dataset = tf.data.TFRecordDataset(tfrecord_file)    # 读取 TFRecord 文件
看一下tf.data.TFRecordDataset的官方解释:A Dataset comprising records from one or more TFRecord files.翻译成中文为:包含来自一个或多个TFRecord文件的记录的数据集。
__init__(
    filenames,
    compression_type=None,
    buffer_size=None,
    num_parallel_reads=None
)
当我们像该类传入TFrecord文件名后,会得到一个Dataset,该Dataset继承自Dataset类。
现在我们的任务就变为:将dataset中的数据example全部解析出来。对dataset中所有元素进行某一种操作可以用map函数。所以我们只要使用一下语句就可以了
dataset = dataset.map(read_and_decode) # 解析数据其中的参数read_and_decode就是我们定义的解析example的函数,实现如下:
def read_and_decode(example_string):
    '''
    从TFrecord格式文件中读取数据
    '''
    feature_dict = tf.io.parse_single_example(example_string, feature_description)
    image = tf.io.decode_png(feature_dict['image'])
    label = tf.io.decode_png(feature_dict['label'])
    image = tf.cast(image, dtype='float32') / 255.
    label = tf.cast(label, dtype='float32') / 255.
    return image, label
example_string就是原始dataset中的数据,feature_description是对字典的描述,这里我们要自己定义一个格式,与写入时保持一致即可:
feature_description = { # 定义Feature结构,告诉解码器每个Feature的类型是什么
    'image': tf.io.FixedLenFeature([], tf.string),
    'label': tf.io.FixedLenFeature([], tf.string)
}
tf.io.FixedLenFeature传入一个固定长度的feature,包含三个参数:
shape: Shape of input data.dtype: Data type of input.default_value: Value to be used if an example is missing this feature. It must be compatible withdtypeand of the specifiedshape.
因为输入的是字符串,所以shape为空,最后一个参数不用填,dtype为string格式。
decode_png将png格式的图片解码为uint8或者uint16。也可以使用decode_image函数。最后将图像转换为float32类型返回,方便后面训练。
具体过程如下:
def read_and_decode(example_string):
    '''
    从TFrecord格式文件中读取数据
    '''
    feature_dict = tf.io.parse_single_example(example_string, feature_description)
    image = tf.io.decode_png(feature_dict['image'])
    label = tf.io.decode_png(feature_dict['label'])
    image = tf.cast(image, dtype='float32') / 255.
    label = tf.cast(label, dtype='float32') / 255.
    return image, label

dataset = dataset.repeat() # 重复数据集
dataset = dataset.map(read_and_decode) # 解析数据
dataset = dataset.shuffle(buffer_size = 100) # 在缓冲区中随机打乱数据
batch  = dataset.batch(batch_size = 10) # 每10条数据为一个batch,生成一个新的Datasets
用Keras写一个简单网络并运行
搭建一个端到端的简单网络(windows下运行)
model = tf.keras.Sequential([
        tf.keras.layers.Conv2D(32, 3, activation='relu', input_shape=(32, 32, 3), padding='same'),
        tf.keras.layers.MaxPooling2D(),
        tf.keras.layers.UpSampling2D(),
        tf.keras.layers.Conv2D(3, 5, activation='relu', padding='same'),
    ])

model.summary()

model.compile(
    optimizer=tf.keras.optimizers.Adam(learning_rate=0.001),
    loss='mse'
)

model.fit(batch,epochs=10,steps_per_epoch=20)
运行结果如下:
Model: "sequential"
_________________________________________________________________
Layer (type) Output Shape Param #
=================================================================
conv2d (Conv2D) (None, 32, 32, 32) 896
_________________________________________________________________
max_pooling2d (MaxPooling2D) (None, 16, 16, 32) 0
_________________________________________________________________
up_sampling2d (UpSampling2D) (None, 32, 32, 32) 0
_________________________________________________________________
conv2d_1 (Conv2D) (None, 32, 32, 3) 2403
=================================================================
Total params: 3,299
Trainable params: 3,299
Non-trainable params: 0
_________________________________________________________________
Train for 20 steps
Epoch 1/10
2019-12-032019-12-03 11:01:50.258469: W tensorflow/stream_executor/cuda/redzone_allocator.cc:312] Internal: Invoking ptxas not supported on Windows
Relying on driver to perform ptx compilation. This message will be only logged once.
20/20 [==============================] - 2s 106ms/step - loss: 2511.2992
Epoch 2/10
20/20 [==============================] - 0s 6ms/step - loss: 878.5541
Epoch 3/10
20/20 [==============================] - 0s 6ms/step - loss: 543.4075
Epoch 4/10
20/20 [==============================] - 0s 6ms/step - loss: 351.0753
Epoch 5/10
20/20 [==============================] - 0s 6ms/step - loss: 260.4697
Epoch 6/10
20/20 [==============================] - 0s 6ms/step - loss: 222.5780
Epoch 7/10
20/20 [==============================] - 0s 5ms/step - loss: 211.1125
Epoch 8/10
20/20 [==============================] - 0s 6ms/step - loss: 182.7598
Epoch 9/10
20/20 [==============================] - 0s 5ms/step - loss: 158.0315
Epoch 10/10
20/20 [==============================] - 0s 5ms/step - loss: 165.6838
汇总代码:
import os
import tensorflow as tf

train_dir = '1/'
label_dir = '2/'
tfrecord_file = 'train.tfrecords'

train_filenames = [train_dir + filename for filename in os.listdir(train_dir)]
label_filenames = [label_dir + filename for filename in os.listdir(label_dir)]

with tf.io.TFRecordWriter(tfrecord_file) as writer:
    for image, label in zip(train_filenames, label_filenames):
        image = open(image, 'rb').read()     # 读取数据集图片到内存,image 为一个 Byte 类型的字符串
        label = open(label, 'rb').read()
        feature = {                             # 建立 tf.train.Feature 字典
            'image': tf.train.Feature(bytes_list=tf.train.BytesList(value=[image])),  # 图片是一个 Bytes 对象
            'label': tf.train.Feature(bytes_list=tf.train.BytesList(value=[label]))   # 图片是一个 Bytes 对象
        }
        example = tf.train.Example(features=tf.train.Features(feature=feature)) # 通过字典建立 Example
        writer.write(example.SerializeToString())   # 将Example序列化并写入 TFRecord 文件
    writer.close()
import tensorflow as tf
import os
import matplotlib.pyplot as plt
import numpy as np

tfrecord_file = 'train.tfrecords'
dataset = tf.data.TFRecordDataset(tfrecord_file)    # 读取 TFRecord 文件
feature_description = { # 定义Feature结构,告诉解码器每个Feature的类型是什么
    'image': tf.io.FixedLenFeature([], tf.string),
    'label': tf.io.FixedLenFeature([], tf.string)
}
def read_and_decode(example_string):
    '''
    从TFrecord格式文件中读取数据
    '''
    feature_dict = tf.io.parse_single_example(example_string, feature_description)
    image = tf.io.decode_png(feature_dict['image'])
    label = tf.io.decode_png(feature_dict['label'])
    image = tf.cast(image, dtype='float32') / 255.
    label = tf.cast(label, dtype='float32') / 255.
    return image, label

dataset = dataset.repeat() # 重复数据集
dataset = dataset.map(read_and_decode) # 解析数据
dataset = dataset.shuffle(buffer_size = 100) # 在缓冲区中随机打乱数据
batch  = dataset.batch(batch_size = 10) # 每10条数据为一个batch,生成一个新的Datasets

model = tf.keras.Sequential([
        tf.keras.layers.Conv2D(32, 3, activation='relu', input_shape=(32, 32, 3), padding='same'),
        tf.keras.layers.MaxPooling2D(),
        tf.keras.layers.UpSampling2D(),
        tf.keras.layers.Conv2D(3, 5, activation='relu', padding='same')
    ])

model.summary()

model.compile(
    optimizer=tf.keras.optimizers.Adam(learning_rate=0.001),
    loss='mse'
)

model.fit(batch,epochs=10,steps_per_epoch=20)


 2万+
2万+

 被折叠的 条评论
为什么被折叠?
被折叠的 条评论
为什么被折叠?
 到【灌水乐园】发言


