


背景
在Python中是可以使用C++动态库的,本文就围绕着这个主题阐述如何使用Python中的ctypes库调用C++动态库。
包括值传递、指针传递
前提
使用C风格的接口
在Python中使用ctypes调用C++动态库时,只能调用C接口,也就是被extern "C"修饰的接口:
extern "C"{
    void hello_world();
}
这是由于C++为了支持函数重载和命名空间,会对函数名称进行修饰(name mangling)。
简单而言,你定义了一个C++的"hello_world"函数,在经过编译器的编译之后,它就不叫"hello_world"了,他会换另外一个名字,比如"_Z3hello_worldi"。
换句话来说,如果你使用编译器修饰之后的函数名称,你也能正确调用到C++函数。
而加上了extern "C"之后,由于C语言不支持重名函数,所以编译器就知道没必要修饰函数名称,从而使用"hello_world"就能访问正确的函数。
最小例子
C接口
#ifndef PYTHON_C_LIBRARY_H
#define PYTHON_C_LIBRARY_H

typedef int errorCode;

extern "C" {
 errorCode hello_world(int value);
}

#endif //PYTHON_C_LIBRARY_H
#include "c++.h"

#include <iostream>

errorCode hello_world(int value) {
    std::cout << "Hello World! value:" << value << std::endl;
    return 0;
}
Python调用
import ctypes
# 调用dll
lib = ctypes.CDLL("dll路径")
lib.hello_world.argtypes = [ctypes.c_int] # 声明C接口的入参类型
lib.hello_world.restype = ctypes.c_int # 声明C接口的返回值类型
# 调用hello方法
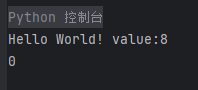
result = lib.hello_world(8)
print(result)
控制台输出:
进阶
C中是没有C++中的stl库的,意味着string、vector、map…都无法直接在C接口中使用
值传递
接下来我们探讨双方能否传递 基本数值、结构体 等数据
基本数值 short、int、float、double、char、bool
//.h
void test_base_data(short s, int i, float f, double d, char c, bool b);
//.cpp
void test_base_data(short s, int i, float f, double d, char c, bool b) {
    std::cout << "s:" << s << ", i:" << i << ", f:" << f << ", d:" << d << ", c:" << c << ", b:" << b << std::endl;
}
import ctypes

# 调用dll
lib = ctypes.CDLL("dll路径")
# 转换编码
lib.test_base_data(5, 40000, 3.4, 3.4028235e38, 'h'.encode('utf-8'), False)
坑:当传递字符、字符串的时候,要转换编码 encode(‘utf-8’) ,不然会出现类型不匹配的问题。
输出:

结构体
struct BaseS {
    int value;
};
// h
void test_struct(BaseS s);
// cpp
void test_struct(BaseS s) {
    std::cout << "the struct value is:" << s.value << std::endl;
}
import ctypes
# 定义结构体
class BaseS(ctypes.Structure):
    _fields_ = [
        ("value", ctypes.c_int)
    ]

# 创建实例
base = BaseS()
base.value = 1

# 调用dll
lib = ctypes.CDLL("dll路径")
lib.test_struct(base)
输出:

复杂结构体
那么一个复杂结构体能传吗?
//h
void test_complex_struct(const Net &net);

//cpp
void test_complex_struct(const Net &net) {
    std::cout << "net value:" << net.value << std::endl;
    for (int i = 0; i < net.num_children; ++i) {
        std::cout << "net children[" << i << "] value:" << net.children[i].value << std::endl;
    }
}
import ctypes

class Net(ctypes.Structure):
    pass

Net._fields_ = [
    ("value", ctypes.c_int),
    ("children", ctypes.POINTER(Net)),
    ("num_children", ctypes.c_int)
]

# 动态库路径
lib = ctypes.CDLL(r"dll路径")

# 创建一个Net,里面包含五个Net
n1 = Net()
n1.value = 0
n1.num_children = 5
n1.children = (Net * 5)()
for i in range(5):
    n1.children[i] = Net()
    n1.children[i].value = i
    n1.children[i].num_children = 0

lib.test_complex_struct(n1)
输出:

指针传递
接下来我们探讨双方能否传递 **基本数值数组、结构体数组、函数指针 **等数据
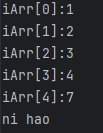
基本数值数组 用int和char举例
//.h
void test_arr(int *iArr,int iArrSize,char *str);//非字符串数组需要一个代表该数组大小的变量
//.cpp
void test_arr(int *iArr, int iArrSize, char *str) {
    for (int i = 0; i < iArrSize; ++i) {
        std::cout << "iArr[" << i << "]:" << iArr[i] << std::endl;
    }
    std::cout << str << std::endl;
}
由于字符串数组会以**‘\0’**结尾,所以不需要一个代表该数组大小的变量
import ctypes

# 赋值
i_arr = [1, 2, 3, 4, 7]
s = "ni hao"
# 转换为C数组
i_arr_c = (ctypes.c_int * len(i_arr)()
for i in range(len(i_arr)):
    i_arr_c[i] = i_arr[i]

# 调用dll
lib = ctypes.CDLL("dll路径")
lib.test_arr(i_arr_c, len(i_arr), s.encode('utf-8'))
输出:
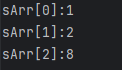
结构体数组
//.h
struct BaseS {
    int value;
};
void test_struct_arr(BaseS *sArr, int sArrSize);//非字符串数组需要一个代表该数组大小的变量

//.cpp
void test_struct_arr(BaseS *sArr, int sArrSize) {
    for (int i = 0; i < sArrSize; ++i) {
        std::cout << "sArr[" << i << "]:" << sArr[i].value << std::endl;
    }
}
import ctypes

# 定义结构体
class BaseS(ctypes.Structure):
    _fields_ = [
        ("value", ctypes.c_int)
    ]

# 创建实例
base = BaseS()
base.value = 1

base2 = BaseS()
base2.value = 2

base3 = BaseS()
base3.value = 8
b_a = [base, base2, base3]
# 创建c数组
base_array = (BaseS * 3)()
# 为数组赋值
for i in range(len(base_array)):
    base_array[i] = b_a[i]

# 调用dll
lib = ctypes.CDLL("C:/Users/Markzero/Desktop/myselfwork/python_c/cmake-build-debug/libpython_c.dll")
lib.test_struct_arr(base_array, len(base_array))
输出:
函数指针
这种方式可能也经常使用,用于绑定回调函数,使得C++也有调python函数的能力
- 传递字符串
//h
typedef void (*callBackFunction)(const char *); //声明函数指针类型
void bindCallBack(callBackFunction function);
//cpp
void bindCallBack(const callBackFunction function) {
    function("你好我是C");
}
import ctypes

def c_callback(s: str):
    # 注意,要对字符串解码
    print("收到了C传来的字符串:", s.decode('utf-8'))

# 加载 C 动态库
lib = ctypes.CDLL('dll动态库')
# 前者是python端函数返回值,后者是python端函数入参 最后面的括号里是你要绑定的回调函数
call_back_function = ctypes.CFUNCTYPE(None, ctypes.c_char_p)(c_callback)
# 调用C接口
lib.bindCallBack(call_back_function)
输出:

2. 传递结构体
//h
struct BaseS {
    int value;
};
typedef void (*callBackStructFunction)(BaseS b);
void bindCallBackStruct(callBackStructFunction function);
//cpp
void bindCallBackStruct(callBackStructFunction function) {
    BaseS b(100);
    function(b);
}
import ctypes
# 加载 C 动态库
lib = ctypes.CDLL('dll动态库')
class BaseS(ctypes.Structure):
    _fields_ = [
        ("value", ctypes.c_int)
    ]

def c_callback_struct(b: BaseS):
    print("收到了C传来的结构体:", b.value)

call_back_struct_function = ctypes.CFUNCTYPE(None, BaseS)(c_callback_struct)
# 调用dll
lib.bindCallBackStruct(call_back_struct_function)
输出:

注意!!!
Python中定义的指针,特别是函数指针,是会被python端的垃圾回收机制管理的,如果C++要持有这些个指针,要注意生命周期的问题,一般的解决方式是将python端的指针设为全局,延长其的生命周期。
共享内存 | 引用传递
说人话就是,python传给c的变量,c修改值后,python相应的变量也会被修改值。
c无法使用引用,只能用指针代替,标题中的引用只是为了方便理解。
基本数值
现在我希望python传递给c一个int变量,c给这个变量赋值为100后,python的变量也是100
//.h
void test_reference(int* num);

//.cpp
void test_reference(int *num) {
    *num = 100;
}
import ctypes

num = 42
print("调用前:", num)
# 转为C的数据结构
value = ctypes.c_int(num)
ptr = ctypes.pointer(value)

# 调用dll
lib = ctypes.CDLL("dll路径")
lib.test_reference(ptr)

# 转为python的数据结构
num = value.value
print("调用后:", num)
输出:

可喜可贺,这说明ptr=指向value的指针,value=原地址存的值
基本数值数组
那么在C端修改一个数组中值也如此简单吗?
//.h
void test_reference_arr(int *num, int aSize);
//.cpp
void test_reference_arr(int *num, int aSize) {
    for (int i = 0; i < aSize; ++i) {
        num[i] = 100;
    }
}
import ctypes

num_arr = [1, 2, 3, 4, 5]
print("调用前:", num_arr)

num_arr_c = (ctypes.c_int * len(num_arr))() # 可以理解为C++中的new操作
for i in range(len(num_arr)):
    num_arr_c[i] = num_arr[i]

# 调用dll
lib = ctypes.CDLL("dll路径")
lib.test_reference_arr(num_arr_c, len(num_arr))

num_arr = [num_arr_c[i] for i in range(len(num_arr))]
print("调用后:", num_arr)
输出:

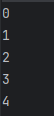
动态数组
之前的例子都是在说固定数组大小的情况,那如果我希望在C端改变数组的容量该怎么做?
这里我们用一个空数组作为例子。
注意:在C中分配的内存,也得在C中释放,python的垃圾回收机制不会自动管理,所以需要额外提供一个释放内存的函数。
//.h
//增长数组函数
void test_extend_arr(int **arr, int *size);
//释放内存函数
void free_arr(int *arr);

//.cpp
void test_extend_arr(int **arr, int *size) {
    int newSize = 100;//新的数组大小
    // 重新分配内存
    int *newarr = (int *) realloc(*arr, newSize * sizeof(int));
    // 注意,内存是有可能分配失败的
    if (newarr == NULL) {
        return;
    }
    // 填充新数组
    for (int i = 0; i < newSize; i++) {
        newarr[i] = 100;
    }

    // 更新原始指针和大小
    *arr = newarr;
    *size = newSize;
}

void free_arr(int *arr) {
    free(arr);
}
import ctypes

# 加载 C 动态库
lib = ctypes.CDLL('dll路径')

# 初始化数组和大小
arr = ctypes.POINTER(ctypes.c_int)()  # 空指针
size = ctypes.c_int(0)

# 调用 C 函数来扩展数组
lib.test_extend_arr(ctypes.byref(arr), ctypes.byref(size))

# 打印数组内容
result = [arr[i] for i in range(size.value)]

# 释放内存
lib.free_arr(arr)

print(result)
输出:

结构体数组
简单结构体
我们先定义一个简单一点的结构体。
struct BaseS {
    int value;
};
//h
void get_base_arr(BaseS **base_arr, int *size);

void free_base(BaseS *base_arr);

//cpp
void get_base_arr(BaseS **base, int *size) {
    *size = 5;
    *base = new BaseS [*size];
    for (int i = 0; i < *size; i++) {
        (*base)[i].value = i;
    }
}

void free_base(BaseS *base_arr) {
    delete[] base_arr;
}
import ctypes

class BaseS(ctypes.Structure):
    _fields_ = [
        ("value", ctypes.c_int)
    ]

# 动态库路径
lib = ctypes.CDLL(r"C:\Users\Markzero\Desktop\myselfwork\python_c\cmake-build-debug\libpython_c.dll")

base = ctypes.POINTER(BaseS)()
size = ctypes.c_int()
# 通过引用方式传递给C端
lib.get_base_arr(ctypes.byref(base), ctypes.byref(size))

for i in range(size.value):
    print(base[i].value)

lib.free_base(base)
成功输出正确的值:
复杂结构体
我们来定义一个复杂一点的结构体,嵌套包含结构体。
struct Net {
    Net *children = nullptr;
    int num_children = 0;

    // 析构函数
    ~Net() {
        delete[] children; // 释放子节点
    }
};
在这个结构体中,我们可以看到这样一个嵌套包含结构,Net之中包含Net数组。为了保证正确释放,我们为这个结构体添加上析构函数,这不会影响到python的结构体定义。
我们先写出C端的代码:
//h
void get_net_arr(Net **netArray, int *size);

void free_net(const Net *netArray);

//cpp
void get_net_arr(Net **netArray, int *size) {
    *size = 2;
    auto aArray = new Net[*size];
    for (int i = 0; i < *size; i++) {
        aArray[i].children = new Net[5];
        aArray[i].num_children = 5;
        aArray[i].value = i;
        for (int j = 0; j < aArray[i].num_children; j++) {
            aArray[i].children[j].value = 100*(j+1);
        }
    }
    *netArray = aArray;
}

void free_net(const Net *netArray) {
    delete[] netArray;
}
在这段代码中我们创建了两个Net,其中它们各自又包含五个Net。
我们再来定义一下python端的代码:
import ctypes
# 由于直接在Net中定义("children", ctypes.POINTER(Net)),会导致类型未定义
# 下面这种分开写的方式,就可以实现自己包含自己的嵌套方式
class Net(ctypes.Structure):
    pass

Net._fields_ = [
    ("value", ctypes.c_int),
    ("children", ctypes.POINTER(Net)),
    ("num_children", ctypes.c_int)
]

# 动态库路径
lib = ctypes.CDLL("dll路径")

# 定义一个待赋值的Net数组
net = ctypes.POINTER(Net)()
# 定义一个待赋值的Net数组大小
size = ctypes.c_int(0)
# 通过引用方式传递给C端
lib.get_net_arr(ctypes.byref(net), ctypes.byref(size))

# 写一个简单的递归 打印这个Net数组
def traverseNet(tnet: ctypes.POINTER(Net)):
    print("Net Value is:", tnet.value)
    print("Net has ", tnet.num_children, " children")
    for i in range(tnet.num_children):
        traverseNet(tnet.children[i])

# 遍历 Net
for i in range(size.value):
    traverseNet(net[i])
# 别忘了释放内存
lib.free_net(net)
让我们看看输出了什么:
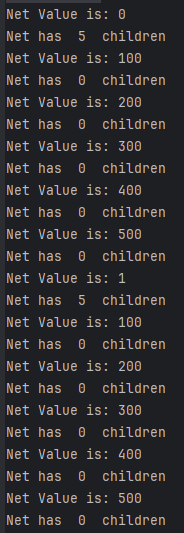
可以看见在python端的变量也的确被正确赋值了。
可喜可贺。


 1556
1556

 被折叠的 条评论
为什么被折叠?
被折叠的 条评论
为什么被折叠?
 到【灌水乐园】发言


