


解析字符串为对象
Value 和 Action 解析器提供了一个简单的 API,用于将字符串转换为值或操作,并在给出错误的字符串或字符串在解析时引发异常时提供有用且详细的错误消息。
Odin 的许多默认特性包含所谓的"解析字符串" - 通过使用 $ 前缀引用成员或通过使用 @ 前缀表示表达式的字符串,这些字符串会转换为值或操作。
一些使用解析字符串的更受欢迎的特性包括 ShowIf (解析字符串为布尔值以确定属性可见性)和 LabelText (解析字符串为另一个字符串,在某些情况下就是字符串本身!),用作属性的标签。
在 Odin 3.0 之前,这个功能是通过各种文档不足且经常即兴的实用工具实现的,而且实现特性功能的代码通常会通过手动使用 .NET 的反射 API 来处理问题。
这当然在几个方面都不是最优的,所以随着 Odin 3.0 的推出,我们将所有与解析字符串相关的逻辑统一到两个概念中,并提供了一个公开的、稳固的、可扩展的和文档齐全的 API: Value解析器和Action解析器。
通过这两个新系统,我们成功地消除了所有与解析字符串相关的手动反射代码,这些代码分布在 Odin 的所有drawers、validators 和state updaters中。这极大地简化了它们的实现。
Value and action 解析器不仅使 Odin 自己的特性实现更加简单、一致和功能丰富,而且也让用户轻松创建使用解析字符串的自己的特性。
使用Action解析器
Action解析器是两种解析器中最简单的一种;它们接受一个字符串并“执行”它,不返回或提供任何类型的值。使用Action解析器的特性示例包括 OnValueChanged、OnCollectionChanged和InlineButton。
Action解析器的使用方法非常简单——让我们创建一个特性,它在特性上方绘制一个按钮以调用动作。
首先,我们从基础知识开始——创建一个特性和一个drawers。
// ActionButtonAttribute.cs
using System;

public class ActionButtonAttribute : Attribute
{
    public string Action;

    public ActionButtonAttribute(string action)
    {
        this.Action = action;
    }
}

// ActionButtonAttributeDrawer.cs
using Sirenix.OdinInspector.Editor;
using UnityEditor;

public class ActionButtonAttributeDrawer : OdinAttributeDrawer<ActionButtonAttribute>
{
    protected override void DrawPropertyLayout(GUIContent label)
    {
        if (GUILayout.Button("Perform Action"))
        {
            // TODO: 执行动作
        }

        this.CallNextDrawer(label);
    }
}
现在我们有一个特性,它在放置它的成员上方绘制了一个按钮——现在我们只需要在点击按钮时执行action字符串作为动作!
为此,我们需要添加Sirenix.OdinInspector.Editor.ActionResolvers命名空间,在drawers的Initialize()方法中创建一个Action解析器,传入来自特性的action字符串,然后在点击按钮时调用Action解析器。
// ActionButtonAttributeDrawer.cs
using Sirenix.OdinInspector.Editor;
using Sirenix.OdinInspector.Editor.ActionResolvers;
using UnityEditor;

public class ActionButtonAttributeDrawer : OdinAttributeDrawer<ActionButtonAttribute>
{
    private ActionResolver actionResolver;

    protected override void Initialize()
    {
        this.actionResolver = ActionResolver.Get(this.Property, this.Attribute.Action);
    }

    protected override void DrawPropertyLayout(GUIContent label)
    {
        if (GUILayout.Button("Perform Action"))
        {
            this.actionResolver.DoActionForAllSelectionIndices();
        }

        this.CallNextDrawer(label);
    }
}
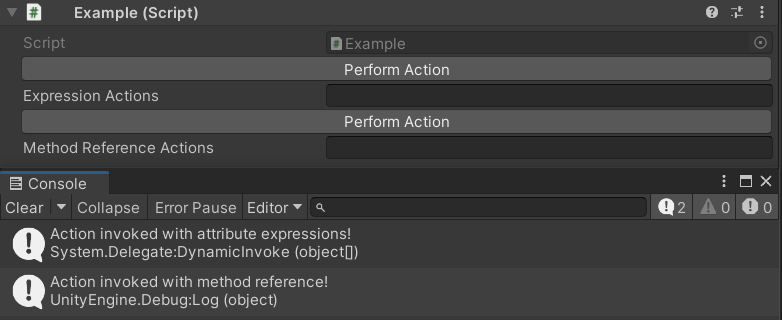
这就足够了,现在它可以工作了!我们现在可以使用ActionButton特性,并执行诸如引用方法或使用表达式等操作:
// Example.cs
using UnityEngine;

public class Example : MonoBehaviour
{
    [ActionButton("@UnityEngine.Debug.Log(\"Action invoked with attribute expressions!\")")]
    public string expressionActions;

    [ActionButton("DoAction")]
    public string methodReferenceActions;

    private void DoAction()
    {
        Debug.Log("Action invoked with method reference!");
    }
}
然而,这里有一个的问题!目前,如果我们传入一个错误的字符串,我们不会得到任何视觉反馈——按钮只会默默地什么都不做!
我们需要告诉解析器在有错误时绘制错误。它将生成一个不错的错误消息,并提供必要的反馈。这可以通过在解析器上调用DrawError()来简单地完成;如果有错误,它将被绘制。
// ActionButtonAttributeDrawer.cs
using Sirenix.OdinInspector.Editor;
using Sirenix.OdinInspector.Editor.ActionResolvers;
using UnityEditor;

public class ActionButtonAttributeDrawer : OdinAttributeDrawer<ActionButtonAttribute>
{
    private ActionResolver actionResolver;

    protected override void Initialize()
    {
        this.actionResolver = ActionResolver.Get(this.Property, this.Attribute.Action);
    }

    protected override void DrawPropertyLayout(GUIContent label)
    {
        this.actionResolver.DrawError();

        if (GUILayout.Button("Perform Action"))
        {
            this.actionResolver.DoActionForAllSelectionIndices();
        }

        this.CallNextDrawer(label);
    }
}
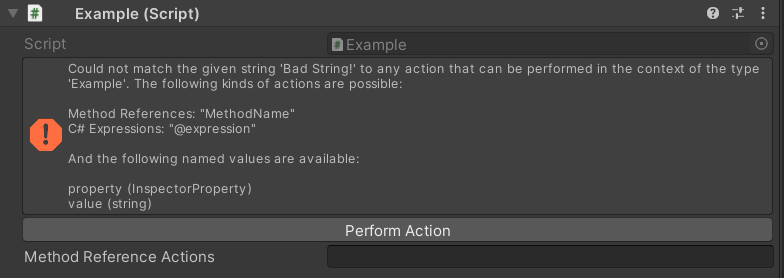
现在,如果我们向特性传入一个错误的字符串,我们将在检查器中得到一个有用的错误消息,解释哪些类型的字符串可以解析为action:
// Example.cs
using UnityEngine;

public class Example : MonoBehaviour
{
    [ActionButton("Bad String!")]
    public string methodReferenceActions;
}
就这样。正如你所看到的,使用Action解析器实际上不能更简单了!
使用Value解析器
Value解析器接收一个字符串并将其解析为指定类型的值。它们在Odin的特性实现中被广泛使用,以提高特性的灵活性和易用性。
它们非常容易使用 - 让我们创建一个简单的特性,如果给定的条件为真,它将对属性的GUI进行着色。
首先,我们从基础开始 - 制作一个特性和一个drawers。
// ColorIfAttribute.cs
using System;

public class ColorIfAttribute : Attribute {
    public string Color;
    public string Condition;

    public ColorIfAttribute(string color, string condition) {
        this.Color = color;
        this.Condition = condition;
    }
}

// ColorIfAttributeDrawer.cs
using Sirenix.OdinInspector.Editor;
using Sirenix.Utilities.Editor;
using UnityEngine;

public class ColorIfAttributeDrawer : OdinAttributeDrawer<ColorIfAttribute> {
    protected override void DrawPropertyLayout(GUIContent label) {
        bool condition = false; // TODO: 获取条件布尔值

        if (condition) {
            Color color = default(Color); // TODO: 获取颜色
            GUIHelper.PushColor(color);
        }

        this.CallNextDrawer(label);

        if (condition) {
            GUIHelper.PopColor();
        }
    }
}
现在我们有一个特性,它可以在放置它的属性上条件性地着色GUI - 但它还没有做任何事情!现在我们只需要从Color和Condition字符串中获取值!
为此,我们需要添加Sirenix.OdinInspector.Editor.ValueResolvers命名空间,并在drawers的Initialize()方法中为Color和Condition字符串创建值解析器,然后从它们中获取条件和颜色:
// ColorIfAttributeDrawer.cs
using Sirenix.OdinInspector.Editor;
using Sirenix.OdinInspector.Editor.ValueResolvers;
using Sirenix.Utilities.Editor;
using UnityEngine;

public class ColorIfAttributeDrawer : OdinAttributeDrawer<ColorIfAttribute> {
    private ValueResolver<Color> colorResolver;
    private ValueResolver<bool> conditionResolver;

    protected override void Initialize() {
        this.colorResolver = ValueResolver.Get<Color>(this.Property, this.Attribute.Color);
        this.conditionResolver = ValueResolver.Get<bool>(this.Property, this.Attribute.Condition);
    }

    protected override void DrawPropertyLayout(GUIContent label) {
        bool condition = this.conditionResolver.GetValue();

        if (condition) {
            GUIHelper.PushColor(this.colorResolver.GetValue());
        }

        this.CallNextDrawer(label);

        if (condition) {
            GUIHelper.PopColor();
        }
    }
}
这就足够了,现在它可以工作了!我们现在可以使用 ColorIf 特性,并执行诸如引用方法或使用表达式来获取条件和颜色:
// Example.cs
using UnityEngine;

public class Example : MonoBehaviour {
    [ColorIf("@Color.green", "ColorCondition")]
    public string coloredString;

    private bool ColorCondition() {
        // 如果字符串的字符数是偶数,则着色属性
        return coloredString?.Length % 2 == 0;
    }
}

然而,这里有一个的问题!目前,如果我们传入一个错误的字符串,我们不会得到任何视觉反馈 - 特性只会默默地什么都不做!
特性不执行是因为,如果在解析字符串时出现错误,那么解析器将简单地传递它解析的类型的默认值 - 例如bool的false,或Color的default(Color)。您也可以在ValueResolver.Get()中传递特定的默认值,这些值将在出错时使用。
我们需要告诉解析器在有错误时绘制错误。它们将生成不错的错误消息,并提供必要的反馈。这可以通过在解析器上调用DrawError()来简单地完成;如果有错误,它将被绘制。
当我们有多个解析器时,我们也可以调用ValueResolver.DrawErrors()方法并传入我们所有的解析器,以方便。我们还可以检查解析器上的HasError来查看它们是否有错误。
// ColorIfAttributeDrawer.cs
using Sirenix.OdinInspector.Editor;
using Sirenix.OdinInspector.Editor.ValueResolvers;
using Sirenix.Utilities.Editor;
using UnityEngine;

public class ColorIfAttributeDrawer : OdinAttributeDrawer<ColorIfAttribute> {
    private ValueResolver<Color> colorResolver;
    private ValueResolver<bool> conditionResolver;

    protected override void Initialize() {
        this.colorResolver = ValueResolver.Get<Color>(this.Property, this.Attribute.Color);
        this.conditionResolver = ValueResolver.Get<bool>(this.Property, this.Attribute.Condition);
    }

    protected override void DrawPropertyLayout(GUIContent label) {
        ValueResolver.DrawErrors(this.colorResolver, this.conditionResolver);

        // 如果条件解析器有错误,这个值将默认为default(bool),这在这种情况下是false。因此,我们不需要检查是否有错误来将布尔值设置为false - 当有错误时它总是false。
        bool condition = this.conditionResolver.GetValue();

        // 然而,我们确实需要检查颜色解析器是否有错误,因为default(Color)与new Color(0, 0, 0, 0)相同 - 一个alpha为0的颜色!如果我们使用该颜色绘制,那么UI将变得完全透明,即不可见!因此,如果颜色解析器有错误,我们永远不会着色任何东西。
        //
        // 另一种选择是在Initialize()中创建颜色解析器时传入Color.white作为默认回退。您选择哪种方法只是口味问题。
        if (this.colorResolver.HasError) {
            condition = false;
        }

        if (condition) {
            GUIHelper.PushColor(this.colorResolver.GetValue());
        }

        this.CallNextDrawer(label);

        if (condition) {
            GUIHelper.PopColor();
        }
    }
}
现在如果我们向特性传入一个错误的字符串,我们将在检查器中得到一个有用的错误消息,解释哪些类型的字符串可以解析为值,如果有解析字符串失败或可能的解析出现错误,例如表达式编译错误:
// Example.cs
using UnityEngine;

public class Example : MonoBehaviour {
    [ColorIf("@Color.thisIsAnError", "Bad String!")]
    public string coloredString;
}

就这样。正如你所看到的,使用值解析器实际上不能更简单了!
解析字符串值
等等,我们还没有结束!还有一个特殊情况需要一个额外的例子。具体来说,如果你正在将字符串解析为类型string,那么有一些有用的工具可以使用,它们可以让你获得你习惯于从LabelText和Title等特性中的默认行为。
我们在这里讨论的是字符串有点特殊情况。毕竟,如果你正在将字符串解析为字符串,那么解析后的字符串本身可能是一个有效的结果,而不需要任何“解析”发生。当你写[Title("My Custom Title")]时,你期望标题是“My Custom Title”。但如果像上面给出的例子那样解析字符串,那么你只会得到一个错误。
对于想要这种行为的情况的解决方案是简单地将字符串作为默认回退值传递:
// 第三个可选参数是如果字符串解析失败要使用的默认回退值
this.someStringResolver = ValueResolver.Get<string>(this.Property, this.Attribute.SomeString, this.Attribute.SomeString);
上述代码中你传入相同的参数两次看起来有点奇怪,所以我们添加了一个特殊的GetForString方法,它等同于上面的代码:
// GetForString方法等同于上述代码示例
this.someStringResolver = ValueResolver.GetForString(this.Property, this.Attribute.SomeString);
最后,当你像这些例子中解析字符串时,它还启用了值解析系统中的一个特殊行为:在字符串前加上" " 将其变成成员引用。因此,字符串“ M y T i t l e ”将解析为“ M y T i t l e ”,但字符串“ "将其变成成员引用。因此,字符串“MyTitle”将解析为“MyTitle”,但字符串“ "将其变成成员引用。因此,字符串“MyTitle”将解析为“MyTitle”,但字符串“MyTitle”将解析为MyTitle字段、属性或方法的内容 - 或者如果没有这样的成员存在,则为错误!
只有在这种情况下,"$"在解析字符串前才会得到特殊处理。然而,你会经常看到它被使用,因为在Odin中将字符串解析为标签、标题等是非常常见的。
Named Values(命名值)
Named Values是Value解析器和Action解析器强大和便利性的重要组成部分。简而言之,它们是可以在解析字符串时通过上下文访问的值。当解析的字符串是一个表达式时,可以使用 $named_value 语法访问命名值;而当解析的字符串是一个引用的方法时,可以将命名值作为参数传递给该方法。
所有Named Values都有一个类型和一个名称,默认情况下,所有解析器都有两个命名值:
- InspectorProperty property: 正在解析字符串的属性实例。
- TValue value: 正在解析字符串的属性的值 - 注意,这个命名值只存在于有值的属性上,并且命名值的类型会根据属性的值类型而变化!
属性命名值非常非常方便 - 这意味着任何解析的字符串始终可以访问有关其检查器上下文的详细信息!
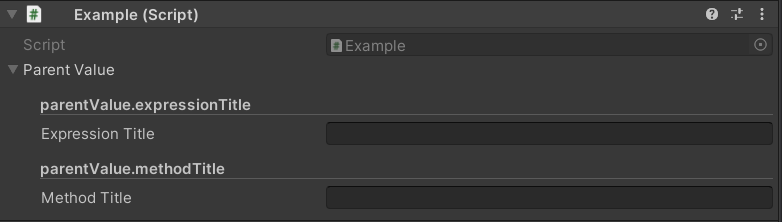
例如,在以下示例中,Title 将始终等于其所在属性的完整路径。这是通过使用属性表达式的 $named_value 语法来访问命名属性值,并引用一个名为 property 的方法,该方法接受一个 InspectorProperty 参数来实现的。
// 下面的两个示例在功能上是等效的。
// 表达式更短小且更方便,但方法可以包含更复杂的逻辑!

[Title("@$property.Path")]
public string expressionTitle;

[Title("$GetTitle")]
public string methodTitle;

private string GetTitle(InspectorProperty property)
{
    return property.Path;
}
困惑了吗?让我们来看一个使用命名值的值解析器的属性示例,你们大多数人可能都熟悉:ValidateInput。
为了唤起你的记忆,ValidateInput 特性可以这样使用:
[ValidateInput("ValidateSomeString")]
public string someString;

private bool ValidateSomeString(string value, ref string message, ref InfoMessageType? messageType)
{
    if (string.IsNullOrEmpty(value))
    {
        message = "Value must not be empty!";
        messageType = InfoMessageType.Error;
        return false;
    }
    else if (value.Length < 10)
    {
        message = "The value is less than 10 characters long - are you sure this is right?";
        messageType = InfoMessageType.Warning;
        return false;
    }

    return true;
}

如你所见,引用的方法接受几个特定于 ValidateInput 特性的参数!
然而,如果你尝试按照在使用Value解析器和使用Action解析器中给出的基本示例那样做,你将只会得到一个错误,抱怨 ValidateSomeString 方法中的额外参数。
这里发生的情况是,ValidateInput 特性的实现逻辑(即 ValidateInputAttributeValidator 类)创建了一堆自定义命名值,其解析的字符串可以选择性地使用。不深入 ValidateInputAttributeValidator 的完整实现,相关部分的代码本质上看起来像这样:
var context = ValueResolverContext.CreateDefault<bool>(this.Property, this.Attribute.Condition, new NamedValue[]
{
    new NamedValue("message", typeof(string)),
    new NamedValue("messageType", typeof(InfoMessageType?)),
});

context.SyncRefParametersWithNamedValues = true;

this.validationChecker = ValueResolver.GetFromContext<bool>(ref context);
这里发生了一些新事情。
首先,它添加了两个额外的命名值:类型为 string 的 message 和类型为 InfoMessageType?(一个可空的枚举值)的 messageType。在其实现的更下方,它随后使用了它们。但等等,命名参数在哪里?嗯,正如我们上面提到的,当有值时它将始终存在,因此没有必要再次创建它。
其次,我们提前创建了我们自己的解析器上下文,以及使用了一个新的解析器调用:ValueResolver.GetFromContext<T>(ref ValueResolverContext context)。这让我们可以在将上下文传递到解析器系统之前设置上下文上的值。如果我们只是想要额外的命名值,我们不需要这样做;所有的“quick and dirty”的解析器 API 都允许你传递一个 params 数组的命名值。我们在这里这样做的原因是因为我们需要指定 SyncRefParametersWithNamedValues 为 true。
解析器上下文上的 SyncRefParametersWithNamedValues = true 是怎么回事?这是因为 ValidateInputAttributeValidator 不仅仅是传递值供验证逻辑使用;它期望验证逻辑在通过 ref 或 out 传递时更改这些值,然后它使用这些更改的参数。将此值设置为 true 告诉解析器应该获取对这些参数所做的任何更改,以便 ValidateInputAttributeValidator 可以使用它们来确定要显示的消息和错误类型。我们需要提前告诉它这个值,因为它改变了命名值可以匹配方法参数的约束;如果你在解析器创建后尝试更改 SyncRefParametersWithNamedValues,你将只会得到一个异常。
如果这看起来复杂,不要担心!很少情况下你需要使用这个选项。
让我们尝试制作我们自己的,稍微更简单直接的示例:一个格式化时间显示特性,提供当前时间的小时、分钟和秒,并将其作为标签在检查器中显示。让我们从我们为这个需要的基本设置开始。
// DisplayFormattedDateAttribute.cs
using System;

public class DisplayFormattedDateAttribute : Attribute {
    public string FormattedDate;

    public DisplayFormattedDateAttribute(string formattedDate) {
        this.FormattedDate = formattedDate;
    }
}

// DisplayFormattedDateAttributeDrawer.cs
using Sirenix.OdinInspector.Editor;
using Sirenix.OdinInspector.Editor.ValueResolvers;
using UnityEngine;

public class DisplayFormattedDateAttributeDrawer : OdinAttributeDrawer<DisplayFormattedDateAttribute> {
    private ValueResolver<string> formattedDateResolver;

    protected override void Initialize() {
        this.formattedDateResolver = ValueResolver.GetForString(this.Property, this.Attribute.FormattedDate);
    }

    protected override void DrawPropertyLayout(GUIContent label) {
        if (this.formattedDateResolver.HasError) {
            this.formattedDateResolver.DrawError();
        } else {
            GUILayout.Label(this.formattedDateResolver.GetValue());
        }

        this.CallNextDrawer(label);
    }
}
这里我们有一个简单的特性实现,它将获取一个字符串,解析它,然后将其作为标签显示在给定属性的上方。现在让我们添加我们讨论的命名值,并在每帧解析字符串之前更新它们。
// DisplayFormattedDateAttributeDrawer.cs
using Sirenix.OdinInspector.Editor;
using Sirenix.OdinInspector.Editor.ValueResolvers;
using UnityEngine;

public class DisplayFormattedDateAttributeDrawer : OdinAttributeDrawer<DisplayFormattedDateAttribute> {
    private ValueResolver<string> formattedDateResolver;

    protected override void Initialize() {
        this.formattedDateResolver = ValueResolver.GetForString(this.Property, this.Attribute.FormattedDate, new NamedValue[]
        {
            new NamedValue("hour", typeof(int)),
            new NamedValue("minute", typeof(int)),
            new NamedValue("second", typeof(int)),
        });
    }

    protected override void DrawPropertyLayout(GUIContent label) {
        if (this.formattedDateResolver.HasError) {
            this.formattedDateResolver.DrawError();
        } else {
            var time = DateTime.Now;
            this.formattedDateResolver.Context.NamedValues.Set("hour", time.Hour);
            this.formattedDateResolver.Context.NamedValues.Set("minute", time.Minute);
            this.formattedDateResolver.Context.NamedValues.Set("second", time.Second);

            GUILayout.Label(this.formattedDateResolver.GetValue());
        }

        this.CallNextDrawer(label);
    }
}
现在我们将能够在声明特性时使用这些命名值:
// Example.cs
using UnityEngine;

public class Example : MonoBehaviour {
    [DisplayFormattedDate("@$hour + \":\" + $minute + \":\" + $second")]
    public string datedString;
}

就这样 - 一个为其解析字符串提供自定义上下文命名值的特性。


 657
657

 被折叠的 条评论
为什么被折叠?
被折叠的 条评论
为什么被折叠?
 到【灌水乐园】发言


