


原文地址:
前言
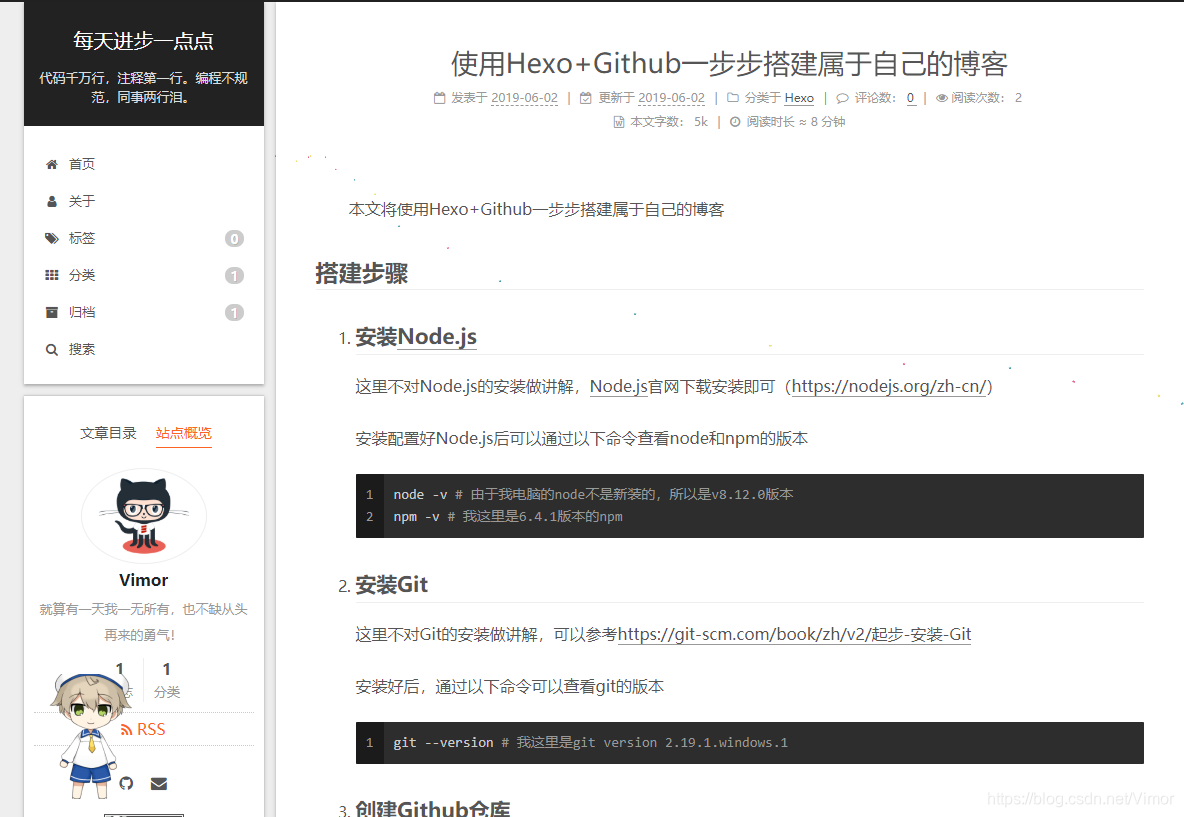
本文将使用Hexo+Github一步步搭建属于自己的博客,不多说,先上图
搭建步骤
-
安装Node.js
这里不对Node.js的安装做讲解,Node.js官网下载安装即可(https://nodejs.org/zh-cn/)
安装配置好Node.js后可以通过以下命令查看node和npm的版本
node -v # 说明:由于我电脑的node不是新装的,所以是v8.12.0版本 npm -v # 说明:我这里是6.4.1版本的npm -
安装Git
这里不对Git的安装做讲解,可以参考https://git-scm.com/book/zh/v2/起步-安装-Git
安装好后,通过以下命令可以查看git的版本
git --version # 说明:我这里是git version 2.19.1.windows.1 -
创建Github仓库
-
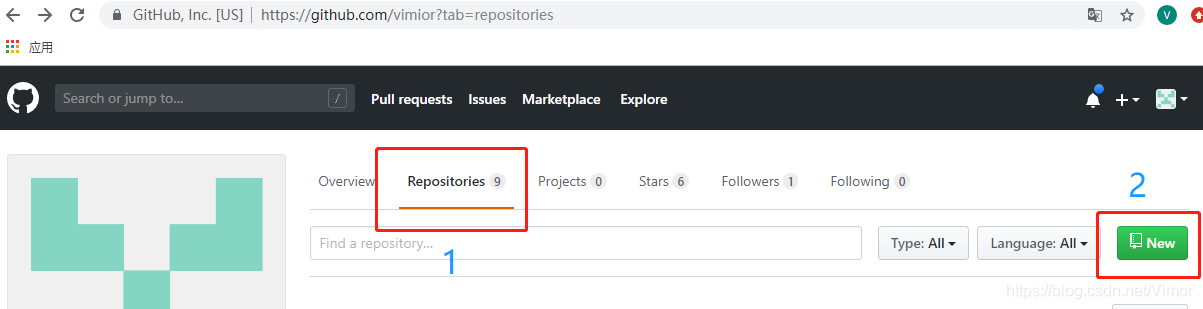
打开github并登录(https://github.com/)
-
新建仓库
-
选中Repositories栏,然后点击右侧的New按钮创建
-
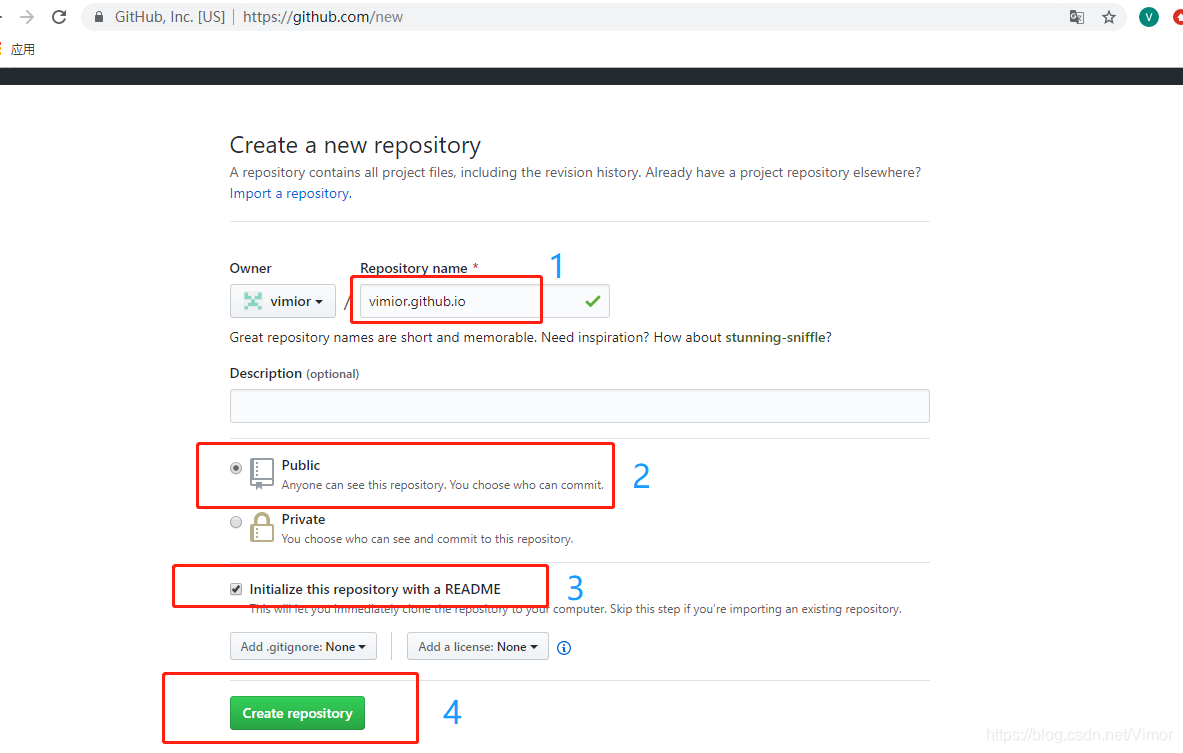
设置仓库名字
- 仓库名必须严格遵守格式:用户名.github.io,不要随意起名,后续会有麻烦,这里vimior是我的用户名)
- 记得选中Public和勾选Initialize this repository with a README
-
-
查看Github Pages
-
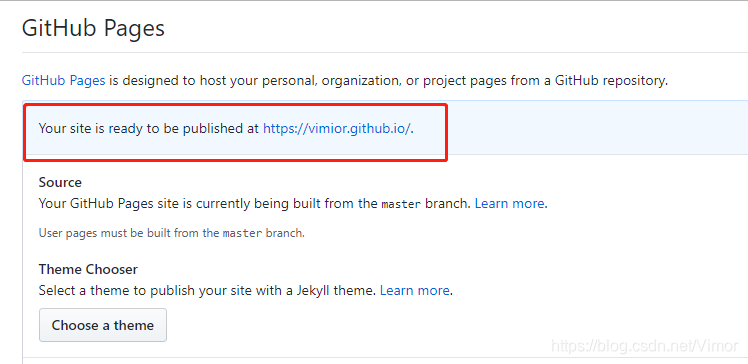
选中刚刚创建的仓库的Settings栏,找到Github Pages的设置项
-
此时Github Pages会显示如下,表明当前仓库可以作为Github Pages
-
-
-
安装Hexo环境
-
安装Hexo
npm install hexo -g # 说明:这里-g参数是为了把hexo安装到全局 hexo -v # 说明:查看hexo是否安装成功,获取其版本信息 -
新建一个工程目录(这里是vimior_blog),然后进入这个目录
-
初始化Hexo
hexo init # 说明:此命令会在当前文件夹下生成一个hexo工程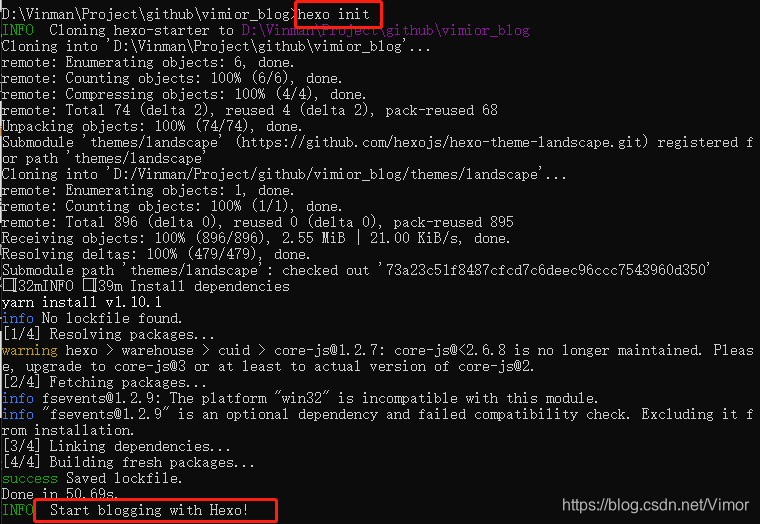
-
生成静态页面
hexo generate # 可以简写成 hexo g -
启动本地服务器,启动后可以通过http://localhost:4000来访问
hexo server # 可以简写成 hexo s -
新建博文
通过hexo new <文章名>来新建或者直接在工程目录下的source/_post目录下创建一个md文件即可,然后重新生成静态页面并启动服务器即可
hexo new "文章名" # 此命令会在工程目录下的source/_post目录下生成一个<文章名>.md的文件
hexo g && hexo s # 此命令重新生成静态文件并启动服务器,此时即可通过浏览器访问到我们刚创建的博文了,修改该md文件即可修改博文内容
博文格式如下
---
title: 博文的标题
---
博文内容

# 注意:如果需要给博文指定类别,可以在头部使用categories: "xxx类别名",参考如下
---
title: 博文的标题
categories: "测试类别"
---
-
-
配置Hexo
注意:这里我们先统一把需要的包安装好,具体配置会在配置里面用注释说明
-
安装__hexo-theme-next__主题(配置使用在后面统一说明)
# 说明:以下命令会从https://github.com/theme-next/hexo-theme-next下载内容到当前目录下的themes/next里面 git clone https://github.com/theme-next/hexo-theme-next themes/next -
安装__hexo-helper-live2d__(用于生成Live2D看板娘)
npm install hexo-helper-live2d --save # 下面的命令是安装live2d的模型,这里选择live2d-widget-model-haruto # 参考https://github.com/xiazeyu/live2d-widget-models选择自己需要的 # 如果选择别的模型,在配置_config.yml文件里的live2d->model->use的值也要对应修改 npm install live2d-widget-model-haruto --save -
安装__hexo-symbols-count-time__(用于字数统计和计算阅读时间)
npm install hexo-symbols-count-time --save -
安装__hexo-generator-sitemap__(用于生成站点地图)
npm install hexo-generator-sitemap --save -
安装__hexo-generator-feed__(用于生成RSS订阅)
npm install hexo-generator-feed --save -
安装__hexo-generator-searchdb__(用于生成搜索数据库)
npm install hexo-generator-searchdb --save -
安装__hexo-deployer-git__(用于推送到Github)
npm install hexo-deployer-git --save -
新建__categories__页(分类页面)
hexo new page categories # 会在source目录下生成categories目录 # 修改source/categories/index.md文件如下 --- title: categories date: 2019-06-01 23:34:54 type: "categories" comments: false --- -
新建__tags__页(标签页面)
hexo new page tags # 会在source目录下生成tags目录 # 修改source/categories/index.md文件如下 --- title: 标签 date: 2019-06-01 14:21:23 type: "tags" comments: false --- -
新建__about__页
hexo new page about # 会在source目录下生成about目录 # 修改source/categories/index.md文件如下 --- title: 我 date: 2019-06-01 23:35:51 comments: false --- <h3 style="text-align: center;font-size: 18px;">就算有一天我一无所有,也不缺从头再来的勇气!</h3> -
修改工程的配置修改___config.yml__文件)
详细配置参考https://hexo.io/zh-cn/docs/configuration
# 以下是在原有配置项修改的,大家仅需修改对应的项 # 博客站点标题 title: 落 # 博客站点子标题 subtitle: 你若安好,便是晴天! # 描述 description: 代码千万行,注释第一行。</br>编程不规范,同事两行泪。 # 作者 author: Vimor # 语言 language: zh-CN # 时区 timezone: Asia/Shanghai # URL,这里的url值大家修改成自己的Github Page地址 url: https://vimior.github.io # 主题配置,这里把默认的landscape注释掉,使用我们安装的next主题 # theme: landscape theme: next # 使用hexo-theme-next主题 # 关联Github Pages,此处的repo值请修改为自己的Github Pages仓库路径 # 这里是执行hexo deploy命令时才需要用到的配置,不影响本地调试运行的使用 deploy: type: git repo: git@github.com:vimior/vimior.github.io.git branch: master ############上面的配置是在原有配置基础上修改的############## ##################完美的分割线:######################### ################下面的配置是新增的######################## # Live2D:看板娘的配置 # 详细配置参考:https://github.com/EYHN/hexo-helper-live2d # live2d->model->use这项要根据自己之前安装Live2D支持的时候安装那个model来配置 live2d: enable: true scriptFrom: local # 默认 pluginRootPath: live2dw/ # 插件在站点上的根目录(相对路径) pluginJsPath: lib/ # 脚本文件相对与插件根目录路径 pluginModelPath: assets/ # 模型文件相对与插件根目录路径 # scriptFrom: jsdelivr # jsdelivr CDN # scriptFrom: unpkg # unpkg CDN # scriptFrom: https://cdn.jsdelivr.net/npm/live2d-widget@3.x/lib/L2Dwidget.min.js # 你的自定义 url tagMode: false # 标签模式, 是否仅替换 live2d tag标签而非插入到所有页面中 debug: false # 调试, 是否在控制台输出日志 log: false model: use: live2d-widget-model-haruto # npm-module package name # use: hijiki # 博客根目录/live2d_models/ 下的目录名 # use: ./wives/hijiki # 相对于博客根目录的路径 # use: https://cdn.jsdelivr.net/npm/live2d-widget-model-hijiki@1.0.5/assets/hijiki.model.json # 你的自定义 url scale: 1 hHeadPos: 0.5 vHeadPos: 0.618 display: superSample: 2 width: 125 height: 125 position: left hOffset: 30 vOffset: 20 mobile: show: true scale: 0.05 react: opacityDefault: 1 opacityOnHover: 0.2 # symbols_count_time配置:用于计算字数,阅读时间 symbols_count_time: symbols: true time: true total_symbols: true total_time: true exclude_codeblock: false # 版权协议的配置 creative_commons: by-nc-sa # 订阅的配置 feed: type: atom path: atom.xml limit: 20 hub: content: content_limit: 140 content_limit_delim: ' ' # 搜索的配置 search: path: search.xml field: post format: html limit: 10000 -
修改__hexo-theme-next主题的配置(修改__themes/next/_config.yml__文件)
详细配置参考http://theme-next.iissnan.com/theme-settings.html
# RSS配置
rss: /atom.xml

# 页脚配置
footer:
  since: 2019
  icon:
  	name: heart
  	animated: true
  	color: "#D0104C"

# 菜单栏配置1:把不需要的菜单的菜单注释掉就好
# 这里的要显示的菜单包括(首页、关于、标签、分类、归档、站点地图、搜索)
menu:
  home: / || home
  about: /about/ || user
  tags: /tags/ || tags
  categories: /categories/ || th
  archives: /archives/ || archive
  # schedule: /schedule/ || calendar
  sitemap: /sitemap.xml || sitemap
  # commonweal: /404/ || heartbeat
menu_settings:
  icons: true
  badges: true

# 主题风格:这里选用Gemini
# scheme: Muse
#scheme: Mist
#scheme: Pisces
scheme: Gemini

# 社交配置:这里把需要显示的配置好,不需要的注释就好
# 这里仅仅显示Github和E-Mail,记得把地址修改为自己的
social:
  GitHub: https://github.com/vimior || github
  E-Mail: mailto:vinman.cub@gmail.com || envelope
  #Weibo: https://weibo.com/yourname || weibo
  #Google: https://plus.google.com/yourname || google
  #Twitter: https://twitter.com/yourname || twitter
  #FB Page: https://www.facebook.com/yourname || facebook
  #VK Group: https://vk.com/yourname || vk
  #StackOverflow: https://stackoverflow.com/yourname || stack-overflow
  #YouTube: https://youtube.com/yourname || youtube
  #Instagram: https://instagram.com/yourname || instagram
  #Skype: skype:yourname?call|chat || skype
social_icons:
  enable: true # 是否显示图标
  icons_only: true # 是否只显示图标
  transition: false

# 用户头像配置
avatar:
  # In theme directory (source/images): /images/avatar.gif
  # In site directory (source/uploads): /uploads/avatar.gif
  # You can also use other linking images.
  url: /images/avatar.png # 注意:需要把avatar.png放在themes/next/source/images里面
  # If true, the avatar would be dispalyed in circle.
  rounded: true
  # The value of opacity should be choose from 0 to 1 to set the opacity of the avatar.
  opacity: 1
  # If true, the avatar would be rotated with the cursor.
  rotated: false

# 回到顶部的配置
back2top:
  enable: true
  sidebar: true
  scrollpercent: true

# 博文的元数据配置,即博文标题下面显示的内容(如发表时间、所属分类等等)
post_meta:
  item_text: true
  created_at: true
  updated_at:
    enable: true
    another_day: false
  categories: true

# 字数统计配置
symbols_count_time:
  separated_meta: true
  item_text_post: true
  item_text_total: false
  awl: 2
  wpm: 300

# brand的背景颜色配置
android_chrome_color: "#fff"

# 代码高亮的主题配置
highlight_theme: night eighties

# 卜算子配置:统计阅读次数等
busuanzi_count:
  enable: true
  total_visitors: true
  total_visitors_icon: user
  total_views: true
  total_views_icon: eye
  post_views: true
  post_views_icon: eye

# 本地搜索配置
local_search:
  enable: true
  # If auto, trigger search by changing input.
  # If manual, trigger search by pressing enter key or search button.
  trigger: auto
  # Show top n results per article, show all results by setting to -1
  top_n_per_article: 1
  # Unescape html strings to the readable one.
  unescape: false

# 更多配置请参阅http://theme-next.iissnan.com/theme-settings.html
# 如评论的配置可以通过配置valine(使用leancloud)
-
-
推送到Github Pages
注意:
-
推送前先本地运行,通过浏览器访问没问题再行推送
-
初次使用git需要设置user name和email
git config --global user.name "your name" git config --global user.email "your email" -
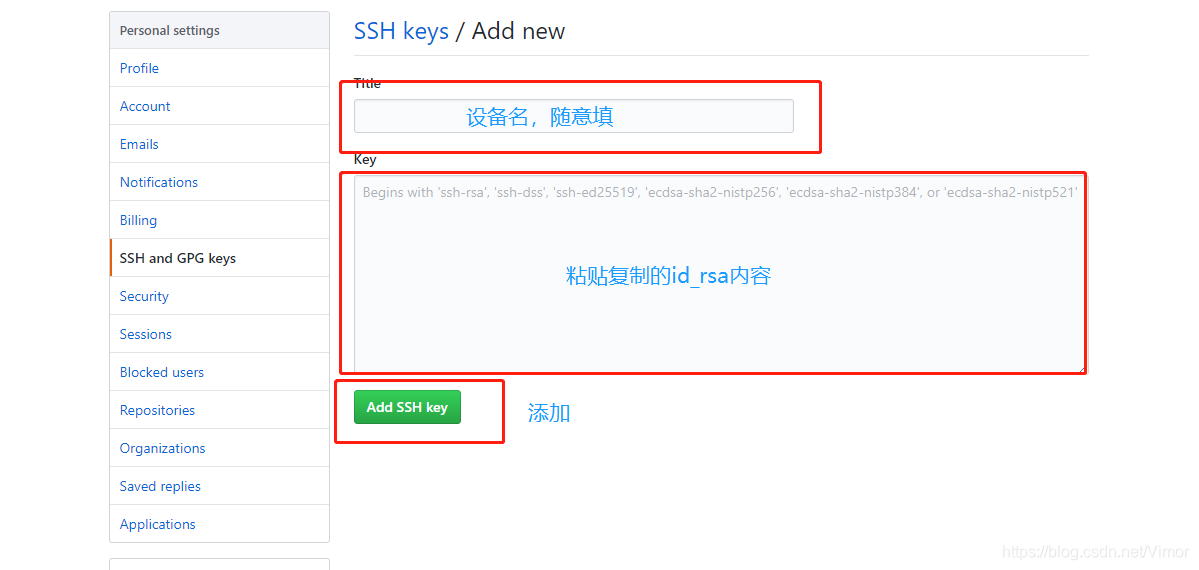
(如果未曾添加过ssh-agent)需要添加ssh-key到github的ssh-agent
# 1. 生成ssh密钥
ssh-keygen -t rsa -C "your email" # 生成路径在%USERPROFILE%/.ssh目录

# 2. 把%USERPROFILE%/.ssh/id_rsa的内容拷贝
# 3. 粘贴到github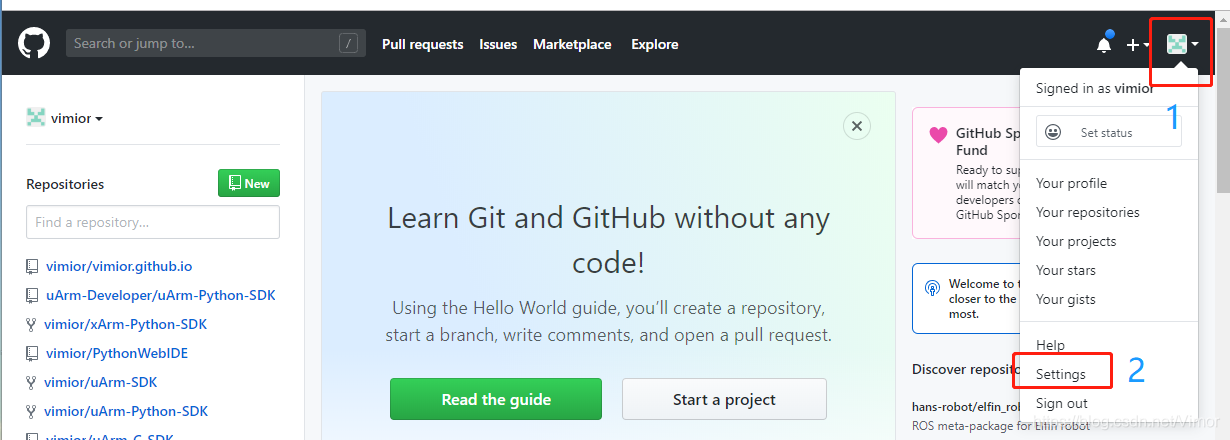

-
生成静态文件
hexo generate # 可以简写为 hexo d -
推送到github pages
hexo deploy # 可以简写为 hexo d
# hexo deploy -g  # 可以简写hexo d -g,等效于hexo g && hexo d
-
总结
此时,我们已经搭建好一个属于自己的博客了,如果需要部署到其他仓库,只需要修改deploy配置即可,详情请查阅https://hexo.io/zh-cn/docs/deployment
Hexo的功能很强大,用 Hexo+Github搭建一个属于自己的博客,不需要我们写代码,只需要通过修改配置即可搭建一个属于自己的酷炫博客。另外,我们平时可以通过在source/_post目录下用Markdown来写自己的笔记、博文,然后重新推送即可在自己的线上博客上看到。
这是我博客里的第一篇博文,由于本人学识有限,难免有错漏,敬请谅解,欢迎指出!


 3995
3995


 被折叠的 条评论
为什么被折叠?
被折叠的 条评论
为什么被折叠?
 到【灌水乐园】发言


