


简介:
本章主要介绍在2.6.22.6内核中,代码的运行过程。而这里主要介绍kernel第一阶段的汇编代码部分。在这部分我们将讲解内核如何对单板控制器信息和机器ID的进行检测。同时也会讲解内核如何创建页表和使能mmu。
声明:
本文主要是看了韦东山老师的视频后所写,希望对你有所帮助。
起始汇编代码:
我们知道不管是在u-boot中还是在kernel中,起始的代码都是汇编代码。这是因为在编译器中汇编代码较C语言代码转化的效率更高,因此在硬件中汇编代码的运行效率更高。同时我们也应该清楚汇编语言较C语言更低级,而对于硬件来说越低级的代码运行情况越好。所以在代码开始的时候使用汇编代码更利于底层程序的运行。
而在讲内核程序之前,我们应该先回顾一下u-boot所做的工作。u-boot的工作是加载并启动内核,而在u-boot启动内核之前,他会为内核传递三个参数:0,单板的机器ID,以及TAG参数的首地址。而这三个参数被分别存放在内核寄存器r0,r1,r2中。
下面我们看内核代码了。内核要做的第一件事为:通过控制当前程序状态寄存器将cpu设置为管理模式,并关闭中断和快速中断。他的代码在arch\arm\kernel\head.S :
	msr	cpsr_c, #PSR_F_BIT | PSR_I_BIT | SVC_MODE @ ensure svc mode
						@ and irqs disabled
与u-boot相同,内核要做的第一件事也是将CPU设置为管理模式来让内核运行在特权模式下。从而可以使内核代码在运行时不受任何其他权限的限制。
接下来内核要通过操作协处理寄存器来获得单板的处理器信息,并将获得的单板处理器信息与内核中所保存的处理器信息进行比较来确定内核中是否存在所要移植的单板。他的代码在arch\arm\kernel\head-common.S:
	mrc	p15, 0, r9, c0, c0		@ get processor id
	bl	__lookup_processor_type		@ r5=procinfo r9=cpuid
现在我们进入__lookup_processor_type来看在这个函数中做了什么:
ENTRY(lookup_processor_type)
	stmfd	sp!, {r4 - r7, r9, lr}
	mov	r9, r0
	bl	__lookup_processor_type
	mov	r0, r5
	ldmfd	sp!, {r4 - r7, r9, pc}

/*
 * Read processor ID register (CP#15, CR0), and look up in the linker-built
 * supported processor list.  Note that we can't use the absolute addresses
 * for the __proc_info lists since we aren't running with the MMU on
 * (and therefore, we are not in the correct address space).  We have to
 * calculate the offset.
 *
 *	r9 = cpuid
 * Returns:
 *	r3, r4, r6 corrupted
 *	r5 = proc_info pointer in physical address space
 *	r9 = cpuid (preserved)
 */
	.type	__lookup_processor_type, %function
__lookup_processor_type:
	adr	r3, 3f
	ldmda	r3, {r5 - r7}
	sub	r3, r3, r7			@ get offset between virt&phys
	add	r5, r5, r3			@ convert virt addresses to
	add	r6, r6, r3			@ physical address space
1:	ldmia	r5, {r3, r4}			@ value, mask
	and	r4, r4, r9			@ mask wanted bits
	teq	r3, r4
	beq	2f
	add	r5, r5, #PROC_INFO_SZ		@ sizeof(proc_info_list)
	cmp	r5, r6
	blo	1b
	mov	r5, #0				@ unknown processor
2:	mov	pc, lr

/*
 * Look in include/asm-arm/procinfo.h and arch/arm/kernel/arch.[ch] for
 * more information about the __proc_info and __arch_info structures.
 */
	.long	__proc_info_begin
	.long	__proc_info_end
3:	.long	.
	.long	__arch_info_begin
	.long	__arch_info_end
从上面的代码中可以看出,程序首先要做的就是保护现场。我们知道在汇编代码中很多的事情要自己写代码,而在其他的高级语言中这些工作编译器已经做好了。例如,在C语言中如果想要调用某个函数直接调用就好,并且也不用在意调用完之后去恢复现场。这是由于C语言相对于汇编来说是高级语言,而其实在C语言转化为汇编的时候也是会有上面保存现场和恢复现场的过程。而上面汇编代码所做的就是调用之前的保存现场和调用完之后的恢复现场。
而真正__lookup_processor_type函数所做的事为:从地址空间为__proc_info_begin的地方取出处理器信息与程序通过协处理器得到的信息进行比较,看是否匹配,当匹配时获取内核中所存放的关于处理器的信息。当比较到 __proc_info_end 依然没有找到从协处理器获得的处理器信息时,程序将获得空值返回。
讲到这里我想大家要问了:这里的区间__proc_info_begin和 __proc_info_end在哪里啊?我们根据以往的经验可以知道这些对特定参数定义的区间一般要到链接文件中去寻找,所以我们打开链接文件可以看到:
		__proc_info_begin = .;
			*(.proc.info.init)
		__proc_info_end = .;
而从上面代码中我们可以知道,所有用 .proc.info.init 修饰的参数都会放到上面定义的这个特殊区域中。而对于我们单板所对应的CPU的定义在arch\arm\mm\proc-arm920.S:
/*
 * Purpose : Function pointers used to access above functions - all calls
 *	     come through these
 */
	.type	arm920_processor_functions, #object
arm920_processor_functions:
	.word	v4t_early_abort
	.word	cpu_arm920_proc_init
	.word	cpu_arm920_proc_fin
	.word	cpu_arm920_reset
	.word   cpu_arm920_do_idle
	.word	cpu_arm920_dcache_clean_area
	.word	cpu_arm920_switch_mm
	.word	cpu_arm920_set_pte_ext
	.size	arm920_processor_functions, . - arm920_processor_functions

	.section ".rodata"

	.type	cpu_arch_name, #object
cpu_arch_name:
	.asciz	"armv4t"
	.size	cpu_arch_name, . - cpu_arch_name

	.type	cpu_elf_name, #object
cpu_elf_name:
	.asciz	"v4"
	.size	cpu_elf_name, . - cpu_elf_name

	.type	cpu_arm920_name, #object
cpu_arm920_name:
	.asciz	"ARM920T"
	.size	cpu_arm920_name, . - cpu_arm920_name

	.align

	.section ".proc.info.init", #alloc, #execinstr

	.type	__arm920_proc_info,#object
__arm920_proc_info:
	.long	0x41009200
	.long	0xff00fff0
	.long   PMD_TYPE_SECT | \
		PMD_SECT_BUFFERABLE | \
		PMD_SECT_CACHEABLE | \
		PMD_BIT4 | \
		PMD_SECT_AP_WRITE | \
		PMD_SECT_AP_READ
	.long   PMD_TYPE_SECT | \
		PMD_BIT4 | \
		PMD_SECT_AP_WRITE | \
		PMD_SECT_AP_READ
	b	__arm920_setup
	.long	cpu_arch_name
	.long	cpu_elf_name
	.long	HWCAP_SWP | HWCAP_HALF | HWCAP_THUMB
	.long	cpu_arm920_name
	.long	arm920_processor_functions
	.long	v4wbi_tlb_fns
	.long	v4wb_user_fns
#ifndef CONFIG_CPU_DCACHE_WRITETHROUGH
	.long	arm920_cache_fns
#else
	.long	v4wt_cache_fns
#endif
	.size	__arm920_proc_info, . - __arm920_proc_info
而在上面的定义中就为我们详细的定义了对用arm920处理器所有的特性。
在比较完处理器信息后,程序还会比较从u-boot传入的机器ID是否为内核所支持的机器ID,并通过不同的机器ID来找到内核中定义的不同类型的单板,并获得这些信息来为后面的调用做准备。而在arch\arm\kernel\head.S中代码为:
bl __lookup_machine_type @ r5=machinfo而在arch\arm\kernel\head-common.S中__lookup_machine_type函数为:
ENTRY(lookup_machine_type)
	stmfd	sp!, {r4 - r6, lr}
	mov	r1, r0
	bl	__lookup_machine_type
	mov	r0, r5
	ldmfd	sp!, {r4 - r6, pc}


/*
 * Lookup machine architecture in the linker-build list of architectures.
 * Note that we can't use the absolute addresses for the __arch_info
 * lists since we aren't running with the MMU on (and therefore, we are
 * not in the correct address space).  We have to calculate the offset.
 *
 *  r1 = machine architecture number
 * Returns:
 *  r3, r4, r6 corrupted
 *  r5 = mach_info pointer in physical address space
 */
	.type	__lookup_machine_type, %function
__lookup_machine_type:
	adr	r3, 3b
	ldmia	r3, {r4, r5, r6}
	sub	r3, r3, r4			@ get offset between virt&phys
	add	r5, r5, r3			@ convert virt addresses to
	add	r6, r6, r3			@ physical address space
1:	ldr	r3, [r5, #MACHINFO_TYPE]	@ get machine type
	teq	r3, r1				@ matches loader number?
	beq	2f				@ found
	add	r5, r5, #SIZEOF_MACHINE_DESC	@ next machine_desc
	cmp	r5, r6
	blo	1b
	mov	r5, #0				@ unknown machine
2:	mov	pc, lr


3:	.long	.
	.long	__arch_info_begin
	.long	__arch_info_end
查询机器ID要做的第一件事同样是保存现场。然后再调用__lookup_machine_type函数,当完成这个函数操作后,程序再用上面保存现场的变量来恢复现场。而我们继续看上面的代码会发现在其实__lookup_machine_type函数要做的是:从区间__arch_info_begin到__arch_info_end中寻找是否存在与u-boot中传入的相同的机器ID,如果有则获取其相关的参数。如果没有则返回0,表示寻找失败。同查找CPU信息一样,上面的__arch_info_begin和 __arch_info_end这两个区间边界在链接文件中定义:
		__arch_info_begin = .;
			*(.arch.info.init)
		__arch_info_end = .;
通过上面链接文件中的信息我们知道与机器ID相关的信息要加段属性:.arch.info.init。而我们在代码中找到与这个段信息相关的宏定义在 include\asm-arm\mach\arch.h :
/*
 * Set of macros to define architecture features.  This is built into
 * a table by the linker.
 */
#define MACHINE_START(_type,_name)			\
static const struct machine_desc __mach_desc_##_type	\
 __used							\
 __attribute__((__section__(".arch.info.init"))) = {	\
	.nr		= MACH_TYPE_##_type,		\
	.name		= _name,

#define MACHINE_END				\
};
而同时我们要查找在什么地方调用了这个宏定义,查找与我们单板相关的信息在arch\arm\mach-s3c2410\mach-smdk2410.c :
MACHINE_START(SMDK2410, "SMDK2410") /* @TODO: request a new identifier and switch
				    * to SMDK2410 */
	/* Maintainer: Jonas Dietsche */
	.phys_io	= S3C2410_PA_UART,
	.io_pg_offst	= (((u32)S3C24XX_VA_UART) >> 18) & 0xfffc,
	.boot_params	= S3C2410_SDRAM_PA + 0x100,
	.map_io		= smdk2410_map_io,
	.init_irq	= s3c24xx_init_irq,
	.init_machine	= smdk2410_init,
	.timer		= &s3c24xx_timer,
MACHINE_END
我们将宏定义的内容带回到宏中,从而得到与2410单板相关的各种信息的定义,而我们观察这个带回的信息会发现,其实这就是对结构体machine_desc的填充。在machine_desc结构体中定义了与机器相关的信息,其中包括:机器ID,物理IO的开始地址,机器名,以及一些重要的函数。而machine_desc结构体的信息为:
struct machine_desc {
/*
* Note! The first four elements are used
* by assembler code in head-armv.S
*/
unsigned int nr; /* architecture number */
unsigned int phys_io; /* start of physical io */
unsigned int io_pg_offst; /* byte offset for io
* page tabe entry */
const char *name; /* architecture name */
unsigned long boot_params; /* tagged list */
unsigned int video_start; /* start of video RAM */
unsigned int video_end; /* end of video RAM */
unsigned int reserve_lp0 :1; /* never has lp0 */
unsigned int reserve_lp1 :1; /* never has lp1 */
unsigned int reserve_lp2 :1; /* never has lp2 */
unsigned int soft_reboot :1; /* soft reboot */
void (*fixup)(struct machine_desc *,
struct tag *, char **,
struct meminfo *);
void (*map_io)(void);/* IO mapping function */
void (*init_irq)(void);
struct sys_timer *timer; /* system tick timer */
void (*init_machine)(void);
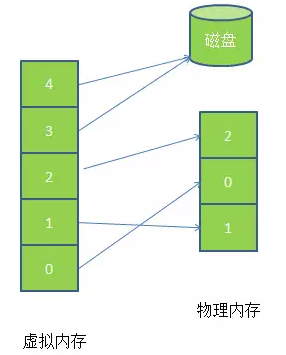
};完成上面两项工作之后说明在内核中有对应的单板的信息,并且程序已经了解了这些信息。在内核中下一步要做的就是创建页表了。我们知道在内核中使用的是虚拟地址而并不是物理地址。所以在这里就要创建页表来支持虚拟地址。而这里关于虚拟地址和页表的关系为: 虚拟内存的基本思想是,每个进程有用独立的逻辑地址空间,内存被分为大小相等的多个块,称为页(Page).每个页都是一段连续的地址。对于进程来看,逻辑上貌似有很多内存空间,其中一部分对应物理内存上的一块(称为页框,通常页和页框大小相等),还有一些没加载在内存中的对应在硬盘上,如图所示。
而关于虚拟内存的详细介绍,大家可以看:虚拟内存(虚拟地址, 页表,换页...)
而关于更加详细的页表创建内容,大家可以看:arm linux 页表创建
在上面说了要在内核中运行就要使用虚拟内存,而虚拟内存的使用是建立在页表和内存管理的基础上了。页表为我们使用虚拟内存提供表格支持,而内存管理却是单板是否可以使用虚拟内存的关键。所以在上面创建好页表后,这里就要使能单板的内存管理(MMU)了。在使能mmu后,内核就可以使用虚拟地址了。而在使能mmu之前我们要先设置一下跳转地址,即当使能好mmu后就可以跳转到__switch_data里的去执行了。而使能mmu的代码为:
/*
 * Setup common bits before finally enabling the MMU.  Essentially
 * this is just loading the page table pointer and domain access
 * registers.
 */
	.type	__enable_mmu, %function
__enable_mmu:
#ifdef CONFIG_ALIGNMENT_TRAP
	orr	r0, r0, #CR_A
#else
	bic	r0, r0, #CR_A
#endif
#ifdef CONFIG_CPU_DCACHE_DISABLE
	bic	r0, r0, #CR_C
#endif
#ifdef CONFIG_CPU_BPREDICT_DISABLE
	bic	r0, r0, #CR_Z
#endif
#ifdef CONFIG_CPU_ICACHE_DISABLE
	bic	r0, r0, #CR_I
#endif
	mov	r5, #(domain_val(DOMAIN_USER, DOMAIN_MANAGER) | \
		      domain_val(DOMAIN_KERNEL, DOMAIN_MANAGER) | \
		      domain_val(DOMAIN_TABLE, DOMAIN_MANAGER) | \
		      domain_val(DOMAIN_IO, DOMAIN_CLIENT))
	mcr	p15, 0, r5, c3, c0, 0		@ load domain access register
	mcr	p15, 0, r4, c2, c0, 0		@ load page table pointer
	b	__turn_mmu_on

/*
 * Enable the MMU.  This completely changes the structure of the visible
 * memory space.  You will not be able to trace execution through this.
 * If you have an enquiry about this, *please* check the linux-arm-kernel
 * mailing list archives BEFORE sending another post to the list.
 *
 *  r0  = cp#15 control register
 *  r13 = *virtual* address to jump to upon completion
 *
 * other registers depend on the function called upon completion
 */
	.align	5
	.type	__turn_mmu_on, %function
__turn_mmu_on:
	mov	r0, r0
	mcr	p15, 0, r0, c1, c0, 0		@ write control reg
	mrc	p15, 0, r3, c0, c0, 0		@ read id reg
	mov	r3, r3
	mov	r3, r3
	mov	pc, r13
而通过上面的代码我们可以看出其实使能mmu更多的是对写寄存器的读写操作。
而在进入__switch_data后程序就要准备进入C语言中了,使用c语言可以实现更加复杂的功能。而我们会在第二阶段讲解start_kernel的内容。


 9760
9760


 被折叠的 条评论
为什么被折叠?
被折叠的 条评论
为什么被折叠?
 到【灌水乐园】发言


