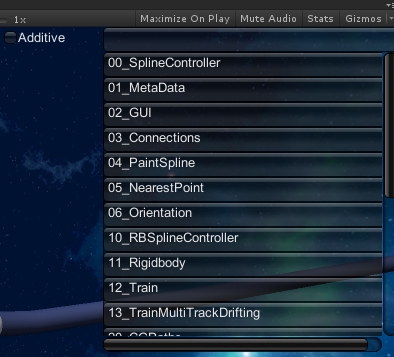
curvy插件中的,很好用

using UnityEngine;
using System.Collections;
using UnityEngine.UI;
using FluffyUnderware.DevTools.Extensions;
using System.Collections.Generic;

#if UNITY_EDITOR
using UnityEditor;
#endif

public class SceneSwitcher : MonoBehaviour {


    bool mChkAdditive;
    Vector2 sv = Vector2.zero;
    Rect mDropdownRect;
    string[] mItems;
    bool mShow;

#if UNITY_EDITOR
    void Start ()
    {

    }
#endif

    int CurrentLevel
    {
        get
        {
#if UNITY_5_0 || UNITY_5_1 || UNITY_5_2
            return Application.loadedLevel;
#else
            return UnityEngine.SceneManagement.SceneManager.GetActiveScene().buildIndex;
#endif
        }
        set
        {
            if (CurrentLevel != value)
            {
#if UNITY_5_0 || UNITY_5_1 || UNITY_5_2
                if (mChkAdditive)
                    Application.LoadLevelAdditive(value);
                else
                    Application.LoadLevel(value);
#else
                if (mChkAdditive)
                    UnityEngine.SceneManagement.SceneManager.LoadScene(value, UnityEngine.SceneManagement.LoadSceneMode.Additive);
                else
                    UnityEngine.SceneManagement.SceneManager.LoadScene(value,UnityEngine.SceneManagement.LoadSceneMode.Single);
#endif
            }
        }
    }

    void getScenes()
    {
        var items = new List<string>();
#if UNITY_EDITOR
        foreach (var lvl in EditorBuildSettings.scenes)
        {
            if (lvl.enabled)
            {
                var path = lvl.path.Split('/');
                items.Add(path[path.Length - 1].TrimEnd(".unity"));
            }
        }
#endif
        mItems = items.ToArray();
    }


    void onSelect(object index)
    {
        CurrentLevel = (int)index;
    }

    void OnGUI()
    {
        if (mItems == null)
        {
            mDropdownRect = new Rect(Screen.width - 200, 0, 295, 300);
            getScenes();
        }

        if (mItems.Length == 0 || CurrentLevel<0)
        {
            GUI.Label(new Rect(Screen.width-480, mDropdownRect.y, 460, 40),"Add scenes to the build settings to enable the scene switcher!");
        }
        else {
            mChkAdditive=GUI.Toggle(new Rect(mDropdownRect.x - 200, mDropdownRect.y, 80, 20), mChkAdditive, "Additive");
            if (GUI.Button(new Rect((mDropdownRect.x - 100), mDropdownRect.y, mDropdownRect.width, 25), ""))
            {
                if (!mShow)
                {
                    mShow = true;
                }
                else
                {
                    mShow = false;
                }
            }

            if (mShow)
            {
                sv = GUI.BeginScrollView(new Rect((mDropdownRect.x - 100), (mDropdownRect.y + 25), mDropdownRect.width, mDropdownRect.height), sv, new Rect(0, 0, mDropdownRect.width, Mathf.Max(mDropdownRect.height, (mItems.Length * 25))));

                GUI.Box(new Rect(0, 0, mDropdownRect.width, Mathf.Max(mDropdownRect.height, (mItems.Length * 25))), "");

                for (int index = 0; index < mItems.Length; index++)
                {

                    if (GUI.Button(new Rect(0, (index * 25), mDropdownRect.height, 25), ""))
                    {
                        mShow = false;
                        CurrentLevel = index;
                    }

                    GUI.Label(new Rect(5, (index * 25), mDropdownRect.height, 25), mItems[index]);

                }

                GUI.EndScrollView();
            }
            else if (CurrentLevel>=0 && CurrentLevel<mItems.Length)
            {
                GUI.Label(new Rect((mDropdownRect.x - 95), mDropdownRect.y, 300, 25), mItems[CurrentLevel]);
            }
        }

    }


}
#Editor模式下可以不添加场景实现场景切换
    private void Start()
    {
        StartCoroutine(LoadSceneCoroutine("Assets/Arts/px_scene/enginetest/role/ModelPlayer.unity"));
    }


    private IEnumerator LoadSceneCoroutine(string strResourcePath)
    {
        //ResourceManager.Instance.SetSwitchingLevel(true);

        //var async = UnityEditor.EditorApplication.LoadLevelAsyncInPlayMode(strResourcePath);
        //yield return async;
        yield return null;
        OpenUI();
    }


 321
321


 被折叠的 条评论
为什么被折叠?


