


@特性/反射/属性/索引器/委托/事件/集合/泛型/匿名方法/不安全代码/多线程
一、C# 特性(Attribute)
特性(Attribute)是用于在运行时传递程序中各种元素(比如类、方法、结构、枚举、组件等)的行为信息的声明性标签。您可以通过使用特性向程序添加声明性信息。一个声明性标签是通过放置在它所应用的元素前面的方括号([ ])来描述的。
特性(Attribute)用于添加元数据,如编译器指令和注释、描述、方法、类等其他信息。.Net 框架提供了两种类型的特性:预定义特性和自定义特性。
1.1 规定特性(Attribute)
规定特性(Attribute)的语法如下:
[attribute(positional_parameters, name_parameter = value, ...)]
element
特性(Attribute)的名称和值是在方括号内规定的,放置在它所应用的元素之前。positional_parameters 规定必需的信息,name_parameter 规定可选的信息
1.2 预定义特性(Attribute)
.Net 框架提供了三种预定义特性:
AttributeUsage
Conditional
Obsolete
1.2.1 AttributeUsage
预定义特性 AttributeUsage 描述了如何使用一个自定义特性类。它规定了特性可应用到的项目的类型。
规定该特性的语法如下:
[AttributeUsage(
   validon,
   AllowMultiple=allowmultiple,
   Inherited=inherited
)]
其中:
参数 validon 规定特性可被放置的语言元素。它是枚举器 AttributeTargets 的值的组合。默认值是 AttributeTargets.All。
参数 allowmultiple(可选的)为该特性的 AllowMultiple 属性(property)提供一个布尔值。如果为 true,则该特性是多用的。默认值是 false(单用的)。
参数 inherited(可选的)为该特性的 Inherited 属性(property)提供一个布尔值。如果为 true,则该特性可被派生类继承。默认值是 false(不被继承)。
例如:
[AttributeUsage(AttributeTargets.Class |
AttributeTargets.Constructor |
AttributeTargets.Field |
AttributeTargets.Method |
AttributeTargets.Property,
AllowMultiple = true)]
1.2.2 Conditional
这个预定义特性标记了一个条件方法,其执行依赖于指定的预处理标识符。
它会引起方法调用的条件编译,取决于指定的值,比如 Debug 或 Trace。例如,当调试代码时显示变量的值。
规定该特性的语法如下:
[Conditional(
   conditionalSymbol
)]
[Conditional(“DEBUG”)]
#define DEBUG
using System;
using System.Diagnostics;
public class Myclass
{
    [Conditional("DEBUG")]
    public static void Message(string msg)
    {
        Console.WriteLine(msg);
    }
}
class Test
{
    static void function1()
    {
        Myclass.Message("In Function 1.");
        function2();
    }
    static void function2()
    {
        Myclass.Message("In Function 2.");
    }
    public static void Main()
    {
        Myclass.Message("In Main function.");
        function1();
        Console.ReadKey();
    }
}
In Main function.
In Function 1.
In Function 2.
1.2.3 Obsolete
这个预定义特性标记了不应被使用的程序实体。它可以让您通知编译器丢弃某个特定的目标元素。例如,当一个新方法被用在一个类中,但是您仍然想要保持类中的旧方法,您可以通过显示一个应该使用新方法,而不是旧方法的消息,来把它标记为 obsolete(过时的)。
规定该特性的语法如下:
[Obsolete(
   message
)]
[Obsolete(
   message,
   iserror
)]
其中:
参数 message,是一个字符串,描述项目为什么过时以及该替代使用什么。
参数 iserror,是一个布尔值。如果该值为 true,编译器应把该项目的使用当作一个错误。默认值是 false(编译器生成一个警告)。
下面的实例演示了该特性:
using System;
public class MyClass
{
   [Obsolete("Don't use OldMethod, use NewMethod instead", true)]
   static void OldMethod()
   {
      Console.WriteLine("It is the old method");
   }
   static void NewMethod()
   {
      Console.WriteLine("It is the new method");
   }
   public static void Main()
   {
      OldMethod();
   }
}
当尝试编译该程序时,编译器会给出一个错误消息说明:
Don’t use OldMethod, use NewMethod instead
1.3 创建自定义特性(Attribute)
.Net 框架允许创建自定义特性,用于存储声明性的信息,且可在运行时被检索。该信息根据设计标准和应用程序需要,可与任何目标元素相关。
创建并使用自定义特性包含四个步骤:
声明自定义特性
构建自定义特性
在目标程序元素上应用自定义特性
通过反射访问特性
最后一个步骤包含编写一个简单的程序来读取元数据以便查找各种符号。元数据是用于描述其他数据的数据和信息。该程序应使用反射来在运行时访问特性
1.4 声明自定义特性
一个新的自定义特性应派生自 System.Attribute 类。例如:
// 一个自定义特性 BugFix 被赋给类及其成员
[AttributeUsage(AttributeTargets.Class |
AttributeTargets.Constructor |
AttributeTargets.Field |
AttributeTargets.Method |
AttributeTargets.Property,
AllowMultiple = true)]

public class DeBugInfo : System.Attribute
在上面的代码中,我们已经声明了一个名为 DeBugInfo 的自定义特性
1.5 构建自定义特性
让我们构建一个名为 DeBugInfo 的自定义特性,该特性将存储调试程序获得的信息。它存储下面的信息:
bug 的代码编号
辨认该 bug 的开发人员名字
最后一次审查该代码的日期
一个存储了开发人员标记的字符串消息
我们的 DeBugInfo 类将带有三个用于存储前三个信息的私有属性(property)和一个用于存储消息的公有属性(property)。所以 bug 编号、开发人员名字和审查日期将是 DeBugInfo 类的必需的定位( positional)参数,消息将是一个可选的命名(named)参数。
每个特性必须至少有一个构造函数。必需的定位( positional)参数应通过构造函数传递。下面的代码演示了 DeBugInfo 类:
// 一个自定义特性 BugFix 被赋给类及其成员
[AttributeUsage(AttributeTargets.Class |
AttributeTargets.Constructor |
AttributeTargets.Field |
AttributeTargets.Method |
AttributeTargets.Property,
AllowMultiple = true)]

public class DeBugInfo : System.Attribute
{
  private int bugNo;
  private string developer;
  private string lastReview;
  public string message;

  public DeBugInfo(int bg, string dev, string d)
  {
      this.bugNo = bg;
      this.developer = dev;
      this.lastReview = d;
  }

  public int BugNo
  {
      get
      {
          return bugNo;
      }
  }
  public string Developer
  {
      get
      {
          return developer;
      }
  }
  public string LastReview
  {
      get
      {
          return lastReview;
      }
  }
  public string Message
  {
      get
      {
          return message;
      }
      set
      {
          message = value;
      }
  }
}
1.6 应用自定义特性
通过把特性放置在紧接着它的目标之前,来应用该特性:
[DeBugInfo(45, "Zara Ali", "12/8/2012", Message = "Return type mismatch")]
[DeBugInfo(49, "Nuha Ali", "10/10/2012", Message = "Unused variable")]
class Rectangle
{
  // 成员变量
  protected double length;
  protected double width;
  public Rectangle(double l, double w)
  {
      length = l;
      width = w;
  }
  [DeBugInfo(55, "Zara Ali", "19/10/2012",
  Message = "Return type mismatch")]
  public double GetArea()
  {
      return length * width;
  }
  [DeBugInfo(56, "Zara Ali", "19/10/2012")]
  public void Display()
  {
      Console.WriteLine("Length: {0}", length);
      Console.WriteLine("Width: {0}", width);
      Console.WriteLine("Area: {0}", GetArea());
  }
}
二、C# 反射(Reflection)
反射指程序可以访问、检测和修改它本身状态或行为的一种能力。
程序集包含模块,而模块包含类型,类型又包含成员。反射则提供了封装程序集、模块和类型的对象。
您可以使用反射动态地创建类型的实例,将类型绑定到现有对象,或从现有对象中获取类型。然后,可以调用类型的方法或访问其字段和属性。
优缺点
优点:
1、反射提高了程序的灵活性和扩展性。
2、降低耦合性,提高自适应能力。
3、它允许程序创建和控制任何类的对象,无需提前硬编码目标类。
缺点:
1、性能问题:使用反射基本上是一种解释操作,用于字段和方法接入时要远慢于直接代码。因此反射机制主要应用在对灵活性和拓展性要求很高的系统框架上,普通程序不建议使用。
2、使用反射会模糊程序内部逻辑;程序员希望在源代码中看到程序的逻辑,反射却绕过了源代码的技术,因而会带来维护的问题,反射代码比相应的直接代码更复杂。
2.1 反射(Reflection)的用途
反射(Reflection)有下列用途:
它允许在运行时查看特性(attribute)信息。
它允许审查集合中的各种类型,以及实例化这些类型。
它允许延迟绑定的方法和属性(property)。
它允许在运行时创建新类型,然后使用这些类型执行一些任务。
2.2 查看元数据
使用反射(Reflection)可以查看特性(attribute)信息。
System.Reflection 类的 MemberInfo 对象需要被初始化,用于发现与类相关的特性(attribute)。为了做到这点,您可以定义目标类的一个对象,如下:
System.Reflection.MemberInfo info = typeof(MyClass);
using System;

[AttributeUsage(AttributeTargets.All)]
public class HelpAttribute : System.Attribute
{
   public readonly string Url;

   public string Topic  // Topic 是一个命名(named)参数
   {
      get
      {
         return topic;
      }
      set
      {

         topic = value;
      }
   }

   public HelpAttribute(string url)  // url 是一个定位(positional)参数
   {
      this.Url = url;
   }

   private string topic;
}
[HelpAttribute("Information on the class MyClass")]
class MyClass
{
}

namespace AttributeAppl
{
   class Program
   {
      static void Main(string[] args)
      {
         System.Reflection.MemberInfo info = typeof(MyClass);
         object[] attributes = info.GetCustomAttributes(true);
         for (int i = 0; i < attributes.Length; i++)
         {
            System.Console.WriteLine(attributes[i]);
         }
         Console.ReadKey();

      }
   }
}
HelpAttribute
用在上一章中创建的 DeBugInfo 特性,并使用反射(Reflection)来读取 Rectangle 类中的元数据
using System;
using System.Reflection;
namespace BugFixApplication
{
   // 一个自定义特性 BugFix 被赋给类及其成员
   [AttributeUsage(AttributeTargets.Class |
   AttributeTargets.Constructor |
   AttributeTargets.Field |
   AttributeTargets.Method |
   AttributeTargets.Property,
   AllowMultiple = true)]

   public class DeBugInfo : System.Attribute
   {
      private int bugNo;
      private string developer;
      private string lastReview;
      public string message;

      public DeBugInfo(int bg, string dev, string d)
      {
         this.bugNo = bg;
         this.developer = dev;
         this.lastReview = d;
      }

      public int BugNo
      {
         get
         {
            return bugNo;
         }
      }
      public string Developer
      {
         get
         {
            return developer;
         }
      }
      public string LastReview
      {
         get
         {
            return lastReview;
         }
      }
      public string Message
      {
         get
         {
            return message;
         }
         set
         {
            message = value;
         }
      }
   }
   [DeBugInfo(45, "Zara Ali", "12/8/2012",
        Message = "Return type mismatch")]
   [DeBugInfo(49, "Nuha Ali", "10/10/2012",
        Message = "Unused variable")]
   class Rectangle
   {
      // 成员变量
      protected double length;
      protected double width;
      public Rectangle(double l, double w)
      {
         length = l;
         width = w;
      }
      [DeBugInfo(55, "Zara Ali", "19/10/2012",
           Message = "Return type mismatch")]
      public double GetArea()
      {
         return length * width;
      }
      [DeBugInfo(56, "Zara Ali", "19/10/2012")]
      public void Display()
      {
         Console.WriteLine("Length: {0}", length);
         Console.WriteLine("Width: {0}", width);
         Console.WriteLine("Area: {0}", GetArea());
      }
   }//end class Rectangle

   class ExecuteRectangle
   {
      static void Main(string[] args)
      {
         Rectangle r = new Rectangle(4.5, 7.5);
         r.Display();
         Type type = typeof(Rectangle);
         // 遍历 Rectangle 类的特性
         foreach (Object attributes in type.GetCustomAttributes(false))
         {
            DeBugInfo dbi = (DeBugInfo)attributes;
            if (null != dbi)
            {
               Console.WriteLine("Bug no: {0}", dbi.BugNo);
               Console.WriteLine("Developer: {0}", dbi.Developer);
               Console.WriteLine("Last Reviewed: {0}",
                                        dbi.LastReview);
               Console.WriteLine("Remarks: {0}", dbi.Message);
            }
         }

         // 遍历方法特性
         foreach (MethodInfo m in type.GetMethods())
         {
            foreach (Attribute a in m.GetCustomAttributes(true))
            {
               DeBugInfo dbi = (DeBugInfo)a;
               if (null != dbi)
               {
                  Console.WriteLine("Bug no: {0}, for Method: {1}",
                                                dbi.BugNo, m.Name);
                  Console.WriteLine("Developer: {0}", dbi.Developer);
                  Console.WriteLine("Last Reviewed: {0}",
                                                dbi.LastReview);
                  Console.WriteLine("Remarks: {0}", dbi.Message);
               }
            }
         }
         Console.ReadLine();
      }
   }
}
Length: 4.5
Width: 7.5
Area: 33.75
Bug No: 49
Developer: Nuha Ali
Last Reviewed: 10/10/2012
Remarks: Unused variable
Bug No: 45
Developer: Zara Ali
Last Reviewed: 12/8/2012
Remarks: Return type mismatch
Bug No: 55, for Method: GetArea
Developer: Zara Ali
Last Reviewed: 19/10/2012
Remarks: Return type mismatch
Bug No: 56, for Method: Display
Developer: Zara Ali
Last Reviewed: 19/10/2012
Remarks:
三、C# 属性(Property)
属性(Property) 是类(class)、结构(structure)和接口(interface)的命名(named)成员。类或结构中的成员变量或方法称为 域(Field)。属性(Property)是域(Field)的扩展,且可使用相同的语法来访问。它们使用 访问器(accessors) 让私有域的值可被读写或操作。
属性(Property)不会确定存储位置。相反,它们具有可读写或计算它们值的 访问器(accessors)。
例如,有一个名为 Student 的类,带有 age、name 和 code 的私有域。我们不能在类的范围以外直接访问这些域,但是我们可以拥有访问这些私有域的属性
3.1 C# 属性(Property)
属性(Property) 是类(class)、结构(structure)和接口(interface)的命名(named)成员。类或结构中的成员变量或方法称为 域(Field)。属性(Property)是域(Field)的扩展,且可使用相同的语法来访问。它们使用 访问器(accessors) 让私有域的值可被读写或操作。
属性(Property)不会确定存储位置。相反,它们具有可读写或计算它们值的 访问器(accessors)。
例如,有一个名为 Student 的类,带有 age、name 和 code 的私有域。我们不能在类的范围以外直接访问这些域,但是我们可以拥有访问这些私有域的属性
// 声明类型为 string 的 Code 属性
public string Code
{
   get
   {
      return code;
   }
   set
   {
      code = value;
   }
}

// 声明类型为 string 的 Name 属性
public string Name
{
   get
   {
     return name;
   }
   set
   {
     name = value;
   }
}

// 声明类型为 int 的 Age 属性
public int Age
{
   get
   {
      return age;
   }
   set
   {
      age = value;
   }
}
下面的实例演示了属性(Property)的用法:
using System;
namespace runoob
{
   class Student
   {

      private string code = "N.A";
      private string name = "not known";
      private int age = 0;

      // 声明类型为 string 的 Code 属性
      public string Code
      {
         get
         {
            return code;
         }
         set
         {
            code = value;
         }
      }

      // 声明类型为 string 的 Name 属性
      public string Name
      {
         get
         {
            return name;
         }
         set
         {
            name = value;
         }
      }

      // 声明类型为 int 的 Age 属性
      public int Age
      {
         get
         {
            return age;
         }
         set
         {
            age = value;
         }
      }
      public override string ToString()
      {
         return "Code = " + Code +", Name = " + Name + ", Age = " + Age;
      }
    }
    class ExampleDemo
    {
      public static void Main()
      {
         // 创建一个新的 Student 对象
         Student s = new Student();

         // 设置 student 的 code、name 和 age
         s.Code = "001";
         s.Name = "Zara";
         s.Age = 9;
         Console.WriteLine("Student Info: {0}", s);
         // 增加年龄
         s.Age += 1;
         Console.WriteLine("Student Info: {0}", s);
         Console.ReadKey();
       }
   }
}
Student Info: Code = 001, Name = Zara, Age = 9
Student Info: Code = 001, Name = Zara, Age = 10
3.2 抽象属性(Abstract Properties)
抽象类可拥有抽象属性,这些属性应在派生类中被实现。下面的程序说明了这点:
using System;
namespace runoob
{
   public abstract class Person
   {
      public abstract string Name
      {
         get;
         set;
      }
      public abstract int Age
      {
         get;
         set;
      }
   }
   class Student : Person
   {

      private string code = "N.A";
      private string name = "N.A";
      private int age = 0;

      // 声明类型为 string 的 Code 属性
      public string Code
      {
         get
         {
            return code;
         }
         set
         {
            code = value;
         }
      }

      // 声明类型为 string 的 Name 属性
      public override string Name
      {
         get
         {
            return name;
         }
         set
         {
            name = value;
         }
      }

      // 声明类型为 int 的 Age 属性
      public override int Age
      {
         get
         {
            return age;
         }
         set
         {
            age = value;
         }
      }
      public override string ToString()
      {
         return "Code = " + Code +", Name = " + Name + ", Age = " + Age;
      }
   }
   class ExampleDemo
   {
      public static void Main()
      {
         // 创建一个新的 Student 对象
         Student s = new Student();

         // 设置 student 的 code、name 和 age
         s.Code = "001";
         s.Name = "Zara";
         s.Age = 9;
         Console.WriteLine("Student Info:- {0}", s);
         // 增加年龄
         s.Age += 1;
         Console.WriteLine("Student Info:- {0}", s);
         Console.ReadKey();
       }
   }
}
Student Info: Code = 001, Name = Zara, Age = 9
Student Info: Code = 001, Name = Zara, Age = 10
四、C# 索引器(Indexer)
索引器(Indexer) 允许一个对象可以像数组一样使用下标的方式来访问。
当为类定义一个索引器时,该类的行为就会像一个 虚拟数组(virtual array) 一样。可以使用数组访问运算符 [ ] 来访问该类的的成员
语法
一维索引器的语法如下:
element-type this[int index]
{
   // get 访问器
   get
   {
      // 返回 index 指定的值
   }

   // set 访问器
   set
   {
      // 设置 index 指定的值
   }
}
4.1 索引器(Indexer)的用途
索引器的行为的声明在某种程度上类似于属性(property)。就像属性(property),您可使用 get 和 set 访问器来定义索引器。但是,属性返回或设置一个特定的数据成员,而索引器返回或设置对象实例的一个特定值。换句话说,它把实例数据分为更小的部分,并索引每个部分,获取或设置每个部分。
定义一个属性(property)包括提供属性名称。索引器定义的时候不带有名称,但带有 this 关键字,它指向对象实例。下面的实例演示了这个概念:
using System;
namespace IndexerApplication
{
   class IndexedNames
   {
      private string[] namelist = new string[size];
      static public int size = 10;
      public IndexedNames()
      {
         for (int i = 0; i < size; i++)
         namelist[i] = "N. A.";
      }
      public string this[int index]
      {
         get
         {
            string tmp;

            if( index >= 0 && index <= size-1 )
            {
               tmp = namelist[index];
            }
            else
            {
               tmp = "";
            }

            return ( tmp );
         }
         set
         {
            if( index >= 0 && index <= size-1 )
            {
               namelist[index] = value;
            }
         }
      }

      static void Main(string[] args)
      {
         IndexedNames names = new IndexedNames();
         names[0] = "Zara";
         names[1] = "Riz";
         names[2] = "Nuha";
         names[3] = "Asif";
         names[4] = "Davinder";
         names[5] = "Sunil";
         names[6] = "Rubic";
         for ( int i = 0; i < IndexedNames.size; i++ )
         {
            Console.WriteLine(names[i]);
         }
         Console.ReadKey();
      }
   }
}
Zara
Riz
Nuha
Asif
Davinder
Sunil
Rubic
N. A.
N. A.
N. A.
4.2 重载索引器(Indexer)
索引器(Indexer)可被重载。索引器声明的时候也可带有多个参数,且每个参数可以是不同的类型。没有必要让索引器必须是整型的。C# 允许索引器可以是其他类型,例如,字符串类型。
下面的实例演示了重载索引器:
using System;
namespace IndexerApplication
{
   class IndexedNames
   {
      private string[] namelist = new string[size];
      static public int size = 10;
      public IndexedNames()
      {
         for (int i = 0; i < size; i++)
         {
          namelist[i] = "N. A.";
         }
      }
      public string this[int index]
      {
         get
         {
            string tmp;

            if( index >= 0 && index <= size-1 )
            {
               tmp = namelist[index];
            }
            else
            {
               tmp = "";
            }

            return ( tmp );
         }
         set
         {
            if( index >= 0 && index <= size-1 )
            {
               namelist[index] = value;
            }
         }
      }
      public int this[string name]
      {
         get
         {
            int index = 0;
            while(index < size)
            {
               if (namelist[index] == name)
               {
                return index;
               }
               index++;
            }
            return index;
         }

      }

      static void Main(string[] args)
      {
         IndexedNames names = new IndexedNames();
         names[0] = "Zara";
         names[1] = "Riz";
         names[2] = "Nuha";
         names[3] = "Asif";
         names[4] = "Davinder";
         names[5] = "Sunil";
         names[6] = "Rubic";
         // 使用带有 int 参数的第一个索引器
         for (int i = 0; i < IndexedNames.size; i++)
         {
            Console.WriteLine(names[i]);
         }
         // 使用带有 string 参数的第二个索引器
         Console.WriteLine(names["Nuha"]);
         Console.ReadKey();
      }
   }
}
Zara
Riz
Nuha
Asif
Davinder
Sunil
Rubic
N. A.
N. A.
N. A.
2
五、C# 委托(Delegate)
C# 中的委托(Delegate)类似于 C 或 C++ 中函数的指针。委托(Delegate) 是存有对某个方法的引用的一种引用类型变量。引用可在运行时被改变。
委托(Delegate)特别用于实现事件和回调方法。所有的委托(Delegate)都派生自 System.Delegate 类
5.1 声明委托(Delegate)
委托声明决定了可由该委托引用的方法。委托可指向一个与其具有相同标签的方法。
例如,假设有一个委托:
public delegate int MyDelegate (string s);
上面的委托可被用于引用任何一个带有一个单一的 string 参数的方法,并返回一个 int 类型变量。
声明委托的语法如下:
delegate < return type>
5.2 实例化委托(Delegate)
一旦声明了委托类型,委托对象必须使用 new 关键字来创建,且与一个特定的方法有关。当创建委托时,传递到 new 语句的参数就像方法调用一样书写,但是不带有参数。例如:
public delegate void printString(string s);
...
printString ps1 = new printString(WriteToScreen);
printString ps2 = new printString(WriteToFile);
下面的实例演示了委托的声明、实例化和使用,该委托可用于引用带有一个整型参数的方法,并返回一个整型值
using System;

delegate int NumberChanger(int n);
namespace DelegateAppl
{
   class TestDelegate
   {
      static int num = 10;
      public static int AddNum(int p)
      {
         num += p;
         return num;
      }

      public static int MultNum(int q)
      {
         num *= q;
         return num;
      }
      public static int getNum()
      {
         return num;
      }

      static void Main(string[] args)
      {
         // 创建委托实例
         NumberChanger nc1 = new NumberChanger(AddNum);
         NumberChanger nc2 = new NumberChanger(MultNum);
         // 使用委托对象调用方法
         nc1(25);
         Console.WriteLine("Value of Num: {0}", getNum());
         nc2(5);
         Console.WriteLine("Value of Num: {0}", getNum());
         Console.ReadKey();
      }
   }
}
Value of Num: 35
Value of Num: 175
5.3 委托的多播(Multicasting of a Delegate)
委托对象可使用 “+” 运算符进行合并。一个合并委托调用它所合并的两个委托。只有相同类型的委托可被合并。“-” 运算符可用于从合并的委托中移除组件委托。
使用委托的这个有用的特点,您可以创建一个委托被调用时要调用的方法的调用列表。这被称为委托的 多播(multicasting),也叫组播。下面的程序演示了委托的多播:
using System;

delegate int NumberChanger(int n);
namespace DelegateAppl
{
   class TestDelegate
   {
      static int num = 10;
      public static int AddNum(int p)
      {
         num += p;
         return num;
      }

      public static int MultNum(int q)
      {
         num *= q;
         return num;
      }
      public static int getNum()
      {
         return num;
      }

      static void Main(string[] args)
      {
         // 创建委托实例
         NumberChanger nc;
         NumberChanger nc1 = new NumberChanger(AddNum);
         NumberChanger nc2 = new NumberChanger(MultNum);
         nc = nc1;
         nc += nc2;
         // 调用多播
         nc(5);
         Console.WriteLine("Value of Num: {0}", getNum());
         Console.ReadKey();
      }
   }
}
Value of Num: 75
5.4 委托(Delegate)的用途
下面的实例演示了委托的用法。委托 printString 可用于引用带有一个字符串作为输入的方法,并不返回任何东西。
我们使用这个委托来调用两个方法,第一个把字符串打印到控制台,第二个把字符串打印到文件:
using System;
using System.IO;

namespace DelegateAppl
{
   class PrintString
   {
      static FileStream fs;
      static StreamWriter sw;
      // 委托声明
      public delegate void printString(string s);

      // 该方法打印到控制台
      public static void WriteToScreen(string str)
      {
         Console.WriteLine("The String is: {0}", str);
      }
      // 该方法打印到文件
      public static void WriteToFile(string s)
      {
         fs = new FileStream("c:\\message.txt", FileMode.Append, FileAccess.Write);
         sw = new StreamWriter(fs);
         sw.WriteLine(s);
         sw.Flush();
         sw.Close();
         fs.Close();
      }
      // 该方法把委托作为参数,并使用它调用方法
      public static void sendString(printString ps)
      {
         ps("Hello World");
      }
      static void Main(string[] args)
      {
         printString ps1 = new printString(WriteToScreen);
         printString ps2 = new printString(WriteToFile);
         sendString(ps1);
         sendString(ps2);
         Console.ReadKey();
      }
   }
}
The String is: Hello World
六、C# 事件(Event)
事件(Event) 基本上说是一个用户操作,如按键、点击、鼠标移动等等,或者是一些提示信息,如系统生成的通知。应用程序需要在事件发生时响应事件。例如,中断。
C# 中使用事件机制实现线程间的通信
6.1 通过事件使用委托
事件在类中声明且生成,且通过使用同一个类或其他类中的委托与事件处理程序关联。包含事件的类用于发布事件。这被称为 发布器(publisher) 类。其他接受该事件的类被称为 订阅器(subscriber) 类。事件使用 发布-订阅(publisher-subscriber) 模型。
发布器(publisher) 是一个包含事件和委托定义的对象。事件和委托之间的联系也定义在这个对象中。发布器(publisher)类的对象调用这个事件,并通知其他的对象。
订阅器(subscriber) 是一个接受事件并提供事件处理程序的对象。在发布器(publisher)类中的委托调用订阅器(subscriber)类中的方法(事件处理程序)。
6.2 声明事件(Event)
在类的内部声明事件,首先必须声明该事件的委托类型。例如:
public delegate void BoilerLogHandler(string status);
然后,声明事件本身,使用 event 关键字:
// 基于上面的委托定义事件
public event BoilerLogHandler BoilerEventLog;
上面的代码定义了一个名为 BoilerLogHandler 的委托和一个名为 BoilerEventLog 的事件,该事件在生成的时候会调用委托
using System;
namespace SimpleEvent
{
  using System;
  /***********发布器类***********/
  public class EventTest
  {
    private int value;

    public delegate void NumManipulationHandler();


    public event NumManipulationHandler ChangeNum;
    protected virtual void OnNumChanged()
    {
      if ( ChangeNum != null )
      {
        ChangeNum(); /* 事件被触发 */
      }else {
        Console.WriteLine( "event not fire" );
        Console.ReadKey(); /* 回车继续 */
      }
    }


    public EventTest()
    {
      int n = 5;
      SetValue( n );
    }


    public void SetValue( int n )
    {
      if ( value != n )
      {
        value = n;
        OnNumChanged();
      }
    }
  }


  /***********订阅器类***********/

  public class subscribEvent
  {
    public void printf()
    {
      Console.WriteLine( "event fire" );
      Console.ReadKey(); /* 回车继续 */
    }
  }

  /***********触发***********/
  public class MainClass
  {
    public static void Main()
    {
      EventTest e = new EventTest(); /* 实例化对象,第一次没有触发事件 */
      subscribEvent v = new subscribEvent(); /* 实例化对象 */
      e.ChangeNum += new EventTest.NumManipulationHandler( v.printf ); /* 注册 */
      e.SetValue( 7 );
      e.SetValue( 11 );
    }
  }
}
event not fire
event fire
event fire
本实例提供一个简单的用于热水锅炉系统故障排除的应用程序。当维修工程师检查锅炉时,锅炉的温度和压力会随着维修工程师的备注自动记录到日志文件中
using System;
using System.IO;

namespace BoilerEventAppl
{

   // boiler 类
   class Boiler
   {
      private int temp;
      private int pressure;
      public Boiler(int t, int p)
      {
         temp = t;
         pressure = p;
      }

      public int getTemp()
      {
         return temp;
      }
      public int getPressure()
      {
         return pressure;
      }
   }
   // 事件发布器
   class DelegateBoilerEvent
   {
      public delegate void BoilerLogHandler(string status);

      // 基于上面的委托定义事件
      public event BoilerLogHandler BoilerEventLog;

      public void LogProcess()
      {
         string remarks = "O. K";
         Boiler b = new Boiler(100, 12);
         int t = b.getTemp();
         int p = b.getPressure();
         if(t > 150 || t < 80 || p < 12 || p > 15)
         {
            remarks = "Need Maintenance";
         }
         OnBoilerEventLog("Logging Info:\n");
         OnBoilerEventLog("Temparature " + t + "\nPressure: " + p);
         OnBoilerEventLog("\nMessage: " + remarks);
      }

      protected void OnBoilerEventLog(string message)
      {
         if (BoilerEventLog != null)
         {
            BoilerEventLog(message);
         }
      }
   }
   // 该类保留写入日志文件的条款
   class BoilerInfoLogger
   {
      FileStream fs;
      StreamWriter sw;
      public BoilerInfoLogger(string filename)
      {
         fs = new FileStream(filename, FileMode.Append, FileAccess.Write);
         sw = new StreamWriter(fs);
      }
      public void Logger(string info)
      {
         sw.WriteLine(info);
      }
      public void Close()
      {
         sw.Close();
         fs.Close();
      }
   }
   // 事件订阅器
   public class RecordBoilerInfo
   {
      static void Logger(string info)
      {
         Console.WriteLine(info);
      }//end of Logger

      static void Main(string[] args)
      {
         BoilerInfoLogger filelog = new BoilerInfoLogger("e:\\boiler.txt");
         DelegateBoilerEvent boilerEvent = new DelegateBoilerEvent();
         boilerEvent.BoilerEventLog += new
         DelegateBoilerEvent.BoilerLogHandler(Logger);
         boilerEvent.BoilerEventLog += new
         DelegateBoilerEvent.BoilerLogHandler(filelog.Logger);
         boilerEvent.LogProcess();
         Console.ReadLine();
         filelog.Close();
      }//end of main

   }//end of RecordBoilerInfo
}
Logging info:
Temperature 100
Pressure 12
Message: O. K
六、集合
集合(Collection)类是专门用于数据存储和检索的类。这些类提供了对栈(stack)、队列(queue)、列表(list)和哈希表(hash table)的支持。大多数集合类实现了相同的接口。
集合(Collection)类服务于不同的目的,如为元素动态分配内存,基于索引访问列表项等等。这些类创建 Object 类的对象的集合。在 C# 中,Object 类是所有数据类型的基类
6.1 C# 动态数组(ArrayList)
动态数组(ArrayList)代表了可被单独索引的对象的有序集合。它基本上可以替代一个数组。但是,与数组不同的是,您可以使用索引在指定的位置添加和移除项目,动态数组会自动重新调整它的大小。它也允许在列表中进行动态内存分配、增加、搜索、排序各项
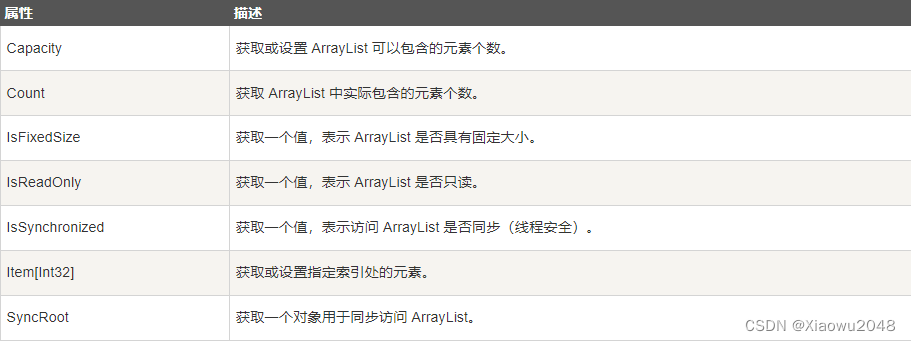
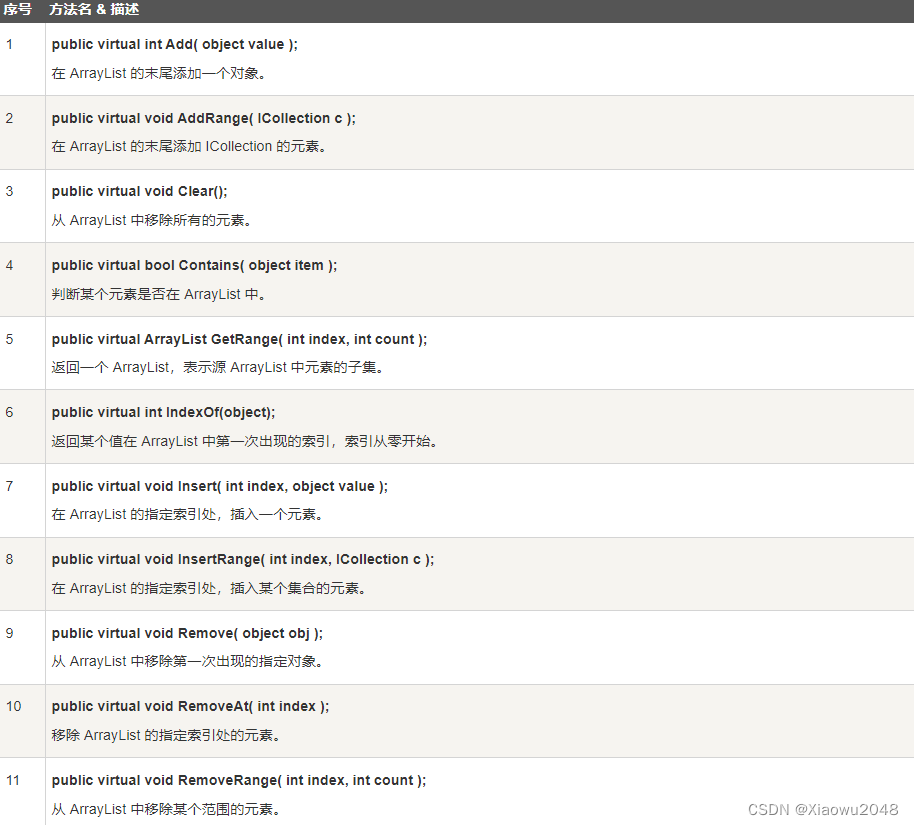
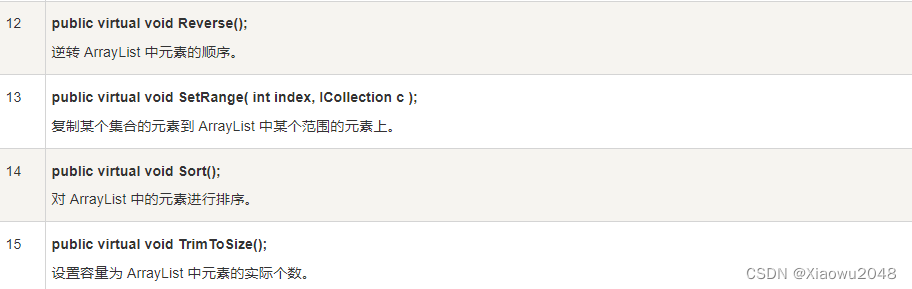
6.1.1 ArrayList 类的方法和属性
下表列出了 ArrayList 类的一些常用的 属性:
下表列出了 ArrayList 类的一些常用的 方法:
using System;
using System.Collections;

namespace CollectionApplication
{
    class Program
    {
        static void Main(string[] args)
        {
            ArrayList al = new ArrayList();

            Console.WriteLine("Adding some numbers:");
            al.Add(45);
            al.Add(78);
            al.Add(33);
            al.Add(56);
            al.Add(12);
            al.Add(23);
            al.Add(9);

            Console.WriteLine("Capacity: {0} ", al.Capacity);
            Console.WriteLine("Count: {0}", al.Count);

            Console.Write("Content: ");
            foreach (int i in al)
            {
                Console.Write(i + " ");
            }
            Console.WriteLine();
            Console.Write("Sorted Content: ");
            al.Sort();
            foreach (int i in al)
            {
                Console.Write(i + " ");
            }
            Console.WriteLine();
            Console.ReadKey();
        }
    }
}
Adding some numbers:
Capacity: 8
Count: 7
Content: 45 78 33 56 12 23 9
Sorted Content: 9 12 23 33 45 56 78
6.2 哈希表(Hashtable)
Hashtable 类代表了一系列基于键的哈希代码组织起来的键/值对。它使用键来访问集合中的元素。
当您使用键访问元素时,则使用哈希表,而且您可以识别一个有用的键值。哈希表中的每一项都有一个键/值对。键用于访问集合中的项目
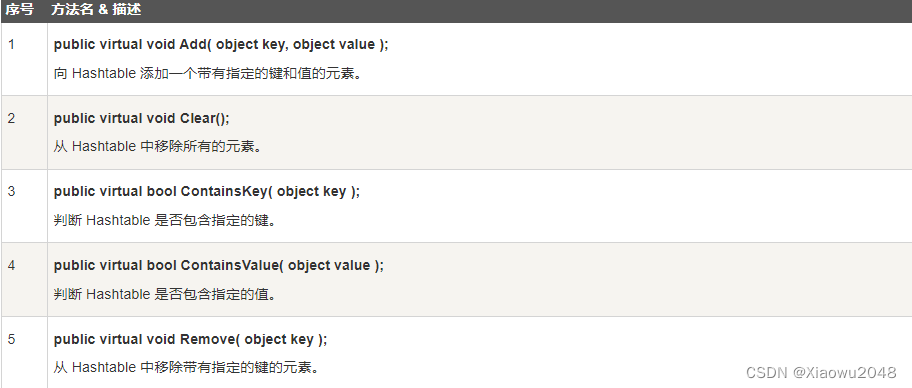
Hashtable 类的方法和属性
下表列出了 Hashtable 类的一些常用的 属性:

下表列出了 Hashtable 类的一些常用的 方法:
using System;
using System.Collections;

namespace CollectionsApplication
{
   class Program
   {
      static void Main(string[] args)
      {
         Hashtable ht = new Hashtable();


         ht.Add("001", "Zara Ali");
         ht.Add("002", "Abida Rehman");
         ht.Add("003", "Joe Holzner");
         ht.Add("004", "Mausam Benazir Nur");
         ht.Add("005", "M. Amlan");
         ht.Add("006", "M. Arif");
         ht.Add("007", "Ritesh Saikia");

         if (ht.ContainsValue("Nuha Ali"))
         {
            Console.WriteLine("This student name is already in the list");
         }
         else
         {
            ht.Add("008", "Nuha Ali");
         }
         // 获取键的集合
         ICollection key = ht.Keys;

         foreach (string k in key)
         {
            Console.WriteLine(k + ": " + ht[k]);
         }
         Console.ReadKey();
      }
   }
}
007: Ritesh Saikia
004: Mausam Benazir Nur
005: M. Amlan
008: Nuha Ali
002: Abida Rehman
003: Joe Holzner
001: Zara Ali
006: M. Arif
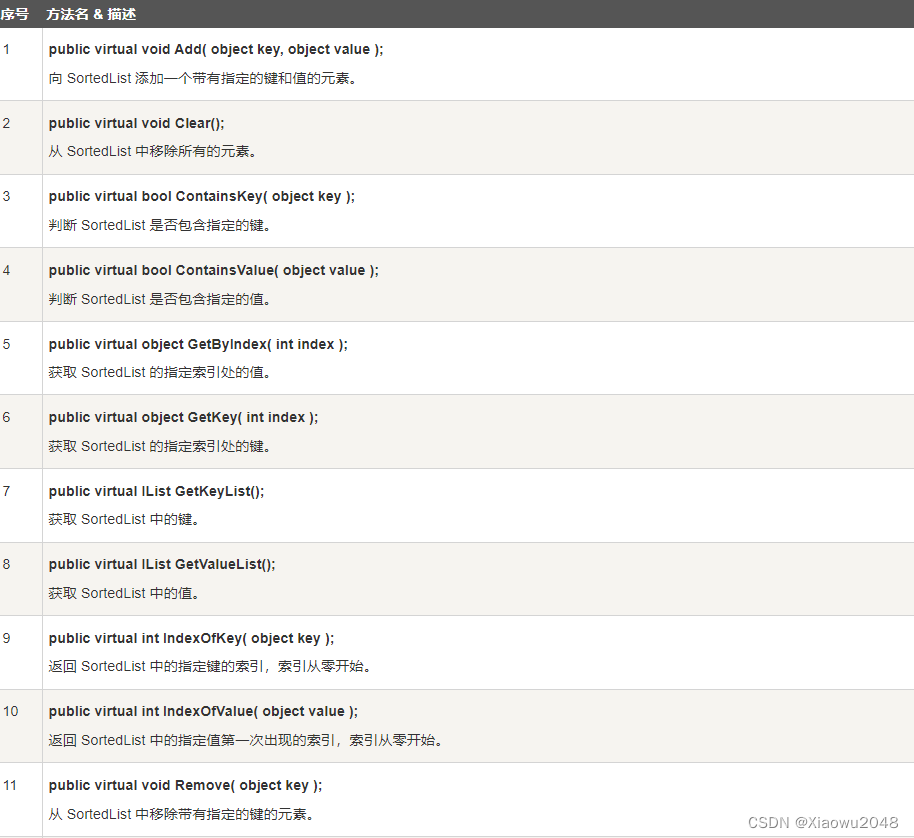
6.3 排序列表(SortedList)
SortedList 类代表了一系列按照键来排序的键/值对,这些键值对可以通过键和索引来访问。
排序列表是数组和哈希表的组合。它包含一个可使用键或索引访问各项的列表。如果您使用索引访问各项,则它是一个动态数组(ArrayList),如果您使用键访问各项,则它是一个哈希表(Hashtable)。集合中的各项总是按键值排序
SortedList 类的方法和属性
下表列出了 SortedList 类的一些常用的 属性:

下表列出了 SortedList 类的一些常用的 方法:

using System;
using System.Collections;

namespace CollectionsApplication
{
   class Program
   {
      static void Main(string[] args)
      {
         SortedList sl = new SortedList();

         sl.Add("001", "Zara Ali");
         sl.Add("002", "Abida Rehman");
         sl.Add("003", "Joe Holzner");
         sl.Add("004", "Mausam Benazir Nur");
         sl.Add("005", "M. Amlan");
         sl.Add("006", "M. Arif");
         sl.Add("007", "Ritesh Saikia");

         if (sl.ContainsValue("Nuha Ali"))
         {
            Console.WriteLine("This student name is already in the list");
         }
         else
         {
            sl.Add("008", "Nuha Ali");
         }

         // 获取键的集合
         ICollection key = sl.Keys;

         foreach (string k in key)
         {
            Console.WriteLine(k + ": " + sl[k]);
         }
      }
   }
}
001: Zara Ali
002: Abida Rehman
003: Joe Holzner
004: Mausam Banazir Nur
005: M. Amlan
006: M. Arif
007: Ritesh Saikia
008: Nuha Ali
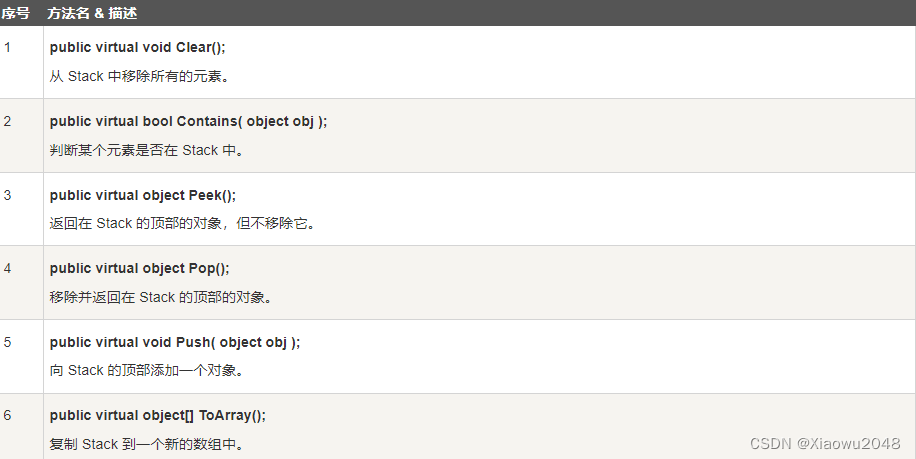
6.4 堆栈(Stack)
堆栈(Stack)代表了一个后进先出的对象集合。当您需要对各项进行后进先出的访问时,则使用堆栈。当您在列表中添加一项,称为推入元素,当您从列表中移除一项时,称为弹出元素
Stack 类的方法和属性

方法
using System;
using System.Collections;

namespace CollectionsApplication
{
    class Program
    {
        static void Main(string[] args)
        {
            Stack st = new Stack();

            st.Push('A');
            st.Push('M');
            st.Push('G');
            st.Push('W');

            Console.WriteLine("Current stack: ");
            foreach (char c in st)
            {
                Console.Write(c + " ");
            }
            Console.WriteLine();

            st.Push('V');
            st.Push('H');
            Console.WriteLine("The next poppable value in stack: {0}",
            st.Peek());
            Console.WriteLine("Current stack: ");
            foreach (char c in st)
            {
               Console.Write(c + " ");
            }
            Console.WriteLine();

            Console.WriteLine("Removing values ");
            st.Pop();
            st.Pop();
            st.Pop();

            Console.WriteLine("Current stack: ");
            foreach (char c in st)
            {
               Console.Write(c + " ");
            }
        }
    }
}
Current stack:
W G M A
The next poppable value in stack: H
Current stack:
H V W G M A
Removing values
Current stack:
G M A
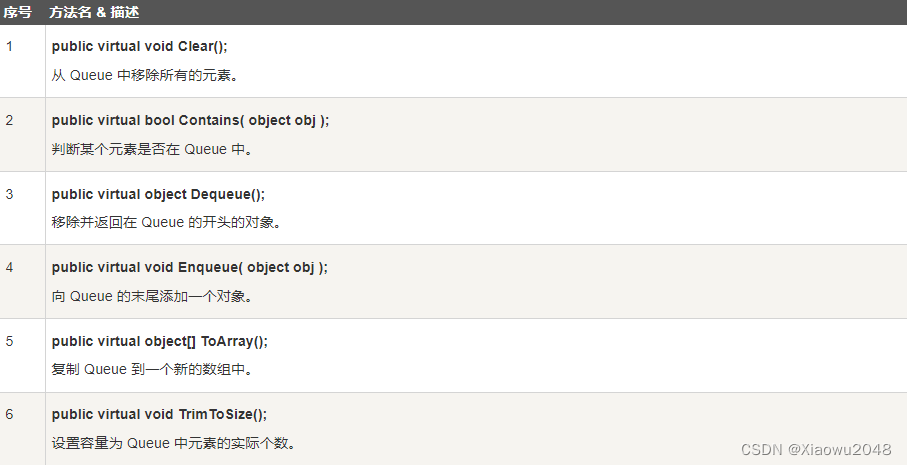
6.5 队列(Queue)
队列(Queue)代表了一个先进先出的对象集合。当您需要对各项进行先进先出的访问时,则使用队列。当您在列表中添加一项,称为入队,当您从列表中移除一项时,称为出队
Queue 类的方法和属性
下表列出了 Queue 类的一些常用的 属性:

下表列出了 Queue 类的一些常用的 方法:
using System;
using System.Collections;

namespace CollectionsApplication
{
   class Program
   {
      static void Main(string[] args)
      {
         Queue q = new Queue();

         q.Enqueue('A');
         q.Enqueue('M');
         q.Enqueue('G');
         q.Enqueue('W');

         Console.WriteLine("Current queue: ");
         foreach (char c in q)
            Console.Write(c + " ");
         Console.WriteLine();
         q.Enqueue('V');
         q.Enqueue('H');
         Console.WriteLine("Current queue: ");
         foreach (char c in q)
            Console.Write(c + " ");
         Console.WriteLine();
         Console.WriteLine("Removing some values ");
         char ch = (char)q.Dequeue();
         Console.WriteLine("The removed value: {0}", ch);
         ch = (char)q.Dequeue();
         Console.WriteLine("The removed value: {0}", ch);
         Console.ReadKey();
      }
   }
}
Current queue:
A M G W
Current queue:
A M G W V H
Removing values
The removed value: A
The removed value: M
6.6 点阵列(BitArray)
BitArray 类管理一个紧凑型的位值数组,它使用布尔值来表示,其中 true 表示位是开启的(1),false 表示位是关闭的(0)。
当您需要存储位,但是事先不知道位数时,则使用点阵列。您可以使用整型索引从点阵列集合中访问各项,索引从零开始
BitArray 类的方法和属性
下表列出了 BitArray 类的一些常用的 属性:

下表列出了 BitArray 类的一些常用的 方法:

using System;
using System.Collections;

namespace CollectionsApplication
{
    class Program
    {
        static void Main(string[] args)
        {
            // 创建两个大小为 8 的点阵列
            BitArray ba1 = new BitArray(8);
            BitArray ba2 = new BitArray(8);
            byte[] a = { 60 };
            byte[] b = { 13 };

            // 把值 60 和 13 存储到点阵列中
            ba1 = new BitArray(a);
            ba2 = new BitArray(b);

            // ba1 的内容
            Console.WriteLine("Bit array ba1: 60");
            for (int i = 0; i < ba1.Count; i++)
            {
                Console.Write("{0, -6} ", ba1[i]);
            }
            Console.WriteLine();

            // ba2 的内容
            Console.WriteLine("Bit array ba2: 13");
            for (int i = 0; i < ba2.Count; i++)
            {
                Console.Write("{0, -6} ", ba2[i]);
            }
            Console.WriteLine();


            BitArray ba3 = new BitArray(8);
            ba3 = ba1.And(ba2);

            // ba3 的内容
            Console.WriteLine("Bit array ba3 after AND operation: 12");
            for (int i = 0; i < ba3.Count; i++)
            {
                Console.Write("{0, -6} ", ba3[i]);
            }
            Console.WriteLine();

            ba3 = ba1.Or(ba2);
            // ba3 的内容
            Console.WriteLine("Bit array ba3 after OR operation: 61");
            for (int i = 0; i < ba3.Count; i++)
            {
                Console.Write("{0, -6} ", ba3[i]);
            }
            Console.WriteLine();

            Console.ReadKey();
        }
    }
}
Bit array ba1: 60
False False True True True True False False
Bit array ba2: 13
True False True True False False False False
Bit array ba3 after AND operation: 12
False False True True False False False False
Bit array ba3 after OR operation: 61
True False True True False False False False
七、泛型
泛型(Generic) 允许您延迟编写类或方法中的编程元素的数据类型的规范,直到实际在程序中使用它的时候。换句话说,泛型允许您编写一个可以与任何数据类型一起工作的类或方法。
可以通过数据类型的替代参数编写类或方法的规范。当编译器遇到类的构造函数或方法的函数调用时,它会生成代码来处理指定的数据类型。下面这个简单的实例将有助于理解这个概念:
using System;
using System.Collections.Generic;

namespace GenericApplication
{
    public class MyGenericArray<T>
    {
        private T[] array;
        public MyGenericArray(int size)
        {
            array = new T[size + 1];
        }
        public T getItem(int index)
        {
            return array[index];
        }
        public void setItem(int index, T value)
        {
            array[index] = value;
        }
    }

    class Tester
    {
        static void Main(string[] args)
        {
            // 声明一个整型数组
            MyGenericArray<int> intArray = new MyGenericArray<int>(5);
            // 设置值
            for (int c = 0; c < 5; c++)
            {
                intArray.setItem(c, c*5);
            }
            // 获取值
            for (int c = 0; c < 5; c++)
            {
                Console.Write(intArray.getItem(c) + " ");
            }
            Console.WriteLine();
            // 声明一个字符数组
            MyGenericArray<char> charArray = new MyGenericArray<char>(5);
            // 设置值
            for (int c = 0; c < 5; c++)
            {
                charArray.setItem(c, (char)(c+97));
            }
            // 获取值
            for (int c = 0; c < 5; c++)
            {
                Console.Write(charArray.getItem(c) + " ");
            }
            Console.WriteLine();
            Console.ReadKey();
        }
    }
}
0 5 10 15 20
a b c d e
7.1 泛型(Generic)的特性
使用泛型是一种增强程序功能的技术,具体表现在以下几个方面:
它有助于您最大限度地重用代码、保护类型的安全以及提高性能。
可以创建泛型集合类。.NET 框架类库在 System.Collections.Generic 命名空间中包含了一些新的泛型集合类。您可以使用这些泛型集合类来替代 System.Collections 中的集合类。
可以创建自己的泛型接口、泛型类、泛型方法、泛型事件和泛型委托。
可以对泛型类进行约束以访问特定数据类型的方法。
关于泛型数据类型中使用的类型的信息可在运行时通过使用反射获取
7.2 泛型(Generic)方法
在上面的实例中,我们已经使用了泛型类,我们可以通过类型参数声明泛型方法。下面的程序说明了这个概念
using System;
using System.Collections.Generic;

namespace GenericMethodAppl
{
    class Program
    {
        static void Swap<T>(ref T lhs, ref T rhs)
        {
            T temp;
            temp = lhs;
            lhs = rhs;
            rhs = temp;
        }
        static void Main(string[] args)
        {
            int a, b;
            char c, d;
            a = 10;
            b = 20;
            c = 'I';
            d = 'V';

            // 在交换之前显示值
            Console.WriteLine("Int values before calling swap:");
            Console.WriteLine("a = {0}, b = {1}", a, b);
            Console.WriteLine("Char values before calling swap:");
            Console.WriteLine("c = {0}, d = {1}", c, d);

            // 调用 swap
            Swap<int>(ref a, ref b);
            Swap<char>(ref c, ref d);

            // 在交换之后显示值
            Console.WriteLine("Int values after calling swap:");
            Console.WriteLine("a = {0}, b = {1}", a, b);
            Console.WriteLine("Char values after calling swap:");
            Console.WriteLine("c = {0}, d = {1}", c, d);
            Console.ReadKey();
        }
    }
}
Int values before calling swap:
a = 10, b = 20
Char values before calling swap:
c = I, d = V
Int values after calling swap:
a = 20, b = 10
Char values after calling swap:
c = V, d = I
7.3
可以通过类型参数定义泛型委托。例如:
delegate T NumberChanger< T>(T n);
using System;
using System.Collections.Generic;

delegate T NumberChanger<T>(T n);
namespace GenericDelegateAppl
{
    class TestDelegate
    {
        static int num = 10;
        public static int AddNum(int p)
        {
            num += p;
            return num;
        }

        public static int MultNum(int q)
        {
            num *= q;
            return num;
        }
        public static int getNum()
        {
            return num;
        }

        static void Main(string[] args)
        {
            // 创建委托实例
            NumberChanger<int> nc1 = new NumberChanger<int>(AddNum);
            NumberChanger<int> nc2 = new NumberChanger<int>(MultNum);
            // 使用委托对象调用方法
            nc1(25);
            Console.WriteLine("Value of Num: {0}", getNum());
            nc2(5);
            Console.WriteLine("Value of Num: {0}", getNum());
            Console.ReadKey();
        }
    }
}
Value of Num: 35
Value of Num: 175
八、匿名方法
我们已经提到过,委托是用于引用与其具有相同标签的方法。换句话说,您可以使用委托对象调用可由委托引用的方法。
匿名方法(Anonymous methods) 提供了一种传递代码块作为委托参数的技术。匿名方法是没有名称只有主体的方法。
在匿名方法中不需要指定返回类型,它是从方法主体内的 return 语句推断的
8.1 编写匿名方法的语法
匿名方法是通过使用 delegate 关键字创建委托实例来声明的。例如:
delegate void NumberChanger(int n);
...
NumberChanger nc = delegate(int x)
{
    Console.WriteLine("Anonymous Method: {0}", x);
};
代码块 Console.WriteLine(“Anonymous Method: {0}”, x); 是匿名方法的主体。
委托可以通过匿名方法调用,也可以通过命名方法调用,即,通过向委托对象传递方法参数。
注意: 匿名方法的主体后面需要一个 ;。
例如:
nc(10);
using System;

delegate void NumberChanger(int n);
namespace DelegateAppl
{
    class TestDelegate
    {
        static int num = 10;
        public static void AddNum(int p)
        {
            num += p;
            Console.WriteLine("Named Method: {0}", num);
        }

        public static void MultNum(int q)
        {
            num *= q;
            Console.WriteLine("Named Method: {0}", num);
        }

        static void Main(string[] args)
        {
            // 使用匿名方法创建委托实例
            NumberChanger nc = delegate(int x)
            {
               Console.WriteLine("Anonymous Method: {0}", x);
            };

            // 使用匿名方法调用委托
            nc(10);

            // 使用命名方法实例化委托
            nc =  new NumberChanger(AddNum);

            // 使用命名方法调用委托
            nc(5);

            // 使用另一个命名方法实例化委托
            nc =  new NumberChanger(MultNum);

            // 使用命名方法调用委托
            nc(2);
            Console.ReadKey();
        }
    }
}
Anonymous Method: 10
Named Method: 15
Named Method: 30
九、不安全代码
当一个代码块使用 unsafe 修饰符标记时,C# 允许在函数中使用指针变量。不安全代码或非托管代码是指使用了指针变量的代码块
9.1 指针变量
指针 是值为另一个变量的地址的变量,即,内存位置的直接地址。就像其他变量或常量,您必须在使用指针存储其他变量地址之前声明指针。
指针变量声明的一般形式为:
type* var-name;
指针类型声明的实例:
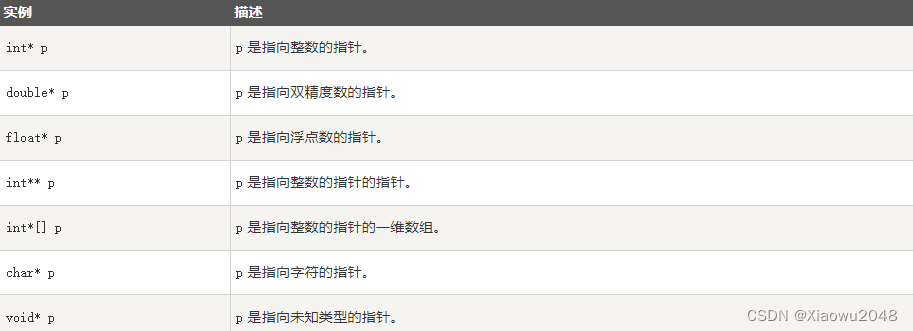
在同一个声明中声明多个指针时,星号 * 仅与基础类型一起写入;而不是用作每个指针名称的前缀。 例如:
int* p1, p2, p3;     // 正确
int *p1, *p2, *p3;   // 错误
下面的实例说明了 C# 中使用了 unsafe 修饰符时指针的使用:
using System;
namespace UnsafeCodeApplication
{
    class Program
    {
        static unsafe void Main(string[] args)
        {
            int var = 20;
            int* p = &var;
            Console.WriteLine("Data is: {0} ",  var);
            Console.WriteLine("Address is: {0}",  (int)p);
            Console.ReadKey();
        }
    }
}
Data is: 20
Address is: 99215364
9.2 使用指针检索数据值
可以使用 ToString() 方法检索存储在指针变量所引用位置的数据。下面的实例演示了这点:
using System;
namespace UnsafeCodeApplication
{
   class Program
   {
      public static void Main()
      {
         unsafe
         {
            int var = 20;
            int* p = &var;
            Console.WriteLine("Data is: {0} " , var);
            Console.WriteLine("Data is: {0} " , p->ToString());
            Console.WriteLine("Address is: {0} " , (int)p);
         }
         Console.ReadKey();
      }
   }
}
Data is: 20
Data is: 20
Address is: 77128984
9.3 传递指针作为方法的参数
可以向方法传递指针变量作为方法的参数。下面的实例说明了这点:
using System;
namespace UnsafeCodeApplication
{
   class TestPointer
   {
      public unsafe void swap(int* p, int *q)
      {
         int temp = *p;
         *p = *q;
         *q = temp;
      }

      public unsafe static void Main()
      {
         TestPointer p = new TestPointer();
         int var1 = 10;
         int var2 = 20;
         int* x = &var1;
         int* y = &var2;

         Console.WriteLine("Before Swap: var1:{0}, var2: {1}", var1, var2);
         p.swap(x, y);

         Console.WriteLine("After Swap: var1:{0}, var2: {1}", var1, var2);
         Console.ReadKey();
      }
   }
}
Before Swap: var1: 10, var2: 20
After Swap: var1: 20, var2: 10
9.4 使用指针访问数组元素
在 C# 中,数组名称和一个指向与数组数据具有相同数据类型的指针是不同的变量类型。例如,int *p 和 int[] p 是不同的类型。您可以增加指针变量 p,因为它在内存中不是固定的,但是数组地址在内存中是固定的,所以您不能增加数组 p。
因此,如果您需要使用指针变量访问数组数据,可以像我们通常在 C 或 C++ 中所做的那样,使用 fixed 关键字来固定指针。
下面的实例演示了这点:
using System;
namespace UnsafeCodeApplication
{
   class TestPointer
   {
      public unsafe static void Main()
      {
         int[]  list = {10, 100, 200};
         fixed(int *ptr = list)

         /* 显示指针中数组地址 */
         for ( int i = 0; i < 3; i++)
         {
            Console.WriteLine("Address of list[{0}]={1}",i,(int)(ptr + i));
            Console.WriteLine("Value of list[{0}]={1}", i, *(ptr + i));
         }
         Console.ReadKey();
      }
   }
}
Address of list[0] = 31627168
Value of list[0] = 10
Address of list[1] = 31627172
Value of list[1] = 100
Address of list[2] = 31627176
Value of list[2] = 200
9.5 编译不安全代码
为了编译不安全代码,您必须切换到命令行编译器指定 /unsafe 命令行。
例如,为了编译包含不安全代码的名为 prog1.cs 的程序,需在命令行中输入命令:
csc /unsafe prog1.cs
如果使用的是 Visual Studio IDE,那么您需要在项目属性中启用不安全代码。
步骤如下:
通过双击资源管理器(Solution Explorer)中的属性(properties)节点,打开项目属性(project properties)。
点击 Build 标签页。
选择选项"Allow unsafe code"。
十、C# 多线程
线程 被定义为程序的执行路径。每个线程都定义了一个独特的控制流。如果您的应用程序涉及到复杂的和耗时的操作,那么设置不同的线程执行路径往往是有益的,每个线程执行特定的工作。
线程是轻量级进程。一个使用线程的常见实例是现代操作系统中并行编程的实现。使用线程节省了 CPU 周期的浪费,同时提高了应用程序的效率。
到目前为止我们编写的程序是一个单线程作为应用程序的运行实例的单一的过程运行的。但是,这样子应用程序同时只能执行一个任务。为了同时执行多个任务,它可以被划分为更小的线程
10.1 线程生命周期
线程生命周期开始于 System.Threading.Thread 类的对象被创建时,结束于线程被终止或完成执行时。
下面列出了线程生命周期中的各种状态:
未启动状态:当线程实例被创建但 Start 方法未被调用时的状况。
就绪状态:当线程准备好运行并等待 CPU 周期时的状况。
不可运行状态:下面的几种情况下线程是不可运行的:
已经调用 Sleep 方法
已经调用 Wait 方法
通过 I/O 操作阻塞
死亡状态:当线程已完成执行或已中止时的状况
10.2 主线程
在 C# 中,System.Threading.Thread 类用于线程的工作。它允许创建并访问多线程应用程序中的单个线程。进程中第一个被执行的线程称为主线程。
当 C# 程序开始执行时,主线程自动创建。使用 Thread 类创建的线程被主线程的子线程调用。您可以使用 Thread 类的 CurrentThread 属性访问线程。
下面的程序演示了主线程的执行:
using System;
using System.Threading;

namespace MultithreadingApplication
{
    class MainThreadProgram
    {
        static void Main(string[] args)
        {
            Thread th = Thread.CurrentThread;
            th.Name = "MainThread";
            Console.WriteLine("This is {0}", th.Name);
            Console.ReadKey();
        }
    }
}
This is MainThread
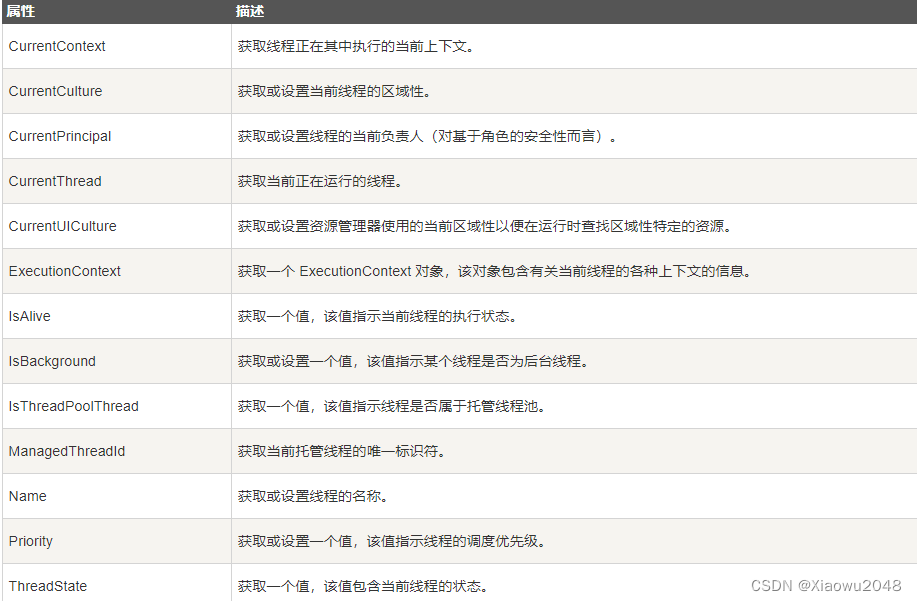
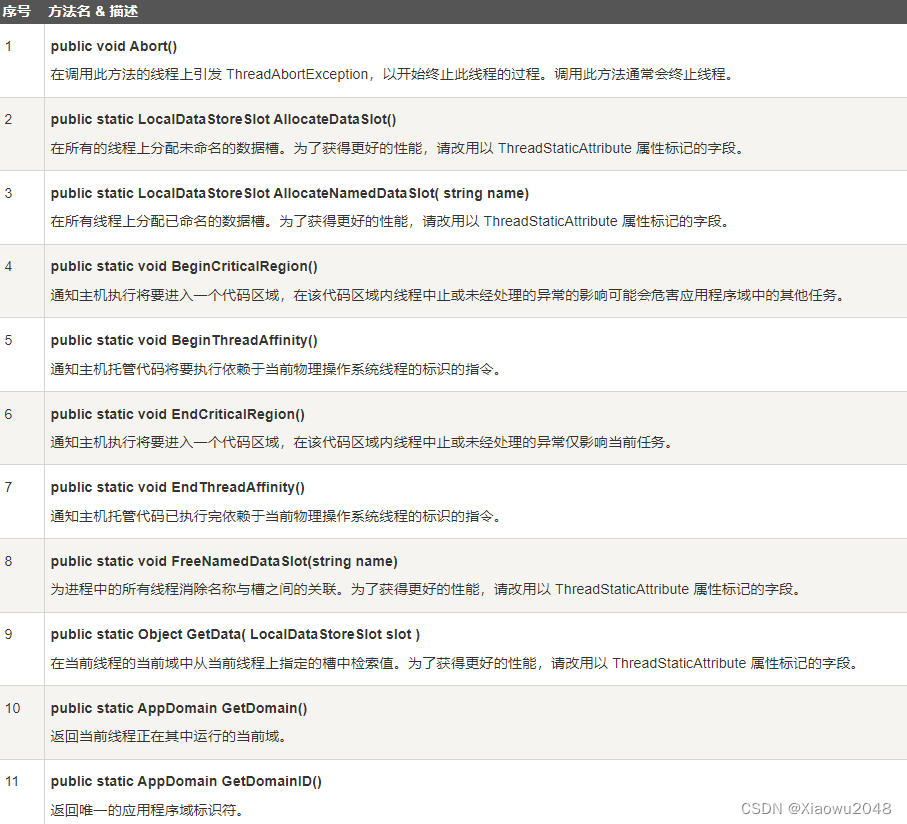
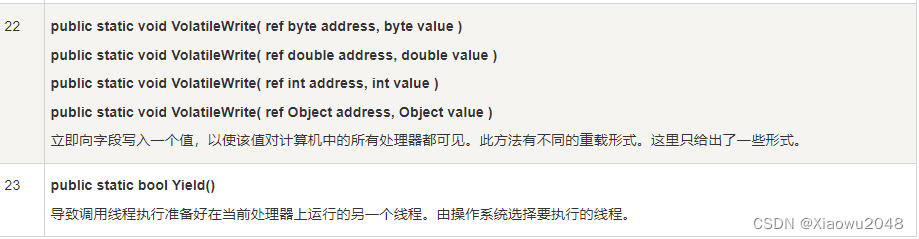
10.3 Thread 类常用的属性和方法
下表列出了 Thread 类的一些常用的 属性:
下表列出了 Thread 类的一些常用的 方法:

10.4 创建线程
线程是通过扩展 Thread 类创建的。扩展的 Thread 类调用 Start() 方法来开始子线程的执行。
下面的程序演示了这个概念:
using System;
using System.Threading;

namespace MultithreadingApplication
{
    class ThreadCreationProgram
    {
        public static void CallToChildThread()
        {
            Console.WriteLine("Child thread starts");
        }

        static void Main(string[] args)
        {
            ThreadStart childref = new ThreadStart(CallToChildThread);
            Console.WriteLine("In Main: Creating the Child thread");
            Thread childThread = new Thread(childref);
            childThread.Start();
            Console.ReadKey();
        }
    }
}
In Main: Creating the Child thread
Child thread starts
10.5 管理线程
Thread 类提供了各种管理线程的方法。
下面的实例演示了 sleep() 方法的使用,用于在一个特定的时间暂停线程
using System;
using System.Threading;

namespace MultithreadingApplication
{
    class ThreadCreationProgram
    {
        public static void CallToChildThread()
        {
            Console.WriteLine("Child thread starts");
            // 线程暂停 5000 毫秒
            int sleepfor = 5000;
            Console.WriteLine("Child Thread Paused for {0} seconds",
                              sleepfor / 1000);
            Thread.Sleep(sleepfor);
            Console.WriteLine("Child thread resumes");
        }

        static void Main(string[] args)
        {
            ThreadStart childref = new ThreadStart(CallToChildThread);
            Console.WriteLine("In Main: Creating the Child thread");
            Thread childThread = new Thread(childref);
            childThread.Start();
            Console.ReadKey();
        }
    }
}
In Main: Creating the Child thread
Child thread starts
Child Thread Paused for 5 seconds
Child thread resumes
10.6 销毁线程
Abort() 方法用于销毁线程。
通过抛出 threadabortexception 在运行时中止线程。这个异常不能被捕获,如果有 finally 块,控制会被送至 finally 块。
下面的程序说明了这点:
using System;
using System.Threading;

namespace MultithreadingApplication
{
    class ThreadCreationProgram
    {
        public static void CallToChildThread()
        {
            try
            {

                Console.WriteLine("Child thread starts");
                // 计数到 10
                for (int counter = 0; counter <= 10; counter++)
                {
                    Thread.Sleep(500);
                    Console.WriteLine(counter);
                }
                Console.WriteLine("Child Thread Completed");

            }
            catch (ThreadAbortException e)
            {
                Console.WriteLine("Thread Abort Exception");
            }
            finally
            {
                Console.WriteLine("Couldn't catch the Thread Exception");
            }

        }

        static void Main(string[] args)
        {
            ThreadStart childref = new ThreadStart(CallToChildThread);
            Console.WriteLine("In Main: Creating the Child thread");
            Thread childThread = new Thread(childref);
            childThread.Start();
            // 停止主线程一段时间
            Thread.Sleep(2000);
            // 现在中止子线程
            Console.WriteLine("In Main: Aborting the Child thread");
            childThread.Abort();
            Console.ReadKey();
        }
    }
}
In Main: Creating the Child thread
Child thread starts
0
1
2
In Main: Aborting the Child thread
Thread Abort Exception
Couldn’t catch the Thread Exception
菜鸟教程,学习记录


 330
330


 被折叠的 条评论
为什么被折叠?
被折叠的 条评论
为什么被折叠?
 到【灌水乐园】发言


