


🏆个人主页:企鹅不叫的博客
🌈专栏
⭐️ 博主码云gitee链接:代码仓库地址
⚡若有帮助可以【关注+点赞+收藏】,大家一起进步!
💙系列文章💙
【Linux】第三章Linux环境基础开发工具使用(yum+rzsz+vim+g++和gcc+gdb+make和Makefile+进度条+git)
【Linux】第四章 进程(冯诺依曼体系+操作系统+进程概念+PID和PPID+fork+运行状态和描述+进程优先级)
【Linux】第五章 环境变量(概念补充+作用+命令+main三个参数+environ+getenv())
【Linux】第六章 进程地址空间(程序在内存中存储+虚拟地址+页表+mm_struct+写实拷贝+解释fork返回值)
【Linux】第七章 进程控制(进程创建+进程终止+进程等待+进程替换+min_shell)
💎一、文件知识回顾
🏆1.基本概念
1.文件=文件内容+文件属性
文件属性也是数据,即便你创建一个空文件,也要占据磁盘空间2.文件操作=文件内容的操作+文件属性的操作
有可能在操作文件的过程中,既改变内容,又改变属性3.所谓的“打开”文件,究竟在干什么?
将文件的属性或内容加载到内存中! ——冯诺依曼体系决定:CPU只能从内存中对数据做读写!4.是不是所有的文件,都会处于被打开的状态?
不是,没有被打开的文件,只在磁盘上存储着。5.对文件的宏观分类:
打开的文件(内存文件) 和 (未打开文件)磁盘文件6.通常我们打开文件,访问文件,关闭文件,是谁在进行相关操作?
是进程在操作,c语言接口fopen,fclose, fread, fwrite… -> 写出代码 -> 形成程序 -> 当我们的文件程序,运行起来的时候,才会执行对应的代码,然后才是真正的对文件进行相关的操作7.学习文件操作:就是学习——进程和打开文件的关系!
🏆2.C语言文件操作
“w”
"w"写入操作,准备写入时,首先会将文件清空再写入
#include<stdio.h>
#include<unistd.h>
int main()
{
FILE *fp=fopen("test.txt","w");
if(fp==NULL)
{
 perror("fopen");
 return 1;
}
const char *msg="hello linux";
int cnt=1;
while(cnt<=10)
{
 fprintf(fp,"%s : %d\n",msg,cnt++);
}
fclose(fp);
return 0;
}
chdir
修改文件保存路径,如果不做处理,文件默认保存当前文件路径下,我们可以通过 ls /proc/(pid) 查看文件进程;ls /proc/(pid) -al 查看文件进程详细信息。
chdir(“路径”):可以更改当前工作路径
#include<stdio.h>
#include<unistd.h>
int main()
{
chdir("/home/Jungle");//修改文件保存的路径
FILE *fp=fopen("test.txt","w");
if(fp==NULL)
{
 perror("fopen");
 return 1;
}
printf("mypid: %d\n", getpid());

     while (1)
     {
             sleep(1);
     }
const char* msg="hello linux";
int cnt=1;
while(cnt<=10)
{
 fprintf(fp,"%s : %d\n",msg,cnt++);
}
fclose(fp);
return 0;
}
“a”
a: 追加写入,不断的往文件中新增内容->追加重定向!
“r”
读取,fgets(buffer, sizeof(buffer), fp) 按行读取,把读取的内容放到buffer,fp流中一行读多少字节,从fp流读出数据;读取失败返回NULL,成功返回buffer,同时如果将传参命令个数传过来就可以控制,我们需要读取的文件是哪一个
#include <stdio.h>
#include <unistd.h>

//myfile filename
int main(int argc, char *argv[])
{
 //当命令只有一个时,会执行不了
 if(argc != 2)
 {
     printf("Usage: %s filename\n", argv[0]);
     return 0;
 }
 //FILE *fp = fopen(test.txt, "r");
 FILE *fp = fopen(argv[1], "r");//argv[1]存放目标文件
 if(fp == NULL)
 {
     perror("fopen");
     return 1;
 }

 char buffer[64];
 //读取文件操作
 while(fgets(buffer, sizeof(buffer), fp) != NULL)
 {
     printf("%s", buffer);
 }
 fclose(fp);
}
下面是直接用./test执行和./test test.c指定文件读取执行结果
[Jungle@VM-20-8-centos:~/lesson17]$ ./test
Usage: ./test filename
[Jungle@VM-20-8-centos:~/lesson17]$ ./test test.c
#include <stdio.h>
#include <unistd.h>

//myfile filename
int main(int argc, char *argv[])
{
 //当命令只有一个时,会执行不了
 if(argc != 2)
 {
     printf("Usage: %s filename\n", argv[0]);
     return 0;
 }
 //FILE *fp = fopen(test.txt, "r");
 FILE *fp = fopen(argv[1], "r");//目标文件
 if(fp == NULL)
 {
     perror("fopen");
     return 1;
 }

 char buffer[64];
 //读取文件操作
 while(fgets(buffer, sizeof(buffer), fp) != NULL)
 {
     printf("%s", buffer);
 }
 fclose(fp);
}
补充:
1.当我们向文件写入的时候,最终是向磁盘写入!而磁盘是硬件,只有操作系统才有资格向硬件写入!
2.能绕开操作系统对文件直接写入吗?
不能,所有的上层访问文件的操作,都必须贯穿操作系统
3.为什么要封装?
1.直接使用原生系统接口,使用成本比较高!
2.语言不具备跨平台性!
封装是如何解决跨平台问题的呢?——穷举所有的底层接口+条件编译!
💎二、系统文件IO
🏆1.open
#include <sys/types.h>
#include <sys/stat.h>
#include <fcntl.h>
int open(const char* pathname, int flags);//只能打开已有文件
int open(const char* pathname, int flags, mode_t mode);//打开曾经不存在的文件,可以初始化权限
pathname: 要打开或创建的目标文件
flags : 打开文件时,可以传入多个参数选项,用下面的一个或者多个常量进行“或”运算,构成flags。
参数 :
O_RDONLY: 只读打开(read only)
O_WRONLY : 只写打开(write only)
O_RDWR : 读,写打开(read write)
上面三个常量,必须指定一个且只能指定一个
O_CREAT : 若文件不存在,则创建它。需要使用mode选项,来指明新文件的访问权限(creat)
O_APPEND : 追加写(append) O_TRUNC :将原文件内容置空(truncate)
返回值:
成功:新打开的文件描述符
失败: - 1man 2 open//查找
宏标志位示例
宏示例,宏系统传递标志位,是用位图结构来进行传递的! 每一个宏标志,一般只需要有一个比特位是1,并且和其他宏对应的值,不能重叠
#include<stdio.h>

#define PRINT_A 0x1    //0000 0001
#define PRINT_B 0x2    //0000 0010
#define PRINT_C 0x4    //0000 0100
#define PRINT_D 0x8    //0000 1000
#define PRINT_DFL 0x0

//open
void Show(int flags)
{
 if(flags & PRINT_A) printf("hello A\n"); //如果flags是PRINT_A,就打印hello A
 if(flags & PRINT_B) printf("hello B\n"); //如果flags是PRINT_B,就打印hello B
 if(flags & PRINT_C) printf("hello C\n"); //如果flags是PRINT_C,就打印hello C
 if(flags & PRINT_D) printf("hello D\n"); //如果flags是PRINT_D,就打印hello D

 if(flags == PRINT_DFL) printf("hello Default\n");
          //如果flags是PRINT_DFL,就打印hello Default
}
int main()
{

printf("PRINT_DFL:\n");
Show(PRINT_DFL);

printf("PRINT_A:\n");
Show(PRINT_A);

printf("PRINT_B:\n");
Show(PRINT_B);

printf("PRINT_A 和 PRINT_B\n");
Show(PRINT_A | PRINT_B);

printf("PRINT_C | PRINTF_D:\n");
Show(PRINT_C | PRINT_D);

printf("PRINT All:\n");
Show(PRINT_A | PRINT_B | PRINT_C |PRINT_D);

return 0;
}
输出:
[Jungle@VM-20-8-centos:~/lesson17]$ ./test
PRINT_DFL:
hello Default
PRINT_A:
hello A
PRINT_B:
hello B
PRINT_A 和 PRINT_B
hello A
hello B
PRINT_C | PRINTF_D:
hello C
hello D
PRINT All:
hello A
hello B
hello C
hello D
int open(const char *pathname, int flags, mode_t mode);
打开曾经不存在的文件,mode给初始权限
不初始权限会乱码
#include<stdio.h>
#include<sys/types.h>
#include<sys/stat.h>
#include<fcntl.h>

int main()
{
int fd = open("test.txt",O_WRONLY | O_CREAT);
if(fd < 0)
{
 perror("open");//获取错误码
 return 1;
}
printf("fd:%d \n",fd);
return 0;
}
结果:
-r--r-s--T 1 Jungle root 0 10月 29 14:34 test.txt
umask()
umask()设置权限掩码
#include<stdio.h>
#include<sys/types.h>
#include<sys/stat.h>
#include<fcntl.h>

int main()
{
umask(0);//调用此进程,设置权限掩码为0
int fd = open("test.txt",O_WRONLY | O_CREAT, 0666);//文件权限更改为666
if(fd < 0)
{
 perror("open");//获取错误码
 return 1;
}
printf("fd:%d \n",fd);
return 0;
}
结果:
-rw-rw-rw- 1 Jungle root 0 10月 29 14:38 test.txt
close()
包含头文件< unistd.h >
#include<stdio.h>
#include<sys/types.h>
#include<sys/stat.h>
#include<fcntl.h>
#include<unistd.h>

int main()
{
umask(0);//调用此进程,设置权限掩码为0
int fd = open("test.txt",O_WRONLY | O_CREAT, 0666);//文件权限更改为666
if(fd < 0)
{
 perror("open");//获取错误码
 return 1;
}
printf("fd:%d \n",fd);
close(fd);//关闭文件
return 0;
}
🏆2.write
#include <unistd.h>
ssize_t write(int fd, const void *buf, size_t count);
参数:
fd,文件描述符
buf,存放要写的内容
count,要写入多少字节
返回值:如果顺利write()会返回实际写入的字节数(len)。当有错误发生时则返回-1,错误代码存入errno中
写入实例
注意:此处size_t count传strlen(str),不传\0,\0在vim中没有对应的实际字符串,打印出来就是乱码
#include<stdio.h>
#include<sys/types.h>
#include<sys/stat.h>
#include<fcntl.h>
#include<unistd.h>
#include<string.h>
int main()
{
umask(0);//调用此进程,设置权限掩码为0
int fd = open("test.txt",O_WRONLY | O_CREAT, 0666);//文件权限更改为666
if(fd < 0)
{
 perror("open");//获取错误码
 return 1;
}
printf("fd:%d \n",fd);
int cnt = 10;
const char* arr = "hello linux\n";
while(cnt--)
{
 //write(fd, arr, strlen(arr)+1); //+1会导致乱码
 write(fd, arr, strlen(arr));
}
close(fd);//关闭文件
return 0;
}
清空
[Jungle@VM-20-8-centos:~/lesson17]$ > test.txt
O_TRUNC
对于 open(“test.txt”,O_WRONLY | O_CREAT, 0666);而言,写入五行数据,然后再重新打开写入一行数据时,只会覆盖前面的内容,不会清空
aaaaabbbbb
hello linux
hello linux
hello linux
hello linux
解决方法:添加O_TRUNC,将原文件内容置空
int fd = open("test.txt",O_WRONLY | O_CREAT | O_TRUNC, 0666);//文件权限更改为666
O_APPEND
加上O_APPEND ,可以在原文件后追加数据
int fd = open("test.txt",O_WRONLY | O_CREAT | O_APPEND , 0666);//文件权限更改为666
🏆3.read
#include <unistd.h>
ssize_t read(int fd, void *buf, size_t count);
参数:
fd,文件描述符
buf,存放要写的内容
count,要写入多少字节
返回值:如果顺利write()会返回实际写入的字节数(len)。当有错误发生时则返回-1,错误代码存入errno中
#include<stdio.h>
#include<sys/types.h>
#include<sys/stat.h>
#include<fcntl.h>
#include<unistd.h>
#include<string.h>
int main()
{
umask(0);//调用此进程,设置权限掩码为0
int fd = open("test.txt",O_RDONLY);      //对应于C语言中的"r"方式操作!
if(fd < 0)
{
 perror("open");
 return 1;
}
printf("fd:%d \n",fd);

char buffer[128];
ssize_t s = read(fd,buffer,sizeof(buffer)-1);   //sizeof(buffer)-1是为了使得读取的内容形成字符串(字符串以\0结尾)
if(s > 0)
{
 buffer[s]='\0';        //因为系统调用接口read中的接收类型为void*,因此既可以是二进制,也可以是字符等,这里将其下标最后一个字符置为\0
 printf("%s",buffer);
}
close(fd);//关闭文件
return 0;
}
结果:
[Jungle@VM-20-8-centos:~/lesson17]$ ./test
fd:3
aaaaa
bbbbb
ccccc
💎三、文件描述符fd
文件描述符顺序
Linux进程默认情况下会有3个缺省打开的文件描述符,分别是标准输入0, 标准输出1, 标准错误2,
0,1,2对应的物理设备一般是:键盘,显示器,显示器,所以我们创建的文件一般都是从3开始的
FILE* -> FILE中的FILE是C语言提供的结构体
#include<stdio.h>
#include<sys/types.h>
#include<sys/stat.h>
#include<fcntl.h>
#include<unistd.h>
#include<string.h>

int main()
{
umask(0);
//测试文件描述符:fd
int fd1 = open("test.txt1",O_WRONLY | O_CREAT | O_TRUNC,0666);
int fd2 = open("test.txt2",O_WRONLY | O_CREAT | O_TRUNC,0666);
int fd3 = open("test.txt3",O_WRONLY | O_CREAT | O_TRUNC,0666);
int fd4 = open("test.txt4",O_WRONLY | O_CREAT | O_TRUNC,0666);

printf("fd1: %d\n",fd1);
printf("fd2: %d\n",fd2);
printf("fd3: %d\n",fd3);
printf("fd4: %d\n",fd4);

close(fd1);
close(fd2);
close(fd3);
close(fd4);
return 0;
}
结果:
[Jungle@VM-20-8-centos:~/lesson18]$ ./test
fd1: 3
fd2: 4
fd3: 5
fd4: 6
012与stdin,stdout,stderr对应关系
验证0就是标准输入
#include<stdio.h>
#include<sys/types.h>
#include<sys/stat.h>
#include<fcntl.h>
#include<unistd.h>
#include<string.h>

int main()
{
 //先验证0,1,2就是标准I/O
 char buffer[1024];
 ssize_t s = read(0,buffer,sizeof(buffer)-1);
 if( s > 0 )
 {
   buffer[s] = '\0';
   printf("echo: %s",buffer);
 }

return 0;
}
结果:
[Jungle@VM-20-8-centos:~/lesson18]$ ./test
123
echo: 123
验证12就是标准输出
#include<stdio.h>
#include<sys/types.h>
#include<sys/stat.h>
#include<fcntl.h>
#include<unistd.h>
#include<string.h>

int main()
{
	const char*str = "Test interface write\n";
 write(1,str,strlen(str));
 write(2,str,strlen(str));
return 0;
}
结果:
[Jungle@VM-20-8-centos:~/lesson18]$ ./test
Test OS interface write
Test OS interface write
验证012就是对应stdin,stdout,stderr
#include<stdio.h>
#include<sys/types.h>
#include<sys/stat.h>
#include<fcntl.h>
#include<unistd.h>
#include<string.h>

int main()
{
	printf("stdin: %d\n",stdin->_fileno);
 printf("stdout: %d\n",stdout->_fileno);
 printf("stderr: %d\n",stderr->_fileno);
return 0;
}
结果:
[Jungle@VM-20-8-centos:~/lesson18]$ ./test
stdin: 0
stdout: 1
stderr: 2
小结
c语言函数接口 fopen/ fclose/ fread/ fwrite… 底层封装的是系统接口open/close/ read/write;上层的c语言类型对应的结构体FILE底层封装的是系统文件描述符fd。总之我们使用的C语言接口一定调用了系统接口
文件描述符在底层
首先文件是被进程控制的,一个进程可以控制多个文件
文件的内核数据结构
struct file
{
//包含文件的内容和属性
struct file* next;
struct file* prev;
}
进程中存在一个结构体指针 struct files_struct* files,指向结构体 struct files_struct,结构体 struct files_struct内部存着一个指针数组(文件描述符表) struct file* fd_ array[ ],他的各个位置存着被打开的文件的地址,[0]指向的打开文件就是上面说的标准输入;[1]指向的打开文件就是标准输出;[2]指向的打开文件就是上面说的标准错误;文件描述符就是这里的指针数组的数组下标,所以只要拿着文件描述符,就可以找到对应的文件。
虚拟文件系统(VFS)
用C语言实现面向对象
struct file
{
//对象属性
//函数指针
void (*readp)(struct file* filep, int fd...)
void (*writep)(struct file* filep, int fd...)
}
//使用
struct file f;
f.readp(...);
进程通过fd描述符控制着struct file,不同对象(键盘,显示器)被file指针控制
结论
- 进程数据独有,两个进程中分别产生生成两个独立的fd
- 两个进程可以任意对文件进行读写操作,各有各的文件描述信息以及读写位置,操作系统并不保证写的原子性
- 进程可以通过系统调用对文件加锁,从而实现对文件内容的保护
- 删除文件实际上只是删除文件的目录项,任何一个进程删除该文件时,另外一个进程不会立即出现读写失败
- 两个进程可以分别读取文件的不同部分而不会相互影响
- 一个进程对文件长度和内容的修改另外一个进程可以立即感知,因为文件内容的修改是直接反馈至磁盘文件系统中的
💎四、文件描述符的应用特征
🏆1.文件描述符的分配规则
在fifiles_struct数组当中,找到当前没有被使用的最小的一个下标,作为新的文件描述符,比如下面close(0)或者close(2),就将0或者2赋值给fd
#include <stdio.h>
#include <sys/types.h>
#include <sys/stat.h>
#include <fcntl.h>
int main()
{
 //正常情况下,输出fd因该是3
 //close(0);//输出fd是0
 //close(1);//没有输出,因为printf->stdout->1->不再指向对应的显示器了,而是已经指向了test.txt的底层struct file对象
 //close(2);//输出fd是2
	int fd = open("test.txt", O_RDONLY);
	if (fd < 0)
	{
		perror("open");
		return 1;
	}
	printf("fd: %d\n", fd);
	close(fd);
	return 0;
}
如果打印fd=1,需要刷新fflush,本来要向显示器打印,最终变成了向指定文件打印(重定向)
#include <stdio.h>
#include <sys/types.h>
#include <sys/stat.h>
#include <fcntl.h>
int main()
{
 close(1);//没有输出,因为printf->stdout->1->不再指向对应的显示器了,而是已经指向了test.txt的底层struct file对象
	int fd = open("test.txt",O_WRONLY | O_CREAT | O_TRUNC,0666);
	if (fd < 0)
	{
		perror("open");
		return 1;
	}
	printf("fd: %d\n", fd);
 fflush(stdout);
	close(fd);
	return 0;
}
结果:
[Jungle@VM-20-8-centos:~/lesson18]$ cat test.txt
fd:1
🏆2.重定向
重定向原理
原理:每个文件描述符都是一个内核中文件描述信息数组的下标,对应有一个文件的描述信息用于操作文件,而重定向就是在不改变所操作的文件描述符的情况下,通过改变描述符对应的文件描述信息进而实现改变所操作的文件
#include <stdio.h>
#include <sys/types.h>
#include <sys/stat.h>
#include <fcntl.h>
#include <unistd.h>
int main()
{
close(1);//关闭显示器,没有输出,因为printf->stdout->1->不再指向对应的显示器了,而是已经指向了test.txt的底层struct file对象
	int fd = open("test.txt",O_WRONLY | O_CREAT | O_TRUNC,0666);
	if (fd < 0)
	{
		perror("open");
		return 1;
	}
	fprintf(stdout, "文件内容,fd = %d\n",fd);
fflush(stdout);
	close(fd);
	return 0;
}
对于close(1)问题,stdout中有一个结构体FILE,close(1)时相当于把指针数组的[1]置为空,所以[1]有空余位置,int fd = open(“test.txt”,O_WRONLY | O_CREAT | O_TRUNC,0666);,指针遍历数组,发现[1]位置为空,就把[1]指向test.txt,此时在1号文件描述符中写的内容,都写到了test.txt文件中,而不再写到标准输出(stdout)中。
stdout是C语言库封装好的,对应文件描述符为1,当fprintf(stdout, “文件内容,fd = %d\n”,fd);,就把内容输入stdout存的文件描述符中,就是输入到[1]中,可是此时[1]指向test.txt,所以,内容就输入到test.txt中了

dup 2系统调用
#include <unistd.h>
int dup2(int oldfd, int newfd);
作用:把 oldfd 内容拷贝进 newfd
参数:
newfd,指定新的文件描述符数值
oldfd,旧的文件描述符数值
返回值:
若dup2调用成功则返回新的文件描述符,出错则返回-1
原本fd的值是3,使用dup2后将oldfd拷贝给newfd,之后返回的是newfd地址,这里是指针拷贝,所以原本[1]位置指向stdout,现在dup2(fd, 1)后,是将fd的值([3])赋值给[1]位置,所以fd此时文件[1]位置指向的不是stdout而是test.txt,将本要输出到[1]中的内容重定向到fd中去。
#include<stdio.h>
#include<sys/types.h>
#include<sys/stat.h>
#include<fcntl.h>
#include<unistd.h>

int main()
{
int fd = open("test.txt",O_WRONLY | O_CREAT | O_TRUNC,0666);
if(fd < 0)
{
perror("open");
return 0;
}
dup2(fd,1);//返回新的指向[1],将fd=3拷贝到[1]中
//本来要向显示器打印,最终变成了向指定文件打印
fprintf(stdout,"打开文件成功,fd: %d\n",fd);
fflush(stdout);
close(fd);
}
结果:在添加dup2(fd, 1);语句之前,会直接向显示器打印“文件内容,fd = 3”,但是修改了[1]位置的指向,让[1]指向fd[3],所以变成了向指定文件打印
[Jungle@VM-20-8-centos:~/lesson19]$ cat test.txt
文件内容,fd = 3
输出重定向:>
#include <iostream>
#include <cstdio>
#include <cstring>
#include <errno.h>
#include <sys/stat.h>
#include <sys/types.h>
#include <fcntl.h>


int main()
{
 //stdout
 printf("hello printf 1\n");
 fprintf(stdout, "hello fprintf 1\n");
 fputs("hello fputs 1\n", stdout);

 //stderr
 fprintf(stderr, "hello fprintf 2\n");
 fputs("hello fputs 2\n", stderr);
 perror("hello perror 2");


 //cout
 std::cout << "hello cout 1" << std::endl;

 //cerr
 std::cerr << "hello cerr 2" << std::endl;
}
结果:执行一下命令后,会生成stdout.txt和stderr.txt文件,内容分别是下面两段
[Jungle@VM-20-8-centos:~/lesson22]$ ./a.out 1>stdout.txt 2>stderr.txt
//stdout
hello fprintf 2
hello fputs 2
hello perror 2: Success
hello cerr 2
//stderr
hello printf 1
hello fprintf 1
hello fputs 1
hello cout 1
命令行有两段,第一段将标准输出输入重定向到显示器[1],第二段将标准错误重定向到显示器[2],意义,可以将错误的日志打印出来
下面是混淆输出,将[1]和[2]都重定向到一个文件中,./a.out > all.txt 是普通的把标准输出重定向——把[1]指向了文件all.txt,2>&1是把[1]拷贝给[2],使得标准错误重定向——把[2]也指向了文件all.txt
[Jungle@VM-20-8-centos:~/lesson22]$ ./a.out > all.txt 2>&1
//all.txt
hello fprintf 2
hello fputs 2
hello perror 2: Success
hello printf 1
hello fprintf 1
hello fputs 1
hello cout 1
hello cerr 2
perror
#include <stdio.h>
void perror(const char *s);
perror(s) 用来将上一个函数发生错误的原因输出到标准设备(stderr)
追加重定向:>>
在追加情况下,多次运行程序,会在文件后追加
#include<stdio.h>
#include<sys/types.h>
#include<sys/stat.h>
#include<fcntl.h>
#include<unistd.h>

int main()
{
int fd = open("test.txt",O_WRONLY | O_CREAT | O_APPEND,0666);
if(fd < 0)
{
perror("open");
return 0;
}
dup2(fd,1);//返回新的指向[1],将fd=3拷贝到[1]中
//本来要向显示器打印,最终变成了向指定文件打印
fprintf(stdout,"打开文件成功,fd: %d\n",fd);
fflush(stdout);
close(fd);
}
结果:
[Jungle@VM-20-8-centos:~/lesson19]$ ./test
[Jungle@VM-20-8-centos:~/lesson19]$ ./test
[Jungle@VM-20-8-centos:~/lesson19]$ ./test
[Jungle@VM-20-8-centos:~/lesson19]$ cat test.txt
打开文件成功,fd: 3
打开文件成功,fd: 3
打开文件成功,fd: 3
输入重定向:<
#include<stdio.h>
#include<sys/types.h>
#include<sys/stat.h>
#include<fcntl.h>
#include<unistd.h>

int main()
{

int fd = open("test.txt",O_RDONLY);
if(fd < 0)
{
perror("open");
return 0;
}
//输入重定向,从文件读取
//如果不加上下面这里代码,系统会默认从键盘读取
dup2(fd,0);

char line[128];  //举个例子
//fegts是从特定的流当中将数据读到缓冲区
while(fgets(line, sizeof line, stdin) != NULL)
{
printf("%s\n",line);
}

fprintf(stdout,"打开文件成功,fd: %d\n",fd);
fflush(stdout);
close(fd);
}
结果:输出重定向后,读取位置从键盘转移到文件当中
[Jungle@VM-20-8-centos:~/lesson19]$ ./test
打开文件成功,fd: 3

打开文件成功,fd: 3

打开文件成功,fd: 3

打开文件成功,fd: 3
🏆3.缓冲区
什么是缓冲区?
缓冲区的本质:就是一段内存
为什么要有缓冲区?
- 解放使用缓冲区的进程时间,使用缓冲区的时间不用浪费在拷贝上
- 缓冲区的存在可以集中处理数据刷新,减少I/O的次数,从而达到提高整机的效率的目的
缓冲区在哪里?
正常情况
输出两行代码,带"\n"
#include<stdio.h>
#include<sys/types.h>
#include<sys/stat.h>
#include<fcntl.h>
#include<unistd.h>
#include<string.h>
int main()
{
  printf("hello pritnf\n");
  const char* str = "hello write\n";
  write(1, str, strlen(str));//[1]是标准输出,将str中的内容输出到显示器上
  sleep(5);

  return 0;
}
结果:输出完这两行后,sleep(5)结束程序
[Jungle@VM-20-8-centos:~/lesson19]$ ./test
hello pritnf
hello write
换行符缺失导致内容没按照预期呈现
输出两行代码不带"\n"
#include<stdio.h>
#include<sys/types.h>
#include<sys/stat.h>
#include<fcntl.h>
#include<unistd.h>
#include<string.h>
int main()
{
  printf("hello pritnf");
  const char* str = "hello write";
  write(1, str, strlen(str));
  sleep(5);

  return 0;
}
结果:先输出str,然后sleep(5)之后输出printf中的内容,说明printf没有立即刷新的原因是,printf底层调用stdout这个文件流,当遇到’\n’时,stdout能立马刷新FILE中的缓冲区,上面没有携带’\n’,所以printf当中的语句一直停留在缓冲区中,直到最后retrun0;语句调用exit函数才执行缓冲区操作
[Jungle@VM-20-8-centos:~/lesson19]$ ./test
hello writehello pritnf
输出下面代码,注意,不带"\n"
#include<stdio.h>
#include<sys/types.h>
#include<sys/stat.h>
#include<fcntl.h>
#include<unistd.h>
#include<string.h>
int main()
{
  printf("hello pritnf");
	  fprintf(stdout,"hello fpritnf");
	  fputs("hello fputs",stdout);
  const char* str = "hello write";
  write(1, str, strlen(str));
  sleep(5);

  return 0;
}
结果:首先直接打印出"hello write",然后等待5s之后打印出"hello pritnfhello fpritnfhello fputs"
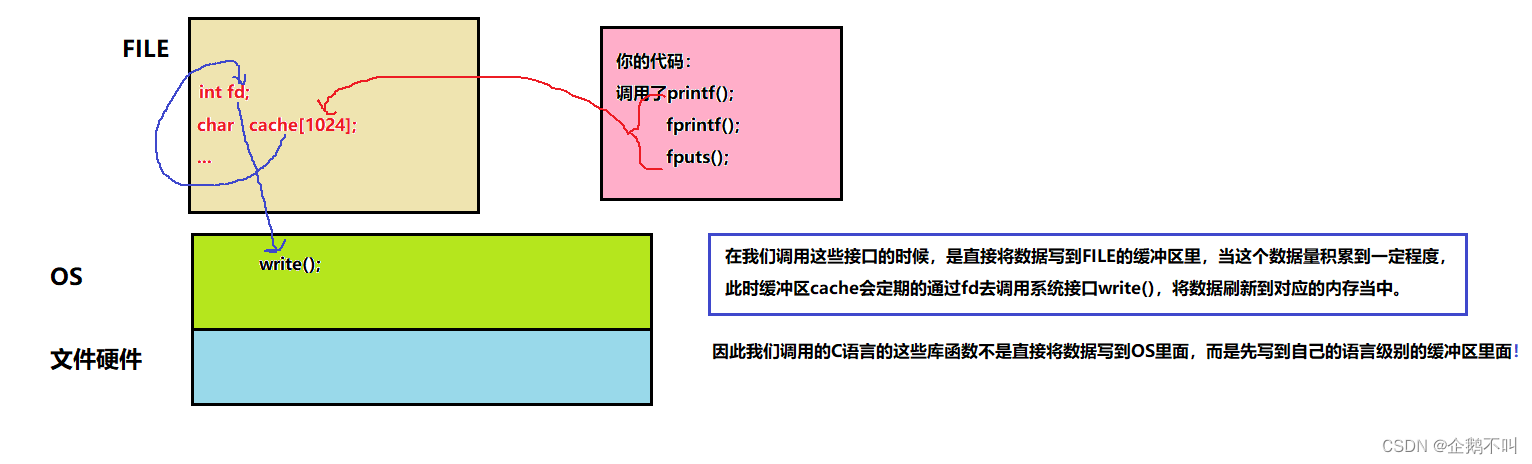
[Jungle@VM-20-8-centos:~/lesson19]$ ./test
hello writehello pritnfhello fpritnfhello fputs
在以上代码中,调用printf() ,fprintf(),fputs() 等,FILE结构体中会会封装许多属性,打印的内容存在结构体FILE的缓冲区cache中,等积累一定的大小再通过fd输出到硬件中,调用效率变高,减少外设和操作系统交互的次数。
既然缓冲区在FILE内部,在C语言中,我们每一次打开一个文件都会有一个FILE*返回,每一个文件都有一个fd和属于自己的语言级别的缓冲区
提前close(fd)导致内容无法呈现
关闭了fd,语言级别的缓冲区cache就找不到fd,无法调用write。同理关闭stdout中_fileno(文件描述符)进程结束刷新时,找不到fd,无法利用文件描述符 _fileno写入OS,所以没有fflush(stdout);就无法打印
#include<stdio.h>
#include<sys/types.h>
#include<sys/stat.h>
#include<fcntl.h>
#include<unistd.h>
#include<string.h>
int main()
{
  printf("hello pritnf");
	  fprintf(stdout,"hello fpritnf");
	  fputs("hello fputs",stdout);
  const char* str = "hello write";
  write(1, str, strlen(str));
	  close(1);//刷新前关闭fd
  sleep(5);
	    //close(stdout->_fileno);//关闭文件描述符
  return 0;
}
结果:打印"hello write"等待5秒,刷新但是关闭了[1]
[Jungle@VM-20-8-centos:~/lesson19]$ ./test
hello write
刷新策略
- 全缓冲,当填满标准IO缓冲后,才进行实际IO操作,如将数据从用户层缓冲区拷贝到内核缓冲区,全缓冲的典型代表是对磁盘文件的读写
- 行缓冲,当输入和输出中遇到换行符时才执行实际IO操作,典型代表是标准输入stdin和标准输出stdout
- 无缓冲,不对数据进行缓冲,直接进行IO,如标准错误stderr,是无缓冲
- 特殊:进程退出,用户强制刷新都是会刷新缓冲区的
缓冲区刷新方法
- 调用exit()进程结束时,会刷新缓冲区,return会调用exit(),注意_exit()不会刷新缓冲区
- 当缓冲区满了也会被强行刷新出来
- 可以通过**fflush()**强制将缓冲流中的数据复制到缓冲区中
- 流被关闭的时候也会被刷新出来,比如调用fclose函数
- 行缓冲遇到’\n’会被刷新出来
fork()和缓冲区
#include<stdio.h>
#include<sys/types.h>
#include<sys/stat.h>
#include<fcntl.h>
#include<unistd.h>
#include<string.h>
int main()
{
  const char* str1 = "hello printf\n";
	  const char* str2 = "hello fprintf\n";
	  const char* str3 = "hello fputs\n";
	  const char* str4 = "hello write\n";
	  //C语言库函数
	  printf(str1);
	  fprintf(stdout, str2);
	  fputs(str3, stdout);
	  //系统接口
	  write(1, str4, strlen(str4));
	  //在调用完上面的代码后,再执行fork();
	  fork();
  return 0;
}
结果:在运行程序时,正常执行了四行,./test > test.txt,当./test输出的内容重定向到test.txt中时,test.txt是磁盘文件,刷新策略由无缓冲(显示器写入)转化到全缓冲(磁盘写入),此时系统接口write()不受缓冲区的影响,直接刷新出来,C语言库函数,字符串存放在各自FILE中的缓冲区当中,当fork()时,创建子进程,父子进程代码共享,随着main函数结束,此时进程退出会刷新缓冲区,缓冲区是自己的FILE内部维护的,属于父进程内部的数据区域,对于数据父子进程要发生写时拷贝,所以父子进程都会各自刷新一份(hello fputs hello printf hello fprintf)到OS中。
当不确定缓冲区内容是否刷新出去时可以调用
fflush函数强制刷新[Jungle@VM-20-8-centos:~/lesson19]$ ./test hello printf hello fprintf hello fputs hello write [Jungle@VM-20-8-centos:~/lesson19]$ ./test > test.txt [Jungle@VM-20-8-centos:~/lesson19]$ cat test.txt hello write hello printf hello fprintf hello fputs hello printf hello fprintf hello fputs
模拟实现C标准库
#include<stdio.h>
#include<unistd.h>
#include<sys/stat.h>
#include<sys/types.h>
#include<fcntl.h>
#include<string.h>
#include<assert.h>
#include<stdlib.h>

#define NUM 1024 //缓冲区大小

#define NONE_FLUSH 0x0   //无缓冲(立即刷新)
#define LINE_FLUSH 0x1   //行缓冲
#define FULL_FLUSH 0x2   //全缓冲

//类型重命名
typedef struct _MyFILE
{
int  _fileno;//文件描述符
char _buffer[NUM];//缓冲区
int  _end;      //指向有效字符的下一个位置
int  _flags;   //fflush 方法
}MyFILE;

MyFILE* my_fopen(const char* filename, const char* method)
{
assert(filename);
assert(method);

int flags = O_RDONLY;  //默认以写、读方式打开
	 //如果是读
if (strcmp(method, "r") == 0)
{}
//如果是读写
else if (strcmp(method, "r+") == 0)
{}
else if (strcmp(method, "w") == 0)
{
  //如果是以写方式打开,就修改为O_WRONLY。
  //如果打开的时候不存在,就O_CREAT 创建
  //如果打开需要将文件清空,就O_TRUNC
  flags = O_WRONLY | O_CREAT | O_TRUNC;
}
else  if (strcmp(method, "w+") == 0)
{}
else if (strcmp(method, "a") == 0)
{
  //追加同理
  flags = O_WRONLY | O_CREAT | O_APPEND;
}
else if (strcmp(method, "a+") == 0)
{}

//打开文件
int fileno = open(filename, flags, 0666);
if (fileno < 0)
{
  return NULL;
}
//打开文件成功就申请空间
MyFILE* fp = (MyFILE*)malloc(sizeof(MyFILE));
if (fp == NULL)  return fp;
memset(fp, 0, sizeof(MyFILE));

//1.正常情况下,会在打开文件时进行判断,使用的系统接口为stat
//man 2 stat。stat就是用来检测一个特定路径下,文件是否存在
//这里没有使用,只进行简单演示
//2.一般情况下,我们打开的文件是什么类型,也要在my_fopen里获得
//这里没有使用处理,
//3.这里默认将刷新方式设置为行缓冲

fp->_fileno = fileno;
fp->_flags |= LINE_FLUSH;
fp->_end = 0;//默认为0下标
return fp;
}
void my_fflush(MyFILE* fp)
{
assert(fp);
if (fp->_end > 0)
{
  write(fp->_fileno, fp->_buffer, fp->_end);
  fp->_end = 0;
  syncfs(fp->_fileno);  //man 2 sync:把buffer cache直接提交到磁盘
}
}
//这里由于是模拟实现,就不考虑my_fwrite的返回值
void my_fwrite(MyFILE* fp, const char* start, int len)
{
// start表示要写入的字符串,len表示要写多长
assert(fp);
assert(start);
assert(len > 0);

//写入到缓冲区
strncpy(fp->_buffer + fp->_end, start, len);  //将数据写到缓冲区了
fp->_end += len;
//_end永远指向的是有效字符的下一个位置
if (fp->_flags & NONE_FLUSH)
{}
else if (fp->_flags & LINE_FLUSH)
{
  if (fp->_end > 0 && fp->_buffer[fp->_end - 1] == '\n')
  {
      //仅仅是写到内核中
      write(fp->_fileno, fp->_buffer, fp->_end);
      fp->_end = 0;
      syncfs(fp->_fileno);
  }
}
else if (fp->_flags & FULL_FLUSH)
{}
}

void my_fclose(MyFILE* fp)
{
//如果在close时,还有数据,那就刷新
my_fflush(fp);
close(fp->_fileno);
free(fp);
}
int main()
{
MyFILE* fp = my_fopen("test.txt", "w");
if (fp == NULL)
{
  printf("my_fopen error\n");
  return 1;
}

const char* s1 = "this is a testAAAA\n";
my_fwrite(fp, s1, strlen(s1));
printf("消息立即刷新!\n");
sleep(3);

const char* s2 = "this is a testBBBB";
my_fwrite(fp, s2, strlen(s2));
//不带'\n',如果继续写,那不会写到文件里,而是放到缓冲区里暂存
printf("写入了一个不满足刷新条件的字符串!\n");
sleep(3);


const char* s3 = "this is a testCCCC";
my_fwrite(fp, s3, strlen(s3));
printf("写入了一个不满足刷新条件的字符串!\n");
sleep(3);


const char* s4 = "end\n";
my_fwrite(fp, s4, strlen(s4));
printf("写入了一个满足刷新条件的字符串!\n");
sleep(3);


const char* s5 = "PPPPPPPPP";
my_fwrite(fp, s5, strlen(s5));
printf("写入了一个不满足刷新条件的字符串!\n");
sleep(1);
my_fflush(fp);
sleep(3);

my_fclose(fp);
}
结果:第一行直接打印,第二行前面两句都是放在缓冲区中,直到第三句将缓冲区打印,第三行放在缓冲区,程序结束打印
this is a testAAAA
this is a testBBBBthis is a testCCCCend
PPPPPPPPP
💎五、文件系统
之前内容是有关内存文件,下面是有关磁盘文件
🏆1.磁盘
相比较于内存,磁盘是一种永久性性可存储介质,目前所有的普通文件都是在磁盘中存储的,磁盘可以当输入设备也可以当输出设备
下面是磁盘物理结构
对磁盘进行读写操作时,一般有以下几个步骤:
- 确定读写信息在磁盘的哪个磁面(Head)。
- 确定读写信息在磁盘的哪个磁柱(Cylinder)。
- 确定读写信息在磁盘的哪个扇区(Sector)。
对磁盘的管理,可以将磁盘想象成磁带,将磁带拉长,转化成为了对数组空间的管理,其中数组的地下标是LBA,而对应在磁盘上的地址为CHS。
比如:逻辑地址快LBA:3234,假设有4面磁盘片面,数据总大小为4000,则每面1000,假设每面有20个磁道。
3234/1000=3 即在第3面,H:3
3234%1000=234
234/20=11即在第11个磁柱,C:11
234%20=14 即在第14个扇区,S:14

磁盘的基本单位是:扇区(常规是512字节)
文件系统访问磁盘的基本单位是:4KB:
1.提高I/O效率
2.不要让软件(OS)设计和硬件(磁盘)具有强相关性,换句话说,就是解耦合!
🏆2.文件系统的管理
文件=内容+属性,Linux采用的是将内容和属性数据分开存储的方案。
内容存储在block中,其大小为4KB,属性存储在inode中,其大小为128B
- Data blocks: 文件内容的保存
- **inode table:**进行inode属性的保存,即保存文件属性
- **Block Bitmap:**位图表征Date blocks的使用情况,一个位是1就是占用,是0就是未占用
- **inode Bitmap:**位图表征inode Table的使用情况
- **Group Descriptor Table 块组描述符:**管理整个分区内一个块的数据,有多少inode,起始的inode编号,有多少个inode被使用,有多少block被使用,还剩多少,你的总group大小是多少
- super block: 存放文件系统本身的结构信息,Data Block和inode的总量、未使用的Data Block和inode的数量、一个Data Block和inode的大小
super block不和Boot Block放在一起:用于备份,防止一个 super block 损坏导致整个分区100GB都不能用,但是会存在冗余

inode table中描述文件属性,数组blocks[15],,[0,11]:直接保存的就是该文件对应的blocks编号,[12,15]:指向一个datablock,保存该文件所使用的其他块的编号,对应一级索引,二级索引…
struct inode{
//文件的所有属性
blocks[15]: //假设大小为15
}
如何理解创建一个空文件?
- 通过遍历inode位图的方式,找到一个空闲的inode。
- 在inode表当中找到对应的inode,并将文件的属性信息填充进inode结构中。
- 将该文件的文件名和inode指针添加到目录文件的数据块中
如何理解删除一个文件?
- 将该文件对应的inode在inode位图当中置为无效。
- 将该文件申请过的数据块在块位图当中置为无效
如何理解目录?
- Linux下一切皆文件,目录可以被看作为文件
- 目录的数据块当中存储的就是该目录下的文件名和对应文件的inode映射
- 本级目录的indoe存放在上级目录中
💎六、软硬链接
回顾文件属性
硬链接数:本质就是改文件inode属性中的一个计数器,就是一个count,作用:标识有几个文件名和我的inode建立了映射关系。

🏆1.软链接
软链接,相当于linux下的快捷方式,链接的源文件被删除后,软链接不能运行
//链接在d2路径下main.c,快捷方式叫main.c.sotf1
ln -s ./d1/d2/main.c main.c.soft1
//链接在当前路径下main.c,快捷方式叫main.c.sotf2
ln -s main.c main.c.soft2
取消软硬链接链接
unlink main.c.soft1
unlink main.c.soft2
🏆2.硬链接
硬链接,在Linux指定的目录下,给指定的文件新增文件名,并增加一个这个新文件名与inode编号的映射关系。
当硬链接的源文件被删除后,硬链接文件仍能正常执行,只是文件的链接数减少了一个,链接就是让多个不在或者同在一个目录下的文件名,同时能够修改同一个文件,其中一个修改后,所有与其有硬链接的文件都一起修改了
//在当前目录下给my.txt硬链接成my.txt.hard
ln my.txt my.txt.hard
//注意硬链接数变为2
-rw-r--r-- 2 Jungle root    0 11月  1 17:00 my.txt
-rw-r--r-- 2 Jungle root    0 11月  1 17:00 my.txt.hard
为什么刚刚创建的目录的硬链接数是2?普通文件硬链接数默认是1?
- 创建普通文件硬链接数默认是1:因为普通文件的文件名本身就和自己的inode具有映射关系,而且只有这一个映射关系
- 创建目录的硬链接数默认是2:首先目录mydir目录名本身就和自己的inode具有映射关系,第二 进入目录后 . 也是和目录具有映射关系的,(默认会有".“和”…“两个文件,”.“相当于本级目录,”…"相当于上级目录)
为什么在本级目录中创建下级目录,本级目录硬链接数会由2->3呢?
因为下级的 … 这个文件指向了上级目录,所以本级又多了一个引用,所以硬链接数会加1
🏆3.软硬链接区别
- 软链接是一个独立的文件,有独立的inode,而硬链接没有独立的inode。
- 软链接相当于快捷方式,硬链接本质没有创建文件,只是建立了一个文件名和已有的inode的映射关系,并写入当前目录
🏆4.三个时间
[Jungle@VM-20-8-centos:~/lesson23]$ stat makefile
文件:"makefile"
大小:0               块:0          IO 块:4096   普通空文件
设备:fd01h/64769d      Inode:1189021     硬链接:1
权限:(0644/-rw-r--r--)  Uid:( 1001/  Jungle)   Gid:(    0/    root)
最近访问:2022-11-01 14:23:48.266586950 +0800
最近更改:2022-11-01 14:23:48.109585730 +0800
最近改动:2022-11-01 14:23:48.109585730 +0800
创建时间:-
stat 文件名:查看对应文件的信息
- Access: 文件最后被访问的时间。
- Modify: 文件内容最后的修改时间。
- Change: 文件属性最后的修改时间。


 3066
3066


 被折叠的 条评论
为什么被折叠?
被折叠的 条评论
为什么被折叠?
 到【灌水乐园】发言


