


简述
一个应用程序为了适应不同场合、不同人的偏好,常常需要在程序的运行过程中能够灵活地改变控件的排布方式。
动态布局介绍了如何在程序运行的过程中改变控件的布局,控件的排布方式依赖于程序运行过程中的设置。
实现
下面用一个小例子来介绍这种效果的实现方式
效果
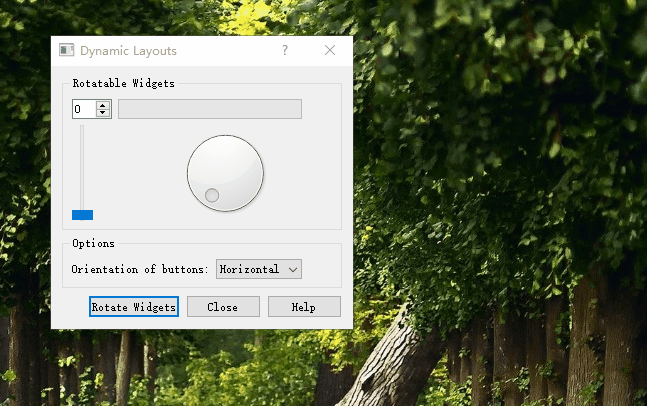
通过方向选择按钮实现按钮面板的垂直与水平排布。
通过点击RotateWidgets按钮来实现Rotatable Widgets内部控件的旋转排布。
源码
dialog.h
#ifndef DIALOG_H
#define DIALOG_H

#include <QDialog>
#include <QQueue>

class QComboBox;
class QDialogButtonBox;
class QGridLayout;
class QGroupBox;
class QLabel;
class QPushButton;

class Dialog : public QDialog
{
    Q_OBJECT

public:
    Dialog(QWidget *parent = 0);

private slots:
    void buttonsOrientationChanged(int index);
    void rotateWidgets();
    void help();

private:
    void createRotatableGroupBox();
    void createOptionsGroupBox();
    void createButtonBox();

    QGroupBox *rotatableGroupBox;
    QQueue<QWidget *> rotatableWidgets;

    QGroupBox *optionsGroupBox;
    QLabel *buttonsOrientationLabel;
    QComboBox *buttonsOrientationComboBox;

    QDialogButtonBox *buttonBox;
    QPushButton *closeButton;
    QPushButton *helpButton;
    QPushButton *rotateWidgetsButton;

    QGridLayout *mainLayout;
    QGridLayout *rotatableLayout;
    QGridLayout *optionsLayout;
};

#endif // DIALOG_H
dialog.cpp
#include <QtWidgets>

#include "dialog.h"

Dialog::Dialog(QWidget *parent)
    : QDialog(parent)
{
    createRotatableGroupBox();
    createOptionsGroupBox();
    createButtonBox();

    mainLayout = new QGridLayout;
    mainLayout->addWidget(rotatableGroupBox, 0, 0);
    mainLayout->addWidget(optionsGroupBox, 1, 0);
    mainLayout->addWidget(buttonBox, 2, 0);
    setLayout(mainLayout);

    mainLayout->setSizeConstraint(QLayout::SetMinimumSize);

    setWindowTitle(tr("Dynamic Layouts"));
}

void Dialog::buttonsOrientationChanged(int index)
{
    mainLayout->setSizeConstraint(QLayout::SetNoConstraint);
    setMinimumSize(0, 0);

    Qt::Orientation orientation = Qt::Orientation(
            buttonsOrientationComboBox->itemData(index).toInt());

    if (orientation == buttonBox->orientation())
        return;

    mainLayout->removeWidget(buttonBox);

    int spacing = mainLayout->spacing();

    QSize oldSizeHint = buttonBox->sizeHint() + QSize(spacing, spacing);
    buttonBox->setOrientation(orientation);
    QSize newSizeHint = buttonBox->sizeHint() + QSize(spacing, spacing);

    if (orientation == Qt::Horizontal) {
        mainLayout->addWidget(buttonBox, 2, 0);
        resize(size() + QSize(-oldSizeHint.width(), newSizeHint.height()));
    } else {
        mainLayout->addWidget(buttonBox, 0, 3, 2, 1);
        resize(size() + QSize(newSizeHint.width(), -oldSizeHint.height()));
    }

    mainLayout->setSizeConstraint(QLayout::SetDefaultConstraint);
}

void Dialog::rotateWidgets()
{
    Q_ASSERT(rotatableWidgets.count() % 2 == 0);

    foreach (QWidget *widget, rotatableWidgets)
        rotatableLayout->removeWidget(widget);

    rotatableWidgets.enqueue(rotatableWidgets.dequeue());

    const int n = rotatableWidgets.count();
    for (int i = 0; i < n / 2; ++i) {
        rotatableLayout->addWidget(rotatableWidgets[n - i - 1], 0, i);
        rotatableLayout->addWidget(rotatableWidgets[i], 1, i);
    }
}

void Dialog::help()
{
    QMessageBox::information(this, tr("Dynamic Layouts Help"),
                               tr("This example shows how to change layouts "
                                  "dynamically."));
}

void Dialog::createRotatableGroupBox()
{
    rotatableGroupBox = new QGroupBox(tr("Rotatable Widgets"));

    rotatableWidgets.enqueue(new QSpinBox);
    rotatableWidgets.enqueue(new QSlider);
    rotatableWidgets.enqueue(new QDial);
    rotatableWidgets.enqueue(new QProgressBar);

    int n = rotatableWidgets.count();
    for (int i = 0; i < n; ++i) {
        connect(rotatableWidgets[i], SIGNAL(valueChanged(int)),
                rotatableWidgets[(i + 1) % n], SLOT(setValue(int)));
    }

    rotatableLayout = new QGridLayout;
    rotatableGroupBox->setLayout(rotatableLayout);

    rotateWidgets();
}

void Dialog::createOptionsGroupBox()
{
    optionsGroupBox = new QGroupBox(tr("Options"));

    buttonsOrientationLabel = new QLabel(tr("Orientation of buttons:"));

    buttonsOrientationComboBox = new QComboBox;
    buttonsOrientationComboBox->addItem(tr("Horizontal"), Qt::Horizontal);
    buttonsOrientationComboBox->addItem(tr("Vertical"), Qt::Vertical);

    connect(buttonsOrientationComboBox,
            QOverload<int>::of(&QComboBox::currentIndexChanged),
            this,
            &Dialog::buttonsOrientationChanged);

    optionsLayout = new QGridLayout;
    optionsLayout->addWidget(buttonsOrientationLabel, 0, 0);
    optionsLayout->addWidget(buttonsOrientationComboBox, 0, 1);
    optionsLayout->setColumnStretch(2, 1);
    optionsGroupBox->setLayout(optionsLayout);
}

void Dialog::createButtonBox()
{
    buttonBox = new QDialogButtonBox;

    closeButton = buttonBox->addButton(QDialogButtonBox::Close);
    helpButton = buttonBox->addButton(QDialogButtonBox::Help);
    rotateWidgetsButton = buttonBox->addButton(tr("Rotate &Widgets"),
                                               QDialogButtonBox::ActionRole);

    connect(rotateWidgetsButton, &QPushButton::clicked, this, &Dialog::rotateWidgets);
    connect(closeButton, &QPushButton::clicked, this, &Dialog::close);
    connect(helpButton, &QPushButton::clicked, this, &Dialog::help);
}
引用
[1] Qt助手


 3159
3159

 被折叠的 条评论
为什么被折叠?
被折叠的 条评论
为什么被折叠?
 到【灌水乐园】发言


