


 本文提供了一套详细的Zabbix监控系统的升级方案,包括不同版本的Zabbix Server、Proxy及Agent的安装配置流程,覆盖从数据库搭建到前端配置的全过程。
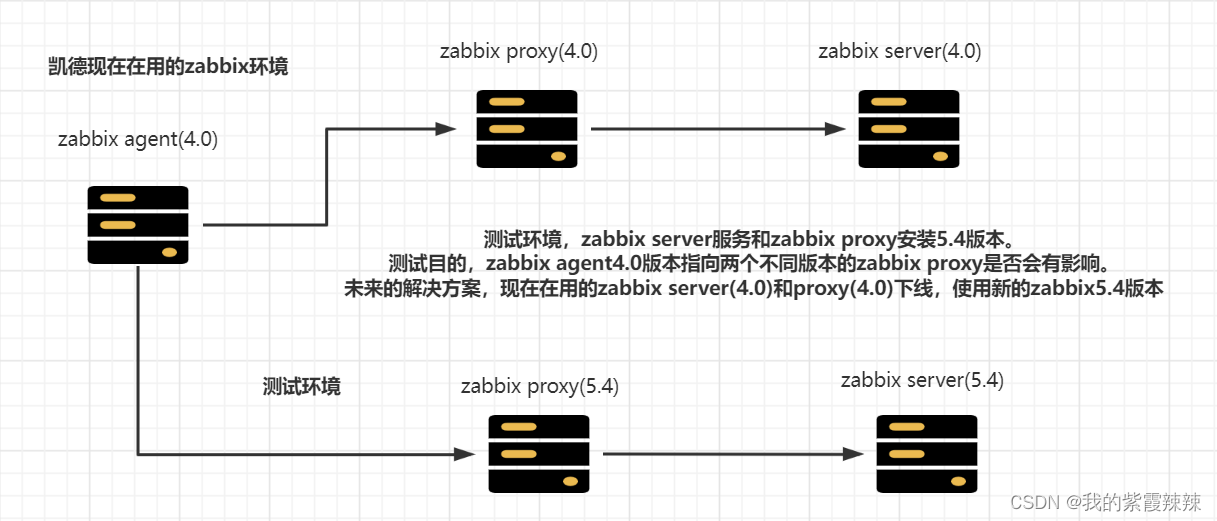
注:此方案会导致zabbix的web页面会有一些监控项不兼容现象,只适用于项目平缓过度阶段,后期还是建议agent和server的版本一致。
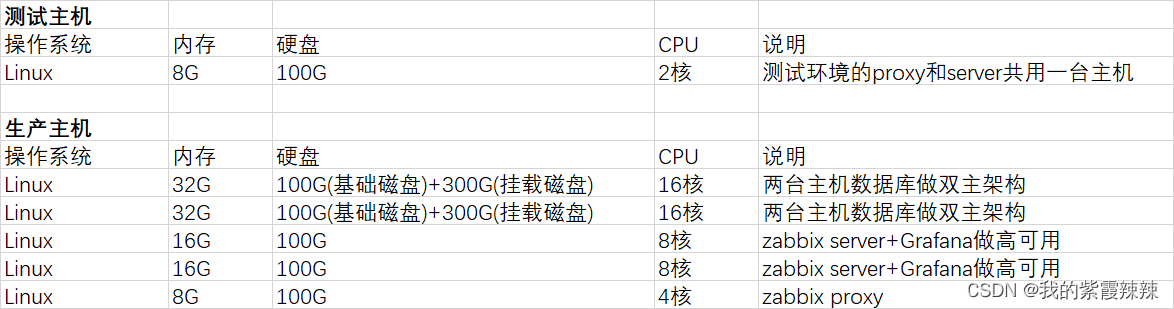
Zabbix升级方案物理资源
Zabbix升级方案
注意:zabbix server与zabbix proxy版本必须一致,agent可以是低版本。
基础环境配置
| 主机名 | IP | 说明 |
|---|---|---|
| zabbix01 | 192.168.15.201 | zabbix agent 4.0版本 |
| zabbix02 | 192.168.15.202 | zabbix server 4.0版本 |
| zabbix05 | 192.168.15.205 | zabbix proxy 4.0版本 |
| zabbix 03 | 192.168.15.203 | zabbix server 5.4版本 |
| zabbix 04 | 192.168.15.204 | zabbix proxy 5.4版本 |
所有主机的都配置hosts解析
vim /etc/hosts
192.168.15.201 zabbix01
192.168.15.202 zabbix02
192.168.15.205 zabbix05
192.168.15.203 zabbix03
192.168.15.204 zabbix04
安装zabbix server4.0版本
1. 获取zabbix官方源
rpm -Uvh https://mirrors.aliyun.com/zabbix/zabbix/4.0/rhel/7/x86_64/zabbix-release-4.0-2.el7.noarch.rpm

2. zabbix默认的源默认是在国外的源,将国外的zabbix源地址替换成阿里云的地址
sed -i 's#http://repo.zabbix.com#https://mirrors.aliyun.com/zabbix#' /etc/yum.repos.d/zabbix.repo

3. 清空缓存
yum clean all
yum makecache

4. 安装zabbix server和agent
yum -y install zabbix-server-mysql zabbix-agent

5. 删除系统默认自带的php5.4版本
rpm -qa |grep php
yum -y remove php* &>/dev/null
rpm -qa |grep php

5.1 更改yum源
rpm -Uvh https://dl.fedoraproject.org/pub/epel/epel-release-latest-7.noarch.rpm
rpm -Uvh https://mirror.webtatic.com/yum/el7/webtatic-release.rpm

5.2 安装php7.2版本和各种扩展
yum -y install php72w php72w-cli php72w-common php72w-devel php72w-embedded php72w-fpm php72w-gd php72w-mbstring php72w-mysqlnd php72w-opcache php72w-pdo php72w-xml

6. 修改zabbix-frontend前端源,开启enabled参数
vim /etc/yum.repos.d/zabbix.repo
[zabbix]
name=Zabbix Official Repository - $basearch
baseurl=https://mirrors.aliyun.com/zabbix/zabbix/4.0/rhel/7/$basearch/
enabled=1	# 修改这里
gpgcheck=1
gpgkey=file:///etc/pki/rpm-gpg/RPM-GPG-KEY-ZABBIX-A14FE59

7. 下载zabbix前端环境
yum install zabbix-web-mysql zabbix-apache-conf -y

8. 在下zabbix所需的数据库,直接用centos自带的mariadb
yum install mariadb-server -y

9. 启动数据库并设置开机自启
systemctl enable --now mariadb

10. 初始化数据库,设置root密码
mysql_secure_installation

# 输入当前root密码(直接回车)
# Enter current password for root (enter for none):

# 设置root密码
# Set root password? [Y/n] y
# New password:
# Re-enter new password:

# 是否移除匿名用户
# Remove anonymous users? [Y/n] y

# 是否禁止root远程登陆
# Disallow root login remotely? [Y/n] n

# 是否移除测试数据库
# Remove test database and access to it? [Y/n] y

# 是否刷新授权表
# Reload privilege tables now? [Y/n] y

11. 使用root用户登陆mariadb,建立zabbix数据库,这里的编码设置,非常重要,否则zabbix无法安装
mysql -uroot -p123
# 创建一个zabbix库,并且设置zabbix的字符编码(utf-8)
create database zabbix character set utf8 collate utf8_bin;
# 创建一个zabbix用户
create user zabbix@localhost identified by '123';
# zabbix用户在zabbix库中的所有表,授予所有的权限
grant all privileges on zabbix.* to zabbix@localhost;
# 刷新授权表
flush privileges;
# 退出
exit

12. 使用zabbix-mysql命令,导入数据库信息
# mysql -u用户名 -p密码 库名
zcat /usr/share/doc/zabbix-server-mysql*/create.sql.gz | mysql -uzabbix -p zabbix

13. 修改zabbix server配置文件,修改数据库的密码
vim /etc/zabbix/zabbix_server.conf
...
DBPassword=123

14. 修改zabbix的php配置文件中的时区
vim /etc/httpd/conf.d/zabbix.conf
...
php_value[date.timezone] = Asia/Shanghai

15. 修改php配置文件
vim /etc/php.ini
...
post_max_size = 500M
max_execution_time = 500
max_input_time = 500
date.timezone = Asia/Shanghai

16. 启动zabbix服务器,设置开机自启
systemctl restart zabbix-server zabbix-agent httpd php-fpm
systemctl enable zabbix-server zabbix-agent httpd php-fpm
安装zabbix proxy 4.0版本
1. 获取zabbix官方源
rpm -Uvh https://mirrors.aliyun.com/zabbix/zabbix/4.0/rhel/7/x86_64/zabbix-release-4.0-2.el7.noarch.rpm

2. zabbix默认的源默认是在国外的源,将国外的zabbix源地址替换成阿里云的地址
sed -i 's#http://repo.zabbix.com#https://mirrors.aliyun.com/zabbix#' /etc/yum.repos.d/zabbix.repo

3. 清空缓存
yum clean all
yum makecache

4. 安装proxy 和 数据库
yum -y install zabbix-proxy-mysql zabbix-get mariadb-server mariadb

5. 启动数据库,配置数据库用户,存储zabbix-agent2信息数据
systemctl start mariadb
mysql -uroot -p
create database zabbix_proxy character set utf8 collate utf8_bin;
grant all privileges on zabbix_proxy.* to zabbix@"localhost" identified by "zabbix";
flush privileges;
exit

6. 导入zabbix数据库信息
rpm -ql zabbix-proxy-mysql		# 查询sql文件在哪
zcat /usr/share/doc/zabbix-proxy-mysql-4.0.37/schema.sql.gz | mysql -uzabbix -pzabbix zabbix_proxy

7. 修改zabbix-proxy配置文件,链接数据库的信息
sed -i.ori "162a DBPassword=zabbix" /etc/zabbix/zabbix_proxy.conf
sed -i "s#Server=127.0.0.1#Server=192.168.15.202#" /etc/zabbix/zabbix_proxy.conf		# 服务端ip
sed -i "s#Hostname=Zabbix proxy#Hostname=zabbix05#" /etc/zabbix/zabbix_proxy.conf		# 代理服务器的主机名

8. 检查zabbix-proxy的配置文件信息
grep "^[a-Z]" /etc/zabbix/zabbix_proxy.conf
# Server=192.168.15.202
# Hostname=zabbix05
# LogFile=/var/log/zabbix/zabbix_proxy.log
# LogFileSize=0
# PidFile=/var/run/zabbix/zabbix_proxy.pid
# SocketDir=/var/run/zabbix
# DBPassword=zabbix
# DBName=zabbix_proxy
# DBUser=zabbix
# SNMPTrapperFile=/var/log/snmptrap/snmptrap.log
# Timeout=4
# ExternalScripts=/usr/lib/zabbix/externalscripts
# LogSlowQueries=3000

9. 启动代理服务
systemctl restart zabbix-proxy

安装zabbix agentd4.0版本
1. 获取zabbix官方源
rpm -Uvh https://mirrors.aliyun.com/zabbix/zabbix/4.0/rhel/7/x86_64/zabbix-release-4.0-2.el7.noarch.rpm

2. zabbix默认的源默认是在国外的源,将国外的zabbix源地址替换成阿里云的地址
sed -i 's#http://repo.zabbix.com#https://mirrors.aliyun.com/zabbix#' /etc/yum.repos.d/zabbix.repo

3. 清空缓存
yum clean all
yum makecache

4. 安装agent2
yum -y install zabbix-agent

5. 查看配置文件和启动命令
# 配置文件
ll  /etc/zabbix/zabbix_agentd.conf
# 启动命令
ll /usr/sbin/zabbix_agentd

6. 启动agents并设置开启自启
systemctl enable --now zabbix-agent.service

7. 检查agents的端口号
netstat -lntp | grep agentd
tcp        0      0 0.0.0.0:10050           0.0.0.0:*               LISTEN      17507/zabbix_agentd
tcp6       0      0 :::10050                :::*                    LISTEN      17507/zabbix_agentd

8. 查看systemctl管理的单元文件
cat /lib/systemd/system/zabbix-agent.service

9. 修改agents配置文件,修改如下,添加zabbix-server主机ip和主机名
vim /etc/zabbix/zabbix_agentd.conf
...
Server=192.168.15.205			# 改成proxy地址
ServerActive=192.168.15.205		# 改成proxy地址
Hostname=zabbix01			# 修改成当前客户端的主机名

10. 查看agents配置文件修改后的内容
grep -Ev "^#|^$" /etc/zabbix/zabbix_agentd.conf
PidFile=/var/run/zabbix/zabbix_agentd.pid
LogFile=/var/log/zabbix/zabbix_agentd.log
LogFileSize=0
Server=192.168.15.205
ServerActive=192.168.15.205
Hostname=zabbix01
Include=/etc/zabbix/zabbix_agentd.d/*.conf

11. 重启agent
systemctl restart zabbix-agent.service

安装zabbix server5.4版本
Mysql数据库组件安装
# 数据库客户端程序
wget https://downloads.percona.com/downloads/Percona-Server-LATEST/Percona-Server-8.0.23-14/binary/redhat/7/x86_64/percona-server-client-8.0.23-14.1.el7.x86_64.rpm

# 数据库主程序
wget https://downloads.percona.com/downloads/Percona-Server-LATEST/Percona-Server-8.0.23-14/binary/redhat/7/x86_64/percona-server-server-8.0.23-14.1.el7.x86_64.rpm

# 数据库主程序依赖
wget https://downloads.percona.com/downloads/Percona-Server-LATEST/Percona-Server-8.0.23-14/binary/redhat/7/x86_64/percona-server-shared-8.0.23-14.1.el7.x86_64.rpm

# 数据库主程序依赖
wget https://downloads.percona.com/downloads/Percona-Server-LATEST/Percona-Server-8.0.23-14/binary/redhat/7/x86_64/percona-server-shared-compat-8.0.23-14.1.el7.x86_64.rpm

# MySQL驱动依赖程序包
wget https://downloads.percona.com/downloads/Percona-Server-LATEST/Percona-Server-8.0.23-14/binary/redhat/7/x86_64/percona-server-devel-8.0.23-14.1.el7.x86_64.rpm

# 安装数据库
yum install -y *.rpm
# 数据库初始化
mysqld --defaults-file=/etc/my.cnf --datadir=/data --user=mysql --initialize-insecure
systemctl start mysqld

# 查看数据库密码
cat /var/log/mysqld.log | grep password

# 登陆数据库
mysql -uroot -p(密码)

# 重新设置数据库管理员密码
ALTER USER 'root'@'localhost' IDENTIFIED BY 'Na123***' PASSWORD EXPIRE NEVER;

# 创建zabbix服务相关数据
create user zabbix@"%" identified by 'Na123***';

create database zabbix character set utf8 collate utf8_bin;

grant all privileges on zabbix.* to 'zabbix'@'%';

# 刷新授权表
flush privileges;
exit;

# 将mysqld设置为开机自启
systemctl enable mysqld
Zabbix Server安装
# zabbix功能依赖安装
yum install -y libxml2-devel net-snmp-devel libssh2-devel OpenIPMI-devel libevent-devel openldap-devel libcurl-devel gcc gcc-c++ unixODBC-devel

# 下载zabbix5.4.0安装包
wget https://cdn.zabbix.com/zabbix/sources/stable/5.4/zabbix-5.4.0.tar.gz

# 解压
tar -xf zabbix-5.4.0.tar.gz

# 编译安装,激活server和agent所有需要的功能
cd zabbix-5.4.0/
./configure --prefix=/usr/local/zabbix --enable-server --enable-agent --with-net-snmp --with-libcurl --with-libxml2 --with-mysql --with-openipmi --with-ldap --with-ssh2 --with-unixodbc --with-libenvent

# 编译安装
make install
修改zabbix配置文件
# 修改本机的agentd配置文件
vim /usr/local/zabbix/etc/zabbix_agentd.conf
LogFile=/tmp/zabbix_agentd.log
Server=127.0.0.1
ServerActive=127.0.0.1
Hostname=Zabbix server

# 修改本机的zabbix_server配置文件
vim /usr/local/zabbix/etc/zabbix_server.conf
LogFile=/tmp/zabbix_server.log
DBName=zabbix
DBUser=zabbix
DBPassword=Na123***
Timeout=4
LogSlowQueries=3000
StatsAllowedIP=0.0.0.0

# 将zabbix的组件数据导入Mysql数据库
mysql -uzabbix -p"Na123***" zabbix < database/mysql/schema.sql
mysql -uzabbix -p"Na123***" zabbix < database/mysql/images.sql
mysql -uzabbix -p"Na123***" zabbix < database/mysql/data.sql
添加zabbix-server的systemctl管理
# 服务启动脚本
vim /usr/lib/systemd/system/zabbix-server.service
[Unit]
Description=Zabbix Server
After=syslog.target
After=network.target
After=mysql.service
After=mysqld.service
After=mariadb.service
After=postgresql.service

[Service]
Environment="CONFFILE=/usr/local/zabbix/etc/zabbix_server.conf"
Type=forking
Restart=on-failure
PIDFile=/tmp/zabbix_server.pid
KillMode=control-group
ExecStart=/usr/local/zabbix/sbin/zabbix_server -c $CONFFILE
ExecStop=/bin/kill -SIGTERM $MAINPID
RestartSec=10s
TimeoutSec=0

[Install]
WantedBy=multi-user.target
添加zabbix-server的systemctl管理
# Agent启动脚本
vim /usr/lib/systemd/system/zabbix-agent.service
[Unit]
Description=Zabbix Agent
After=syslog.target
After=network.target

[Service]
Environment="CONFFILE=/usr/local/zabbix/etc/zabbix_agentd.conf"
Type=forking
Restart=on-failure
PIDFile=/tmp/zabbix_agentd.pid
KillMode=control-group
ExecStart=/usr/local/zabbix/sbin/zabbix_agentd -c $CONFFILE
ExecStop=/bin/kill -SIGTERM $MAINPID
RestartSec=10s
User=zabbix
Group=zabbix

[Install]
WantedBy=multi-user.target
启动zabbix服务
useradd zabbix
systemctl daemon-reload
systemctl enable zabbix-agent
systemctl start zabbix-agent
systemctl enable zabbix-server
systemctl start zabbix-server
PHP安装
# libzip版本要求⼤于0.11
wget http://packages.psychotic.ninja/7/plus/x86_64/RPMS/libzip-devel-0.11.2-6.el7.psychotic.x86_64.rpm

# libzip版本要求⼤于0.11
wget http://packages.psychotic.ninja/7/plus/x86_64/RPMS/libzip-0.11.2-6.el7.psychotic.x86_64.rpm

# 正则依赖包
wget http://mirrors.163.com/centos/7/cloud/x86_64/openstack-queens/Packages/o/oniguruma-6.7.0-1.el7.x86_64.rpm

# 正则依赖包
wget http://mirrors.163.com/centos/7/cloud/x86_64/openstack-queens/Packages/o/oniguruma-devel-6.7.0-1.el7.x86_64.rpm

# 依赖
yum -y install libzip-devel-0.11.2-6.el7.psychotic.x86_64.rpm libzip-0.11.2-6.el7.psychotic.x86_64.rpm oniguruma-6.7.0-1.el7.x86_64.rpm oniguruma-devel-6.7.0-1.el7.x86_64.rpm

# 依赖
yum -y install libxml2-devel openssl-devel libcurl-devel libjpeg-devel libpng-devel freetype-devel php-ldap openldap-devel sqlite-devel libxslt-devel libdap*

# 安装php-7.4.20.tar.gz
wget http://php.net/distributions/php-7.4.20.tar.gz
tar -xf php-7.4.20.tar.gz
cd php-7.4.20
ln -sv /usr/lib64/libldap* /usr/lib
ln -sv /usr/lib64/libdap* /usr/lib

./configure \
--prefix=/usr/local/php \
--with-config-file-path=/usr/local/php \
--with-curl \
--with-freetype \
--enable-gd \
--with-jpeg \
--with-gettext \
--with-kerberos \
--with-libdir=lib64 \
--with-libxml \
--with-mysqli \
--with-ldap \
--with-openssl \
--with-pdo-mysql \
--with-pear \
--enable-sockets \
--with-mhash \
--with-ldap-sasl \
--with-xsl \
--with-zlib \
--enable-fpm \
--enable-bcmath \
--enable-mbregex \
--enable-mbstring \
--enable-opcache \
--enable-pcntl \
--enable-shmop \
--enable-soap \
--enable-sockets \
--enable-sysvsem \
--enable-xml \
--with-zip

vim Makefile
...
EXTRA_LIBS = -lcrypt -lresolv -lcrypt -lrt -lutil -lrt -lm -ldl -lxml2 -lgssapi_krb5 -lkrb5 -lk5crypto -lcom_err -lssl -lcrypto -lsqlite3 -lz -lcurl -lxml2 -lz -lpng15 -ljpeg -lfreetype -lonig -lsqlite3 -lxml2 -lxml2 -lxml2 -lxml2 -lxml2 -lxslt -lz -ldl -lm -lxml2 -lexslt -lxslt -lz -lm -lgcrypt -ldl -lgpg-error -lxml2 -lzip -lz -lz -lssl -lcrypto -lcrypt -ldap_msgfree -llber

make && make install

cp php.ini-production /usr/local/php/php.ini
cp /usr/local/php/etc/php-fpm.conf.default /usr/local/php/etc/php-fpm.conf
cp /usr/local/php/etc/php-fpm.d/www.conf.default /usr/local/php/etc/php-fpm.d/www.conf
修改php配置文件
vim /usr/local/php/php.ini
...
post_max_size = 16M
max_execution_time = 3000
max_input_time = 3000
date.timezone = Asia/Shanghai
memory_limit = 256M
# 安装zabbix之后登陆报错:Error connecting to database: No such file or directory。
# 需要加上php-fpm连接数据库的sock的配置参数后,重启php-fpm和nginx服务。
mysqli.default_socket = /var/lib/mysql/mysql.sock
vim /usr/local/php/etc/php-fpm.d/www.conf
...
pm.max_children = 30
pm.start_servers = 10
pm.min_spare_servers = 10
pm.max_spare_servers = 24
pm.max_requests = 500
添加zabbix-server的systemctl管理
# php启动脚本
vim /usr/lib/systemd/system/php-fpm.service
[Unit]
Description=The PHP FastCGI Process Manager
After=network.target

[Service]
Type=simple
PIDFile=/usr/local/php/var/run/php-fpm.pid
ExecStart=/usr/local/php/sbin/php-fpm --nodaemonize --fpm-config /usr/local/php/etc/php-fpm.conf
ExecReload=/bin/kill -USR2 $MAINPID
PrivateTmp=true

[Install]
WantedBy=multi-user.target
启动php服务
systemctl daemon-reload
systemctl enable php-fpm
systemctl start php-fpm
Nginx安装及初始化
# 下载Nginx安装包
wget http://nginx.org/download/nginx-1.20.1.tar.gz

# 解压
tar -xf nginx-1.20.1.tar.gz

# 下载Nginx依赖包
yum install -y bzip2 pcre-devel zlib-devel

# 编译安装Nginx
cd nginx-1.20.1/

 ./configure --prefix=/usr/local/nginx --with-http_dav_module --with-http_stub_status_module --with-http_addition_module --with-http_sub_module --with-http_ssl_module --with-http_gzip_static_module --with-pcre

make && make install
修改Nginx主配置文件
# Nginx主配置文件模板
vim /usr/local/nginx/conf/nginx.conf
worker_processes 3;
worker_cpu_affinity auto;
error_log /tmp/nginx_error.log warn;
pid logs/nginx.pid;
worker_rlimit_nofile 65535;
events {
 use epoll;
 worker_connections 65535;
}
http {
 include mime.types;
 default_type application/octet-stream;
 access_log off;
 sendfile on;
  server_names_hash_bucket_size 128;
 client_header_buffer_size 32k;
 large_client_header_buffers 4 32k;
 client_max_body_size 50m;
 tcp_nopush on;
 keepalive_timeout 60;
 tcp_nodelay on;
 fastcgi_cache_path /tmp/nginx_cache levels=1:2 keys_zone=cachephp:30m inactive=1d
max_size=2g;
 fastcgi_cache cachephp;
 fastcgi_cache_key "$request_method://$host$request_uri";
 fastcgi_cache_methods GET HEAD;
 fastcgi_ignore_client_abort on;
 fastcgi_connect_timeout 300;
 fastcgi_send_timeout 300;
 fastcgi_read_timeout 300;
 fastcgi_buffer_size 64k;
 fastcgi_buffers 8 128k;
 fastcgi_busy_buffers_size 128k;
 fastcgi_temp_file_write_size 256k;
 fastcgi_cache_valid 200 302 1h;
 fastcgi_cache_valid 301 1d;
 fastcgi_cache_valid any 1m;
 fastcgi_cache_min_uses 1;
 fastcgi_cache_use_stale error timeout invalid_header http_500;
 open_file_cache max=204800 inactive=20s;
 open_file_cache_min_uses 1;
 open_file_cache_valid 30s;
 gzip on;
 gzip_min_length 1k;
 gzip_buffers 4 16k;
 gzip_http_version 1.0;
 gzip_comp_level 2;
 gzip_types text/plain application/x-javascript text/css application/xml;
 gzip_vary on;
 gzip_proxied expired no-cache no-store private auth;
 gzip_disable "MSIE [1-6]\.";
 server_tokens off;
 open_file_cache_errors on;
 add_header X-Cache "$upstream_cache_status";
 fastcgi_temp_path /tmp/nginx_tmp;
 fastcgi_pass_header Set-Cookie;
 client_body_temp_path /tmp/client_body_temp;
 uwsgi_temp_path /tmp/uwsgi_temp;
 scgi_temp_path /tmp/scgi_temp;
 proxy_temp_path /tmp/proxy_temp;
 server {
 listen 8080;
 server_name localhost;
 location / {
 root /usr/local/nginx/html;
 index index.php index.html;
 }
 location ~ \.php$ {
 fastcgi_pass 127.0.0.1:9000;
 fastcgi_index index.php;
 fastcgi_param SCRIPT_FILENAME /usr/local/nginx/html$fastcgi_script_name;
 include fastcgi_params;
 }
 }
 server {
 listen 80;
 server_name 192.168.15.203;
 location / {
 root /usr/local/nginx/html;
 index index.php index.html;
 proxy_redirect off;
 proxy_set_header Host $host;
 proxy_set_header X-Real-IP $remote_addr;
 proxy_set_header X-Forwarded-For $proxy_add_x_forwarded_for;
 proxy_pass http://127.0.0.1:3000/;
 }
 location /admin/ {
 index index.php index.html;
 proxy_redirect off;
 proxy_set_header Host $host;
 proxy_set_header X-Real-IP $remote_addr;
 proxy_set_header X-Forwarded-For $proxy_add_x_forwarded_for;
 proxy_pass http://127.0.0.1:8080/;
 }
 access_log off;
 }
}
# 检查nginx配置文件是否正常
/usr/local/nginx/sbin/nginx -t
nginx: the configuration file /usr/local/nginx/conf/nginx.conf syntax is ok
nginx: configuration file /usr/local/nginx/conf/nginx.conf test is successful
添加nginx的systemctl管理
# Nginx启动脚本
vim /usr/lib/systemd/system/nginx.service
[Unit]
Description=The NGINX HTTP and reverse proxy server
After=syslog.target network.target remote-fs.target nss-lookup.target

[Service]
Type=forking
PIDFile=/usr/local/nginx/logs/nginx.pid
ExecStartPre=/usr/local/nginx/sbin/nginx -t
ExecStart=/usr/local/nginx/sbin/nginx
ExecReload=/usr/local/nginx/sbin/nginx -s reload
ExecStop=/usr/bin/kill -s QUIT $MAINPID
PrivateTmp=true

[Install]
WantedBy=multi-user.target
启动nginx服务
systemctl daemon-reload
systemctl restart nginx
systemctl enable nginx
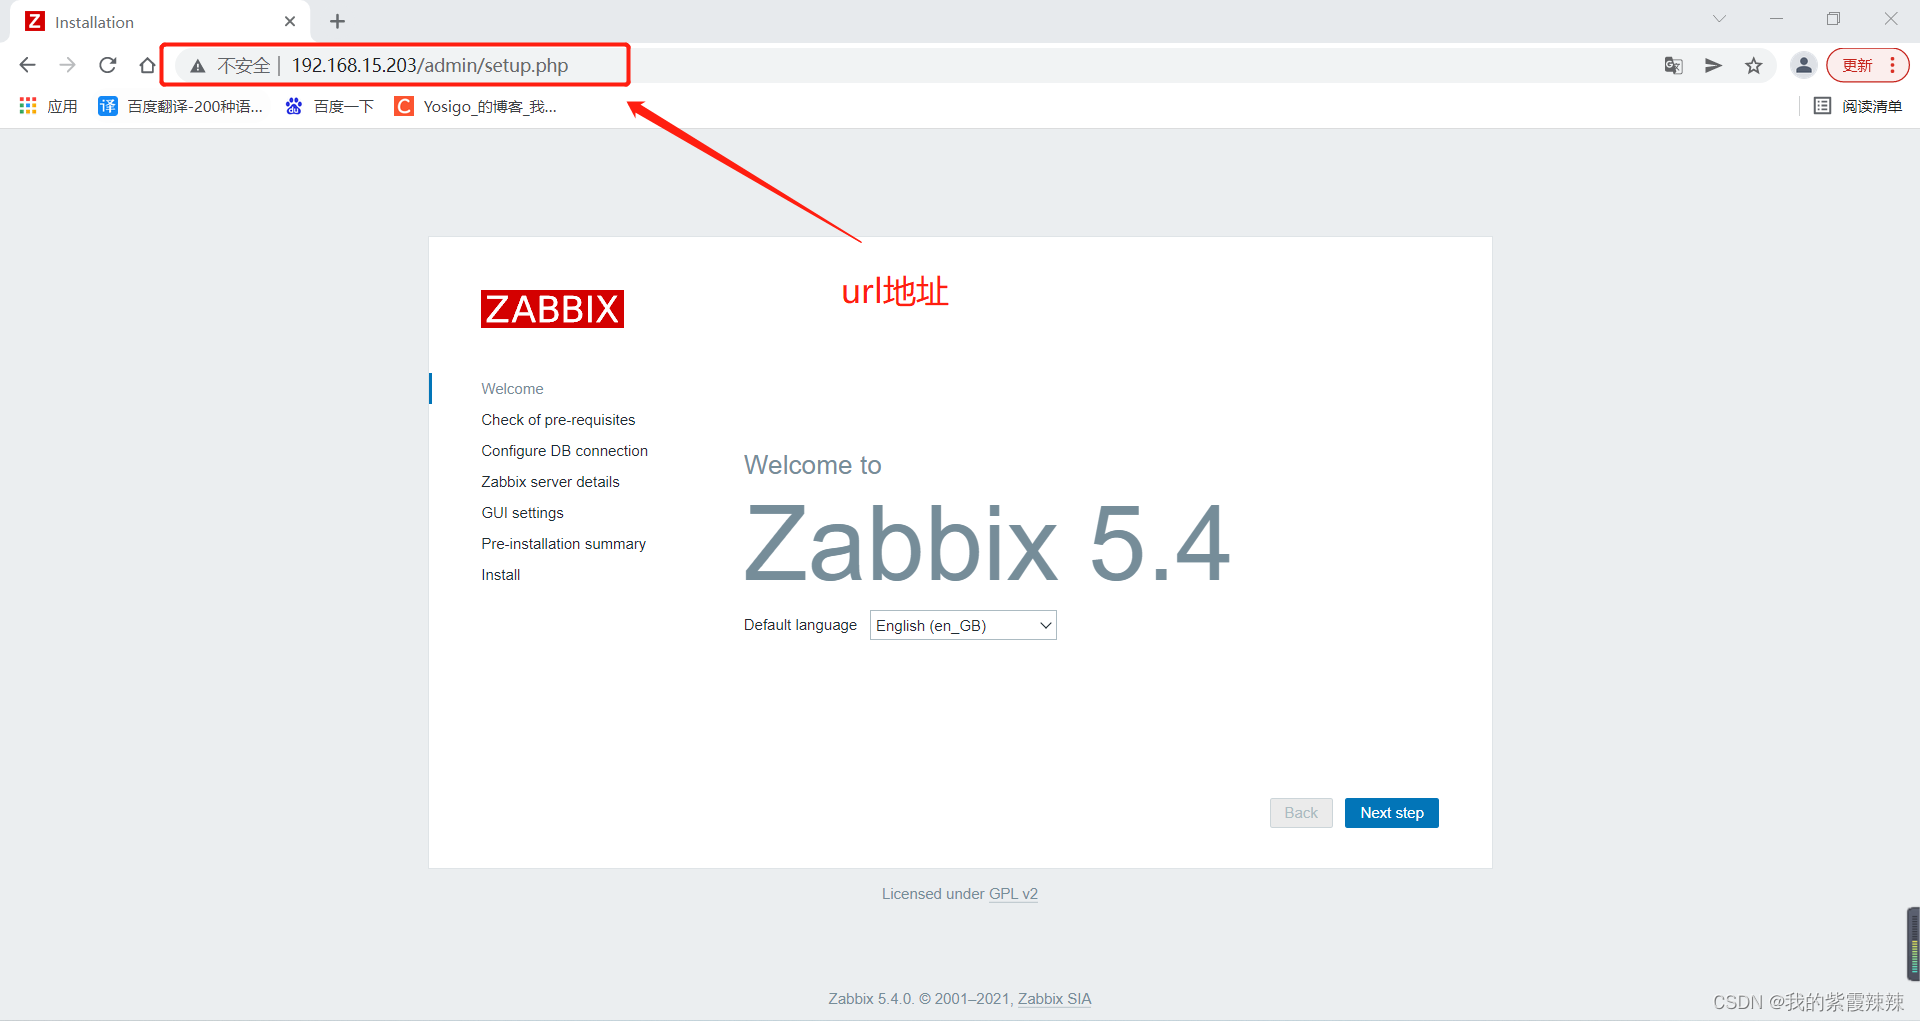
前端文件处理
cd zabbix-5.4.0/
\cp -r ui/* /usr/local/nginx/html/
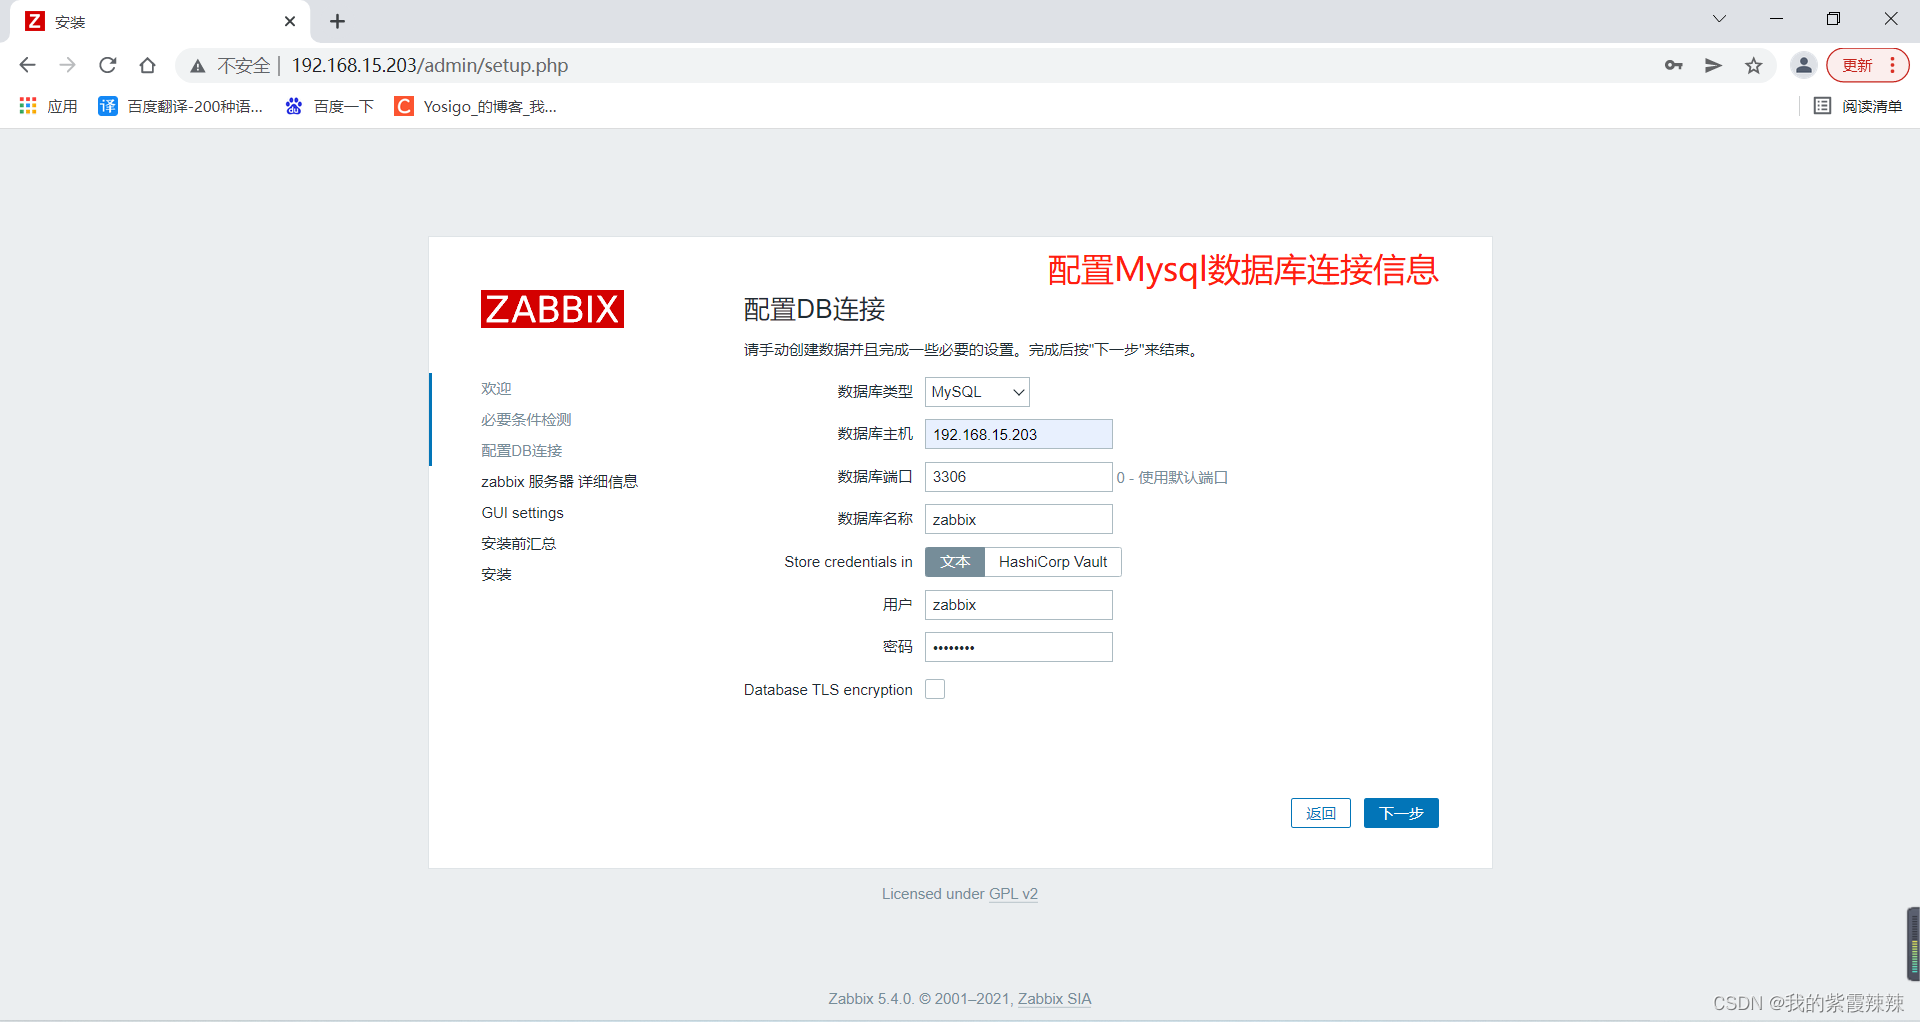
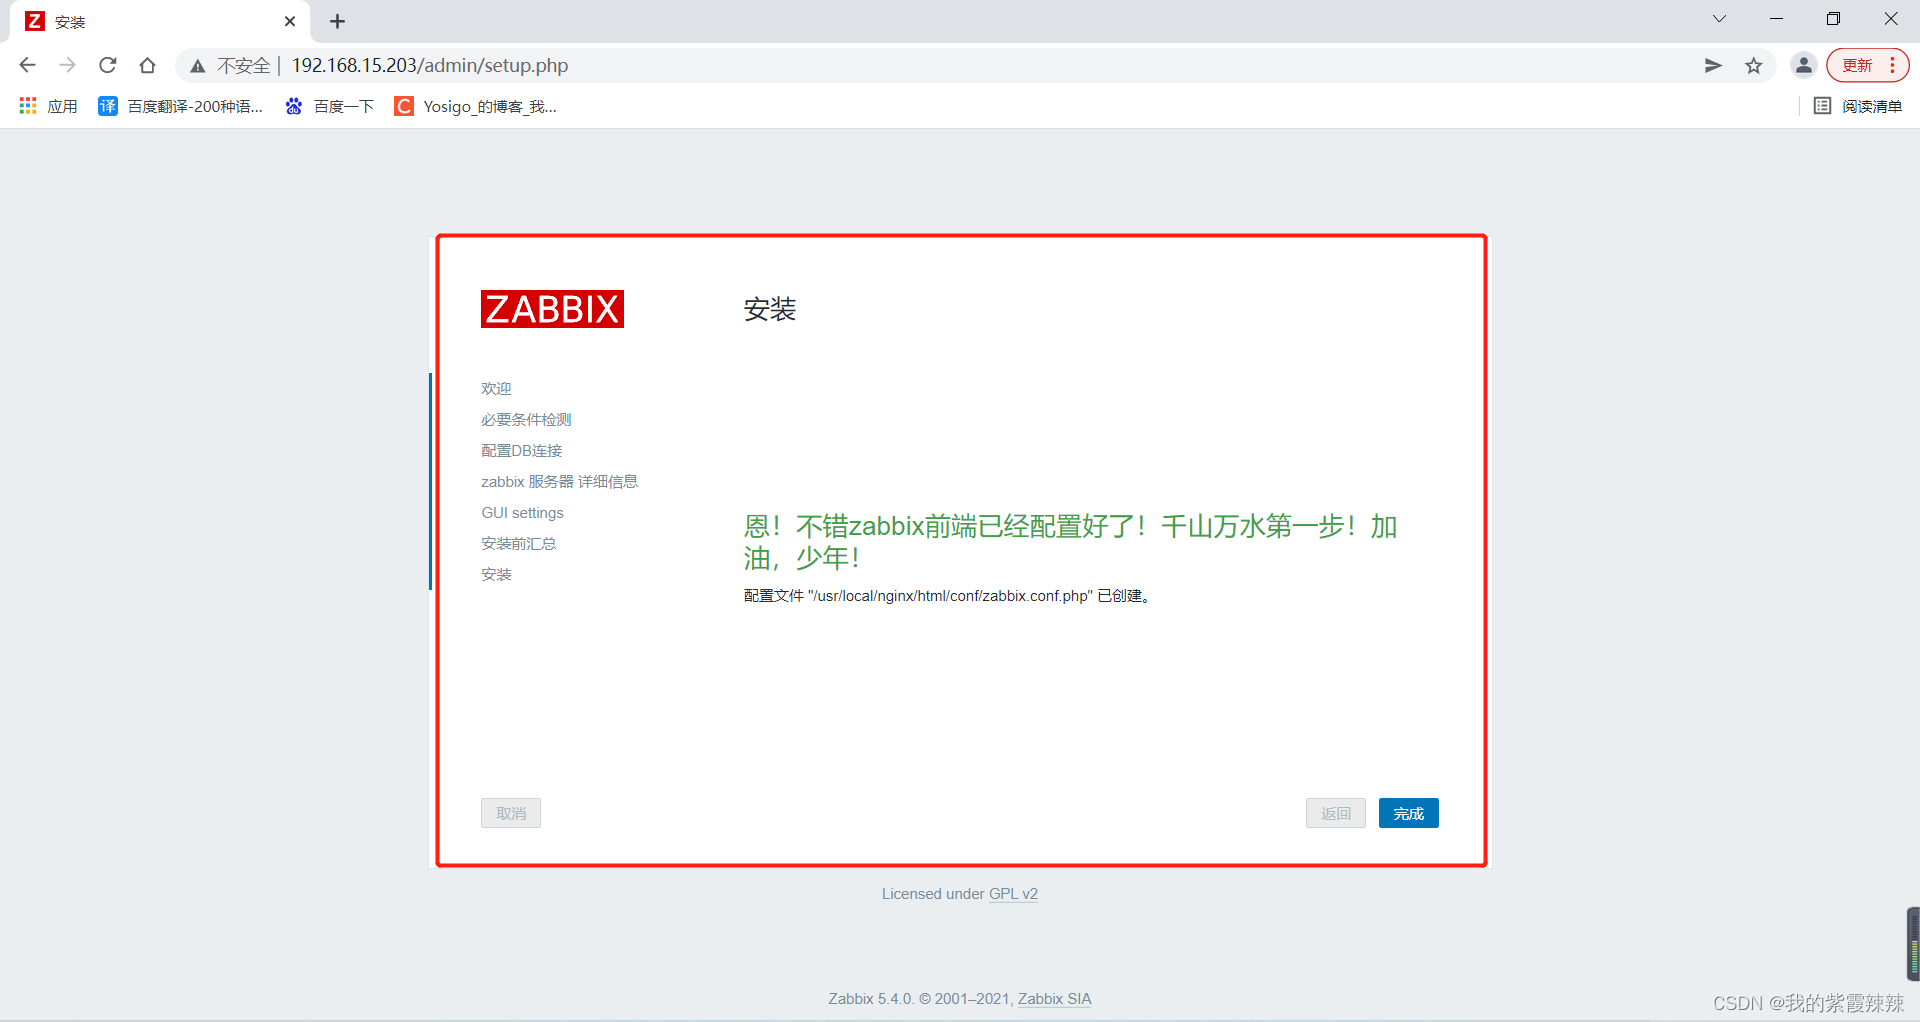
配置zabbix连接数据的配置文件
cp /usr/local/nginx/html/conf/zabbix.conf.php.example /usr/local/nginx/html/conf/zabbix.conf.php

vim /usr/local/nginx/html/conf/zabbix.conf.php
...
$DB['TYPE']                             = 'MYSQL';
$DB['SERVER']                   = 'localhost';
$DB['PORT']                             = '3306';
$DB['DATABASE']                 = 'zabbix';
$DB['USER']                             = 'zabbix';
$DB['PASSWORD']                 = 'Na123***';

安装zabbix proxy5.4版本
安装mariadb数据库
# 数据库安装和初始化
yum install -y mariadb-server

# 修改数据库配置文件
vim /etc/my.cnf
[mysqld]
bind-address = 0.0.0.0
datadir = /data/
port = 3306
character-set-server = utf8
pid-file = /data/mysql.pid
socket = /data/mysql.sock
skip-name-resolve =1
skip-external-locking = 1
log-error = /data/mysqld.log
max_connections = 10000
back_log = 600
table-open-cache = 4096
max_allowed_packet = 500M
max-heap-table-size = 128M
key_buffer_size =2048M
sort-buffer-size = 32M
join-buffer-size = 16M
net_buffer_length = 8K
read_buffer_size = 32M
read_rnd_buffer_size = 512K
myisam_sort_buffer_size = 8M
thread-cache-size = 64
query-cache-size = 4096M
query-cache-type = 1
query-cache-limit = 4M
tmp-table-size = 128M
log_warnings= 1
default-storage-engine = InnoDB
innodb=FORCE
innodb_file_per_table = 1
innodb_open_files = 2048
innodb_buffer_pool_size= 4G
innodb_buffer_pool_instances= 8
innodb_thread_concurrency = 16
innodb_flush_log_at_trx_commit = 2
innodb_flush_method = O_DIRECT
innodb_max_dirty_pages_pct = 90
innodb_io_capacity =2000
server-id = 1

[client]
socket = /data/mysql.sock
port = 3306
default-character-set = utf8

# 创建数据目录并修改权限
mkdir /data
chown mysql:mysql /data

# 添加限制是每个进程可以打开的文件数的限制
sed -i '/TimeoutSec=300/a\LimitNOFILE=10000' /usr/lib/systemd/system/mariadb.service

vim /usr/lib/systemd/system/mysqld.service
LimitNOFILE = 10000

vim /etc/security/limits.conf
* soft nproc 65535
* hard nproc 65535
* soft nofile 102400
* hard nofile 102400

# 启动数据库服务
systemctl start mariadb
systemctl enable mariadb
安装zabbix proxy
wget https://mirrors.aliyun.com/zabbix/zabbix/5.4/rhel/7/x86_64/zabbix-agent-5.4.0-8.el7.x86_64.rpm

wget https://mirrors.aliyun.com/zabbix/zabbix/5.4/rhel/7/x86_64/zabbix-get-5.4.0-8.el7.x86_64.rpm

wget https://mirrors.aliyun.com/zabbix/zabbix/5.4/rhel/7/x86_64/zabbix-sender-5.4.0-8.el7.x86_64.rpm

wget https://mirrors.aliyun.com/zabbix/zabbix/5.4/rhel/7/x86_64/zabbix-proxy-mysql-5.4.0-8.el7.x86_64.rpm

wget https://mirrors.aliyun.com/zabbix/zabbix/5.4/rhel/7/x86_64/zabbix-sql-scripts-5.4.0-8.el7.noarch.rpm

yum install -y epel*

yum install -y fping zabbix-agent-5.4.0-8.el7.x86_64.rpm zabbix-get-5.4.0-8.el7.x86_64.rpm zabbix-sender-5.4.0-8.el7.x86_64.rpm zabbix-proxy-mysql-5.4.0-8.el7.x86_64.rpm zabbix-sql-scripts-5.4.0-8.el7.noarch.rpm
mysql -uroot -p

create database zabbix character set utf8 collate utf8_bin;
create user zabbix@localhost identified by 'Na123***';
grant all privileges on zabbix.* to zabbix@localhost;
flush privileges;
quit;

# 导入zabbix数据库信息
zcat /usr/share/doc/zabbix-sql-scripts/mysql/schema.sql.gz | mysql -uzabbix -p zabbix
# 修改zabbix-proxy的配置文件
vim /etc/zabbix/zabbix_proxy.conf
Server=192.168.15.203
Hostname=zabbix04  # 代理服务器的主机名
LogFile=/var/log/zabbix/zabbix_proxy.log
LogFileSize=10
EnableRemoteCommands=1
LogRemoteCommands=1
PidFile=/var/run/zabbix/zabbix_proxy.pid
SocketDir=/var/run/zabbix
DBHost=localhost
DBName=zabbix
DBUser=zabbix
DBPassword=Na123***
DBSocket=/data/mysql.sock
ProxyLocalBuffer=72
ProxyOfflineBuffer=12
HeartbeatFrequency=60
ConfigFrequency=120
DataSenderFrequency=1
StartPollers=100
StartIPMIPollers=1
StartPreprocessors=20
StartPollersUnreachable=30
StartHistoryPollers=6
StartTrappers=30
StartPingers=11
StartDiscoverers=16
StartHTTPPollers=50
StartVMwareCollectors=11
VMwareFrequency=60
VMwarePerfFrequency=60
VMwareCacheSize=246M
VMwareTimeout=60
SNMPTrapperFile=/var/log/snmptrap/snmptrap.log
StartSNMPTrapper=1
CacheSize=1G
StartDBSyncers=8
HistoryCacheSize=2G
HistoryIndexCacheSize=512M
Timeout=30
ExternalScripts=/usr/lib/zabbix/externalscripts
LogSlowQueries=3000
# 不同Proxy,填写对应Proxy的IP
StatsAllowedIP=192.168.15.204

# 修改agent配置文件
vim /etc/zabbix/zabbix_agentd.conf
PidFile=/var/run/zabbix/zabbix_agentd.pid
LogFile=/var/log/zabbix/zabbix_agentd.log
LogFileSize=0
EnableRemoteCommands=1
LogRemoteCommands=1
# 不同Proxy,填写对应Proxy的IP
Server=192.168.15.204
# 不同Proxy,填写对应Proxy的IP
ServerActive=192.168.15.204
Timeout=30
Include=/etc/zabbix/zabbix_agentd.d/*.conf

# 重启zabbix-proxy和zabbix-agent
systemctl restart zabbix-proxy.service
systemctl restart zabbix-agent.service
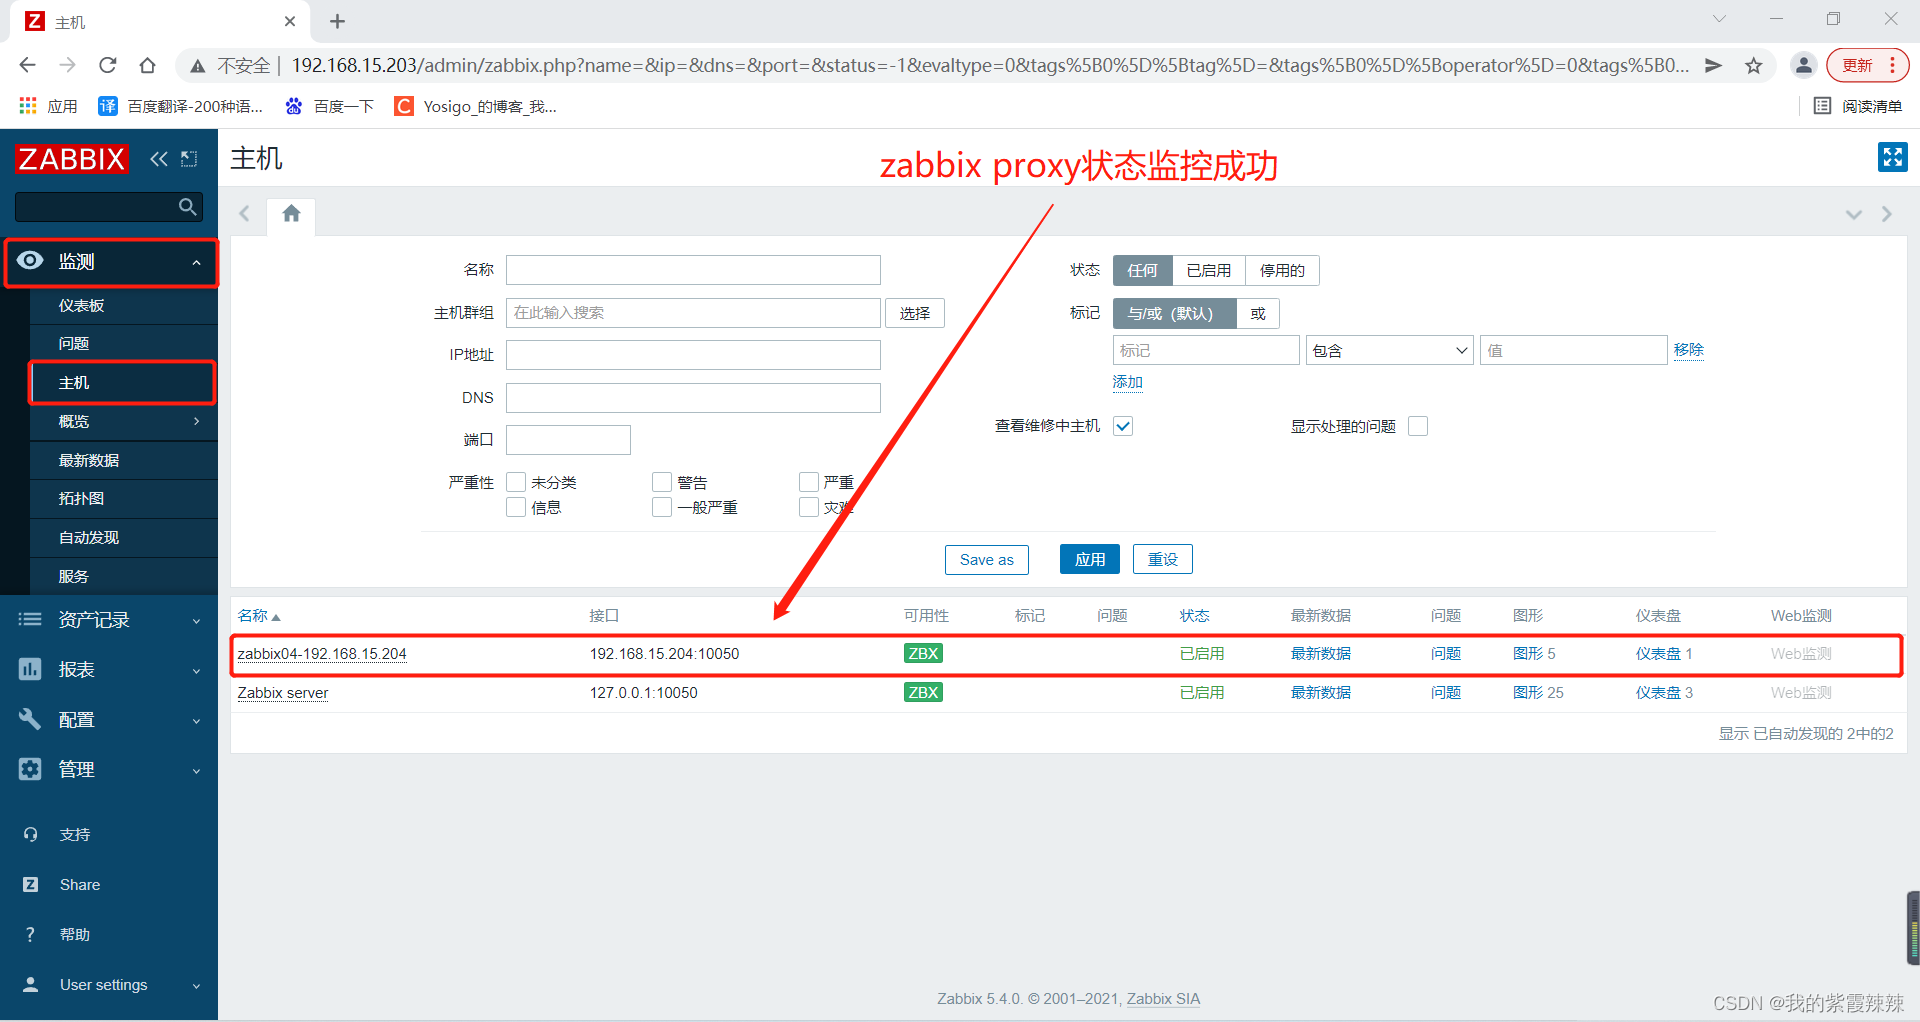
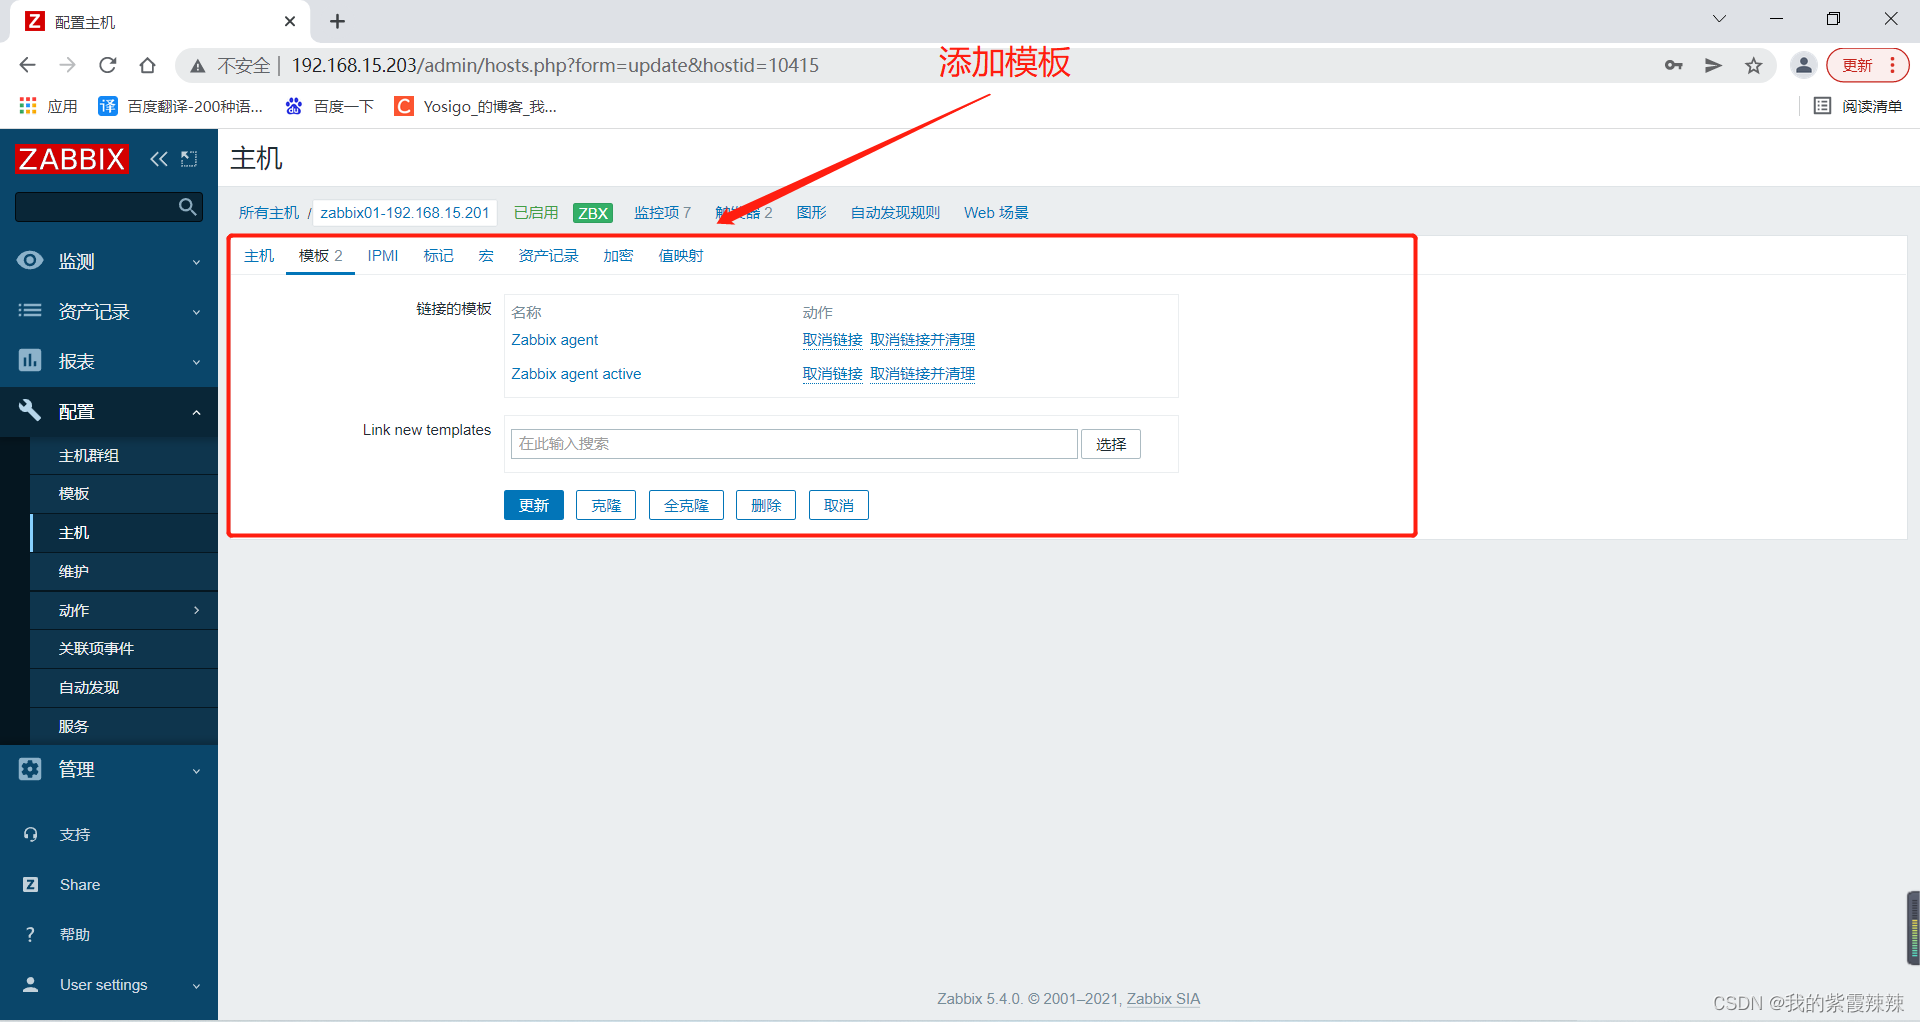
在zabbix server5.4版本的web页面添加proxy
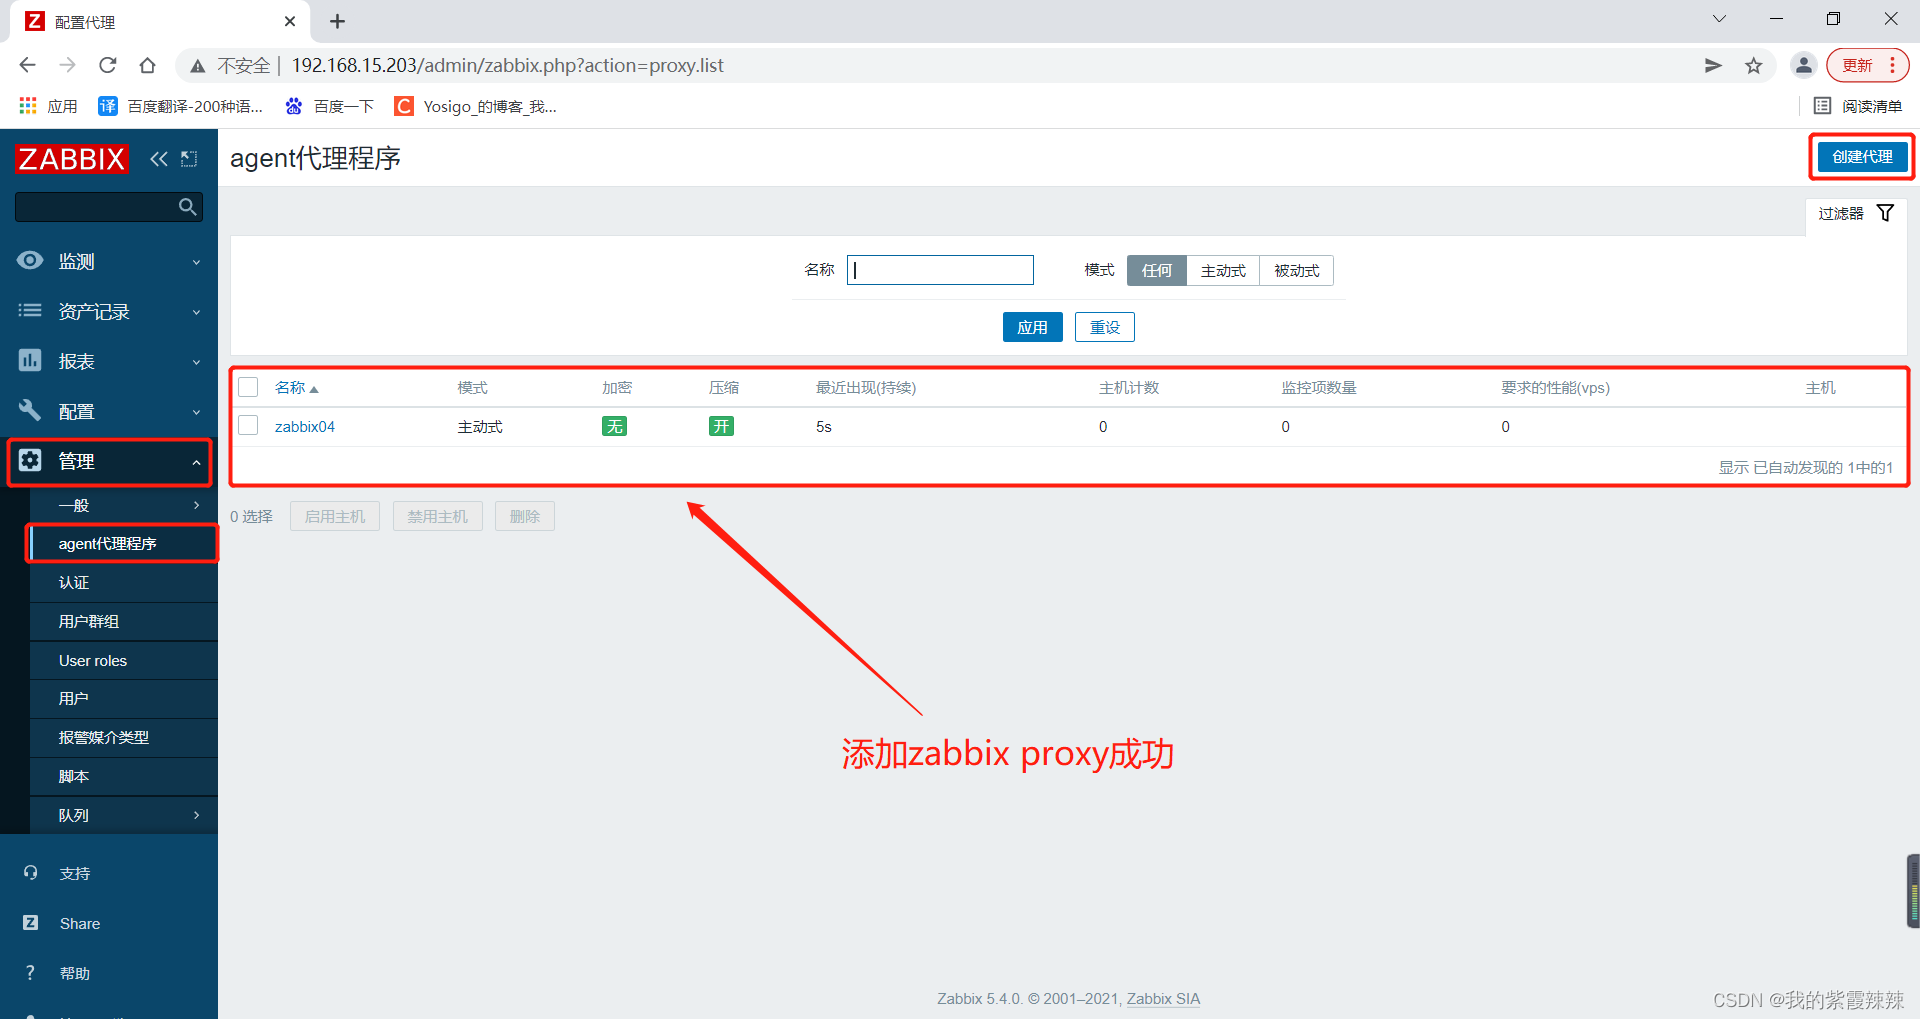

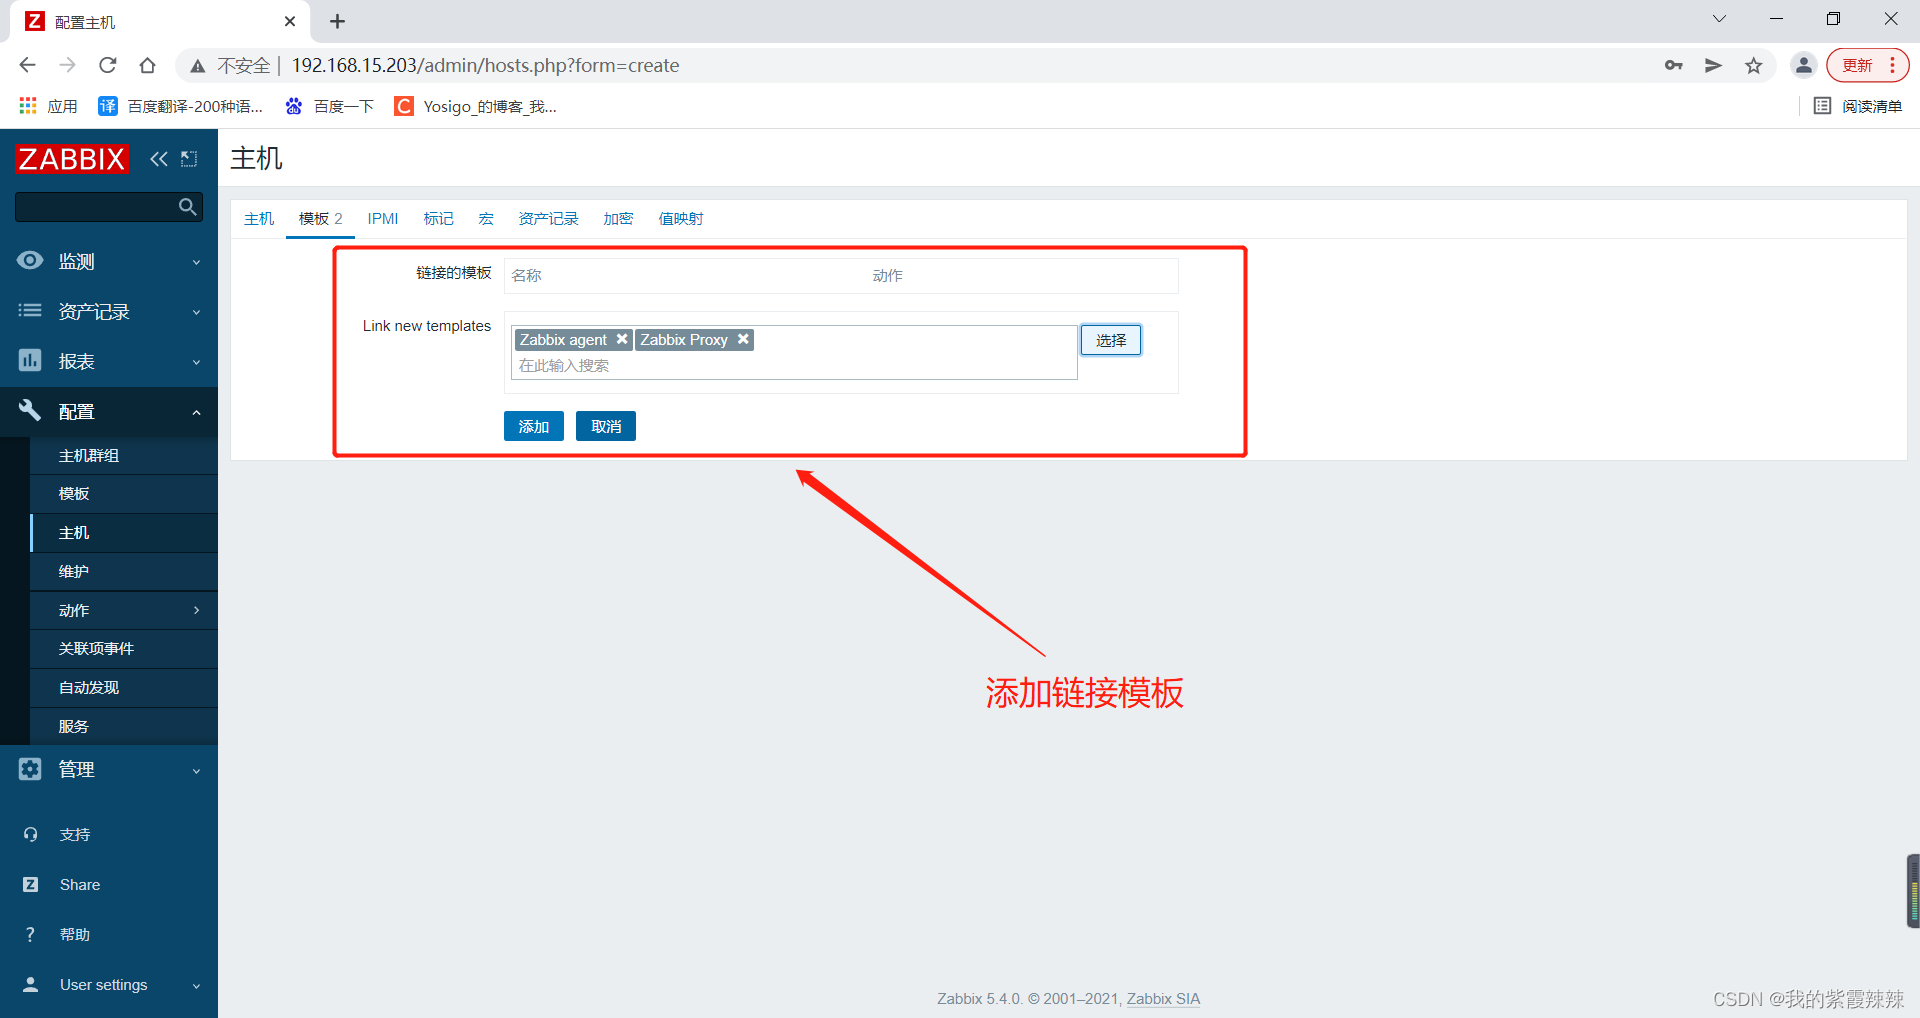
zabbix agent4.0同时指向两个proxy
zabbix01主机进行操作
# zabbix01主机进行操作,将agent同时指向两个zabbix proxy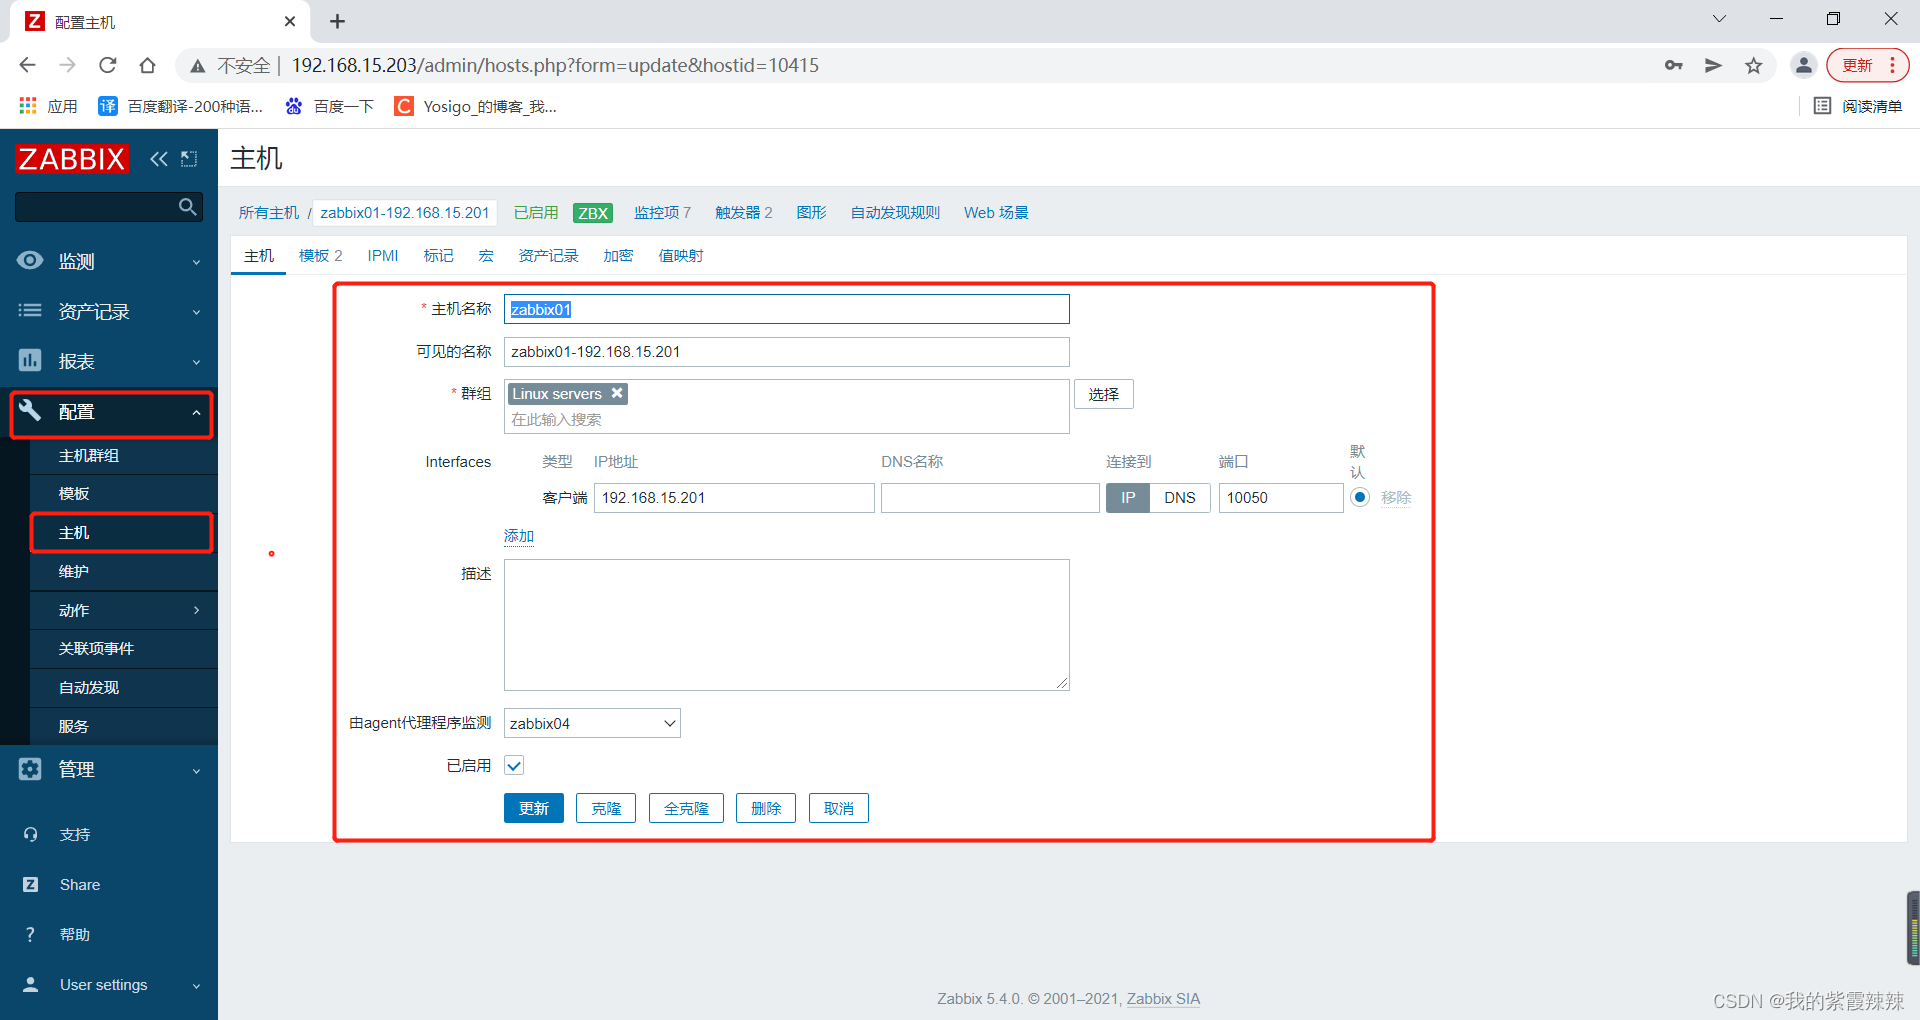
vim /etc/zabbix/zabbix_agentd.conf
...
Server=192.168.15.205,192.168.15.204
ServerActive=192.168.15.205,192.168.15.204
# 重启zabbix-agent服务
systemctl restart zabbix-agent.service
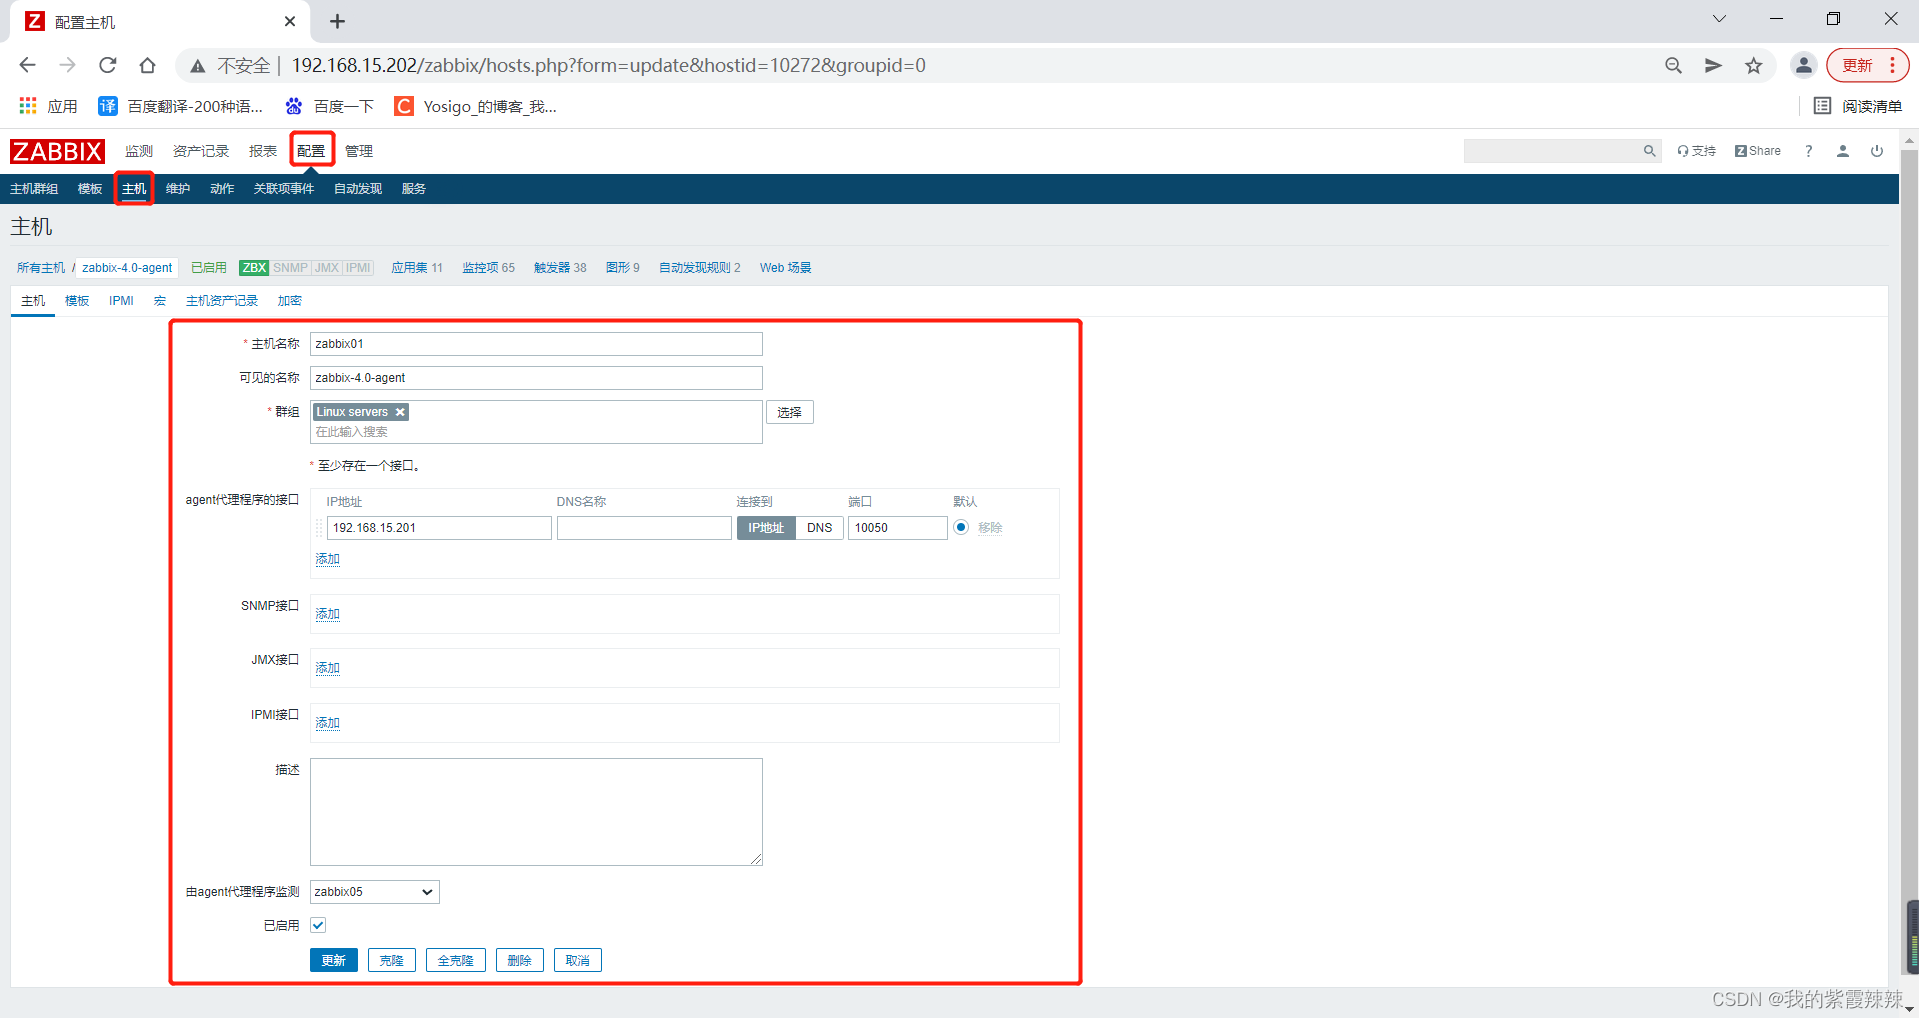
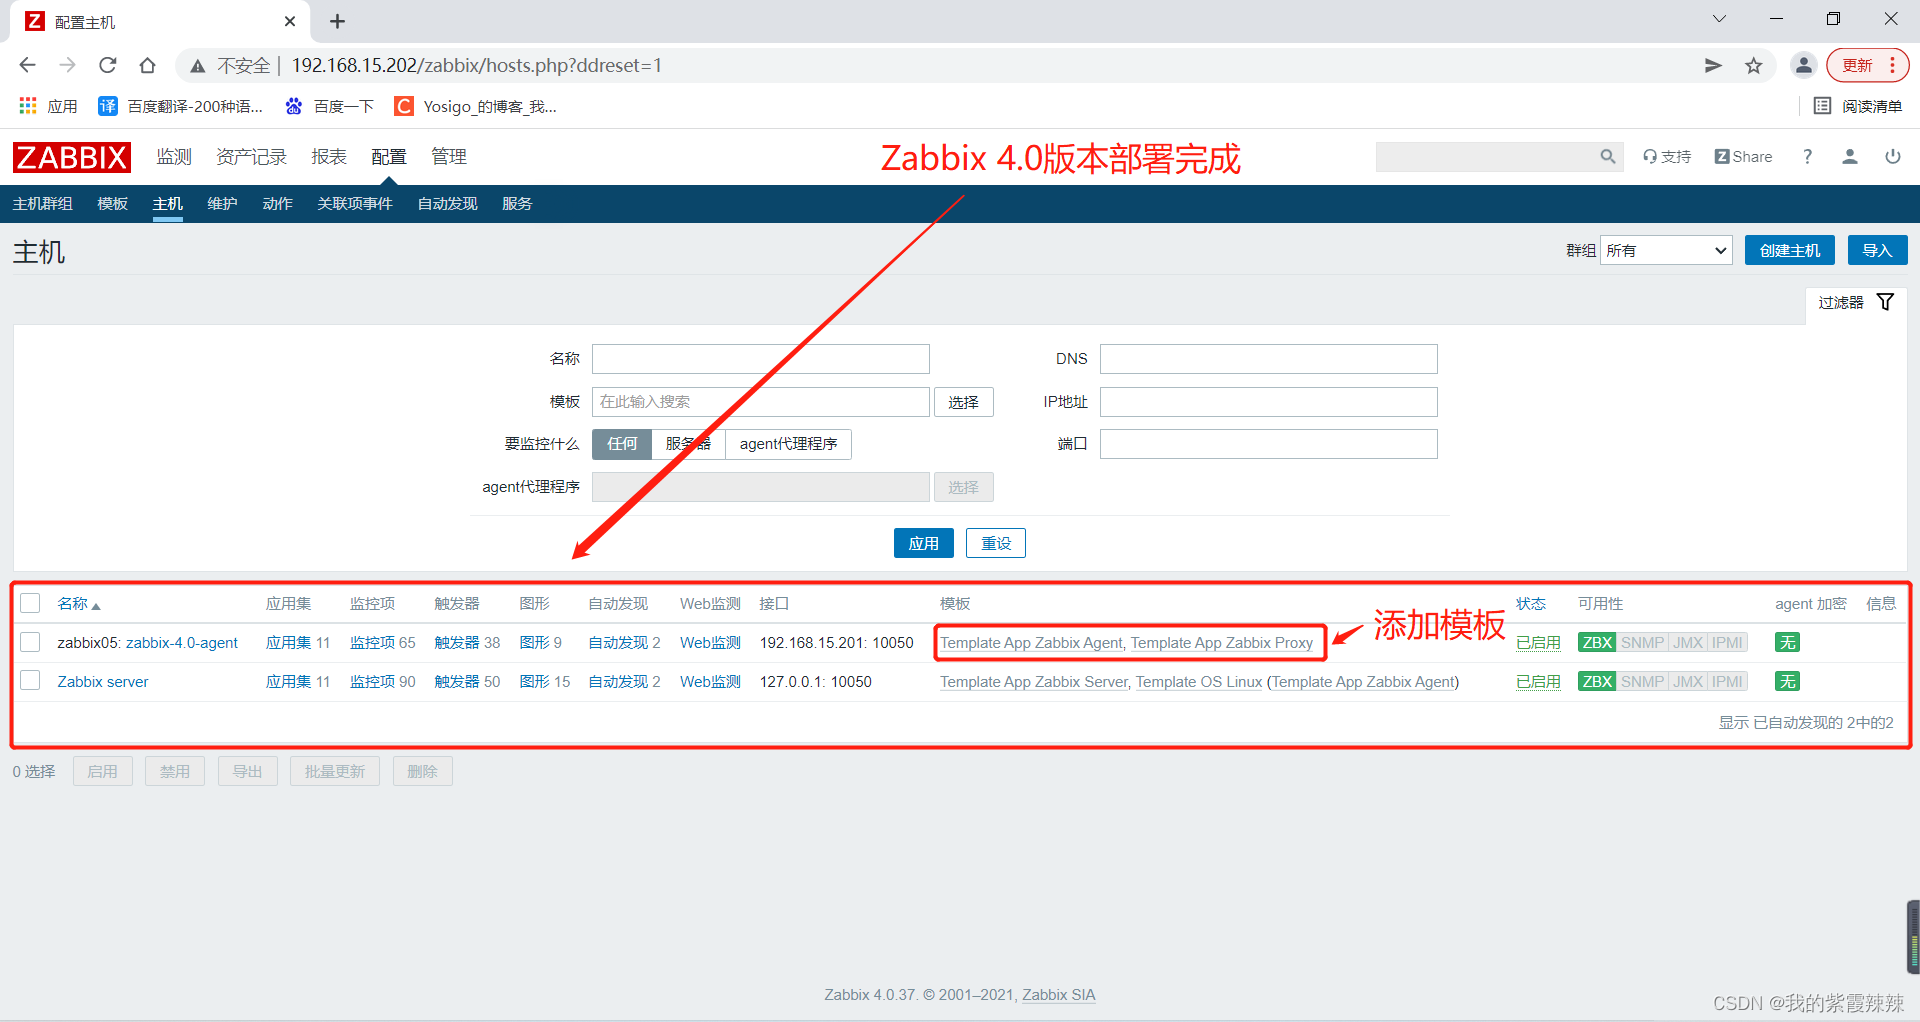
在zabbix server5.4版本的web页面添加zabbix01主机监控


 950
950

 被折叠的 条评论
为什么被折叠?
被折叠的 条评论
为什么被折叠?
 到【灌水乐园】发言


