Openstack kilo指南安装与实践(2)
2.基础环境
笔记:
这个指南的主干版本是关注于未来的kilo发布版本并不会为现在的Juno版本而工作。如果你想安装Juno,你必须取而代之的使用Juno版本的指南。
这个章节解释了如何去配置在传统网络中包含两个节点和有三个OpenStack 网络(neutron)的例子的结构里的每一个节点。
笔记
尽管许多环境都包含了验证、镜像、计算、至少一个网络服务和控制面板。对象存储服务可以进行多里操作。在你为OpenStack配置合适的节点之前,如果你使用的情况仅仅涉及到对象存储,你可以跳到第九章“增加对象存储”。然而,控制面板的服务至少需要镜像服务和计算服务。
你必须使用拥有管理员权限的账户去配置每一个节点。要么以root使用者使用命令行,要么用配置用sudo命令使其生效。
当服务使用Sysv初始化脚本而不是原生态系统的文件的时候,在openSUSE上面的调用会输出警告信息。
在你开始之前
为了最好的运行效果,我们推荐你的环境满足或者超出在Figure 1.2, “Minimal architecture example with OpenStack Networking(neutron)—Hardware requirements” 或者 Figure 1.5, “Minimal architecture example with legacy networking (nova-network)—Hardware requirements”(在上一篇文章有讲述)
然而OpenStack不需要一个大量的资源,接下来最小化需要应该需要支持一个有内核服务的概念证明环境和几个CirrOS的实例:
- 控制节点:一个处理器,2GB内存和5GB存储
- 网络节点:一个处理器,512M内存和5GB存储
计算节点:一个处理器,2GB内存和10GB存储
为了最小化集群和为OpenStack通过更多资源,我们推荐你的linux扩展版本的最小化安装,而且,我们强烈建议你安装至少在一个控制节点安装一个你的扩展版本的64位。如果你在控制节点上安装了32位的扩展版本的linux系统,那么尝试开启一个实例时使用64位的镜像将会失败。
笔记
一个单磁盘在每一个节点为许多基础安装工作。然而,你应该考虑逻辑卷管理(LVM)为了安装可选择服务比如块存储。
许多使用者在虚拟机(VMs)上构建他们的测试环境。虚拟机最主要的好处包括下面所说的:
- 一个物理服务器可以支持多节点,每一个节点可以有任意数量的网络接口。
- 在安装的过程中能够周期性的拍摄快照,然后在出现问题是可以回退到当时的工作状态
然而虚拟机会降低你的实例的功能,尤其是如果你的hypervisor和/或缺乏处理器对嵌套虚拟机硬件加速的支持。
笔记
如果你选择在虚拟机上安装,确保你的hypervisor允许混乱的模式和使MAC地址不能不过滤外部网络。
对于更多的系统要求的信息,请观看Openstack Operations Guide。
安全
OpenStack服务支持大量的安全方法,包括密码,策略,和加密。除此之外,所支持的服务包括了数据库服务和至少是密码安全的消息代理支持。
为了使得安装过程更加方便,这个指导仅仅覆盖了密码安全在一定适用情况下。你可以手动创建安全密码,大体上把他们使用成一个工具比如pwgen或者运行下面的命令:
$ openssl rand -hex 10
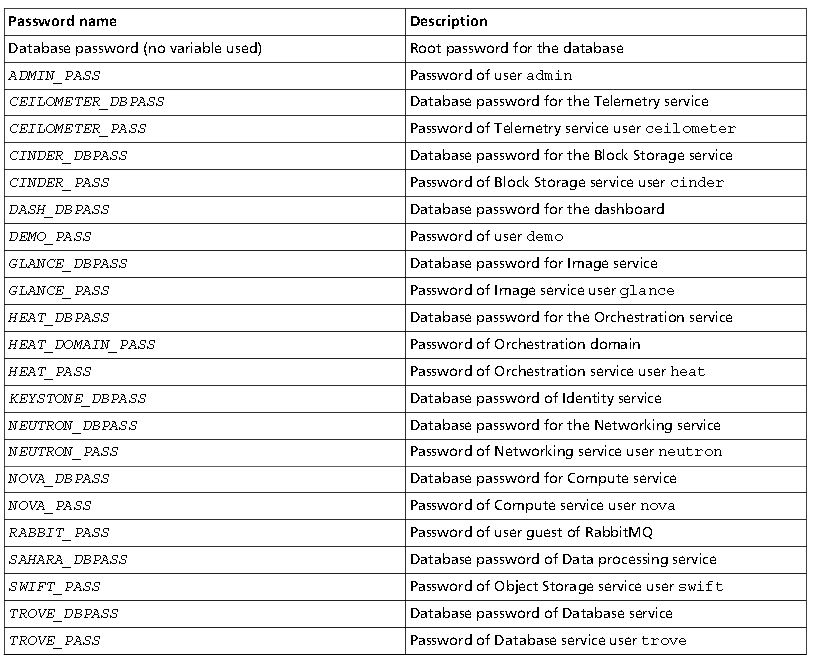
对于OpenStack服务来说,这个指南使用SERVICE_PASS去用用服务账号的密码和SERVICE_PASS去引用数据库密码.
接下来的表格里提供了 一系列服务需要的密码和在本指南与之关联的引用:
Table 2.1. Passwords
OpenStack和支持的服务需要管理员权限在安装和操作的过程。在某些情况,服务执行对主机进行修改可能会干扰自动化部署工具,比如Ansible, Chef, and Puppet。比如,有些OpenStack服务添加一个root wrapper使用sudo可能会干扰安全服务。详情可以观看Cloud Administrator Guide。而且,网络服务为了核心网络参数和修改防火墙规则假定默认值。为了避免许多假设在你安装的过程中,我推荐使用一个stock 部署在你的主机上的一个所支持的版本。然而,如果你选择为你的主机自动化部署,在进一步行动之前,希望回顾一下对他们的配置和管理。
网络
在为你的每一个节点部署你所选择的结构安装系统的时候,你必须配置网络接口。我们推荐你不要使用任何自动化部署网络管理工具而是手动的去编辑合适配置文件。对于在你的版本中如何去配置网络网络,请观看文档。
所有的节点需要网络去访问为了管理比如包的安装,安全的更新,DNS和NTP。在大多数情况下,节点一个包含网络访问通过管理网络接口。为了强调网络分离的重要性,这个简单的例子结构为主机网络使用私有地址空间和假定这个网络的基础设施能通过NAT提供网络。为了阐述这个基础设施即服务(Iaas)的灵活性。这个例子结构使用公有的IP地址空间对外部网络和假设网络基础服务提供直接网络访问对于在你的OpenStack环境。在这个环境中仅有一块公有IP地址空间,主机网络和外部网络最后都必须获得使用它获得网络访问。简单来说,这个指南上的图表仅仅展示了对于OpenStack服务的网络访问。
笔记
你的版本不能默认有默认的限制的防火墙。对于更多关于是你的环境安全的信息,请观看OpenStack Operations Guide
对于简单的OpenStack网络(neutron)或者传统的网络(nova-network)结构进一步进行网络配置。
OpenStack 网络(neutron)
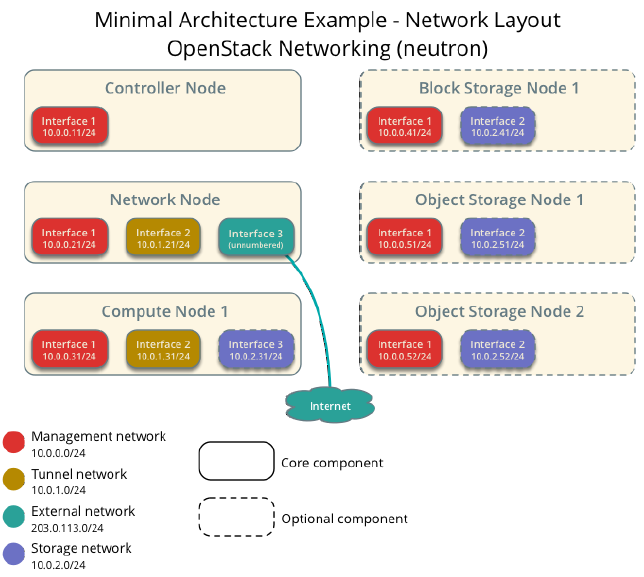
这个拥有OpenStack 网络(neutron)的例子结构需要一个控制节点、一个网络节点和至少一个计算节点。这个网络节点包含一个的网络接口在主机网络上,一个在实例的内部网络,以及一个在外部网络。节点包含一个网络接口在管理网络和一个在内部网络上。
简单的例子结构假设使用如下的网络:
主机网络在10.0.0.0/24,网关为10.0.0.1
笔记
这个网络需要一个网关去为以管理为目的的所有节点提供网络访问,比如包的安装,安全更新,DNS,和NTP。
实例内网在10.0.1.0/24没有网关
笔记
这个网络不需要网关是因为交流在你的OpenStack环境中是发生在网络节点和计算节点之间。
外网在203.0.113.0/24,网关为203.0.113.1
笔记
在OpenStack的环境中,这个网络有网关是去给实例提供网络访问。
你可以自定义范围和网关来为你的独特的网络基础设施来工作。
【笔者告诉各位这点非常重要,在配置节点的网络时,网络配置需要如此】
笔记
网络接口名字是有版本的不同而不同。传统上,接口是使用”eth“后面跟着连续的数字。为了包括所有的不同的情况,这个指南仅仅是应用了第一个接口作为接口的最低号数的接口,第二接口作为高一级号数的接口,第三个结构为最高一级号数的接口。
Figure 2.1. Minimal architecture example with OpenStack Networking (neutron)—Network layout
除非你尝试在这个例子结构使用额外的配置来提供,否则你必须修改网络去匹配你的环境。而且,每一个节点必须确定其他节点通过名字与IP。比如,这个controller的名字必须和10.0.0.11绑定,这个IP地址就是控制节点的管理接口。
警告
配置网络接口会打断网络的连接。我们建议为这些程序使用当地的终端会话。
控制节点
配置网络
1. 配置第一个接口为主机接口
IP address:10.0.0.11
Network mask:255.255.255.0(or/24)
Default gateway:10.0.0.1
2.重启系统使改变生效。
实践:
笔者当初误解了,为此郁闷了好几天,为何修改后,真的连网络都不可以连接了。笔者当初以为,所谓的配置第一个接口,是把ubuntu下/etc/networks/interfaces文件进行修改。而我是这样修改的:
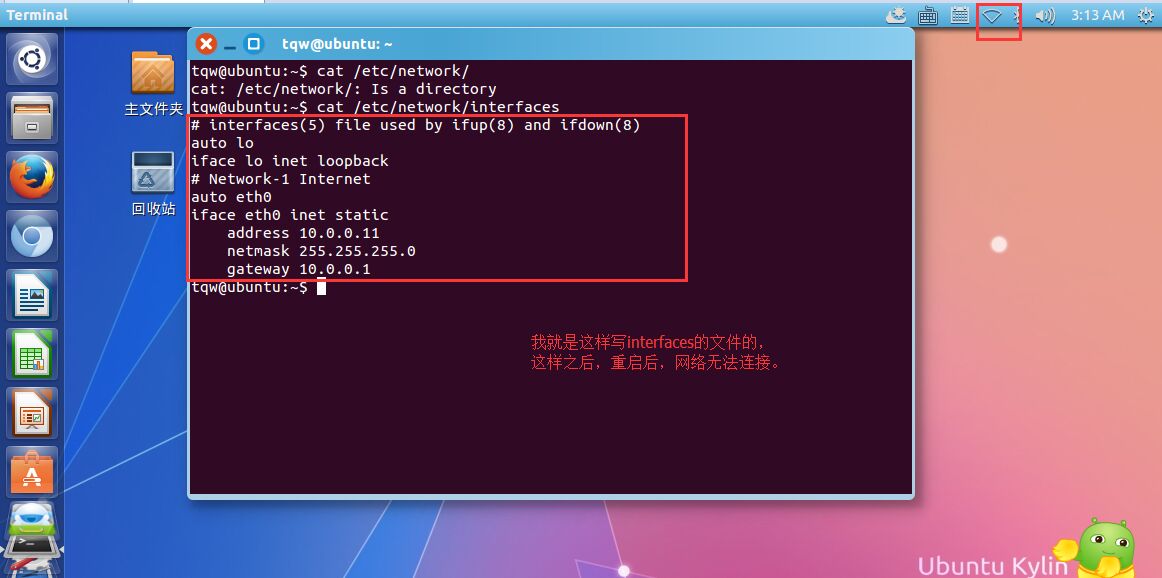
重启后,没有了网络。说明,修改得并不对。
然后我查找了相关资料进行了按部就班的根据文档进行如下配置:
命令如下:
ifconfig eth0 10.0.0.11 netmask 255.255.255.0
route add default gw 10.0.0.1
修改后,再次重启打开,却发现,又恢复了,修改之前的网络设置,如下图:
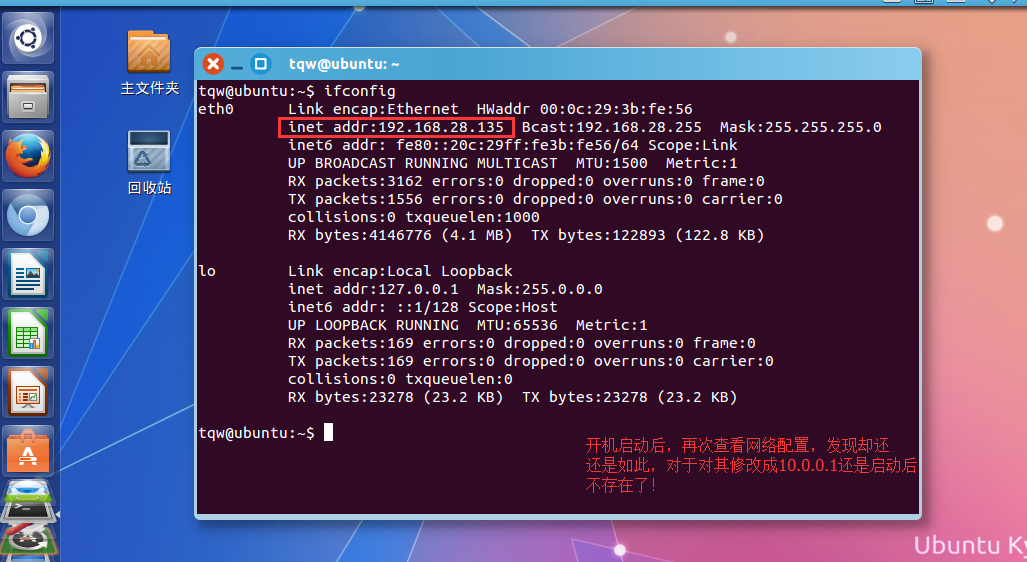
后来想起才应该知道,这样做的不对的,因为对于我的主机网络网络来说,我在虚拟机运行的控制节点是以NAT模式和主机连接,共享网段,当连接主机网络的时候,自然会被修改会原来的网络。
所以我最后选择不去修改我的网络。
我的控制节点最后为:
eth0 # 第一个网络接口
IP address:192.168.28.135
network Mask:255.255.255.0
我查看了一下我的路由默认网关:
配置名称转换
1. 设置控制节点的hostname为controller
2. 编辑/etc/hosts 文件包含如下:
# controller
10.0.0.11 controller
# network
10.0.0.21 network
# compute1
10.0.0.31 compute1警告
某些版本增加外来入口点登记在/etc/hosts文件用了决定实际的hostname对于另一个回环IP地址比如127.0.1.1。你必须添加注释去移除这个入口点去防止发生名称转换问题。
实践:
先是修改这个节点的hostname名字:
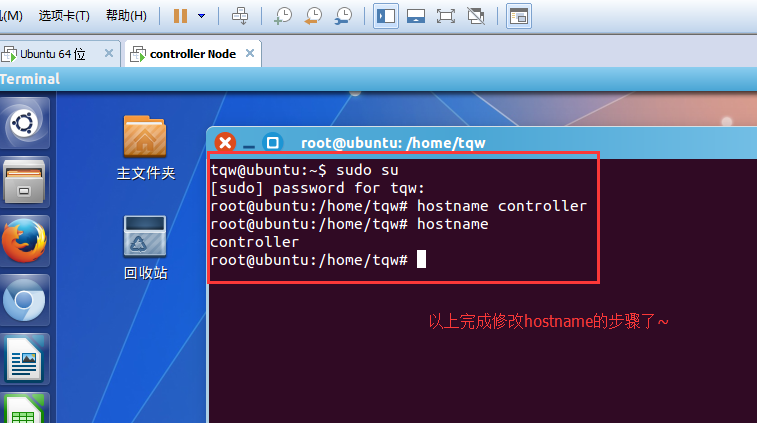
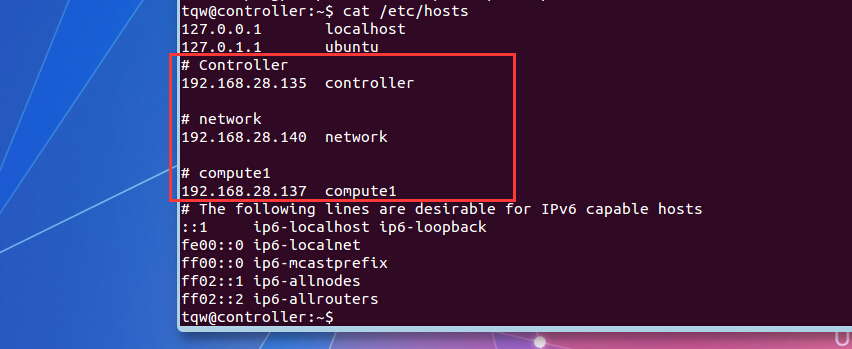
接下来是修改hosts文件:
注意
修改文件需要在root权限下进去,否则是只读的形式而已,不能修改,一旦保存就会报错。【笔者已经犯过好几次这种错误了】
如果想编写文件,使用的是vim命令,但是如果你并没有vim的话,请输入以下命令安装sudo apt-get install vim
如果你的显示找不到依赖包的话,说明软件包并不存在,那么你需要执行下列命令:
sudo apt-get update
修改的hosts文件的命令为:
vim /etc/hosts
笔者的修改添加如下:
网络节点
配置网络
1. 配置第一个接口为主机接口
IP address:10.0.0.21
Network mask:255.255.255.0(or/24)
Default gateway:10.0.0.1
2.配置第二个接口为内部网络接口
IP address:10.0.0.21
Network mask:255.255.255.0(or/24)
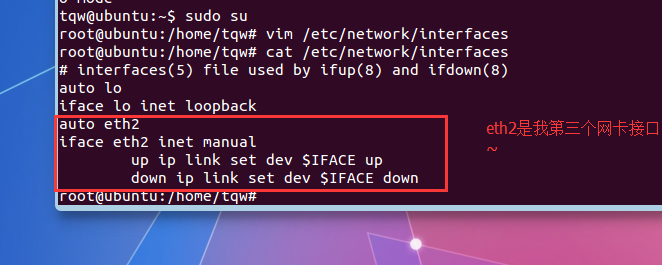
3.这个额外的接口使用一个特殊配置没有IP地址去赋值给它。配置第三个接口为外部网络接口
用实际接口的名字去取代INTERFACE_NAME。例如,eth2或者eth256.
编辑/etc/networks/interfaces文件包含如下:
# The external network interface
auto INTERFACE_NAME
iface INTERFACE_NAME inet manual
up ip link set dev $IFACE up
down ip link set dev $IFACE down
实践:
4.重启系统使得修改生效.
配置名称转换
1. 设置控制节点的hostname为controller
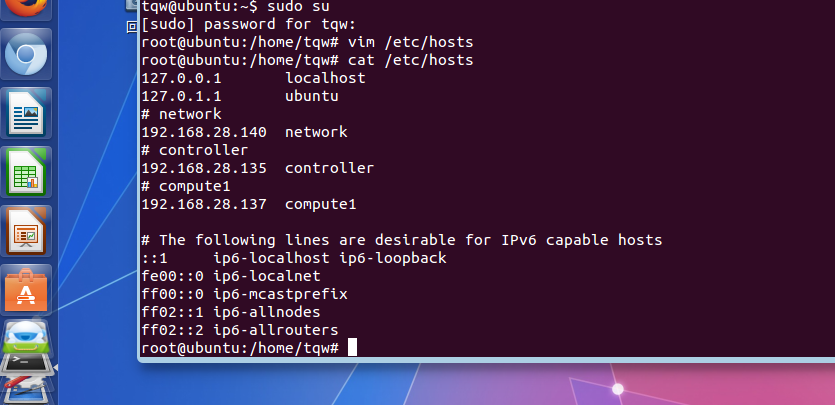
2. 编辑/etc/hosts 文件包含如下:
# network
10.0.0.21 network
# controller
10.0.0.11 controller
# compute1
10.0.0.31 compute1警告
某些版本增加外来入口点登记在/etc/hosts文件用了决定实际的hostname对于另一个回环IP地址比如127.0.1.1。你必须添加注释去移除这个入口点去防止发生名称转换问题。
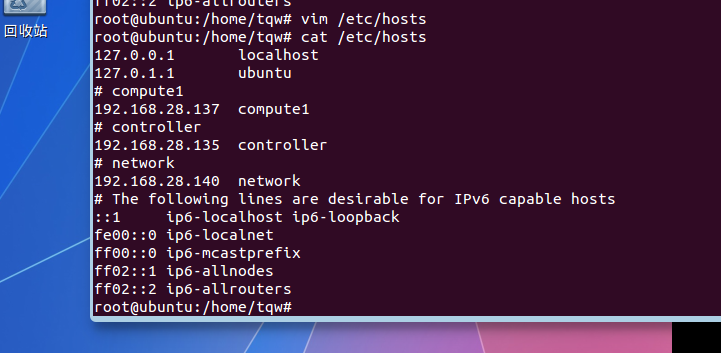
实践:
这是我修改的/etc/hosts的文件:
我修改hostname为如下:
计算节点
配置网络
1. 配置第一个接口为主机接口
IP address:10.0.0.31
Network mask:255.255.255.0(or/24)
Default gateway:10.0.0.1笔记
额外的计算节点应该使用10.0.0.32,10.0.0.33等等。
2.配置第二个接口为实例的内部网络接口
IP address:10.0.0.31
Network mask:255.255.255.0(or/24)
3.重启系统使得修改生效.
配置名称转换
1. 设置控制节点的hostname为controller
2. 编辑/etc/hosts 文件包含如下:
# compute1
10.0.0.31 compute1
# controller
10.0.0.11 controller
# network
10.0.0.21 network警告
某些版本增加外来入口点登记在/etc/hosts文件用了决定实际的hostname对于另一个回环IP地址比如127.0.1.1。你必须添加注释去移除这个入口点去防止发生名称转换问题。
实践:
我的compute1节点的hostname修改
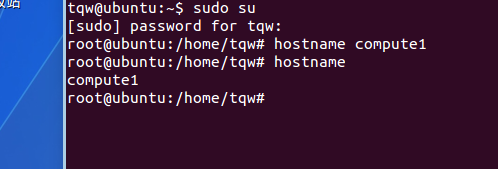
我的/etc/hosts文件的修改
核实连接
我们建议你核实网络对于因特网的连接和在进一步之前节点之间的连接
1.从controller节点,使用ping 一个在因特网上的网站
# ping -c 4 openstack.org
实践:

信息显示如下:
tqw@controller:~$ ping -c 4 openstack.org
PING openstack.org (162.242.140.107) 56(84) bytes of data.
64 bytes from 162.242.140.107: icmp_seq=1 ttl=128 time=304 ms
64 bytes from 162.242.140.107: icmp_seq=2 ttl=128 time=306 ms
64 bytes from 162.242.140.107: icmp_seq=3 ttl=128 time=318 ms
64 bytes from 162.242.140.107: icmp_seq=4 ttl=128 time=315 ms— openstack.org ping statistics —
4 packets transmitted, 4 received, 0% packet loss, time 3004ms
rtt min/avg/max/mdev = 304.944/311.230/318.391/5.634 ms
2.从controller节点,ping网络节点的主机接口
# ping -c 4 network
实践:

输出信息如下:
tqw@controller:~$ ping -c 4 network
PING network (192.168.28.140) 56(84) bytes of data.
64 bytes from network (192.168.28.140): icmp_seq=1 ttl=64 time=1.32 ms
64 bytes from network (192.168.28.140): icmp_seq=2 ttl=64 time=0.503 ms
64 bytes from network (192.168.28.140): icmp_seq=3 ttl=64 time=0.566 ms
64 bytes from network (192.168.28.140): icmp_seq=4 ttl=64 time=0.831 ms— network ping statistics —
4 packets transmitted, 4 received, 0% packet loss, time 3000ms
rtt min/avg/max/mdev = 0.503/0.805/1.322/0.323 ms
3.从controller节点,ping计算节点的主机接口
# ping -c 4 compute1
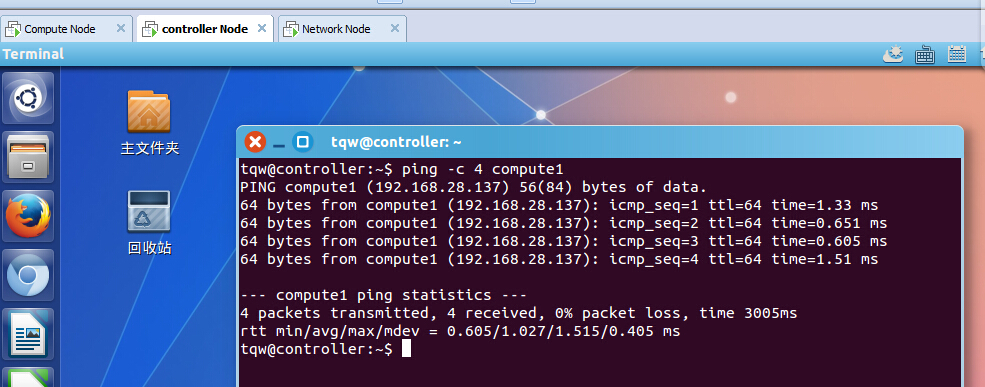
tqw@controller:~$ ping -c 4 compute1
PING compute1 (192.168.28.137) 56(84) bytes of data.
64 bytes from compute1 (192.168.28.137): icmp_seq=1 ttl=64 time=1.33 ms
64 bytes from compute1 (192.168.28.137): icmp_seq=2 ttl=64 time=0.651 ms
64 bytes from compute1 (192.168.28.137): icmp_seq=3 ttl=64 time=0.605 ms
64 bytes from compute1 (192.168.28.137): icmp_seq=4 ttl=64 time=1.51 ms— compute1 ping statistics —
4 packets transmitted, 4 received, 0% packet loss, time 3005ms
rtt min/avg/max/mdev = 0.605/1.027/1.515/0.405 ms
4.从网络节点,ping一个在因特网的网站
# ping -c 4 openstack.org
实践:
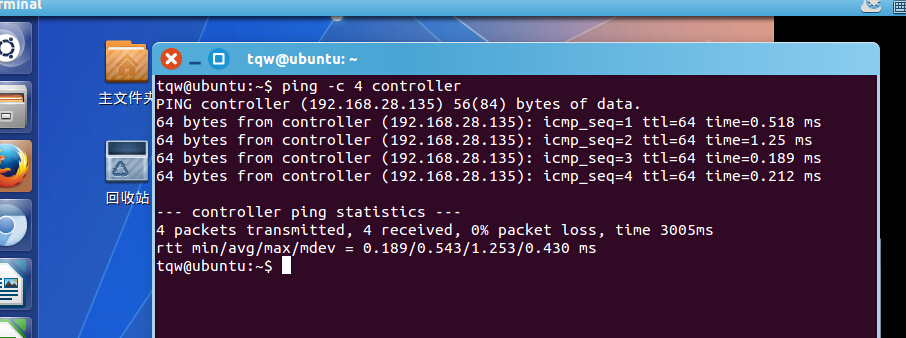
5.从网络节点,ping在控制节点上的主接口
# ping -c 4 controller
实践:
tqw@ubuntu:~$ ping -c 4 controller
PING controller (192.168.28.135) 56(84) bytes of data.
64 bytes from controller (192.168.28.135): icmp_seq=1 ttl=64 time=0.518 ms
64 bytes from controller (192.168.28.135): icmp_seq=2 ttl=64 time=1.25 ms
64 bytes from controller (192.168.28.135): icmp_seq=3 ttl=64 time=0.189 ms
64 bytes from controller (192.168.28.135): icmp_seq=4 ttl=64 time=0.212 ms— controller ping statistics —
4 packets transmitted, 4 received, 0% packet loss, time 3005ms
rtt min/avg/max/mdev = 0.189/0.543/1.253/0.430 ms
6.从网络节点,ping在计算机节点上的实例内网接口
# ping -c 4 192.168.28.138
实践:

我设置的内网为192.168.28.138
7.从计算节点,ping一个在因特网上的网站
# ping -c 4 openstack
实践:
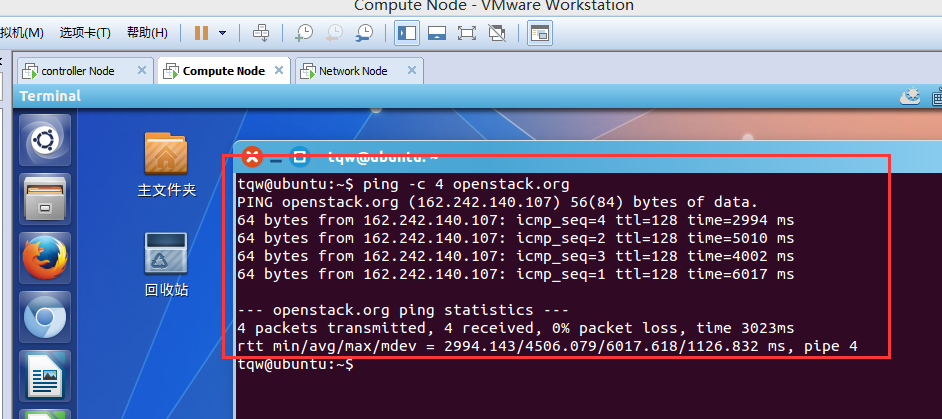
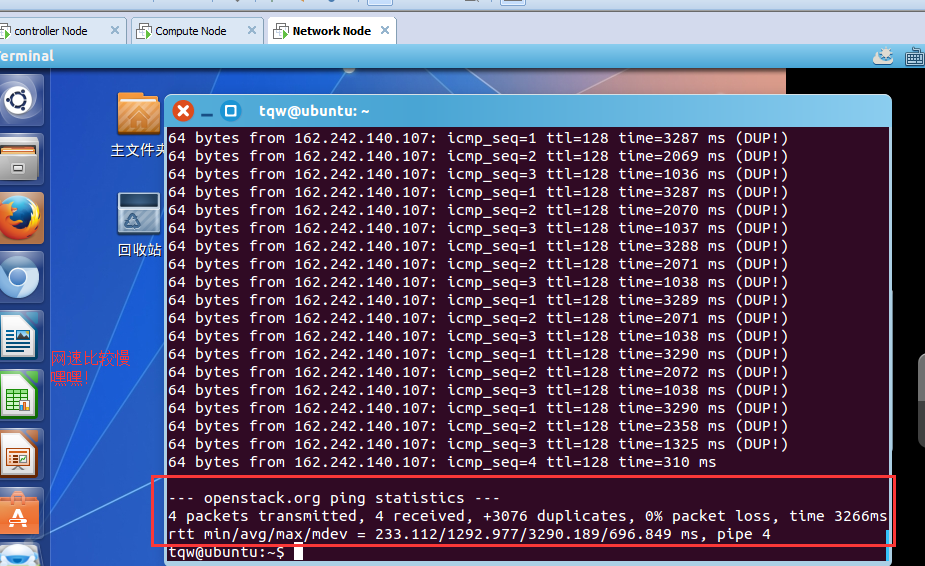
信息如下:
tqw@ubuntu:~$ ping -c 4 openstack.org
PING openstack.org (162.242.140.107) 56(84) bytes of data.
64 bytes from 162.242.140.107: icmp_seq=4 ttl=128 time=2994 ms
64 bytes from 162.242.140.107: icmp_seq=2 ttl=128 time=5010 ms
64 bytes from 162.242.140.107: icmp_seq=3 ttl=128 time=4002 ms
64 bytes from 162.242.140.107: icmp_seq=1 ttl=128 time=6017 ms— openstack.org ping statistics —
4 packets transmitted, 4 received, 0% packet loss, time 3023ms
rtt min/avg/max/mdev = 2994.143/4506.079/6017.618/1126.832 ms, pipe 4
8.从计算节点,ping在控制节点的主接口
# ping -c 4 controller
实践:

信息如下:
tqw@ubuntu:~$ ping -c 4 controller
PING controller (192.168.28.135) 56(84) bytes of data.
64 bytes from controller (192.168.28.135): icmp_seq=1 ttl=64 time=1.57 ms
64 bytes from controller (192.168.28.135): icmp_seq=2 ttl=64 time=0.658 ms
64 bytes from controller (192.168.28.135): icmp_seq=3 ttl=64 time=0.975 ms
64 bytes from controller (192.168.28.135): icmp_seq=4 ttl=64 time=0.567 ms— controller ping statistics —
4 packets transmitted, 4 received, 0% packet loss, time 3003ms
rtt min/avg/max/mdev = 0.567/0.943/1.574/0.395 ms
9.从计算节点,ping在网络节点的实例内网接口
# ping -c 4 192.168.28.138
实践:

算是完成了初始的第一步,三个节点的连接。
传统网络(nova-network)
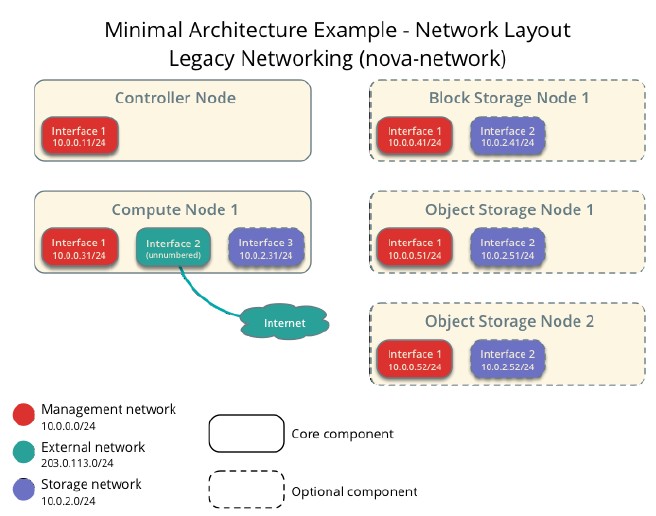
这个拥有例子结构的传统网络(nova-network)需要一个控制节点和至少应该计算节点,这个控制节点包含一个网络接口在主网络。计算节点包含一个网络接口在主网络上和一个在外部网络上。
简单的例子结构假设使用如下的网络:
主机网络在10.0.0.0/24,网关为10.0.0.1
笔记
这个网络需要一个网关去为以管理为目的的所有节点提供网络访问,比如包的安装,安全更新,DNS,和NTP。
外网在203.0.113.0/24,网关为203.0.113.1
笔记
在OpenStack的环境中,这个网络有网关是去给实例提供网络访问。
你可以自定义范围和网关来为你的独特的网络基础设施来工作。
笔记
网络接口名字是有版本的不同而不同。传统上,接口是使用”eth“后面跟着连续的数字。为了包括所有的不同的情况,这个指南仅仅是应用了第一个接口作为接口的最低号数的接口,第二接口作为高一级号数的接口,第三个结构为最高一级号数的接口。
Figure 2.2. Minimal architecture example with legacy networking (novanetwork)—Network layout
除非你尝试在这个例子结构使用额外的配置来提供,否则你必须修改网络去匹配你的环境。而且,每一个节点必须确定其他节点通过名字与IP。比如,这个controller的名字必须和10.0.0.11绑定,这个IP地址就是控制节点的管理接口。
警告
配置网络接口会打断网络的连接。我们建议为这些程序使用当地的终端会话。
控制节点
配置网络
1. 配置第一个接口为主机接口
IP address:10.0.0.11
Network mask:255.255.255.0(or/24)
Default gateway:10.0.0.1
2.重启系统使改变生效。
配置名称转换
1. 设置控制节点的hostname为controller
2. 编辑/etc/hosts 文件包含如下:
# controller
10.0.0.11 controller
# compute1
10.0.0.31 compute1警告
某些版本增加外来入口点登记在/etc/hosts文件用了决定实际的hostname对于另一个回环IP地址比如127.0.1.1。你必须添加注释去移除这个入口点去防止发生名称转换问题。
计算节点
配置网络
1. 配置第一个接口为主机接口
IP address:10.0.0.31
Network mask:255.255.255.0(or/24)
Default gateway:10.0.0.1笔记
额外的计算节点应该使用10.0.0.32,10.0.0.33等等。
2.这个额外的接口使用一个特殊配置没有IP地址去赋值给它。配置第二个接口为外部网络接口
用实际接口的名字去取代INTERFACE_NAME。例如,eth1或者eth224.
编辑/etc/networks/interfaces文件包含如下:
# The external network interface
auto INTERFACE_NAME
iface INTERFACE_NAME inet manual
up ip link set dev $IFACE up
down ip link set dev $IFACE down
实践:
3.重启系统使得修改生效
配置名称转换
1. 设置控制节点的hostname为controller
2. 编辑/etc/hosts 文件包含如下:
# network
10.0.0.21 network
# controller
10.0.0.11 controller
# compute1
10.0.0.31 compute1警告
某些版本增加外来入口点登记在/etc/hosts文件用了决定实际的hostname对于另一个回环IP地址比如127.0.1.1。你必须添加注释去移除这个入口点去防止发生名称转换问题。### 计算节点
配置网络
1. 配置第一个接口为主机接口
IP address:10.0.0.31
Network mask:255.255.255.0(or/24)
Default gateway:10.0.0.1
笔记
额外的计算节点应该使用10.0.0.32,10.0.0.33等等。
2.这个额外的接口使用一个特殊配置没有IP地址去赋值给它。配置第二个接口为外部网络接口
用实际接口的名字去取代INTERFACE_NAME。例如,eth1或者eth224.
编辑/etc/networks/interfaces文件包含如下:
# The external network interface
auto INTERFACE_NAME
iface INTERFACE_NAME inet manual
up ip link set dev $IFACE up
down ip link set dev $IFACE down
实践:
3.重启系统使得修改生效
配置名称转换
1. 设置控制节点的hostname为controller
2. 编辑/etc/hosts 文件包含如下:
# compute1
10.0.0.31 compute1
# controller
10.0.0.11 controller警告
某些版本增加外来入口点登记在/etc/hosts文件用了决定实际的hostname对于另一个回环IP地址比如127.0.1.1。你必须添加注释去移除这个入口点去防止发生名称转换问题。
核实连接
我们建议你核实网络对于因特网的连接和在进一步之前节点之间的连接
1.从controller节点,使用ping 一个在因特网上的网站
# ping -c 4 openstack.org
2.从controller节点,ping计算节点的主机接口
# ping -c 4 compute1
3.从计算节点,ping一个在因特网上的网站
# ping -c 4 openstack
4.从计算节点,ping在控制节点的主接口
# ping -c 4 controller
网络时间控制(NTP)
你必须安装NTP去适当的同步节点间的服务。我们建议你配置控制节点去引用更精确(低层的)服务和引用控制节点的其他节点。
控制节点
安装NTP服务
# apt-get install ntp
配置NTP服务
默认情况下,控制节点同步时间通过公共服务池。然而,你可以选择性的编辑/etc/ntp.conf文件去配置那些可供选择的你的组织所提供的服务器。
1.编辑/etc/ntp.conf文件以及必要时在你的环境中添加、改变或者移出下面的键:
server NTP_SERVER iburst
restrict -4 default kod notrap nomodify
restrict -6 default kod notrap nomodify
用hostname或者一共合适的精确(底层的)NTP服务器IP地址。这个配置支持多重服务键。
笔记
对于restrict键,本质上,你可以移除nopeer和noquery选择。
笔记
如果/etc/ntp.conf文件存在移除它。
2.重启NTP服务
# service ntp restart
实践:
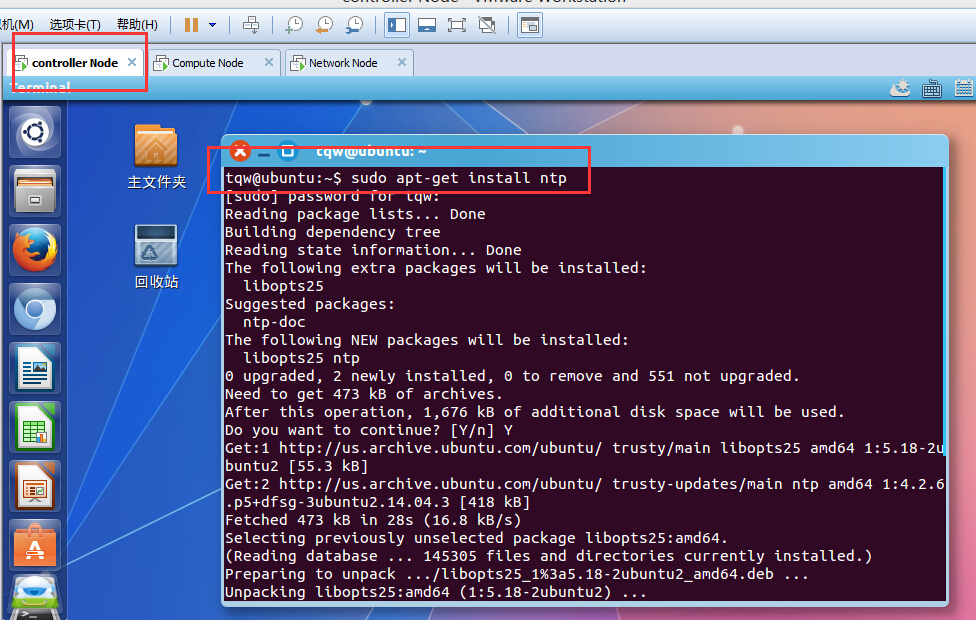
信息如下:
tqw@ubuntu:~$ sudo apt-get install ntp
[sudo] password for tqw:
Reading package lists… Done
Building dependency tree
Reading state information… Done
The following extra packages will be installed:
libopts25
Suggested packages:
ntp-doc
The following NEW packages will be installed:
libopts25 ntp
0 upgraded, 2 newly installed, 0 to remove and 551 not upgraded.
Need to get 473 kB of archives.
After this operation, 1,676 kB of additional disk space will be used.
Do you want to continue? [Y/n] Y
Get:1 http://us.archive.ubuntu.com/ubuntu/ trusty/main libopts25 amd64 1:5.18-2ubuntu2 [55.3 kB]
Get:2 http://us.archive.ubuntu.com/ubuntu/ trusty-updates/main ntp amd64 1:4.2.6.p5+dfsg-3ubuntu2.14.04.3 [418 kB]
Fetched 473 kB in 28s (16.8 kB/s)
Selecting previously unselected package libopts25:amd64.
(Reading database … 145305 files and directories currently installed.)
Preparing to unpack …/libopts25_1%3a5.18-2ubuntu2_amd64.deb …
Unpacking libopts25:amd64 (1:5.18-2ubuntu2) …
Selecting previously unselected package ntp.
Preparing to unpack …/ntp_1%3a4.2.6.p5+dfsg-3ubuntu2.14.04.3_amd64.deb …
Unpacking ntp (1:4.2.6.p5+dfsg-3ubuntu2.14.04.3) …
Processing triggers for man-db (2.6.7.1-1) …
Processing triggers for ureadahead (0.100.0-16) …
ureadahead will be reprofiled on next reboot
Setting up libopts25:amd64 (1:5.18-2ubuntu2) …
Setting up ntp (1:4.2.6.p5+dfsg-3ubuntu2.14.04.3) …
* Starting NTP server ntpd [ OK ]
Processing triggers for libc-bin (2.19-0ubuntu6) …
Processing triggers for ureadahead (0.100.0-16) …
我实际上并没有修改/etc/net.conf文件,然后我重启ntp服务器:
信息如下:
root@ubuntu:/home/tqw# service ntp restart
* Stopping NTP server ntpd [ OK ]
* Starting NTP server ntpd [ OK ]
其他节点
安装NTP服务
# apt-get install ntp
配置NTP服务
配置网络节点和计算节点对控制节点的引用。
1.编辑/etc/ntp.conf文件:
添加注释或者移除所有除了一个server键并改变它对控制节点的引用
server controller iburst
笔记
如果/etc/ntp.conf文件存在移除它。
2.重启NTP服务
# service ntp restart
【实践】:
笔者是把所有的话都注释掉了,然后只留下一句话:
server controller iburst
确定操作
我们建议你进一步操作之前确定NTP同步。某些节点,其中部分引用控制节点,需要花几分钟去同步。
1.在控制节点命令行运行:
# ntpq -c peers
remote列的内容表明了hostname或者是一个或多个的NTP服务器的IP地址。
笔记
在refid列的内容典型引用了上层服务器的IP地址。
实践:
2.在控制节点命令行运行:
# ntpq -c assoc
在condition的那一列代表sys.peer至少有一个服务器
【实践】:
3.在其他所有节点运行下面命令行命令
# ntpq -c peers
在remote此列应该象征着控制节点的hostname。
【实践:】
【network node】:

【compute1 node】:
笔记
在refid一列典型的是引用上层服务器的IP地址
4.在所有其他节点运行下面的命令行命令:
# ntpq -c assoc
在condition那一列的内容表明sys.peers。
【实践:】
【network node】:

【compute1 node】:
openstack 包
由于不同发布版本的模块,已发布的OpenStack作为这个版本(kilo)的一部分或者用其他方法使用。
笔记
使任何自动化更新服务不能使用或者移除他们因为他们会影响你的OpenStack的环境。
使OpenStack仓库可用
- 安装ubuntu云端获取keyring和repository
# apt-get install ubuntu-cloud-keyring
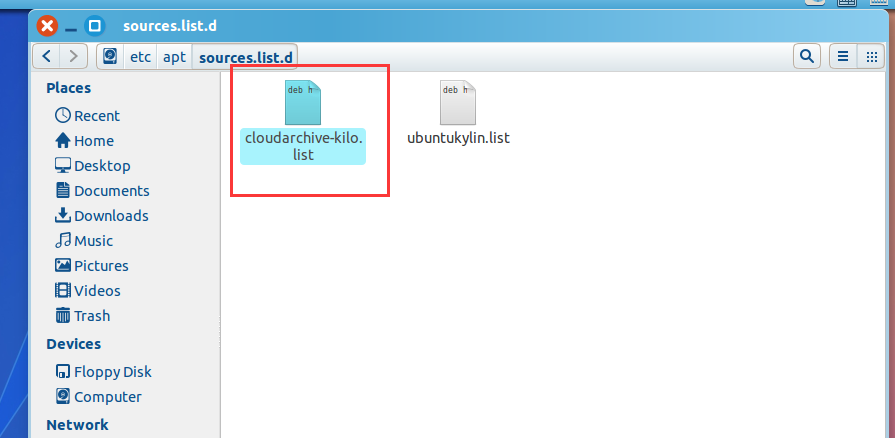
# echo “deb http://ubuntu-cloud.archive.canonical.com/ubuntu” \
“trusty-updates/kilo main” > /etc/apt/sources.list.d/cloudarchive-kilo.list
完成安装
- 更新你系统的包
# apt-get update && apt-get dist-upgrade
笔记
如果更新过程中包括了一个新内核,请重启使其生效。
笔者实践:
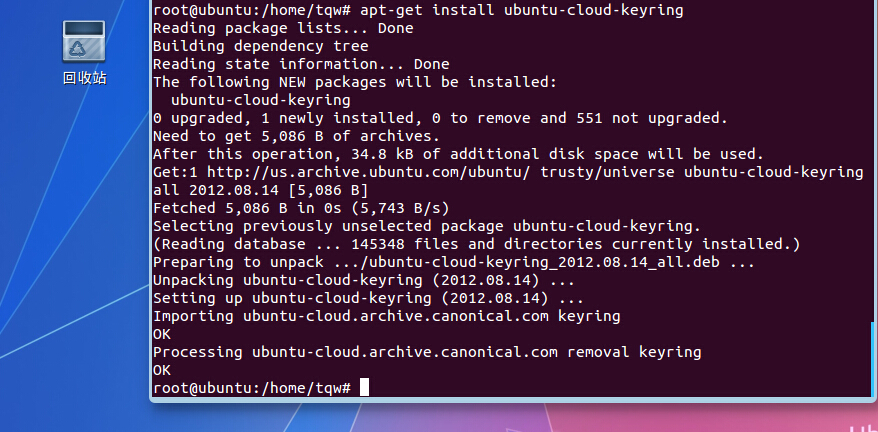
信息如下:
root@ubuntu:/home/tqw# apt-get install ubuntu-cloud-keyring
Reading package lists… Done
Building dependency tree
Reading state information… Done
The following NEW packages will be installed:
ubuntu-cloud-keyring
0 upgraded, 1 newly installed, 0 to remove and 551 not upgraded.
Need to get 5,086 B of archives.
After this operation, 34.8 kB of additional disk space will be used.
Get:1 http://us.archive.ubuntu.com/ubuntu/ trusty/universe ubuntu-cloud-keyring all 2012.08.14 [5,086 B]
Fetched 5,086 B in 0s (5,743 B/s)
Selecting previously unselected package ubuntu-cloud-keyring.
(Reading database … 145348 files and directories currently installed.)
Preparing to unpack …/ubuntu-cloud-keyring_2012.08.14_all.deb …
Unpacking ubuntu-cloud-keyring (2012.08.14) …
Setting up ubuntu-cloud-keyring (2012.08.14) …
Importing ubuntu-cloud.archive.canonical.com keyring
OK
Processing ubuntu-cloud.archive.canonical.com removal keyring
OK
接着笔者按照命令,键入这样的命令:

然后观察了一下这个path下,有没有这个文件,起初未输入命令,是没有这个文件的。
最后我安装步骤输入完成更新的操作:
笔者这种菜鸟,自然不知道是否更新内核,只有重启了。毕竟重启也没啥事。
SQL 数据库
许多OpenStack服务使用一个SQL数据库去储存信息。数据库一般都运行在控制节点上。在这个指南上的过程是依据linux版本使用MariaDB或者MYSQL。OpenStack也支持其他数据库包括PostgreSQL.
安装和配置数据库服务器
1.安装包
笔记
python的MYSQL库与MariaDB兼容
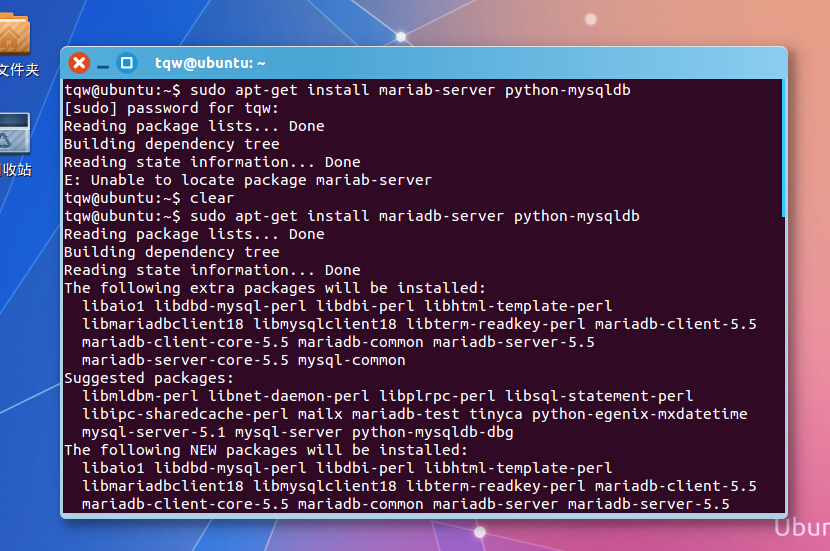
# apt-get install mariadb-server python-mysqldb
[实践]:
命令输完后,便进行安装,需要你输入密码:
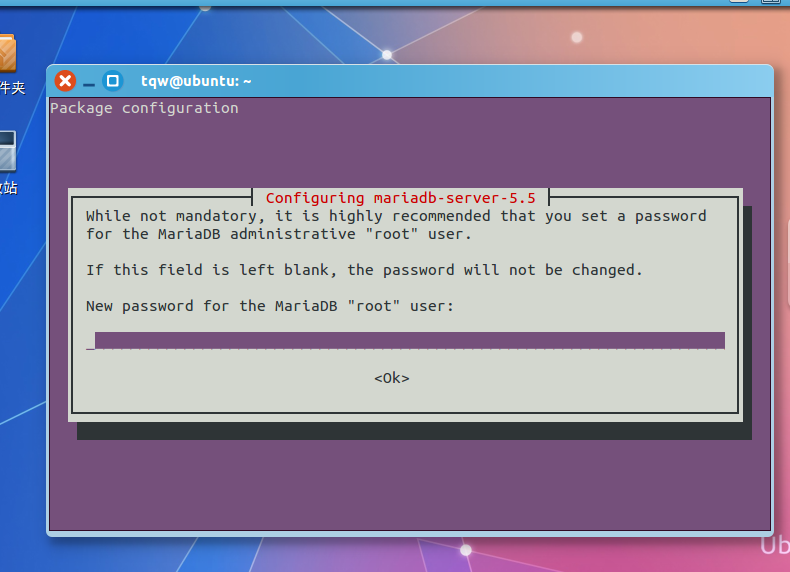
我选择root密码:
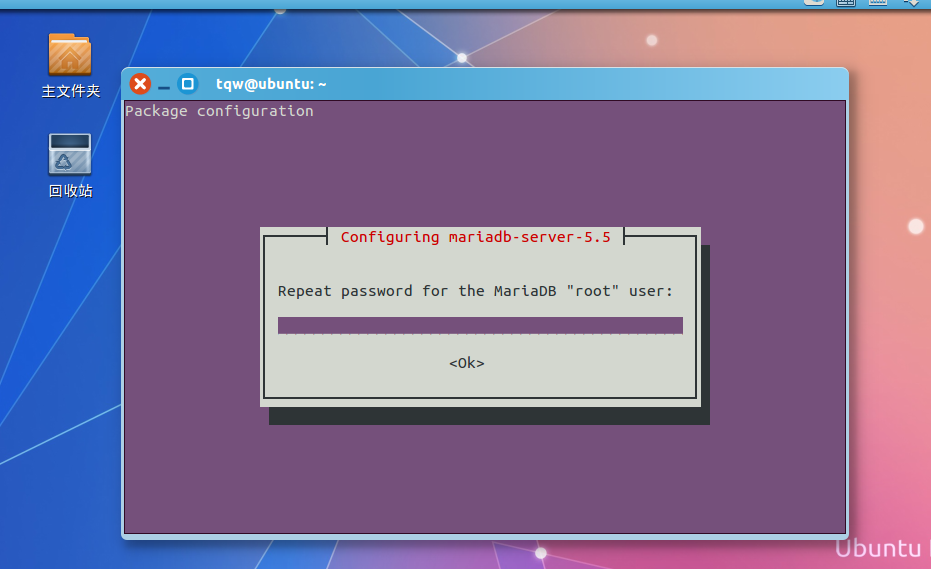
要求确认密码
完成后:
输出所有的信息:
tqw@ubuntu:~ sudoapt−getinstallmariab−serverpython−mysqldb[sudo]passwordfortqw:Readingpackagelists…DoneBuildingdependencytreeReadingstateinformation…DoneE:Unabletolocatepackagemariab−servertqw@ubuntu: clear
tqw@ubuntu:~$ sudo apt-get install mariadb-server python-mysqldb
Reading package lists… Done
Building dependency tree
Reading state information… Done
The following extra packages will be installed:
libaio1 libdbd-mysql-perl libdbi-perl libhtml-template-perl
libmariadbclient18 libmysqlclient18 libterm-readkey-perl mariadb-client-5.5
mariadb-client-core-5.5 mariadb-common mariadb-server-5.5
mariadb-server-core-5.5 mysql-common
Suggested packages:
libmldbm-perl libnet-daemon-perl libplrpc-perl libsql-statement-perl
libipc-sharedcache-perl mailx mariadb-test tinyca python-egenix-mxdatetime
mysql-server-5.1 mysql-server python-mysqldb-dbg
The following NEW packages will be installed:
libaio1 libdbd-mysql-perl libdbi-perl libhtml-template-perl
libmariadbclient18 libmysqlclient18 libterm-readkey-perl mariadb-client-5.5
mariadb-client-core-5.5 mariadb-common mariadb-server mariadb-server-5.5
mariadb-server-core-5.5 mysql-common python-mysqldb
0 upgraded, 15 newly installed, 0 to remove and 0 not upgraded.
Need to get 11.5 MB of archives.
After this operation, 118 MB of additional disk space will be used.
Do you want to continue? [Y/n] Y
Get:1 http://us.archive.ubuntu.com/ubuntu/ trusty/main libaio1 amd64 0.3.109-4 [6,364 B]
Get:2 http://us.archive.ubuntu.com/ubuntu/ trusty-updates/main mysql-common all 5.5.44-0ubuntu0.14.04.1 [13.9 kB]
Get:3 http://us.archive.ubuntu.com/ubuntu/ trusty-updates/universe mariadb-common all 5.5.44-1ubuntu0.14.04.1 [13.9 kB]
Get:4 http://us.archive.ubuntu.com/ubuntu/ trusty-updates/universe libmariadbclient18 amd64 5.5.44-1ubuntu0.14.04.1 [532 kB]
Get:5 http://us.archive.ubuntu.com/ubuntu/ trusty-updates/main libmysqlclient18 amd64 5.5.44-0ubuntu0.14.04.1 [596 kB]
Get:6 http://us.archive.ubuntu.com/ubuntu/ trusty/main libdbi-perl amd64 1.630-1 [879 kB]
Get:7 http://us.archive.ubuntu.com/ubuntu/ trusty/main libterm-readkey-perl amd64 2.31-1 [27.4 kB]
Get:8 http://us.archive.ubuntu.com/ubuntu/ trusty-updates/universe mariadb-client-core-5.5 amd64 5.5.44-1ubuntu0.14.04.1 [637 kB]
Get:9 http://us.archive.ubuntu.com/ubuntu/ trusty-updates/universe mariadb-client-5.5 amd64 5.5.44-1ubuntu0.14.04.1 [973 kB]
Get:10 http://us.archive.ubuntu.com/ubuntu/ trusty-updates/universe mariadb-server-core-5.5 amd64 5.5.44-1ubuntu0.14.04.1 [3,842 kB]
Get:11 http://us.archive.ubuntu.com/ubuntu/ trusty-updates/universe mariadb-server-5.5 amd64 5.5.44-1ubuntu0.14.04.1 [3,749 kB]
Get:12 http://us.archive.ubuntu.com/ubuntu/ trusty/main libdbd-mysql-perl amd64 4.025-1 [99.3 kB]
Get:13 http://us.archive.ubuntu.com/ubuntu/ trusty/main libhtml-template-perl all 2.95-1 [65.5 kB]
Get:14 http://us.archive.ubuntu.com/ubuntu/ trusty-updates/universe mariadb-server all 5.5.44-1ubuntu0.14.04.1 [11.7 kB]
Get:15 http://us.archive.ubuntu.com/ubuntu/ trusty/main python-mysqldb amd64 1.2.3-2ubuntu1 [55.4 kB]
Fetched 11.5 MB in 5min 46s (33.2 kB/s)
Preconfiguring packages …
Selecting previously unselected package libaio1:amd64.
(Reading database … 175350 files and directories currently installed.)
Preparing to unpack …/libaio1_0.3.109-4_amd64.deb …
Unpacking libaio1:amd64 (0.3.109-4) …
Selecting previously unselected package mysql-common.
Preparing to unpack …/mysql-common_5.5.44-0ubuntu0.14.04.1_all.deb …
Unpacking mysql-common (5.5.44-0ubuntu0.14.04.1) …
Selecting previously unselected package mariadb-common.
Preparing to unpack …/mariadb-common_5.5.44-1ubuntu0.14.04.1_all.deb …
Unpacking mariadb-common (5.5.44-1ubuntu0.14.04.1) …
Selecting previously unselected package libmariadbclient18:amd64.
Preparing to unpack …/libmariadbclient18_5.5.44-1ubuntu0.14.04.1_amd64.deb …
Unpacking libmariadbclient18:amd64 (5.5.44-1ubuntu0.14.04.1) …
Selecting previously unselected package libmysqlclient18:amd64.
Preparing to unpack …/libmysqlclient18_5.5.44-0ubuntu0.14.04.1_amd64.deb …
Unpacking libmysqlclient18:amd64 (5.5.44-0ubuntu0.14.04.1) …
Selecting previously unselected package libdbi-perl.
Preparing to unpack …/libdbi-perl_1.630-1_amd64.deb …
Unpacking libdbi-perl (1.630-1) …
Selecting previously unselected package libterm-readkey-perl.
Preparing to unpack …/libterm-readkey-perl_2.31-1_amd64.deb …
Unpacking libterm-readkey-perl (2.31-1) …
Selecting previously unselected package mariadb-client-core-5.5.
Preparing to unpack …/mariadb-client-core-5.5_5.5.44-1ubuntu0.14.04.1_amd64.deb …
Unpacking mariadb-client-core-5.5 (5.5.44-1ubuntu0.14.04.1) …
Selecting previously unselected package mariadb-client-5.5.
Preparing to unpack …/mariadb-client-5.5_5.5.44-1ubuntu0.14.04.1_amd64.deb …
Unpacking mariadb-client-5.5 (5.5.44-1ubuntu0.14.04.1) …
Selecting previously unselected package mariadb-server-core-5.5.
Preparing to unpack …/mariadb-server-core-5.5_5.5.44-1ubuntu0.14.04.1_amd64.deb …
Unpacking mariadb-server-core-5.5 (5.5.44-1ubuntu0.14.04.1) …
Processing triggers for man-db (2.6.7.1-1ubuntu1) …
Setting up mysql-common (5.5.44-0ubuntu0.14.04.1) …
Setting up mariadb-common (5.5.44-1ubuntu0.14.04.1) …
Selecting previously unselected package mariadb-server-5.5.
(Reading database … 175680 files and directories currently installed.)
Preparing to unpack …/mariadb-server-5.5_5.5.44-1ubuntu0.14.04.1_amd64.deb …
Unpacking mariadb-server-5.5 (5.5.44-1ubuntu0.14.04.1) …
Selecting previously unselected package libdbd-mysql-perl.
Preparing to unpack …/libdbd-mysql-perl_4.025-1_amd64.deb …
Unpacking libdbd-mysql-perl (4.025-1) …
Selecting previously unselected package libhtml-template-perl.
Preparing to unpack …/libhtml-template-perl_2.95-1_all.deb …
Unpacking libhtml-template-perl (2.95-1) …
Selecting previously unselected package mariadb-server.
Preparing to unpack …/mariadb-server_5.5.44-1ubuntu0.14.04.1_all.deb …
Unpacking mariadb-server (5.5.44-1ubuntu0.14.04.1) …
Selecting previously unselected package python-mysqldb.
Preparing to unpack …/python-mysqldb_1.2.3-2ubuntu1_amd64.deb …
Unpacking python-mysqldb (1.2.3-2ubuntu1) …
Processing triggers for man-db (2.6.7.1-1ubuntu1) …
Processing triggers for ureadahead (0.100.0-16) …
ureadahead will be reprofiled on next reboot
Setting up libaio1:amd64 (0.3.109-4) …
Setting up libmariadbclient18:amd64 (5.5.44-1ubuntu0.14.04.1) …
Setting up libmysqlclient18:amd64 (5.5.44-0ubuntu0.14.04.1) …
Setting up libdbi-perl (1.630-1) …
Setting up libterm-readkey-perl (2.31-1) …
Setting up mariadb-client-core-5.5 (5.5.44-1ubuntu0.14.04.1) …
Setting up mariadb-client-5.5 (5.5.44-1ubuntu0.14.04.1) …
Setting up mariadb-server-core-5.5 (5.5.44-1ubuntu0.14.04.1) …
Setting up mariadb-server-5.5 (5.5.44-1ubuntu0.14.04.1) …
* Stopping MariaDB database server mysqld [ OK ]
chown: cannot access ‘/var/run/mysqld’: No such file or directory
150822 20:10:11 [Note] /usr/sbin/mysqld (mysqld 5.5.44-MariaDB-1ubuntu0.14.04.1) starting as process 7271 …
* Starting MariaDB database server mysqld [ OK ]
* Checking for corrupt, not cleanly closed and upgrade needing tables.
Setting up libdbd-mysql-perl (4.025-1) …
Setting up libhtml-template-perl (2.95-1) …
Setting up python-mysqldb (1.2.3-2ubuntu1) …
Processing triggers for ureadahead (0.100.0-16) …
Setting up mariadb-server (5.5.44-1ubuntu0.14.04.1) …
Processing triggers for libc-bin (2.19-0ubuntu6.6) …
2.为数据库管理账户选择一个合适的密码
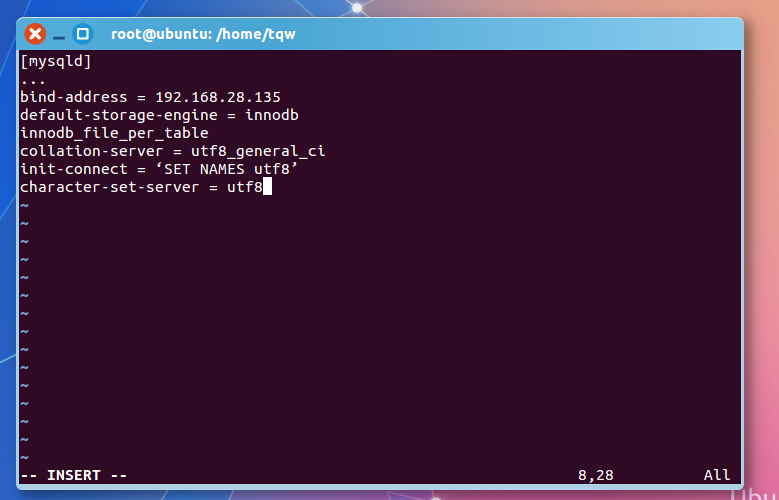
3.创建并编辑/etc/mysql/conf.d/mysqld_openstack.cnf文件和完成下列操作:
a. 在mysql的对话中,设置bind-address键为控制节点的主网络IP地址使得其能够通过主网络访问其他节点。
[mysqld]
…
bind-address = 10.0.0.11
b.在mysqld的对话中,设置接下来的键值使得有用选择能够使用和utf-8字符设置生效。
[mysqld]
…
default-storage-engine = innodb
innodb_file_per_table
collation-server = utf8_general_ci
init-connect = ‘SET NAMES utf8’
character-set-server = utf8
实践:
完成安装
1.重启数据库服务
service mysql restart
实践:

重启两次失效,我发觉可能是由于前一个文件我写错了。然后我把省略号删除掉。
我的那个/etc/mysql/conf.d/mysqld_openstack.cnf文件修改内容如下:

接着我再运行一遍:
成功了:
2.使得数据库服务安全
# mysql_secure_installation
NOTE: RUNNING ALL PARTS OF THIS SCRIPT IS RECOMMENDED FOR ALL MariaDB
SERVERS IN PRODUCTION USE! PLEASE READ EACH STEP CAREFULLY!
In order to log into MariaDB to secure it, we’ll need the current
password for the root user. If you’ve just installed MariaDB, and
you haven’t set the root password yet, the password will be blank,
so you should just press enter here.
Enter current password for root (enter for none):
OK, successfully used password, moving on…
Setting the root password ensures that nobody can log into the MariaDB
root user without the proper authorisation.
Set root password? [Y/n] Y
New password:
Re-enter new password:
Password updated successfully!
Reloading privilege tables..
… Success!
By default, a MariaDB installation has an anonymous user, allowing anyone
to log into MariaDB without having to have a user account created for
them. This is intended only for testing, and to make the installation
go a bit smoother. You should remove them before moving into a
production environment.
Remove anonymous users? [Y/n] Y
… Success!
Normally, root should only be allowed to connect from ‘localhost’. This
ensures that someone cannot guess at the root password from the network.
Disallow root login remotely? [Y/n] Y
… Success!
By default, MariaDB comes with a database named ‘test’ that anyone can
access. This is also intended only for testing, and should be removed
before moving into a production environment.
Remove test database and access to it? [Y/n] Y
- Dropping test database…
… Success!
- Removing privileges on test database…
… Success!
Reloading the privilege tables will ensure that all changes made so far
will take effect immediately.
Reload privilege tables now? [Y/n] Y
… Success!
Cleaning up…
All done! If you’ve completed all of the above steps, your MariaDB
installation should now be secure.
Thanks for using MariaDB!
实践:
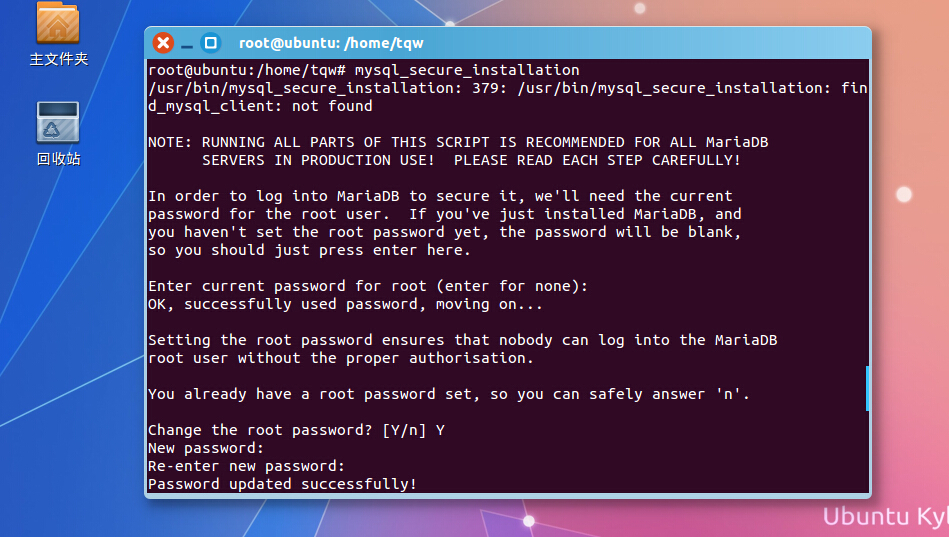
需要你重新输入密码和改变密码,但是我都改成还是root,嘿嘿,本人比较懒,然后后面有几次让你确认,然后我就确认,接着完成了。
信息显示如下:
root@ubuntu:/home/tqw# mysql_secure_installation
/usr/bin/mysql_secure_installation: 379: /usr/bin/mysql_secure_installation: find_mysql_client: not foundNOTE: RUNNING ALL PARTS OF THIS SCRIPT IS RECOMMENDED FOR ALL MariaDB
SERVERS IN PRODUCTION USE! PLEASE READ EACH STEP CAREFULLY!In order to log into MariaDB to secure it, we’ll need the current
password for the root user. If you’ve just installed MariaDB, and
you haven’t set the root password yet, the password will be blank,
so you should just press enter here.Enter current password for root (enter for none):
OK, successfully used password, moving on…Setting the root password ensures that nobody can log into the MariaDB
root user without the proper authorisation.You already have a root password set, so you can safely answer ‘n’.
Change the root password? [Y/n] Y
New password:
Re-enter new password:
Password updated successfully!
Reloading privilege tables..
… Success!By default, a MariaDB installation has an anonymous user, allowing anyone
to log into MariaDB without having to have a user account created for
them. This is intended only for testing, and to make the installation
go a bit smoother. You should remove them before moving into a
production environment.Remove anonymous users? [Y/n] Y
… Success!Normally, root should only be allowed to connect from ‘localhost’. This
ensures that someone cannot guess at the root password from the network.Disallow root login remotely? [Y/n] Y
… Success!By default, MariaDB comes with a database named ‘test’ that anyone can
access. This is also intended only for testing, and should be removed
before moving into a production environment.Remove test database and access to it? [Y/n] Y
- Dropping test database…
ERROR 1008 (HY000) at line 1: Can’t drop database ‘test’; database doesn’t exist
… Failed! Not critical, keep moving…
- Removing privileges on test database…
… Success!Reloading the privilege tables will ensure that all changes made so far
will take effect immediately.Reload privilege tables now? [Y/n] Y
… Success!Cleaning up…
All done! If you’ve completed all of the above steps, your MariaDB
installation should now be secure.Thanks for using MariaDB!
消息队列
OpenStack使用一个消息队列在服务之间协调操作和状态信息。这个消息队列服务一般运行在controller节点上。OpenStack支持几个消息队列服务,比如RabbitMQ,Qpid和ZeroMQ。然而,大多数版本的OpenStack支持一个比较受欢迎的队列服务。这个指导实现RabbitMQ消息队列的服务因为大多数版本都支持它。如果你想实现一个不同的消息队列,请咨询与它相关的文档。
安装队列服务
- 安装包
# apt-get install rabbitmq-server
配置队列服务
1.增加OpenStack使用者
# rabbitmqctl add_user openstack RABBIT_PASS
Creating user “openstack” …
…done.
用合适的密码取代RABBIT_PASS
2.允许openstack用户配置、写入和读取访问的权限
# rabbitmqctl set_permissions openstack “.” “.” “.*”
Setting permissions for user “openstack” in vhost “/” …
…done.
实践:
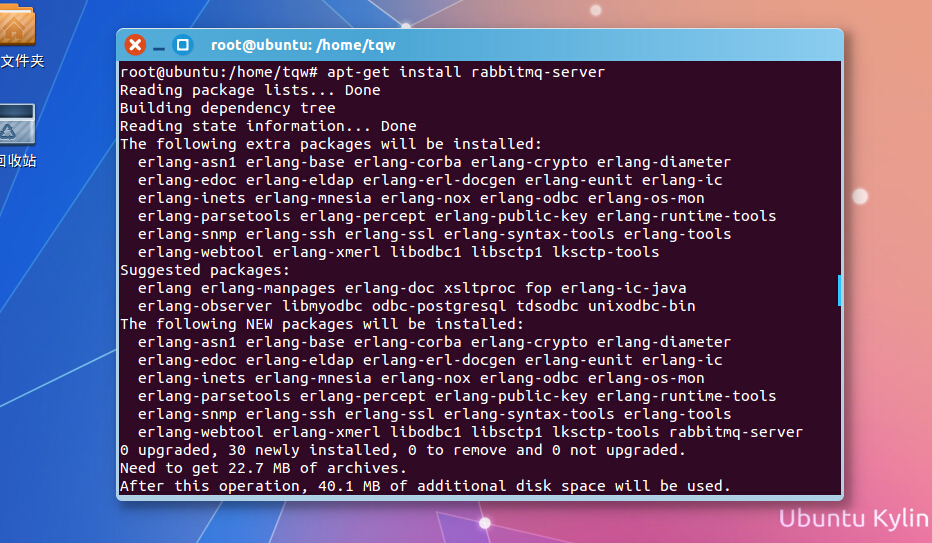
信息:
root@ubuntu:/home/tqw# apt-get install rabbitmq-server
Reading package lists… Done
Building dependency tree
Reading state information… Done
The following extra packages will be installed:
erlang-asn1 erlang-base erlang-corba erlang-crypto erlang-diameter
erlang-edoc erlang-eldap erlang-erl-docgen erlang-eunit erlang-ic
erlang-inets erlang-mnesia erlang-nox erlang-odbc erlang-os-mon
erlang-parsetools erlang-percept erlang-public-key erlang-runtime-tools
erlang-snmp erlang-ssh erlang-ssl erlang-syntax-tools erlang-tools
erlang-webtool erlang-xmerl libodbc1 libsctp1 lksctp-tools
Suggested packages:
erlang erlang-manpages erlang-doc xsltproc fop erlang-ic-java
erlang-observer libmyodbc odbc-postgresql tdsodbc unixodbc-bin
The following NEW packages will be installed:
erlang-asn1 erlang-base erlang-corba erlang-crypto erlang-diameter
erlang-edoc erlang-eldap erlang-erl-docgen erlang-eunit erlang-ic
erlang-inets erlang-mnesia erlang-nox erlang-odbc erlang-os-mon
erlang-parsetools erlang-percept erlang-public-key erlang-runtime-tools
erlang-snmp erlang-ssh erlang-ssl erlang-syntax-tools erlang-tools
erlang-webtool erlang-xmerl libodbc1 libsctp1 lksctp-tools rabbitmq-server
0 upgraded, 30 newly installed, 0 to remove and 0 not upgraded.
Need to get 22.7 MB of archives.
After this operation, 40.1 MB of additional disk space will be used.
Do you want to continue? [Y/n] Y
Get:1 http://us.archive.ubuntu.com/ubuntu/ trusty/main libodbc1 amd64 2.2.14p2-5ubuntu5 [175 kB]
Get:2 http://ubuntu-cloud.archive.canonical.com/ubuntu/ trusty-updates/kilo/main rabbitmq-server all 3.4.3-2~cloud0 [4,040 kB]
Get:3 http://us.archive.ubuntu.com/ubuntu/ trusty/main libsctp1 amd64 1.0.15+dfsg-1 [9,226 B]
Get:4 http://us.archive.ubuntu.com/ubuntu/ trusty-updates/main erlang-base amd64 1:16.b.3-dfsg-1ubuntu2.1 [6,536 kB]
Get:5 http://us.archive.ubuntu.com/ubuntu/ trusty-updates/main erlang-asn1 amd64 1:16.b.3-dfsg-1ubuntu2.1 [738 kB]
Get:6 http://us.archive.ubuntu.com/ubuntu/ trusty-updates/main erlang-mnesia amd64 1:16.b.3-dfsg-1ubuntu2.1 [658 kB]
Get:7 http://us.archive.ubuntu.com/ubuntu/ trusty-updates/main erlang-runtime-tools amd64 1:16.b.3-dfsg-1ubuntu2.1 [157 kB]
Get:8 http://us.archive.ubuntu.com/ubuntu/ trusty-updates/main erlang-crypto amd64 1:16.b.3-dfsg-1ubuntu2.1 [70.2 kB]
Get:9 http://us.archive.ubuntu.com/ubuntu/ trusty-updates/main erlang-public-key amd64 1:16.b.3-dfsg-1ubuntu2.1 [498 kB]
Get:10 http://us.archive.ubuntu.com/ubuntu/ trusty-updates/main erlang-ssl amd64 1:16.b.3-dfsg-1ubuntu2.1 [559 kB]
Get:11 http://us.archive.ubuntu.com/ubuntu/ trusty-updates/main erlang-inets amd64 1:16.b.3-dfsg-1ubuntu2.1 [753 kB]
Get:12 http://us.archive.ubuntu.com/ubuntu/ trusty-updates/main erlang-corba amd64 1:16.b.3-dfsg-1ubuntu2.1 [2,235 kB]
Get:13 http://us.archive.ubuntu.com/ubuntu/ trusty-updates/main erlang-syntax-tools amd64 1:16.b.3-dfsg-1ubuntu2.1 [289 kB]
Get:14 http://us.archive.ubuntu.com/ubuntu/ trusty-updates/main erlang-diameter amd64 1:16.b.3-dfsg-1ubuntu2.1 [600 kB]
Get:15 http://us.archive.ubuntu.com/ubuntu/ trusty-updates/main erlang-xmerl amd64 1:16.b.3-dfsg-1ubuntu2.1 [972 kB]
Get:16 http://us.archive.ubuntu.com/ubuntu/ trusty-updates/main erlang-edoc amd64 1:16.b.3-dfsg-1ubuntu2.1 [298 kB]
Get:17 http://us.archive.ubuntu.com/ubuntu/ trusty-updates/main erlang-eldap amd64 1:16.b.3-dfsg-1ubuntu2.1 [91.8 kB]
Get:18 http://us.archive.ubuntu.com/ubuntu/ trusty-updates/main erlang-erl-docgen amd64 1:16.b.3-dfsg-1ubuntu2.1 [134 kB]
Get:19 http://us.archive.ubuntu.com/ubuntu/ trusty-updates/main erlang-eunit amd64 1:16.b.3-dfsg-1ubuntu2.1 [137 kB]
Get:20 http://us.archive.ubuntu.com/ubuntu/ trusty-updates/main erlang-ic amd64 1:16.b.3-dfsg-1ubuntu2.1 [818 kB]
Get:21 http://us.archive.ubuntu.com/ubuntu/ trusty-updates/main erlang-odbc amd64 1:16.b.3-dfsg-1ubuntu2.1 [50.1 kB]
Get:22 http://us.archive.ubuntu.com/ubuntu/ trusty-updates/main erlang-snmp amd64 1:16.b.3-dfsg-1ubuntu2.1 [1,497 kB]
Get:23 http://us.archive.ubuntu.com/ubuntu/ trusty-updates/main erlang-os-mon amd64 1:16.b.3-dfsg-1ubuntu2.1 [94.9 kB]
Get:24 http://us.archive.ubuntu.com/ubuntu/ trusty-updates/main erlang-parsetools amd64 1:16.b.3-dfsg-1ubuntu2.1 [156 kB]
Get:25 http://us.archive.ubuntu.com/ubuntu/ trusty-updates/main erlang-percept amd64 1:16.b.3-dfsg-1ubuntu2.1 [136 kB]
Get:26 http://us.archive.ubuntu.com/ubuntu/ trusty-updates/main erlang-ssh amd64 1:16.b.3-dfsg-1ubuntu2.1 [361 kB]
Get:27 http://us.archive.ubuntu.com/ubuntu/ trusty-updates/main erlang-webtool amd64 1:16.b.3-dfsg-1ubuntu2.1 [39.5 kB]
Get:28 http://us.archive.ubuntu.com/ubuntu/ trusty-updates/main erlang-tools amd64 1:16.b.3-dfsg-1ubuntu2.1 [501 kB]
Get:29 http://us.archive.ubuntu.com/ubuntu/ trusty-updates/main erlang-nox all 1:16.b.3-dfsg-1ubuntu2.1 [17.7 kB]
Get:30 http://us.archive.ubuntu.com/ubuntu/ trusty/main lksctp-tools amd64 1.0.15+dfsg-1 [51.3 kB]
Fetched 22.7 MB in 3min 0s (125 kB/s)
Selecting previously unselected package libodbc1:amd64.
(Reading database … 175842 files and directories currently installed.)
Preparing to unpack …/libodbc1_2.2.14p2-5ubuntu5_amd64.deb …
Unpacking libodbc1:amd64 (2.2.14p2-5ubuntu5) …
Selecting previously unselected package libsctp1:amd64.
Preparing to unpack …/libsctp1_1.0.15+dfsg-1_amd64.deb …
Unpacking libsctp1:amd64 (1.0.15+dfsg-1) …
Selecting previously unselected package erlang-base.
Preparing to unpack …/erlang-base_1%3a16.b.3-dfsg-1ubuntu2.1_amd64.deb …
Unpacking erlang-base (1:16.b.3-dfsg-1ubuntu2.1) …
Selecting previously unselected package erlang-asn1.
Preparing to unpack …/erlang-asn1_1%3a16.b.3-dfsg-1ubuntu2.1_amd64.deb …
Unpacking erlang-asn1 (1:16.b.3-dfsg-1ubuntu2.1) …
Selecting previously unselected package erlang-mnesia.
Preparing to unpack …/erlang-mnesia_1%3a16.b.3-dfsg-1ubuntu2.1_amd64.deb …
Unpacking erlang-mnesia (1:16.b.3-dfsg-1ubuntu2.1) …
Selecting previously unselected package erlang-runtime-tools.
Preparing to unpack …/erlang-runtime-tools_1%3a16.b.3-dfsg-1ubuntu2.1_amd64.deb …
Unpacking erlang-runtime-tools (1:16.b.3-dfsg-1ubuntu2.1) …
Selecting previously unselected package erlang-crypto.
Preparing to unpack …/erlang-crypto_1%3a16.b.3-dfsg-1ubuntu2.1_amd64.deb …
Unpacking erlang-crypto (1:16.b.3-dfsg-1ubuntu2.1) …
Selecting previously unselected package erlang-public-key.
Preparing to unpack …/erlang-public-key_1%3a16.b.3-dfsg-1ubuntu2.1_amd64.deb …
Unpacking erlang-public-key (1:16.b.3-dfsg-1ubuntu2.1) …
Selecting previously unselected package erlang-ssl.
Preparing to unpack …/erlang-ssl_1%3a16.b.3-dfsg-1ubuntu2.1_amd64.deb …
Unpacking erlang-ssl (1:16.b.3-dfsg-1ubuntu2.1) …
Selecting previously unselected package erlang-inets.
Preparing to unpack …/erlang-inets_1%3a16.b.3-dfsg-1ubuntu2.1_amd64.deb …
Unpacking erlang-inets (1:16.b.3-dfsg-1ubuntu2.1) …
Selecting previously unselected package erlang-corba.
Preparing to unpack …/erlang-corba_1%3a16.b.3-dfsg-1ubuntu2.1_amd64.deb …
Unpacking erlang-corba (1:16.b.3-dfsg-1ubuntu2.1) …
Selecting previously unselected package erlang-syntax-tools.
Preparing to unpack …/erlang-syntax-tools_1%3a16.b.3-dfsg-1ubuntu2.1_amd64.deb …
Unpacking erlang-syntax-tools (1:16.b.3-dfsg-1ubuntu2.1) …
Selecting previously unselected package erlang-diameter.
Preparing to unpack …/erlang-diameter_1%3a16.b.3-dfsg-1ubuntu2.1_amd64.deb …
Unpacking erlang-diameter (1:16.b.3-dfsg-1ubuntu2.1) …
Selecting previously unselected package erlang-xmerl.
Preparing to unpack …/erlang-xmerl_1%3a16.b.3-dfsg-1ubuntu2.1_amd64.deb …
Unpacking erlang-xmerl (1:16.b.3-dfsg-1ubuntu2.1) …
Selecting previously unselected package erlang-edoc.
Preparing to unpack …/erlang-edoc_1%3a16.b.3-dfsg-1ubuntu2.1_amd64.deb …
Unpacking erlang-edoc (1:16.b.3-dfsg-1ubuntu2.1) …
Selecting previously unselected package erlang-eldap.
Preparing to unpack …/erlang-eldap_1%3a16.b.3-dfsg-1ubuntu2.1_amd64.deb …
Unpacking erlang-eldap (1:16.b.3-dfsg-1ubuntu2.1) …
Selecting previously unselected package erlang-erl-docgen.
Preparing to unpack …/erlang-erl-docgen_1%3a16.b.3-dfsg-1ubuntu2.1_amd64.deb …
Unpacking erlang-erl-docgen (1:16.b.3-dfsg-1ubuntu2.1) …
Selecting previously unselected package erlang-eunit.
Preparing to unpack …/erlang-eunit_1%3a16.b.3-dfsg-1ubuntu2.1_amd64.deb …
Unpacking erlang-eunit (1:16.b.3-dfsg-1ubuntu2.1) …
Selecting previously unselected package erlang-ic.
Preparing to unpack …/erlang-ic_1%3a16.b.3-dfsg-1ubuntu2.1_amd64.deb …
Unpacking erlang-ic (1:16.b.3-dfsg-1ubuntu2.1) …
Selecting previously unselected package erlang-odbc.
Preparing to unpack …/erlang-odbc_1%3a16.b.3-dfsg-1ubuntu2.1_amd64.deb …
Unpacking erlang-odbc (1:16.b.3-dfsg-1ubuntu2.1) …
Selecting previously unselected package erlang-snmp.
Preparing to unpack …/erlang-snmp_1%3a16.b.3-dfsg-1ubuntu2.1_amd64.deb …
Unpacking erlang-snmp (1:16.b.3-dfsg-1ubuntu2.1) …
Selecting previously unselected package erlang-os-mon.
Preparing to unpack …/erlang-os-mon_1%3a16.b.3-dfsg-1ubuntu2.1_amd64.deb …
Unpacking erlang-os-mon (1:16.b.3-dfsg-1ubuntu2.1) …
Selecting previously unselected package erlang-parsetools.
Preparing to unpack …/erlang-parsetools_1%3a16.b.3-dfsg-1ubuntu2.1_amd64.deb …
Unpacking erlang-parsetools (1:16.b.3-dfsg-1ubuntu2.1) …
Selecting previously unselected package erlang-percept.
Preparing to unpack …/erlang-percept_1%3a16.b.3-dfsg-1ubuntu2.1_amd64.deb …
Unpacking erlang-percept (1:16.b.3-dfsg-1ubuntu2.1) …
Selecting previously unselected package erlang-ssh.
Preparing to unpack …/erlang-ssh_1%3a16.b.3-dfsg-1ubuntu2.1_amd64.deb …
Unpacking erlang-ssh (1:16.b.3-dfsg-1ubuntu2.1) …
Selecting previously unselected package erlang-webtool.
Preparing to unpack …/erlang-webtool_1%3a16.b.3-dfsg-1ubuntu2.1_amd64.deb …
Unpacking erlang-webtool (1:16.b.3-dfsg-1ubuntu2.1) …
Selecting previously unselected package erlang-tools.
Preparing to unpack …/erlang-tools_1%3a16.b.3-dfsg-1ubuntu2.1_amd64.deb …
Unpacking erlang-tools (1:16.b.3-dfsg-1ubuntu2.1) …
Selecting previously unselected package erlang-nox.
Preparing to unpack …/erlang-nox_1%3a16.b.3-dfsg-1ubuntu2.1_all.deb …
Unpacking erlang-nox (1:16.b.3-dfsg-1ubuntu2.1) …
Selecting previously unselected package lksctp-tools.
Preparing to unpack …/lksctp-tools_1.0.15+dfsg-1_amd64.deb …
Unpacking lksctp-tools (1.0.15+dfsg-1) …
Selecting previously unselected package rabbitmq-server.
Preparing to unpack …/rabbitmq-server_3.4.3-2~cloud0_all.deb …
Unpacking rabbitmq-server (3.4.3-2~cloud0) …
Processing triggers for man-db (2.6.7.1-1ubuntu1) …
Processing triggers for ureadahead (0.100.0-16) …
Setting up libodbc1:amd64 (2.2.14p2-5ubuntu5) …
Setting up libsctp1:amd64 (1.0.15+dfsg-1) …
Setting up erlang-base (1:16.b.3-dfsg-1ubuntu2.1) …
Searching for services which depend on erlang and should be started…none found.
Setting up erlang-asn1 (1:16.b.3-dfsg-1ubuntu2.1) …
Setting up erlang-mnesia (1:16.b.3-dfsg-1ubuntu2.1) …
Setting up erlang-runtime-tools (1:16.b.3-dfsg-1ubuntu2.1) …
Setting up erlang-crypto (1:16.b.3-dfsg-1ubuntu2.1) …
Setting up erlang-public-key (1:16.b.3-dfsg-1ubuntu2.1) …
Setting up erlang-ssl (1:16.b.3-dfsg-1ubuntu2.1) …
Setting up erlang-inets (1:16.b.3-dfsg-1ubuntu2.1) …
Setting up erlang-corba (1:16.b.3-dfsg-1ubuntu2.1) …
Setting up erlang-syntax-tools (1:16.b.3-dfsg-1ubuntu2.1) …
Setting up erlang-diameter (1:16.b.3-dfsg-1ubuntu2.1) …
Setting up erlang-xmerl (1:16.b.3-dfsg-1ubuntu2.1) …
Setting up erlang-edoc (1:16.b.3-dfsg-1ubuntu2.1) …
Setting up erlang-eldap (1:16.b.3-dfsg-1ubuntu2.1) …
Setting up erlang-erl-docgen (1:16.b.3-dfsg-1ubuntu2.1) …
Setting up erlang-eunit (1:16.b.3-dfsg-1ubuntu2.1) …
Setting up erlang-ic (1:16.b.3-dfsg-1ubuntu2.1) …
Setting up erlang-odbc (1:16.b.3-dfsg-1ubuntu2.1) …
Setting up erlang-snmp (1:16.b.3-dfsg-1ubuntu2.1) …
Setting up erlang-os-mon (1:16.b.3-dfsg-1ubuntu2.1) …
Setting up erlang-parsetools (1:16.b.3-dfsg-1ubuntu2.1) …
Setting up erlang-percept (1:16.b.3-dfsg-1ubuntu2.1) …
Setting up erlang-ssh (1:16.b.3-dfsg-1ubuntu2.1) …
Setting up erlang-webtool (1:16.b.3-dfsg-1ubuntu2.1) …
Setting up erlang-tools (1:16.b.3-dfsg-1ubuntu2.1) …
Setting up erlang-nox (1:16.b.3-dfsg-1ubuntu2.1) …
Setting up lksctp-tools (1.0.15+dfsg-1) …
Setting up rabbitmq-server (3.4.3-2~cloud0) …
Adding grouprabbitmq' (GID 127) ...rabbitmq’ (UID 118) …
Done.
Adding system user
Adding new userrabbitmq' (UID 118) with grouprabbitmq’ …
Not creating home directory/var/lib/rabbitmq'.rabbitmq’ (GID 127) …
* Starting message broker rabbitmq-server [ OK ]
Processing triggers for libc-bin (2.19-0ubuntu6.6) ...
Processing triggers for ureadahead (0.100.0-16) ...
root@ubuntu:/home/tqw# apt-get install rabbitmq-server
Reading package lists... Done
Building dependency tree
Reading state information... Done
The following extra packages will be installed:
erlang-asn1 erlang-base erlang-corba erlang-crypto erlang-diameter
erlang-edoc erlang-eldap erlang-erl-docgen erlang-eunit erlang-ic
erlang-inets erlang-mnesia erlang-nox erlang-odbc erlang-os-mon
erlang-parsetools erlang-percept erlang-public-key erlang-runtime-tools
erlang-snmp erlang-ssh erlang-ssl erlang-syntax-tools erlang-tools
erlang-webtool erlang-xmerl libodbc1 libsctp1 lksctp-tools
Suggested packages:
erlang erlang-manpages erlang-doc xsltproc fop erlang-ic-java
erlang-observer libmyodbc odbc-postgresql tdsodbc unixodbc-bin
The following NEW packages will be installed:
erlang-asn1 erlang-base erlang-corba erlang-crypto erlang-diameter
erlang-edoc erlang-eldap erlang-erl-docgen erlang-eunit erlang-ic
erlang-inets erlang-mnesia erlang-nox erlang-odbc erlang-os-mon
erlang-parsetools erlang-percept erlang-public-key erlang-runtime-tools
erlang-snmp erlang-ssh erlang-ssl erlang-syntax-tools erlang-tools
erlang-webtool erlang-xmerl libodbc1 libsctp1 lksctp-tools rabbitmq-server
0 upgraded, 30 newly installed, 0 to remove and 0 not upgraded.
Need to get 22.7 MB of archives.
After this operation, 40.1 MB of additional disk space will be used.
Do you want to continue? [Y/n] Y
Get:1 http://us.archive.ubuntu.com/ubuntu/ trusty/main libodbc1 amd64 2.2.14p2-5ubuntu5 [175 kB]
Get:2 http://ubuntu-cloud.archive.canonical.com/ubuntu/ trusty-updates/kilo/main rabbitmq-server all 3.4.3-2~cloud0 [4,040 kB]
Get:3 http://us.archive.ubuntu.com/ubuntu/ trusty/main libsctp1 amd64 1.0.15+dfsg-1 [9,226 B]
Get:4 http://us.archive.ubuntu.com/ubuntu/ trusty-updates/main erlang-base amd64 1:16.b.3-dfsg-1ubuntu2.1 [6,536 kB]
Get:5 http://us.archive.ubuntu.com/ubuntu/ trusty-updates/main erlang-asn1 amd64 1:16.b.3-dfsg-1ubuntu2.1 [738 kB]
Get:6 http://us.archive.ubuntu.com/ubuntu/ trusty-updates/main erlang-mnesia amd64 1:16.b.3-dfsg-1ubuntu2.1 [658 kB]
Get:7 http://us.archive.ubuntu.com/ubuntu/ trusty-updates/main erlang-runtime-tools amd64 1:16.b.3-dfsg-1ubuntu2.1 [157 kB]
Get:8 http://us.archive.ubuntu.com/ubuntu/ trusty-updates/main erlang-crypto amd64 1:16.b.3-dfsg-1ubuntu2.1 [70.2 kB]
Get:9 http://us.archive.ubuntu.com/ubuntu/ trusty-updates/main erlang-public-key amd64 1:16.b.3-dfsg-1ubuntu2.1 [498 kB]
Get:10 http://us.archive.ubuntu.com/ubuntu/ trusty-updates/main erlang-ssl amd64 1:16.b.3-dfsg-1ubuntu2.1 [559 kB]
Get:11 http://us.archive.ubuntu.com/ubuntu/ trusty-updates/main erlang-inets amd64 1:16.b.3-dfsg-1ubuntu2.1 [753 kB]
Get:12 http://us.archive.ubuntu.com/ubuntu/ trusty-updates/main erlang-corba amd64 1:16.b.3-dfsg-1ubuntu2.1 [2,235 kB]
Get:13 http://us.archive.ubuntu.com/ubuntu/ trusty-updates/main erlang-syntax-tools amd64 1:16.b.3-dfsg-1ubuntu2.1 [289 kB]
Get:14 http://us.archive.ubuntu.com/ubuntu/ trusty-updates/main erlang-diameter amd64 1:16.b.3-dfsg-1ubuntu2.1 [600 kB]
Get:15 http://us.archive.ubuntu.com/ubuntu/ trusty-updates/main erlang-xmerl amd64 1:16.b.3-dfsg-1ubuntu2.1 [972 kB]
Get:16 http://us.archive.ubuntu.com/ubuntu/ trusty-updates/main erlang-edoc amd64 1:16.b.3-dfsg-1ubuntu2.1 [298 kB]
Get:17 http://us.archive.ubuntu.com/ubuntu/ trusty-updates/main erlang-eldap amd64 1:16.b.3-dfsg-1ubuntu2.1 [91.8 kB]
Get:18 http://us.archive.ubuntu.com/ubuntu/ trusty-updates/main erlang-erl-docgen amd64 1:16.b.3-dfsg-1ubuntu2.1 [134 kB]
Get:19 http://us.archive.ubuntu.com/ubuntu/ trusty-updates/main erlang-eunit amd64 1:16.b.3-dfsg-1ubuntu2.1 [137 kB]
Get:20 http://us.archive.ubuntu.com/ubuntu/ trusty-updates/main erlang-ic amd64 1:16.b.3-dfsg-1ubuntu2.1 [818 kB]
Get:21 http://us.archive.ubuntu.com/ubuntu/ trusty-updates/main erlang-odbc amd64 1:16.b.3-dfsg-1ubuntu2.1 [50.1 kB]
Get:22 http://us.archive.ubuntu.com/ubuntu/ trusty-updates/main erlang-snmp amd64 1:16.b.3-dfsg-1ubuntu2.1 [1,497 kB]
Get:23 http://us.archive.ubuntu.com/ubuntu/ trusty-updates/main erlang-os-mon amd64 1:16.b.3-dfsg-1ubuntu2.1 [94.9 kB]
Get:24 http://us.archive.ubuntu.com/ubuntu/ trusty-updates/main erlang-parsetools amd64 1:16.b.3-dfsg-1ubuntu2.1 [156 kB]
Get:25 http://us.archive.ubuntu.com/ubuntu/ trusty-updates/main erlang-percept amd64 1:16.b.3-dfsg-1ubuntu2.1 [136 kB]
Get:26 http://us.archive.ubuntu.com/ubuntu/ trusty-updates/main erlang-ssh amd64 1:16.b.3-dfsg-1ubuntu2.1 [361 kB]
Get:27 http://us.archive.ubuntu.com/ubuntu/ trusty-updates/main erlang-webtool amd64 1:16.b.3-dfsg-1ubuntu2.1 [39.5 kB]
Get:28 http://us.archive.ubuntu.com/ubuntu/ trusty-updates/main erlang-tools amd64 1:16.b.3-dfsg-1ubuntu2.1 [501 kB]
Get:29 http://us.archive.ubuntu.com/ubuntu/ trusty-updates/main erlang-nox all 1:16.b.3-dfsg-1ubuntu2.1 [17.7 kB]
Get:30 http://us.archive.ubuntu.com/ubuntu/ trusty/main lksctp-tools amd64 1.0.15+dfsg-1 [51.3 kB]
Fetched 22.7 MB in 3min 0s (125 kB/s)
Selecting previously unselected package libodbc1:amd64.
(Reading database ... 175842 files and directories currently installed.)
Preparing to unpack .../libodbc1_2.2.14p2-5ubuntu5_amd64.deb ...
Unpacking libodbc1:amd64 (2.2.14p2-5ubuntu5) ...
Selecting previously unselected package libsctp1:amd64.
Preparing to unpack .../libsctp1_1.0.15+dfsg-1_amd64.deb ...
Unpacking libsctp1:amd64 (1.0.15+dfsg-1) ...
Selecting previously unselected package erlang-base.
Preparing to unpack .../erlang-base_1%3a16.b.3-dfsg-1ubuntu2.1_amd64.deb ...
Unpacking erlang-base (1:16.b.3-dfsg-1ubuntu2.1) ...
Selecting previously unselected package erlang-asn1.
Preparing to unpack .../erlang-asn1_1%3a16.b.3-dfsg-1ubuntu2.1_amd64.deb ...
Unpacking erlang-asn1 (1:16.b.3-dfsg-1ubuntu2.1) ...
Selecting previously unselected package erlang-mnesia.
Preparing to unpack .../erlang-mnesia_1%3a16.b.3-dfsg-1ubuntu2.1_amd64.deb ...
Unpacking erlang-mnesia (1:16.b.3-dfsg-1ubuntu2.1) ...
Selecting previously unselected package erlang-runtime-tools.
Preparing to unpack .../erlang-runtime-tools_1%3a16.b.3-dfsg-1ubuntu2.1_amd64.deb ...
Unpacking erlang-runtime-tools (1:16.b.3-dfsg-1ubuntu2.1) ...
Selecting previously unselected package erlang-crypto.
Preparing to unpack .../erlang-crypto_1%3a16.b.3-dfsg-1ubuntu2.1_amd64.deb ...
Unpacking erlang-crypto (1:16.b.3-dfsg-1ubuntu2.1) ...
Selecting previously unselected package erlang-public-key.
Preparing to unpack .../erlang-public-key_1%3a16.b.3-dfsg-1ubuntu2.1_amd64.deb ...
Unpacking erlang-public-key (1:16.b.3-dfsg-1ubuntu2.1) ...
Selecting previously unselected package erlang-ssl.
Preparing to unpack .../erlang-ssl_1%3a16.b.3-dfsg-1ubuntu2.1_amd64.deb ...
Unpacking erlang-ssl (1:16.b.3-dfsg-1ubuntu2.1) ...
Selecting previously unselected package erlang-inets.
Preparing to unpack .../erlang-inets_1%3a16.b.3-dfsg-1ubuntu2.1_amd64.deb ...
Unpacking erlang-inets (1:16.b.3-dfsg-1ubuntu2.1) ...
Selecting previously unselected package erlang-corba.
Preparing to unpack .../erlang-corba_1%3a16.b.3-dfsg-1ubuntu2.1_amd64.deb ...
Unpacking erlang-corba (1:16.b.3-dfsg-1ubuntu2.1) ...
Selecting previously unselected package erlang-syntax-tools.
Preparing to unpack .../erlang-syntax-tools_1%3a16.b.3-dfsg-1ubuntu2.1_amd64.deb ...
Unpacking erlang-syntax-tools (1:16.b.3-dfsg-1ubuntu2.1) ...
Selecting previously unselected package erlang-diameter.
Preparing to unpack .../erlang-diameter_1%3a16.b.3-dfsg-1ubuntu2.1_amd64.deb ...
Unpacking erlang-diameter (1:16.b.3-dfsg-1ubuntu2.1) ...
Selecting previously unselected package erlang-xmerl.
Preparing to unpack .../erlang-xmerl_1%3a16.b.3-dfsg-1ubuntu2.1_amd64.deb ...
Unpacking erlang-xmerl (1:16.b.3-dfsg-1ubuntu2.1) ...
Selecting previously unselected package erlang-edoc.
Preparing to unpack .../erlang-edoc_1%3a16.b.3-dfsg-1ubuntu2.1_amd64.deb ...
Unpacking erlang-edoc (1:16.b.3-dfsg-1ubuntu2.1) ...
Selecting previously unselected package erlang-eldap.
Preparing to unpack .../erlang-eldap_1%3a16.b.3-dfsg-1ubuntu2.1_amd64.deb ...
Unpacking erlang-eldap (1:16.b.3-dfsg-1ubuntu2.1) ...
Selecting previously unselected package erlang-erl-docgen.
Preparing to unpack .../erlang-erl-docgen_1%3a16.b.3-dfsg-1ubuntu2.1_amd64.deb ...
Unpacking erlang-erl-docgen (1:16.b.3-dfsg-1ubuntu2.1) ...
Selecting previously unselected package erlang-eunit.
Preparing to unpack .../erlang-eunit_1%3a16.b.3-dfsg-1ubuntu2.1_amd64.deb ...
Unpacking erlang-eunit (1:16.b.3-dfsg-1ubuntu2.1) ...
Selecting previously unselected package erlang-ic.
Preparing to unpack .../erlang-ic_1%3a16.b.3-dfsg-1ubuntu2.1_amd64.deb ...
Unpacking erlang-ic (1:16.b.3-dfsg-1ubuntu2.1) ...
Selecting previously unselected package erlang-odbc.
Preparing to unpack .../erlang-odbc_1%3a16.b.3-dfsg-1ubuntu2.1_amd64.deb ...
Unpacking erlang-odbc (1:16.b.3-dfsg-1ubuntu2.1) ...
Selecting previously unselected package erlang-snmp.
Preparing to unpack .../erlang-snmp_1%3a16.b.3-dfsg-1ubuntu2.1_amd64.deb ...
Unpacking erlang-snmp (1:16.b.3-dfsg-1ubuntu2.1) ...
Selecting previously unselected package erlang-os-mon.
Preparing to unpack .../erlang-os-mon_1%3a16.b.3-dfsg-1ubuntu2.1_amd64.deb ...
Unpacking erlang-os-mon (1:16.b.3-dfsg-1ubuntu2.1) ...
Selecting previously unselected package erlang-parsetools.
Preparing to unpack .../erlang-parsetools_1%3a16.b.3-dfsg-1ubuntu2.1_amd64.deb ...
Unpacking erlang-parsetools (1:16.b.3-dfsg-1ubuntu2.1) ...
Selecting previously unselected package erlang-percept.
Preparing to unpack .../erlang-percept_1%3a16.b.3-dfsg-1ubuntu2.1_amd64.deb ...
Unpacking erlang-percept (1:16.b.3-dfsg-1ubuntu2.1) ...
Selecting previously unselected package erlang-ssh.
Preparing to unpack .../erlang-ssh_1%3a16.b.3-dfsg-1ubuntu2.1_amd64.deb ...
Unpacking erlang-ssh (1:16.b.3-dfsg-1ubuntu2.1) ...
Selecting previously unselected package erlang-webtool.
Preparing to unpack .../erlang-webtool_1%3a16.b.3-dfsg-1ubuntu2.1_amd64.deb ...
Unpacking erlang-webtool (1:16.b.3-dfsg-1ubuntu2.1) ...
Selecting previously unselected package erlang-tools.
Preparing to unpack .../erlang-tools_1%3a16.b.3-dfsg-1ubuntu2.1_amd64.deb ...
Unpacking erlang-tools (1:16.b.3-dfsg-1ubuntu2.1) ...
Selecting previously unselected package erlang-nox.
Preparing to unpack .../erlang-nox_1%3a16.b.3-dfsg-1ubuntu2.1_all.deb ...
Unpacking erlang-nox (1:16.b.3-dfsg-1ubuntu2.1) ...
Selecting previously unselected package lksctp-tools.
Preparing to unpack .../lksctp-tools_1.0.15+dfsg-1_amd64.deb ...
Unpacking lksctp-tools (1.0.15+dfsg-1) ...
Selecting previously unselected package rabbitmq-server.
Preparing to unpack .../rabbitmq-server_3.4.3-2~cloud0_all.deb ...
Unpacking rabbitmq-server (3.4.3-2~cloud0) ...
Processing triggers for man-db (2.6.7.1-1ubuntu1) ...
Processing triggers for ureadahead (0.100.0-16) ...
Setting up libodbc1:amd64 (2.2.14p2-5ubuntu5) ...
Setting up libsctp1:amd64 (1.0.15+dfsg-1) ...
Setting up erlang-base (1:16.b.3-dfsg-1ubuntu2.1) ...
Searching for services which depend on erlang and should be started...none found.
Setting up erlang-asn1 (1:16.b.3-dfsg-1ubuntu2.1) ...
Setting up erlang-mnesia (1:16.b.3-dfsg-1ubuntu2.1) ...
Setting up erlang-runtime-tools (1:16.b.3-dfsg-1ubuntu2.1) ...
Setting up erlang-crypto (1:16.b.3-dfsg-1ubuntu2.1) ...
Setting up erlang-public-key (1:16.b.3-dfsg-1ubuntu2.1) ...
Setting up erlang-ssl (1:16.b.3-dfsg-1ubuntu2.1) ...
Setting up erlang-inets (1:16.b.3-dfsg-1ubuntu2.1) ...
Setting up erlang-corba (1:16.b.3-dfsg-1ubuntu2.1) ...
Setting up erlang-syntax-tools (1:16.b.3-dfsg-1ubuntu2.1) ...
Setting up erlang-diameter (1:16.b.3-dfsg-1ubuntu2.1) ...
Setting up erlang-xmerl (1:16.b.3-dfsg-1ubuntu2.1) ...
Setting up erlang-edoc (1:16.b.3-dfsg-1ubuntu2.1) ...
Setting up erlang-eldap (1:16.b.3-dfsg-1ubuntu2.1) ...
Setting up erlang-erl-docgen (1:16.b.3-dfsg-1ubuntu2.1) ...
Setting up erlang-eunit (1:16.b.3-dfsg-1ubuntu2.1) ...
Setting up erlang-ic (1:16.b.3-dfsg-1ubuntu2.1) ...
Setting up erlang-odbc (1:16.b.3-dfsg-1ubuntu2.1) ...
Setting up erlang-snmp (1:16.b.3-dfsg-1ubuntu2.1) ...
Setting up erlang-os-mon (1:16.b.3-dfsg-1ubuntu2.1) ...
Setting up erlang-parsetools (1:16.b.3-dfsg-1ubuntu2.1) ...
Setting up erlang-percept (1:16.b.3-dfsg-1ubuntu2.1) ...
Setting up erlang-ssh (1:16.b.3-dfsg-1ubuntu2.1) ...
Setting up erlang-webtool (1:16.b.3-dfsg-1ubuntu2.1) ...
Setting up erlang-tools (1:16.b.3-dfsg-1ubuntu2.1) ...
Setting up erlang-nox (1:16.b.3-dfsg-1ubuntu2.1) ...
Setting up lksctp-tools (1.0.15+dfsg-1) ...
Setting up rabbitmq-server (3.4.3-2~cloud0) ...
Adding group
Done.
Adding system userrabbitmq' (UID 118) ...rabbitmq’ (UID 118) with group
Adding new userrabbitmq' .../var/lib/rabbitmq’.
Not creating home directory
* Starting message broker rabbitmq-server [ OK ]
Processing triggers for libc-bin (2.19-0ubuntu6.6) …
Processing triggers for ureadahead (0.100.0-16) …
接着:
信息输出如下:
root@ubuntu:/home/tqw# rabbitmqctl add_user openstack root
Creating user “openstack” …
root@ubuntu:/home/tqw# rabbitmqctl set_permissions openstack “.” “.” “.*”
Setting permissions for user “openstack” in vhost “/” …
本节介绍结束!








 844
844

 被折叠的 条评论
为什么被折叠?


