


目录
1.概念
gin是go语言编写的一个web框架,是对net/http库的封装;同类型的框架还有Beego、Iris。
2.Gin服务的环境构建
1.创建一个go项目,如:ginServer
2.创建一个go.mod文件
    选中项目右击->New->Go Modules File
3.配置七牛云代理
    Settings->Go->Go Modules
    GOPROXY=https://goproxy.cn,direct
4.下载Gin依赖
    Terminal里输入
    go get -u github.com/gin-gonic/gin
3.编写第一个Gin接口
1.创建controllers包:用于存放各个模块的go代码
2.在controllers包下创建HelloController.go文件

func Hello(ginServer *gin.Engine) {
	ginServer.GET("/hello", func(context *gin.Context) {
		context.JSON(http.StatusOK, gin.H{"message": "Hello,Gin"})
	})
}

3.在项目根目录下创建main.go文件

func main() {
	//创建Gin服务
	ginServer := gin.Default()
	//注册Hello模块
	controllers.Hello(ginServer)
	//启动Gin服务
	ginServer.Run("127.0.0.1:8080")
}

4.浏览器输入 http://localhost:8080/hello进行测试
4.Restful风格开发
Restful通过不同的请求方式实现增删查改
1.传统写法
    get /getUserList 查询
    post /insertUser 新增
    post /updateUser 修改
    post /deleteUser 删除
2.Restful写法
    get    /user 查询
    post   /user 新增
    put    /user 修改
    delete /user 删除
3.Restful风格开发:实现用户的增删查改
    3.1:创建UserController

    func User(ginServer *gin.Engine) {
	    //新增
	    ginServer.POST("/user", func(context *gin.Context) {
		    context.JSON(http.StatusOK, gin.H{"message": "新增"})
	    })
	    //修改
	    ginServer.PUT("/user", func(context *gin.Context) {
		    context.JSON(http.StatusOK, gin.H{"message": "修改"})
	    })
	    //删除
	    ginServer.DELETE("/user", func(context *gin.Context) {
		    context.JSON(http.StatusOK, gin.H{"message": "删除"})
	    })
	    //查询
	    ginServer.GET("/user", func(context *gin.Context) {
		    context.JSON(http.StatusOK, gin.H{"message": "查询"})
	    })
    }
    3.2:main.go引用这个函数

    controllers.User(ginServer)

    3.3:apiPost测试
5.响应页面
上面入门案例返回给浏览器的是JSON数据,现在返回一个HTML页面给浏览器
1.创建一个templates目录,编写HTML模板文件index.html;获取后台返回的数据{{.变量名}}
    <!DOCTYPE html>
    <html lang="en">
    <head>
        <meta charset="UTF-8">
        <title>首页</title>
    </head>
    <body>
        <h1>欢迎访问首页</h1>
        <h2>{{.message}}</h2>
    </body>
    </html>
2.main.go文件中加载HTML模板目录
	//加载HTML模板
	ginServer.LoadHTMLGlob("templates/*")
3.创建首页访问接口跳转到首页模板
    func Index(ginServer *gin.Engine) {
	    ginServer.GET("/index", func(context *gin.Context) {
		    context.HTML(http.StatusOK, "index.html", gin.H{"message": "我是后台返回的数据"})
	    })
    }
4.main.go文件中调用上面这个接口
	controllers.Index(ginServer)
5.启动测试
6.加载css/js文件等静态资源
1.创建static目录,下级创建css、js、img目录
2.创建css和js文件
    body{
        background-color: aliceblue;
    }

    alert("我是一个弹窗")
3.html中引入css和js文件
    <!--加载css文件-->
    <link rel="stylesheet" href="/static/css/main.css">
    <!--加载js文件-->
    <script src="/static/js/main.js"></script>
4.main.go加载静态资源
	//加载静态资源 (要访问的路径,静态文件路径)
	ginServer.Static("/static", "./static")
7.设置网站图标
1.在/static/img/目录下放一个图标文件,如:favicon.jpg(对文件格式没要求,是图片就行)
2.在main.go中设置图标
    //网站图标
	ginServer.Use(favicon.New("./static/img/favicon.jpg"))
3.导包:"github.com/thinkerou/favicon"
4.在Terminal里输入go get下载依赖
5.重启服务和浏览器进行测试

注意:浏览器一定要退出重进,不然不生效
8.响应不同类型的数据
//1.创建DataController文件
func Data(ginServer *gin.Engine) {
	//1.返回普通类型数据
	ginServer.GET("/data1", func(context *gin.Context) {
		context.JSON(http.StatusOK, "我是返回的数据")
	})
	//2.返回map类型数据
	//自定义map
	ginServer.GET("/data2", func(context *gin.Context) {
		m := map[string]any{}
		m["username"] = "张三"
		m["age"] = 88
		context.JSON(http.StatusOK, m)
	})
	//gin.H{}也是map
	ginServer.GET("/data3", func(context *gin.Context) {
		context.JSON(http.StatusOK, gin.H{
			"username": "李四",
			"age":      99,
		})
	})
	//3.返回结构体类型数据
	ginServer.GET("/data4", func(context *gin.Context) {
		user := pojo.User{
			Name: "王五",
			Age:  66,
		}
		context.JSON(http.StatusOK, user)
	})
	//4.返回切片类型的数据
	ginServer.GET("/data5", func(context *gin.Context) {
		//创建切片
		userList := make([]pojo.User, 2)
		//赋值
		userList[0] = pojo.User{
			Name: "张三",
			Age:  23,
		}
		userList[1] = pojo.User{
			Name: "李四",
			Age:  24,
		}
		context.JSON(http.StatusOK, userList)
	})
}
//2.main.go引入
controllers.Data(ginServer)
9.获取请求参数
9.1.1获取get请求中key=value格式的数据
ginServer.GET("/param/getParam1", func(context *gin.Context) {
    username := context.Query("username")          // Query:值
	password, flag := context.GetQuery("password") //getQuery:值,状态
	if !flag {
		fmt.Println("参数获取失败")
		return
	}
	context.JSON(http.StatusOK, gin.H{
		"username": username,
		"password": password,
	})
})
9.1.2.ApiPost测试

9.2.1.获取get请求中Restful格式的数据
ginServer.GET("/param/getParam2/:username/:password", func(context *gin.Context) {
	username := context.Param("username")
	password := context.Param("password")
	context.JSON(http.StatusOK, gin.H{
		"username": username,
		"password": password,
	})
})
9.2.2.ApiPost测试

9.3.1.获取post请求中form-data格式的数据
ginServer.POST("/param/getParam3", func(context *gin.Context) {
	username := context.PostForm("username")
	password := context.PostForm("password")
	context.JSON(http.StatusOK, gin.H{
		"username": username,
		"password": password,
	})
})
9.3.2.ApiPost测试

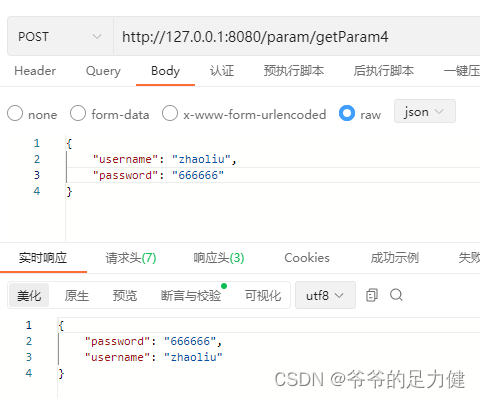
9.4.1.获取post请求中json格式的数据
ginServer.POST("/param/getParam4", func(context *gin.Context) {
	//从Request.Body读取请求数据,返回[]byte
	data, err := context.GetRawData()
	if err != nil {
		context.JSON(http.StatusInternalServerError, "参数获取失败")
		return
	}
	//定义map接收数据
	var m map[string]any
	//将字节切片封装为json数据
	json.Unmarshal(data, &m)

	context.JSON(http.StatusOK, m)
})
9.4.2.ApiPost测试
10.重定向
func Redirect(ginServer *gin.Engine) {
	//重定向到外部网站地址
	ginServer.GET("/redirect1", func(context *gin.Context) {
		context.Redirect(http.StatusMovedPermanently, "https://www.baidu.com")
	})
	//重定向到网站内部的一个地址
	ginServer.GET("/redirect2", func(context *gin.Context) {
		context.Redirect(http.StatusMovedPermanently, "/index")
	})
}
11.访问不存在的接口跳转404页面
1.创建404后要跳转的页面
    <!DOCTYPE html>
    <html lang="en">
    <head>
        <meta charset="UTF-8">
        <title>404页面</title>
    </head>
    <body>
      <h1>你是憨批吗,地址都调错了</h1>
    </body>
    </html>

2.编写404跳转路由,只要找不到地址就跳转404页面
    func Redirect(ginServer *gin.Engine) {
	    //重定向到外部网站
	    ginServer.GET("/redirect1", func(context *gin.Context) {
		    context.Redirect(http.StatusMovedPermanently, "https://www.baidu.com")
	    })
	    //重定向到网站内部的地址
	    ginServer.GET("/redirect2", func(context *gin.Context) {
		    context.Redirect(http.StatusMovedPermanently, "/index")
	    })
    }
12.路由组
同一个业务,接口定义往往会加入相同的业务标识,这个标识可以提取出来只写一次;
例如:用户模块(/user/insert、/user/update、/user/getUserById)
注意:使用了路由组,接口必须由路由组调用
func RouterGroup(ginServer *gin.Engine) {
	//定义路由组
	userGroup := ginServer.Group("/user")
	//为方便测试,都用的GET
	userGroup.GET("/insert", func(context *gin.Context) {
		context.JSON(http.StatusOK, gin.H{"message": "新增用户"})
	})
	userGroup.GET("/update", func(context *gin.Context) {
		context.JSON(http.StatusOK, gin.H{"message": "修改用户"})
	})
	userGroup.GET("/getUserById", func(context *gin.Context) {
		context.JSON(http.StatusOK, gin.H{"message": "查询用户"})
	})
}
13.gin中间件(拦截器)
1.设置全局拦截器

    //创建全局拦截器函数
    func MyHandle() gin.HandlerFunc {
	    //获取参数
	    return func(context *gin.Context) {
		    //获取参数中key的值,不是123的拦截
		    key := context.Query("key")
		    if key != "123" {
			    context.Abort() //拦截
		    }
		    context.Next() //放行
	    }
    }

    //在main.go中引用拦截器
    ginServer.Use(controllers.MyHandle())

    注意点:拦截器最好设置在所有接口前面,设置在拦截器前面的接口不会被拦截到

2.为单个路由设置拦截器(测试前先把main.go中的全局拦截器引用注释掉)

    //修改入门案例函数,加上拦截器的引用
    func Hello(ginServer *gin.Engine) {
	    ginServer.GET("/hello", MyHandle(), func(context *gin.Context) {
		    context.JSON(http.StatusOK, gin.H{"message": "Hello Gin"})
	    })
    }


3.为路由组设置拦截器(为路由组设置拦截器后,调用接口需要使用路由组调用)
    //修改路由组案例的函数
    func RouterGroup(ginServer *gin.Engine) {
	    //定义路由组
	    userGroup := ginServer.Group("/user", MyHandle())
	    //为方便测试,都用的GET
	    userGroup.GET("/insert", func(context *gin.Context) {
		    context.JSON(http.StatusOK, gin.H{"message": "新增用户"})
	    })
	    userGroup.GET("/update", func(context *gin.Context) {
		    context.JSON(http.StatusOK, gin.H{"message": "修改用户"})
	    })
	    userGroup.GET("/getUserById", func(context *gin.Context) {
		    context.JSON(http.StatusOK, gin.H{"message": "查询用户"})
	    })
    }

4.在上下文中设置值和取值
    //在拦截器中设置值
    func MyHandle() gin.HandlerFunc {
	    //获取参数
	    return func(context *gin.Context) {
		    //获取参数中key的值,不是123的拦截
		    key := context.Query("key")
		    //在拦截器中设置值
		    context.Set("param", key)
		    if key != "123" {
		    	context.Abort() //拦截
		    }
		    context.Next() //放行
	    }
    }

    //在接口中取值
    func Hello(ginServer *gin.Engine) {
	    ginServer.GET("/hello", MyHandle(), func(context *gin.Context) {
		    //取出在拦截器设置的值
		    value, _ := context.Get("param")
		    context.JSON(http.StatusOK, gin.H{
			    "message": "Hello Gin",
			    "param":   value,
		    })
	    })
    }
14.session
session:服务器端的会话技术,用于解决路由间的数据共享问题。
cookie:客户端的会话技术,用于在浏览器端存储session信息。
使用场景:
用户登录后,服务器会创建一个session并将sessionId返回给浏览器端;
浏览器端使用cookie存储sessionId,下次调用其他接口时会在http的请求头中带着;
服务器端拿到请求头中的sessionId,就可以确定用户信息了。
1.下载session依赖
    go get github.com/gin-contrib/sessions

2.创建一个结构体
    type LoginUser struct {
	    Username string `json:"username"`
	    Password string `json:"password"`
    }

3.编写登录接口,将用户信息存储在json中
    func Login(ginServer *gin.Engine) {
	    ginServer.POST("/login", func(context *gin.Context) {
		    username := context.PostForm("username")
		    password := context.PostForm("password")
		    user := pojo.LoginUser{username, password}
		    //创建session对象
		    session := sessions.Default(context)
		    //将结构体出入session中
		    session.Set("user", user)
		    session.Save()
		    context.JSON(http.StatusOK, gin.H{"message": "登录成功"})
	    })
    }
4.在拦截器中获用户取信息,判断调用其他接口时拦截还是放行
    func MyHandle() gin.HandlerFunc {
	    //获取参数
	    return func(context *gin.Context) {
		    session := sessions.Default(context)
		    user := session.Get("user")
		    loginUser := user.(pojo.LoginUser)
		    //登录人不是zhangsan就拦截
		    if loginUser.Username != "zhangsan" {
		    	context.Abort() //拦截
		    }
		    context.Next() //放行
	    }
    }

5.拦截器控制的接口
    func Hello(ginServer *gin.Engine) {
	    ginServer.GET("/hello", MyHandle(), func(context *gin.Context) {
		    context.JSON(http.StatusOK, gin.H{
			    "message": "Hello Gin",
		    })
	    })
    }

6.在main.go中使用session
    //创建cookie存储
	store := cookie.NewStore([]byte("secret"))
	//路由上加上session中间件
	ginServer.Use(sessions.Sessions("mysession", store))
	//将数据注册进来
	gob.Register(pojo.LoginUser{})
	//登录
	controllers.Login(ginServer)

测试:使用ApiPost调用登录接口,再调用hello接口,发现登录人是zhangsan的就可以访问hello,不是zhangsan的就会被拦截,同时调用hello接口时请求头cookie中还带有mysession信息
15.跨域
跨域:前后端分离项目中,前端访问后端接口时往往ip或者端口不同,浏览器访问又会采用同源策略,符合同源策略才能访问,所有会产生跨域问题。
同源策略:协议、域名、端口全部相同就是同源,否则就会跨域
1.在static/js/目录下引入vue.js和axios.js

2.编写异步请求代码

<!DOCTYPE html>
<html lang="en">
<head>
    <meta charset="UTF-8">
    <title>首页</title>
</head>
<body>
    <h1>欢迎访问首页</h1>

    <script src="/static/js/vue.js"></script>
    <script src="/static/js/axios.js"></script>
    <script>
        var vue = new Vue({
            el:"#app",
            data:{},
            created(){
                this.loadData();
            },
            methods:{
                loadData(){
                    axios.post("http://localhost:8089/user").then(res=>{
                        console.log("res",res)
                    })
                }
            }
        })
    </script>
</body>
</html>

3.编写访问首页的接口
func Index(ginServer *gin.Engine) {
	ginServer.GET("/index", func(context *gin.Context) {
		context.HTML(http.StatusOK, "index.html", gin.H{"message": "首页"})
	})
}

4.编写后端被调用的接口
func User(ginServer *gin.Engine) {
	//使用Restful风格实现用户的增删查改
	ginServer.POST("/user", func(context *gin.Context) {
		context.JSON(http.StatusOK, gin.H{"message": "新增成功"})
	})
}
4.启动两个服务默认前后端调用(前端8088,后端8089)启动方式见下图

5.此时浏览器访问http://localhost:8088/index,发现调用后台接口时报了跨域

6.解决跨域:在8089拦截器上加上允许跨域访问信息,记得在main.go或者具体方法上使用拦截器

func Cors() gin.HandlerFunc {
	return func(c *gin.Context) {
		// 注意这一行,不能配置为通配符“*”号 比如未来写域名或者你想授权的域名都可以
		c.Header("Access-Control-Allow-Origin", "http://localhost:8088")
		//c.Header("Access-Control-Allow-Origin", "*")
		// 响应头表示是否可以将对请求的响应暴露给页面。返回true则可以,其他值均不可以。
		c.Header("Access-Control-Allow-Credentials", "true")
		// 表示此次请求中可以使用那些header字段
		c.Header("Access-Control-Allow-Headers", "Access-Control-Allow-Headers,Cookie, Content-Length,Origin,cache-control,X-Requested-With, Content-Type, Accept, Authorization, Token, Timestamp, UserId") // 我们自定义的header字段都需要在这里声明
		// 表示此次请求中可以使用那些请求方法 GET/POST(多个使用逗号隔开)
		c.Header("Access-Control-Allow-Methods", "POST, GET, OPTIONS,DELETE,PUT")
		// 处理请求
		c.Next()
	}
}
7.此时访问http://localhost:8088/index,成功调用了8089的user接口
15.1:vue.js和axios.js下载方式
axios:在安装包dist目录下

vue.js:veu官网下载(安装 — Vue.js)

15.2:Goland启动多个服务

然后在main.go中改端口号


 5509
5509


 被折叠的 条评论
为什么被折叠?
被折叠的 条评论
为什么被折叠?
 到【灌水乐园】发言


