


目录
4、配置Spring Security,内存分配用户名密码,加密方式,授权
二、Spring Security 集成进阶 (自定义授权)
1、添加处理类,实现接口 AccessDeniedHandler
前面我们已经完成了尚好房权限管理的部分相关功能,给用户分配角色,给角色分配权限,及左侧动态菜单,做好权限管理的数据准备,接下来我们要使用这些数据进行权限的相关控制。
Spring Security是 Spring提供的安全认证服务的框架。 使用Spring Security可以帮助我们来简化【认证】和【授权】的过程。
中文官网:初识 Spring Security_w3cschool
Maven坐标:
<!-- spring security安全框架 -->
<dependency>
    <groupId>org.springframework.security</groupId>
    <artifactId>spring-security-web</artifactId>
    <version>5.2.7.RELEASE</version>
</dependency>
<dependency>
    <groupId>org.springframework.security</groupId>
    <artifactId>spring-security-config</artifactId>
    <version>5.2.7.RELEASE</version>
</dependency>
一、Spring Security 入门使用
1、添加版本管理
<spring.security.version>5.2.7.RELEASE</spring.security.version><!-- spring security安全框架 -->
<dependency>
<groupId>org.springframework.security</groupId>
<artifactId>spring-security-web</artifactId>
<version>${spring.security.version}</version>
</dependency>
<dependency>
<groupId>org.springframework.security</groupId>
<artifactId>spring-security-config</artifactId>
<version>${spring.security.version}</version>
</dependency>2、引入依赖
<!-- spring security安全框架 -->
<dependency>
    <groupId>org.springframework.security</groupId>
    <artifactId>spring-security-web</artifactId>
</dependency>
<dependency>
    <groupId>org.springframework.security</groupId>
    <artifactId>spring-security-config</artifactId>
</dependency>
3、配置Spring Security Fillter
web.xml
<!-- SpringSecurity Filter -->
<!-- DelegatingFilterProxy用于整合第三方框架(代理过滤器,非真正的过滤器,真正的过滤器需要在spring的配置文件) -->
<filter>
  <filter-name>springSecurityFilterChain</filter-name>
  <filter-class>org.springframework.web.filter.DelegatingFilterProxy</filter-class>
</filter>
<filter-mapping>
  <filter-name>springSecurityFilterChain</filter-name>
  <url-pattern>/*</url-pattern>
</filter-mapping>
4、配置Spring Security,内存分配用户名密码,加密方式,授权
配置Spring Security有两种方式:
1、xml文件配置
2、java类配置 (我们是用这种方式)
@Configuration //声明为配置类,相当于一个xml
@EnableWebSecurity //@EnableWebSecurity是开启SpringSecurity的默认行为
public class WebSecurityConfig extends WebSecurityConfigurerAdapter{

    /*认证:
        1.基于内存的认证方式(了解)
        2.基于数据库的认证方式(重要)*/
    @Override
    protected void configure(AuthenticationManagerBuilder auth) throws Exception {
        //基于内存的认证方式,写死用户名称和密码,分配空的角色(没有权限)
        auth.inMemoryAuthentication()
                .withUser("lucy")
                .password(new BCryptPasswordEncoder().encode("123456"))
                .roles("");
    }
    //设置加密方式
    //声明一个bean对象,等价于<bean id='PasswordEncoder' class='org.springframework.security.crypto.bcrypt.BCryptPasswordEncoder;'>
    @Bean
    public PasswordEncoder passwordEncoder(){
        return new BCryptPasswordEncoder();
    }
}
//授权:
@Override
protected void configure(HttpSecurity http) throws Exception {
//默认授权: 不登陆系统,所有的资源都不允许访问
super.configure(http);
}仅需三个步骤,我们就已经集成好了Spring Security,其他的事情就可以交给Spring Security为我们处理。启动项目,访问:http://localhost:8000/

二、Spring Security 集成进阶 (自定义授权)
前面我们已经完成了Spring Security的入门级配置,通过Spring Security的使用,Spring Security将我们项目中的所有资源都保护了起来,要访问这些资源必须要完成认证才能够访问。
但是这个案例中的使用方法离我们真实生产环境还差很远,还存在如下一些问题:
1、项目中我们将所有的资源(所有请求URL)都保护起来,实际环境下往往有一些资源不需要认证也可以访问,也就是可以匿名访问。
2、登录页面是由框架生成的,而我们的项目往往会使用自己的登录页面。
3、直接将用户名和密码配置在了java程序中,而真实生产环境下的用户名和密码往往保存在数据库中。
1. 登录、访问基础设置 (自定义页面)
    //授权:
    @Override
    protected void configure(HttpSecurity http) throws Exception {
        //默认授权: 不登陆系统,所有的资源都不允许访问
        //super.configure(http);
        //自定义授权控制

        //1.设置同源资源允许访问 同源(资源父路径一致的,协议,ip,port)的资源允许访问
        http.headers().frameOptions().sameOrigin();

        //2.授权静态资源不登录允许访问
        http.authorizeRequests()
                .antMatchers("/statis/**","/login").permitAll()
                .anyRequest().authenticated();
        //3.授权自定义的登录页面
        //loginPage("/login")表示,通过这个映射跳转到自己的登录页,登陆成功后去向哪里
        http.formLogin().loginPage("/login").defaultSuccessUrl("/");

        //4.授权注销路径
        //logoutUrl("/logout") 通过这个请求路径注销系统,销毁session,注销后去到哪
        http.logout().logoutUrl("/logout").logoutSuccessUrl("/login");

        //5.关闭跨站请求伪造功能
        //开启会自动生成<input type="hidden" name="_csrf" value="f3f9c374-b7b5-4c21-b925-8a32b3a0ed27"/>
        http.csrf().disable();
    }
2. 登录页面
<!DOCTYPE html>
<html xmlns:th="http://www.thymeleaf.org">

<head th:include="common/head :: head"></head>

<body class="gray-bg">

<div class="middle-box text-center loginscreen  animated fadeInDown">
    <div>
        <div>
            <h1 class="logo-name">房</h1>
        </div>
        <h3>欢迎使用 尚好房平台管理系统</h3>

        <form class="m-t" role="form" th:action="@{/login}" method="post">
            <!--跨站请求伪造功能自动生成的-->
            <!--<input type="hidden" name="_csrf" value="f3f9c374-b7b5-4c21-b925-8a32b3a0ed27"/>-->
            <label style="color:red;" th:if="${param.error}" th:text="用户名或密码错误"></label>
            <div class="form-group">
                <input type="text" name="username" value="admin" class="form-control" placeholder="用户名" required="">
            </div>
            <div class="form-group">
                <input type="password" name="password" value="123456" class="form-control" placeholder="密码" required="">
            </div>
            <button type="submit" class="btn btn-primary block full-width m-b">登 录</button>


            <p class="text-muted text-center"> <a href="javascript:"><small>忘记密码了?</small></a> | <a href="javascript:">注册一个新账号</a>
            </p>

        </form>
    </div>
</div>
</body>

</html>
3. 从数据库中查询用户信息
1. 启动基于数据库的认证方式,注入userDetailsService
    @Autowired
    UserDetailsService userDetailsService;

    /*认证:
        1.基于内存的认证方式(了解)
        2.基于数据库的认证方式(重要)*/
    @Override
    protected void configure(AuthenticationManagerBuilder auth) throws Exception {
        //1. 基于内存的认证方式,写死用户名称和密码,分配空的角色(没有权限)
        /*auth.inMemoryAuthentication()
                .withUser("lucy")
                .password(new BCryptPasswordEncoder().encode("123456"))
                .roles("");*/

        //2.基于数据库的认证方式(重点)
        auth.userDetailsService(userDetailsService);
    }
2. 编写userDetailsService实现类
//加载用户信息权限集合
@Component
public class UserDetailsServiceImpl implements UserDetailsService {

    @Reference
    AdminService adminService;

    @Override
    public UserDetails loadUserByUsername(String username) throws UsernameNotFoundException {
        //1.通过表单username获取admin对象,框架底层通过编码器自动解析密码进行匹配
        Admin admin = adminService.getByUsername(username);
        if(admin == null){
            //return null;
            throw new UsernameNotFoundException("用户名不存在");
        }

        // org.springframework.security.core.userdetails.User implements UserDetails
        // User 是 UserDetails的实现类 权限集合暂时new为空
        return new User(admin.getUsername(),admin.getPassword(), new ArrayList());

    }
}
3.更改前往主页方法,动态获取用户
之前获取左侧菜单我们是写死了的,目前可以动态获取当前用户了
    //框架首页
    @RequestMapping("/")
    public String index(Map map){
        //Long adminId = 1L; //假设用户id=1
        //Admin admin = adminService.getById(adminId);

        //代码补充 TODO
        //通过 SecurityContextHolder 从线程中获取认证对象
        //(框架过滤器会将session域的用户对象存放到当前线程上(ThreadLocal)) 比session效率高
        Authentication authentication = SecurityContextHolder.getContext().getAuthentication();
        User user = (User)authentication.getPrincipal();
        Admin admin = adminService.getByUsername(user.getUsername());

        //左侧菜单树,子节点通过双层for循环迭代生成的,当前集合值只存放父节点
        List<Permission> permissionList = permissionService.findMenuPermissionByAdminId(admin.getId());
        map.put("admin",admin);
        map.put("permissionList",permissionList);

        return PAGE_FRAM;
    }
三、用户授权
1. 设置用户权限
//加载用户信息权限集合
@Component
public class UserDetailsServiceImpl implements UserDetailsService {

    @Reference
    AdminService adminService;

    @Reference
    PermissionService permissionService;

    @Override
    public UserDetails loadUserByUsername(String username) throws UsernameNotFoundException {
        //1.通过表单username获取admin对象,框架底层通过编码器自动解析密码进行匹配
        Admin admin = adminService.getByUsername(username);
        if(admin == null){
            //return null;
            throw new UsernameNotFoundException("用户名不存在");
        }

        //2.1 获取选项权限集合
        List<String> codeList = null;
        if(admin.getId() == 1){ //超级管理员
            codeList = permissionService.findAllCode();
        }else {
            codeList = permissionService.findCodeListByAdminId(admin.getId());
        }
        //2.2 构建权限对象集合
        Set<GrantedAuthority> auths = new HashSet();
        if(codeList!=null && codeList.size()>0){
            for (String code : codeList) {
                //将code(权限字段)构建成权限对象,SimpleGrantedAuthority是GrantedAuthority的实现类
                auths.add(new SimpleGrantedAuthority(code));
            }
        }
        // org.springframework.security.core.userdetails.User implements UserDetails
        // User 是 UserDetails的实现类
        return new User(admin.getUsername(),admin.getPassword(), auths);
    }
}
2. 权限表中获取用户权限
service
    @Override
    public List<String> findCodeListByAdminId(Long id) {
        return permissionDao.findCodeListByAdminId(id);
    }

    @Override
    public List<String> findAllCode() {
        return permissionDao.findAllCode();
    }
dao.xml
    <select id="findCodeListByAdminId" parameterType="long" resultType="string">
        select
            distinct p.code
        from acl_admin_role ar
                 inner join acl_role_permission rp on rp.role_id = ar.role_id
                 inner join acl_permission p on p.id = rp.permission_id
        where
            ar.admin_id = #{adminId}
          and p.type = 2
          and ar.is_deleted = 0
          and rp.is_deleted = 0
          and p.is_deleted = 0

    </select>

    <select id="findAllCode" resultType="string">
        select distinct
        p.code
        from  acl_permission p
        where p.type = 2 and p.is_deleted = 0
    </select>
3. controller 方法权限控制
加入注解 @EnableGlobalMethodSecurity(prePostEnabled = true)
@Configuration //声明为配置类,相当于一个xml
@EnableWebSecurity //@EnableWebSecurity是开启SpringSecurity的默认行为
//开启基于方法级别的细粒度权限控制 即在controller方法上加权限注解即可,例如@PreAuthorize("hasAuthority('role.show')")
@EnableGlobalMethodSecurity(prePostEnabled = true)
public class WebSecurityConfig extends WebSecurityConfigurerAdapter{
controller方法添加权限注解

    //存储权限
    //设置权限控制注解,在访问方法前需要校验控制权限
    @PreAuthorize("hasAuthority('role.assgin') or hasRole('admin')")
    @RequestMapping("/assignPermission")
    public String assignPermission(@RequestParam("roleId") Long roleId,
                             @RequestParam("permissionIds") Long[] permissionIds, //Spring将字符串自动转换为数组
                             HttpServletRequest request){


        permissionService.assignPermission(roleId,permissionIds);
        return this.successPage(null,request);
    }

    //分配权限列表
    @PreAuthorize("hasAuthority('role.assgin')")
    @RequestMapping("/assignShow/{roleId}")
    public String assignPermission(@PathVariable("roleId") Long roleId,Map map){

        //{ id:2, pId:0, name:"随意勾选 2", checked:true, open:true},
        List<Map<String,Object>> permissionList = permissionService.findPermissionByRoleId(roleId);


        //这里解析成了json字符串,前端就需要重新解析为json对象
        map.put("zNodes", JSON.toJSONString(permissionList));
        //map.put("permissionList",permissionList);
        map.put("roleId",roleId);
        return PAGE_ASSIGN_SHOW;
    }


    //删除
    @PreAuthorize("hasAuthority('role.delete')")
    @RequestMapping("/delete/{id}")
    public String delete(@PathVariable Long id,ModelMap model){
        roleService.delete(id);
        return ACTION_LIST;
    }

    //修改
    @PreAuthorize("hasAuthority('role.edit')")
    @RequestMapping(value="/update")
    public String update(Map map,Role role,HttpServletRequest request) {
        roleService.update(role);

        return this.successPage("修改成功",request);
    }

    //前往修改页面
    @PreAuthorize("hasAuthority('role.edit')")
    @RequestMapping("/edit/{id}")
    public String edit(@PathVariable Long id,ModelMap model){
        Role role = roleService.getById(id);
        model.addAttribute("role",role);
        return PAGE_EDIT;
    }
4. 页面功能按钮权限控制
上面我们完成了controller层方法的权限,现在我们要控制页面按钮的权限,如:角色管理上面只有查看权限,那么页面新增、修改、删除、分配权限按都不显示。
怎么实现呢?其实Spring Security已经给我们封装好了标签库,我们直接使用即可。
1.添加依赖
parent 版本管理:
<thymeleaf-springsecurity5.version>3.0.4.RELEASE</thymeleaf-springsecurity5.version><!--用于springsecurity5标签-->
<dependency>
<groupId>org.thymeleaf.extras</groupId>
<artifactId>thymeleaf-extras-springsecurity5</artifactId>
<version>${thymeleaf-springsecurity5.version}</version>
</dependency>web-admin 引入依赖
<!--用于springsecurity5标签-->
<dependency>
    <groupId>org.thymeleaf.extras</groupId>
    <artifactId>thymeleaf-extras-springsecurity5</artifactId>
</dependency>
2. 配置文件 spring security 标签支持
修改spring-mvc.xml,在模板引擎配置spring security 标签支持
<!--配置模板引擎-->
<bean id="templateEngine" class="org.thymeleaf.spring5.SpringTemplateEngine">
    <!--引用视图解析器-->
    <property name="templateResolver" ref="templateResolver"></property>
    <!-- 添加spring security 标签支持:sec -->
    <property name="additionalDialects">
        <set>
            <bean class="org.thymeleaf.extras.springsecurity5.dialect.SpringSecurityDialect" />
        </set>
    </property>
</bean>
3. 页面按钮控制
1、在html文件里面申明使用spring-security标签
<html xmlns:th="http://www.thymeleaf.org"
      xmlns:sec="http://www.thymeleaf.org/extras/spring-security">
2、按钮上使用标签 sec:authorize
<button type="button" class="btn btn-sm btn-primary create" sec:authorize="hasAuthority('role.create')">新增</button>

<a class="edit" th:attr="data-id=${item.id}" sec:authorize="hasAuthority('role.edit')">修改</a>
<a class="delete" th:attr="data-id=${item.id}" sec:authorize="hasAuthority('role.delete')">删除</a>
<a class="assgin" th:attr="data-id=${item.id}" sec:authorize="hasAuthority('role.assgin')">分配权限</a>
四、403(没有权限)统一处理
1、添加处理类,实现接口 AccessDeniedHandler
//403未授权的统一处理方式
public class CustomAccessDeniedHandler implements AccessDeniedHandler {

    @Override
    public void handle(HttpServletRequest request, HttpServletResponse response,
                       AccessDeniedException accessDeniedException) throws IOException {
        response.sendRedirect("/auth");
    }

}
2、WebSecurityConfig 配置类进行授权
    //授权:
    @Override
    protected void configure(HttpSecurity http) throws Exception {
        //默认授权: 不登陆系统,所有的资源都不允许访问
        //super.configure(http);
        //自定义授权控制

        //1.设置同源资源允许访问 同源(资源父路径一致的,协议,ip,port)的资源允许访问
        http.headers().frameOptions().sameOrigin();

        //2.授权静态资源不登录允许访问
        http.authorizeRequests()
                .antMatchers("/static/**","/login").permitAll()//允许匿名用户访问的路径
                .anyRequest().authenticated();//其他页面需要验证
        //3.授权自定义的登录页面
        //loginPage("/login")表示,通过这个映射跳转到自己的登录页,登陆成功后去向哪里
        http.formLogin().loginPage("/login").defaultSuccessUrl("/");

        //4.授权注销路径
        //logoutUrl("/logout") 通过这个请求路径注销系统,销毁session,注销后去到哪
        http.logout().logoutUrl("/logout").logoutSuccessUrl("/login");

        //5.关闭跨站请求伪造功能
        //开启会自动生成<input type="hidden" name="_csrf" value="f3f9c374-b7b5-4c21-b925-8a32b3a0ed27"/>
        http.csrf().disable();

        //6.授权自定义的403权限不足处理类
        http.exceptionHandling().accessDeniedHandler(new CustomAccessDeniedHandler());
    }
3、indexController添加映射、新增403页面
    private static final String PAGE_AUTH = "frame/auth";
    //403统一处理
    @GetMapping("/auth")
    public String auth() {
        return PAGE_AUTH;
    }
<!DOCTYPE html>
<html>
<head>
</head>
<body style="position: relative;">
<div style="text-align:center;margin-top: 100px;font-size: 20px;">
<strong>没有权限</strong>
</div>
</body>
</html>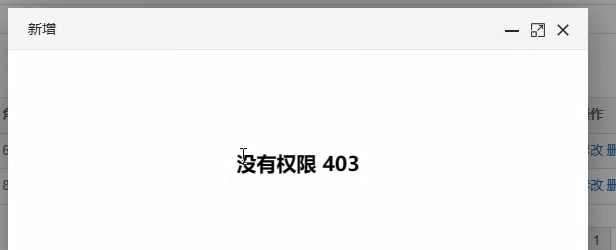
五、Spring Session 共享
Session共享原理
用户第一次访问应用时,应用会创建一个新的 Session,并且会将 Session 的 ID 作为 Cookie 缓存在浏览器,下一次访问时请求的头部中带着该 Cookie,应用通过获取的 Session ID 进行查找,如果该 Session 存在且有效,则继续该请求,如果 Cookie 无效或者 Session 无效,则会重新生成一个新的 Session 在普通的 JavaEE 应用中,Session 信息放在内存中,当容器(如 Tomcat)关闭后,内存中的 Session 被销毁;重启后如果当前用户再去访问对应的是一个新的 Session ,在多实例中无法共享,一个用户只能访问指定的实例才能使用相同的 Session; Session 共享实现的原理是将原来内存中的 Session 放在一个需要共享 Session 的实例都可以访问到的位置,如数据库,Redis 中等,从而实现多实例 Session 共享 实现共享后,只要浏览器的 Cookie 中的 Session ID 没有改变,多个实例中的任意一个被销毁不会影响用户访问。
Spring Session共享原理
当请求进来的时候,SessionRepositoryFilter 会先拦截到请求,将 request 和 response 对象转换成 SessionRepositoryRequestWrapper 和 SessionRepositoryResponseWrapper 。后续当第一次调用 request 的getSession方法时,会调用到 SessionRepositoryRequestWrapper 的
getSession方法。这个方法是被从写过的,逻辑是先从 request 的属性中查找,如果找不到;再查找一个key值是"SESSION"的 Cookie,通过这个 Cookie 拿到 SessionId 去 Redis 中查找,如果查不到,就直接创建一个RedisSession 对象,同步到 Redis 中。说的简单点就是:拦截请求,将之前在服务器内存中进行 Session 创建销毁的动作,改成在 Redis 中创建。
我们以web-admin为例,web-front实现方式一样。
1、添加依赖、版本管理
<redis-session.version>1.3.5.RELEASE</redis-session.version><!--spring-session 同步-->
<dependency>
<groupId>org.springframework.session</groupId>
<artifactId>spring-session-data-redis</artifactId>
<version>${redis-session.version}</version>
</dependency>web引入依赖
<!--spring-session 同步-->
<dependency>
    <groupId>org.springframework.session</groupId>
    <artifactId>spring-session-data-redis</artifactId>
</dependency>
2、添加配置文件
spring/spring-redis.xml
<?xml version="1.0" encoding="UTF-8"?>
<beans xmlns="http://www.springframework.org/schema/beans"
       xmlns:xsi="http://www.w3.org/2001/XMLSchema-instance"
       xsi:schemaLocation="http://www.springframework.org/schema/beans
                         http://www.springframework.org/schema/beans/spring-beans.xsd">

    <!--Jedis连接池的相关配置-->
    <bean id="jedisPoolConfig" class="redis.clients.jedis.JedisPoolConfig">
        <!--最大连接数, 默认8个-->
        <property name="maxTotal" value="100"></property>
        <!--最大空闲连接数, 默认8个-->
        <property name="maxIdle" value="50"></property>
        <!--允许借调 在获取连接的时候检查有效性, 默认false-->
        <property name="testOnBorrow" value="true"/>
        <!--允许归还 在return给pool时,是否提前进行validate操作-->
        <property name="testOnReturn" value="true"/>
    </bean>
    <!--配置JedisConnectionFactory-->
    <bean id="connectionFactory" class="org.springframework.data.redis.connection.jedis.JedisConnectionFactory">
        <property name="hostName" value="192.168.86.86"/>
        <property name="port" value="6379"/>
        <property name="database" value="0"/>
        <property name="poolConfig" ref="jedisPoolConfig"/>
    </bean>
    <!-- 配置session共享 -->
    <bean id="redisHttpSessionConfiguration"
          class="org.springframework.session.data.redis.config.annotation.web.http.RedisHttpSessionConfiguration">
        <property name="maxInactiveIntervalInSeconds" value="600" />
    </bean>
</beans>
3、spring-mvc.xml引入配置
    <!-- 导入 先扫描dubbo 在扫描 mvn -->
    <import resource="classpath:spring/spring-registry.xml"></import>
    <import resource="classpath:spring/spring-redis.xml"></import>
4、添加session共享过滤器
<?xml version="1.0" encoding="UTF-8"?>
<web-app xmlns="http://xmlns.jcp.org/xml/ns/javaee"
		 xmlns:xsi="http://www.w3.org/2001/XMLSchema-instance"
		 xsi:schemaLocation="http://xmlns.jcp.org/xml/ns/javaee http://xmlns.jcp.org/xml/ns/javaee/web-app_4_0.xsd"
		 version="4.0">

	<display-name>web</display-name>

	<!-- spring session共享filter -->
	<!-- 该过滤器必须是第一个过滤器,所有的请求经过该过滤器后执行后续操作 -->
	<filter>
		<filter-name>springSessionRepositoryFilter</filter-name>
		<filter-class>org.springframework.web.filter.DelegatingFilterProxy</filter-class>
	</filter>
	<filter-mapping>
		<filter-name>springSessionRepositoryFilter</filter-name>
		<url-pattern>/*</url-pattern>
	</filter-mapping>

	<!-- 解决post乱码 添加字符编码过滤器 -->
	<filter>
		<filter-name>encode</filter-name>
		<filter-class>org.springframework.web.filter.CharacterEncodingFilter</filter-class>
		<init-param>
			<param-name>encoding</param-name>
			<param-value>UTF-8</param-value>
		</init-param>
		<init-param>
			<param-name>forceRequestEncoding</param-name>
			<param-value>true</param-value>
		</init-param>
		<init-param>
			<param-name>forceResponseEncoding</param-name>
			<param-value>true</param-value>
		</init-param>
	</filter>
	<filter-mapping>
		<filter-name>encode</filter-name>
		<url-pattern>/*</url-pattern>
	</filter-mapping>

	<!-- SpringSecurity Filter -->
	<!-- DelegatingFilterProxy用于整合第三方框架(代理过滤器,非真正的过滤器,真正的过滤器需要在spring的配置文件) -->
	<filter>
		<filter-name>springSecurityFilterChain</filter-name>
		<filter-class>org.springframework.web.filter.DelegatingFilterProxy</filter-class>
	</filter>
	<filter-mapping>
		<filter-name>springSecurityFilterChain</filter-name>
		<url-pattern>/*</url-pattern>
	</filter-mapping>

	<!-- 配置SpringMVC框架前端控制器 -->
	<servlet>
		<servlet-name>springMVC</servlet-name>
		<servlet-class>org.springframework.web.servlet.DispatcherServlet</servlet-class>
		<init-param>
			<param-name>contextConfigLocation</param-name>
			<param-value>classpath:spring/spring-mvc.xml</param-value>
		</init-param>
		<load-on-startup>1</load-on-startup>
	</servlet>
	<servlet-mapping>
		<servlet-name>springMVC</servlet-name>
		<url-pattern>/</url-pattern>
	</servlet-mapping>

	<!--删除了ContextLoaderListener-->
</web-app>
5、测试
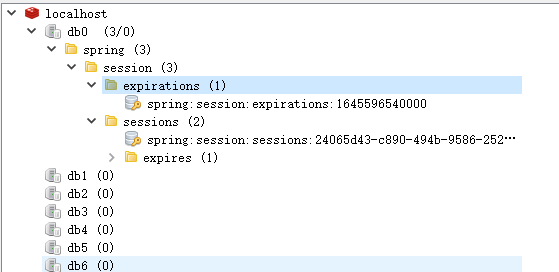
说明:如果session没有同步到redis,那么再次重启,session信息已经清空,就会再次跳转登录,当前没有跳转登录,说明我们的session信息保存到redis。


 2282
2282


 被折叠的 条评论
为什么被折叠?
被折叠的 条评论
为什么被折叠?
 到【灌水乐园】发言


