


 本文介绍了如何在本地搭建环境,安装Faster-Whisper模型,并通过实时转写脚本和WebSocket服务器实现音频的实时识别和转写。作者分享了从BaiduAPI切换到本地解决方案的过程,包括测试代码、音频处理和WebSocket服务的整合示例。
Faster-Whisper 实时识别电脑语音转文本
前言
以前做的智能对话软件接的Baidu API,想换成本地的,就搭一套Faster-Whisper吧。
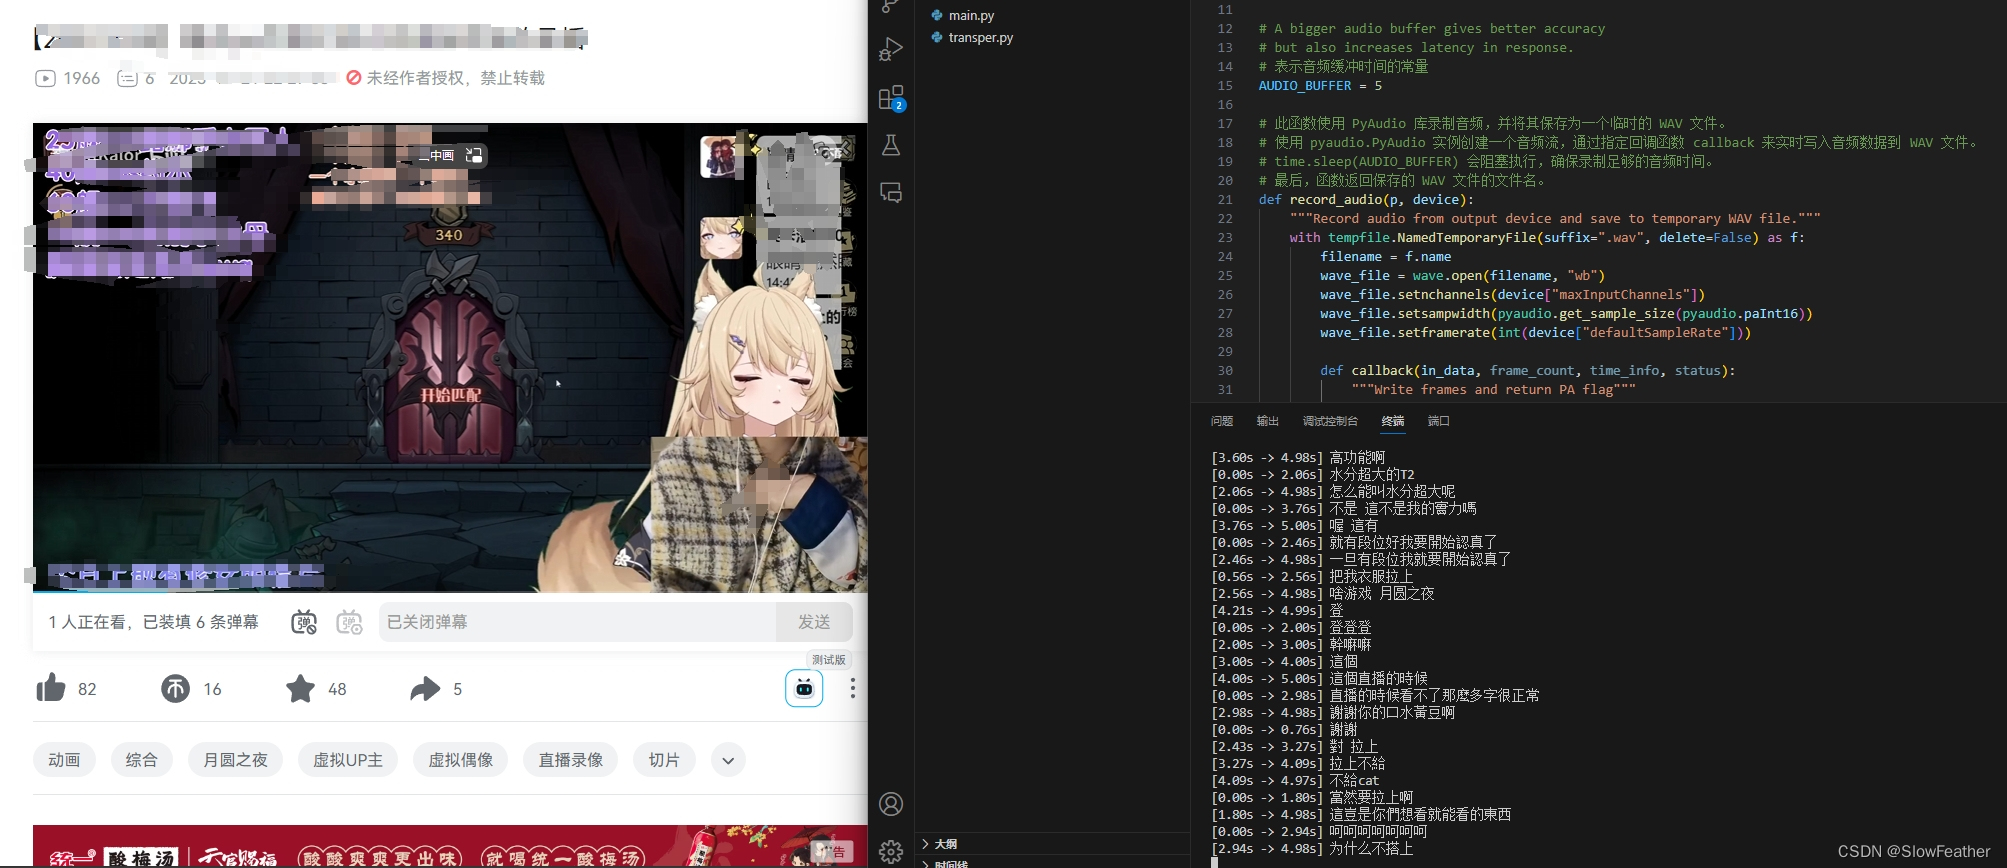
下面是B站视频实时转写的截图
项目
搭建环境
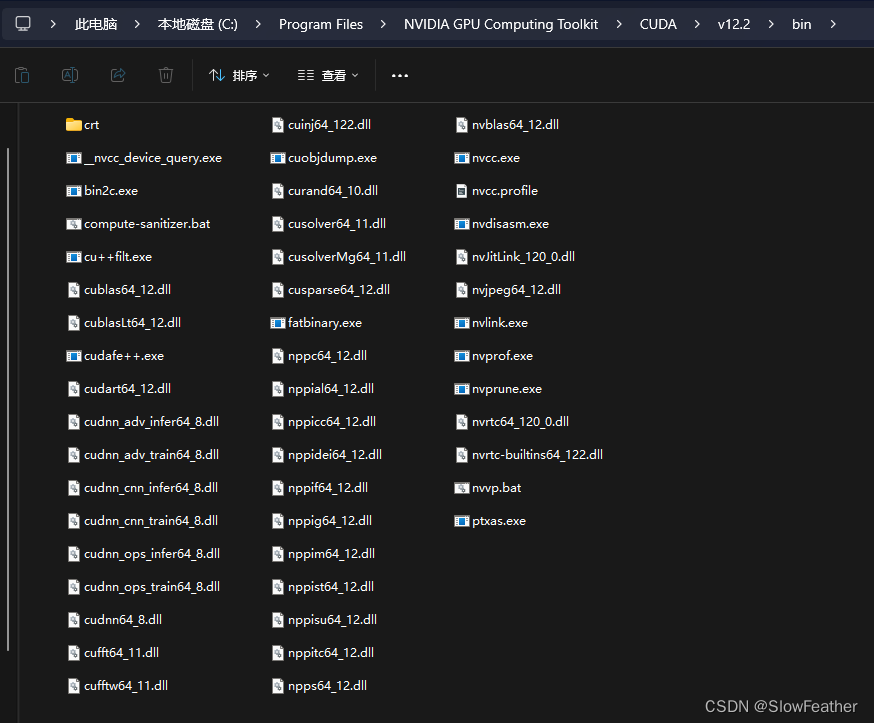
所需要的CUDANN已经装好了,如果装的是12.2应该是包含cuBLAS了
没装的,可以从下面链接下载装一下,文末的参考视频中也有讲解
https://github.com/Purfview/whisper-standalone-win/releases/tag/libs
Ancanda的运行环境去Clone一下之前配好的环境,用之前BertVits的即可
安装Faster-Whisper
输入即可安装
pip install faster-whisper
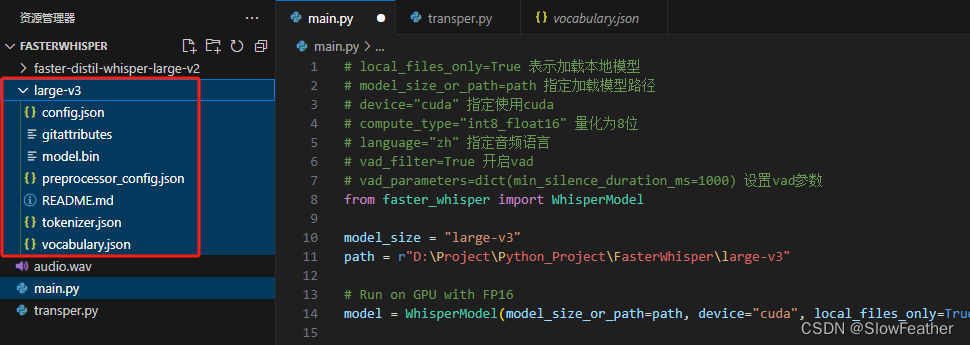
下载模型
https://huggingface.co/Systran/faster-whisper-large-v3
下载完放到代码旁边就可以了
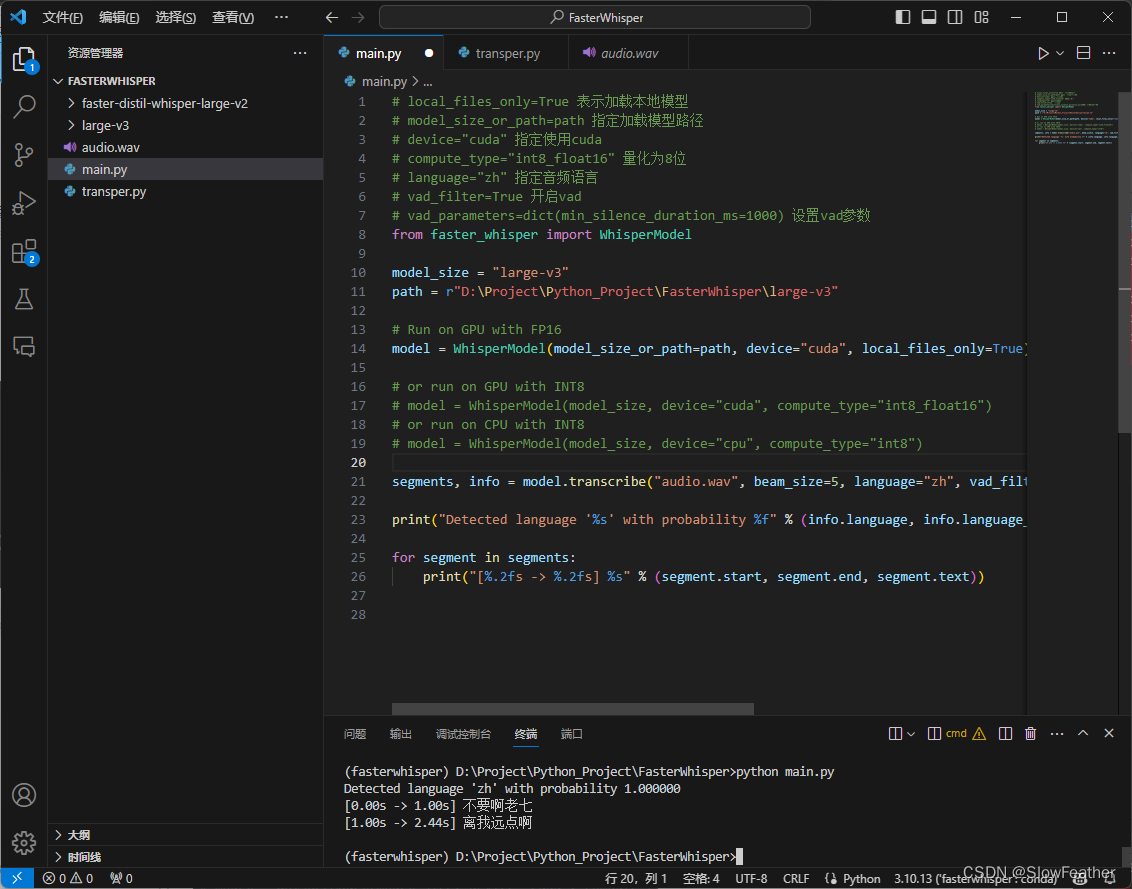
编写测试代码
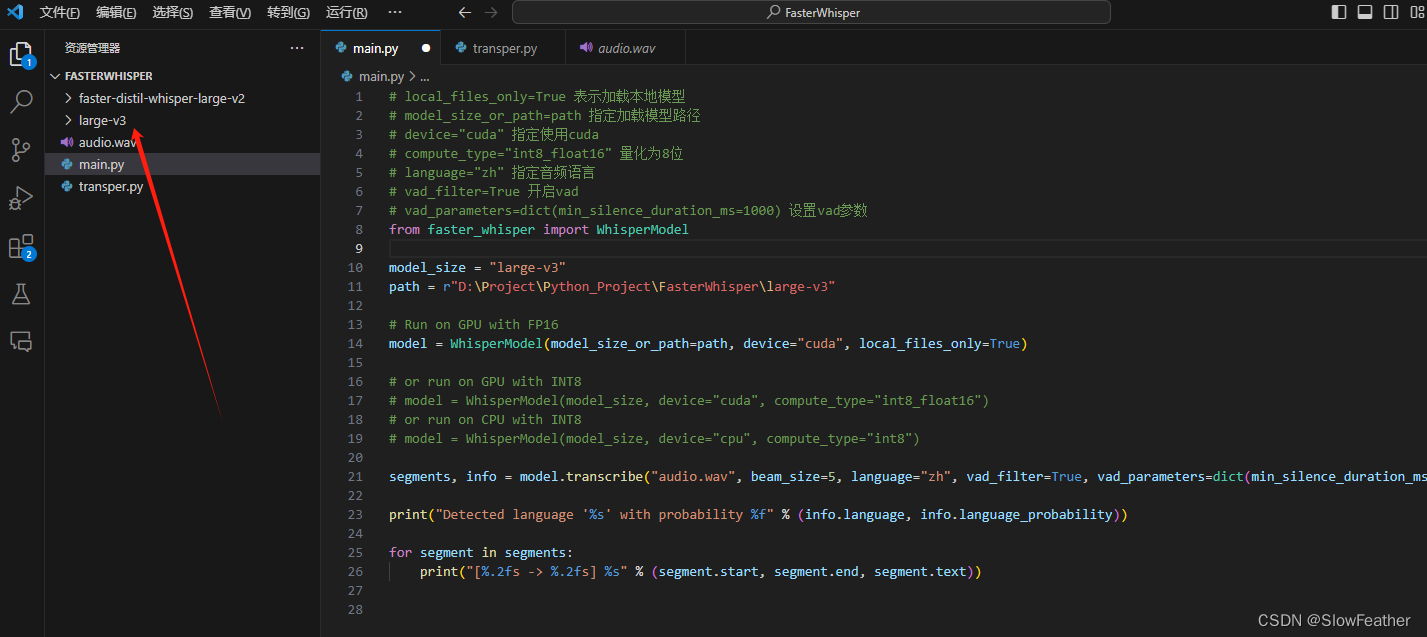
# local_files_only=True 表示加载本地模型
# model_size_or_path=path 指定加载模型路径
# device="cuda" 指定使用cuda
# compute_type="int8_float16" 量化为8位
# language="zh" 指定音频语言
# vad_filter=True 开启vad
# vad_parameters=dict(min_silence_duration_ms=1000) 设置vad参数
from faster_whisper import WhisperModel

model_size = "large-v3"
path = r"D:\Project\Python_Project\FasterWhisper\large-v3"

# Run on GPU with FP16
model = WhisperModel(model_size_or_path=path, device="cuda", local_files_only=True)

# or run on GPU with INT8
# model = WhisperModel(model_size, device="cuda", compute_type="int8_float16")
# or run on CPU with INT8
# model = WhisperModel(model_size, device="cpu", compute_type="int8")

segments, info = model.transcribe("audio.wav", beam_size=5, language="zh", vad_filter=True, vad_parameters=dict(min_silence_duration_ms=1000))

print("Detected language '%s' with probability %f" % (info.language, info.language_probability))

for segment in segments:
    print("[%.2fs -> %.2fs] %s" % (segment.start, segment.end, segment.text))
运行测试代码
找个音频放入文件夹内,输入python main.py即可运行!
可以看到正确(不太正确)的识别出了音频说了什么。
实时转写脚本
新建一个脚本transper.py
运行即可
此处特别感谢开源项目
https://github.com/MyloBishop/transper
import os
import sys
import time
import wave
import tempfile
import threading

import torch
import pyaudiowpatch as pyaudio
from faster_whisper import WhisperModel as whisper

# A bigger audio buffer gives better accuracy
# but also increases latency in response.
# 表示音频缓冲时间的常量
AUDIO_BUFFER = 5

# 此函数使用 PyAudio 库录制音频,并将其保存为一个临时的 WAV 文件。
# 使用 pyaudio.PyAudio 实例创建一个音频流,通过指定回调函数 callback 来实时写入音频数据到 WAV 文件。
# time.sleep(AUDIO_BUFFER) 会阻塞执行,确保录制足够的音频时间。
# 最后,函数返回保存的 WAV 文件的文件名。
def record_audio(p, device):
    """Record audio from output device and save to temporary WAV file."""
    with tempfile.NamedTemporaryFile(suffix=".wav", delete=False) as f:
        filename = f.name
        wave_file = wave.open(filename, "wb")
        wave_file.setnchannels(device["maxInputChannels"])
        wave_file.setsampwidth(pyaudio.get_sample_size(pyaudio.paInt16))
        wave_file.setframerate(int(device["defaultSampleRate"]))

        def callback(in_data, frame_count, time_info, status):
            """Write frames and return PA flag"""
            wave_file.writeframes(in_data)
            return (in_data, pyaudio.paContinue)

        stream = p.open(
            format=pyaudio.paInt16,
            channels=device["maxInputChannels"],
            rate=int(device["defaultSampleRate"]),
            frames_per_buffer=pyaudio.get_sample_size(pyaudio.paInt16),
            input=True,
            input_device_index=device["index"],
            stream_callback=callback,
        )

        try:
            time.sleep(AUDIO_BUFFER)  # Blocking execution while playing
        finally:
            stream.stop_stream()
            stream.close()
            wave_file.close()
            # print(f"{filename} saved.")
    return filename

# 此函数使用 Whisper 模型对录制的音频进行转录,并输出转录结果。
def whisper_audio(filename, model):
    """Transcribe audio buffer and display."""
    # segments, info = model.transcribe(filename, beam_size=5, task="translate", language="zh", vad_filter=True, vad_parameters=dict(min_silence_duration_ms=1000))
    segments, info = model.transcribe(filename, beam_size=5, language="zh", vad_filter=True, vad_parameters=dict(min_silence_duration_ms=1000))
    os.remove(filename)
    # print(f"{filename} removed.")
    for segment in segments:
        # print(f"[{segment.start:.2f} -> {segment.end:.2f}] {segment.text.strip()}")
        print("[%.2fs -> %.2fs] %s" % (segment.start, segment.end, segment.text))

# main 函数是整个脚本的主控制函数。
# 加载 Whisper 模型,选择合适的计算设备(GPU 或 CPU)。
# 获取默认的 WASAPI 输出设备信息,并选择默认的扬声器(输出设备)。
# 使用 PyAudio 开始录制音频,并通过多线程运行 whisper_audio 函数进行音频转录。
def main():
    """Load model record audio and transcribe from default output device."""
    print("Loading model...")
    device = "cuda" if torch.cuda.is_available() else "cpu"
    print(f"Using {device} device.")
    # model = whisper("large-v3", device=device, compute_type="float16")
    model = whisper("large-v3", device=device, local_files_only=True)

    print("Model loaded.")

    with pyaudio.PyAudio() as pya:
        # Create PyAudio instance via context manager.
        try:
            # Get default WASAPI info
            wasapi_info = pya.get_host_api_info_by_type(pyaudio.paWASAPI)
        except OSError:
            print("Looks like WASAPI is not available on the system. Exiting...")
            sys.exit()

        # Get default WASAPI speakers
        default_speakers = pya.get_device_info_by_index(
            wasapi_info["defaultOutputDevice"]
        )

        if not default_speakers["isLoopbackDevice"]:
            for loopback in pya.get_loopback_device_info_generator():
                # Try to find loopback device with same name(and [Loopback suffix]).
                # Unfortunately, this is the most adequate way at the moment.
                if default_speakers["name"] in loopback["name"]:
                    default_speakers = loopback
                    break
            else:
                print(
                    """
                    Default loopback output device not found.
                    Run `python -m pyaudiowpatch` to check available devices.
                    Exiting...
                    """
                )
                sys.exit()

        print(
            f"Recording from: {default_speakers['name']} ({default_speakers['index']})\n"
        )

        while True:
            filename = record_audio(pya, default_speakers)
            thread = threading.Thread(target=whisper_audio, args=(filename, model))
            thread.start()

main()
实时转写WebSocket服务器模式
在最新Google Bard的帮助下,从同步多线程单机版变成了异步WebSocket服务器版本,Unity可以链接并监听实时转写的数据了(写这篇文章时是冬季,ChatGPT实测已经开始休眠状态了)
import asyncio
import os
import wave
import tempfile
import torch
import pyaudiowpatch as pyaudio
from faster_whisper import WhisperModel as whisper
import websockets
import json

# Audio buffer time
AUDIO_BUFFER = 5

# Dictionary to store WebSocket connections
clients = {}

# handle client
async def handle_client(websocket):
   client_id = id(websocket)  # Using the WebSocket object's ID as a unique identifier
   print(f"Client connected from {websocket.remote_address} with ID {client_id}")
   clients[client_id] = websocket
   try:
      # print(f"Client connected from {websocket.remote_address}")
      # Wait for messages from the client
      async for message in websocket:
         print(f"Received message from client {client_id}: {message}")
         # Process the message (you can replace this with your logic)
         response = f"Server received: {message}"
         # Send a response back to the client
         await websocket.send(response)
         print(f"Sent response to client {client_id}: {response}")

   except websockets.exceptions.ConnectionClosedError:
      print(f"Connection with {websocket.remote_address} closed.")
   finally:
      # Remove the WebSocket connection when the client disconnects
      del clients[client_id]

# Send a message to all connected clients
async def send_all_clients(message):
   if clients==None or clients=={}:
      print("No clients connected.")
      return
   for client_id, websocket in clients.items():
      try:
         await websocket.send(message)
         print(f"Sent message to client {client_id}: {message}")
      except Exception as e:
         print(f"Error sending message to client {client_id}: {e}")

# Send a message to a specific client identified by client_id
async def send_message(client_id, message):
   if client_id in clients:
      websocket = clients[client_id]
      await websocket.send(message)
      print(f"Sent message to client {client_id}: {message}")
   else:
      print(f"Client with ID {client_id} not found.")


# Start the server
async def main_server():
   server = await websockets.serve(handle_client, "localhost", 8765)
   print("WebSocket server started. Listening on ws://localhost:8765")

   await server.wait_closed()


#This function records audio using the PyAudio library and saves it as a temporary WAV file.
#Use pyaudio PyAudio instance creates an audio stream and writes audio data in real-time to a WAV file by specifying the callback function callback.
#Due to the use of the asyncio library, it is no longer necessary to use time. sleep() to block execution, but instead to use asyncio. sleep() to wait asynchronously.
#Finally, the function returns the file name of the saved WAV file.
async def record_audio(p, device):
    """Record audio from output device and save to temporary WAV file."""
    with tempfile.NamedTemporaryFile(suffix=".wav", delete=False) as f:
        filename = f.name
        wave_file = wave.open(filename, "wb")
        wave_file.setnchannels(device["maxInputChannels"])
        wave_file.setsampwidth(pyaudio.get_sample_size(pyaudio.paInt16))
        wave_file.setframerate(int(device["defaultSampleRate"]))

        def callback(in_data, frame_count, time_info, status):
            """Write frames and return PA flag"""
            wave_file.writeframes(in_data)
            return (in_data, pyaudio.paContinue)

        stream = p.open(
            format=pyaudio.paInt16,
            channels=device["maxInputChannels"],
            rate=int(device["defaultSampleRate"]),
            frames_per_buffer=pyaudio.get_sample_size(pyaudio.paInt16),
            input=True,
            input_device_index=device["index"],
            stream_callback=callback,
        )

        await asyncio.sleep(AUDIO_BUFFER)

        stream.stop_stream()
        stream.close()
        wave_file.close()
        # print(f"{filename} saved.")
    return filename

# SegmentData class
class SegmentData:
    def __init__(self, start, end,text):
        # 实例属性
        self.start = start
        self.end = end
        self.text = text

    def __dict__(self):
        return {"start": self.start, "end": self.end, "text": self.text}

def convert_to_unity_data(data):  # 参数 data 为字典列表
    unity_data = []
    for item in data:
        segment_data = SegmentData(item["start"], item["end"], item["text"])
        unity_data.append(segment_data)
    return unity_data


# This function transcribes the recorded audio using the Whisper model and outputs the transcription result.
async def whisper_audio(filename, model):
    """Transcribe audio buffer and display."""
    segments, info = model.transcribe(filename, beam_size=5, language="zh", vad_filter=True, vad_parameters=dict(min_silence_duration_ms=1000))
    os.remove(filename)
    # print(f"{filename} removed.")
    if segments:
        segments_dict_list = [{"start": segment.start, "end": segment.end, "text": segment.text.strip()} for segment in segments]
        json_transcriptions=json.dumps(segments_dict_list)
        print(f"Transcription: {json_transcriptions}")
        try:
            await send_all_clients(json_transcriptions)
        except Exception as e:
            print(f"Error sending message: {e}")


# Start recording audio using PyAudio and concurrently run the whisper_audio function for audio transcription using asyncio.gather.
async def main():
    """Load model record audio and transcribe from default output device."""
    print("Loading model...")
    device = "cuda" if torch.cuda.is_available() else "cpu"
    print(f"Using {device} device.")
    model = whisper("large-v3", device=device, local_files_only=True,compute_type="int8_float16")

    print("Model loaded.")

    with pyaudio.PyAudio() as pya:
        # Get microphone device information (assuming you want to select the first microphone device)
        microphone_index = 0
        microphone_info = pya.get_device_info_by_index(microphone_index)
        while True:
            filename = await record_audio(pya, microphone_info)
            await asyncio.gather(whisper_audio(filename, model))


async def appmain():
    await asyncio.gather(main(), main_server())  # Gather coroutines here

if __name__ == "__main__":
    asyncio.run(appmain())  # Pass the main coroutine to asyncio.run()
参考
faster-whisper
MyloBishop/transper
Google Bard
基于faster_whisper的实时语音识别
基于faster whisper实现实时语音识别项目语音转文本python编程实现


 379
379

 被折叠的 条评论
为什么被折叠?
被折叠的 条评论
为什么被折叠?
 到【灌水乐园】发言


