


大体思路。
onMearSure()里测量出所有子View大小。onLayout()中指定位置。定义attrs文件,最终目的为了方便管理。
attr文件定义。
<declare-styleable name="TopBar">
        <attr name="titleText" format="string"></attr>
        <attr name="titlesize" format="dimension"></attr>
        <attr name="titlecolor" format="color"></attr>
        <attr name="leftTextcolor" format="color"></attr>
        <attr name="leftBackground" format="reference|color"></attr>
        <attr name="leftText" format="string"></attr>
        <attr name="rightTextcolor" format="color"></attr>
        <attr name="rightBackground" format="reference|color"></attr>
        <attr name="rightText" format="string"></attr>
        <attr name="topmode" format="integer"></attr>//0代表左右两边是Button,1两边为Imageview 默认0
    </declare-styleable>
当前主要考虑到两种情况,一种左右都是图片,另一种左右均为Button.
代码片段
public CustomTopBar(Context context, AttributeSet attrs, int defStyleAttr) {
        super(context, attrs, defStyleAttr);
        mContext = context;
        TypedArray a = context.obtainStyledAttributes(attrs,R.styleable.TopBar);
        mode = a.getInteger(R.styleable.TopBar_topmode,0);
        mLeftBackGround = a.getDrawable(R.styleable.TopBar_leftBackground);
        mRightBackGround = a.getDrawable(R.styleable.TopBar_rightBackground);
        if(mode==0) {
            mLeftTextColor = a.getColor(R.styleable.TopBar_leftTextcolor, Color.BLACK);
            mLeftText = a.getString(R.styleable.TopBar_leftText);

            mRightTextColor = a.getColor(R.styleable.TopBar_rightTextcolor, Color.BLACK);
            mRightText = a.getString(R.styleable.TopBar_rightText);

        }

        mTitleText = a.getString(R.styleable.TopBar_titleText);
        mTitleSize =a.getDimension(R.styleable.TopBar_titlesize, 10f);
        mTitleTextColor = a.getColor(R.styleable.TopBar_titlecolor, Color.BLACK);

        a.recycle();


        initViews();
获取xml中对应的值。a.recycle();及时释放资源。主要进行制空操作。
@Override
    protected void onMeasure(int widthMeasureSpec, int heightMeasureSpec) {
        super.onMeasure(widthMeasureSpec, heightMeasureSpec);
        measureChildren(widthMeasureSpec,heightMeasureSpec);
    }
measureChildren()计算出所有子View的宽高,没有这一步骤在onLayout中childView 获取到的宽高都是0。
接下来是initViews中的方法。
private void initViews() {
        mLeftParmas = new LayoutParams(LayoutParams.WRAP_CONTENT,LayoutParams.MATCH_PARENT);
        mRightParmas = new LayoutParams(LayoutParams.WRAP_CONTENT,LayoutParams.MATCH_PARENT);
        mTitleParmas = new LayoutParams(LayoutParams.WRAP_CONTENT,LayoutParams.MATCH_PARENT);
        if(mode==0){
            mLeftButton = new Button(mContext);
            mRightButton = new Button(mContext);
            mLeftButton.setText(mLeftText);
            mLeftButton.setTextColor(mLeftTextColor);
            mLeftButton.setBackground(mLeftBackGround);

            mLeftButton.setLayoutParams(mLeftParmas);
            mLeftButton.setGravity(Gravity.CENTER);
            addView(mLeftButton);
            mRightButton.setText(mRightText);
            mRightButton.setTextColor(mRightTextColor);
            mRightButton.setBackground(mRightBackGround);

            mRightButton.setLayoutParams(mRightParmas);
            mRightButton.setGravity(Gravity.CENTER);
            addView(mRightButton);
        }else {
            mLeftImage = new ImageView(mContext);
            mRightImage = new ImageView(mContext);
            mLeftImage.setImageDrawable(mLeftBackGround);
            mLeftImage.setLayoutParams(mLeftParmas);
            addView(mLeftImage);
            mRightImage.setImageDrawable(mRightBackGround);
            mRightImage.setLayoutParams(mRightParmas);
            addView(mRightImage);
        }

        mTitleTextView = new TextView(mContext);


        mTitleTextView.setText(mTitleText);
        mTitleTextView.setTextColor(mTitleTextColor);
        mTitleTextView.setTextSize(mTitleSize);
        mTitleTextView.setGravity(Gravity.CENTER);

        mTitleTextView.setLayoutParams(mTitleParmas);
        addView(mTitleTextView);

        if(mode==0) {
            mLeftButton.setOnClickListener(new OnClickListener() {
                @Override
                public void onClick(View v) {
                    if (mListener != null) {
                        mListener.leftClick();
                    }
                }
            });
            mRightButton.setOnClickListener(new OnClickListener() {
                @Override
                public void onClick(View v) {
                    if (mListener != null) {
                        mListener.rightClick();
                    }
                }
            });
        }else{
            mLeftImage.setOnClickListener(new OnClickListener() {
                @Override
                public void onClick(View v) {
                    if (mListener != null) {
                        mListener.leftClick();
                    }
                }
            });
            mRightImage.setOnClickListener(new OnClickListener() {
                @Override
                public void onClick(View v) {
                    if (mListener != null) {
                        mListener.rightClick();
                    }
                }
            });
        }
    }
判断下采取用的是ImageView,Button。依次添加到ViewGroup中。如果继承的是RelativeLayout 不是ViewGroup, 只需要设置每个View 对应parmas 的位置信息,既addRule(,)即可。
onLayout方法
protected void onLayout(boolean changed, int l, int t, int r, int b) {

        int count = getChildCount();
        int cr,cb,cl,ct;
        cb = b;
        cl=0;
        ct=0;
        cr=r;
        for(int i=0;i<count;i++){
            View child = getChildAt(i);
            int width = child.getMeasuredWidth();
            switch (i){
                case 0://左
                    cl=ct=0;
                    break;
                case 1://右
                    cl = r-width;
                    break;
                case 2://中

                    cl= r/2-width/2;
                    break;
            }
            child.layout(cl,ct,cl+width,b);
        }
    }
如果是继承的RelativeLayout 直接写个super即可,因为父类的方法中已根据rule对其子View位置做了计算及分配。
xml方法
 <com.jalen.customproject.CustomTopBar
        android:id="@+id/topbar"
        android:layout_width="match_parent"
        android:layout_height="50dip"
        topBar:titleText="测试"
        topBar:titlesize="10sp"
        topBar:leftText="LEFT"
        topBar:rightText="Right"
        topBar:titlecolor="@android:color/holo_blue_bright"
        topBar:leftBackground="@mipmap/lucky_item_show"
        topBar:rightBackground="@mipmap/me_feedback_advice_img"
        topBar:topmode="1"
        >
记得在根控件加上xmlns:topBar=”http://schemas.android.com/apk/res-auto”
个人建议
最好写两个style 分别是button模式跟ImgaeView模式的。或者写一个include都可以。
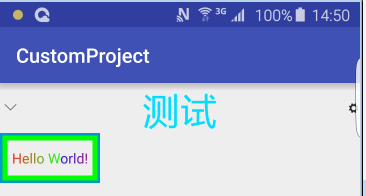
效果图:
Demo地址:CustomProject
有问题欢迎issue.


 476
476

 被折叠的 条评论
为什么被折叠?
被折叠的 条评论
为什么被折叠?
 到【灌水乐园】发言


