


1.完善了添加商品的后台代码(主要是Item表)将List<item>的数据挨个存到item表中
GoodsController.java中:
@RequestMapping("/add")
	public Result add(@RequestBody Goods goods){
		//获取安全框架中的商家姓名
        String sellerId = SecurityContextHolder.getContext().getAuthentication().getName();
        goods.getTbGoods().setSellerId(sellerId);

        try {
			goodsService.add(goods);
			return new Result(true, "增加成功");
		} catch (Exception e) {
			e.printStackTrace();
			return new Result(false, "增加失败");
		}
	}
GoodsServiceImpl.java中
@Override
    public void add(Goods goods) {
        //获取并添加商品中的TbGoods表
        TbGoods tbGoods = goods.getTbGoods();
        //设置商品状态为草稿状态:0 提交审核:1 审核通过:2 审核未通过:3 关闭商品:4 商品上架:5 商品下架:6
        tbGoods.setAuditStatus("0");
        goodsMapper.insert(tbGoods);
        //因为TbGoods和TbGoodsDesc这两张表是一对一的,主键相关
        Long id = tbGoods.getId();//为了能获取到id,得去TbGoods的insert语句中添加selectKey去获取lastId
        TbGoodsDesc tbGoodsDesc = goods.getTbGoodsDesc();
        tbGoodsDesc.setGoodsId(id);
        goodsDescMapper.insert(tbGoodsDesc);
        List<TbItem> list = goods.getTbItemList();
        for (TbItem item : list) {
            System.out.println(item.getSpec());
        }
        //先判断tbGoods表中isEnableSpec属性(规格)是否为启用状态
        if ("1".equals(tbGoods.getIsEnableSpec())) {//把"1"写在前面,防止不点按钮值为空,出现空指针异常的错误
            //给商品的SKU表添加数据
            List<TbItem> tbItemList = goods.getTbItemList();
            for (TbItem item : tbItemList) {
                //添加SKU的商品标题(SPU+规格选项的名称)
                String SPU = tbGoods.getGoodsName();
                Map<String, String> map = JSON.parseObject(item.getSpec(), Map.class);
                for (String key : map.keySet()) {
                    SPU += " " + map.get(key);
                }
                String SKU = SPU;
                item.setTitle(SKU);
                //添加商品卖点(tbGoods的副标题)
                item.setSellPoint(tbGoods.getCaption());
                //添加图片(采用图片列表的第一张即可)
                List<Map> images = JSON.parseArray(tbGoodsDesc.getItemImages(), Map.class);
                if (images.size() > 0) {
                    item.setImage(images.get(0).get("url").toString());
                }
                //添加SKU商品所属类目
                item.setCategoryid(tbGoods.getCategory3Id());
                //添加创建时间
                item.setCreateTime(new Date());
                //添加更新时间
                item.setUpdateTime(new Date());
                //添加goods_id(手动维护多对一的关系)
                item.setGoodsId(tbGoods.getId());
                //添加seller_id
                item.setSellerId(tbGoods.getSellerId());
                //添加分类的名称,(后面搜索时用到)
                item.setCategory(itemCatMapper.selectByPrimaryKey(tbGoods.getCategory3Id()).getName());
                //添加品牌的名称
                String brandName = brandMapper.selectByPrimaryKey(tbGoods.getBrandId()).getName();
                item.setBrand(brandName);
                //添加商家的公司名
                item.setSeller(sellerMapper.selectByPrimaryKey(tbGoods.getSellerId()).getName());
                //别忘了将item对象存到对应的表中
                itemMapper.insert(item);
            }
        }else {
            //如果规格为不启用状态,那么就自定义一个空的item(除了Title不一样,别的都一样
            TbItem item = new TbItem();
            item.setTitle(tbGoods.getGoodsName());
            //添加商品卖点(tbGoods的副标题)
            item.setSellPoint(tbGoods.getCaption());
            //添加图片(采用图片列表的第一张即可)
            List<Map> images = JSON.parseArray(tbGoodsDesc.getItemImages(), Map.class);
            if (images.size() > 0) {
                item.setImage(images.get(0).get("url").toString());
            }
            //添加SKU商品所属类目
            item.setCategoryid(tbGoods.getCategory3Id());
            //添加创建时间
            item.setCreateTime(new Date());
            //添加更新时间
            item.setUpdateTime(new Date());
            //添加goods_id(手动维护多对一的关系)
            item.setGoodsId(tbGoods.getId());
            //添加seller_id
            item.setSellerId(tbGoods.getSellerId());
            //添加分类的名称,(后面搜索时用到)
            item.setCategory(itemCatMapper.selectByPrimaryKey(tbGoods.getCategory3Id()).getName());
            //添加品牌的名称
            String brandName = brandMapper.selectByPrimaryKey(tbGoods.getBrandId()).getName();
            item.setBrand(brandName);
            //添加商家的公司名
            item.setSeller(sellerMapper.selectByPrimaryKey(tbGoods.getSellerId()).getName());

            //因为item不是页面传入,需要设置页面牵扯的默认值★★★★★★★★★★★★(容易忘)
            item.setStatus("0");
            item.setIsDefault("1");
            item.setNum(9999);
            item.setPrice(tbGoods.getPrice());


            //别忘了将item对象存到对应的表中
            itemMapper.insert(item);
        }

    }
goods_edit.html页面(是否启用规格,动态展示规格和规格选项列表):
<!--规格-->
                            <div class="tab-pane" id="spec">
                            	<div class="row data-type">
	                            	<div class="col-md-2 title">是否启用规格</div>
			                        <div class="col-md-10 data">
			                        	<input ng-click="entity.tbGoodsDesc.specificationItems=[]" ng-model="entity.tbGoods.isEnableSpec" ng-true-value="1" ng-false-value="0" type="checkbox" >	{{entity.tbGoodsDesc.specificationItems}}|||{{entity.tbItemList}}
			                        </div>
                            	</div>
                            	<p>


                            	<div ng-if="entity.tbGoods.isEnableSpec==1">
goosController.js中(添加成功的话,跳转商品展示页面):
//保存
    $scope.add = function () {
        //增加获取富文本的内容并赋值
        $scope.entity.tbGoodsDesc.introduction = editor.html();
        //提交之后清空富文本编辑框
        editor.html();
        goodsService.add($scope.entity).success(
            function (response) {
                if (response.success) {
                    //如果成功,清空当前$scope.entity对象
                    $scope.entity = {};
                    //添加成功的话,就跳转商品展示页面
                    location.href = "goods.html"
                } else {
                    alert(response.message);
                }

            }
        );
    }
遇到的问题:如果添加成功后去查sqlyog时tb_item表中不显示数据,原因是tb_item表中数据太多,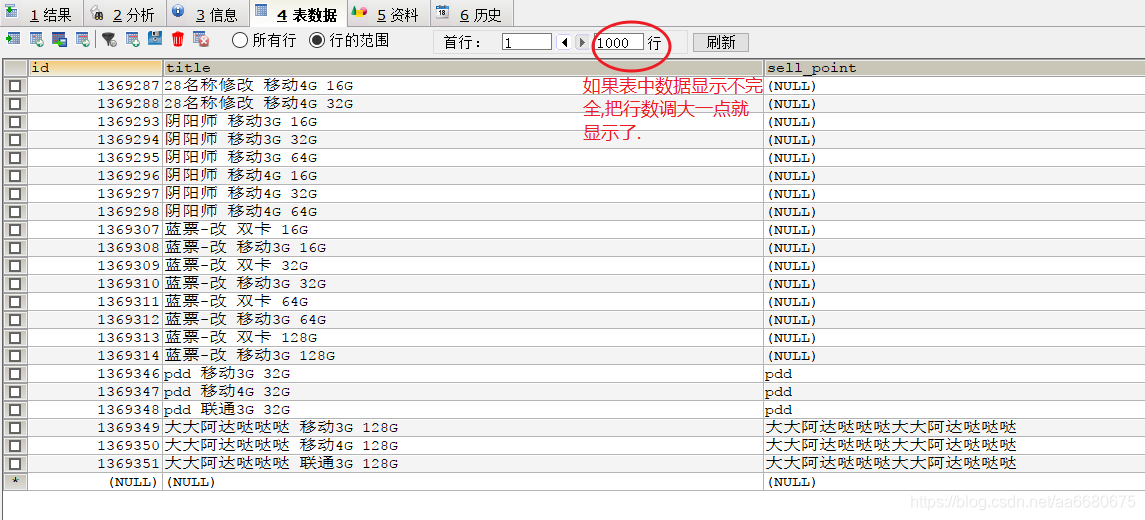
2.跳转到goods.html页面(商品展示页面)

goods.html页面部分:
引入js文件
<!--引入js文件-->
    <script type="text/javascript" src="../plugins/angularjs/angular.min.js"></script>
    <script type="text/javascript" src="../plugins/angularjs/pagination.js"></script>
    <link rel="stylesheet" href="../plugins/angularjs/pagination.css">
    <script type="text/javascript" src="../js/base_pagination.js" ></script>
    <script type="text/javascript" src="../js/service/goodsService.js" ></script>
    <script type="text/javascript" src="../js/service/itemCatService.js"></script>
    <script type="text/javascript" src="../js/service/uploadService.js"></script>
    <script type="text/javascript" src="../js/service/typeTemplateService.js"></script>
    <script type="text/javascript" src="../js/controller/baseController.js" ></script>
    <script type="text/javascript" src="../js/controller/goodsController.js" ></script>
body标签中的绑定
<body class="hold-transition skin-red sidebar-mini" ng-app="pinyougou" ng-controller="goodsController" ng-init="findItemCatList()">页面数据的绑定
<tr ng-repeat="entity in list">
			                              <td><input ng-click="updateSelection($event,entity.id)"  type="checkbox"></td>
				                          <td>{{entity.id}}</td>
									      <td>{{entity.goodsName}}</td>
									      <td>{{entity.price}}</td>
									      <td>{{itemCatList[entity.category1Id]}}</td>
									      <td>{{itemCatList[entity.category2Id]}}</td>
									      <td>{{itemCatList[entity.category3Id]}}</td>
		                                  <td>
		                                  	<span>
		                                  		{{status[entity.auditStatus]}}
		                                  	</span>
		                                  </td>
		                                  <td class="text-center">
		                                 	  <button type="button" class="btn bg-olive btn-xs">修改</button>
		                                  </td>
			                          </tr>
页面下方添加分页组件:
<!--数据列表/-->
<!--在页面上加上分页组件-->
<tm-pagination conf="paginationConf"></tm-pagination>
因为商品展示页面只展示这个商家的,不能展示别的商家的,所以得添加条件,又因为页面展示是分页展示,所有肯定会调用GoodsController.java中的search()方法,因为这个方法中传递一个searchEntity对象
GoodsController.java中
@RequestMapping("/search")
	public PageResult search(@RequestBody TbGoods goods, int page, int rows  ){

	//获取商家id,因为只查询当前商家的所有商品
        String sellerId = SecurityContextHolder.getContext().getAuthentication().getName();
        //按条件查询
        goods.setSellerId(sellerId);

        return goodsService.findPage(goods, page, rows);
	}
GoodsServiceImpl.java中,修改之前的代码生成器生成的查询条件
@Override
    public PageResult findPage(TbGoods goods, int pageNum, int pageSize) {
        PageHelper.startPage(pageNum, pageSize);

        TbGoodsExample example = new TbGoodsExample();
        Criteria criteria = example.createCriteria();

        if (goods != null) {
            if (goods.getSellerId() != null && goods.getSellerId().length() > 0) {
                criteria.andSellerIdEqualTo(goods.getSellerId());
            }
            if (goods.getGoodsName() != null && goods.getGoodsName().length() > 0) {
                criteria.andGoodsNameLike("%" + goods.getGoodsName() + "%");
            }
            if (goods.getAuditStatus() != null && goods.getAuditStatus().length() > 0) {
                criteria.andAuditStatusEqualTo(goods.getAuditStatus() );
            }


        }

        Page<TbGoods> page = (Page<TbGoods>) goodsMapper.selectByExample(example);
        return new PageResult(page.getTotal(), page.getResult());
    }
商品展示页面中三级分类和状态显示汉字的处理(原来是数字)
goodsController.js中:
    //添加商品状态
    $scope.status = ['未审核', '审核中', '审核通过', '审核未通过', '关闭', '上架', '下架'];

    //添加所有商品的分类
    $scope.itemCatList = [];
    $scope.findItemCatList = function () {
        itemCatService.findAll().success(
            function (response) {
                for (var i = 0; i < response.length; i++) {
                    $scope.itemCatList[response[i].id] = response[i].name;
                }
            }
        )
    }
页面部分在三级分类和状态的位置加上对应的数组(上图中已做修改)
商品的分页展示已完成(goods.html和goods_edit.html这两个页面共用的一个goodsController.js、goodsService.js、GoodsController.java)
3.实现了商品的模糊搜索
效果:
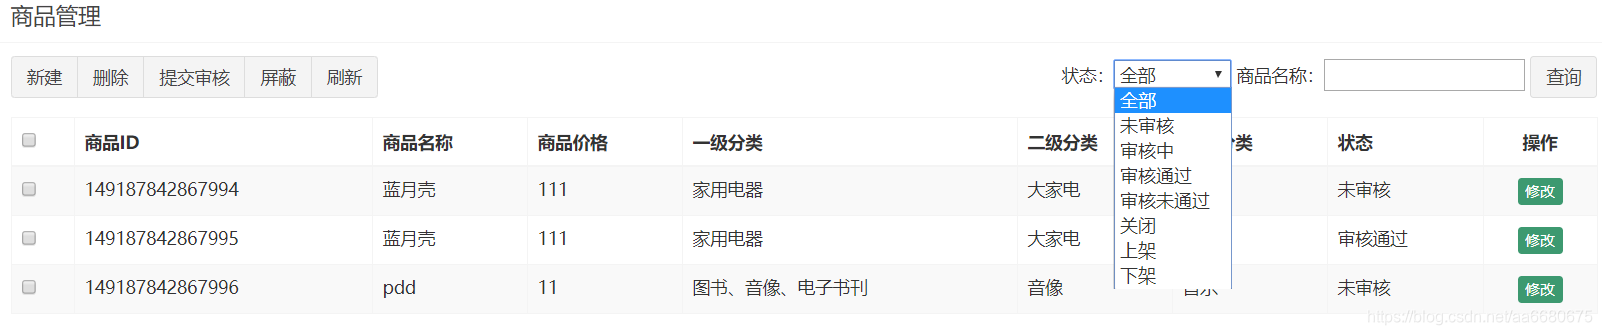
goods.html页面:
<div class="box-tools pull-right">
                                <div class="has-feedback">
                                  状态:<select ng-model="searchEntity.auditStatus">
                                         	<option value="">全部</option>
                                         	<option value="0">未审核</option>
                                         	<option value="1">审核中</option>
                                         	<option value="2">审核通过</option>
                                         	<option value="3">审核未通过</option>
                                         	<option value="3">关闭</option>
                                         	<option value="3">上架</option>
                                         	<option value="3">下架</option>
                                        </select>
							                  商品名称:<input ng-model="searchEntity.goodsName">
									<button ng-click="reloadList()" class="btn btn-default" >查询</button>
                                </div>
                            </div>
4.实现了商家提交审核的功能
goods.html页面:
在每个商品前的复选框中绑定方法
<td><input ng-click="updateSelection($event,entity.id)" type="checkbox"></td>提交按钮绑定方法:
<button ng-click="updateStatus(1)" type="button" class="btn btn-default" title="提交审核" ><i class="fa fa-check"></i> 提交审核</button>goodsController.js中:
//商家提交审核
    $scope.updateStatus = function (status) {
        goodsService.updateStatus($scope.selectIds, status).success(
            function (response) {
                if (response.success) {
                    //提交审核成功后
                    $scope.reloadList();
                }else {
                    alert(response.message);
                }
            }
        )
    }
goodsService.js中:
//updateStatus
	this.updateStatus=function (ids,status) {
		return $http.get('../goods/updateStatus.do?ids='+ids+'&status='+status);
    }
GoodsController.java中:
@RequestMapping("/updateStatus")
    public Result updateStatus(Long [] ids,String status){
        try {
            goodsService.updateStatus(ids,status);
            return new Result(true, "修改商品状态成功");
        } catch (Exception e) {
            e.printStackTrace();
            return new Result(false, "修改商品状态失败");
        }
    }
GoodsServiceImpl.java中:
//修改商品状态
    @Override
    public void updateStatus(Long[] ids, String status) {
        for (Long id : ids) {
            //循环修改商品状态
            TbGoods tbGoods = goodsMapper.selectByPrimaryKey(id);
            tbGoods.setAuditStatus(status);
            goodsMapper.updateByPrimaryKey(tbGoods);
        }
    }
5.运营商部分实现了展示所有提交审核的商品(status=1)
从代码生成器中复制GoodsController.java、goodsController.js、goodsService.js到pyg_manager_web模块
goods.html页面:
引入js文件:
    <script type="text/javascript" src="../plugins/angularjs/angular.min.js"></script>
    <script src="../plugins/angularjs/pagination.js"></script>
    <link rel="stylesheet" href="../plugins/angularjs/pagination.css">
    <script type="text/javascript" src="../js/base_pagination.js"></script>
    <script type="text/javascript" src="../js/service/goodsService.js"></script>
    <script type="text/javascript" src="../js/service/itemCatService.js"></script>
    <script type="text/javascript" src="../js/controller/baseController.js"></script>
    <script type="text/javascript" src="../js/controller/goodsController.js"></script>
body标签:
<body class="hold-transition skin-red sidebar-mini" ng-app="pinyougou" ng-controller="goodsController" ng-init="findItemCatList();searchEntity={auditStatus:1}">页面数据展示:
<tr ng-repeat="entity in list">
                <td><input ng-click="updateSelection($event,entity.id)"  type="checkbox"></td>
                <td>{{entity.id}}</td>
                <td>{{entity.goodsName}}</td>
                <td>{{entity.price}}</td>
                <td>{{itemCatList[entity.category1Id]}}</td>
                <td>{{itemCatList[entity.category2Id]}}</td>
                <td>{{itemCatList[entity.category3Id]}}</td>
                <td>
		             <span>
		                {{status[entity.auditStatus]}}
		             </span>
                </td>
                <td class="text-center">
                    <button type="button" class="btn bg-olive btn-xs">详情</button>
                </td>
            </tr>
分页插件的引入:
<!--数据列表/-->

<tm-pagination conf="paginationConf"></tm-pagination>
因为运营商只展示提交审核的商品,也就是商品状态码为"1"的商品,所以在goods.html页面部分的body标签中的ng-init后面加上searchEntity={auditStatus:1}即可
6.实现了运营商部分goods.html页面的模糊搜索
7.实现了运营商对商品的处理(审核通过2、审核未通过3、强制关闭4)
goods.html页面:
每个商品前的复选框中绑定updateSelection
<td><input ng-click="updateSelection($event,entity.id)" type="checkbox"></td>处理的按钮绑定updateStatus
<button ng-click="updateStatus(2)" type="button" class="btn btn-default" title="审核通过"><i
                            class="fa fa-check"></i> 审核通过
                    </button>
                    <button ng-click="updateStatus(3)" type="button" class="btn btn-default" title="审核未通过"><i
                            class="fa fa-check"></i> 审核未通过
                    </button>
                    <button ng-click="updateStatus(4)" type="button" class="btn btn-default" title="强制关闭"><i
                            class="fa fa-check"></i> 强制关闭
                    </button>
goodsController.js中:
//运营商通过审核
    $scope.updateStatus = function (status) {
        goodsService.updateStatus($scope.selectIds, status).success(
            function (response) {
                if (response.success) {
                    //提交审核成功后
                    $scope.reloadList();
                    //审核通过之后把selectIds置为空,防止在对商品做修改时重复修改先前的代码
		    $scope.selectIds=[];
                }else {
                    alert(response.message);
                }
            }
        )
    }
goodsService.js中:
//运营商通过审核
    this.updateStatus=function (ids,status) {
        return $http.get('../goods/updateStatus.do?ids='+ids+'&status='+status);
    }
GoodsController.java中:
@RequestMapping("/updateStatus")
	public Result updateStatus(Long [] ids,String status){
		try {
			goodsService.updateStatus(ids,status);
			return new Result(true, "修改商品状态成功");
		} catch (Exception e) {
			e.printStackTrace();
			return new Result(false, "修改商品状态失败");
		}
	}
GoodsServiceImpl.java中(不用动,运营商和商家共用Servcie层):
//修改商品状态
    @Override
    public void updateStatus(Long[] ids, String status) {
        for (Long id : ids) {
            //循环修改商品状态
            TbGoods tbGoods = goodsMapper.selectByPrimaryKey(id);
            tbGoods.setAuditStatus(status);
            goodsMapper.updateByPrimaryKey(tbGoods);
        }
    }
8.商家部分:实现了商家对商品的逻辑删除,数据库层面实际上是将isDelete的null改为了"1",删除操作只能是商家才有,运营商不行
goos.html页面:
删除按钮绑定dele()
<button ng-click="dele()" type="button" class="btn btn-default" title="删除" ><i class="fa fa-trash-o"></i> 删除</button>goodsController.js中:
//批量删除
    $scope.dele = function () {
        //获取选中的复选框
        goodsService.dele($scope.selectIds).success(
            function (response) {
                if (response.success) {
                    $scope.reloadList();//刷新列表
                    $scope.selectIds = [];
                }
            }
        );
    }
GoodsServcieImpl.java中:
    /**
     * 批量删除
     */
    @Override
    public void delete(Long[] ids) {
        for (Long id : ids) {
            //把原来的物理删除改为逻辑删除
//            goodsMapper.deleteByPrimaryKey(id);
            TbGoods tbGoods = goodsMapper.selectByPrimaryKey(id);
            //"1"代表删除,null代表没有被删除
            tbGoods.setIsDelete("1");
            goodsMapper.updateByPrimaryKey(tbGoods);
        }
    }
删除成功之后刷新列表,只显示商品的属性isDelete为null的,所以得在分页查询时加条件
因为商家做完删除商品操作后,不管是商家还是运营商,都不能显示被删除的商品
所以就在商家和运营商共用的部分GoodsServiceImpl.java的findPage方法上限制搜索条件(查询商品属性isDelete为null的):
@Override
    public PageResult findPage(TbGoods goods, int pageNum, int pageSize) {
        PageHelper.startPage(pageNum, pageSize);

        TbGoodsExample example = new TbGoodsExample();
        Criteria criteria = example.createCriteria();

        //在这里增加逻辑删除不显示(对客户端和商家来说都不显示,所以写在这)
        criteria.andIsDeleteIsNull();

        if (goods != null) {
            if (goods.getSellerId() != null && goods.getSellerId().length() > 0) {
                criteria.andSellerIdEqualTo(goods.getSellerId());
            }
            if (goods.getGoodsName() != null && goods.getGoodsName().length() > 0) {
                criteria.andGoodsNameLike("%" + goods.getGoodsName() + "%");
            }
            if (goods.getAuditStatus() != null && goods.getAuditStatus().length() > 0) {
                criteria.andAuditStatusEqualTo(goods.getAuditStatus() );
            }


        }

        Page<TbGoods> page = (Page<TbGoods>) goodsMapper.selectByExample(example);
        return new PageResult(page.getTotal(), page.getResult());
    }
9.实现了对事务的控制,在pyg_sellergoods_service模块下service.impl目录下的每一个实现类上加上@Transactional注解即可


 1755
1755

 被折叠的 条评论
为什么被折叠?
被折叠的 条评论
为什么被折叠?
 到【灌水乐园】发言


