


http://blog.csdn.net/abc_key/article/details/38275333
本章介绍
- 引导客户端和服务器
- 从Channel引导客户端
- 添加多个ChannelHandler
- 使用通道选项和属性
Netty提供了简单统一的方法来引导服务器和客户端。引导是配置Netty服务器和客户端程序的一个过程,Bootstrap允许这些应用程序很容易的重复使用。Netty程序的客户端和服务器都可以使用Bootstrap,其目的是简化编码过程,Bootstrap还提供了一个机制就是让一些组件(channels,pipeline,handlers等等)都可以在后台工作。本章将具体结合以下部分一起使用开发Netty程序:
- EventLoopGroup
- Channel
- 设置ChannelOption
- Channel被注册后将调用ChannelHandler
- 添加指定的属性到Channel
- 设置本地和远程地址
- 绑定、连接(取决于类型)
9.1 不同的引导类型
Netty包含了2个不同类型的引导,第一个是使用服务器的ServerBootstrap,用来接受客户端连接以及为已接受的连接创建子通道;第二个是用于客户端的Bootstrap,不接受新的连接,并且是在父通道类完成一些操作。
还有一种情况是处理DatagramChannel实例,这些用于UDP协议,是无连接的。换句话说,由于UDP的性质,所以当处理UDP数据时没有必要每个连接通道与TCP连接一样。因为通道不需要连接后才能发送数据,UDP是无连接协议。一个通道可以处理所有的数据而不需要依赖子通道。
下图是引导的类关系图:
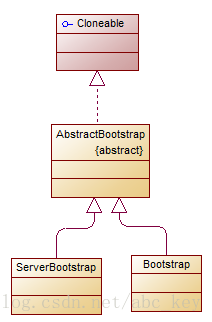
我们在前面讨论了许多用于客户端和服务器的知识,为了对客户端和服务器之间的关系提供了一个共同点,Netty使用AbstractBootstrap类。通过一个共同的父类,在本章中讨论的客户端和服务器的引导程序能够重复使用通用功能,而无需复制代码或逻辑。通常情况下,多个通道使用相同或非常类似的设置时有必要的。而不是为每一个通道创建一个新的引导,Netty使得AbstractBootstrap可复制。也就是说克隆一个已配置的引导,其返回的是一个可重用而无需配置的引导。Netty的克隆操作只能浅拷贝引导的EventLoopGroup,也就是说EventLoopGroup在所有的克隆的通道中是共享的。这是一个好事情,克隆的通道一般是短暂的,例如一个通道创建一个HTTP请求。
本章主要讲解Bootstrap和ServerBootstrap,首先我们来看看ServerBootstrap。
9.2 引导客户端和无连接协议
当需要引导客户端或一些无连接协议时,需要使用Bootstrap类。
9.2.1 引导客户端的方法
创建Bootstrap实例使用new关键字,下面是Bootstrap的方法:
- group(...),设置EventLoopGroup,EventLoopGroup用来处理所有通道的IO事件
- channel(...),设置通道类型
- channelFactory(...),使用ChannelFactory来设置通道类型
- localAddress(...),设置本地地址,也可以通过bind(...)或connect(...)
- option(ChannelOption<T>, T),设置通道选项,若使用null,则删除上一个设置的ChannelOption
- attr(AttributeKey<T>, T),设置属性到Channel,若值为null,则指定键的属性被删除
- handler(ChannelHandler),设置ChannelHandler用于处理请求事件
- clone(),深度复制Bootstrap,Bootstrap的配置相同
- remoteAddress(...),设置连接地址
- connect(...),连接远程通道
- bind(...),创建一个新的Channel并绑定
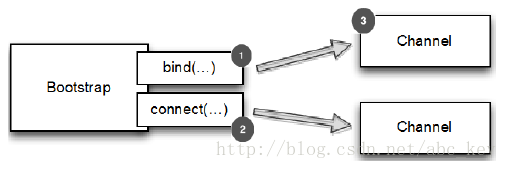
9.2.2 怎么引导客户端
引导负责客户端通道连接或断开连接,因此它将在调用bind(...)或connect(...)后创建通道。下图显示了如何工作:
下面代码显示了引导客户端使用NIO TCP传输:
package netty.in.action;

import io.netty.bootstrap.Bootstrap;
import io.netty.buffer.ByteBuf;
import io.netty.channel.ChannelFuture;
import io.netty.channel.ChannelFutureListener;
import io.netty.channel.ChannelHandlerContext;
import io.netty.channel.EventLoopGroup;
import io.netty.channel.SimpleChannelInboundHandler;
import io.netty.channel.nio.NioEventLoopGroup;
import io.netty.channel.socket.nio.NioSocketChannel;

/**
 * 引导配置客户端
 *
 * @author c.k
 *
 */
public class BootstrapingClient {

	public static void main(String[] args) throws Exception {
		EventLoopGroup group = new NioEventLoopGroup();
		Bootstrap b = new Bootstrap();
		b.group(group).channel(NioSocketChannel.class).handler(new SimpleChannelInboundHandler<ByteBuf>() {
			@Override
			protected void channelRead0(ChannelHandlerContext ctx, ByteBuf msg) throws Exception {
				System.out.println("Received data");
				msg.clear();
			}
		});
		ChannelFuture f = b.connect("127.0.0.1", 2048);
		f.addListener(new ChannelFutureListener() {
			@Override
			public void operationComplete(ChannelFuture future) throws Exception {
				if (future.isSuccess()) {
					System.out.println("connection finished");
				} else {
					System.out.println("connection failed");
					future.cause().printStackTrace();
				}
			}
		});
	}
}
9.2.3 选择兼容通道实现
Channel的实现和EventLoop的处理过程在EventLoopGroup中必须兼容,哪些Channel是和EventLoopGroup是兼容的可以查看API文档。经验显示,相兼容的实现一般在同一个包下面,例如使用NioEventLoop,NioEventLoopGroup和NioServerSocketChannel在一起。请注意,这些都是前缀“Nio”,然后不会用这些代替另一个实现和另一个前缀,如“Oio”,也就是说OioEventLoopGroup和NioServerSocketChannel是不相容的。
Channel和EventLoopGroup的EventLoop必须相容,例如NioEventLoop、NioEventLoopGroup、NioServerSocketChannel是相容的,但是OioEventLoopGroup和NioServerSocketChannel是不相容的。从类名可以看出前缀是“Nio”的只能和“Nio”的一起使用,“Oio”前缀的只能和Oio*一起使用,将不相容的一起使用会导致错误异常,如OioSocketChannel和NioEventLoopGroup一起使用时会抛出异常:Exception in thread "main" java.lang.IllegalStateException: incompatible event loop type。
9.3 使用ServerBootstrap引导服务器
9.3.1 引导服务器的方法
先看看ServerBootstrap提供了哪些方法
- group(...),设置EventLoopGroup事件循环组
- channel(...),设置通道类型
- channelFactory(...),使用ChannelFactory来设置通道类型
- localAddress(...),设置本地地址,也可以通过bind(...)或connect(...)
- option(ChannelOption<T>, T),设置通道选项,若使用null,则删除上一个设置的ChannelOption
- childOption(ChannelOption<T>, T),设置子通道选项
- attr(AttributeKey<T>, T),设置属性到Channel,若值为null,则指定键的属性被删除
- childAttr(AttributeKey<T>, T),设置子通道属性
- handler(ChannelHandler),设置ChannelHandler用于处理请求事件
- childHandler(ChannelHandler),设置子ChannelHandler
- clone(),深度复制ServerBootstrap,且配置相同
- bind(...),创建一个新的Channel并绑定
9.3.2 怎么引导服务器
下图显示ServerBootstrap管理子通道:
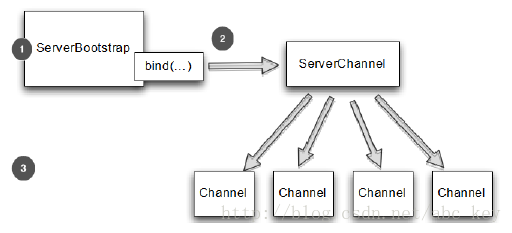
child*方法是在子Channel上操作,通过ServerChannel来管理。
下面代码显示使用ServerBootstrap引导配置服务器:
package netty.in.action;

import io.netty.bootstrap.ServerBootstrap;
import io.netty.buffer.ByteBuf;
import io.netty.channel.ChannelFuture;
import io.netty.channel.ChannelFutureListener;
import io.netty.channel.ChannelHandlerContext;
import io.netty.channel.EventLoopGroup;
import io.netty.channel.SimpleChannelInboundHandler;
import io.netty.channel.nio.NioEventLoopGroup;
import io.netty.channel.socket.nio.NioServerSocketChannel;

/**
 * 引导服务器配置
 * @author c.k
 *
 */
public class BootstrapingServer {

	public static void main(String[] args) throws Exception {
		EventLoopGroup bossGroup = new NioEventLoopGroup(1);
		EventLoopGroup workerGroup = new NioEventLoopGroup();
		ServerBootstrap b = new ServerBootstrap();
		b.group(bossGroup, workerGroup).channel(NioServerSocketChannel.class)
				.childHandler(new SimpleChannelInboundHandler<ByteBuf>() {
					@Override
					protected void channelRead0(ChannelHandlerContext ctx, ByteBuf msg) throws Exception {
						System.out.println("Received data");
						msg.clear();
					}
				});
		ChannelFuture f = b.bind(2048);
		f.addListener(new ChannelFutureListener() {
			@Override
			public void operationComplete(ChannelFuture future) throws Exception {
				if (future.isSuccess()) {
					System.out.println("Server bound");
				} else {
					System.err.println("bound fail");
					future.cause().printStackTrace();
				}
			}
		});
	}
}
9.4 从Channel引导客户端
有时候需要从另一个Channel引导客户端,例如写一个代理或需要从其他系统检索数据。从其他系统获取数据时比较常见的,有很多Netty应用程序必须要和企业现有的系统集成,如Netty程序与内部系统进行身份验证,查询数据库等。
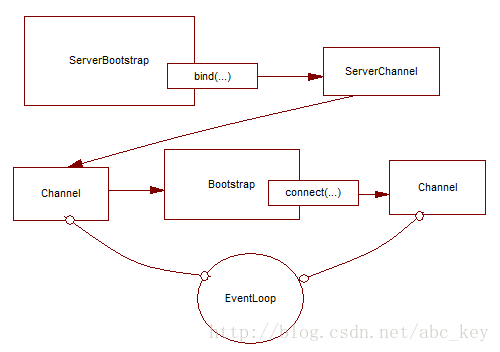
当然,你可以创建一个新的引导,这样做没有什么不妥,只是效率不高,因为要为新创建的客户端通道使用另一个EventLoop,如果需要在已接受的通道和客户端通道之间交换数据则需要切换上下文线程。Netty对这方面进行了优化,可以讲已接受的通道通过eventLoop(...)传递到EventLoop,从而使客户端通道在相同的EventLoop里运行。这消除了额外的上下文切换工作,因为EventLoop继承于EventLoopGroup。除了消除上下文切换,还可以在不需要创建多个线程的情况下使用引导。
为什么要共享EventLoop呢?一个EventLoop由一个线程执行,共享EventLoop可以确定所有的Channel都分配给同一线程的EventLoop,这样就避免了不同线程之间切换上下文,从而减少资源开销。
下图显示相同的EventLoop管理两个Channel:
看下面代码:
package netty.in.action;

import java.net.InetSocketAddress;

import io.netty.bootstrap.Bootstrap;
import io.netty.bootstrap.ServerBootstrap;
import io.netty.buffer.ByteBuf;
import io.netty.channel.ChannelFuture;
import io.netty.channel.ChannelFutureListener;
import io.netty.channel.ChannelHandlerContext;
import io.netty.channel.EventLoopGroup;
import io.netty.channel.SimpleChannelInboundHandler;
import io.netty.channel.nio.NioEventLoopGroup;
import io.netty.channel.socket.nio.NioServerSocketChannel;
import io.netty.channel.socket.nio.NioSocketChannel;

/**
 * 从Channel引导客户端
 *
 * @author c.k
 *
 */
public class BootstrapingFromChannel {

	public static void main(String[] args) throws Exception {
		EventLoopGroup bossGroup = new NioEventLoopGroup(1);
		EventLoopGroup workerGroup = new NioEventLoopGroup();
		ServerBootstrap b = new ServerBootstrap();
		b.group(bossGroup, workerGroup).channel(NioServerSocketChannel.class)
				.childHandler(new SimpleChannelInboundHandler<ByteBuf>() {
					ChannelFuture connectFuture;

					@Override
					public void channelActive(ChannelHandlerContext ctx) throws Exception {
						Bootstrap b = new Bootstrap();
						b.channel(NioSocketChannel.class).handler(
								new SimpleChannelInboundHandler<ByteBuf>() {
									@Override
									protected void channelRead0(ChannelHandlerContext ctx,
											ByteBuf msg) throws Exception {
										System.out.println("Received data");
										msg.clear();
									}
								});
						b.group(ctx.channel().eventLoop());
						connectFuture = b.connect(new InetSocketAddress("127.0.0.1", 2048));
					}

					@Override
					protected void channelRead0(ChannelHandlerContext ctx, ByteBuf msg)
							throws Exception {
						if (connectFuture.isDone()) {
							// do something with the data
						}
					}
				});
		ChannelFuture f = b.bind(2048);
		f.addListener(new ChannelFutureListener() {
			@Override
			public void operationComplete(ChannelFuture future) throws Exception {
				if (future.isSuccess()) {
					System.out.println("Server bound");
				} else {
					System.err.println("bound fail");
					future.cause().printStackTrace();
				}
			}
		});
	}
}
9.5 添加多个ChannelHandler
在所有的例子代码中,我们在引导过程中通过handler(...)或childHandler(...)都只添加了一个ChannelHandler实例,对于简单的程序可能足够,但是对于复杂的程序则无法满足需求。例如,某个程序必须支持多个协议,如HTTP、WebSocket。若在一个ChannelHandler中处理这些协议将导致一个庞大而复杂的ChannelHandler。Netty通过添加多个ChannelHandler,从而使每个ChannelHandler分工明确,结构清晰。
Netty的一个优势是可以在ChannelPipeline中堆叠很多ChannelHandler并且可以最大程度的重用代码。如何添加多个ChannelHandler呢?Netty提供ChannelInitializer抽象类用来初始化ChannelPipeline中的ChannelHandler。ChannelInitializer是一个特殊的ChannelHandler,通道被注册到EventLoop后就会调用ChannelInitializer,并允许将ChannelHandler添加到CHannelPipeline;完成初始化通道后,这个特殊的ChannelHandler初始化器会从ChannelPipeline中自动删除。
听起来很复杂,其实很简单,看下面代码:
package netty.in.action;

import io.netty.bootstrap.ServerBootstrap;
import io.netty.channel.Channel;
import io.netty.channel.ChannelFuture;
import io.netty.channel.ChannelInitializer;
import io.netty.channel.EventLoopGroup;
import io.netty.channel.nio.NioEventLoopGroup;
import io.netty.channel.socket.nio.NioServerSocketChannel;
import io.netty.handler.codec.http.HttpClientCodec;
import io.netty.handler.codec.http.HttpObjectAggregator;

/**
 * 使用ChannelInitializer初始化ChannelHandler
 * @author c.k
 *
 */
public class InitChannelExample {

	public static void main(String[] args) throws Exception {
		EventLoopGroup bossGroup = new NioEventLoopGroup(1);
		EventLoopGroup workerGroup = new NioEventLoopGroup();
		ServerBootstrap b = new ServerBootstrap();
		b.group(bossGroup, workerGroup).channel(NioServerSocketChannel.class)
			.childHandler(new ChannelInitializerImpl());
		ChannelFuture f = b.bind(2048).sync();
		f.channel().closeFuture().sync();
	}

	static final class ChannelInitializerImpl extends ChannelInitializer<Channel>{
		@Override
		protected void initChannel(Channel ch) throws Exception {
			ch.pipeline().addLast(new HttpClientCodec())
				.addLast(new HttpObjectAggregator(Integer.MAX_VALUE));
		}
	}

}
9.6 使用通道选项和属性
比较麻烦的是创建通道后不得不手动配置每个通道,为了避免这种情况,Netty提供了ChannelOption来帮助引导配置。这些选项会自动应用到引导创建的所有通道,可用的各种选项可以配置底层连接的详细信息,如通道“keep-alive(保持活跃)”或“timeout(超时)”的特性。
Netty应用程序通常会与组织或公司其他的软件进行集成,在某些情况下,Netty的组件如通道、传递和Netty正常生命周期外使用;在这样的情况下并不是所有的一般属性和数据时可用的。这只是一个例子,但在这样的情况下,Netty提供了通道属性(channel attributes)。
属性可以将数据和通道以一个安全的方式关联,这些属性只是作用于客户端和服务器的通道。例如,例如客户端请求web服务器应用程序,为了跟踪通道属于哪个用户,应用程序可以存储用的ID作为通道的一个属性。任何对象或数据都可以使用属性被关联到一个通道。
使用ChannelOption和属性可以让事情变得很简单,例如Netty WebSocket服务器根据用户自动路由消息,通过使用属性,应用程序能在通道存储用户ID以确定消息应该发送到哪里。应用程序可以通过使用一个通道选项进一步自动化,给定时间内没有收到消息将自动断开连接。看下面代码:
	public static void main(String[] args) {
		//创建属性键对象
		final AttributeKey<Integer> id = AttributeKey.valueOf("ID");
		//客户端引导对象
		Bootstrap b = new Bootstrap();
		//设置EventLoop,设置通道类型
		b.group(new NioEventLoopGroup()).channel(NioSocketChannel.class)
		//设置ChannelHandler
			.handler(new SimpleChannelInboundHandler<ByteBuf>() {
				@Override
				protected void channelRead0(ChannelHandlerContext ctx, ByteBuf msg)
						throws Exception {
					System.out.println("Reveived data");
					msg.clear();
				}

				@Override
				public void channelRegistered(ChannelHandlerContext ctx) throws Exception {
					//通道注册后执行,获取属性值
					Integer idValue = ctx.channel().attr(id).get();
					System.out.println(idValue);
					//do something with the idValue
				}
			});
		//设置通道选项,在通道注册后或被创建后设置
		b.option(ChannelOption.SO_KEEPALIVE, true).option(ChannelOption.CONNECT_TIMEOUT_MILLIS, 5000);
		//设置通道属性
		b.attr(id, 123456);
		ChannelFuture f = b.connect("www.manning.com",80);
		f.syncUninterruptibly();
} public static void main(String[] args) {
Bootstrap b = new Bootstrap();
b.group(new OioEventLoopGroup()).channel(OioDatagramChannel.class)
.handler(new SimpleChannelInboundHandler<DatagramPacket>() {
@Override
protected void channelRead0(ChannelHandlerContext ctx, DatagramPacket msg)
throws Exception {
// do something with the packet
}
});
ChannelFuture f = b.bind(new InetSocketAddress(0));
f.addListener(new ChannelFutureListener() {
@Override
public void operationComplete(ChannelFuture future) throws Exception {
if (future.isSuccess()) {
System.out.println("Channel bound");
} else {
System.err.println("Bound attempt failed");
future.cause().printStackTrace();
}
}
});
}


 1661
1661


 被折叠的 条评论
为什么被折叠?
被折叠的 条评论
为什么被折叠?
 到【灌水乐园】发言


