| 开始进入新的学习之前,先回顾一下“上堂课”,
之前主要学了eclipse的使用方法,以及做了一个最最简单的WEB项目,
并初步接触了WEB项目中的核心文件web.xml。 今天,我们开始新的旅程,并隆重推出另一个主角spring~~~ 首先,下载spring,
地址是http://sourceforge.net/project/showfiles.php?group_id=73357&package_id=173644&release_id=608794,
推荐下载spring-framework-2.5.5-with-dependencies.zip文件,解压缩到eclipse的同级目录,这是我的习惯,你也可以任意。
这样spring的全路径是D:/StudySpring/spring-framework-2.5.5。 讲到这里,再次说一下本教程的内容的来源,这些例子都是spring官方的,都在D:/StudySpring/spring-framework-2.5.5/docs/MVC-step-by-step文件夹下,这个文件夹下是最基本的spring讲解,大家嫌我罗嗦的话,也可以直接看原版的。 ok,接下来要学习的例子,是在我们第一个spring001项目的基础上修改的,所以不用新建项目,直接打开“上堂课”的spring001即可,这里强烈建议备份一下之前的成果物,免得没地方后悔,呵呵~~~,我也顺便说一下,eclipse的备份方法。
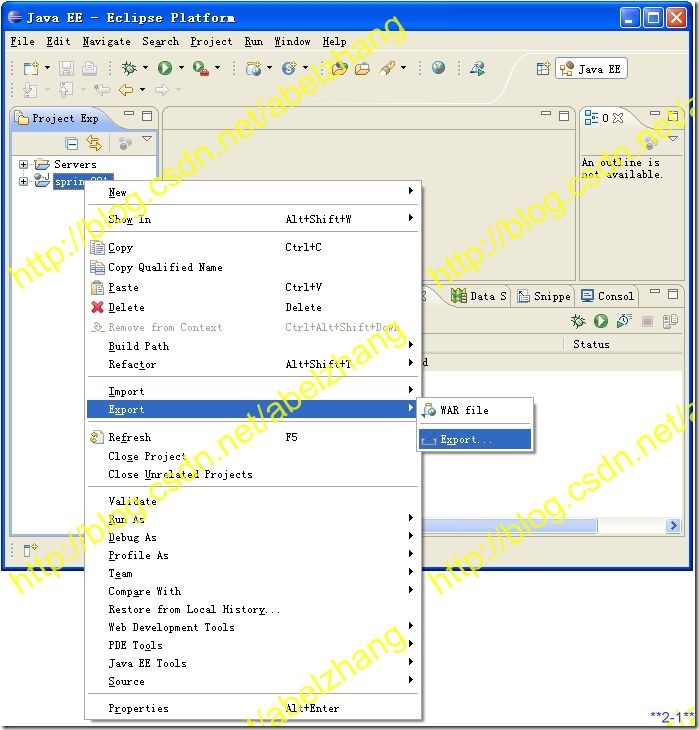
首先,在spring001上鼠标右键,在弹出菜单里选择Export->Export,如下图所示
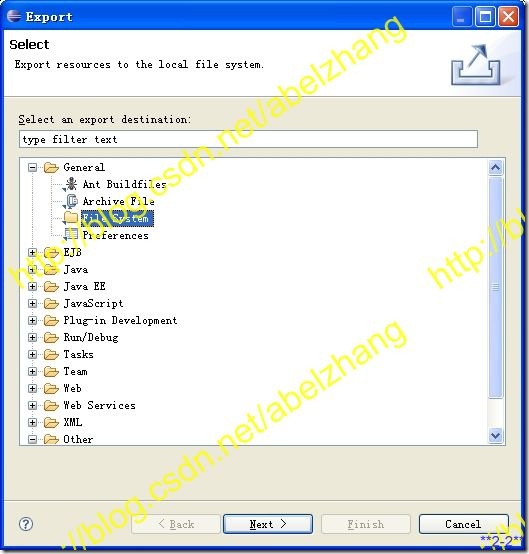
在接下来的对话框里选择General->File System,选好后点击“Next”按钮
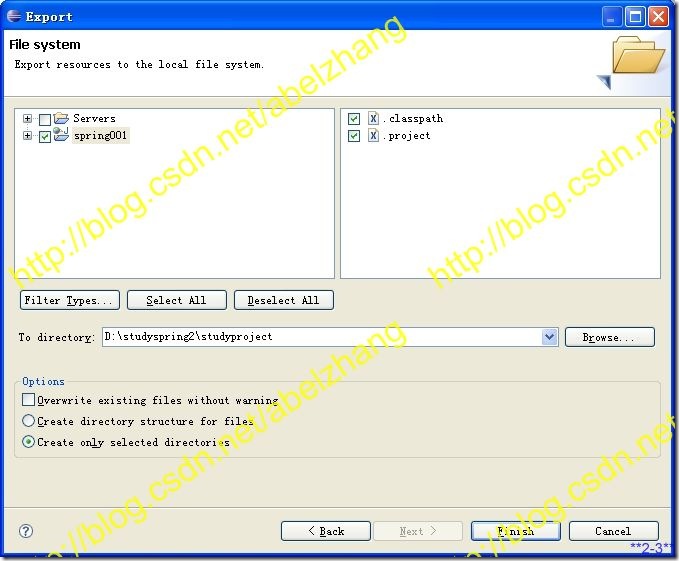
在接下来的对话框里,选择你要导出的spring001项目,以及选择好你要导出到的位置,
然后就可以点击“Finish”按钮来导出项目文件,我的选择如下图所示。
 备份好以后,就可以开始我们新的旅程,这里多说一句,建议大家把每个阶段的成果物保留一份,
一来可以起到备份的作用,
二来可以起到对比的作用,体会一下每次变更的意义。 首先,修改web.xml,修改后的内容如下,大家可以参照对比一下修改前后的内容差别
- <?xml version="1.0" encoding="UTF-8"?>
- <web-app version="2.4"
- xmlns="http://java.sun.com/xml/ns/j2ee"
- xmlns:xsi="http://www.w3.org/2001/XMLSchema-instance"
- xsi:schemaLocation="http://java.sun.com/xml/ns/j2ee
- http://java.sun.com/xml/ns/j2ee/web-app_2_4.xsd" >
- <servlet>
- <servlet-name>springapp</servlet-name>
- <servlet-class>org.springframework.web.servlet.DispatcherServlet</servlet-class>
- <load-on-startup>1</load-on-startup>
- </servlet>
- <servlet-mapping>
- <servlet-name>springapp</servlet-name>
- <url-pattern>*.htm</url-pattern>
- </servlet-mapping>
- <welcome-file-list>
- <welcome-file>
- index.jsp
- </welcome-file>
- </welcome-file-list>
- </web-app>
重点如下:
①define a DispatcherServlet (also known as a 'Front Controller').
It is going to control where all our requests are routed based on information we will enter at a later point.
②This servlet definition also has an attendant
entry that maps to the URL patterns that we will be using. We have decided to let any URL with an '.htm' extension be routed to the 'springapp' servlet (the DispatcherServlet). 虽然我的english is very poor,但是为了稍微和国际接一点点轨,还是强迫自己看些英文,而且觉得看英文有时候比看中文能够理解的快些~~ 接下来,再介绍一个重要文件给大家,也是一个xml的配置文件,叫springapp-servlet.xml,我们把这个文件创建在WebContent/WEB-INF下面,也就是和web.xml在一起。文件内容如下
- <?xml version="1.0" encoding="UTF-8"?>
- <beans xmlns="http://www.springframework.org/schema/beans"
- xmlns:xsi="http://www.w3.org/2001/XMLSchema-instance"
- xsi:schemaLocation="http:
- http:
- <!-- the application context definition for the springapp DispatcherServlet -->
- <bean name="/hello.htm" class="springapp.web.HelloController"/>
- </beans>
重点如下:
①This file contains the bean definitions (plain old Java objects) used by the DispatcherServlet. It is the WebApplicationContext where all web-related components go.
②The name of this file is determined by the value of the
element from the 'web.xml', with '-servlet' appended to it (hence 'springapp-servlet.xml'). This is the standard naming convention used with Spring's Web MVC framework.
③Now, add a bean entry named '/hello.htm' and specify the class as springapp.web.HelloController. This defines the controller that our application will be using to service a request with the corresponding URL mapping of '/hello.htm'.
④The Spring Web MVC framework uses an implementation class of the interface called HandlerMapping to define the mapping between a request URL and the object that is going to handle that request (the handler). 接下来,要拷贝一些即将用到的jar包,具体如下
①D:/StudySpring/spring-framework-2.5.5/dist下的spring.jar
②D:/StudySpring/spring-framework-2.5.5/dist/modules下的spring-webmvc.jar
③D:/StudySpring/spring-framework-2.5.5/lib/jakarta-commons下面的commons-logging.jar
⑤D:/StudySpring/apache-tomcat-6.0.18/lib下面的servlet-api.jar 把上述的jar包文件,拷贝到spring001项目下的WebContent/WEB-INF/lib下面。
※如你的路径和我不一样,请对应到自己的路径 下面,要出场的更是一个重量级的宝贝—Controller(控制器),可以说这是spring的指挥中心,这个控制器体现在我们的项目中是一个java文件。
我们来新建一个HelloController.java文件,
创建之前,我们要创建好package,名字是springapp.web,
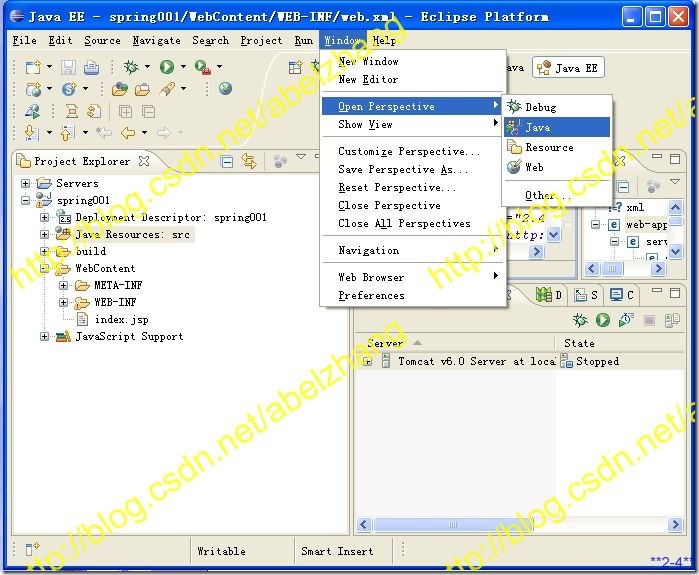
创建package的方法如下,个人习惯是,先把eclips的视图切换到“java”模式下,切换的方法是选择菜单Window->Open Perspective->Java,如下图所示
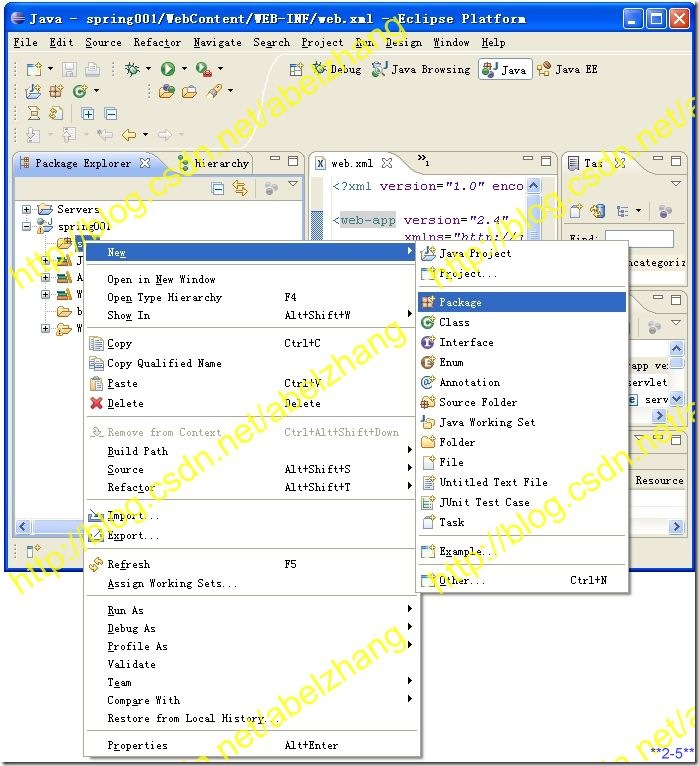
 切换好后,会发现在spring001下有一个“src”的节点,鼠标右键它,在弹出菜单里选择New->Package,如下图所示
 在弹出窗口里,填入要创建的package名称,这里我填写springapp.web,意思是创建两个package,一个叫springapp,一个叫web,后者是前者的子package,如下图所示
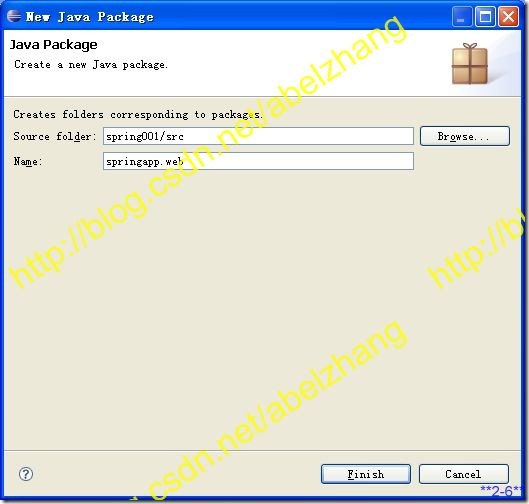 点击“Finish”按钮来结束创建package的工作。 接下来是,创建控制器---HelloController.java,
创建在刚才创建的springapp的web的下面,
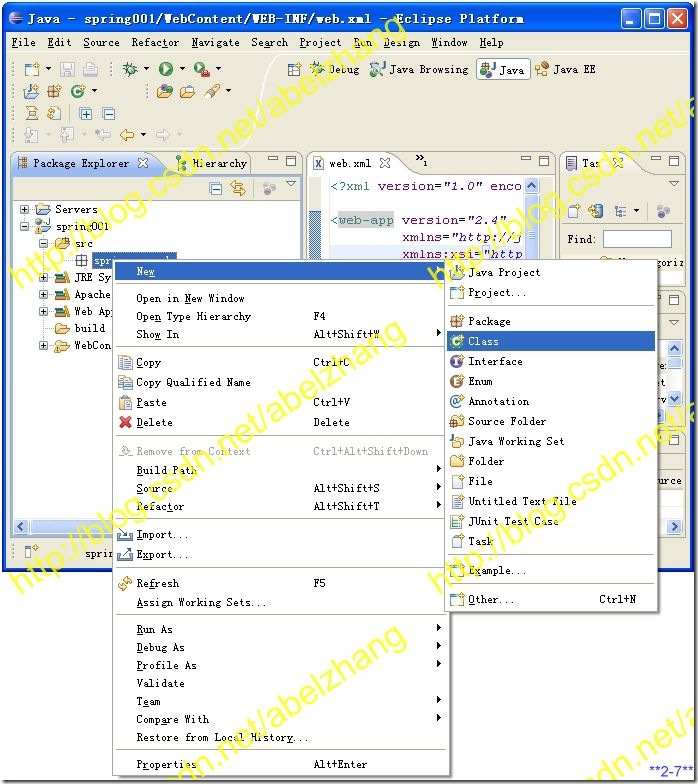
创建方法是,鼠标右键springapp.web,在弹出菜单里选择New->Class,如下图所示
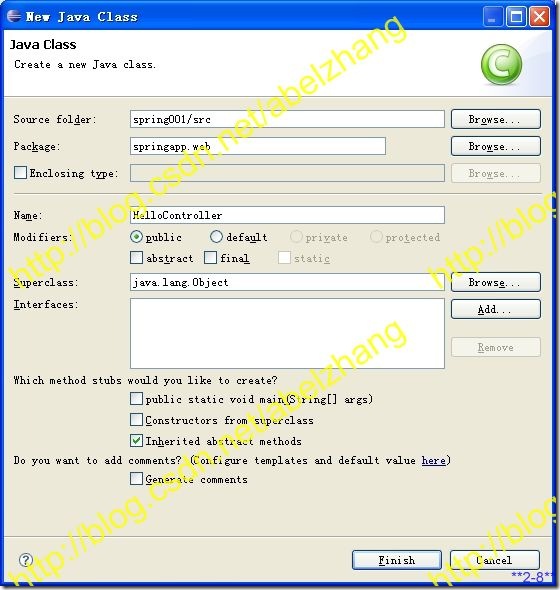
 在弹出的窗口里,只需在name对应的文本框里输入HelloController,输好后点击“Finish”按钮。如下图所示
 HelloController.java的代码内容如下
- package springapp.web;
- import org.springframework.web.servlet.mvc.Controller;
- import org.springframework.web.servlet.ModelAndView;
- import javax.servlet.ServletException;
- import javax.servlet.http.HttpServletRequest;
- import javax.servlet.http.HttpServletResponse;
- import org.apache.commons.logging.Log;
- import org.apache.commons.logging.LogFactory;
- import java.io.IOException;
- public class HelloController implements Controller {
- protected final Log logger = LogFactory.getLog(getClass());
- public ModelAndView handleRequest(HttpServletRequest request, HttpServletResponse response)
- throws ServletException, IOException {
- logger.info("Returning hello view");
- return new ModelAndView("hello.jsp");
- }
- }
接下来,我们还要创建一个view(视图),在WebContent下面创建一个hello.jsp文件,内容如下,创建方法就不说了,不会的,可以参考前面的章节。
- <html>
- <head><title>Hello :: Spring Application</title></head>
- <body>
- <h1>Hello - Spring Application</h1>
- <p>Greetings.</p>
- </body>
- </html>
ok,到此为止,就完成了这个阶段的修改任务,接下来就可以启动这个项目,来验证我们的成果,在eclipse里,启动项目,启动方法参考前面的章节,如果没有问题的话,你会得到下面的画面
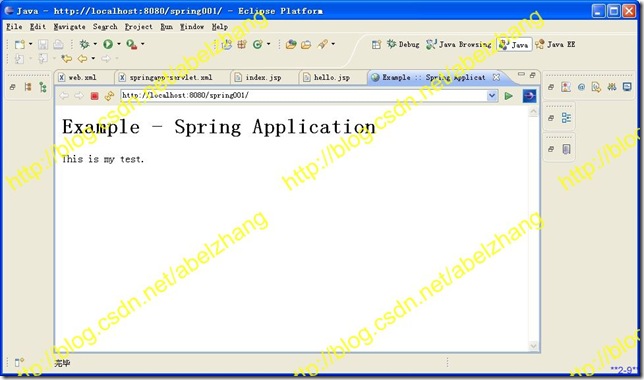
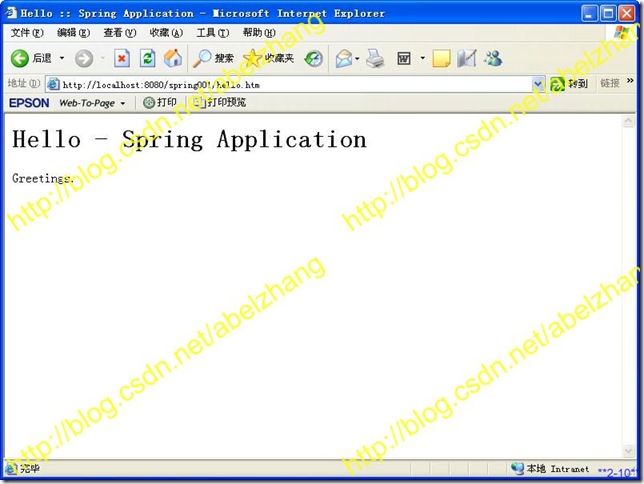
咦,这不是上个练习的页面吗~~~~¥%¥¥%,没错,这是因为eclipse启动后默认的页面,但不是我们要测试的页面,或者说本次练习没有使用到index.jsp,我们可以在地址栏里直接追加上hello.html,即为http://localhost:8080/spring001/hello.html,也可以在IE的地址栏里输入http://localhost:8080/spring001/hello.html,会得到下面的页面
 总结一下,重点 1:web.xml里增加的内容 2:springapp-servlet.xml(这个名字的来由和代码内容同样重要哦~~) 3;控制器-controller 4:视图-view
END | 

 被折叠的 条评论
为什么被折叠?


