| 到今天我们已经进行了3次学习,打了一些基础,今天终于可以开始学习入门的知识了,那就开始入门吧,呵呵~~~
(之所以改成入门篇,是因为今天开始的内容比前面的内容稍微复杂一点,入门篇结束后,可以说spring的MVC框架的内容就可以基本了解,为日后的深入学习打下点点基础) 好,下面就开始今天的学习 还是在原有的项目spring001上修改,大家可以通过一次次的修改的内容,逐步体会一下spring的结构,而我越来越觉得spring的官方学习资料MVC-step-by-step的精妙所在了~~~ 开始之前,请不要忘记备份下上次的成果~~ 首先,改进一下上次的练习,修改对象是控制器HelloController.java,这里面把返回对象的路径都写成固定的了,不是很好的开发习惯,也造成了一种不必要的依赖关系,我们修改的方法如下,大家可以在修改后对照一下差别的地方。 Ok,把我们的HelloController.java用下面的内容替换
- package springapp.web;
- import org.springframework.web.servlet.mvc.Controller;
- import org.springframework.web.servlet.ModelAndView;
- import javax.servlet.ServletException;
- import javax.servlet.http.HttpServletRequest;
- import javax.servlet.http.HttpServletResponse;
- import org.apache.commons.logging.Log;
- import org.apache.commons.logging.LogFactory;
- import java.io.IOException;
- import java.util.Date;
- public class HelloController implements Controller {
- protected final Log logger = LogFactory.getLog(getClass());
- public ModelAndView handleRequest(HttpServletRequest request, HttpServletResponse response)
- throws ServletException, IOException {
- String now = (new Date()).toString();
- logger.info("Returning hello view with " + now);
- return new ModelAndView("hello", "now", now);
- }
- }
 既然这种依赖关系不存在于控制器中,那在哪里呢?肯定要有个地方指定,对吧,
答案是,在配置文件里设定,我们这里是体现在springapp-servlet.xml里面,
请用下面的内容替换。
- <?xml version="1.0" encoding="UTF-8"?>
- <beans xmlns="http://www.springframework.org/schema/beans"
- xmlns:xsi="http://www.w3.org/2001/XMLSchema-instance"
- xsi:schemaLocation="http://www.springframework.org/schema/beans
- http://www.springframework.org/schema/beans/spring-beans-2.0.xsd">
-
-
-
- <bean name="/hello.htm" class="springapp.web.HelloController"/>
-
- <bean id="viewResolver" class="org.springframework.web.servlet.view.InternalResourceViewResolver">
- <property name="viewClass" value="org.springframework.web.servlet.view.JstlView"></property>
- <property name="prefix" value="/WEB-INF/jsp/"></property>
- <property name="suffix" value=".jsp"></property>
- </bean>
-
- </beans>
改造好后就可以开始我们今天的新内容了,大家可以通过运行一下自己的程序,
来验证一下,看到的画面应该和上次的一样。
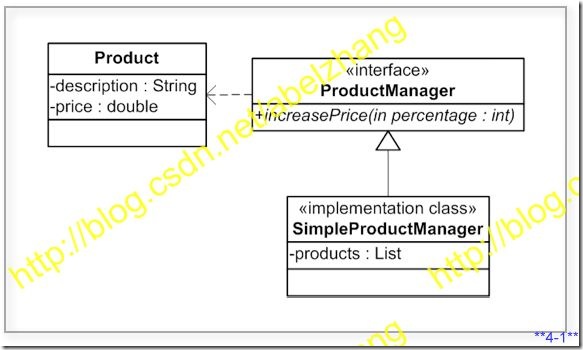
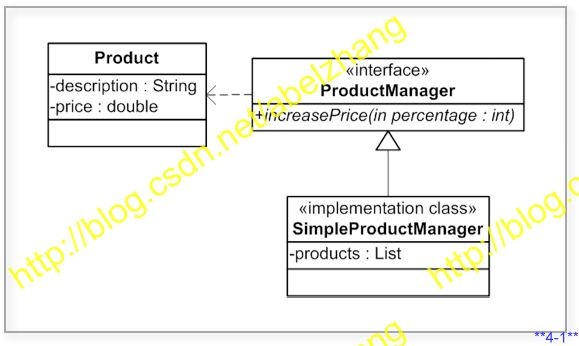
下面就开始我们今天的主角,通过一个Inventory Management System(目录管理系统)来体会spring。
这个系统的业务逻辑如下图:
接下来,来添加我们的业务逻辑部分的程序文件,在springapp包下面建一个叫domain的包,
然后创建springapp/domain/Product.java类,内容如下
- package springapp.domain;
- import java.io.Serializable;
- public class Product implements Serializable {
- private String description;
- private Double price;
-
- public String getDescription() {
- return description;
- }
-
- public void setDescription(String description) {
- this.description = description;
- }
-
- public Double getPrice() {
- return price;
- }
-
- public void setPrice(Double price) {
- this.price = price;
- }
-
- public String toString() {
- StringBuffer buffer = new StringBuffer();
- buffer.append("Description: " + description + ";");
- buffer.append("Price: " + price);
- return buffer.toString();
- }
- }
然后,再创建一个service包,在这个包里创建我们的
springapp/service/ProductManager.java,
它是一个接口类,内容如下:
- package springapp.service;
- import java.io.Serializable;
- import java.util.List;
- import springapp.domain.Product;
- public interface ProductManager extends Serializable{
- public void increasePrice(int percentage);
-
- public List<Product> getProducts();
-
- }
然后,创建实现这个接口类的springapp/service/SimpleProductManager.java,内容如下
- package springapp.service;
- import java.util.List;
- import springapp.domain.Product;
- public class SimpleProductManager implements ProductManager {
- private List<Product> products;
-
- public List<Product> getProducts() {
- return products;
- }
- public void increasePrice(int percentage) {
- if (products != null) {
- for (Product product : products) {
- double newPrice = product.getPrice().doubleValue() *
- (100 + percentage)/100;
- product.setPrice(newPrice);
- }
- }
- }
-
- public void setProducts(List<Product> products) {
- this.products = products;
- }
-
- }
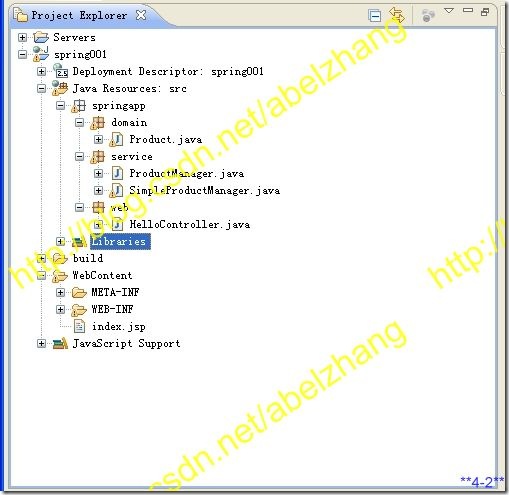
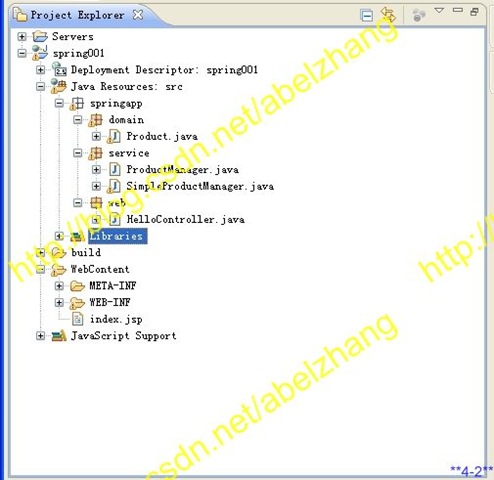
到这,创建好的类的结构,如下图所示
接下来,要新增加一个控制器,名叫InventoryController.java,
位置在springapp/web/下,内容如下
- package springapp.web;
- import org.springframework.web.servlet.mvc.Controller;
- import org.springframework.web.servlet.ModelAndView;
- import javax.servlet.ServletException;
- import javax.servlet.http.HttpServletRequest;
- import javax.servlet.http.HttpServletResponse;
- import java.io.IOException;
- import java.util.Map;
- import java.util.HashMap;
- import org.apache.commons.logging.Log;
- import org.apache.commons.logging.LogFactory;
- import springapp.service.ProductManager;
- public class InventoryController implements Controller {
- protected final Log logger = LogFactory.getLog(getClass());
- private ProductManager productManager;
- public ModelAndView handleRequest(HttpServletRequest request, HttpServletResponse response)
- throws ServletException, IOException {
- String now = (new java.util.Date()).toString();
- logger.info("returning hello view with " + now);
- Map<String, Object> myModel = new HashMap<String, Object>();
- myModel.put("now", now);
- myModel.put("products", this.productManager.getProducts());
- return new ModelAndView("hello", "model", myModel);
- }
- public void setProductManager(ProductManager productManager) {
- this.productManager = productManager;
- }
- }
然后,修改我们的view,即hello.jsp,修改内容如下
- <%@ include file="/WEB-INF/jsp/include.jsp" %>
- <html>
- <head><title><fmt:message key="title"/></title></head>
- <body>
- <h1><fmt:message key="heading"/></h1>
- <p><fmt:message key="greeting"/> <c:out value="${model.now}"/></p>
- <h3>Products</h3>
- <c:forEach items="${model.products}" var="prod">
- <c:out value="${prod.description}"/> <i>$<c:out value="${prod.price}"/></i><br><br>
- </c:forEach>
- </body>
- </html>
到目前为止还没有引入数据库,所以我们只能在配置文件里造一些测试数据,这个配置文件就是springapp-servlet.xml,修改后的内容如下
- <?xml version="1.0" encoding="UTF-8"?>
- <beans xmlns="http://www.springframework.org/schema/beans"
- xmlns:xsi="http://www.w3.org/2001/XMLSchema-instance"
- xsi:schemaLocation="http://www.springframework.org/schema/beans
- http://www.springframework.org/schema/beans/spring-beans-2.5.xsd">
-
- <bean id="productManager" class="springapp.service.SimpleProductManager">
- <property name="products">
- <list>
- <ref bean="product1"/>
- <ref bean="product2"/>
- <ref bean="product3"/>
- </list>
- </property>
- </bean>
- <bean id="product1" class="springapp.domain.Product">
- <property name="description" value="Lamp"/>
- <property name="price" value="5.75"/>
- </bean>
-
- <bean id="product2" class="springapp.domain.Product">
- <property name="description" value="Table"/>
- <property name="price" value="75.25"/>
- </bean>
- <bean id="product3" class="springapp.domain.Product">
- <property name="description" value="Chair"/>
- <property name="price" value="22.79"/>
- </bean>
- <bean id="messageSource" class="org.springframework.context.support.ResourceBundleMessageSource">
- <property name="basename" value="messages"/>
- </bean>
- <bean name="/hello.htm" class="springapp.web.InventoryController">
- <property name="productManager" ref="productManager"/>
- </bean>
- <bean id="viewResolver" class="org.springframework.web.servlet.view.InternalResourceViewResolver">
- <property name="viewClass" value="org.springframework.web.servlet.view.JstlView"/>
- <property name="prefix" value="/WEB-INF/jsp/"/>
- <property name="suffix" value=".jsp"/>
- </bean>
- </beans>
接下来,添加我们的message内容文件,这个文件在hello.jsp里面用到,
创建的路径是我们的src下面,名字叫messages.properties,文件内容如下
- title=SpringApp
- heading=Hello :: SpringApp
- greeting=Greetings, it is now
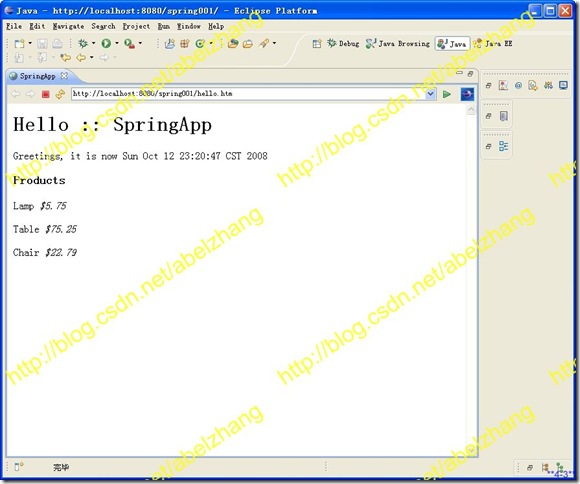
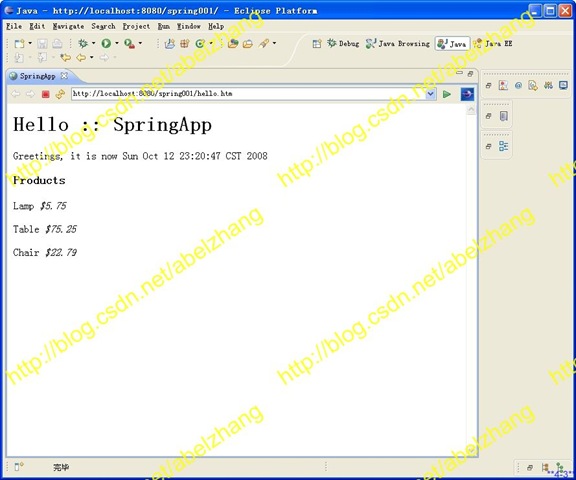
OK,今天的内容就到这里,可以运行一下,看看我们的成果,如果没有问题,应该能看到下面的画面(运行方法见前面的教程)
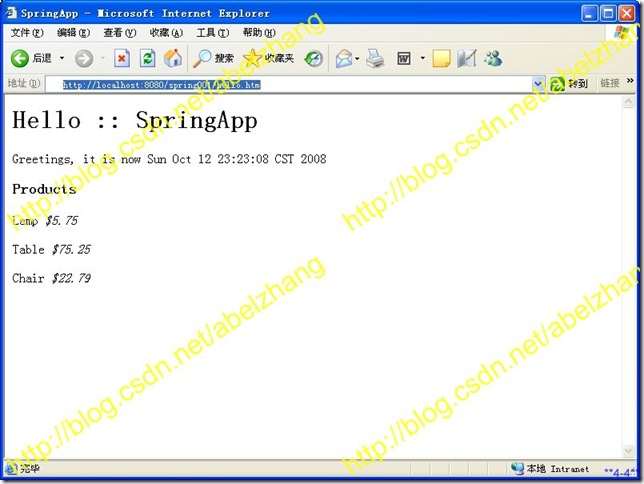
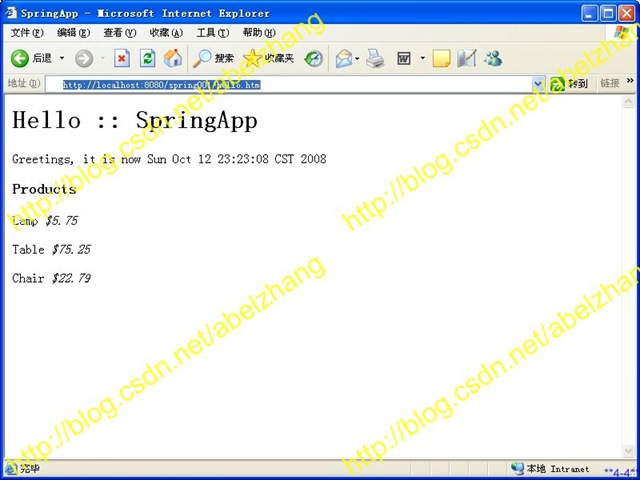
或者在IE的地址栏里输入http://localhost:8080/spring001,得到下面的结果画面
重点总结
1:注意下控制器变了一个,原来的不使用了。
2:hello.jsp里如何使用message.properties内容,看一下springapp-servlet.xml就会明白了。
3:创建了service层,请体会下意义。
END
| 


 34万+
34万+

 被折叠的 条评论
为什么被折叠?
被折叠的 条评论
为什么被折叠?
 到【灌水乐园】发言


