


Arduino 电位计(potentionmeter)
In this tutorial, we are going to learn:
在本教程中,我们将学习:
- How potentiometer works. 电位器的工作原理。
- How to connect the potentiometer to Arduino.
如何将电位器连接到Arduino。 - How to program Arduino to read the value from the potentiometer and convert it to another controlable values.
如何对Arduino进行编程以从电位器中读取值并将其转换为另一个可控值。
Hardware Required 所需硬件
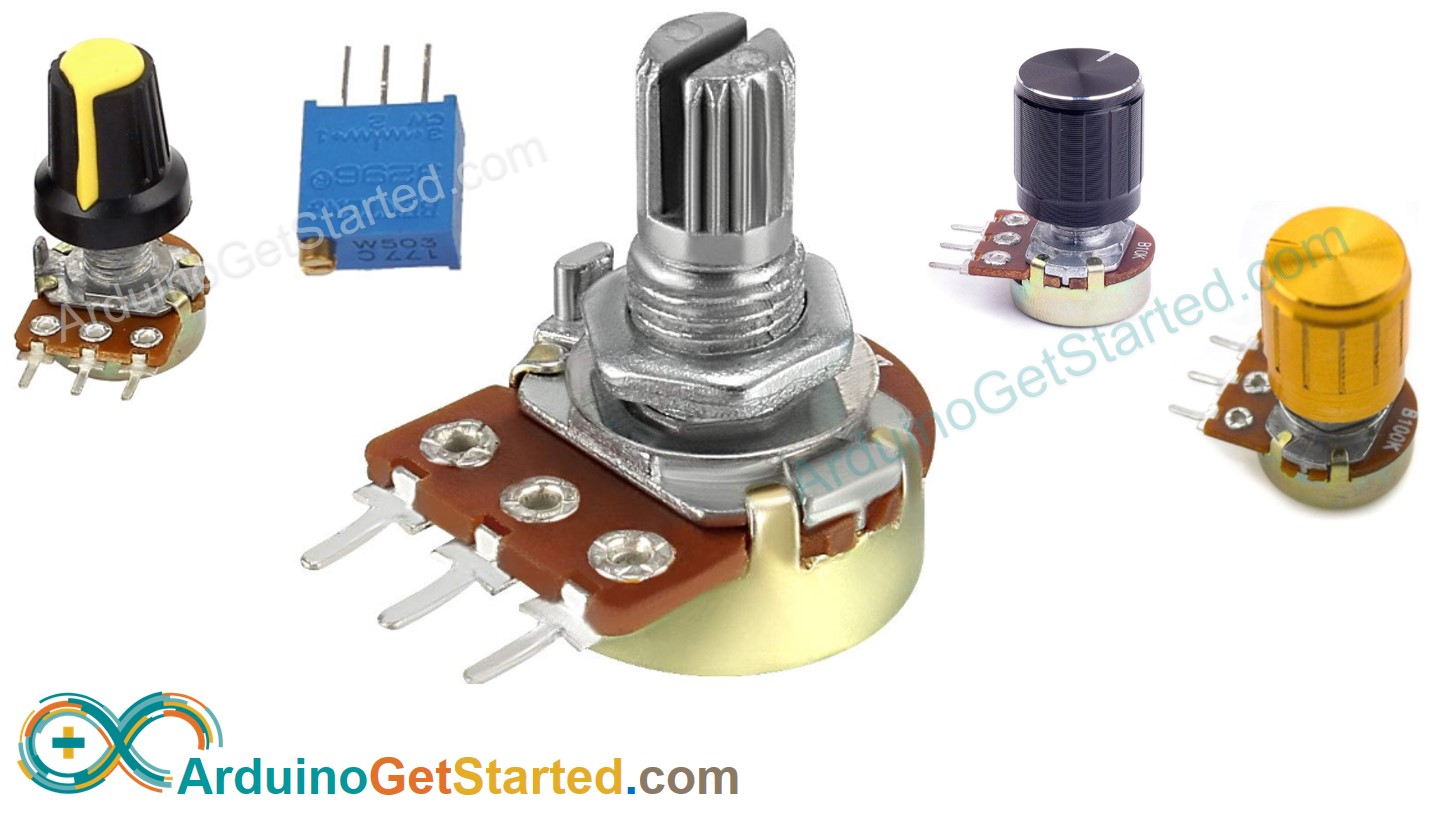
About Potentiometer 关于电位器
Rotary potentiometer (also called rotary angle sensor) is used to manually adjust the value of something (e.g volume of the stereo, the brightness of lamp, zoom level of oscilloscope…)
旋转电位器(也称为旋转角度传感器)用于手动调整某物的值(例如立体声的音量、灯的亮度、示波器的变焦级别…
Pinout 引脚排列
Potentiometer usually has 3 pins:
电位器通常有 3 个引脚:GND pin: needs to be connected to GND (0V)
GND引脚:需要接GND(0V)
-
VCC pin: needs to be connected to VCC (5V or 3.3v)
VCC引脚:需要连接VCC(5V或3.3V) -
Output pin: outputs the voltage to Arduino’s input pin.
输出引脚:将电压输出到Arduino的输入引脚。
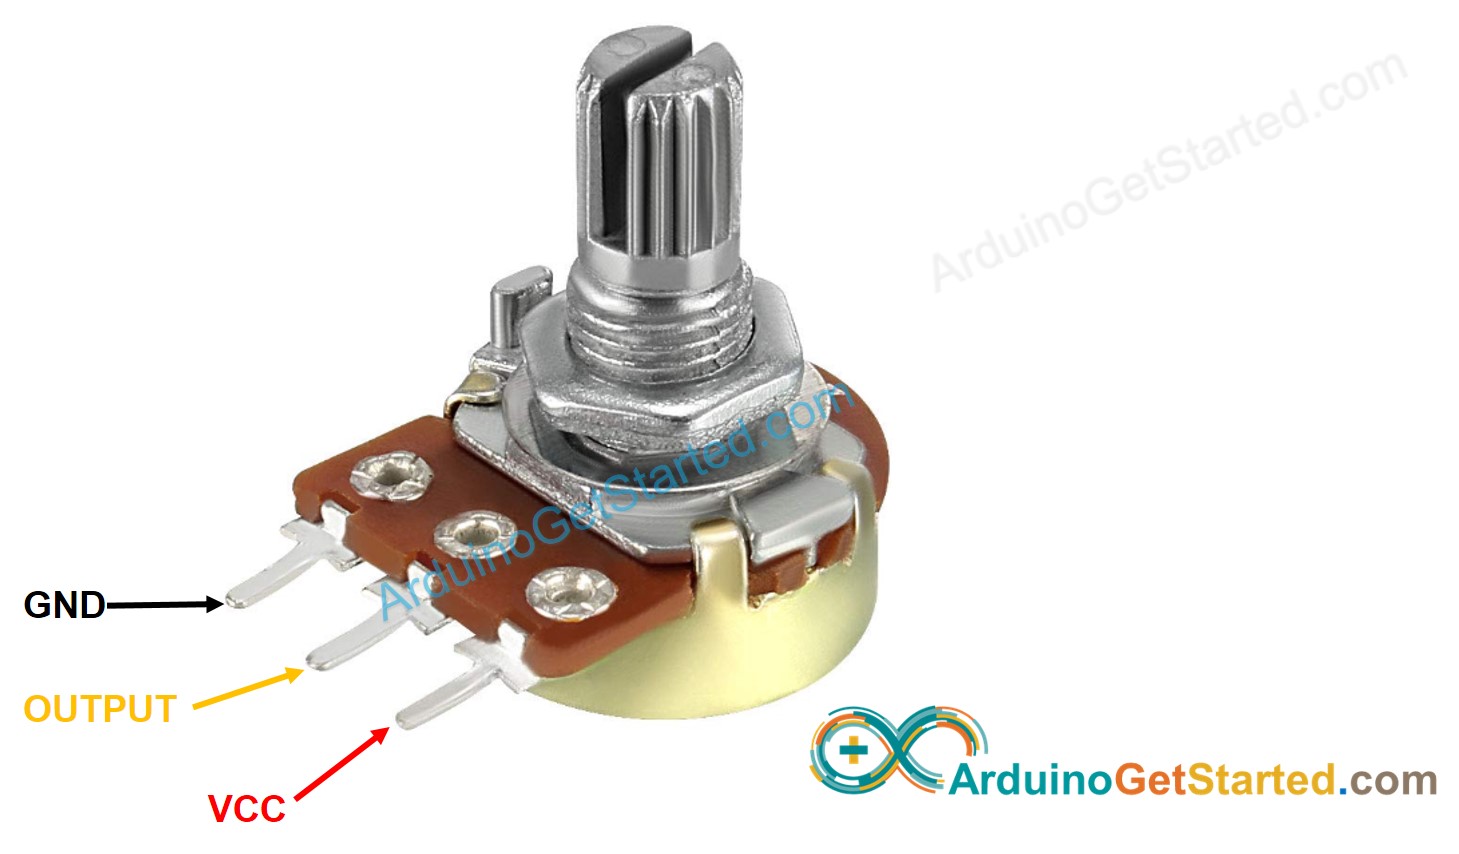
※ NOTE THAT: ※ 注意事项:
GND pin and VCC pin are interchangeable
GND 引脚和 VCC 引脚可互换
How It Works 它是如何工作的
The shaft of the potentiometer is rotatable from 0° (nearest by GND) to an upper bound angle (nearest by VCC pin), called ANGLE_MAX.
电位计的轴可从 0°(最接近 GND)旋转到上界角(最接近 VCC 引脚),称为ANGLE_MAX。
The voltage at the output pin ranges from GND’s voltage to VCC’s voltage. The output voltage is in direct proportion to the rotated angle of the shaft.
输出引脚上的电压范围为 GND 的电压到 VCC 的电压。输出电压与轴的旋转角度成正比。
-
If the angle is 0°, output pin’S voltage is 0v
如果角度为0°,则输出引脚的电压为0v -
If the angle is ANGLE_MAX, output pin’S voltage is VCC’s voltage
如果角度ANGLE_MAX,则输出引脚的电压为VCC的电压 -
If the angle is in between 0° and ANGLE_MAX, $ output_voltage = angle × VCC / ANGLE_MAX $
如果角度在 0° 和 ANGLE_MAX 之间,则 o u t p u t _ v o l t a g e = 角度 × V C C / A N G L E _ M A X output\_voltage = 角度 × VCC / ANGLE\_MAX output_voltage=角度×VCC/ANGLE_MAX
※ NOTE THAT: ※ 注意事项:
ANGLE_MAX value is depended on manufacturers. In practice, we usually do NOT care about the value of ANGLE_MAX, except when we need to calculate the rotated angle (see use cases part).
ANGLE_MAX值取决于制造商。在实践中,我们通常不关心ANGLE_MAX值,除非我们需要计算旋转角度(参见用例部分)。
Arduino - Rotary Potentiometer Arduino - 旋转电位器
Arduino’s pin A0 to A5 can work as analog input. The analog input pin converts the voltage (between 0v and VCC) into integer values (between 0 and 1023), called ADC value or analog value.
Arduino 的引脚 A0 到 A5 可以用作模拟输入。模拟输入引脚将电压(0v和VCC之间)转换为整数值(0到1023之间),称为ADC值或模拟值。
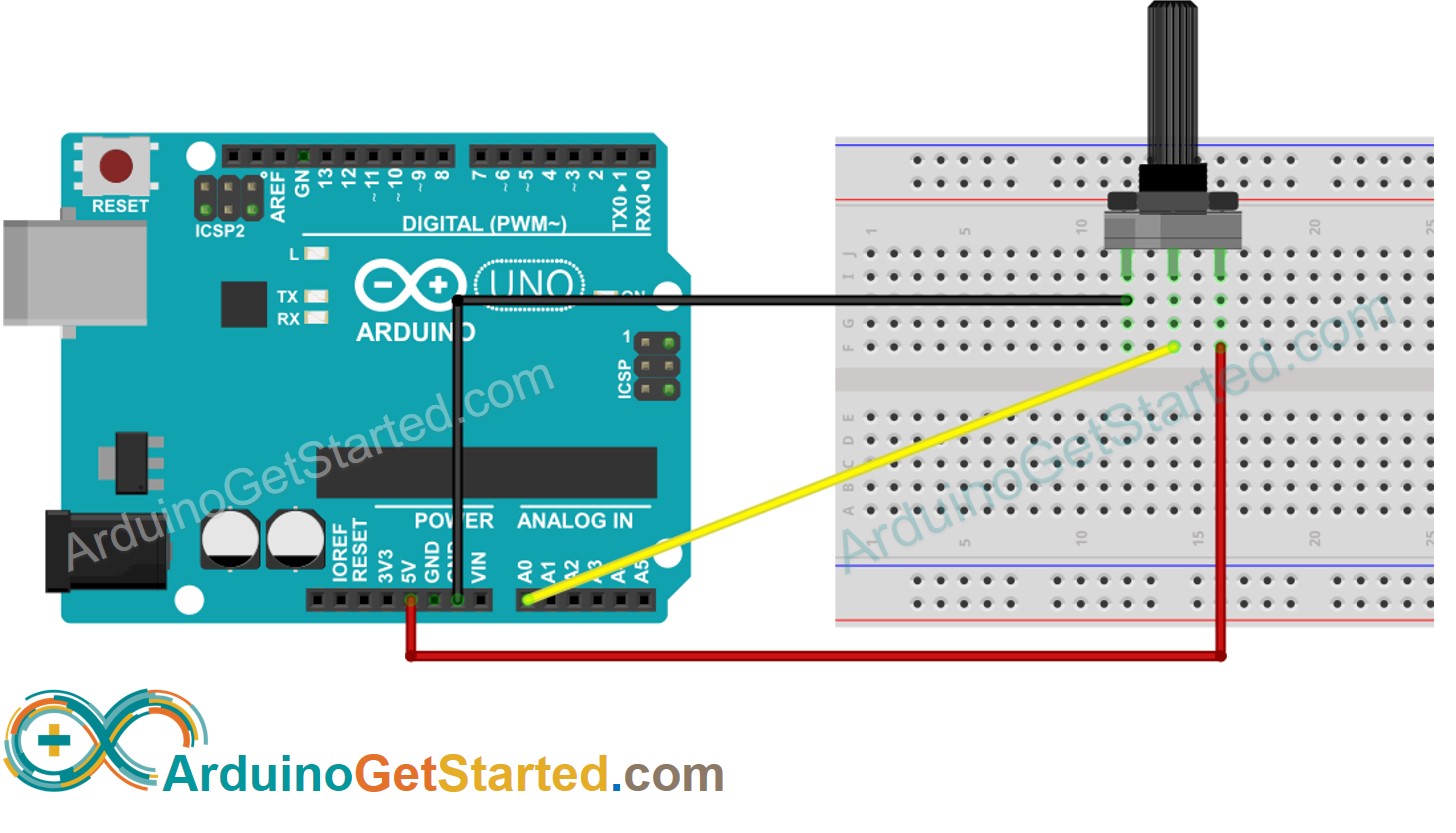
By connecting an output pin of the potentiometer to an analog input pin, we can read the analog value from the pin, and then converts it to a meaningful value.
通过将电位器的输出引脚连接到模拟输入引脚,我们可以从引脚读取模拟值,然后将其转换为有意义的值。
The value Arduino get is NOT angle, NOT voltage. It is integer value ranges from 0 to 1023.
Arduino得到的值不是角度,不是电压。它是整数值范围从 0 到 1023。
After getting the integer value from the analog input pin, we rescale this value into another value. Let’s see the use cases.
从模拟输入引脚获取整数值后,我们将该值重新缩放为另一个值。让我们看看用例。
Use Cases 使用案例
-
Rescale to potentiometer’s angle.
重新缩放到电位器的角度。 -
Rescale to potentiometer’s voltage:
重新调整到电位器的电压: -
Rescale to the controllable value (e.g volume of stereo, brightness, speed of DC motor… ). This is the most common-used case.
重新缩放到可控值(例如立体声音量、亮度、直流电机速度…这是最常用的情况。
Rescale Range 重新缩放范围
| FROM | TO | |||
|---|---|---|---|---|
| Angle 角度 | rotated by user 按用户旋转 | 0° | → | ANGLE_MAX |
| Voltage 电压 | from potentiometer’s pin 从电位计的引脚 | 0V | → | VCC |
| ADC value ADC值 | read by Arduino 由Arduino阅读 | 0 | → | 1023 |
| Other value 其他值 | converted by Arduino 由Arduino转换 | VALUE_MIN | → | VALUE_MAX |
Wiring Diagram 接线图
How To Program For Potentiometer 如何对电位器进行编程
- Read the value from an input pin, which connected to the output pin of the potentiometer by using analogRead() function.
从输入引脚读取值,输入引脚使用 analogRead() 函数连接到电位计的输出引脚。
analogValue = analogRead(A0);
- Rescale to the potentiometer’s angle by using map()function.
使用 map() 函数重新缩放到电位器的角度。
angle = map(analogValue, 0, 1023, 0, ANGLE_MAX);
- Rescale to the potentiometer’s voltage:
重新调整到电位器的电压:
voltage = map(analogValue, 0, 1023, 0, VCC);
- Rescale to the controllable value (e.g volume of stereo, brightness, speed of DC motor… )
重新缩放到可控值(例如立体声音量、亮度、直流电机速度…
value = map(analogValue, 0, 1023, VALUE_MIN, VALUE_MAX);
- For example, rescaling to the brightness of LED. As mentioned in this tutorial, the brightness of LED can be controlled by using PWM value from 0 (always OFF) to 255 (always ON). Therefore, we can map the analog value to the brightness of LED (from OFF to the brightest) as follows:
例如,重新缩放到 LED 的亮度。如本教程所述,可以使用PWM值从0(始终关闭)到255(始终打开)来控制LED的亮度。因此,我们可以将模拟值映射到 LED 的亮度(从 OFF 到最亮),如下所示:
brightness = map(analogValue, 0, 1023, 0, 255);
If you want to dim LED from the nightlight to the brightest,
如果您想将 LED 从夜灯调暗到最亮,
nightlight = 100; // depending on your desired brightness
brightness = map(analogValue, 0, 1023, nightlight  , 255);
※ NOTE THAT: ※ 注意事项:
The map() function can only be used to rescale the analog value to the int or long type value. If the controllable value is float type, you need to use the floatMap() function instead of the map() function.
map() 函数只能用于将模拟值重新缩放为 int 或 long 类型值。如果可控值为 float 类型,则需要使用 floatMap() 函数而不是 map() 函数。
floatMap() function: floatMap() 函数:
float floatMap(float x, float in_min, float in_max, float out_min, float out_max) {
  return (x - in_min) * (out_max - out_min) / (in_max - in_min) + out_min;
}
 Arduino Code Arduino代码
/*

 * Created by ArduinoGetStarted.com
   *
 * This example code is in the public domain
   *
 * Tutorial page: https://arduinogetstarted.com/tutorials/arduino-potentiometer
   */

float floatMap(float x, float in_min, float in_max, float out_min, float out_max) {
  return (x - in_min) * (out_max - out_min) / (in_max - in_min) + out_min;
}

// the setup routine runs once when you press reset:
void setup() {
  // initialize serial communication at 9600 bits per second:
  Serial.begin(9600);
}

// the loop routine runs over and over again forever:
void loop() {
  // read the input on analog pin A0:
  int analogValue = analogRead(A0);
  // Rescale to potentiometer's voltage (from 0V to 5V):
  float voltage = floatMap(analogValue, 0, 1023, 0, 5);

  // print out the value you read:
  Serial.print("Analog: ");
  Serial.print(analogValue);
  Serial.print(", Voltage: ");
  Serial.println(voltage);
  delay(1000);
}
Quick Steps 步骤
-
Copy the above code and open with Arduino IDE
复制上面的代码并使用Arduino IDE打开 -
Click Upload button on Arduino IDE to upload code to Arduino
单击Arduino IDE上的“上传”按钮,将代码上传到Arduino
-
Open Serial Monitor 开放式串行监视器
-
Rotate the potentiometer 旋转电位器
-
See the result on Serial Monitor
在串行监视器上查看结果
Video Tutorial 视频教程
We are considering to make the video tutorials. If you think the video tutorials are essential, please subscribe to our YouTube channel to give us motivation for making the videos.
我们正在考虑制作视频教程。如果您认为视频教程是必不可少的,请订阅我们的 YouTube 频道,为我们制作视频提供动力。
Challenge Yourself 挑战自我
Use the potentiometer to do one of the following projects:
使用电位计执行以下项目之一:
-
Controlling position of the servo motor. Hint: Refer to arduino - Servo Motor.
伺服电机的控制位置。提示:请参阅arduino - 伺服电机。 -
Changing the brightness of LED. Hint: Refer to Arduino - Fade Led.
更改 LED 的亮度。提示:请参阅 Arduino - Fade Led。
Additional Knowledge 其他知识
GND pin and VCC pin are interchangeable. The is no convention about these two pins. If you select a pin as the GND pin, the other is the VCC pin. There is only one thing you need to pay attention to. The voltage value at the output pin is inverted when we interchange these pins.
GND 引脚和 VCC 引脚可互换。关于这两个引脚没有约定。如果选择一个引脚作为 GND 引脚,则另一个是 VCC 引脚。您只需要注意一件事。当我们互换这些引脚时,输出引脚上的电压值是反相的。


 1778
1778

 被折叠的 条评论
为什么被折叠?
被折叠的 条评论
为什么被折叠?
 到【灌水乐园】发言


