


Arduino - 步进电机
参考:步进电机相关文章
WARNING
This tutorial is currently updating.
本教程目前正在更新中。
Hardware Required 所需硬件
Please note: These are Amazon affiliate links. If you buy the components through these links, We will get a commission at no extra cost to you. We appreciate it.
请注意:这些是亚马逊会员链接。如果您通过这些链接购买组件,我们将免费获得佣金。我们对此表示感谢。
About Stepper Motor 关于步进电机
There are two types of step motors: bipolar stepper motor and unipolar stepper motor. They differ from each other in the internal structure and the working principle.
步进电机有两种类型:双极步进电机和单极步进电机。它们在内部结构和工作原理上彼此不同。
With the naked eyes, they look similar to each other. However, we can distinguish them by the number of wires. The bipolar motor usually has four wires. The unipolar motor usually has six wires.
用肉眼看,它们看起来很相似。但是,我们可以通过电线的数量来区分它们。双极电机通常有四根电线。单极电机通常有六根电线。
Controlling the bipolar stepper motor and the unipolar stepper motor is different. Fortunately, we can control the unipolar stepper as if it is a bipolar stepper motor by using four of six wires.
双极步进电机和单极步进电机的控制方式不同。幸运的是,我们可以通过使用六根线中的四根来控制单极步进电机,就好像它是双极步进电机一样。
Pinout 引脚排列
https://arduinogetstarted.com/images/tutorial/stepper-motor-pinout.jpg
How To Control Stepper Motor with Arduino 如何使用Arduino控制步进电机
The stepper motor requires more power than Arduino board can give it, so you’ll need another power supply for it. Ideally, Stepper motor’s datasheet or manual lets you know the voltage of the power supply.
步进电机需要的功率比Arduino板所能提供的功率更大,因此您需要另一个电源。理想情况下,步进电机的数据表或手册可以让您了解电源的电压。
We CANNOT connect the stepper motor directly to Arduino. We MUST connect via a motor driver or motor controller.
我们无法将步进电机直接连接到Arduino。我们必须通过电机驱动器或电机控制器进行连接。
The motor driver and motor controller can be:
电机驱动器和电机控制器可以是:
- Chip (e.g. SN754410) 芯片(例如SN754410)
- Module (e.g. A4988) 模块(例如 A4988)
- Shield (e.g. Arduino Motor Shield Rev3, Stepper Motor Controller PES-2605, Adafruit Motor/Stepper/Servo Shield)
扩展板(例如 Arduino 电机扩展板 Rev3、步进电机控制器 PES-2605、Adafruit 电机/步进/伺服扩展板)
To make it easy for beginners, we recommend using one of the following shields:
为了方便初学者,我们建议使用以下防护罩之一:
- Arduino Motor Shield Rev3: this is an official shield from Arduino.
Arduino电机扩展板Rev3:这是Arduino的官方扩展板。 - Stepper Motor Controller PES-2605: this is very easy to use. Besides, its library supports various functions. It supports the micro-stepping method that makes the stepper motor move smoothly. The company that makes this shield has been good at providing documentation and tutorials. However, to use this shield, we need to use it along with the PHPoC WiFi shield. This does NOT add any difficulty but adds more cost.
步进电机控制器PES-2605:这非常易于使用。此外,它的库支持各种功能。它支持微步进方法,使步进电机平稳移动。制造此盾牌的公司一直擅长提供文档和教程。但是,要使用此防护罩,我们需要将其与PHPoC WiFi防护罩一起使用。这不会增加任何难度,但会增加更多成本。
If the cost is no matter for you, we recommend using the Stepper Motor Controller PES-2605.
如果成本对您来说无关紧要,我们建议您使用步进电机控制器 PES-2605。
If you need to save costs, we recommend using Arduino Motor Shield Rev3.
如果您需要节省成本,我们建议使用 Arduino Motor Shield Rev3。
Using Arduino Motor Shield Rev3 使用 Arduino Motor Shield Rev3
Wiring Diagram 接线图
- Stack Arduino Motor Shield Rev3 on Arduino Uno
在Arduino Uno上堆叠Arduino电机扩展板Rev3 - Connect stepper motor to Arduino Motor Shield Rev3
将步进电机连接到 Arduino 电机扩展板 Rev3
https://arduinogetstarted.com/images/tutorial/arduino-stepper-motor-wiring-diagram.jpg
Code
Quick Steps 快速步骤
- Download or copy the above code and open with Arduino IDE
下载或复制上述代码并使用Arduino IDE打开 - Click Upload button on Arduino IDE to upload code to Arduino
单击Arduino IDE上的“上传”按钮,将代码上传到Arduino - Open Serial Monitor to see result:
打开串行监视器查看结果:
Video Tutorial 视频教程
We are considering to make the video tutorials. If you think the video tutorials are essential, please subscribe to our YouTube channel to give us motivation for making the videos.
我们正在考虑制作视频教程。如果您认为视频教程是必不可少的,请订阅我们的 YouTube 频道,为我们制作视频提供动力。
Additional Knowledge 其他知识
1. Stepper motor vibrates while moving 1.步进电机在移动时振动
Do NOT worry if the stepper motor vibrates while moving. This is a characteristic of the stepper motor. We can reduce vibration by using the micro-stepping control method.
如果步进电机在移动时振动,请不要担心。这是步进电机的一个特点。我们可以通过使用微步进控制方法来减少振动。
Also, because of this characteristic, if we control properly, the stepper motor can produce musical sounds as if it is a musical instrument. You can see this project on Arduino Project Hub.
此外,由于这一特性,如果我们控制得当,步进电机可以像乐器一样发出音乐声音。您可以在Arduino项目中心看到此项目。
2. Method of controlling stepper motors 2. 步进电机的控制方法
- Full-step: The unit of moving is one step, which is equivalent a value of degree specified in stepper motor’s datasheet or manual.
全步:移动的单位为一步,相当于步进电机数据表或手册中指定的度数值。 - Half-step: divides each full step into two smaller steps. The unit of moving is half of the full step. This method allows the motor move with double resolution.
半步:将每个完整步骤分成两个较小的步骤。移动的单位是整个步骤的一半。这种方法允许电机以双分辨率移动。 - Micro-step: divides each full step into many smaller steps. The unit of moving is a fraction of the full step. The fraction can be 1/4, 1/8, 1/16, 1/32 or even more. This method allows the motor move with higher resolution. It also make motor move smoother at low speeds. The bigger dividend is, the higher resolution and the smoother motion is.
微步:将每个完整步骤划分为许多较小的步骤。移动的单位是整个步骤的一小部分。分数可以是 1/4、1/8、1/16、1/32 甚至更多。这种方法允许电机以更高的分辨率移动。它还使电机在低速时移动更平稳。红利越大,分辨率越高,运动越流畅。
For example, If the motor’s datasheet specifies 1.8 degree/step:
例如,如果电机的数据表指定 1.8 度/步:
- Full-step: The motor can move with 1.8 degree/step <⇒ 200 steps/ revolution
全步:电机可以1.8度/步<⇒200步/转的速度移动 - Half-step: The motor can move with 0.9 degree/step <⇒ 400 steps/ revolution
半步:电机可以0.9度/步<⇒400步/转移动 - Micro-step: The motor can move with 0.45, 0.225, 1125, 0.05625 degree/step <⇒ 800, 1600, 3200, 6400… steps/ revolution
Micro-step: The motor can move with 0.45, 0.225, 1125, 0.05625 degree/step <⇒ 800, 1600, 3200, 6400…步骤/革命
The above code used the full-step control method.
上面的代码使用了全步控制方法。
3. Resonance Issue 3. 共振问题
This is the advanced usages. The beginners do NOT need to pay attention to it. This happens in a speed range, in which the step rate equals the motor’s natural frequency. There may be an audible change in noise made by the motor, as well as an increase in vibration. In real applications, the developer SHOULD pay attention to this issue.
这是高级用法。初学者不需要注意它。这发生在一个速度范围内,在这个速度范围内,步进率等于电机的固有频率。电机发出的噪音可能会有可听见的变化,以及振动的增加。在实际应用中,开发人员应该注意这个问题。
The Best Arduino Starter Kit 最好的Arduino入门套件
See Also 另见
- Arduino - Controls 28BYJ-48 Stepper Motor using ULN2003 Driver
Arduino - 使用ULN2003驱动器控制 28BYJ-48 步进电机 - Arduino - Controls Stepper Motor using L298N Driver
Arduino - 使用 L298N 驱动器控制步进电机 - Arduino - Stepper Motor and Limit Switch
Arduino - 步进电机和限位开关
Arduino - Control Stepper Motor using L298N Driver Arduino - 使用 L298N 驱动器控制步进电机
Arduino Uno R4 WiFi Led Matrix
Arduino Uno R4 WiFi LED 矩阵
In this tutorial, we are going to learn:
在本教程中,我们将学习:
- How to use L298N driver to control bipolar stepper motor
如何使用L298N驱动器控制双极步进电机 - How to control the position of stepper motor
如何控制步进电机的位置 - How to control the speed of stepper motor
如何控制步进电机的速度 - How to control the direction of stepper motor
如何控制步进电机的方向
The tutorial can apply to any kind of bipolar stepper motor (4 wires). The tutorial will take NEMA 17 stepper motor as an example.
本教程适用于任何类型的双极步进电机(4 线)。本教程将以 NEMA 17 步进电机为例。
Hardware Required 所需硬件
About Stepper Motor 关于步进电机
There are two popular types of stepper motors:
有两种流行的步进电机类型:
- bipolar: this type of motor has 4 wires
双极:这种类型的电机有 4 根线 - unipolar: this type of motor has 5 wires or 6 wires.
单极:这种类型的电机有 5 线或 6 线。
For a 6-wire unipolar stepper motor, we can use four of six wires and control it as a bipolar stepper motor.
对于 6 线单极步进电机,我们可以使用六线中的四线并将其作为双极步进电机进行控制。
For 5-wire unipolar stepper motor, see Arduino - control 28BYJ-48 stepper motor using ULN2003 driver
对于 5 线单极步进电机,请参阅 Arduino - 使用 ULN2003 驱动器控制 28BYJ-48 步进电机
This tutorial focuses only on the bipolar stepper motor.
本教程仅介绍双极步进电机。
Bipolar Stepper Motor pinout 双极步进电机引脚排列
The bipolar Stepper Motor pinout has 4 pins. Depending on manufacturers, the motor’s pins have several naming. The below table shows some wide-used pin-naming:
双极步进电机引脚排列有 4 个引脚。根据制造商的不同,电机的引脚有多种命名方式。下表显示了一些广泛使用的引脚命名:
| PIN NO 密码 | Naming 1 命名 1 | Naming 2 命名 2 | Naming 3 命名 3 |
|---|---|---|---|
| 1 | A+ | A | A |
| 2 | A- | A | C |
| 3 | B+ | B | B |
| 4 | B- | B | D |
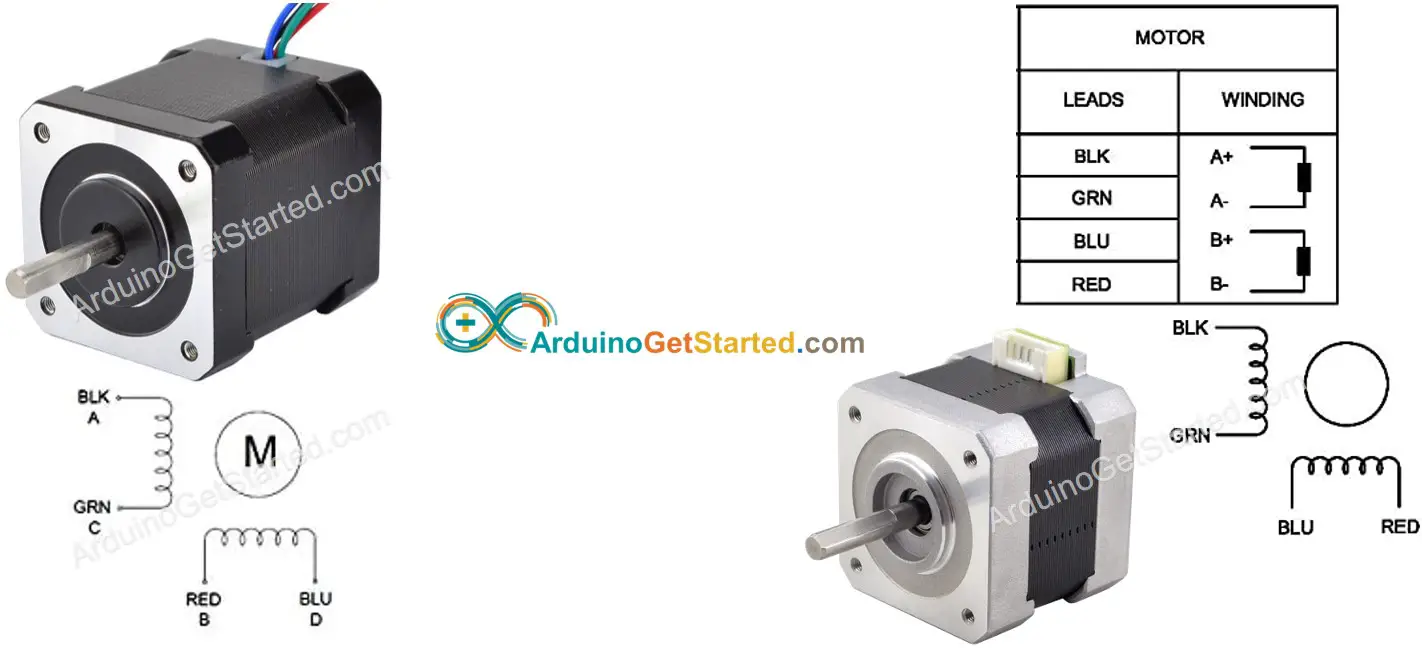
The order of pins, wire naming, and wire coloring can vary between manufacturers. You need to read the datasheet or manual to see the mapping between wire color and pin name. The above image also shows the specification of two different motors with different wire naming and wire coloring.
引脚的顺序、导线命名和导线着色可能因制造商而异。您需要阅读数据表或手册,了解导线颜色和引脚名称之间的映射关系。上图还显示了两种不同电机的规格,它们具有不同的线命名和线颜色。
Steps per Revolution 每转步数
The motor’s specification specifies the degree per step (let’s call DEG_PER_STEP). Depending on the method of control, the steps per revolution (let’s call STEP_PER_REVOLUTION) is calculated as the following table:
电机的规格规定了每步的度数(我们称之为DEG_PER_STEP)。根据控制方法的不同,每转的步数(我们称之为STEP_PER_REVOLUTION)计算如下表:
| Control method 控制方式 | Steps per Revolution 每转步数 | Real degree per step 每步实度数 |
|---|---|---|
| Full-step 完整步骤 | STEP_PER_REVOLUTION = 360 / DEG_PER_STEP | DEG_PER_STEP |
| Half-step 半步 | STEP_PER_REVOLUTION = (360 / DEG_PER_STEP) * 2 | DEG_PER_STEP / 2 |
| Micro-step (1/n) 微步 (1/n) | STEP_PER_REVOLUTION = (360 / DEG_PER_STEP) * n | DEG_PER_STEP / n |
For example, If the motor’s datasheet specifies 1.8 degree/step:
例如,如果电机的数据表指定 1.8 度/步:
| Control method 控制方式 | Steps per Revolution 每转步数 | Real degree per step 每步实度数 |
|---|---|---|
| Full-step 完整步骤 | 200 steps/revolution 200 步/转 | 1.8° |
| Half-step 半步 | 400 steps/revolution 400 步/转 | 0.9° |
| Micro-step (1/n) 微步 (1/n) | (200 * n) steps/revolution (200 * n) 步数/转数 | (1.8 / n)° (1.8/N)° |
How to control a stepper motor using Arduino 如何使用Arduino控制步进电机
Arduino can generate signals to control the stepper motor. However, the signals from Arduino do not have enough voltage and/or current that the stepper motor requires. Therefore, we need a hardware driver in between Arduino and the stepper motor. The driver does two works:
Arduino可以生成信号来控制步进电机。但是,来自Arduino的信号没有足够的电压和/或电流来满足步进电机的要求。因此,我们需要在Arduino和步进电机之间安装一个硬件驱动器。驱动程序执行两项工作:
- Amplify the control signals from Arduino (current and voltage)
放大来自Arduino的控制信号(电流和电压) - Protect Arduino from high current and voltage that is used to power the stepper motor.
保护Arduino免受用于为步进电机供电的高电流和电压的影响。
There are many kinds of hardware drivers that can be used to control stepper motors. L298N Driver is one of the most wide-used hardware drivers for controlling stepper motors.
有许多种类的硬件驱动程序可用于控制步进电机。L298N 驱动器是用于控制步进电机的最广泛使用的硬件驱动器之一。
About L298N Driver 关于L298N Driver
A single L298N Driver can be used to control two DC motors or a stepper motor. In this tutorial, we learn how to use it to control the stepper motor.
单个 L298N 驱动器可用于控制两个直流电机或一个步进电机。在本教程中,我们将学习如何使用它来控制步进电机。

L298N Driver Pinout L298N 驱动器引脚排列
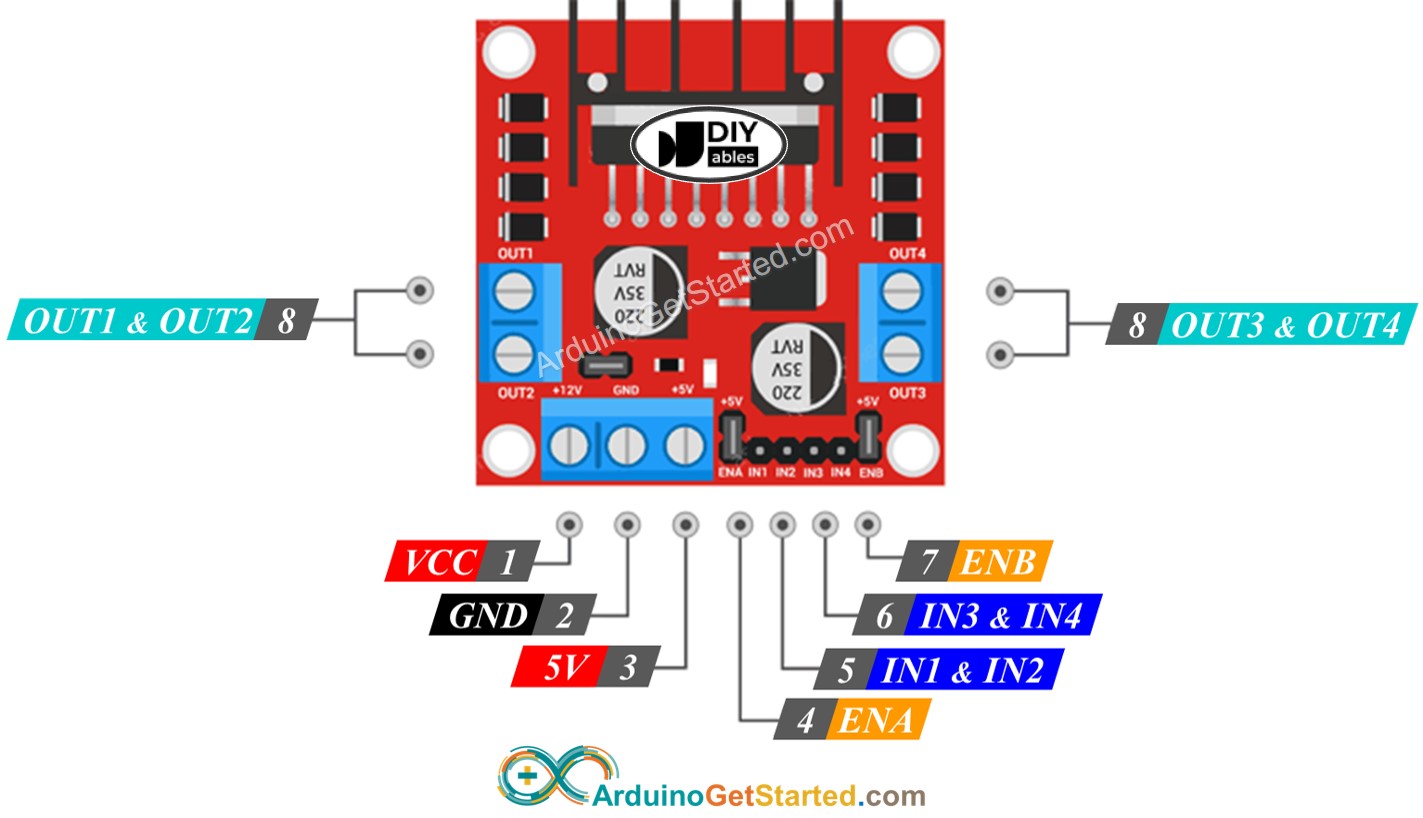
L298N Driver has 11 pins and three jumpers:
L298N 驱动器有 11 个引脚和 3 个跳线:
- VCC pin: supplies power for the motor. It can be anywhere between 5 to 35V.
VCC引脚:为电机供电。它可以在 5 到 35V 之间。 - GND pin: is a common ground pin, needs to be connected to GND (0V).
GND引脚:是一个公共接地引脚,需要连接到GND(0V)。 - 5V pin: supplies power for L298N module. It can be supplied by 5V from Arduino.
5V引脚:为L298N模块供电。它可以由Arduino的5V供电。 - IN1, IN2, IN3, IN4 pins: are connected to Arduino’s pins to receive the control signal to control the stepper motor.
IN1、IN2、IN3、IN4引脚:连接到Arduino的引脚,接收控制信号,控制步进电机。 - OUT1, OUT2, OUT3, OUT4 pins: are connected to the stepper motor.
OUT1、OUT2、OUT3、OUT4引脚:连接步进电机。 - ENA, ENB jumpers: are used to enable stepper motor. You need to keep both the ENA & ENB jumpers in place.
ENA、ENB跳线:用于使步电机。您需要将 ENA 和 ENB 跳线都固定到位。 - 5V-EN jumper: if we keep 5V-EN jumper in place, the power for the L298N module is got from VCC, we do not need to connect anything to the 5V pin. if we remove the 5V-EN jumper, we need to supply power to the L298N module via a 5V pin
5V-EN跳线:如果我们保持5V-EN跳线到位,L298N模块的电源来自VCC,我们不需要将任何东西连接到5V引脚。如果我们移除 5V-EN 跳线,我们需要通过 298V 引脚为 L5N 模块供电
As described above, the L298N driver has two input powers:
如上所述,L298N 驱动器具有两种输入功率:
- One for stepper motor (VCC and GND pins): from 5 to 35V.
一个用于步进电机(VCC 和 GND 引脚):5V 至 35V。 - One for the L298N module’s internal operation (5V and GND pins): from 5 to 7V. if the 5V-EN jumper is kept in place, we do not need to connect this pin to anything.
一个用于 L298N 模块的内部操作(5V 和 GND 引脚):从 5V 到 7V。 如果 5V-EN 跳线保持在原位,我们不需要将此引脚连接到任何东西。
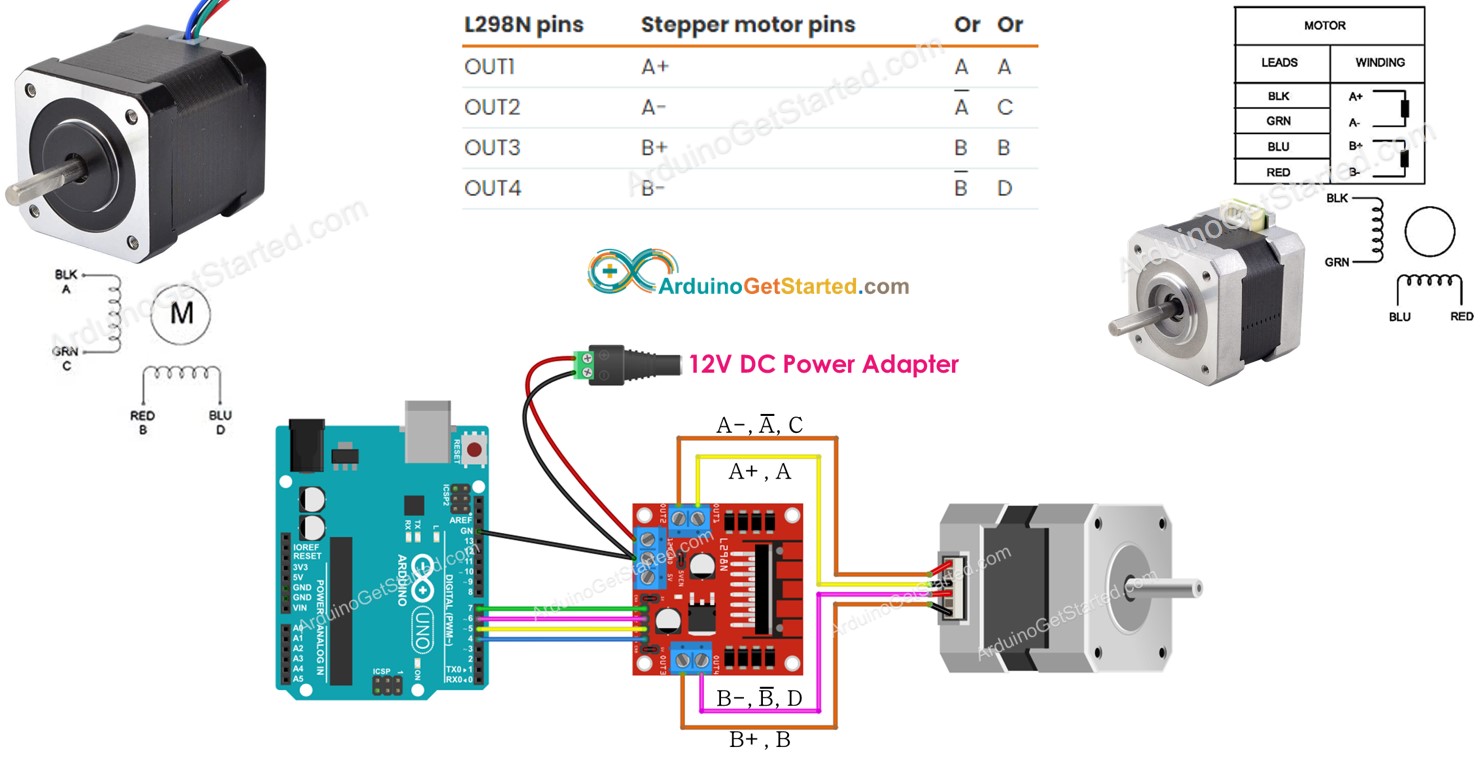
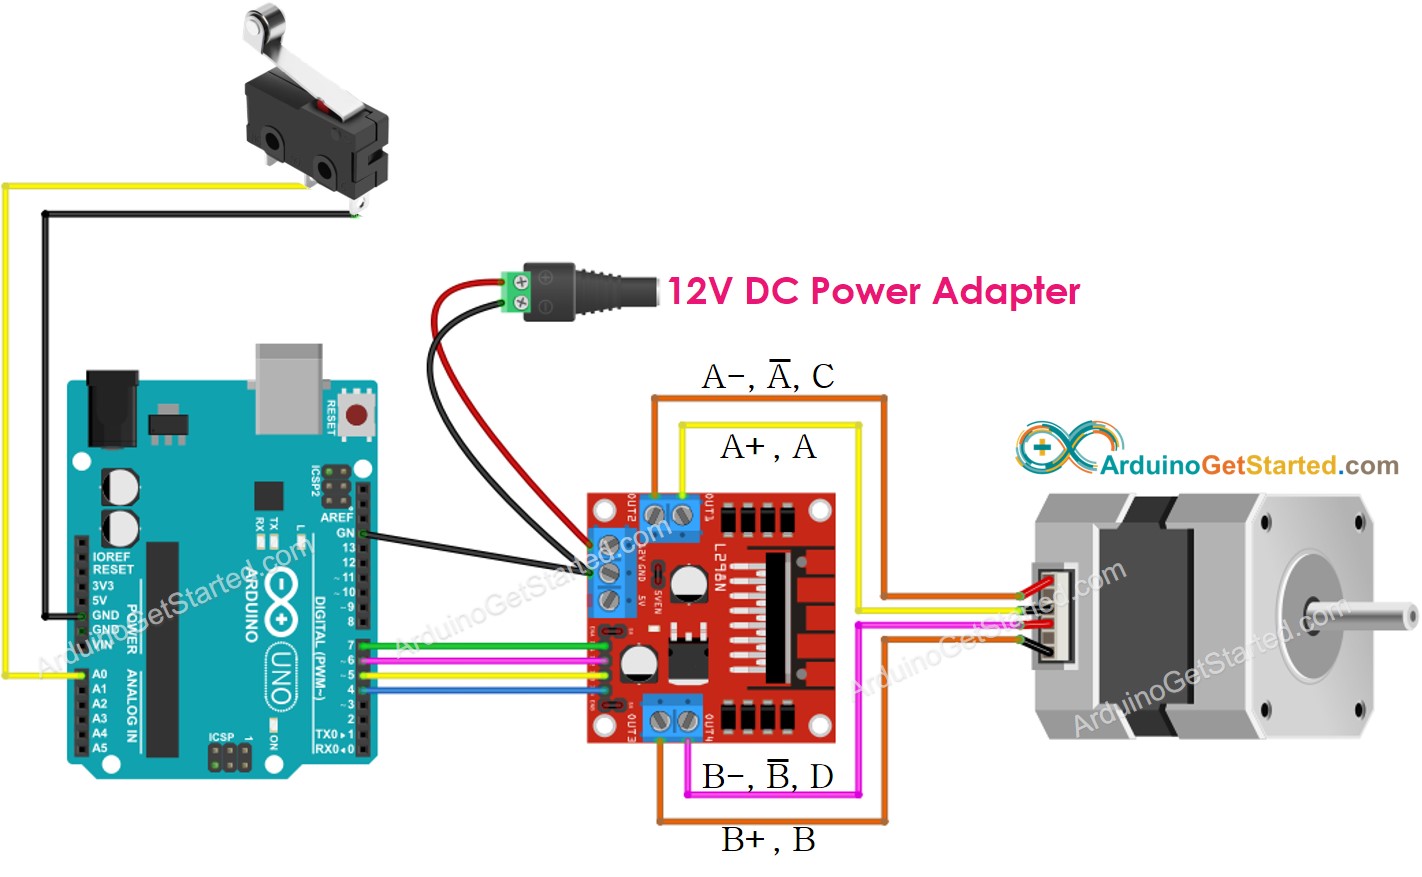
Wiring Diagram 接线图
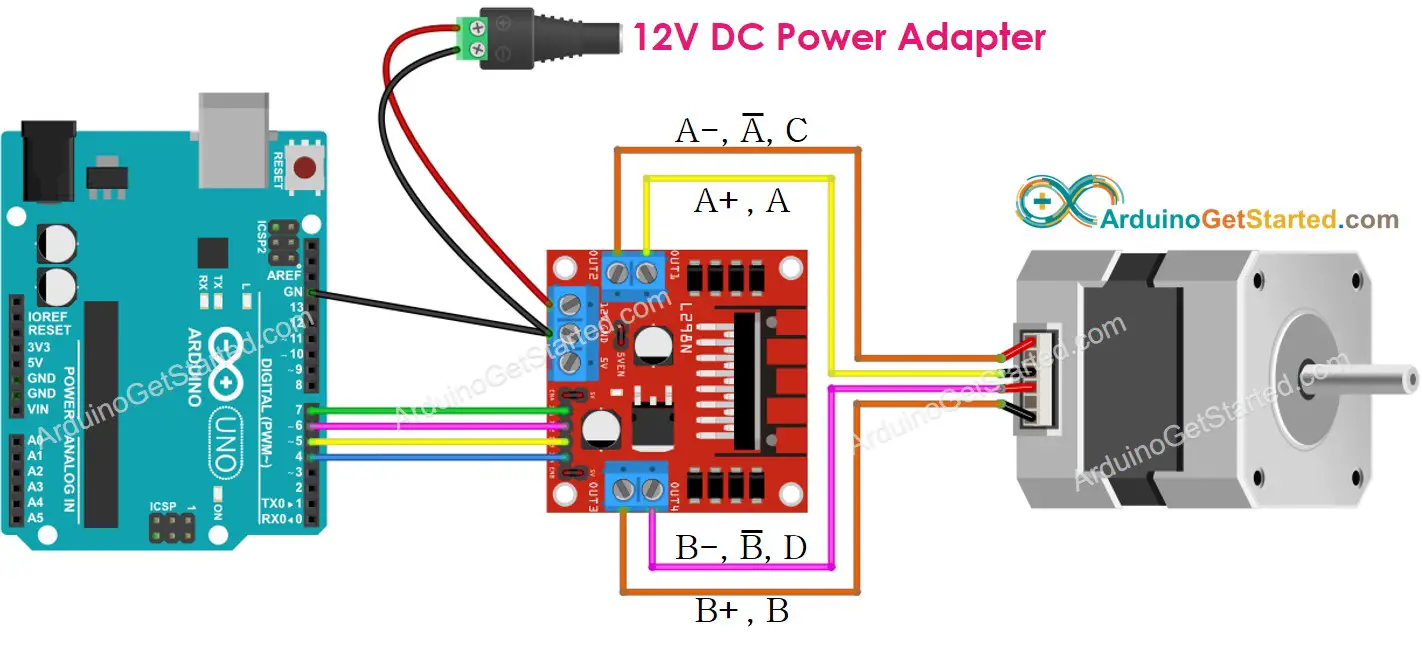
This image is created using Fritzing. Click to enlarge image
此图像是使用 Fritzing 创建的。点击放大图片
※ NOTE THAT: ※ 注意事项:
- Please keep all three jumpers on the L298N module in place (in case motor’s power supply ≤ 12V)
请将 L298N 模块上的所有三个跳线固定到位(以防电机电源≤ 12V) - Order of the pins on stepper motors may vary between manufacturers. Please check the below table for correct wiring.
步进电机上的引脚顺序可能因制造商而异。请检查下表是否正确接线。
Wiring table between Arduino and L298N Driver Arduino和L298N驱动器之间的接线表
| Arduino pins | L298N pins |
|---|---|
| 7 | IN1 |
| 6 | IN2 |
| 5 | IN3 |
| 4 | IN4 |
Wiring table between L298N Driver and Stepper motor
Important!: Please do not care about the wire order of the stepper motor on the above wiring diagram image. It is just an example. The order of the pins on stepper motors may vary between manufacturers. Make sure that your wiring follows the below table.
| L298N pins | Stepper motor pins | Or | Or |
|---|---|---|---|
| OUT1 | A+ | A | A |
| OUT2 | A- | A | C |
| OUT3 | B+ | B | B |
| OUT4 | B- | B | D |
Before buying a stepper motor, we would recommend you check the check datasheet, specification, or manual of the stepper motor. Make sure that they provide the mapping between the pin’s color and name. For example, This stepper motor provides the mapping as below image:
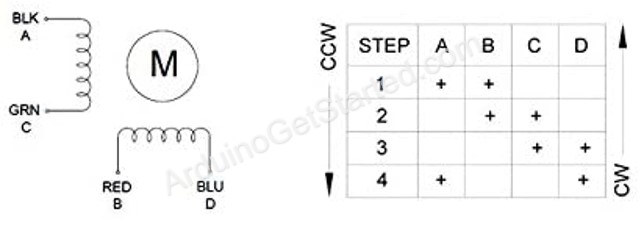
Based on that mapping, the wiring table becomes:
根据该映射,接线表变为:
| L298N pins L298N 引脚 | stepper motor pins 步进电机引脚 | wire color 线材颜色 |
|---|---|---|
| OUT1 | A | black wire 黑线 |
| OUT2 | C | green wire 绿线 |
| OUT3 | B | red wire 红线 |
| OUT4 | D | blue wire 蓝线 |
※ NOTE THAT: ※ 注意事项:
In all the above wiring tables between the stepper motor and L298N Driver, we can swap OUT1 with OUT2, OUT3 with OUT4. Therefore, there are more ways to do the wiring. However, if we swap them, the motors’ rotation direction may be changed (clockwise to anticlockwise, and vice versa).
在上述步进电机和 L298N 驱动器之间的所有接线表中,我们可以将 OUT1 与 OUT2、OUT3 与 OUT4 交换。因此,有更多的方法可以进行布线。但是,如果我们交换它们,电机的旋转方向可能会改变(顺时针到逆时针,反之亦然)。
How to control a Stepper motor using an L298N driver. 如何使用 L298N 驱动器控制步进电机。
Controlling a stepper motor is not a simple task, especially when we want to control it in a non-blocking manner. Fortunately, thanks to AccelStepper library, controlling the stepper motor becomes a piece of cake.
控制步进电机并非易事,尤其是当我们想以非阻塞方式控制它时。幸运的是,多亏了 AccelStepper 库,控制步进电机变得轻而易举。
Arduino IDE also has a built-in Stepper library. However, We do not recommend you to use this library because:
Arduino IDE 还具有内置的步进器库。但是,我们不建议您使用此库,因为:
- The library provides the blocking function. It means it blocks Arduino from doing other works while it controls the stepper motor.
该库提供阻塞功能。这意味着它在控制步进电机时会阻止Arduino进行其他工作。 - It does not have sufficient functions.
它没有足够的功能。
Instead, we recommend you use the AccelStepper library. This library supports:
相反,我们建议您使用 AccelStepper 库。此库支持:
- Acceleration 加速度
- Deceleration. 减速。
- Full-step and half-step driving.
全步和半步驾驶。 - Multiple simultaneous steppers, with independent concurrent stepping on each stepper.
多个同步步进器,每个步进器上具有独立的并发步进。 - Disadvantage: NOT support micro-step driving
缺点:不支持微步驱动
How To Control the Position of Stepper Motor via L298N Driver 如何通过L298N驱动器控制步进电机的位置
We can move the stepper motor to the desired position by using:
我们可以通过以下方法将步进电机移动到所需位置:
stepper.moveTo(desiredPosition); // move motor one revolution
※ NOTE THAT:
The stepper.moveTo() function is non-blocking. This is a great point of the library. However, we have to pay attentions when using this function:
stepper.moveTo() 函数是非阻塞的。这是图书馆的一大亮点。但是,我们在使用此功能时必须注意:
- Call ‘stepper.run()’ as frequently as possible. It should be called in the void loop() function.
尽可能频繁地调用 ‘stepper.run()’。它应该在 void loop() 函数中调用。 - Do NOT use delay() function when motor is moving.
不要在电机移动时使用 delay() 函数。 - Should NOT use Serial.print() and Serial.println() function when motor is moving. These functions make the stepper motor move slower.
当电机移动时,不应使用 Serial.print() 和 Serial.println() 函数。这些功能使步进电机移动速度变慢。
How To Control the Speed of Stepper Motor via L298N Driver 如何通过L298N驱动器控制步进电机的速度
We can control not only the speed but also acceleration and deceleration by using some simple functions.
我们不仅可以使用一些简单的功能来控制速度,还可以控制加速和减速。
stepper.setAcceleration(50.0); // set acceleration/deceleration stepper.setSpeed(200); // set desired speed
How To Control the Direction of Stepper Motor via L298N Driver 如何通过L298N驱动器控制步进电机的方向
If you do the wiring as above, the motor will rotate in:
如果按照上述方式接线,电机将旋转:
- Clockwise direction: if we control the motor from a position to higher position (Position increment)
顺时针方向:如果我们控制电机从一个位置到更高的位置(位置增量) - Anticlockwise direction: if we control the motor from a position to lower position (Position decrement)
逆时针方向:如果我们将电机从一个位置控制到更低的位置(位置递减)
For example: 例如:
- If the current position is 100 and we control the motor to 200, the motor rotates in the clockwise direction
如果当前位置为 100,我们将电机控制到 200,则电机沿顺时针方向旋转 - If the current position is -200 and we control the motor to -100, the motor rotates in the clockwise direction
如果当前位置为-200,我们将电机控制为-100,则电机按顺时针方向旋转 - If the current position is 200 and we control the motor to 100, the motor rotates in the anticlockwise direction
如果当前位置为 200,我们将电机控制到 100,则电机逆时针方向旋转 - If the current position is -100 and we control the motor to -200, the motor rotates in the anticlockwise direction
如果当前位置为 -100,我们将电机控制为 -200,则电机逆时针方向旋转
※ NOTE THAT: ※ 注意事项:
As mentioned before, if you swap OUT1 with OUT2, or OUT3 with OUT4, the increment of the position may be anticlockwise and the decrement of the position may be clockwise.
如前所述,如果将 OUT1 与 OUT2 交换,或将 OUT3 与 OUT4 交换,则仓位的增量可能是逆时针方向的,仓位的递减量可能是顺时针方向的。
How To Stop Stepper Motor 如何停止步进电机
- The stepper motor will automatically stop after reaching the desired position.
步进电机在到达所需位置后会自动停止。 - The stepper motor can be forced to stop immediately anytime by using stepper.stop() function.
步进电机可以通过使用 stepper.stop() 函数随时强制立即停止。
Arduino Code - Stepper Motor Code Arduino代码 - 步进电机代码
The below code does:
以下代码执行:
- Rotate motor one revolution in the clockwise direction
将电机顺时针方向旋转一圈 - Stop motor 5 seconds 停止电机 5 秒
- Rotate motor back one revolution in the anticlockwise direction
将电机逆时针方向旋转一圈 - Stop motor 5 seconds 停止电机 5 秒
- That process is repeated again and again
这个过程一遍又一遍地重复
/*

 * Created by ArduinoGetStarted.com
   *
 * This example code is in the public domain
   *
 * Tutorial page: https://arduinogetstarted.com/tutorials/arduino-controls-stepper-motor-using-l298n-driver
   */

#include <AccelStepper.h>

#define DEG_PER_STEP 1.8

#define STEP_PER_REVOLUTION (360 / DEG_PER_STEP)

AccelStepper stepper(AccelStepper::FULL4WIRE, 7, 6, 5, 4);

long moveToPosition = STEP_PER_REVOLUTION;

void setup() {
  Serial.begin(9600);

  stepper.setAcceleration(200.0); // set acceleration
  stepper.setSpeed(200);          // set initial speed
  stepper.setCurrentPosition(0);  // set position to 0

  stepper.moveTo(STEP_PER_REVOLUTION); // move motor one revolution, in clockwise direction
  Serial.println("Motor moving in clockwise direction");
}

void loop() {
  if (stepper.distanceToGo() == 0) {
    Serial.println("Motor is stopped");
    delay(5000); // stop 5 seconds
    stepper.setCurrentPosition(0); // reset position to 0
    moveToPosition = -1 * moveToPosition; // reverse direction

    stepper.moveTo(moveToPosition); // move motor one revolution

    if (stepper.distanceToGo() > 0)
      Serial.println("Motor moving in clockwise direction");
    else if (stepper.distanceToGo() < 0)
      Serial.println("Motor moving in anticlockwise direction");
  }

  // Serial.print(F("position: "));
  // Serial.println(stepper.currentPosition());

  stepper.run(); // MUST be called as frequently as possible
}
Quick Steps 快速步骤
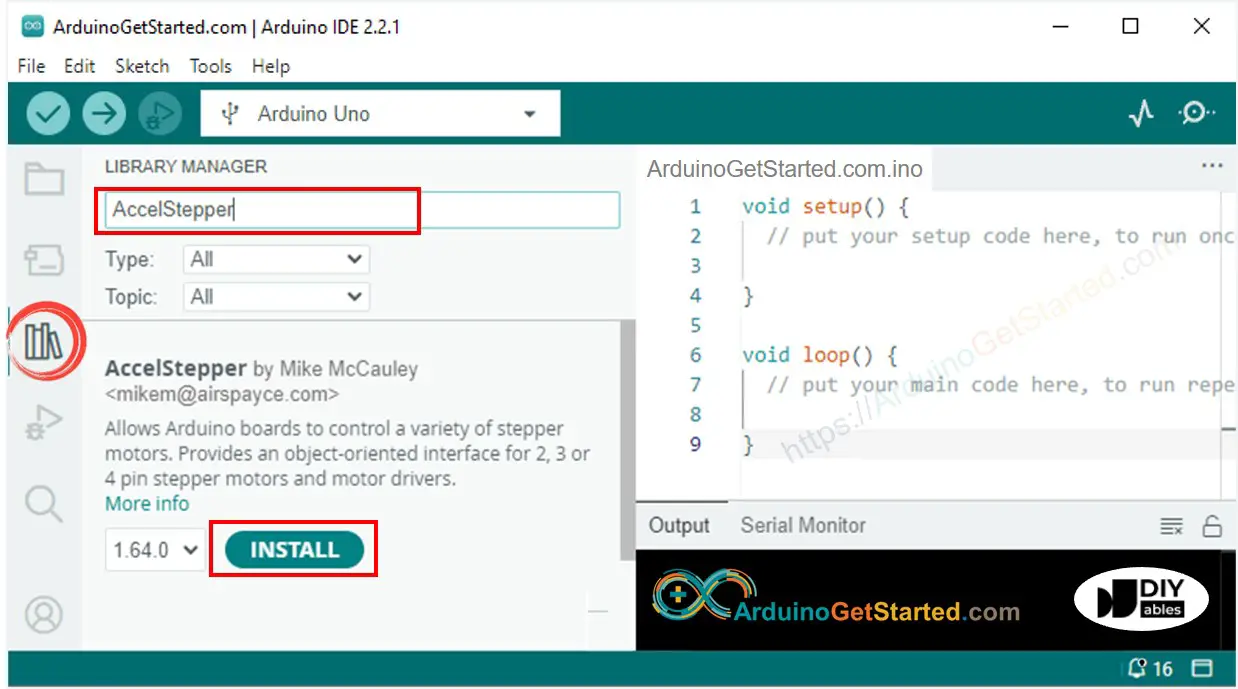
- Navigate to the Libraries icon on the left bar of the Arduino IDE.
导航到 Arduino IDE 左侧栏上的 Libraries 图标。 - Search “AccelStepper”, then find the AccelStepper library by Mike McCauley
搜索“AccelStepper”,然后找到 Mike McCauley 的 AccelStepper 库 - Click Install button to install AccelStepper library.
单击“安装”按钮安装 AccelStepper 库。
- Copy the above code and open with Arduino IDE
复制上面的代码并使用Arduino IDE打开 - Click Upload button on Arduino IDE to upload code to Arduino
单击Arduino IDE上的“上传”按钮,将代码上传到Arduino - You will see: 您将看到:
- Stepper motor rotates one revolution in the clockwise direction
步进电机顺时针旋转一圈 - Stepper motor stops 5 seconds
步进电机停止 5 秒 - Stepper motor rotates back one revolution in the anticlockwise direction
步进电机逆时针方向旋转一圈 - Stepper motor stops 5 seconds
步进电机停止 5 秒 - The above process is run repeatedly.
上述过程重复运行。
- Stepper motor rotates one revolution in the clockwise direction
- See the result on Serial Monitor
在串行监视器上查看结果
Motor moving in clockwise direction Motor is stopped Motor moving in anticlockwise direction Motor is stopped Motor moving in clockwise direction Motor is stopped Motor moving in anticlockwise direction Motor is stopped Motor moving in clockwise direction Motor is stopped Motor moving in anticlockwise direction Motor is stopped
电机顺时针方向移动 电机停止 电机逆时针方向移动 电机停止 电机顺时针方向移动 电机停止 电机逆时针方向移动 电机停止 电机顺时针方向移动 电机停止 电机逆时针方向移动 电机停止
步进电机与限位开关
※ NOTE THAT: ※ 注意事项:
Depending on the stepper motor, the wiring connection between the stepper motor and L298N may be different. Please take a close look at this Arduino - Stepper Motor tutorial to see how to connect the stepper motor to the L298N motor driver.
根据步进电机的不同,步进电机和 L298N 之间的接线连接可能会有所不同。请仔细阅读此 Arduino - 步进电机教程,了解如何将步进电机连接到 L298N 电机驱动器。
Arduino代码 - 通过限位开关停止步进电机
There are several ways to make a stepper motor stop:
有几种方法可以使步进电机停止:
- Call stepper.stop() function: This way does NOT stop the stepper motor immediately but gradually
调用 stepper.stop() 函数:这种方式不会立即停止步进电机,而是逐渐停止 - Do NOT call stepper.run() function: This way stops the stepper motor immediately
不要调用 stepper.run() 函数:这样会立即停止步进电机
The below code make a stepper motor spin infinitely and stop immediately when a limit switch is touched
下面的代码使步进电机无限旋转,并在触摸限位开关时立即停止
/*

 * Created by ArduinoGetStarted.com
   *
 * This example code is in the public domain
   *
 * Tutorial page: https://arduinogetstarted.com/tutorials/arduino-stepper-motor-and-limit-switch
   */

#include <ezButton.h>

#include <AccelStepper.h>

#define MAX_POSITION 0x7FFFFFFF // maximum of position we can set (long type)

ezButton limitSwitch(A0); // create ezButton object that attach to pin A0;

AccelStepper stepper(AccelStepper::FULL4WIRE, 7, 6, 5, 4);

bool isStopped = false;

void setup() {
  Serial.begin(9600);

  limitSwitch.setDebounceTime(50); // set debounce time to 50 milliseconds

  stepper.setMaxSpeed(500.0);   // set the maximum speed
  stepper.setAcceleration(50.0); // set acceleration
  stepper.setSpeed(100);         // set initial speed
  stepper.setCurrentPosition(0); // set position

  stepper.moveTo(MAX_POSITION);
}

void loop() {
  limitSwitch.loop(); // MUST call the loop() function first

  if (limitSwitch.isPressed()) {
    Serial.println(F("The limit switch: TOUCHED"));
    isStopped = true;
  }

  if (isStopped == false) {
    // without this part, the move will stop after reaching maximum position
    if (stepper.distanceToGo() == 0) { // if motor moved to the maximum position
      stepper.setCurrentPosition(0);   // reset position to 0
      stepper.moveTo(MAX_POSITION);       // move the motor to maximum position again
    }

    stepper.run(); // MUST be called in loop() function
  } else {
    // without calling stepper.run() function, motor stops immediately
    // NOTE: stepper.stop() function does NOT stops motor immediately
    Serial.println(F("The stepper motor is STOPPED"));
  }
}
Arduino代码 - 通过限位开关改变步进电机的方向
The below code make a stepper motor spin infinitely and change its direction when a limit switch is touched
下面的代码使步进电机无限旋转,并在触摸限位开关时改变其方向
/*
 * Created by ArduinoGetStarted.com
   *
 * This example code is in the public domain
   *
 * Tutorial page: https://arduinogetstarted.com/tutorials/arduino-stepper-motor-and-limit-switch
   */

#include <ezButton.h>

#include <AccelStepper.h>

#define DIRECTION_CCW -1

#define DIRECTION_CW   1

#define MAX_POSITION 0x7FFFFFFF // maximum of position we can set (long type)

ezButton limitSwitch(A0); // create ezButton object that attach to pin A0;

AccelStepper stepper(AccelStepper::FULL4WIRE, 7, 6, 5, 4);

int direction  = DIRECTION_CW;
long targetPos = 0;

void setup() {
  Serial.begin(9600);

  limitSwitch.setDebounceTime(50); // set debounce time to 50 milliseconds

  stepper.setMaxSpeed(500.0);   // set the maximum speed
  stepper.setAcceleration(50.0); // set acceleration
  stepper.setSpeed(100);         // set initial speed
  stepper.setCurrentPosition(0); // set position

  targetPos = direction * MAX_POSITION;
  stepper.moveTo(targetPos);
}

void loop() {
  limitSwitch.loop(); // MUST call the loop() function first

  if (limitSwitch.isPressed()) {
    Serial.println(F("The limit switch: TOUCHED"));
    direction *= -1; // change direction
    Serial.print(F("The direction -> "));
    if (direction == DIRECTION_CW)
      Serial.println(F("CLOCKWISE"));
    else
      Serial.println(F("ANTI-CLOCKWISE"));

    targetPos = direction * MAX_POSITION;
    stepper.setCurrentPosition(0); // set position
    stepper.moveTo(targetPos);
  }

  // without this part, the move will stop after reaching maximum position
  if (stepper.distanceToGo() == 0) { // if motor moved to the maximum position
    stepper.setCurrentPosition(0);   // reset position to 0
    stepper.moveTo(targetPos);       // move the motor to maximum position again
  }

  stepper.run(); // MUST be called in loop() function
}
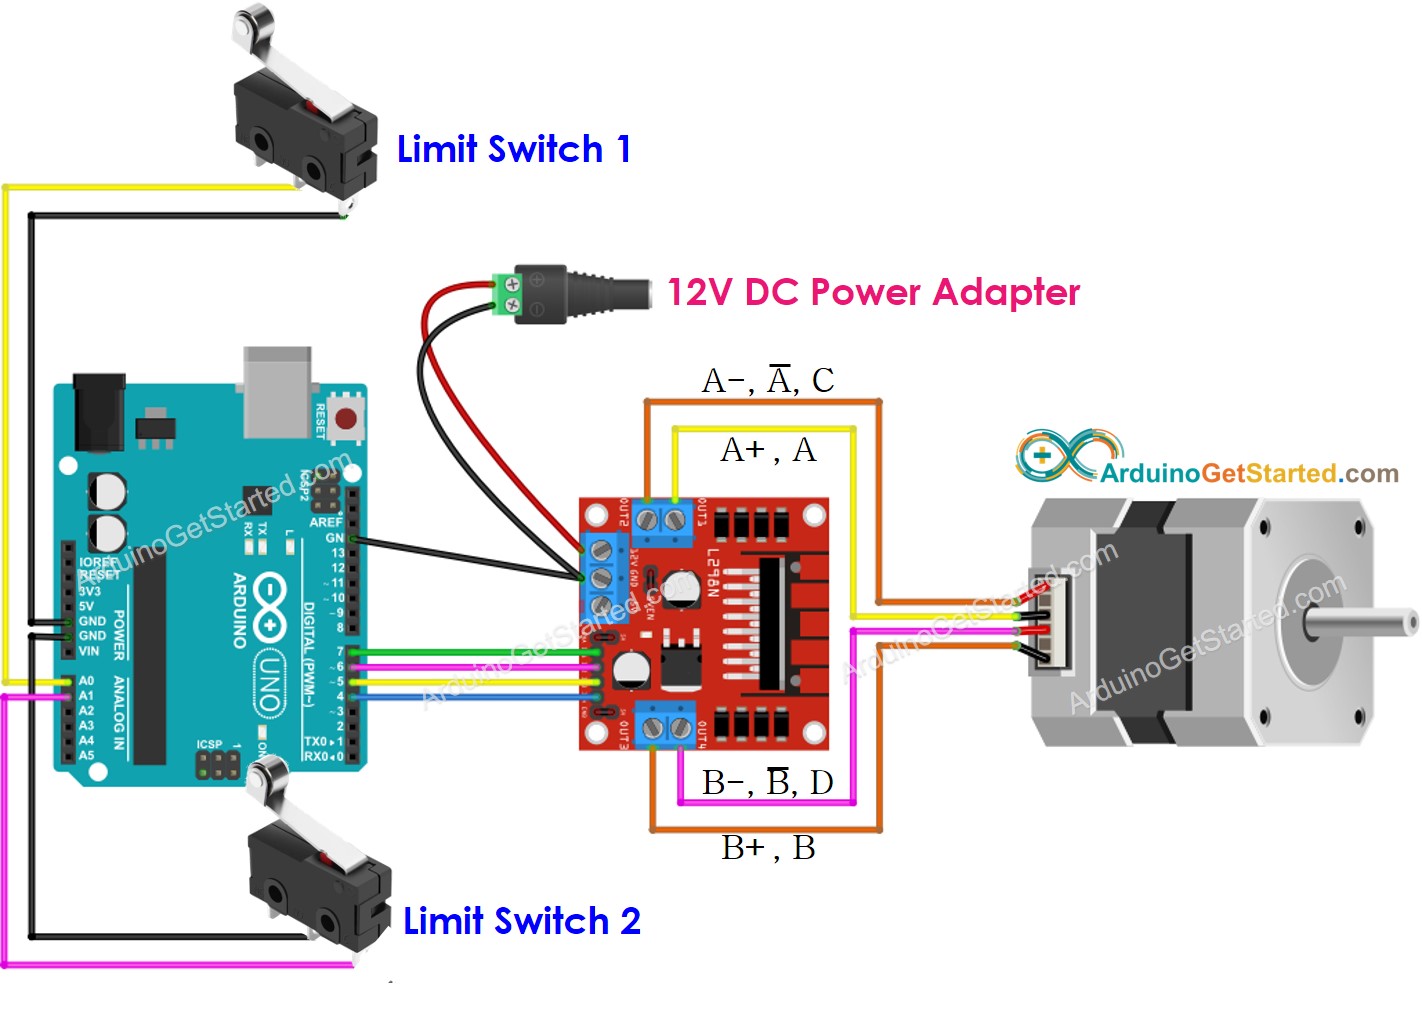
Arduino代码 - 通过两个限位开关改变步进电机的方向
The below code make a stepper motor spin infinitely and change its direction when one of two limit switches is touched
下面的代码使步进电机无限旋转,并在触摸两个限位开关之一时改变其方向
/*

 * Created by ArduinoGetStarted.com
   *
 * This example code is in the public domain
   *
 * Tutorial page: https://arduinogetstarted.com/tutorials/arduino-stepper-motor-and-limit-switch
   */

#include <ezButton.h>

#include <AccelStepper.h>

#define DIRECTION_CCW -1

#define DIRECTION_CW   1

#define STATE_CHANGE_DIR 1

#define STATE_MOVE       2

#define STATE_MOVING     3

#define MAX_POSITION 0x7FFFFFFF // maximum of position we can set (long type)

ezButton limitSwitch_1(A0); // create ezButton object that attach to pin A0;
ezButton limitSwitch_2(A1); // create ezButton object that attach to pin A1;

AccelStepper stepper(AccelStepper::FULL4WIRE, 7, 6, 5, 4);

int stepperState = STATE_MOVE;
int direction    = DIRECTION_CW;
long targetPos   = 0;

void setup() {
  Serial.begin(9600);

  limitSwitch_1.setDebounceTime(50); // set debounce time to 50 milliseconds
  limitSwitch_2.setDebounceTime(50); // set debounce time to 50 milliseconds

  stepper.setMaxSpeed(500.0);   // set the maximum speed
  stepper.setAcceleration(50.0); // set acceleration
  stepper.setSpeed(100);         // set initial speed
  stepper.setCurrentPosition(0); // set position
}

void loop() {
  limitSwitch_1.loop(); // MUST call the loop() function first
  limitSwitch_2.loop(); // MUST call the loop() function first

  if (limitSwitch_1.isPressed()) {
    stepperState = STATE_CHANGE_DIR;
    Serial.println(F("The limit switch 1: TOUCHED"));
  }

  if (limitSwitch_2.isPressed()) {
    stepperState = STATE_CHANGE_DIR;
    Serial.println(F("The limit switch 2: TOUCHED"));
  }

  switch (stepperState) {
    case STATE_CHANGE_DIR:
      direction *= -1; // change direction
      Serial.print(F("The direction -> "));
      if (direction == DIRECTION_CW)
        Serial.println(F("CLOCKWISE"));
      else
        Serial.println(F("ANTI-CLOCKWISE"));

      stepperState = STATE_MOVE; // after changing direction, go to the next state to move the motor
      break;

    case STATE_MOVE:
      targetPos = direction * MAX_POSITION;
      stepper.setCurrentPosition(0); // set position
      stepper.moveTo(targetPos);
      stepperState = STATE_MOVING; // after moving, go to the next state to keep the motor moving infinity
      break;

    case STATE_MOVING: // without this state, the move will stop after reaching maximum position
      if (stepper.distanceToGo() == 0) { // if motor moved to the maximum position
        stepper.setCurrentPosition(0);   // reset position to 0
        stepper.moveTo(targetPos);       // move the motor to maximum position again
      }
      break;
  }

  stepper.run(); // MUST be called in loop() function
}
Code Explanation 代码说明
Read the line-by-line explanation in comment lines of source code!
阅读源代码注释行中的逐行说明!
Video Tutorial 视频教程
We are considering to make the video tutorials. If you think the video tutorials are essential, please subscribe to our YouTube channel to give us motivation for making the videos.
我们正在考虑制作视频教程。如果您认为视频教程是必不可少的,请订阅我们的 YouTube 频道,为我们制作视频提供动力。


 5079
5079

 被折叠的 条评论
为什么被折叠?
被折叠的 条评论
为什么被折叠?
 到【灌水乐园】发言


